Hammond A-405SP User manual

*#1
Model: #52
Owner’s Manual
ank You and congratulations on your choice of a genuine HAMMOND
Organ.
e A-405SP is a Spinet Organ featuring the traditional Drawbar sounds
of a vintage Hammond Organ, Realistic Extra Voices, and a convenient
MIDI sequencer onboard.
Please read this manual thoroughly before using your A-405SP and refer
to it as necessary.

*#1 #52Owner’s Manual
2IMPORTANT SAFETY INSTRUCTIONS
Read these instructions.
Keep these instructions.
Heed all warnings.
Follow all instructions.
Do not use this apparatus near water.
Clean only with dry cloth.
Do not block any ventilation openings.
Install in accordance with the manufacturer’s instructions.
Do not install near any heat sources such as radiators, heat registers,
stoves or other apparatus (including ampliers) that produce heat.
Do not defeat the safety purpose of the polarized or grounding-type
plug. A polarized plug has two blades with one wider than the other.
A grounding type plug has two blades and a third grounding prong.
The wider blade or third prong is provided for your safety. If the pro-
vided plug does not t into your outlet, consult an electrician for re-
placement of the obsolete outlet.
Protect the power cord from being walked on or pinched, particu-
larly at plugs, convenience receptacles, and the point where they exit
from the apparatus.
Only use attachments/accessories specied by the manufacturer.
Use only with the cart, stand, tripod, bracket,
or table specied by the manufacturer, or sold
with the apparatus. When cart is used: use cau-
tion when moving the cart/apparatus combi-
nation to avoid injury from tip-over.
Unplug this apparatus during lightning storms,
or when unused for long periods of time.
Refer all servicing to qualied service personnel. Servicing is required
when the apparatus has been damaged in any way, such as power-
supply cord or plug is damaged, liquid has been spilled or objects
have fallen into the apparatus, the apparatus has been exposed to
rain or moisture, does not operate normally, or has been dropped.
Apparatus shall not be exposed to dripping or splashing and no ob-
jects lled with liquids, such as vases, shall be placed on the appara-
tus.
WARNING: To reduce the risk of re or electric shock, do not expose
this apparatus to rain or moisture.
The lightning ash with arrowhead symbol within an equilateral tri-
angle, indicates that dangerous voltage constituting a risk of electric
shock is present within this unit.
The exclamation point within equilateral triangle, indicates that there
are important operating and maintenance instructions in the litera-
ture accompanying this unit.
In case in the future your instrument gets too old to play/use or
malfunctions beyond repair, please observe the instructions of
this mark, or, if any question, be sure to contact your dealer or
your nearest town or municipal oce for its proper disposal.
3
Introduction
FOR UNITED KINGDOM:
FOR YOUR SAFETY, PLEASE READ THE FOLLOWING TEXT CAREFULLY
This appliance is supplied with a molded 3-pin mains plug for your safety and convenience.
The plug contains a 5 amp fuse.
Should the fuse need to be replaced, please ensure that the replacement fuse has a rating of 5
amps and that it is approved by ASTA or BSI to BSI1362.
Check for the ASTA mark or the BSI mark on the body of the fuse.
If the plug contains a removable fuse cover, you must ensure that it is retted when the fuse is
replaced.
If the fuse cover is lost, the plug must not be used until a replacement cover is obtained.
A replacement fuse cover can be obtained from your local Hammond Dealer.
IF THE FITTED MOULDED PLUG IS UNSUITABLE FOR THE SOCKET OUTLET IN YOUR HOME, THEN
THE FUSE SHOULD BE REMOVED AND THE PLUG CUT OFF AND DISPOSED OF SAFELY.
THERE IS A DANGER OF SEVERE ELECTRICAL SHOCK IF THE CUT-OFF PLUG IS INSERTED INTO ANY
13 AMP SOCKET.
If a new plug is to be attached to the cord, please observe the wiring code as shown below.
If in any doubt, please consult a qualied electrician.
IMPORTANT - The wires in this mains lead are coloured in accordance with the following code:
Blue: Neutral
Brown: Live
As the colours of the wires in the mains lead of this unit may not correspond with the coloured
marking identifying the terminals in your plug, proceed as follows.
The wire which is coloured BLUE must be connected to the terminal in the plug which is marked
with the letter N or coloured BLACK.
The wire which is coloured BROWN must be connected to the terminal in the plug which is
marked with the letter L or coloured RED.
Under no circumstances should either of these wires be connected to the earth terminal of the
three-pin plug, marked with the letter E or the Earth Symbol .
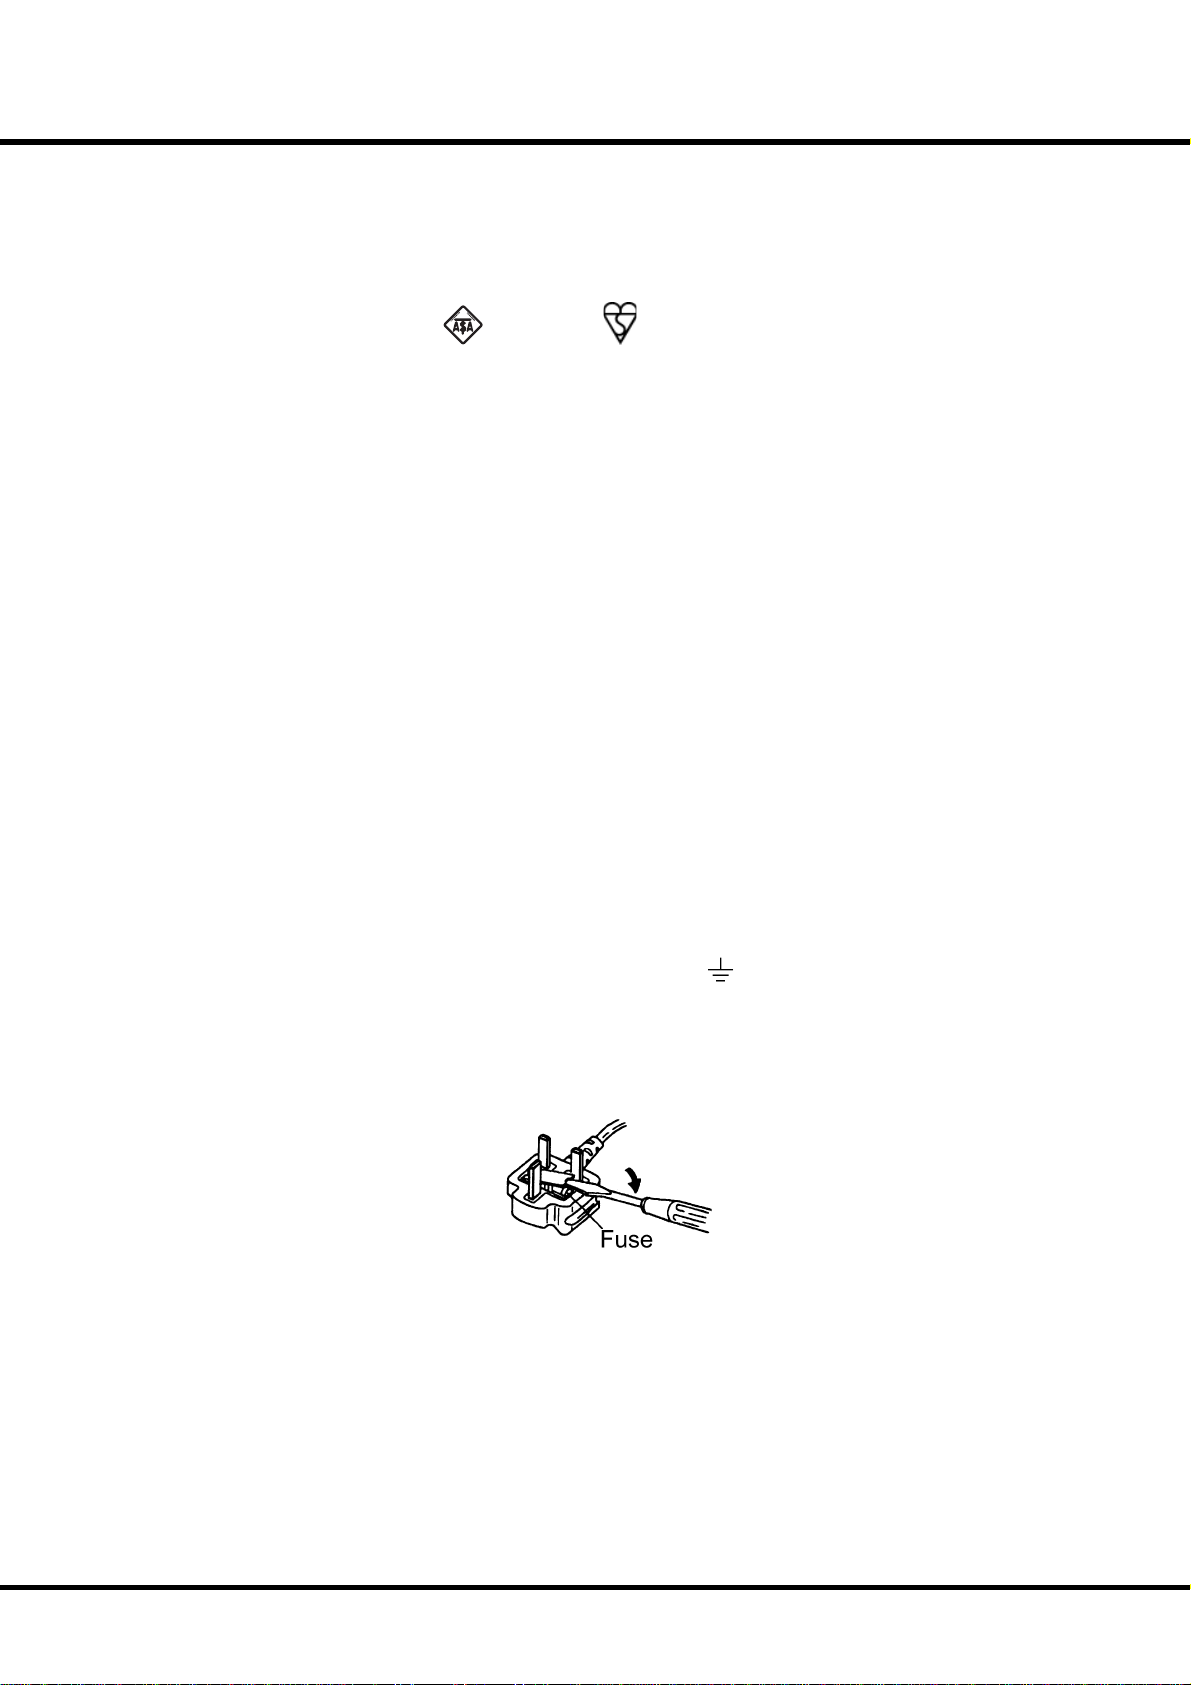
To replace the fuse, open the fuse compartment with a screwdriver and replace the fuse and
fuse cover.

*#1 #52Owner’s Manual
4IMPORTANT - PLEASE READ
Your Hammond Organ A-405SP is designed to give you the true and authentic sound of Hammond
Harmonic Drawbars, as well as provide you a large variety of features to allow great flexibility in how
you want to use the keyboard. is Owner’s Manual is designed to explain the operating features of
your Hammond A-405SP as simply and graphically as possible.
Because we want to make this manual, as well as the keyboard itself, as easy to understand as possible,
the explanations in this manual are grouped by subject matter, and not in the order in which they
necessarily appear in the display (the screen in the Great left end block). For example, all functions
pertaining to Drawbars are grouped together, all Percussion features are treated as a group, and so on.
Also, each feature is treated as an explanation unto itself, and does not require you to already have
prior working knowledge of some other feature. e explanations are presented such that, if you fol-
low the steps, will be identical to that shown in the manual at that stage of the explanation.
Do not be daunted by the number of steps required to perform each operation. Each step is simple.
Simply bear these things in mind:
1. Read each step carefully.
2. Don’t skip any of the steps.
3. Don’t perform the steps out of sequence.
With these guidelines, you are well on your way to mastering all of the many sounds and features of
your Hammond A-405SP.

5
Introduction
BATTERY BACK UP
Your A-405SP uses a battery-backed RAM to remember your changes to the Parameters.
When the battery voltage becomes low, the Display will show:
TRANSPOSEPRESET
SWELL PEDAL GREAT
TRANSPOSEPRESET
SWELL PEDAL GREAT
If you see these messages, you should immediately back up your parameter changes, if you
have made any. If there is no battery installed in the unit, or if the battery is completely
dead, the Display will show:
TRANSPOSEPRESET
SWELL PEDAL GREAT
After the above message is displayed, the A-405SP will re-initialize itself, and the factory
default settings will be restored (except Combination Presets, Leslie Cabinets and Custom
Tone-Wheels). erefore, it is a good idea to periodically save your data to CompactFlash™
card.
CAUTION: In order to change batteries, be sure to ask your dealer or store.

*#1 #52Owner’s Manual
6
Table Of Contents
IMPORTANT SAFETY INSTRUCTIONS................................................ 2
IMPORTANT - PLEASE READ................................................................. 4
BATTERY BACK UP ................................................................................... 5
MAIN FEATURES ....................................................................................... 9
HOW TO ASSEMBLE ..............................................................................10
Components..................................................................................................10
Connect the Pedalboard ...........................................................................11
Bench ...............................................................................................................11
Manual Lid......................................................................................................11
Put on the Music Rack................................................................................11
NAMES AND FUNCTIONS ...................................................................12
Top Panel ........................................................................................................12
End Block ........................................................................................................14
Manual Bottom.............................................................................................15
Rear Panel.......................................................................................................15
Pedals...............................................................................................................16
HOOK-UP ......................................................17
BASIC HOOK-UP.....................................................................................18
CONNECTING THE LESLIE SPEAKER ................................................18
USING A MIDI SOUND MODULE.......................................................19
USING HEADPHONES...........................................................................19
USING AN EXTERNAL FOOT SWITCH ..............................................20
USING A LESLIE MODE SWITCH........................................................20
TURN ON AND PLAY.....................................21
POWER ON...............................................................................................22
How to power on .........................................................................................22
Switch-off memory .....................................................................................22
Reset to the initial status...........................................................................22
LISTEN TO THE DEMONSTRATION PERFORMANCE....................23
PLAY WITH THE COMBINATION PRESETS ......................................24
How to recall the Preset ............................................................................24
Ex. Select 4-5 .........................................................................................................24
PLAY WITH THE CONTROLLERS.........................................................25
Pitch Bend / Modulation Wheel..............................................................25
Expression Pedal ..........................................................................................25
Foot Switch ....................................................................................................25
TRY MAKING YOUR OWN SOUND....................................................26
Select the Preset Button [CANCEL]........................................................26
Pull out the SWELL Drawbars..................................................................26
Add Percussion.............................................................................................26
Add effects .....................................................................................................27
Vibrato & Chorus..................................................................................................27
Leslie ........................................................................................................................27
Reverb .....................................................................................................................27
Using Extra Voice..........................................................................................28
Ex. Use “Positive Organ”for SWELL................................................................28
Pedal Sustain .................................................................................................29
Pedal To Great ...............................................................................................29
Great To Pedal ...............................................................................................29
Storing registrations in Combination Preset .....................................30
Ex. Memorize to “6-2”.........................................................................................30
SETTING UP ..................................................31
SOUND ENGINE STRUCTURE.............................................................32
HARMONIC DRAWBARS™ ...................................................................34
Manual Drawbars.........................................................................................35
White Drawbars ...................................................................................................35
Black Drawbars.....................................................................................................35
Brown Drawbars ..................................................................................................35
Pedal Drawbars.............................................................................................35
Drawbar Registration Patterns................................................................36
Flute family (2 step pattern) ............................................................................36
Reed family (triangle pattern).........................................................................36
Diapason family (check mark pattern) ........................................................36
String family (bow pattern) .............................................................................36
Modern Drawbar Registrations ..............................................................37
Jazz ...........................................................................................................................37
Groovy & Funky....................................................................................................37
Bluesy ......................................................................................................................37
Max Power .............................................................................................................37
Match the Registration to Drawbars.....................................................38
PERCUSSION............................................................................................39
Drawbar Cancel....................................................................................................39
VIBRATO & CHORUS..............................................................................40
LESLIE.........................................................................................................41
EXTRA VOICES, REVERB .......................................................................42
PEDAL SUSTAIN, COUPLER.................................................................43
COMBINATION PRESETS......................................................................44
Bank and Number........................................................................................44
Name the current setting..........................................................................45
Record into the Combination Presets ..................................................46
USING THE CONTROL PANEL.......................47
OPERATION CONTROL PANEL ...........................................................48
PLAY MODE..............................................................................................49
How to read the display ............................................................................49
Button operation in this mode ...............................................................49
MENU MODE ...........................................................................................50
How to read the display ............................................................................50
Button operation in this mode ...............................................................50
Menu and their contents ..........................................................................51
FUNCTION MODE..................................................................................52
How to read the display ............................................................................52
Button operation in this mode ...............................................................52
SHORT CUT TO THE FUNCTION MODE...........................................53
Example of operation:................................................................................53
Example of operation:................................................................................54
LOCK THE DISPLAY IN PLAY MODE..................................................56
SETTING THE PARAMETERS ........................57
DRAWBAR.................................................................................................58
MANUAL DRAWBARS (SWELL and GREAT)............................................58
PEDAL DRAWBARS .........................................................................................59
PRESET.......................................................................................................60
PRESET NAME ..................................................................................................60
PRESET LOAD ...................................................................................................60
TUNE ..........................................................................................................61
CONTROL..................................................................................................62
PITCH BEND ......................................................................................................62
MODULATION ..................................................................................................62
EXPRESSION......................................................................................................63
FOOT SWITCH...................................................................................................64
DAMPER .............................................................................................................65
DISPLAY..............................................................................................................65
COUPLER............................................................................................................65
PEDALBOARD...................................................................................................65

7
Introduction
CUST. TW (CUSTom ToneWheels).....................................................66
Record the CUSTOM virtual TONEWHEELS.........................................68
PERCUSS (PERCUSSion).......................................................................69
LESLIE.........................................................................................................70
CABINET NUMBERS........................................................................................70
LESLIE PARAMETERS......................................................................................70
SWITCH OFF MODE........................................................................................72
EXTERNAL LESLIE SPEAKER.........................................................................72
Record the Cabinets....................................................................................73
OD/VIB (OverDrive / VIBrato).............................................................74
OVERDRIVE........................................................................................................74
VIBRATO & CHORUS.......................................................................................74
Vibrato and Chorus of Hammond Organs ..........................................75
EXVOICE (EXtra VOICE) ........................................................................76
EQUALIZ (EQUALIZer) ..........................................................................78
DRAWBARS .......................................................................................................78
EXTRA VOICE ....................................................................................................78
REVERB ......................................................................................................79
DRAWBARS .......................................................................................................79
EXTRA VOICE ....................................................................................................79
CHORUS ....................................................................................................80
EXTRA VOICE ....................................................................................................80
DEFAULT....................................................................................................81
SYSTEM......................................................................................................82
MIDI ..............................................................83
ABOUT MIDI.............................................................................................84
What is “MIDI” ? .............................................................................................84
MIDI terminals on this Organ ..................................................................84
What the MIDI can do on your Organ ..................................................84
MIDI STRUCTURE ...................................................................................86
KEYBOARD CHANNELS.................................................................................86
EXTERNAL ZONE CHANNELS......................................................................86
MULTI ..................................................................................................................86
USING EXTERNAL SEQUENCER.........................................................87
Recording to the Sequencer or the Computer ....................................87
Playback from the Sequencer or the Computer..................................87
USING A MIDI COMPATIBLE LESLIE SPEAKER...............................88
USING A MIDI SOUND MODULE.......................................................89
ZONES........................................................................................................90
DRAWBARS .......................................................................................................90
EXTERNAL ZONES...........................................................................................90
PANIC FUNCTION and PARAMETER RELOAD.............................................91
MIDI ............................................................................................................92
MIDI TEMPLATE................................................................................................92
MASTER..............................................................................................................92
CHANNELS ........................................................................................................93
USING THE SEQUENCER ..............................95
RECORDING AND PLAYING THE PERFORMANCE........................96
What you can do with the sequencer ..................................................96
About CF Card...............................................................................................96
CF CARD YOU CAN USE .....................................................................................96
CF CARD SLOT.......................................................................................................96
About Song File............................................................................................96
General MIDI .........................................................................................................96
Standard MIDI File...............................................................................................96
INITIALIZE THE CF CARD......................................................................97
SONG PROCEDURES .............................................................................98
How to read the display ............................................................................98
Record a song................................................................................................98
Change the song name .......................................................................... 100
Playback the song ....................................................................................101
Chain Play.................................................................................................... 102
How to delete the song.......................................................................... 103
Using Rhythm.............................................................................................104
USING BUTTONS ............................................................................................... 104
FOLDER OPERATION.......................................................................... 105
How to Enter and Exit..............................................................................105
How to delete a Folder............................................................................105
Creating a Folder.......................................................................................106
Change the Folder name .......................................................................106
FREQUENTLY ASKED QUESTIONS.............107
TROUBLESHOOTING.......................................................................... 108
INSTRUMENT CARE ............................................................................ 109
APPENDIX...................................................111
CUSTOM TONEWHEELS PRESETS.................................................. 112
MIDI TEMPLATES................................................................................. 113
CHANNELS AND MIDI MESSAGES................................................. 113
MIDI INFORMATION FOR TONEWHEEL DIV................................ 114
MIDI Implementation..............................................................................114
Channel Voice Message ................................................................................ 114
Channel Mode Message ................................................................................ 114
Drawbar Data List .....................................................................................115
System Exclusive Message.....................................................................116
Mode Setting Exclusive Message ............................................................... 116
NRPN Switch ...................................................................................................... 116
Data Set (Rx. only) ............................................................................................ 116
Identity Request (Rx. only)............................................................................ 116
Identity Reply (Tx. only) .................................................................................116
Global Parameters ....................................................................................117
Bank Parameters .......................................................................................117
Preset Parameters.....................................................................................118
Leslie Parameters...................................................................................... 121
MIDI INFORMATION FOR MULTI 16 DIV. ..................................... 122
MIDI Implementation..............................................................................122
Channel Voice Message ................................................................................ 122
Channel Mode Message ................................................................................ 123
System Realtime Message............................................................................. 124
System Exclusive Message............................................................................ 124
INSTRUMENTS LIST ............................................................................ 125
MIDI IMPLEMENTATION CHART..................................................... 132
SPECIFICATIONS.................................................................................. 134
SERVICE .................................................................................................. 135

*#1 #52Owner’s Manual
8
Index
B
Back-Up 22
Bank 24
C
Cabinet Number 70
Cancel 26
CF Card 96
Chorus 77, 80
Click 58
Cobination Presets 44
Control 62
Control Panel 48
Coupler 65
CU-1 20
Custom Tonewheels 66
Cut Off Frequency 67
D
Damper 65
Decay Rate 59
Default 81
Display 65
Display Lock 56
Drawbar 58
Drawbars 34
E
Equalizer 78
Expression 63, 77, 91
Expression Pedal 25
External Leslie Speaker 72
External Zone 86, 90
Extra Voice 28, 42, 76
F
Fold-Back 58
Folder 105
Foot Switch 25, 64
Function Mode 52
G
General MIDI 96
Great To Pedal 29
I
Instrument Care 109
K
Keyboard Channels 86
Key Track 69
L
Leakage Noise 67
Leslie 27, 41, 70
Leslie Parameter 70
M
Menu Mode 50
MIDI 84
Modulation 25, 62
Multi 86
N
Name 45
Number 24
O
Octave 76, 90
Overdrive 74
P
Pan 77, 90
Pedalboard 65
Pedal Sustain 29, 43
Pedal To Great 29
Percussion 26, 39, 69
Pitch Bend 25, 62
Play Mode 49
Preset 24, 60
Preset Load 60
Preset Name 60
R
Rebound 82
Record 46
Registration 36
Reset 22
Resonance 67
Reverb 27, 42, 77, 79
Rhythm 104
S
Sequencer 87, 96
Short Cut 53
Standard MIDI File 96
Storing 30
Sustain Length 59
Switch Off Mode 72
System 82
T
Tone wheels 58
Transpose 49
Troubleshooting 108
Tune 61
V
Velocity 69, 77, 90
Vibrato & Chorus 27, 40, 74
Volume 76, 90
Z
Zones 90

9
Introduction
MAIN FEATURES
ACCURATELY REPRODUCES THE TONE-WHEEL SOUND
Your new A-405SP contains 96 independent oscillating digital tone-wheels that accurately
reproduce the sound of the Vintage B-3/C-3.
In addition, this organ has full polyphony
BUILT IN EXTRA VOICE
Such Extra Voices as the piano, strings, brass, wind, 880 instruments and 56 drum kits are
built in for producing realistic instrumental sound.
16 part multi-timbral GM upper compatible sound engine is included for reproducing
GM standard song data.
ADVANCED DIGITAL LESLIE / VIBRATO EFFECTS
e A-405SP is equipped with a DSP effect generator to simulate the Scanner-Vibrato
and Leslie Speaker. e range of sound that you can create is expanded by the use of
Vibrato and Chorus effects, and by the real sounding Leslie effects which effectively simu-
lates the rotation of the two Rotors which are present in traditional Leslie Speakers.
EQUALIZER AND TONE CONTROL
A 3-band equalizer and tone-control are now built in. e equalizer can make fine or
course tonal adjustments to the bass, treble, and mid frequency ranges. e tone-control
simulates the circuit built in on the vintage B-3/C-3 pre-amp to obtain a gently-cut treble.
SEQUENCER WITH CompactFlash™ CARD SLOT
A sequencer is built in for recording the player’s performance. A Compact Flash card is
utilized to record the performance data.
MIDI MASTER KEYBOARD
An external zone is available on each manual and pedalboard to enable this organ to be
used as a master keyboard.
50W 2CH AUDIO AMPLIFIER
Built in a 50 watt Power Amp for each cahnnel of Left and Right.
us you can enjoy a dynamic play with the organ itself.
*#1 #52Owner’s Manual
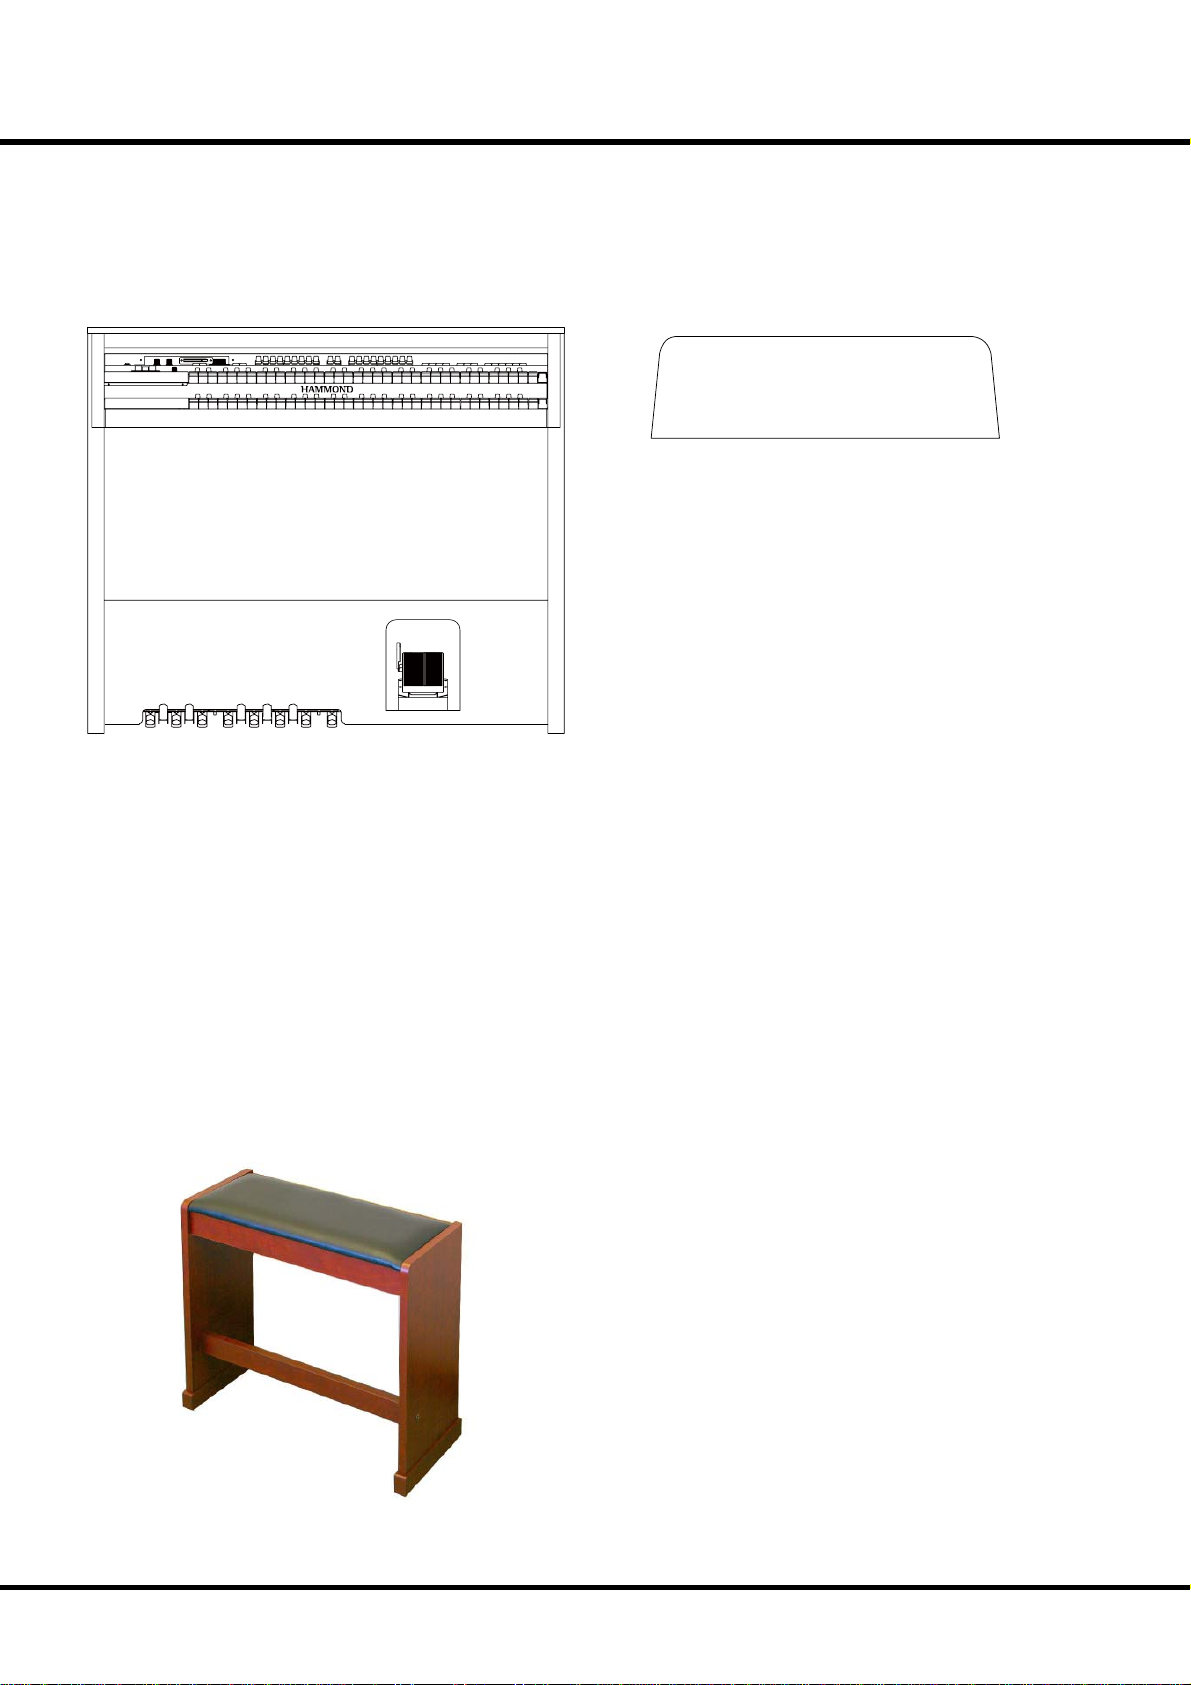
10 HOW TO ASSEMBLE
Components
Organ
Bench
Music Rack

11
Introduction
Put on the Music Rack
Insert the Music Rack into the rail whenever necessary.
ATTENTION
Do not excessive pressure on the music rack.

*#1 #52Owner’s Manual
12 NAMES AND FUNCTIONS
Top Panel
UPPER LEFT
1. POWER Switch
is switch turns the power ON and OFF. (P. 22)
CAUTION
Even when the POWER switch is turned o, electricity
is still owing to the instrument at the minimum level.
When you are not using the instrument for a long time,
make sure you unplug the power cord from the wall AC
outlet.
2. MASTER VOLUME Knob
Controls the total volume of internal speaker, headphones and
line out jack. (P. 22)
3. EXT. LESLIE VOLUME Knob
Controls the total volume of external Leslie Speaker.
4. CF Card Slot
Insert the CompactFlash™ Card here.
is is used to store the song and recall the rhythm style of this
organ. Use required CompactFlash™ Card. (P. 96)
VIBRATO & CHORUS
5. SWELL ON Button
Switches on and off the Vibrato & Chorus Effects on the
SWELL Drawbar part. (P. 40)
6. GREAT ON Button
Switches on and off the Vibrato & Chorus Effects on the
GREAT Drawbar part. (P. 40)
7. VIBRATO & CHORUS MODE Knob
Changes the depth of Vibrato & Chorus Effects. (P. 40)
LESLIE
8. LESLIE ON Button
When it is turned ON, the rotor turns and the sound come
from the Rotor.
When the lamp is lighting, it is “ON”. (P. 41)
9. LESLIE FAST Button
Changes the speed of the Rotor from Slow to Fast and vice
versa. When the lamp is lighting, it is “Fast”. (P. 41)
DRAWBARS
10. SWELL DRAWBARS
Controls SWELL keyboard harmonics. (P. 34)
11. PEDAL DRAWBARS
Controls PEDAL keyboard harmonics. (P. 34)
12. GREAT DRAWBARS
Controls GREAT keyboard harmonics. (P. 34)
PERCUSSION
13. SECOND ON Button
Adds 4´ Percussion (decay sound) to SWELL keyboard. (P. 39)
14. THIRD ON Button
Adds 2⅔΄Percussion (decay sound) to SWELL keyboard. (P. 39)
15. DECAY FAST Button
Changes decay time of Percussion. (P. 39)
SWELL
PRESET
TRANSPOSE
PEDAL GREAT
ON
SWELL
ON
GREAT
LESLIE
ON
LESLIE
FAST
GREAT
TO
PEDAL
PEDAL
TO
GREAT
SUSTAIN
PEDAL
REVERB
EXTRA VOICE
VOLUME
V-3
C-1
C-3C-2
V-1V-2
VIBRATO
CHORUS
AND
PITCH BEND MODULATION
PEDAL
PLAYJUMPMENU
SEQUENCER
PAGE/ PARAM.
1234
VALUE
SONG
12 3 5 6 78 9 10 11
4

13
Introduction
16. VOLUME SOFT Button
Changes Percussion volume. (P. 39)
EXTRA VOICE
17. ON SWELL Button
Turns on/off the SWELL Extra Voice. (P. 28)
18. ON GREAT Button
Turns on/off the GREAT Extra Voice. (P. 28)
19. ON PEDAL Button
Turns on/off the PEDAL Extra Voice. (P. 28)
PRESETS
20. BANK Button
Switches Bank by pressing together the bank button with the
number buttons (#21). (P. 24)
21. NUMBER Buttons
Recalls the Preset or switches the Bank by using together BANK
button (#20). (P. 24)
22. RECORD Button
Records Presets. (P. 30)
23. CANCEL Button
Cancels Presets. Calls out the “CANCEL” setting.
e Drawbar registration and the actual one always agree. (P. 26)
KEYBOARDS
24. SWELL Keyboard
is is a keyboard with 61 notes, velocity-sensitive.
25. GREAT Keyboard
is is a keyboard with 61 notes, velocity-sensitive.
SECOND
HARMONIC
THIRD
HARMONIC
FAST
DECAY
PERCUSS.
SOFT
ON
SWELL
ON
GREAT
ON
1
6789
2345
BANK
RECORD CANCEL
PEDAL
12 13 14 15 16 17 18 19
20
21
22 23
24
25

*#1 #52Owner’s Manual
14
End Block
SWELL END BLOCK
26. PITCH BEND Wheel
Slides the pitch up or down.
e pitch goes up when moved up, and goes down when
moved down. (P. 62)
27. MODULATION Wheel
Adds modulation for Extra Voice section. (P. 62)
28. REVERB Knob
is is for adjusting the depth of the Reverb effects. (P. 42)
29. EXTRA VOICE VOLUME Knob
is is for controlling the volume of Extra Voice section. (P. 42)
30. PEDAL TO GREAT Button
is is for playing the PEDAL parts using GREAT keyboard.
(P. 43)
31. GREAT TO PEDAL Button
is is for playing the GREAT parts using PEDAL keyboard.
(P. 43)
32. PEDAL SUSTAIN Button
Adds sustain effect for PEDAL Drawbar part. (P. 43)
GREAT END BLOCK
33. Display
Various information is displayed here. (P. 48)
34. PAGE Buttons
Used to scroll through the various pages of controls and pa-
rameters. (P. 48)
35. PARAM Buttons
is is used for selecting the parameter item to edit, also to
select items #1 and #2 on the basic edit pages. (P. 48)
36. VALUE Buttons
is is used to increase or decrease values, also to select items
#3 and #4 on the basic edit pages. (P. 48)
37. MENU Button
is is for calling the MENU mode, Also for exiting from vari-
ous function modes, and jump to function modes. (P. 48)
38. JUMP Button
is allows you to quickly call a pre-selected menu item di-
rectly. (P. 48)
39. PLAY Button
is selects the basic Play mode. (P. 48)
40. Button
is is used for recording your performance to the built-in Se-
quencer. (P. 98)
41. Button
is stops the built-in Sequencer and returns to the top of the
song. (P. 98)
42. Button
is is used to run the built-in Sequencer or pause it. (P. 98)
SWELL
PRESET
TRANSPOSE
PEDAL GREAT
GREAT
TO
PEDAL
PEDAL
TO
GREAT
SUSTAIN
PEDAL
REVERB
EXTRA VOICE
VOLUME
PITCH BEND MODULATION
PEDAL
PLAYJUMPMENU
SEQUENCER
PAGE/ PARAM.
1234
VALUE
SONG
26 27 28
29
30 31 32
33
34
35 36
37 38 39
40 41 42

15
Introduction
Rear Panel
Manual Bottom
43. FOOT SWITCH Jack
is jack is for Foot Switch (= FS-9H - optional) and the Leslie
Switch (= CU-1 - optional).
You can switch the speed of the Leslie effect and the Combina-
tion Preset, etc. while playing. (P. 20)
44. HEADPHONES Jack
is is for connecting the stereo headphones. e speakers are
turned off, when a plug is inserted to this jack. (P. 19)
45. MICROPHONE VOLUME Knob
is adjusts the volume of the microphone (#46).
NOTE: The microphone volume can be adjusted with the MASTER
VOLUME (#2) and EXT. LESLIE VOLUME (#3) knob.
46. MICROPHONE Jack
If you plug a microphone into the this jack, you can use the this
organ as a public-address system.
NOTE: Feedback could be produced depending on the location of
microphone relative to speakers. This can be prevented by:
- Changing the position of the microphone.
- Relocating microphone at a greater distance from speakers.
- Lowering volume levels.
47. LINE IN L, R Jack
is is the input for an external sound module or a CD player.
e signals input to this jack are routed to the built-in speak-
ers, LINE OUT jack, HEADPHONE jack, and the stationary
channel of Leslie Speaker.
NOTE: The line in volume can be adjusted with the MASTER VOLUME
(#2) and EXT. LESLIE VOLUME (#3) knob.
48. LINE OUT L Jack
is is the Left channel output of this organ.
49. LINE OUT R Jack
is is the Right channel output of this organ.
Use the Left and Right output jacks if your mixer or amplifier
has a stereo input.
50. MIDI OUT Jack
Sends out the performance information of this organ. (P. 84)
51. MIDI IN1 (KEYBOARD) Jack
is jack is for playing the keyboard channels (SWELL,
GREAT, PEDAL) from external MIDI equipment. (P. 84)
52. MIDI IN 2 (MULTI) Jack
is jack is for playing the built-in 16 part multi-timbral sound
engine from external MIDI equipment. (P. 84)
53. LESLIE 11 PIN Socket
Connect the Leslie speaker here. (P. 18)
HEAD
PHONE
FOOT
SWITCH 2
SEQUENCER
MIN. MAX.
VOLUME IN L R L R (KEYBOARD) (MULTI)
OUT
MICROPHONE LINE IN LINE OUT
LESLIE 11PIN
MIDI
IN 1IN 2
43 44
45 46 47 48 49 50 51 52
53

*#1 #52Owner’s Manual
16
Pedals
54. EXPRESSION Pedal
is is for changing the total volume of the organ.
e Foot Switch is attached on the top left. (P. 25)
55. Pedalboard
13 notes. Flat type, non-velocity keyboard.
55
54

17
HOOK-UP

*#1 #52Owner’s Manual
18 BASIC HOOK-UP
is organ has a built-in speaker system, so you can start playing immediately after
connecting to the power source by inserting the AC plug to the AC outlet.
CONNECTING THE LESLIE SPEAKER
is organ is equipped with a 11-pin Leslie connector, so you can directly connect
the Leslie Speaker.
Make this connection with the Organ power OFF.
Connect the Leslie Speaker to the 11-pin terminal on the or-
gan, with the exclusive 11-pin Leslie Cable (to be separately
purchased - with the other Leslie Speaker accessories).
Adjust the setting of the “EXT. LESLIE CH”, in accordance
with the Leslie Speaker connected. (P. 72)
eg. Typical Leslie Speaker Channel
122XB, 3300/W -- 1CH
2101/mk2, 3300/3300W with Stationary Unit -- 3CH
Please carefully read the User’s Guide of the Leslie Speaker.
CAUTION
Do not expose this organ to any ex-
cessive heat sources such as direct
sunlight or ames.
MIN. MAX.
VOLUME IN L R L/MONO R OUT INTHRU
MICROPHONE LINE IN LINE OUT
LESLIE 11PIN
MIDI
MIN. MAX.
VOLUME IN L R L / MONO R OUT INTHRU
MICROPHONE LINE IN LINE OUT
LESLIE 11PIN
MIDI
to AC outlet
Leslie Rotary Unit
Leslie “Y” Cable
Leslie Stationary Unit
Standard 11-pin Cable

19
Hook-Up
USING A MIDI SOUND MODULE
Each Manual and the Pedalboard on this organ has a External Zone for controlling exter-
nal MIDI sound modules. When Connected to the LINE IN jacks, the external MIDI
sound module output is sent to the built in speakers, stationary channel of the Leslie
terminal (on a so-equipped Leslie), the LINE OUT jack and the headphone jack.
NOTE: Adjust the volume of the equipment connected to the LINE IN jack on the external equip-
ment itself.
USING HEADPHONES
You can practice silently by connecting the stereo headphones
to the HEADPHONE jack of this organ.
When the plug is inserted to the HEADPHONE jack, the
built-in / external Leslie speakers are silenced.
ATTENTION
Hold the molded part of the plug of the cord when you
connect or disconnect it to avoid the risk of breaking
the cable.
Do not use excessive volume with headphones, due to
risk hearing damage.
HEAD
PHONE
FOOT
SWITCH 2
MIDI Sound Module
MIN. MAX.
VOLUME IN L R L / MONO R (KEYBOARD) (MULTI)
OUT
MICROPHONE LINE IN LINE OUT
LESLIE 11PIN
MIDI
IN 1IN 2
LINE OUT MIDI IN

*#1 #52Owner’s Manual
20 USING AN EXTERNAL FOOT SWITCH
USING A LESLIE MODE SWITCH
is organ has a foot switch attached to the Expression Pedal. If necessary, you
may also add an external foot switch to it. In that case, connect an unlatch-
type foot switch to the “FOOT SWITCH” jack on the underside of the key
bed. e Hammond FS-9H (optional) is recommended.
e “FOOT SWITCH” jack is tip-ring-sleeve. So you may connect a twin-
pedal-type foot switch with a stereophonic plug to this jack.
After this connection, set the FOOT 2 DEVICE at “PEDAL” in the “CON-
TROL - FOOT SW” mode. (P. 63)
You may connect the traditional ‘half-moon type’ Leslie speed Switch to this organ for
switching the Leslie mode as if a B-3/C-3. Mount the CU-1 (optional) on the front
of the GREAT manual and then connect the plug to the “FOOT SWITCH” jack.
After this connection, set the FOOT 2 DEVICE to “CU-1” in the CONTROL -
FOOT SW” mode. (P. 63)
Self-tapping Screw
ø4 x 16mm
HEAD
PHONE
FOOT
SWITCH 2
HEAD
PHONE
FOOT
SWITCH 2
Table of contents
Other Hammond Musical Instrument manuals

Hammond
Hammond X-66 User manual

Hammond
Hammond SKX User manual

Hammond
Hammond B-3P User manual

Hammond
Hammond SK Pro Series User manual

Hammond
Hammond XPK-250W User manual

Hammond
Hammond XKL-5 User manual

Hammond
Hammond SKX User manual

Hammond
Hammond Exceed M-44 User manual

Hammond
Hammond XK-5 User manual

Hammond
Hammond SK1 User manual

Hammond
Hammond X-5 User manual

Hammond
Hammond M Series User manual

Hammond
Hammond Model A User manual

Hammond
Hammond XT-100 Owner's manual

Hammond
Hammond Sk Series User manual

Hammond
Hammond X-5 User manual

Hammond
Hammond SK1 User manual

Hammond
Hammond SKX User manual

Hammond
Hammond B-3 User manual

Hammond
Hammond L series User manual


