Hanhart LABOR 2 User manual

LABOR 2
Garantie & Bedienungsanleitung
Guarantee & instructions for use
Garantie & mode d‘emploi
Garanzia & istruzioni per l‘uso

T1
T2
M HR MIN SEC START / STOP
CLIP
STAND
BATTERY
MAGNET
HIGH
LOW
OFF
Hanhart-Garantie: 2 (zwei) Jahre
Sollten sich innerhalb dieser Zeit Mängel ergeben, die auf Fabrikations-
fehler oder schlechtes Material zurückzuführen sind, so wird unter Vor-
lage dieses Garantiescheines kostenlose Instandsetzung oder Umtausch
vorgenommen. Fehler infolge falscher Behandlung sowie Schäden,
die durch ausgelaufene Batterien entstanden sind, sowie die Batterien
selbst, fallen nicht unter die Garantie.
Hanhart-guarantee: 2 (two) years
If this stopwatch should become defective within this period you are
entitled to get it repaired or exchanged free of charge.Defects resulting
from abuse of the stop watch are not covered by this guarantee: for
instance, if contact springs are corroded by batteries which have leaked.
Batteries are not covered by this guarantee.
Hanhart-garantie: 2 (deux) ans
Si un défaut apparaissait durant cette période, nous échangerions ou
réparerions ce compteur gratuitement. Cette promesse de garantie ne
couvre pas les dégradations causées par un emploi abusif: par exemple,
si les ressorts de contact sont corrodés par des piles ayant coulé. Les
piles ne sont pas couvertes par cette garantie.
Hanhart-garanzia: 2 (due) anni
Se entro tale periodo dovessero verificarsi difetti di tal genere ci cariche-
remo dell‘o nere di riparare o sostituire gratuitamente il contasecondi
ad eccezione delle spese di tras porto. La presente garanzia non copre i
guasti causati da manomissione o da uso non corretto dello strumento.
La presente garanzia non riguarda lo pile.
Datum / Date / Date / Data:
Verkäufer / Vendor / Vendeur / Venditore:

BEDIENUNGSANLEITUNG
ÜBERSICHT DER TASTEN
T1 Auswahl Timer T1
T2 Auswahl Timer T2
M Einstellen der gespeicherten Zeit
HR Einstellen des Stundenwertes
MIN Einstellen des Minutenwertes
SEK Einstellen des Sekundenwertes
START/STOP Starten / Anhalten des Timers
TIMER ANWEISUNGEN
VERWENDUNG DER STOPPUHR
Drücken Sie T1 oder T2, um zum gewünschten Timer
zu wechseln.
1 Drücken Sie die Tasten HR und MIN, um den
Timer zu löschen, wenn der Timer angehalten
ist.
2 Drücken Sie die Taste START/STOP, um zur
Count-down-Zeit zurückzukehren.
Der Timer ist innerhalb einer Stunde auf eine Zehntel-
sekunde und nach einer Stunde auf Sekunden genau.
Der Timer zählt bis zu 99 Stunden 59 Minuten 59
Sekunden.
EINSTELLEN DER COUNT-DOWN-ZEIT:
1 Drücken Sie die HR-Taste, um den Stundenwert zu
erhöhen. Halten Sie diese Taste gedrückt, um den
Wert schnell zu erhöhen.
2 Drücken Sie die MIN-Taste, um den Minutenwert zu
erhöhen. Halten Sie diese Taste gedrückt, um den
Wert schnell zu erhöhen.
3 Drücken Sie die Taste SEC, um den Sekundenwert
zu erhöhen. Halten Sie diese Taste gedrückt, um den
Wert schnell zu erhöhen.
4 Drücken Sie die Tasten HR und MIN, um den Timer zu
löschen.
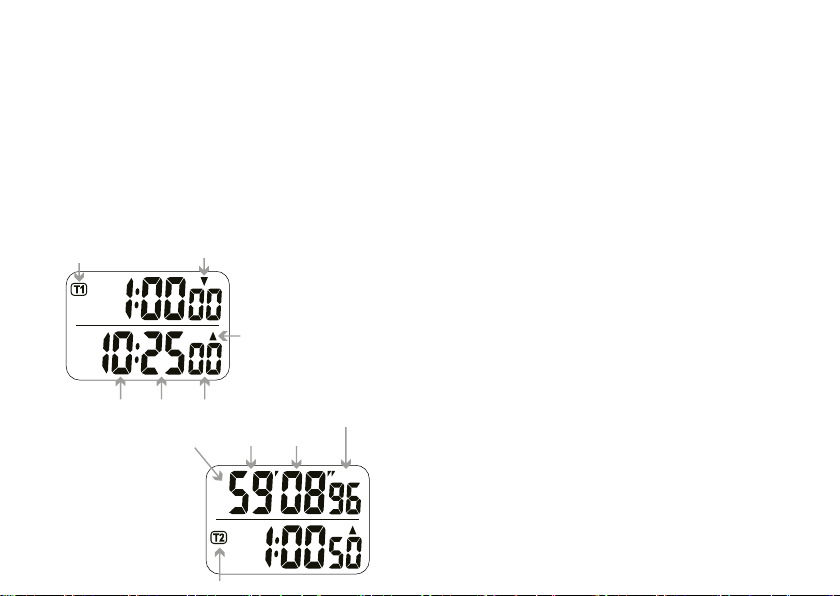
T1 im Kontroll-
zustand
T2 im
Kontrollzustand
Stoppuhr Minuten Sekunden
1/100 Sekunde
Stunden Minuten Sekunden
Count-up
Symbol
Count-down
Symbol

Sie können die Count-down-Zeit bis zu 99 Stunden 59
Minuten 59 Sekunden einstellen.
COUNT-DOWN STARTEN:
Drücken Sie nach dem Einstellen der Count-down-Zeit
die START/STOP-Taste, um den Count-down zu starten,
wenn „▼“ blinkt. Drücken Sie START/STOP erneut, um
den Count-down mit der Taste „▼“ anzuhalten bis es
aufhört zu blinken. Drücken Sie die START/STOP-Taste
erneut, um den Count-down fortzusetzen.
Während der Count-down läuft, blinkt die Taste des
verwendeten Timers (grün).
AM ENDE DES COUNT-DOWNS:
Wenn der Timer auf Null zurückzählt, blinkt das
Aufwärtszählsymbol „▲“, der Timer zählt von Null
aufwärts und der Alarm ertönt für eine Minute (wenn
der Alarm mit dem Fluktuationsschalter eingeschaltet
wird), und die entsprechende Anzeigelampe für eine
Minute (rot) blinkt.
Drücken Sie die Taste START/STOP, um zur Count-down-
Zeit zurückzukehren.
SPEICHERZEIT EINSTELLEN:
Sie können eine Zeiteinstellung schnell wieder als
Speicherzeit verwenden.
Stellen Sie wie folgt ein:
1 Halten Sie bei angehaltenem Timer die M-Taste ge-
drückt, bis der Wert blinkt.
2 Drücken Sie die HR-Taste, um den Stundenwert zu
erhöhen. Halten Sie diese Taste gedrückt, um den
Wert schnell zu erhöhen.
3 Drücken Sie die MIN-Taste, um den Minutenwert zu
erhöhen. Halten Sie diese Taste gedrückt, um den
Wert schnell zu erhöhen.
4 Drücken Sie die Taste SEC, um den Sekundenwert
zu erhöhen. Halten Sie diese Taste gedrückt, um den
Wert schnell zu erhöhen. Drücken Sie die Tasten HR
und MIN, um den Timer zu löschen.
5 Drücken Sie die M-Taste, um die Standardzeit-
einstellung zu beenden.
Wenn Sie die Speicherzeit verwenden möchten,
drücken Sie die M-Taste, um die von Ihnen eingestellte
Speicherzeit aufzurufen, wenn der Timer angehalten
ist.
ALARM STEUERN
Der Fluktuationsschalter kann in die entsprechende
Position geschaltet werden, um den Lautstärkepegel
des Alarms einzustellen.
HIGH: Hohe Lautstärke
LOW: Geringe Lautstärke
OFF: Alarm aus

BEFESTIGUNG DES TIMERS
Sie können die Aufhängevorrichtung (Clip) verwenden,
um sie an der Wand oder an anderen Orten aufzu-
hängen.
Das Produkt kann mit ausgeklapptem Fuß aufrecht
auf dem Tisch stehen.
Auf der Rückseite befinden sich zwei Magneten ,die an
Metalloberflächen haften.
BATTERIEWECHSEL
Wenn die Batterie schwach ist, wird das Display
dunkel oder undeutlich. Ersetzen Sie die Batterie in
dem Fall.
1 Halten Sie den Batteriefachdeckel fest und drücken
Sie ihn in die angegebene Richtung, um den
Batteriefachdeckel zu öffnen.
2 Nehmen Sie die alte Batterie heraus und legen Sie
eine neue Batterie ein. Achten Sie dabei auf die
richtige Polarität.
3 Bringen Sie die Batterieabdeckung wieder an.
Verbraucher sind gesetzlich verpflichtet Altbatterien zu
einer geeigneten Sammelstelle/ Verkaufsstelle/ Ver-
sandlager zu bringen. Die durchgestrichene Mülltonne
bedeutet: Batterien und Akkus dürfen nicht in den Haus-
müll. Pb, Cd und Hg bezeichnet Inhaltsstoffe die oberhalb
der gesetzlichen Werte liegen.
USER‘S GUIDE
KEYS
T1 Switch to timer T1
T2 Switch to timer T2
M Set/return to memory time
HR Adjust hour valve
MIN Adjust minute valve
SEK Adjust second valve
START/STOP Start / pause the timer
TIMER INSTRUCTIONS
USE THE STOPWATCH
Press T1 or T2, to switch to the timer desired.
1 Press button HR and MIN, to clear the timer when the
timer is paused.
2 Press the START / STOP button to start the stopwatch
immediately.
The timer is accurate to centisecond within one hour,
and accurate to seconds after one hour. The timer
counts up to 99 hours 59 minutes 59 seconds.
SET THE COUNT-DOWN TIME:
1 Press the HR button to increase „hour“ value, press
and hold to increase quickly.
2 Press the MIN button to increase „minute“ value,
press and hold to increase quickly.
3 Press the SEC button to increase „second“ value,
press and hold to increase quickly.
4 Press the HR and MIN buttons to clear the timer.
You can set up to 99 hours 59 minutes 59 seconds of
the count-down time.
START THE COUNT-DOWN:
After setting the count-down time, press the START
/ STOP button to start the count-down, with the „▼“
T1 in the control-
state
T2 in
the control state
Hours Minutes Seconds
1/100 second
Hours Minutes Seconds
Count-up
symbol
Count-down
symbol

flashing.
Press the START / STOP button again to pause count-
down, with the „▼“stop flashing.
Press the START / STOP button again to continue the
count-down.
When the count-down is in progress, the correspon-
ding button lamp (green) of the timer you are using
blinks.
AFTER THE END OF THE COUNT-DOWN
When the timer counts down to zero, the count-up
symbol „▲“ flashes, the timer will count up from zero,
and the alarm will sound for a minute (if the alarm is
turned on using fluctuation switch), and the corre-
sponding indicating lamp (red) will flash for a minute.
Press the START I STOP button to return immediately to
the set count-down time.
SET MEMORY TIME:
You can quickly re-use a time setting as memory time.
Set as follows:
1 When the timer is paused, press and hold the M
button until the value flashes.
2 Press the HR button to increase „hour” value, press
and hold to increase quickly.
3 Press the MIN button to increase „minute“ value,
press and hold to increase quickly.
4 Press the SEC button to increase „second“ value,
press and hold to increase quickly.Press the HR and
MIN buttons to clear the timer.
5 Press the Mbutton to finish the default time setting.
Whenever you want to use the memory time, press the
Mbutton to bring up the memory time you set, when
the timer is paused.
CONTROL ALARM
The fluctuation switch can be switched to correspon-
ding position to adjust the volume level of the alarm.
HIGH: High volume
LOW: low volume
OFF: Alarm off
PLACING OF THE TIMER
You can use the hanging bracket to hang it on the wall
or other places.
The product can stand upright on the table with the
bottom bracket unfolded.
This product comes with a magnet, it can be attached
onto the metal surface of the iron box or refrigerator.
HOW TO REPLACE THE BATTERY
When the power is low, the display becomes dim or
unclear. Replace the battery when the battery power
is low.
1 Hold and push the battery cover to open the

battery cover.
2 Remove the old battery, and put on a new battery
according to the correct polarity direction.
3 Replace the battery cover.
Consumers are legally required to dispose of batteries
at suitable collection points, vending points or dispatch
bays. The crossed-out wheeled bin means that batteries
must not be disposed of in the household waste.
Pb, Cd and Hg designate substances that exceed the
legal limits.

GUIDE D’UTILISATION
BOUTONS
T1 Passer au timer T1
T2 Passer au timer T2
M Régler/rertourner á memoire
HR Régler valeur heur
MIN Régler valeur minute
SEK Régler valeur seconde
START/STOP Lacer / arrêter le timer
TIMER INSTRUCTIONS
UTILISATION DU CHRONOMÈTRE
Appuyez sur T1 ou T2 pour passer à la minuterie
souhaitée.
1 Appuyez sur les touches HR et MIN pour régler le
effacer la minuterie lorsque la minuterie est arrêtée.
2 Appuyer sur la touche marche/arrêt (START/STOP)
pour passer à l‘écran Compte à rebours
pour le retour.
La minuterie est réinitialisée à un centigrade en une
heure et à quelques secondes exactement. La minute-
rie compte jusqu‘à 99 heures 59 minutes 59 secondes.
EN RÉGLANT LE TEMPS DU COMPTE À REBOURS :
1 Appuyer sur la touche HR pour régler la valeur des
heures d‘augmenter. Maintenez ce bouton enfoncé,
pour augmenter rapidement la valeur.
2 Appuyez sur la touche MIN pour augmenter la valeur
des minutes. Tenez cette clé appuyez sur pour aug
menter la valeur rapidement.
3 Appuyer sur le bouton SEC pour augmenter la deu-
xième valeur. Appuyez sur cette touche et mainte-
nez-la enfoncée.Appuyez sur pour augmenter la
valeur rapidement.
4 Appuyez sur les touches HR et MIN pour augmenter
le minuteur pour effacer.
T1 en modalité
contrôle
T2 en
modalité contrôle
Heurs Minutes Secondes
1/100 seconde
Heurs Minutes Secondes
Count-up
symbole
Count-down
symbole

Vous pouvez régler le temps de compte à rebours
jusqu‘à 99 heures 59 minutes 59 secondes.
COMMENCEZ LE COMPTE À REBOURS :
Après avoir réglé le temps du compte à rebours,
appuyez sur la touche START/STOP pour démarrer le
compte à rebours lorsque „▼“ clignote. Appuyez
de nouveau sur START/STOP pour arrêter le compte à
rebours avec le bouton „▼“ jusqu‘à ce qu‘il cesse de
clignoter. Appuyer de nouveau sur la touche marche/
arrêt (START/STOP) pour continuer le compte à rebours.
Pendant le compte à rebours, le bouton de la minute-
rie utilisée clignote (vert).
À LA FIN DU COMPTE À REBOURS :
Lorsque la minuterie compte à rebours jusqu‘à zéro,
le symbole de comptage progressif „▲“ clignote, la
minuterie compte à rebours à partir de zéro et l‘alar-
me retentit pendant une minute (si l‘alarme est acti-
vée avec le commutateur de fluctuation) et le voyant
correspondant clignote pendant une minute (rouge).
Appuyer sur la touche marche/arrêt (START/STOP) pour
revenir au temps du compte à rebours.
RÉGLER LE TEMPS DE STOCKAGE :
Vous pouvez rapidement réutiliser un réglage de
l‘heure comme temps de mémoire.
Régler comme suit :
1 Lorsque la minuterie est arrêtée, maintenez le M-
jusqu‘à ce que la valeur clignote.
2 Appuyez sur la touche HR pour afficher la valeur des
heures d‘augmenter. Maintenez ce bouton enfoncé,
pour augmenter rapidement la valeur.
3 Appuyez sur la touche MIN pour augmenter la valeur
minute. Maintenez ce bouton enfoncé.
Appuyez sur pour augmenter la valeur rapidement.
4 Appuyer sur la touche SEC pour augmenter les
secondes-valeur. Maintenez ce bouton enfoncé.
Appuyez sur pour augmenter la valeur rapidement.
Appuyez sur les touches HR et MIN pour régler le
minuteur pour effacer.
5 Appuyez sur la touche Mpour supprimer la valeur
par défaut pour terminer le réglage de l‘heure.
Si vous voulez utiliser le temps de mémoire, appuyez
sur la touche Mpour rappeler le temps de mémoire
que vous avez réglé lorsque le minuteur est arrêté.
COMMANDE D‘ALARME
Le commutateur de fluctuation peut être mis dans la
position appropriée pour régler le niveau de volume
de l‘alarme.
HIGH : Volume élevé
LOW : Faible volume
OFF : Alarme désactivée
MONTAGE DE LA MINUTERIE
Vous pouvez utiliser le dispositif de suspension (clip)
pour l‘accrocher au mur ou à d‘autres endroits.
Le produit peut se tenir debout sur la table avec le
pied déplié.
Il y a deux aimants au dos du produit qui adhèrent aux
surfaces métalliques.
CHANGEMENT DE PILE
Lorsque la batterie est faible, l‘affichage devient som-
bre ou flou. Dans ce cas, remplacez la pile.
1 Tenir le couvercle de la pile et l‘enfoncer dans le
sens indiqué, pour ouvrir le couvercle du comparti-
ment des piles.
2 Retirez l‘ancienne pile et placez-la dans le Insérez
une nouvelle pile. Ce faisant, faites attention à la
bonne polarité.
3 Remettre le couvercle de la pile en place.
La législation exige des consommateurs le dépôt de piles
usagées dans un lieu de collecte approprie; un point de
vente ou un entrepôt d’expédition. La poubelle barrée
signifie qu’il est interdit de jeter les piles et les batteries
avec les ordures ménagères. Pb, Cd et Hg désignent
les substances dont les valeurs dépassent les limites
légales.

ISTRUZIONI PER L‘USO
PANORAMICA DELLE CHIAVI
T1 Selezione il timer T1
T2 Selezione il T2
M Impostazione del tempo memorizzato
HR Impostazione del valore orario
MIN Impostazione del valore dei minuti
SEK Impostazione valore dei secondi
START/STOP Avvio/stop del timer
TIMER INSTRUCTIONS
ISTRUZIONI DEL TIMER
Premere T1 o T2 per passare al timer desiderato.
1 Premere i pulsanti HR e MIN per azzerare il timer,
mentre che è fermo.
2 Premere il pulsante START/STOP per tornare al conto
alla rovescia.
Il timer è preciso ad un decimo di secondi entro la
prima ora, dopo la prima ora è preciso a secondi.
IMPOSTANDO IL CONTO ALLA ROVESCIA:
1 Premere il tasto HR per aumentare il valore dell‘ora.
Tenere premuto questo pulsante, per aumentare
rapidamente il valore.
2 Premere il tasto MIN per aumentare il valore dei
minuti. Tenere premuto questo pulsante, per
aumentare rapidamente il valore.
3 Premere il tasto SEC per aumentare il valore dei
secondi. Tenere premuto questo pulsante, per
aumentare rapidamente il valore.
4 Premere i pulsanti HR e MIN per cancellare il timer.
È possibile impostare il conto alla rovescia fino a 99
ore 59 minuti 59 secondi.
INIZIARE IL CONTO ALLA ROVESCIA :
Dopo aver impostato il tempo di conto alla rovescia,
T1 in modalità di
controllo
T2 in
modalità di controllo
Ore Minuti Secondo
1/100 secondo
Ore Minuti Secondo
Count-up
simbolo
Count-down
simbolo

premere il pulsante START/STOP per avviare il conto alla
rovescia quando „▼“ lampeggia. Premere nuovamen-
te START/STOP per fermare il conto alla rovescia con il
tasto „▼“ fino che smette di lampeggiare. Premere
nuovamente il tasto START/STOP per continuare il conto
alla rovescia.
Mentre il conto alla rovescia è in corso, il pulsante del
timer utilizzato lampeggia (verde).
ALLA FINE DEL CONTO ALLA ROVESCIA :
Quando il timer conta alla rovescia fino a zero, il
simbolo „▲“ lampeggia, il timer conta alla rovescia da
zero e l‘allarme suona per un minuto (se l‘allarme è
attivato con l‘interruttore a fluttuazione) e la corri-
spondente spia luminosa lampeggia per un minuto
(rossa).
Premere il pulsante START/STOP per tornare al conto
alla rovescia.
IMPOSTARE IL TEMPO DI CONSERVAZIONE :
È possibile riutilizzare rapidamente un‘impostazione
di tempo come tempo di memoria.
Impostare come segue:
1 Mentre il timer è fermo, tenere premuto il tasto M
finché il valore lampeggia.
2 Premere il tasto HR per aumentare il valore dell‘ora.
Tenere premuto questo pulsante, per aumentare
rapidamente il valore.
3 Premere il tasto MIN per aumentare il valore dei
minuti. Tenere premuto questo pulsante.
Premere per aumentare rapidamente il valore.
4 Premere il tasto SEC per aumentare il valore dei
secondi. Tenere premuto per aumentare rapida-
mente il valore.
Premere i pulsanti HR e MIN per impostare l‘opzione
Timer da cancellare.
5 Premere il tasto Mper cancellare lo standard per
terminare l‘impostazione dell‘ora.
Se si desidera utilizzare il tempo di memoria, premere
il tasto Mper richiamare il tempo di memoria impost-
ato quando il timer è fermo.
CONTROLLO ALLARMI
L‘interruttore a fluttuazione può essere commutato
nella posizione appropriata per regolare il livello del
volume dell‘allarme.
ALTO: Alto volume
BASSO: Volume basso
OFF: Allarme spento
MONTAGGIO DEL TIMER
È possibile utilizzare il dispositivo di sospensione (clip)
per appenderlo alla parete o in altri luoghi.
Il prodotto può stare in piedi sul tavolo con il piede
piegato.

Sul retro del prodotto ci sono due magneti che si
attaccano alle superfici metalliche.
CAMBIO BATTERIA
Quando la batteria è scarica, il display diventa scuro o
sfocato. Sostituire la batteria in questo caso.
1 Tenere il coperchio della batteria e premere nella
direzione indicata, per aprire il coperchio del vano
batterie.
2 Togliere la vecchia batteria e inserire una batteria
nuova. Prestare attenzione alla polarità corretta.
3 Riposizionare il coperchio della batteria.
Per legge, i consumatori sono obbligati a depositare
le batterie esaurite presso i punti di raccolta, i punti di
vendita o immagazzini di spedizioni. Il simbolo del conte-
nitore dei rifiuti sbarrato indica che e vietato smaltire le
batterie con i rifiuti i domestici. Pb, Cd e Hg indicano le
sostanze presenti con valori superiori alla norma.

Hanhart 1882 GmbH
Hauptstr. 33 I 78148 Gütenbach
Germany
www.hanhart.com
Table of contents
Languages:
Other Hanhart Watch manuals

Hanhart
Hanhart Pioneer Series User manual

Hanhart
Hanhart Compact 2 User manual

Hanhart
Hanhart Delta E 100 User manual

Hanhart
Hanhart Modul 3 User manual

Hanhart
Hanhart DELTA E 200 SPECTRON User manual

Hanhart
Hanhart PROFIL 25 User manual

Hanhart
Hanhart Pioneer Series User manual

Hanhart
Hanhart Delta E 100 User manual

Hanhart
Hanhart PRIMUS User manual

Hanhart
Hanhart ClassicTimer Tachymaster 50 User manual


