Hanhart Compact 2 User manual

COMPACT 2
Garantie & Bedienungsanleitung
Guarantee & instructions for use
Garantie & mode d‘emploi
Garanzia & istruzioni per l‘uso

START
STOP RESET
HR
Set Clock
Timer
MIN SEC
OPEN
Hanhart-Garantie: 2 (zwei) Jahre
Sollten sich innerhalb dieser Zeit Mängel ergeben, die auf Fabrikations-
fehler oder schlechtes Material zurückzuführen sind, so wird unter
Vorlage dieses Garantie scheines kostenlose Instandsetzung oder
Umtausch vorgenommen. Fehler infolge falscher Behandlung sowie
Schäden, die durch ausgelaufene Batterien entstanden sind, sowie die
Batterien selbst, fallen nicht unter die Garantie.
Hanhart-guarantee: 2 (two) years
If this stopwatch should become defective within this period you are
entitled to get it repaired or exchanged free of charge.Defects resulting
from abuse of the stop watch are not covered by this guarantee: for
instance, if contact springs are corroded by batteries which have leaked.
Batteries are not covered by this guarantee.
Hanhart-garantie: 2 (deux) ans
Si un défaut apparaissait durant cette période, nous échangerions ou
réparerions ce compteur gratuitement. Cette promesse de garantie ne
couvre pas les dégradations causées par un emploi abusif: par exemple,
si les ressorts de contact sont corrodés par des piles ayant coulé. Les
piles ne sont pas couvertes par cette garantie.
Hanhart-garanzia: 2 (due) anni
Se entro tale periodo dovessero verificarsi difetti di tal genere ci cariche-
remo dell‘o nere di riparare o sostituire gratuitamente il contasecondi
ad eccezione delle spese di tras porto. La presente garanzia non copre i
guasti causati da manomissione o da uso non corretto dello strumento.
La presente garanzia non riguarda lo pile.
Datum / Date / Date / Data:
Verkäufer / Vendor / Vendeur / Venditore:

Abwärts-Zeitmessung (Countdown)
Den Schiebeschalter TIMER/CLOCK auf die Position TIMER schieben, RESET
drücken, die Anzeige gibt 0:00 00 und die Markierung TIMER an.
1. Auf die Taste HR zum Vorwärtsstellen der Stundenziffern drücken.
Bei jedem Tastendruck ertönt ein Signal. Zum Schnelleinstellen der
Stundenziffern für 2 Sekunden auf die Taste HR drücken und halten.
2. Über die Tasten MIN und SEC werden die Zeiten in gleicher Weise
eingegeben.
3. Falls die Einstellung gelöscht werden soll, einmal auf die Taste RESET
drücken, der Zeitmesser springt auf null, eine neue Zeit kann einge
geben werden.
Start/Stopp
1. Nachdem die Zeit eingestellt ist, einmal auf die Taste START/STOP
drücken und der Zeitmesser zählt im Sekundenrhythmus abwärts.
2. Während der Zeitmesser in Betrieb ist, einmal auf die Taste START/
STOP drücken, und die Zeitmessung stoppt.
3. Nochmals auf die Taste START/STOP drücken und der Zeitmesser
beginnt von neuem abwärts zu zählen.
Alarm
1. Wenn der Zeitmesser auf O Std. 00 Min. 00 Sek. abgezählt hat, blinkt
auf der Anzeige die Markierung TIMES-UP, ein Alarm ertönt 1 Minute
lang und der Zeitmesser zählt automatisch aufwärts mit einer Zähl-
einheit von 1 Sekunde.
2. Der Alarm und die Aufwärtszählzeit können durch Druck auf eine der
folgenden Tasten gestoppt werden: HR – MIN – SEC - START/STOP - RESET.
Speicherrückruf-Funktion
1. Nach Stoppen des Alarms kann durch Druck auf die Taste START/
STOP die vorher eingestellte Abzählzeit auf die Anzeige zurückgerufen
werden.
Die Markierung MEMORY erscheint auf der Anzeige.
2. Beim zweiten Druck auf die Taste START/STOP erfolgt eine erneute
Abwärtszählung.
Die Markierung MEMORY verschwindet.
Eigenschaften der Compact 2
- LCD Aufwärts-/Abwärts-Zeitmesser, Normalzeit
- 6-stellige Anzeige für Stunde, Minute und Sekunde
- Automatisches Aufwärtszählen, nachdem der Zeitmesser bis auf null
abgezählt hat.
- Abwärts-Zeitmesser:
Maximale Einstellung 23 Std., 59 Min., 59 Sek.
Zähleinheit 1 Sekunde
- Aufwärts-Zeitmesser:
Maximale Aufwärtszeitmessung 23 Std., 59 Min., 59 Sek.
Zähleinheit 1 Sekunde
- Speicherrückruf-Funktion beim Abwärts-Zeitmesser
- Wenn der Zeitmesser auf null abgezählt hat, ertönt ein Alarm für 1
Minute
- Getrennte Einstelltaste zum Einstellen der Stunde, Minute und
Sekunde
- Maße: 64 x 60 x 16 mm
- Gewicht : ca. 40 g
Klemmenbefestigung (Abbildung)
Der Zeitmesser kann an dünnen Gegenständen, z.B. an der Hemden-
tasche, befestigt werden.
Magnetbefestigung (Abbildung)
Der Zeitmesser kann an Eisen- oder Stahloberflächen mit Hilfe des
Magnets befestigt werden.
Tischständer (Abbildung)
Der Zeitmesser kann durch Herausklappen des Metallständers auf eine
Fläche gestellt werden.
Ersetzen der Batterie (Abbildung)
Mit einer Münze in Pfeilrichtung das Batteriefach auf der Rückseite des
Zeitmessers öffnen.
Die verbrauchte Batterie entfernen, eine neue Knopfzelle 1,5 V, Größe
G-13, einlegen und den Deckel schließen (darauf achten, dass der
positive Pol ‘+‘ oben liegt).

Aufwärts-Zeitmessung
1. Wenn der Zeitmesser nullgestellt ist (Reset), kann durch einmaligen
Druck auf die Taste START/STOP das Aufwärtszählen in Betrieb gesetzt
werden. Die Zähleinheit ist 1 Sekunde. Bei jedem Tastendruck ertönt
ein Ton.
2. Zum Stoppen der Aufwärtszeitmessung ein zweites Mal auf die Taste
START/STOP drücken. Dieser Vorgang kann beliebig oft wiederholt
werden.
3. Durch Druck auf die Taste RESET wird nullgestellt.
Einstellen der Normalzeit
Den Schiebeschalter TIMER/CLOCK auf die Position CLOCK schieben, die
Uhrzeit mit aufblinkendem Doppelpunkt erscheint auf der Anzeige.
Stunde
Zum Vorwärtsstellen der Stundenziffern gleichzeitig auf die Tasten
SET und HR drücken. In beiden Fällen ertönt ein Bestätigungston. Zum
Schnelleinstellen der Stundenziffern auf die Taste SET und gleichzeitig
auf die Taste HR drücken und für 2 Sekunden niederhalten.
Minute
Taste SET und MIN, Einstellung wie bei Stunden.
Sekunde
Auf die Taste SET drücken (Ton ertönt) und zur gleichen Zeit auf die Taste
SEC drücken (Ton ertönt), die Sekunden werden nullgestellt, wenn die
Ziffern im Bereich von 0-30 Sekunden liegen. Falls die Ziffern im Bereich
von 31-59 Sekunden liegen, wird die Sekundenziffer auf null gestellt und
die Minutenziffer um 1 erhöht.

Characteristics of Compact 2
- Countdown with acoustic signal, stopwatch in count-up, LCD watch
- 6 LCD digits for hours minutes and seconds
- Automatic function as stopwatch after elapsed countdown
- Countdown
Maximal display: 23 h, 59 min., 59 sec.,
measuring unit: 1 sec.
- Memory for countdown (recall of pre-set time)
- Acoustic signal during 1 minute when pre-set time is elapsed
- Separate programming buttons for hours, minutes and seconds
- Sizes: 64 x 60 x 16 mm
- Weight: about 40 g (with battery)
Fixation by means of the clip (illustration)
This stopwatch can be fixed on thin objects like the front pocket of a
shirt.
Fixation by means of the magnet (illustration)
This stopwatch can be fixed on iron or steel surfaces with its magnet on
the backside.
Fixation by means of the stand (illustration)
This stopwatch can be set up on tables by folding out the clip on the
backside.
Battery servicing (see illustration)
By turning the round screw-plate on the backside with a coin in the
direction of the arrow, change battery (11.5 V, G-131), positive element
‘+’ on top. Replace the screw-plate by turning in the opposite direction
of the arrow.
Countdown
Switch button TIMER/CLOCK on position TIMER. Depress button RESET. Dis-
play shows 00:00 00 and TIMER.
1. Pre-setting of hours:
Depress button HR until desired figure is displayed. Digits are chan-
ging by each pressure and signalized by an acoustic beep. By keeping
the button HR depressed, digits are moving faster without acoustic
signal.
2. Pre-setting of minutes:
Same procedure, but with button MIN.
3. Pre-setting of seconds:
Same procedure, but with button SEC.
Start/stop
1. Once the desired time is pre-set, depress button START/STOP.
Countdown is started on seconds’ rhythm.
2. At any moment, it is possible to interrupt and restart the countdown
by depressing button START/STOP.
Alarm
1. Once the pre-set time is elapsed, an acoustic signal is buzzing 1
minute long. The sign TIMES-UP is displayed.
The timer is then changing in function ‘stopwatch’.
2. Alarm and stopwatch can be stopped by depressing the following
buttons: HR - MIN – SEC - START/STOP - RESET.
Memory for countdown
1. Once the buzzer is switched off, it is possible to recall the pre-set
time by depressing the button START/STOP. The sign MEMORY is then
displayed.
2. By depressing again the button START/STOP the countdown is
reactivated. The sign MEMORY disappears.
Stopwatch
1. Depress button RESET for setting display to zero.
2. Depress button START/STOP for starting the time measurement at
seconds’ rhythm.
3. The count-up can be interrupted and restarted as often as
requested by pressing the button START/STOP.
Pre-setting of normal time
1. Select function ‚normal time‘ by positioning the switch TIMER/CLOCK
on CLOCK. The normal time is then displayed and is to be recognized
by a double point blinking on display.

2. Pre-setting of hours:
Keep button SET depressed and, simultaneously, activate the button
HR. Digits are changing by each pressure and signalized by an
acoustic beep. By keeping the button HR depressed, digits are
moving faster without acoustic signal.
3. Pre-setting of minutes:
Same operation as before, but by pressure of button MIN.
4. Pre-setting of seconds:
Keep button SET depressed and, simultaneously, activate button SEC.
Seconds are reset to zero, but if more than 30 seconds were
previously displayed, the figure of minutes will be raised by one
additional minute.

pressions et sont accompagnés d‘un signal sonore. En maintenant la
touche HR pressée, les chiffres défilent à plus grande vitesse sans
signal sonore.
2. Programmation des minutes:
Même opération par pression sur la touche MIN.
3. Programmation des secondes:
Même opération par pression sur la touche SEC.
Start/Stop
1. Après programmation du temps voulu, presser la touche START/STOP et
le compteur commence le count-down a la cadence d‘une seconde.
2. Il est possible d‘interrompre et de reprendre le count-down par
pression sur touche START/STOP.
Alarme
1. Lorsque le temps programmé est échu, retentit un signal sonore
durant une minute, sur l‘affichage clignote l‘indication TIMES-UP, et
le timer passe en fonction de compteur de temps.
2. L’alarme et le compteur s‘arrêtent par pression sur une des touches
suivantes: HR - MIN - SEC - START/STOP - RESET.
Mémoire pour countdown
1. Apres l‘arrêt de l‘alarme, possibilité de rappeler le temps
programme par pression sur la touche START/STOP.
L’indication MEMORY paraît sur l‘affichage.
2. Par nouvelle pression sur la touche START/STOP le count-down est
réactivé - l‘indication MEMORY disparaît.
Compteur de temps
1. Mettre l’affichage a zéro par pression sur la touche RESET.
2. Par pression sur la touche START/STOP - démarrage de la mesure du
temps à la cadence d’une seconde.
3. Cette mesure peut être interrompue et reprise à volonté par pression
sur la touche START/STOP.
Programmation du temps réel
1. Sélectionner la fonction „temps réel“ en positionnant le bouton TIMER/
Caractéristiques du Compact 2
- Compteur de temps/compte-minute (à rebours) et montre LCD
- Affichage LCD, 6 chiffres heures, minutes, secondes
- Fonction automatique en compteur de temps après ‚count-down
- Compte à rebours:
Affichage max. 23 h, 59 min. 59 sec, unité de mesure 1 sec.
- Mémoire pour count-down (rappel du temps programmé)
- Signal sonore pendant 1 minute quand le temps programme est
échu
- Touches de programmation séparées pour heures, minutes et
secondes
- Dimensions: 64 x 60 x 16 mm
- Poids : env. 40 g (avec pile)
Fixation par la pince (croquis)
Le Compteur peut être fixé aux objects minces, la poche de chemise
par exemple.
Fixation par l‘aimant (croquis)
Le Compteur peut être fixé sur la surfasse de fer ou d‘acier à l‘aide
de l‘aimant.
Fixation au moyen d‘un socle (croquis)
Le Compteur peut être fournie par le dépliage plot métallique sur une
surface.
Remplacement de la pile (croquis)
Ouvrir le cache-pile en tournant dans le sens de la flèche à l‘aide
d‘une pièce de monnaie.
Changer la pile (1,5 V G-13) en respectant la polarité (attention: pole
‘+’ au-dessus). Refixer le cache-pile en le tournant dans le sens
contraire de la flèche.
Compte à rebours (countdown)
Mettre le poussoir TIMER/CLOCK sur position TIMER, presser la touche
RESET, sur l‘affichage est indiqué 0:00 00 et TIMER.
1. Programmation des heures:
Presser la touche HR. Les chiffres changent au rythme des

CLOCK sur la position CLOCK. Le temps réel est alors affiché et se
reconnaît au double point qui clignote sur l’affichage.
2. Programmation des heures:
Maintenir le bouton SET pressé et simultanément activer la touche
HR. Les chiffres changent au rythme des pressions et sont accom
pagnés d’un signal sonore. En maintenant La touche HR pressée, les
chiffres défilent plus grande vitesse sans signal sonore.
3. Programmation des minutes:
Répéter la même opération, mais par pression sur la touche MIN.
4. Programmation des secondes :
Maintenir le bouton SET pressé et activer la touche SEC
simultanément. Les secondes sont remises à zéro mais si le nombre
des secondes se trouvait dans la zone 31-59 auparavant, le chiffre
des minutes sera augmenté d’une minute.

Contatore a ritroso (countdown)
Spingere la levetta TIMER/CLOCK nella posizione TIMER, quindi premere il
pulsante RESET. II contatore segno 0:00.00
1. Premere il pulsante HR per ottenere l’indicazione delle ore desiderata.
Ad ogni pressione del tasto corrispondente un segnale acustico. Per
far scorrere più velocemente l‘indicatore delle ore tenere premuto il
pulsante HR per circa 2 secondi.
2. Analogamente si posizionano i valori dei minuti e dei secondi agendo
sui pulsanti MIN e SEC.
3. Se si desidera annullare i valori impostati si prema il pulsante RESET.
Ad azzeramento avvenuto, si può impostare un nuovo valore di tempo
ai valori desiderati.
Start/Stop
1. Dopo aver impostato il valore del tempo desiderato, premere una
volta il pulsante START/STOP. Il conteggio a ritroso parte con cadenza
al secondo.
2. Se si desidera fermare il conteggio, premere una volta il pulsante
START/STOP.
3. Premendo nuovamente il pulsante START/STOP il contatore riprende a
misurare il tempo a ritroso.
Allarme
1. Quando il contatore giunge allo zero (0 ore, 00 minuti e 00 secondi)
sul contatore inizia a pulsare la scritta TIMES-UP ed un segnale
acustico inizia a suonare per la durata di un minuto. Il contatore
prosegue a contare automaticamente, sempre con cadenza al
secondo, con accumulo positivo.
2. L’allarme ed il prosieguo del conteggio possono essere fermati
premendo uno dei seguenti pulsanti:HR - MIN – SEC - START/STOP - RESET.
Funzione di richiamo valore in memoria
1. Dopo aver fermato il segnale d‘allarme può essere richiamato,
premendo il pulsante START/STOP, il valore precedentemente
impostato. Sul contatore appare la scritta MEMORY.
2. Premendo per la seconda volta il pulsante START/STOP riprende un
Proprietà del COMPACT 2
- Contatore LCD positivo o negativo + tempo normale
- Contatore a 6 posizioni per ore, minuti e secondi
- Contatore automatico ad accumulo positivo dopo che il conteggio
negativo è giunto a zero
- Contatore ad accumulo positivo:
Massima capacità: 23 ore, 59 minuti, 59 secondi
Cadenza del conteggio: 1 secondo
- Cantatore negative a ritroso
Massima capacità, dal tempo di partenza: 23 ore, 59 minuti, 59
secondi, Cadenza del conteggio: 1 secondo.
- Funzione di accumulo per conteggio negative.
- Quando il conteggio negativo giunge allo zero, entra in funzione, per
la durata di un minuto, un segnale acustico d‘allarme.
- Tasti separati per agire sulle ore, minuti e secondi.
- Dimensioni mm. 64 x 60 x 16
- Peso circa 40 grammi (con batteria)
Fissaggio con morsetto (illustrazione)
II contasecondi, per mezzo del morsetto sistemato sulla faccia posterio-
re può essere fissato a pareti sottili, ad es alla tasca del camice.
Fissaggio magnetico (illustrazione)
II contasecondi può esse re fissato per mezzo del suo attacco magnetico
a pareti piane in ferro o metallo ferroso.
Fixation au moyen d‘un socle (illustrazione)
II contasecondi può essere appoggiato ad una superficie orizzontale
per mezzo di una basetta metallica a rientranza, sistemata sulla faccia
posteriore dello strumento.
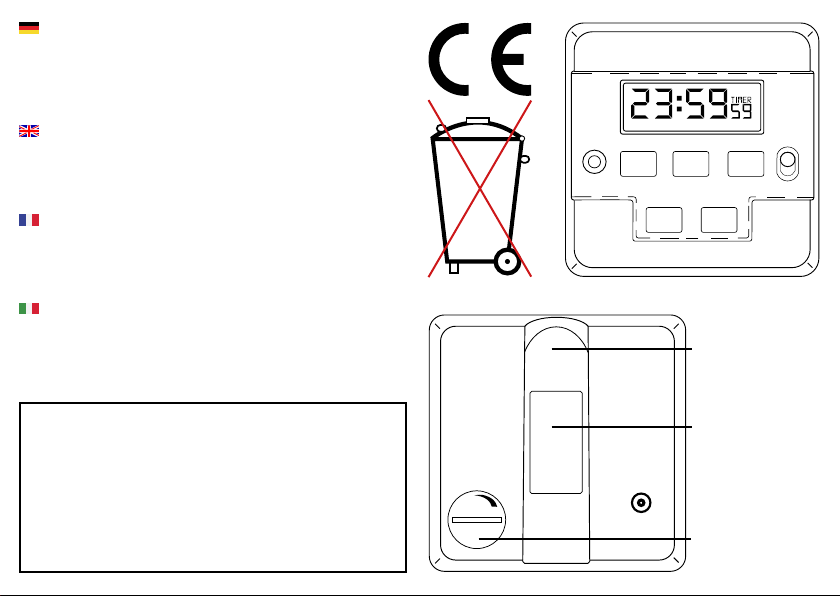
Cambio della batteria (illustrazione)
Ruotare con l‘ausilio di una moneta nel senso della freccia ed aprire
l‘alloggiamento delta batteria poste sulla faccia posteriore dello
strumento. Togliere la batteria esaurita e sostituirla con una nuova a
bottone, da 1,5 V, dimensioni G-13, quindi richiudere il coperchio (fare
attenzione che il polo positive - risulti versa l’alto).

nuovo conteggio a ritroso. La scritta MEMORY scompare.
Contatore ad accumulo positivo
1. Quando il contatore e stato azzerato (reset), esse può essere
utilizzato come contasecondi premendo il pulsante START/ STOP. La
cadenza è al secondo. Per ogni pressione di pulsante si ha un segnale
acustico.
2. Per fermarlo premere nuovamente il pulsante START/STOP. Questo può
essere premuto tante volle quanto lo si desideri.
3. Per azzerare il tutto si prema il pulsante RESET.
Regolazione del tempo normale
1. Spostare la levetta TIMER/CLOCK sulla posizione CLOCK: sul contatore
appare il valore del tempo normale che viene caratterizzato dal
pulsante dei due punti.
2. Ore
Per cambiare i valori delle cifre relative alle ore, premere
contemporaneamente i pulsanti HR e SET. Anche in queste caso si
sente un segnale acustico. Per far procedere più velocemente
l‘avanzamento dei valori corrispondenti alle ore, premere
contemporaneamente i pulsanti HR e SET e tenerli premuti per circa 2
secondi.
3. Minuti:
Premere contemporaneamente i pulsanti SET e MIN, analogamente a
quanto descritto perle ore.
4. Secondi:
Premere contemporaneamente i pulsanti SET e SEC. Anche in questo
caso viene evidenziato un segnale acustico.
Con questa operazione la cifra dei secondi viene azzerata quando la
cifra stessa è compresa tra 0 e 30; nel caso invece la cifra sia
compresa tra 31 e 59, il contatore dei secondi si azzera e la cifra
corrispondente ai minuti aumenta di una unità.

Hanhart 1882 GmbH
Hauptstr. 33 I 78148 Gütenbach
Germany
www.hanhart.com
Other manuals for Compact 2
1
Table of contents
Languages:
Other Hanhart Watch manuals

Hanhart
Hanhart Delta E 100 User manual

Hanhart
Hanhart CLASSICTIMER User manual

Hanhart
Hanhart LABOR 2 User manual

Hanhart
Hanhart Modul 3 User manual

Hanhart
Hanhart 14035 User manual

Hanhart
Hanhart Pioneer Series User manual

Hanhart
Hanhart DELTA E 200 SPECTRON User manual

Hanhart
Hanhart Pioneer Series User manual

Hanhart
Hanhart PRIMUS User manual

Hanhart
Hanhart PROFIL 25 User manual