Hanhart Modul 3 User manual

INSTRUCTION BOOK & GUARANTEE
Modul 3
Accord 1

BEDIENUNGSANLEITUNG & GARANTIE 1
Elektronische Stoppuhren
Modul 3, Accord 1
INSTRUCTION BOOK & GUARANTEE 11
Electronical stopwatches
Modul 3, Accord 1
MODE D‘EMPLOI & GARANTIE 21
Chronomètre compteur
Modul 3, Accord 1
ISTRUZIONI PER L'USO E GARANZIA 31
Orologio contaminuti
Modul 3, Accord 1
Hanhart-Garantie: 2 (zwei) Jahre
Sollten sich innerhalb dieser Zeit Mängel ergeben, die auf Fabrikations-
fehler oder schlechtes Material zurückzuführen sind, so wird unter Vor-
lage dieses Garantiescheines kostenlose Instandsetzung oder Umtausch
vorgenommen. Fehler infolge falscher Behandlung sowie Schäden,
die durch ausgelaufene Batterien entstanden sind, sowie die Batterien
selbst, fallen nicht unter die Garantie.
Hanhart-guarantee: 2 (two) years
If this stopwatch should become defective within this period you are
entitled to get it repaired or exchanged free of charge.Defects resulting
from abuse of the stop watch are not covered by this guarantee: for
instance, if contact springs are corroded by batteries which have leaked.
Batteries are not covered by this guarantee.
Hanhart-garantie: 2 (deux) ans
Si un défaut apparaissait durant cette période, nous échangerions ou
réparerions ce compteur gratuitement. Cette promesse de garantie ne
couvre pas les dégradations causées par un emploi abusif: par exemple,
si les ressorts de contact sont corrodés par des piles ayant coulé. Les
piles ne sont pas couvertes par cette garantie.
Hanhart-garanzia: 2 (due) anni
Se entro tale periodo dovessero verificarsi difetti di tal genere ci
caricheremo dell‘o nere di riparare o sostituire gratuitamente il con-
tasecondi ad eccezione delle spese di tras porto. La presente garanzia
non copre i guasti causati da manomissione o da uso non corretto dello
strumento. La presente garanzia non riguarda lo pile.
Datum / Date / Date / Data:
Verkäufer / Vendor / Vendeur / Venditore:
Technische Daten
Temperaturbereich
im Einsatz: -15° C bis +55° C
bei Lagerung: -25° C bis +65° C
Batterie
Typ: Mignonzelle AA
Kapazität: ca. 2 - 3 Jahre
Indiktor: im Display als Batteriesymbol, ca. 1 Woche vor Total-
entladung
Display LCD, 1,5-zeilig, 7/2 Digit, Zeitanzeige, Speicheranzeige,
verschiedene Symbole
Modul 3: h - mm - ss
Accord 1: 99999,99
Gehäuse ABS-Kunststoff, 85 x 62 x 27 mm
Gewicht 95g mit Batterie
Genauigkeit +/- 14 Sek. / Monat
Zeitauflösung Modul 3: 1/100 Sek.
Accord 1: 1/100 Min.
Speicher 60
Optionen Interfaceanschluss bei Modul 3
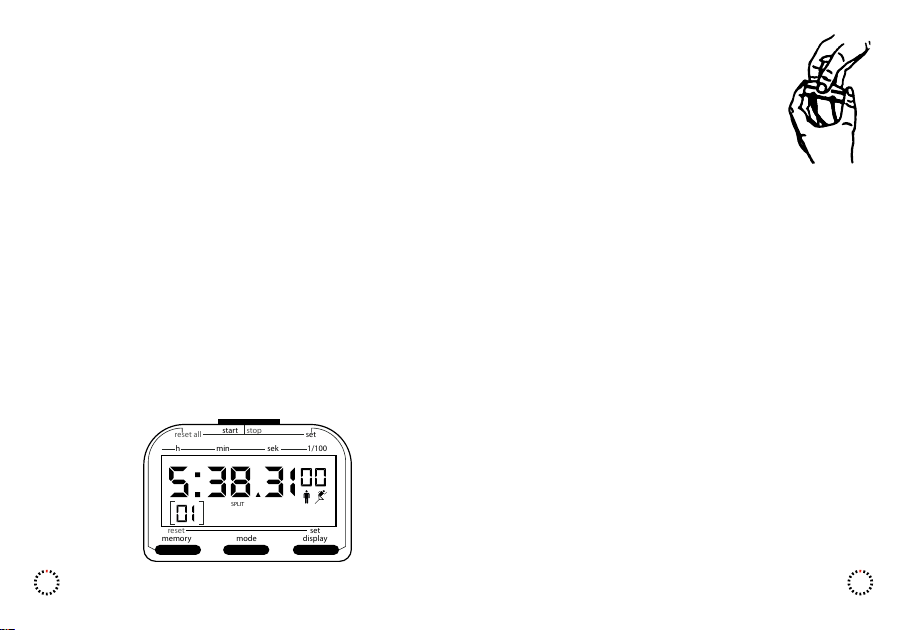
1
memory
reset
reset all
mode
SPLIT
set
display
set
start
h min sek 1/100
stop
Batterie einlegen bzw. wechseln
Gehäuserückwand (Unterteil) durch Druck auf den Steg
an der Gehäuseunterseite abnehmen (siehe Skizze).
Batterie einsetzen (auf richtige Polung achten). Deckel
wieder einrasten. Nach dem Einlegen der Batterie muss
das Datum und die Uhrzeit neu gesetzt werden.
Kordel & Schutztasche montieren
Batteriedeckel abnehmen und Kordel von der Gehäu-
seaußenseite durch eines der beiden Löcher einführen und durch das
andere Loch von der Gehäuseinnenseite wieder hinausführen. Beide
Kordelenden von innen durch die beiden Löcher der Schutztasche
führen und dann verknoten.
Mögliche Funktionen Modul 3 / Accord 1
a) Reset, Nullstellen der Stoppuhr
b) Zeiten messen
c) Speicherabruf / Speicher löschen
d) Uhrzeit
e) Datum
a) Reset, Nullstellen der Stoppuhr
Durch gemeinsames Drücken der Tasten START/STOP und MEMORY.
Dabei werden alle Zeiten und Speicher gelöscht. Der vorher einge-
stellte Mode bleibt aber erhalten.
b) Zeiten messen
Ein kurzer Druck auf die Taste MODE bewirkt ein Weiterschalten zur
nächsten Funktion im Rotationsprinzip. Die Reihenfolge ist:
SPLIT, LAP, ADD (nicht bei ACCORD), TIME, DATE
Mit der Taste START/STOP wird die Zeit gemessen, angezeigt und
abgespeichert. Nach jeder Start/Stop-Betätigung bleibt die Zeitan-
zeige im Display scheinbar stehen.
Dies dient lediglich zur besseren Erkennung der gemessenen Zeit.
Intern bleibt die Stoppuhr aber weiterhin aktiv. Wünschen Sie die
Zeitanzeige im Display wieder als laufende Anzeige, dann drücken Sie
kurz die Taste DISPLAY. 2

3
Messen mit der Modul 3
Zeitarten
SPLIT = Splitzeit
LAP = Rundenzeit
ADD = Additionszeit
Symbole
SPLIT und xy nach dem ersten Start.
LAP und xy nach dem ersten Start.
ADD und je nach ungerader oder gerader Tastenbetätigung:
Xy Stoppuhr ist aktiviert
xy Stoppuhr deaktiviert (Lap & Split sind im Hintergrund aktiv).
Messen mit der Accord 1
Zeitarten
SPLIT = Fortschrittszeit
LAP = Einzelzeit
Symbole
SPLIT und xy nach dem ersten Start.
LAP und xy nach dem ersten Start.
Alle drei (zwei bei der Accord 1) Zeitarten können während der aktiven
Zeitmessung durch Drücken der MODE-Taste abwechselnd aktiviert
werden. Sie brauchen sich nicht vor Beginn der Zeitmessung für eine
bestimmte Zeitart zu entscheiden. Uhrzeit und Datum sind während der
aktiven Zeitnahme nicht abrufbar.
c) Speicherabruf:
Wie erwähnt wird jeder Stoppvorgang bis zur maximal möglichen Kapa-
zität abgespeichert. Die Anzahl der Stoppvorgänge werden im Display
unten links angezeigt.
4
Die ersten 59 Speicher beinhalten auch die ersten
59 Stoppzeiten. Der 60. Speicher beinhaltet immer die zuletzt gestoppte
Zeit. Bei 72 Stoppvorgängen sind z. B. die ersten 59 Zeiten entsprechend
der Reihenfolge abgespeichert. Im 60. Speicherplatz steht dann die
zuletzt gemessene 72. Zeit. Nach einem kurzen Druck auf die Taste
MEMORY folgt ein Sprung in den Modus für die Speicherauslese. Als
Indikator dafür ist das Symbol MEMO im Display ersichtlich. Der Stopp-
zähler steht auf 00.
Der weitere Ablauf:
1) kurzer Druck auf Taste START/STOP:
Stoppzähler = 1 mit 1. Zeit
2) kurzer Druck auf Taste START/STOP:
Stoppzähler = 2 mit 2. Zeit
3) kurzer Druck auf Taste START/STOP:
Stoppzähler = 3 mit 3. Zeit
…
43) kurzer Druck auf Taste START/STOP:
Stoppzähler = 43 mit 43. Zeit usw.
Durch einen kurzen Druck auf die Tasten MEMORY, DISPLAY oder MODE
wird in den aktiven Stoppmodus zurückgeschaltet.
Es bleibt noch anzumerken, dass die Speicherzeiten entsprechend der
eingestellten Zeitart angezeigt werden, z. B.:
Zeitart = LAP
Es werden Rundenzeiten angezeigt.
Umschalten auf ADD
Es werden Additionszeiten angezeigt.
Speicher löschen:
Durch gemeinsames Betätigen von Taste MEMORY und DISPLAY.
Alle Speicherzeiten werden gelöscht. Die Speicheranzeige wird auf
null zurückgestellt. Die momentan laufende Zeitanzeige bleibt
unverändert.

5
d) Uhrzeit
Anwählbar nach Reset über die Taste MODE. Das Symbol »TIME« ist
der Indikator für die Uhrzeit: 09,23.44 (hh, mm, ss).
Das Symbol »SET« zeigt an, dass mit Taste SET die Uhrzeit pro-
grammiert werden kann.
Ablauf:
Kurzer Druck auf Taste SET
(10-er Std. blinkt) mit Taste START/STOP wird die blinkende Stelle
hochgezählt.
Kurzer Druck auf Taste SET
(1-er Std. blinkt) mit der Taste START/STOP wird die blinkende Stelle
hochgezählt.
Kurzer Druck auf Taste SET
(10-er Min. blinkt) usw.
Ein kurzer Druck auf die Taste MODE bewirkt ein Verlassen des
Einstell-Vorganges.
e) Datum
Anwählbar nach Reset über die Taste MODE. Das Symbol »DATE« ist
der Indikator für das Datum: 25.11.92 (tt, mm, jj).
Das Symbol »SET« zeigt an, dass mit Taste SET das Datum program-
miert werden kann.
Ablauf:
Kurzer Druck auf Taste SET
(10-er Jahr blinkt) mit Taste START/STOP wird die blinkende Stelle
hochgezählt.
Kurzer Druck auf Taste SET
(1-er Jahr blinkt) mit Taste START/STOP wird die blinkende Stelle
hochgezählt.
Kurzer Druck auf Taste SET
(10-er Monat blinkt) mit Taste START/STOP wird die blinkende Stelle
hochgezählt.
Kurzer Druck auf Taste SET
(1-er Monat blinkt) mit Taste START/STOP wird die blinkende Stelle
hochgezählt.
6
Kurzer Druck auf Taste SET
(10-er Tag blinkt) mit Taste START/STOP wird die blinkende Stelle
hochgezählt.
Kurzer Druck auf Taste SET
(1-er Tag blinkt) mit Taste START/STOP wird die blinkende Stelle
hochgezählt.
Ein kurzer Druck auf die Taste MODE bewirkt ein Verlassen des
Einstell-Vorganges.
Bitte beachten: Jeder Setzvorgang von Uhrzeit oder Datum muss mit
einem Reset abgeschlossen werden!
Modul 3 - Zusatzfunktionen
Das Modell Modul 3 beinhaltet alle Eigenschaften der Basisversion, mit
folgenden zusätzlichen Funktionen:
- CD für Count-Down
- Setzen der Splitzeit
Ablauf: Ein kurzer Druck auf die Taste MODE bewirkt ein Weiterschalten
zur nächsten Funktion im Rotationsprinzip. Die Reihenfolge ist:
SPLIT, LAP, ADD (siehe Zeiten messen, Seite 5) zusätzlich:
CD (Count-Down, siehe unten)
TIME (siehe Uhrzeit) und DATE(siehe Datum)
CD (Count-Down)
Das Symbol »CD« ist der Indikator für den Count Down. Das Symbol
»SET« zeigt an, dass mit Taste SET eine Zeit vorprogrammiert werden
kann. Ablauf:
Kurzer Druck auf Taste SET
(1-er Sek. blinkt) mit Taste START/STOP wird die blinkende Stelle
hochgezählt.
Kurzer Druck auf Taste SET
(10-er Sek. blinkt) mit Taste START/STOP wird die blinkende Stelle
hochgezählt.
Kurzer Druck auf Taste SET
(1-er Min. blinkt) mit Taste START/STOP wird die blinkende Stelle
hochgezählt.

7
Kurzer Druck auf Taste SET
(10-er Min. blinkt) mit Taste START/STOP wird die blinkende Stelle
hochgezählt.
Kurzer Druck auf Taste SET (1-er Std. blinkt) mit Taste START/STOP
wird die blinkende Stelle hochgezählt.
Ein kurzer Druck auf die Taste MODE bewirkt ein Verlassen des
Einstell-Vorganges.
Mit der Taste START/STOP kann der Count-Down abwechselnd gestartet
bzw. gestoppt werden. Die Symbole XY XY zeigen den augenblicklichen
Status an.
Ein Nulldurchgang (... 3, 2,1, 0 --> n, n-1, n-2...) aktiviert ein Alarmsignal
mit 6 Sek. Dauer. Die Anzeige links unten wird um eins erhöht. Somit
kann jederzeit die Anzahl aller Nulldurchgänge bis max. 99 in der
genannten Anzeige abgelesen werden. Innerhalb der Count-Down-Zeit-
messung ist ein Modewechsel nur möglich zwischen:
CD, TIME und DATE.
Echtzeit (Uhr) in Splittimer übertragen:
Bei manchen Sportarten dürfen Zeitnahmen nur synchron zur Nor-
malzeit durchgeführt werden. Jede gestoppte Zeit steht analog zur
normalen Uhrzeit. Logischerweise muss der Splittimer dann synchron
mit der Uhrzeit geschaltet werden.
Ein kurzes gemeinsames Drücken der Tasten START/STOP und SET
überträgt die interne Uhrzeit in den Splitzähler. Dabei werden die
Sekunden auf die nächste volle Minuten aufgerundet. Anschließend
kann die Stoppuhr manuell oder über einen Impuls von einer externen
Hauptuhr gestartet werden, sofern die volle Minute übereinstimmt.
Die Splitzeit wird intern mit einem 24 h-Zähler verwaltet. Deswegen ist
die Std.-Stelle immer analog zu einer 24 h-Anzeige. Beispiele:
Normalzeit Anzeige in Stoppuhr bei Ausdruck
08:32.56,99 8:32.56,99 08:32.56,99
10:05.59,77 0:05.59,77 10:05.59,77
23:33.44,57 3:33.44,57 23:33.44,57 8
Sobald eine Übertragung der Uhrzeit in den Splitzähler erfolgt ist, bleibt
die Funktion der Stoppuhr auf den SPLIT-Mode begrenzt.
(Andere Zeitarten sind in diesem Zusammenhang nicht sinnvoll).
Anschlussmöglichkeiten am Stecker EXTERN:
- Mini-Drucker für unserer Stoppuhrenfamilie Modul + Accord
- Interface mit Verbindung zu einem PC mit folgenden Möglichkeiten:
1-2 Stoppuhren
(Start/Ziel) können angeschlossen werden.
1-2 Lichtschranken, Startpistolen oder sonstige Impulsgeber. Über
Standard-Druckerkabel wird die Verbindung zum PC hergestellt.
Die Firma HANHART bietet dazu eine Software an, mit welcher fast
alle erdenklichen Sportzeitmessungen durchführbar sind.
Beispiele für Hardwarekombinatonen:
- 1 Lichtschranke (etc.) und 1 Stoppuhr für Start und Ziel
- 1 Lichtschranke (etc.) und 2 Stoppuhren für Start bzw. Ziel.
- 2 Lichtschranken (etc.) und 2 Stoppuhren für Start bzw. Ziel
Die Software steuert das Interface automatisch, entsprechend der
angeschlossenen Konstellation.
Anbei noch einige Beispiele aus der Softwareleistung:
- Bedienung nach SAA-Standard (Maus oder wahlweise Tastatur)
- Lichtschrankeneingänge können vom PC aus gesperrt werden.
- Einzel-, Doppel- oder Gruppenstart.
- Einfach- oder Doppelwertung.
- Einfach- oder Gruppenauswertung.
- Rundenzeiten mit Einzel- oder Gruppenstart.
- Ranglisten nach Startnummern oder Zeiten geordnet
- Sofortige Anzeige der Fahrzeit etc.
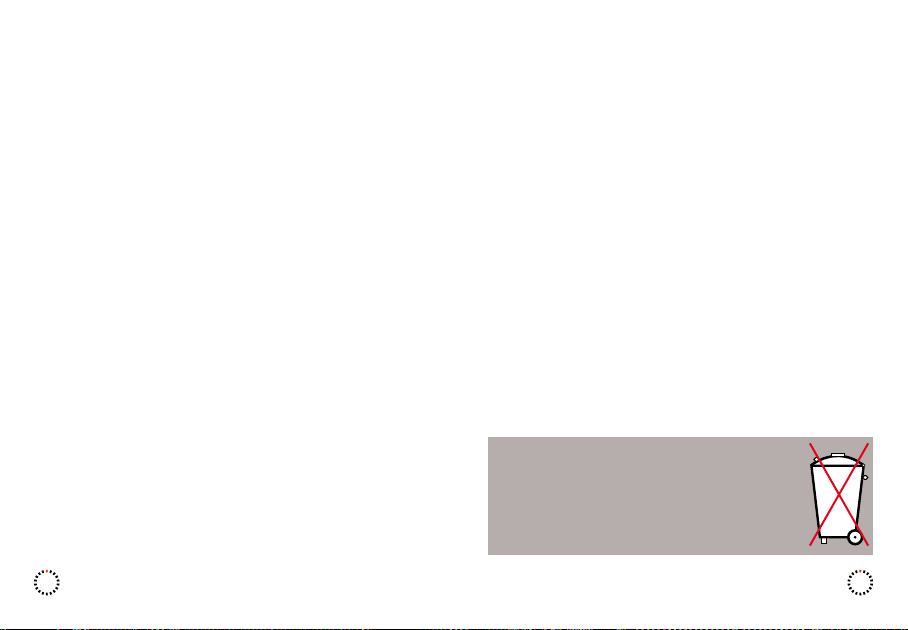
Verbraucher sind gesetzlich verpflichtet Altbatterien zu
einer geeigneten Sammelstelle/ Verkaufsstelle/ Versand-
lager zu bringen. Die durchgestrichene Mülltonne bedeu-
tet: Batterien und Akkus dürfen nicht in den Hausmüll.
Pb, Cd und Hg bezeichnet Inhaltsstoffe die oberhalb der
gesetzlichen Werte liegen.

Technical Data
Temperature range
in use: -15° C to +55° C
in storage: -25° C to +65° C
Battery
Type: Mignon cell AA
Lifetime: app. 2 - 3 years
Indicator: Symbol in the display, 1 week warning
Display LCD, 1,5-lines, 7/2 digit, clock, memory note,
various symbols
Modul 3: h - mm - ss
Accord 1: 99999,99
Case ABS-plastic, 85 x 62 x 27 mm
Weight 95g with battery
Accuracy +/- 14 sec. / month
Measuring units Modul 3: 1/100 sec.
Accord 1: 1/100 min.
Storages 60
Options Interface connector for Modul 3
9
memory
reset
reset all
mode
SPLIT
set
display
set
start
h min sek 1/100
stop
Battery replacement
Remove the battery cover by pressing grove located on
the bottom of the case (see diagram). Load battery as
per diagram inside battery compartment with correct
polarity (+/-). Replace cover. After the battery has been
replaced, the date and time must be reset once again.
Installation of lanyard and protection pouch
Remove the battery cover, pull lanyard through one of
the holes from the outside of the case, and then pull out through the
other hole from the inside of the case. Pass through with both ends of
the lanyard into the holes of the protection pouch from the inside and
tie it together.
Possible functions Modul 3 / Accord 1
a) Reset, return memory and display to zero
b) Time measurement
c) Memory recall / memory reset
d) Clocktime
e) Date
a) Reset, return memory and display to zero
Reset Stopwatch by simultaneously pressing the START/STOP key and
MEMORY key at the same time. All recorded times and memories will
be reset. However, the previously selected modes will remain the
same.
b) Time measurement
A short press of the MODE key pages through the functions.
The rotation sequence is Split, Lap, Addition (not with the ACCORD),
Time and Date.
With the START/STOP key, the time will be measured, displayed and
placed in memory. After each Start/Stop operation, the time will be
displayed (frozen). This indicates the time measurement, the display
is standing still, however the internal clock is still active. To see the
running time, press the DISPLAY key again.
10

11
Timing with Modul 3
Timing modes
SPLIT = Split time
LAP = Lap time (Taylor)
ADD = Additional time (single event/time out)
Symbols
SPLIT and xx after the first start
LAP and xx after the first start
ADD and after every even or uneven key confirmation:
Xy stopwatch is active
Xy stopwatch is inactive (lap & split still active in background).
Timing with Accord 1
Timing modes
SPLIT = Intermediate time
LAP = Lap time (Taylor)
Symbols
SPLIT and xy after the first start.
LAP and xy after the first start.
All three (two for the Accord 1) time modes can be switched by pressing
the MODE key. At the start of the time measurement, a specific time
mode may not need to be selected, since the required time mode can be
selected when the stopwatch is recording time.
Date and real time are not available during timing.
c) Memory recall
Every frozen display will be recorded in memory. The memory records
up to 60 events. This count will be displayed on the bottom left of the
display. The first 59 events include the first 59 recorded times.
12
The 60th event will always include the last recorded time.
Example: with 72 recorded times, the first 59 recorded times are stored
in memory including the 72nd recorded time.
By pushing the MEMORY key, the recorded events can be recalled. The
symbol >>MEMO<< is displayed and the count is set to zero.
The memory can be recalled as follows:
1) A quick press on the START/STOP button:
counter equals 1 with the 1st recorded time
2) A quick press on the START/STOP button:
counter equals 2 with the 2nd recorded time
3) A quick press on the START/STOP button:
equals 3 with the 3rd recorded time
…
43) A quick press on the START/STOP button:
counter equals 43 with the 43rd recorded time and so on
By pressing the MEMORY, DISPLAY or MODE keys, the normal timing
modes will be switched back. The recorded time in memory reflect the
set times as follows:
Example:
Times mode = Lap
Lap Times will be indicated
Switch to Add
Add Times will be indicated
Clearing Memory
Simultaneously pressing MEMORY and DISPLAY keys will clear the
whole memory. The memory indicator will be set back to zero.
The current memory indicator remains unchanged.

13
d) Clock time / real time
Available after selecting RESET, in the MODE key. The Symbol
>>TIME<< is an indicator for the real time.
Example: 09,23,44 (HMS)
The symbol SET indicates that the real time can be programmed as
follows:
A quick press of the SET key
(10th hour blinking) with the Start/Stop key counts up the hours.
A quick press of the SET key
(1st hour blinking) with the Start/Stop key counts up the hours.
A quick press of the SET key
(10th minute blinking) with the Start/Stop key counts up the minutes.
A quick press of the MODE key will finish the set procedure.
e) Date
Available after selecting reset, with the Mode key. The symbol
>>DATE<< is the indicator for the date 25.11.93 (DMY), U.S.A. 11.25.93
(MDV).
The symbol SET shows that with the Set key, the date can be
programmed as follows:
A quick press of the SET key
(10th year blinking) with the Start/Stop key count up.
A quick press of the SET key
(1st year blinking) with the Start/Stop key count up.
A quick press of the SET key
(10th month blinking) with the Start/Stop key count up.
A quick press of the SET key
(1st month blinking) with the Start/Stop key count up.
A quick press of the SET key
(10th day blinking) with the Start/Stop key count up.
A quick press of the SET key
(1st day blinking) with the Start/Stop key count up.
A quick press of the MODE KEY will finish the set procedure.
Attention: Please reset the stopwatch after each time setting.
14
Modul 3 - Additional functions
The Modul 3 includes these additional functions:
- CD for Count Down
- Real time setting with split times
Start:
A quick press of the MODE key (rotation) the sequence is:
Split. Lap, Addition (see time measurement page 17), CD (Count
down, see below), Real Time (see before). Date (see before).
(CD) Count down
CD is the symbol for the Count Down operation. With the SET key,
time can be preprogramed.
A quick press of the SET key (the first second is blinking).
With a quick press of Start/Stop key, the blinking position can be
adjusted.
With a quick press of Start/Stop key, the first second position can be
adjusted.
With a quick press of Start/Stop key, the 10th second position can be
adjusted.
With a quick press of Start/Stop key, the first minute position can be
adjusted.
With a quick press of Start/Stop key, the 10th minute position can be
adjusted.
With a quick press of Start/Stop key, the 1st hour position can be
adjusted.
A quick press of the MODE key will move the position to the next
sequence.
With a quick press of the Start/Stop key, the count down can be started/
stopped.
The symbol xy xy shows the current status.
At zero, the alarm signal will be activated for
6 seconds. The display on the bottom left will be increased by one. Thus,
the recording of the
zero rotation can be read up to ninety-nine times. During the count down
mode, the modes can only be switched between count down
and date.

15
At zero, the alarm signal will be activated for
6 seconds. The display on the bottom left will be increased by one. Thus,
the recording of the zero rotation can be read up to ninety-nine times.
During the count down mode, the modes can only be switched between
count down and date.
Real time into split time:
By some sport events, real time and time recordings are synchroni-
zed. Every recorded time will be shown in real time. Therefore, the
split time is synchronized with real time.
Simultaneously pressing the START/STOP and SET key combines real
time with split time. The second will be rounded off to the next
minute. At this time the stopwatch can be controlled manually or by
impulse through an external main clock which will control the start of
the main event.
The split time will be controlled by 24 hour real time without 10 hour di-
git in the display but extern connections (printer, PC) write the complete
real time
Real time Display Printer
08:32.56,99 8:32.56,99 08:32.56,99
10:05.59,77 0:05.59,77 10:05.59,77
23:33.44,57 3:33.44,57 23:33.44,57
When Real Time controls the split time, no other modes are available.
The following options are available with the interface:
- Mini-printer with the MODUL and ACCORD
- Interface with PC as follows:
1-2 Stopwatches (Start/Finish]
1-2 Light Barriers, start pistols or other impulse devices can be
connected by PC cable
Hanhart offers the suitable software for the most sport
time applications. 16
Example for hardware combinations:
1) One light barrier (etc.) and one stopwatch for Start/Finish
2) One light barrier (etc.) and two stopwatches for Start/Finish
3) Two light barriers (etc.) and two stopwatches for Start/Finish
The software automatically controls the interface, according to the
hardware set up.
Additional software capabilities are:
- Input by mouse or keyboard per SAA standard
- Light barriers (etc.) can be controlled by PC
- Single, double or group starts
- Single or double evaluation
- Single or group evaluation
- Lap (tailor) time, single and group starts
- Listing by start numbers or times
- Immediate display of running time
Consumers are legally required to dispose of batteries
at suitable collection points, vending points or dispatch
bays. The crossed-out wheeled bin means that batteries
must not be disposed of in the household waste.
Pb, Cd and Hg designate substances that exceed the
legal limits.

Caractéristiques techniques
Intervallo di temperatura
En utilisation: -15 °C à +55 °C
En stockage: -25 °C à +65 °C
Pile
Type: Mignon pile AA
Durée: circa 2 - 3 ans
Indicateur: indicateur dans le display, 1 semaine indication
Affichage LCD, 1,5-ligne, 7/2 cifre, l'heure, Fenêtre pour
indication des fonctions, différent symboles
Modul 3: h - mm - ss
Accord 1: 99999,99
Boîter ABS-plastique, 85 x 62 x 27 mm
Poids 95g avec pile
Precisione +/- 14 sec. / mese
Unité des temps Modul 3: 1/100 sec.
Accord 1: 1/100 min.
Mémoires 60
Option branchement Interface pour Modul 3
17
memory
reset
reset all
mode
SPLIT
set
display
set
start
h min sek 1/100
stop
Mise en place de la pile
Ôter le couvercle par pression sur l’onglet situé à la
base du boîtier (cf. croquis). Placer la pile en respectant
la polarité. Remettre le couvercle. Après la mise en
place de la pile, la date et l’heure sont à reprogrammer.
Montage du cordon et de la housse de protection
Retirer le couvercle de la pile et introduire le cordon du
boitier extérieur par un de deux trous et le ressortier par
l’autre trou du boitier intérieur. Diriger les deux extrémités du cordon de
l’intérieur dans les trous de la housse de protection et les nouer.
Fonctions possibles Modul 3 / Accord 1
a) Reset, Remise à zéro
b) Mesurer les temps
c) Appel-mémoires et annulation-mémoires
d) Heure réelle (montre)
e) Date (calendrier)
a) Reset, Remise à zéro
Par pression commune des touches START/ STOP et MEMORY. Par
ce fait toutes les mémoires du chronomètre-compteur seront
annulées. Cependant le mode programmé avant demeure maintenu.
b) Mesure de temps
Une brève pression sur la touche MODE sélec tionne successivement
les différentes fonc tions. Les fonctions sont:
SPLIT, LAP, AOD (sauf pour l'ACCORDI. HEURE, DATE.
Avec la touche START/STOP le temps est mesuré, affiché et enre-
gistré (mise en mémoires). Aprés chaque pression de la touche
START/STOP, l'affichage du temps est figé pour permettre la lecture
aisée du temps affiché. Cet arrêt n'est qu'apparent.
Le chronomètre demeure actif. Pour visualiser le défilement du
temps, appuyer briévement sur la touche DISPLAY.
18

19
Mesurer avec Modul 3
Mode des temps
SPLIT = Temps intermédiaire
LAP = Temps au tour, rondes
ADD = Temps consécutif, additionné
Symbole et Affichage
SPLIT et xx après le premier start
LAP et xx après le premier start
ADD et suivant un actionnement pair ou impair de la touche:
Xy chronomètre est activé
Xy chronomètre est désactivé (lap e split sont actif intérieurement).
Mesurer avec Accord 1
Mode des temps
SPLIT = Temps progressif
LAP = Temps unitaire
Simboli
SPLIT e xx après le premier start
LAP e xx après le premier start
Les différents modes de temps 13 pour le Modul, (2 pour l'Accord) peu-
vent être activés à tour de rôle par pression de la touche MODE, pendant
une mesure active. Il n'est pas néces saire de choisir un mode de temps
particulier avant le début de la mesure. L'heure réelle et date ne sont
pas accessibles pendant la prise de temps.
c) L'appel mémoire
Chaque pression de la touche START/STOP mémorise le temps corres-
pondant jusqu'à saturation complète de la capacité mémoire.
Le nombre de pressions effectués sur la touche STOP, sera indiqué en
bas à gauche de l"affichage. 20
Les 59 premiers temps mémo risés correspondront ainsi aux 59 pre-
miers temps stoppés. La 60ème mémoires indiquera toujours le dernier
temps stoppé. Pour 72 STOP exécutés, les 59 premiers seront mis en
mémoire suivant l'ordre chronologique.
La 60ème mémoire comprendra donc le 72ème temps stoppé [dernier
temps). Aprés une brève pression de la touche MEMORY, on passe au
mode »Lecture de mémoires«. Lïndicateur MEMO est alors visible sur
["affichage. Le compteur affiche 00. Suite du déroulement:
1) Brève pression sur la touche START/STOP:
compteur STOP= 01 avec 1er temps mémorisé
2) Brève pression sur la touche START/STOP:
compteur STOP= 02 avec 2ème temps mémorisé
3) Brève pression sur la touche START/STOP:
compteur STOP= 03 avec 3ème temps mémorisé
…
43) Brève pression sur la touche START/STOP:
compteur STOP= 43 avec 43ème temps mémorisé
Par une brève pression sur la touche MEMORY, DISPLAY ou MODE,
on revient dans le mode STOP actif. Il faut noter que les temps mis en
mémoire correspondent aux mode de temps indiqués.
Par exemple:
Mode LAP - les temps LAP sont indiqués.
Mode ADD - les temps ADD sont indiqués.
Annulation de la mémoire
Par pression simultannée des touches
MEMORY et DISPLAY, tout les temps mis en mémoire seront annulés.
Lïndicateur mémoire est remis à zéro. La mesure active à cet instant
n'est pas interrompue.

21
d) Réglage de l'heure
Après remise à zéro (RESET), selectionner la touche MODE.
Le symbole >>TIME<< est l'indicateur pour l'heure. 09,23.44
lhh, mm, ss).
Le symbole SET indique qu'avec la touche SET, l'heure peut être
ajustée. Déroulement:
brève pression sur la touche SET
(dizaines d'heures clignotent) avec la touche START/STOP les heures
defilent jusqu'au chiffre désiré.
brève pression sur la touche SET
(unité d'heures clignote) avec la touche START/ STOP les heures
défilent jusqu'au chiffre désiré.
brève pression sur la touche SET
(dizaines de minutes clignotent) etc...
Une brève pression sur la touche MODE fait quitter le mode SET.
e) Réglage de la date
Après remise à zéro (RESET) selectionner la touche MODE.
Le symbole DATE est l'indicateur pour la date: 25.11.92 (jj, mm, aa).
Le symbole SET indique qu"avec la touche SET la date peut être
ajusté.
Déroulement:
brève pression sur la touche SET:
(dizaines d'année clignotent) avec la touche START/STOP les années
défilent jusqu'au chiffre désiré.
brève pression sur la touche SET: (unité d'année clignote) avec la touche
START/ STOP les années défilent jusqu'au chiffre désiré.
brève pression sur la touche SET: (dizaines de mois clignotent) avec la
touche START/STOP les mois défilent jusqu'au chiffre désiré.
brève pression sur la touche SET: (unité de mois clignote) avec la touche
START/STOP les mois défilentjusqu'au chiffre désiré.
brève pression sur la touche SET: (dizaines de jour clignotent) avec la
touche START/STOP les jours défilent jusqu'au chiffre désiré.
brève pression sur la touche SET: (unité de jour clignotent) avec la
touche START/ STOP les jours défilent jusqu'au chiffre
désiré.Une brève pression sur la touche MODE fait
quitter le mode SET.
22
Remarque: chaque ajustement de l'heure ou de la date doit être
conclut avec un Reset.
Modul 3 - Version élargie
Comporte toutes les qualités de la version de base avec les fonctions
supplémentaires suivantes:
- CD compte à rebours (Count-down)
- Temps SPLIT (temps intermédiaires)
Déroulement: une brève pression sur la touche MODE provoque la
sélection d'une nouvelle fonction. L'ordre des fonctions est:
SPLIT, LAP, ADD (voir mesure de temps), de plus CD (compte à
rebours), TIME (voir heure réelle) DATE (voir date).
(CD) Count Down, compte à rebours
Le symbole >>CD<< est l'indicateur pour le compte à rebours. Le
symbole SET indique, qu'avec la touche SET, un temps peut être
programmé d'avance:
Déroulement:
brève pression sur la touche SET (unité de seconde clignote) avec la
touche START/STOP les secondes défilent jusqu'au chiffre désiré.
brève pression sur la touche SET (dizaines de secondes clignotent) avec
la touche START/STOP les secondes défilent jusqu'au chiffre désiré.
brève pression sur la touche SET (unité de minute clignote) avec la
touche START/ STOP les minutes défilent jusqu'au chiffre désiré.
brève pression sur la touche SET (dizaines de minutes clignotent) avec la
touche START/STOP les minutes défilent jusqu'au chiffre désiré.
brève pression sur la touche SET (unité d'heure clignote) avec la touche
START/ STOP les heures défilent jusqu'au chiffre désiré.
Une brève pression sur la touche MODE fait quitter le mode SET.
Avec la touche START/STOP le compte à rebours peut être soit
déclenché, soit arrété. Les symboles xx xx indiquent le status actuel.
Un passage par le zéro (3, 2, 1, 0 --> n, n-1, n-2...] active un signal
d'alarme durant 6 secondes. L'indication en bas à gauche augmente
d'une uni té. Il est ainsi possible de lire à tout moment tous les
passages zéro à 99 au maximum dans cette case indicatrice.
23
Pendant un compte à rebours un changement de mode n'est possible
qu'entre CD, TIME et DATE.
Heure réelle (montre) enregistrée aux temps intermédiaires
Dans certain sports, les prises de temps doivent être effectuées avec
l'heure réelle. Chaque temps stoppé est celui de l'heure réelle.
Une brève pression commune des touches START/STOP et SET transmet
l'heure réelle dans le compteur intermédiaire.
Ainsi les secondes seront arrondis à la prochaine
minute. Puis le chronomètre-compteur peut être enclanché manuelle-
ment ou par une impulsion provenant d'une montre principale externe, à
condition que l'heure coincide.
Le temps intermédiaire sera géré intérieurement par un compteur 24 h.
c'est pourquoi les heures seront toujours analo gues a un affichage 24 h.
Exemples:
heure
normale
Affichage sur le
chronomètre Impression
08:32.56,99 8:32.56,99 08:32.56,99
10:05.59,77 0:05.59,77 10:05.59,77
23:33.44,57 3:33.44,57 23:33.44,57
Dés qu'un transfert de l'heure a été effectué dans le compteur inter_
médiaire, la fonction du chronomètre dans la mode SPLIT demeure
restreinte. (d'autres modes de temps dans ce rapport ne sont pas
significatifs).
Les possibilités de branchement sur la fiche EXTERNE:
- Mini-imprimante pour notre famille de chronomètre Modul et
Accord.
- interface avec rattachement à un PC:
possibilitè de brancher 1-2 chronomètres (départ/ arrivée).
1-2 barrières lumineuses à infrarouge, pistolet de départ ou autres
sources d'impulsion.
Un cable d'imprimante standard assure la liaison avec le PC
24
La Compagnie Hanhart commercialise un logiciel, conçu pour le
chronomètrage de tous types de mesure de temps correspondant
pratiquement à tous les sports.
Exemples de combinaison Hardware:
1 barrière lumineuse (etc.) et 1 chronomètre pour départ
et arrivée. barrière lumineuse (etc.) et 2 chronomètres
pour départ et arrivée.
2 barrières lumineuses (etc.) et 2 chronomètres
pour départ et arrivée.
Le programme contrôle automatiquement l'interface, suivant la confi-
guration choisie.
Ci-joint quelques exemples de la performance de la software:
Ecco alcuni esempi di possibilità di utilizzo del software:
- Commande d'aprés Standard-SM (souris ou clavier)
- Barrières lumineuses peuvent être bloquées à partir du PC
- Départ simple, double ou en groupe
- Evaluation simple ou double
- Interprétation simple ou double
- Temps au tour à départ simple ou en groupe
- Classement d'aprés les numéros de dossards ou d'aprés les temps
- Indication immédiate de la durée parcourue etc.
La législation exige des consommateurs le dépôt de piles
usagées dans un lieu de collecte approprie; un point de
vente ou un entrepôt d’expédition. La poubelle barrée
signifie qu’il est interdit de jeter les piles et les batteries
avec les ordures ménagères. Pb, Cd et Hg désignent
les substances dont les valeurs dépassent les limites
légales.

Dati Tecnici
Intervallo di temperatura
In uso: -15 °C a +55 °C
In magazzino: -25 °C a +65 °C
Batteria
Tipo: Mignon batteria AA
Durata: circa 2 - 3 anni
Indicazione: indicazione sul display, 1 settimane indicatore carica
Display LCD, 1,5-lignea, 7/2 cifre, l'heure, Fenêtre pour
indication des fonctions, différent symboles
Modul 3: h - mm - ss
Accord 1: 99999,99
Cassa ABS-plastica, 85 x 62 x 27 mm
Peso 95g con batteria
Precisione +/- 14 sec. / mese
Risolutione Modul 3: 1/100 sec.
Accord 1: 1/100 min.
Memorie 60
Opzione Presa per collegamento interfaccia per Modul 3
25
memory
reset
reset all
mode
SPLIT
set
display
set
start
h min sek 1/100
stop
Inserzione della batteria
Togliere il coperchio posteriore (la parte inferiore)
mediante pressione sulla zona esterna (vedi schizzo).
Sostituire la batteria facendo attenzione alla coincidenza
dei poli. Rimettere il coperchio. Dopo la sostituzione
della batteria devono essere ripristinate la data e l'ora.
Montaggio dell'astuccio e del cordoncino
Rimuovere il coperchio del vano batterie ed inserire il
cordoncino dall’esterno in uno dei due fori e farlo uscire dall'altro. Inser-
ire i due cappi del cordoncino nei passanti dell'astuccio e annodare.
Funzioni possibili di Modul 3 / Accord 1
a) Reset, messa a zero
b) Misura dei vari tempi
c) Richiamo delle memorie e spegnimento delle stesse
d) Tempo reale
e) Data
a) Reset, messa a zero dell'orologio
Si premano contemporaneamente i pulsanti START/STOP e MEMORY.
Tutti i tempi e le memorie vengono cancellati. Rimane sola mente la
funzione inserita con MODE.
b) Mesura dei tempi
Una breve pressione del pulsante MODE consente ii cambio delle
funzioni secondo il principio della rotazione. La sequenza è la
seguente: SPLIT, LAP, ADD (solo per i Modul 3), TIME e DATE.
Con il pulsante START/STOP il tempo viene misurato, totalizzato e
memorizzato. Dopo ogni pressione del pulsante START/STOP il tempo
totalizzato rimane visibile sul Display. Ciò serve unicamente per una
migliore conoscenza dei tempi misurati. All'interno, comunque, il
contasecondi continua a funzionare. Per osservare il tempo misurato
nel suo scorrere all’interno dello strumento, premere brevemente il
pulsante DISPLAY.
26

27
Misurazione con Modul 3
Modi del tempo
SPLIT = Tempo split
LAP = Tempo al giro
ADD = Tempo addizionale
Simboli
SPLIT e xx dopo il primo start
LAP e xx dopo il primo start
ADD e dopo ogni pressione dispari e pari:
Xy contasecondi è attivato
Xy contasecondi è disattivato (lap e split sono attivi all’interno).
Misurazione con Accord 1
Modi del tempo
SPLIT = Tempo progressivo
LAP = Tempo addizionale
Simboli
SPLIT e xx dopo il primo start
LAP e xx dopo il primo start
Le 3 funzioni (2 per Accord ^1) possono essere rese attive e selezionate
durante il funzionamento mediante il pulsante MODE. Non è necessario
selezionarle prima dell'inizio della misurazione.
Il tempo reale e la data non sono richiamabili durante il funzionamento
con una funzione specifica (diversa da TIME e DATE).
c) Richiamo delle memorie e spegnimento delle stesse
Con una breve pressione del pulsante MEMORY si predispone l’appa-
recchio per il richiamo dei tempi memorizzati per mezzo del pulsante
START/STOP secondo la funzione (SPLIT – LAP – ADD) preselezionata.
Il contatore di impulsi è leggibile nella parte bassa a sinistra. 28
Le prime 59 memorie comprendono anche i primi 59 tempi. La 60 me-
moria comprende sempre anche l’ultimo tempo rilevato.
Per esempio, al 72 rilevamento sono memorizzati solo i tempi progressi-
vi sino alla 59. memorizzazione.
Nel 60. posto della memoria si trova quindi l'ultimo tempo rilevato.
Con una breve pressione del pulsante MEMORY si ha uno scatto per
la scelta della funzione memorizzata. Ciò viene indicato con il simbolo
>>MEMO<< visibile sul display.
Il contatore di impulsi rimane sullo 00.
Altre rilevazioni:
1) Breve pressione sul pulsante START/STOP:
Rilevazione= 1 con il 1. tempo
2) Breve pressione sul pulsante START/STOP:
Rilevazione= 2 con il 2. tempo
3) Breve pressione sul pulsante START/STOP:
Rilevazione= 3 con il 3. tempo
…
43) Breve pressione sul pulsante START/STOP:
Rilevazione= 43 con il 43. tempo
Con una breve pressione del pulsante MEMORY, DISPLAY oppure MODE
si renderanno attive le funzioni corrispondenti.
Esempio:
Mode LAP - Saranno conteggiati i tempi LAP
Mode ADD - Saranno conteggiati i tempi ADD
Cancellazione memoria
Premere contemporaneamente i pulsanti MEMORY e DISPLAY. Tutti i
tempi memorizzati vengono cancellati. Il contatore delle memorie torna
a zero. Il conteggio del tempo sul contatore rimane invariato.

29
d) Tempo reale
Dopo l'azzeramento (reset) si prema il pulsante MODE.
Il simbolo >>TIME<< è l'indicatore del tempo reale (orologio) es.
09.23.44 (ore, minuti, secondi). Il simbolo SET indica che è possibile
programmare il tempo reale premendo il pulsante SET stesso.
Inizio:
Breve pressione di SET (le cifre delle ore iniziano a pulsare)
Per fissarla al valore desiderato si prema START/STOP.
Un'altra breve pressione di SET provoca il pulsare della cifra delle
unità corrispondente alle ore. Per fissare al valore desiderato si
prema START/STOP.
Un'altra breve pressione del pulsante SET provoca il pulsare della cifra
delle decine corrispondente ai secondi e così via.
Una breve pressione del pulsante MODE consente l'uscita della
funzione SET.
e) Data
Dopo l'azzeramento (reset) si prema il pulsante MODE. Il simbolo
>>DATE<< indica che sul display è leggibile la data. Esempio: 25.11.92
(giorno, mese, anno).
Il simbolo SET sta a significare che premendo il pulsante SET stesso
si può programmare la data.
Inizio:
Breve pressione del pulsante SET, la cifra delle decine riferita all'anno
inizia a pulsare. Per fissarla al valore desiderato si prema START/
STOP.
Un'altra breve pressione del pulsante SET provoca il pulsare della cifra
delle unità corrispondente all'anno; per fissarla al valore desiderato si
prema START/STOP.
Breve pressione del pulsante SET, la cifra delle decine riferita al mese,
pulsa, e così via.
Una breve pressione del pulsante MODE consente l'uscita dalla
funzione SET.
Fare attenzione:
Ogni variazione dell'ora d'orologio e della data deve
essere conclusa con un azzeramento (reset).
30
Modul 3 - Versione amplificata
Vengono estese la capacità della versione base con le seguenti funzioni
aggiuntive
- CD per il conteggio a ritroso (Count-down)
- Tempo SPLIT
Inizio: Una breve pressione del pulsante MODE provoca un ulteriore
comando atta funzione seguente secondo il principio di rotazione.
La successione è la seguente:
SPLIT, LAP, ADD (vedere Misura dei Tempi, a pag. 41); CD (Count-
down, vedere più oltre); TIME (vedere Tempo reale); DATE (vedere
Data).
(CD) Count Down
Il simbolo >>CD<< è l’indicatore per il Count-down. Il simbolo SET sta
a significare che premendo Il pulsante SET è possibile programmare
il TEMPO.
Inizio:
Breve pressione del pulsante SET, la cifra dell'unità riferita ai secondi
inizia a pulsare, per fissarla al valore desiderato si prema il pulsante
START/STOP.
Un’ulteriore pressione del pulsante SET fa pulsare la cifra delle decine
riferita ai secondi per fissarla al valore desiderato si prema il
pulsante START/STOP.
Un'ulteriore pressione del pulsante SET fa pulsare la cifra delle unità
riferita ai minuti e così via.
Una breve pressione del pulsante MODE consente l'uscita dalla funzione
SET. Il pulsante START/STOP consente di fare partire o di fermare il
conteggio Count-down.
I simboli xy xy mostrano la situazione.
Un conteggio a ritroso che oltrepassa lo zero (...3, 2, 1, --> n, n-1, n-2...)
mette in funzione un allarme acustico della durata di 6 secondi.
Se non lo si ferma, premendo START/STOP l'apparecchio ricomincia il
Count-down con il medesimo valore impostato. Il contatore in basso
a sinistra indica il numero di volte (sino ad un massimo di 99) che il
conteggio Countdown è stato effettuato.

31
Assieme al conteggio CD (Count-down) è possibile operare un cambia-
mento di funzioni solamente tra: CD, TIME e DATE.
Trasferimento del tempo reale (orologio) nel sistema Split
Alcune rilevazioni sportive richiedono un sincronismo con il tempo reale
(tempo dell'orologio).
Ogni tempo rilevato è riconducibile al tempo reale solo se la funzione
SPLIT e fatta coincidere con il tempo reale stesso.
Una breve e contemporanea pressione del pulsante START/STOP e SET
trasferisce il tempo reale (precedentemente inserito nello strumento)
nel contatore SPLIT.
Il secondi verranno arrotondati ai successivi minuti interi.
Il contasecondi può essere fatto partire manualmente oppure tramite un
impulso proveniente dall’esterno, poiché i minuti interi coincidono.
Il tempo SPLIT viene amministrato da un contatore interno di 24 ore.
In questo modo la posizione delle ore è sempre analoga a quella di un
contatore di 24 ore.
Esempio:
Tempo
normale
Contatore nel
contasecondi Del rilevamento
08:32.56,99 8:32.56,99 08:32.56,99
10:05.59,77 0:05.59,77 10:05.59,77
23:33.44,57 3:33.44,57 23:33.44,57
Appena effettuato un trasferimento dell'ora reale nel contatore SPLIT, la
funzione del contasecondi rimane limitata nella posizione SPLIT.
Possibilità di collegamento alla presa EXTERN:
- Mini-stampante per la serie Modul e Accord
- Interfaccia con collegamento ad un PC con le seguenti possibilità:
unione di 1 -2 contasecondi (Partenza - Traguardo)
1-2 cellule fotoelettriche, pistola di partenza od altri generatori di
impulsi.
Nel collegamento standard con la stampante è prevista
l’unione con il PC. 32
HANHART ha messo a punto un software in grado di soddisfare la rileva-
zione dei tempi in numerose applicazioni sportive.
Esempi di combinazioni per hardware:
Una cellula fotoelettrica (ecc.) ed uno contasecondi, per partenza ed
arrivo.
Una cellula fotoelettrica (ecc.) e due contasecondi, rispettivamente
per partenza ed arrivo.
Due cellule fotoelettriche e due contasecondi, rispettivamente per
partenza ed arrivo.
Il software governa automaticamente l'interfaccia, relativamente agli
strumenti collegati.
Ecco alcuni esempi di possibilità di utilizzo del software:
- Impiego del sistema SAA (mouse o tastiera)
- Ingressi da cellule fotoelettriche collegate con un PC
- Partenze individuali, a coppie od in gruppo
- Classifica individuale od a coppie
- Utilizzazione per misurazioni individuali o di gruppo
- Classif. secondo l’ordine di partenza o secondo i tempi rilevati
- Tempi intermedi
- Rilevazione immediata del tempo impiegato
- ecc.
Per legge, i consumatori sono obbligati a depositare
le batterie esaurite presso i punti di raccolta, i punti di
vendita o immagazzini di spedizioni. Il simbolo del cont-
enitore dei rifiuti sbarrato indica che e vietato smaltire le
batterie con i rifiuti i domestici. Pb, Cd e Hg indicano le
sostanze presenti con valori superiori alla norma.

Hanhart 1882 GmbH
Uhrenmanufaktur
Hauptstraße 33
78148 Gütenbach
Germany
www.hanhart.com
This manual suits for next models
1
Table of contents
Languages:
Other Hanhart Watch manuals

Hanhart
Hanhart ClassicTimer Tachymaster 50 User manual

Hanhart
Hanhart Pioneer Series User manual

Hanhart
Hanhart PROFIL 25 User manual

Hanhart
Hanhart Pioneer Series User manual

Hanhart
Hanhart Compact 2 User manual

Hanhart
Hanhart PRIMUS User manual

Hanhart
Hanhart Delta E 100 User manual

Hanhart
Hanhart Delta E 100 User manual

Hanhart
Hanhart LABOR 2 User manual

Hanhart
Hanhart 14035 User manual


