manuals.online logo
Brands
  1. Home
  2. •
  3. Brands
  4. •
  5. Hannlomax
  6. •
  7. Clock Radio
  8. •
  9. Hannlomax HX-113CR User manual

Hannlomax HX-113CR User manual

PLL ALARM CLOCK RADIO With USB PORT AND SD CARD SLOT
For MP3 FILES PLAYBACK
Model : H -113CR
INSTRUCTION MANUAL
FCC NOTICE
This equipment has been tested and found to comply with the limits for a Class B digital device, pursuant to Part 15 of the FCC ules.
These limits are designed to provide reasonable protection against harmful interference in a residential installation. This equipment
generates, uses and can radiate radio frequency energy and, if not installed and used in accordance with the instructions, may cause
harmful interference to radio communications.
However, there is no guarantee that interference will not occur in a particular installation. If this equipment does cause harmful
interference to radio or television reception, which can be determined by turning the equipment off and on, the user is encouraged to try to
correct the interference by one or more of the following measures:
– eorient or relocate the receiving antenna.
– Increase the separation between the equipment and receiver.
– Connect the equipment into an outlet on a circuit different from that to which the receiver is needed.
– Consult the dealer or an experienced radio/TV technician for help.
This device complies with part 15 of the FCC ules. Operation is subject to the following two conditions :
This device may not cause harmful interference, and (2) this device must accept any interference received, including interference that
may cause undesired operation.
Basic Control
Remote Control
1 button
2 SET button
3 MEM/REP button
4 PWR/FUN button
5 C/F / SNZ button
6 EQ/ALM button
7 VOL+ button
8 VOL− button
9  button
10
 button
Specifications
FM frequency range 88 – 108 MHz
Supported storage USB/SD/MMC
Lithium-ion battery 3.7V / 1100 mA
Adaptor input power DC 5V / 1800mA
Nominal voltage (clock) 3V (1.5V x 2 batteries AG13)
Specifications and functions are subject to change without notice. It is connected with continual improvement of the device.
POWER SUPPLY
Battery Power
• The built-in battery used for the unit power supply is rechargeable. The battery must be fully charged before the first
use. The first charging time should be about 14-16 hours.
• Connect the adapter to a power supply socket, and insert the charging plug into the Power input of the unit.
• The unit will start charging after well connected. When fully charged, the course of charging stops automatically.
Now the adaptor can be unplugged from the unit.
• To ensure safety, neither change the parts and fitments of the battery by yourself nor unwrap the battery. We
suggest you use only the battery and the adapter supplied with the unit, so as not to do the damage to the unit.
Additional power
• Included are 2 AG13 batteries (1.5 V) which are to be inserted in the terminal inside the battery compartment. This
is additional power is intended for operation of clock, alarm, calendar, thermometer and countdown timer. Without
the additional power the time and alarm settings will not be stored if the unit is switched off.
• To install the batteries, unscrew the screw on the battery compartment on the back panel. Make sure to observe
the polarity of the batteries
GENERAL OPERATION
Power on/off
When the unit is connected to the current supply mains, slide the POWE switch to ON
position to switch the power on. To switch the power off, slide the POWE switch to
OFF position.
Clock and calendar
• In clock mode (no ALA M indication) press the SET button to enable
time setting mode. Press repeatedly the SET button to go to setting of
parameters in the following sequence:
12/24 hour  hour  minute  year  month  date.
• Press the TUNE/ button to adjust the parameter up. Press the
/TUNE button to adjust the parameter down.
• Day of week will be set automatically.
• In time setting mode, if no button is pressed within 10 seconds after a
parameter is selected, the unit will automatically go to clock mode.
Thermometer
The unit is equipped with a built-in thermometer. The current temperature is
updated every 30 seconds and is shown on the display. In clock mode
press SNOOZE button to select Celsius or Fahrenheit thermometer mode.
Backlight
Hold the SET button for 2 seconds to switch on the backlight, repeatedly
press for 2 seconds to switch it off.
1 TUNE/button 10 SNOOZE/SLEEP
button
2 SD/MMC memory
card slot
11 MEM/REP button
3 /MEM-UP
button
12 ALARM/EQ
button
4 /TUNE button 13 SET/LIGHT button
5 USB port 14 Telescopic
FM-antenna
6 FUNCTION/
POWER button
15 Battery
compartment
7 VOL− button 16 POWER ON/OFF
switch
8 VOL+ button 17 Power (DC5V)
input
9 STOP/MEM-DN
button
18 AU INPUT
Page 1
Page 2
Radio operation
• adio reception is only available when the unit is powered by the
rechargeable battery.
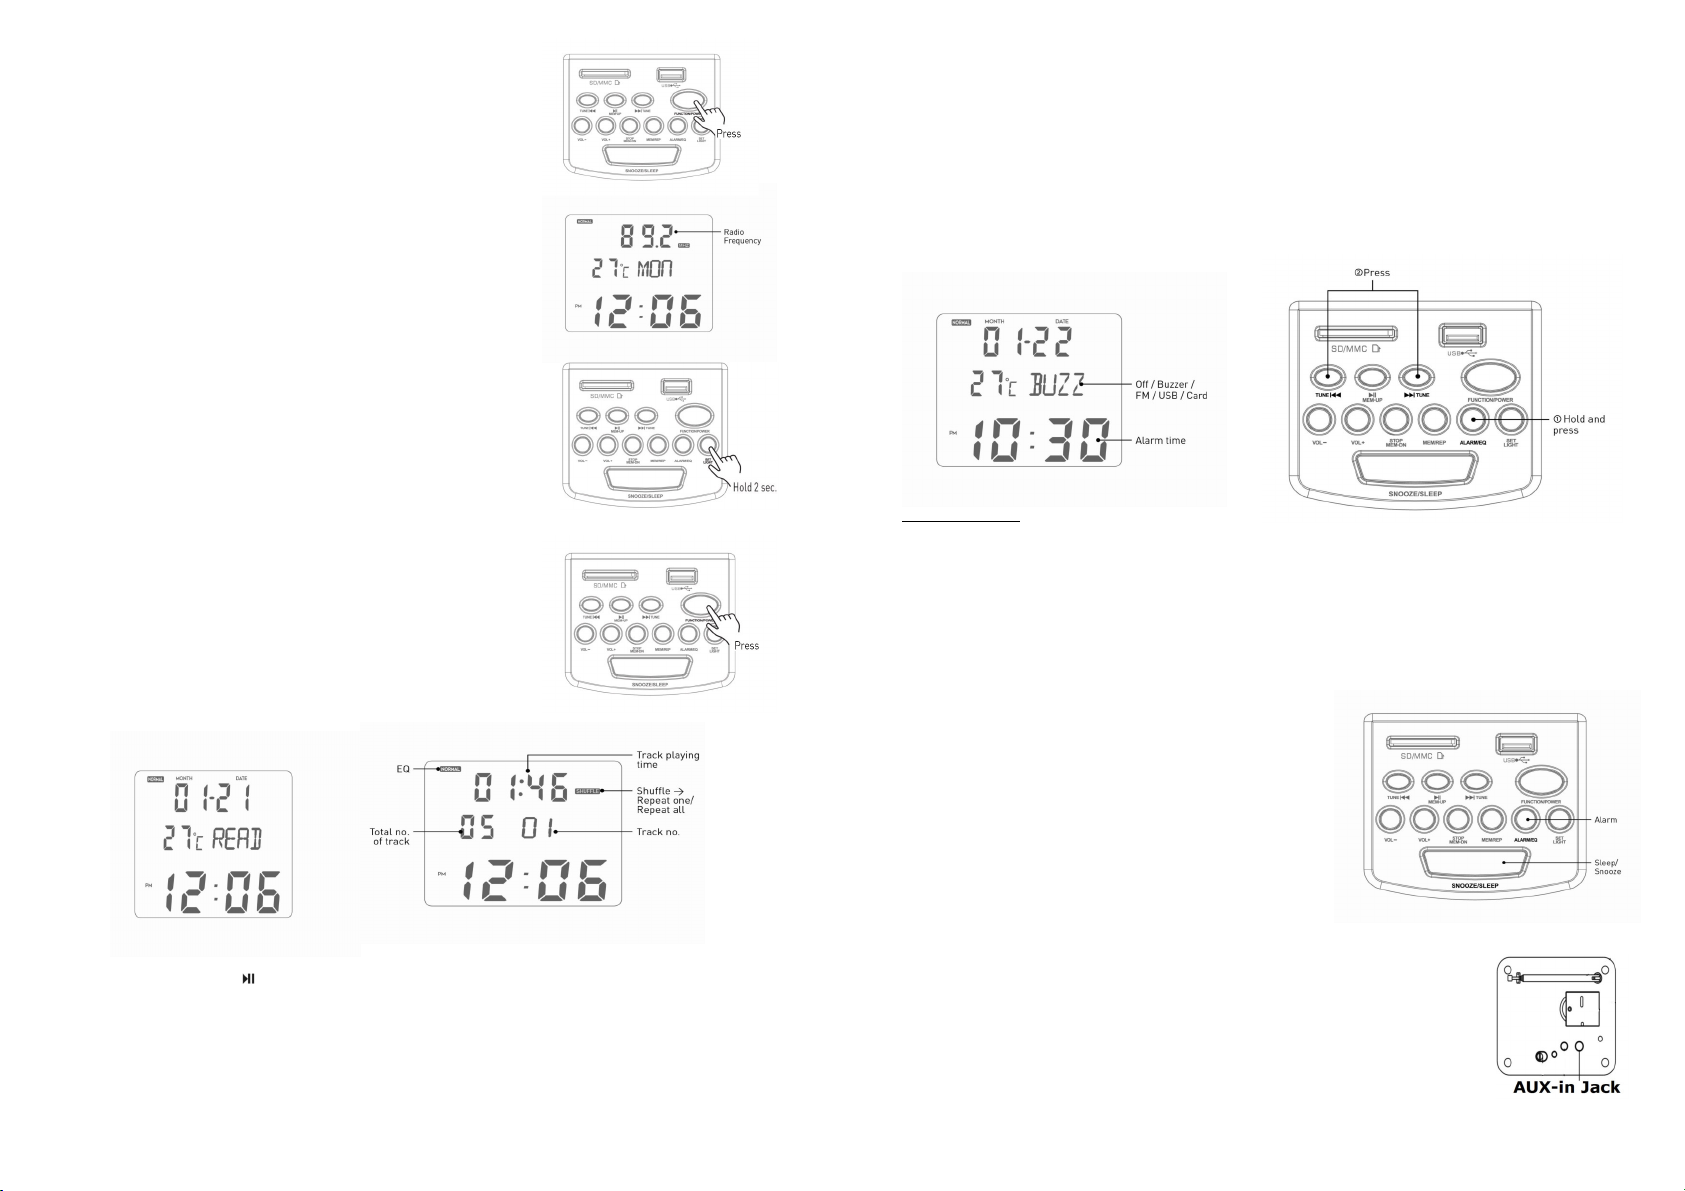
• In clock mode press the FUNCTION button to choose the radio mode.
• For FM reception, extend the telescopic antenna.
• To adjust the frequency step by step press repeatedly the TUNE/ or
/TUNE buttons. For automatic search of a station, press and hold the
TUNE/ or /TUNE buttons; the unit will look for the next available
station and start its broadcast. epeat the operation to search more
stations.
• To save a station, press the MEM/REP button. The memory position will
link. Press the MEM-UP/MEM-DN buttons to select a memory position, then
the MEM/REP button to save the current station under the selected number.
You can store maximum 20 stations in the memory.
• Hold the MEM/REP button for 2 seconds, it will scan and save all the
available stations automatically.
• During program saving, if no button is pressed within several seconds, the
unit will return to normal radio mode.
• To call a saved station, press the MEM-UP/ MEM-DN buttons.
• To adjust volume, in radio mode press repeatedly the VOL+/VOL− buttons.
• To switch off the radio, press the POWER button for 2 seconds.
USB/SD/MMC operation
Connecting USB/SD/MMC
• Insert a USB device into the USB port or insert a memory card into the
memory card slot. Press the FUNCTION button to enable USB or
SD/MMC mode. The unit will start reading the device, READ will be
displayed. If no device is detected, NO will be displayed.
• If the MP3 files are detected in the storage device, it will start playing the
first track on the device. During playback, the display shows the total
number of tracks, currently playing track number, playback time and
equalizer mode. If no tracks are found in the storage device, NULL will be
displayed.
Playback operations
• During playback press the button to pause playback. Press this button again to resume playback.
• During playback press the TUNE/ or /TUNE buttons to go to previous or next track.
• During playback press the STOP button to go to clock mode.
• To adjust volume, press repeatedly the VOL+/ VOL− buttons.
• During playback press the ALARM/EQ button to select equalizer mode: Normal - Classic - Bass - Live - Rock.
The mode will be displayed blinking.
• During playback, press the MEM/REP button to select playback mode: Shuffle - Repeat One - Repeat All.
• Press SET button to confirm.
• In play mode selection, if no button is pressed within several seconds, the unit will return to normal playback mode.
General USB/SD/MMC notes
• This unit is equipped with a USB socket that can accept and play MP3 files stored on standard USB flash
(compatible with USB version 2.0) up to 32 GB.
• This unit is also equipped with an SD/MMC card socket that can accept and play MP3 files stored on standard
SD/MMC cards up to 32 GB.
• Always switch off the unit or change mode to another one before removing a USB flash drive or SD/MMC card, to
prevent damage to your USB device or memory card.
Note: Although this product is fully compatible with USB 2.0 and SD/MMC card standard formats, a small percentage
of USB flash drives and SD/MMC cards might not be readable, due to those device manufacturers’ non-compliance
with the full (official) USB and SD/MMC card standards.
• FAT32 file system is supported by USB and SD/MMC of this unit.
ALARM operation
Setting the Alarm
• Press and hold ALARM button, then press repeatedly ALARM button to go to setting of parameters in following
sequence: alarm hour => alarm minute => alarm sound (OFF/BUZ/FM/USB/CA D). The selected parameter will
blink meaning readiness for adjustment.
• Press the TUNE/ button to adjust the parameter up. Press the /TUNE to adjust the parameter down.
• In alarm time setting mode, if no button is pressed within 10 seconds after a parameter is selected, the unit will
automatically return to clock mode.
• Do not select USB or SD as alarm signal if no USB device or SD/MMC card is connected, otherwise the alarm will
not work.
Alarm switch off and Snooze
• When the alarm signal is on, press the SNOOZE button to
interrupt the alarm signal for 5 minutes. After 5 minutes the
alarm sound will go on again.
• When the alarm signal is on, press the ALARM button to switch
off the alarm sound completely.
Sleep timer
• Sleep Timer allows you to listen to the radio/music while you fall
asleep.
• Press the SLEEP/SNOOZE button to set the sleeping time,
repeatedly press to change the sleeping time interval from 10 to
90 minutes.
• Now you can enjoy listening to the radio for the pre-set period of
sleep time. After this pre-set time has elapsed, the unit will stop
the radio/music.
AU input
To connect an external audio device (eg. MP3-player), please use a standard stereo cable
with 3.5 mm to 3.5 mm plugs to connect the audio line-out of the external device to the AUX
input socket of this unit.
Page 3 Page 4

Other Hannlomax Clock Radio manuals

Hannlomax HX-129CR User manual

Hannlomax

Hannlomax HX-129CR User manual

Hannlomax HX-202Qi User manual

Hannlomax

Hannlomax HX-202Qi User manual

Hannlomax HX-122CR User manual

Hannlomax

Hannlomax HX-122CR User manual

Hannlomax HX-100 User manual

Hannlomax

Hannlomax HX-100 User manual

Hannlomax HX-200 User manual

Hannlomax

Hannlomax HX-200 User manual

Hannlomax HX-123CR User manual

Hannlomax

Hannlomax HX-123CR User manual

Hannlomax HX-200 User manual

Hannlomax

Hannlomax HX-200 User manual

Hannlomax HX-128CR User manual

Hannlomax

Hannlomax HX-128CR User manual

Hannlomax HX-135C User manual

Hannlomax

Hannlomax HX-135C User manual

Hannlomax HX-109CR User manual

Hannlomax

Hannlomax HX-109CR User manual

Hannlomax HX-108CR User manual

Hannlomax

Hannlomax HX-108CR User manual

Hannlomax HX-130CR User manual

Hannlomax

Hannlomax HX-130CR User manual

Hannlomax HX-134CR User manual

Hannlomax

Hannlomax HX-134CR User manual

Hannlomax HX-200 User manual

Hannlomax

Hannlomax HX-200 User manual

Hannlomax HX-116CR User manual

Hannlomax

Hannlomax HX-116CR User manual

Hannlomax HX-508R User manual

Hannlomax

Hannlomax HX-508R User manual

Hannlomax HX-107CR User manual

Hannlomax

Hannlomax HX-107CR User manual

Hannlomax HX-101 User manual

Hannlomax

Hannlomax HX-101 User manual

Hannlomax HX-505CR User manual

Hannlomax

Hannlomax HX-505CR User manual

Popular Clock Radio manuals by other brands

Hello Kitty KT2056 owner's manual

Hello Kitty

Hello Kitty KT2056 owner's manual

NexxTech 1219769 owner's manual

NexxTech

NexxTech 1219769 owner's manual

Vitek VT-3518 SR Manual instruction

Vitek

Vitek VT-3518 SR Manual instruction

Scott CX48 user manual

Scott

Scott CX48 user manual

Konig KN-WS200 manual

Konig

Konig KN-WS200 manual

Hyundai RAC 481 PLLBO instruction manual

Hyundai

Hyundai RAC 481 PLLBO instruction manual

Majestic DAB 842N instruction manual

Majestic

Majestic DAB 842N instruction manual

Teac CRX300iP operating instructions

Teac

Teac CRX300iP operating instructions

Ritmix RRC-1005 instruction manual

Ritmix

Ritmix RRC-1005 instruction manual

Insignia NS-CLIP02 Quick setup guide

Insignia

Insignia NS-CLIP02 Quick setup guide

Sony Walkman ICF-C390 user manual

Sony

Sony Walkman ICF-C390 user manual

Aiwa FR-CD3000 operating instructions

Aiwa

Aiwa FR-CD3000 operating instructions

Silvercrest KH 2190 operating instructions

Silvercrest

Silvercrest KH 2190 operating instructions

Bigben RR60 operating instructions

Bigben

Bigben RR60 operating instructions

Silvercrest SUR 1 A1 Operation and safety notes

Silvercrest

Silvercrest SUR 1 A1 Operation and safety notes

Bigben RR30 operating instructions

Bigben

Bigben RR30 operating instructions

Eton GRUNDIG ESP2000 manual

Eton

Eton GRUNDIG ESP2000 manual

Philips AJT3300 Short user manual

Philips

Philips AJT3300 Short user manual

manuals.online logo
manuals.online logoBrands
  • About & Mission
  • Contact us
  • Privacy Policy
  • Terms and Conditions

Copyright 2025 Manuals.Online. All Rights Reserved.