ALARM CLOCK RADIO WITH NATURAL SOUND
Model : HX-130CR
INSTRUCTION MANUAL
Note: Please read and follow these instru tions before using your unit.
1. Read these instru tions. Keep these instru tions. Heed all warnings. Follow all instru tions.
2. Do not use this apparatus near water.
3. Clean only with dry loth.
4. Do not blo k any ventilation openings. Install in a ordan e with the manufa turer’s instru tions.
5. Do not install near any heat sour es su h as radiators, heat registers, stoves, or other apparatus (in luding amplifiers) that produ e heat.
6. Do not defeat the safety purpose of the polarized or grounding-type plug. A polarized plug has two blades with one wider than the other. A
grounding type plug has two blades and a third grounding prong. The wide blade or the third prong are provided for your safety. If the
provided plug does not fit into your outlet, onsult an ele tri ian for repla ement of the obsolete outlet.
7. Prote t the power ord from being walked on or pin hed parti ularly at plugs, onvenien e re epta les, and the point where they exit from
the apparatus.
8. Only use atta hments/a essories spe ified by the manufa turer.
9. Use only with the art, stand, tripod, bra ket, or table spe ified by the manufa turer, or sold with the apparatus.
When a art is used, use aution when moving the art/apparatus ombination to avoid injury from tip-over.
10. Unplug this apparatus during lightning storms or when unused for long periods of time.
11. Refer all servi ing to qualified servi e personnel. Servi ing is required when the apparatus has been damaged in
any way, su h as power-supply ord or plug is damaged, liquid has been spilled or obje ts have fallen into the
apparatus, the apparatus has been exposed to rain or moisture, does not operate normally, or has been dropped.
12. Grounding or Polarization – This produ t may be equipped with a polarized alternating- urrent line plug (a plug having one blade wider
than the other). This plug will fit into the power outlet only one way. This is a safety feature. If you are unable to insert the plug fully into the
outlet, try reversing the plug. If the plug should still fail to fit, onta t your ele tri ian to repla e your obsolete outlet. Do not defeat the
safety purpose of the polarized plug.
13. Alternate Warnings – This produ t is equipped with a three-wire ground-type plug, a plug having a third (grounding) pin. This plug will only
into a grounding-type power outlet. This is a safety feature. If you are unable to insert the plug into the outlet, onta t your ele tri ian to
repla e your obsolete outlet. Do not defeat the safety purpose of the grounding-type plug.
14. Ventilation – Slots and openings in the abinet are provided for ventilation and to ensure reliable operation of the produ t and to prote t it
from overheating, and these openings must not be blo ked or overed. The openings should never be blo ked by pla ing the produ t on
a bed, sofa, rug, or other similar surfa e. This produ t should not be pla ed in a built-in installation su h as a book ase or ra k unless
proper ventilation is provided or the manufa turer’s instru tions have been adhered to.
15. The MAINS plug or an applian e oupler is used as the dis onne t devi e, the dis onne t devi e shall remain readily operable.
16. 回: CLASS II apparatus with double insulation, and no prote tive earth provided.
17. Caution Marking and rating plate was lo ated at bottom en losure of the apparatus.
18. To redu e the risk of fire or ele tri sho k, do not expose this apparatus to rain or moisture.
19. The apparatus shall not be exposed to dripping or splashing and that no obje ts filled with liquids, su h as vases, shall be pla ed on
apparatus.
20. The mains plug is used as dis onne t devi e. The mains plug of apparatus should not be obstru ted OR should be easily a essed
during intended use. To be ompletely dis onne t the power input, the mains plug or apparatus shall be dis onne ted from the mains.
21. Battery shall not be exposed to ex essive heat su h as sunshine, fire or the like.
22. Ex essive sound pressure from earphones and headphone an ause hearing loss.
FCC NOTICE
This equipment has been tested and found to omply with the limits for a Class B digital devi e, pursuant to Part 15 of the FCC Rules. These
limits are designed to provide reasonable prote tion against harmful interferen e in a residential installation. This equipment generates, uses
and an radiate radio frequen y energy and, if not installed and used in a ordan e with the instru tions, may ause harmful interferen e to
radio ommuni ations.
However, there is no guarantee that interferen e will not o ur in a parti ular installation. If this equipment does ause harmful interferen e to
radio or television re eption, whi h an be determined by turning the equipment off and on, the user is en ouraged to try to orre t the
interferen e by one or more of the following measures:
– Reorient or relo ate the re eiving antenna.
– In rease the separation between the equipment and re eiver.
– Conne t the equipment into an outlet on a ir uit different from that to whi h the re eiver is needed.
– Consult the dealer or an experien ed radio/TV te hni ian for help.
SPECIFICATIONS
Frequen y Range: AM 522 - 1710 KHz
FM 87.5 – 108 MHz
Power Supply: AC 120V ~ 60 Hz
Ba k-Up Battery: 2 p . UM4 ‘AAA’ size (Not in luded)
Spe ifi ations are subje t to hange without prior noti e.
-1-
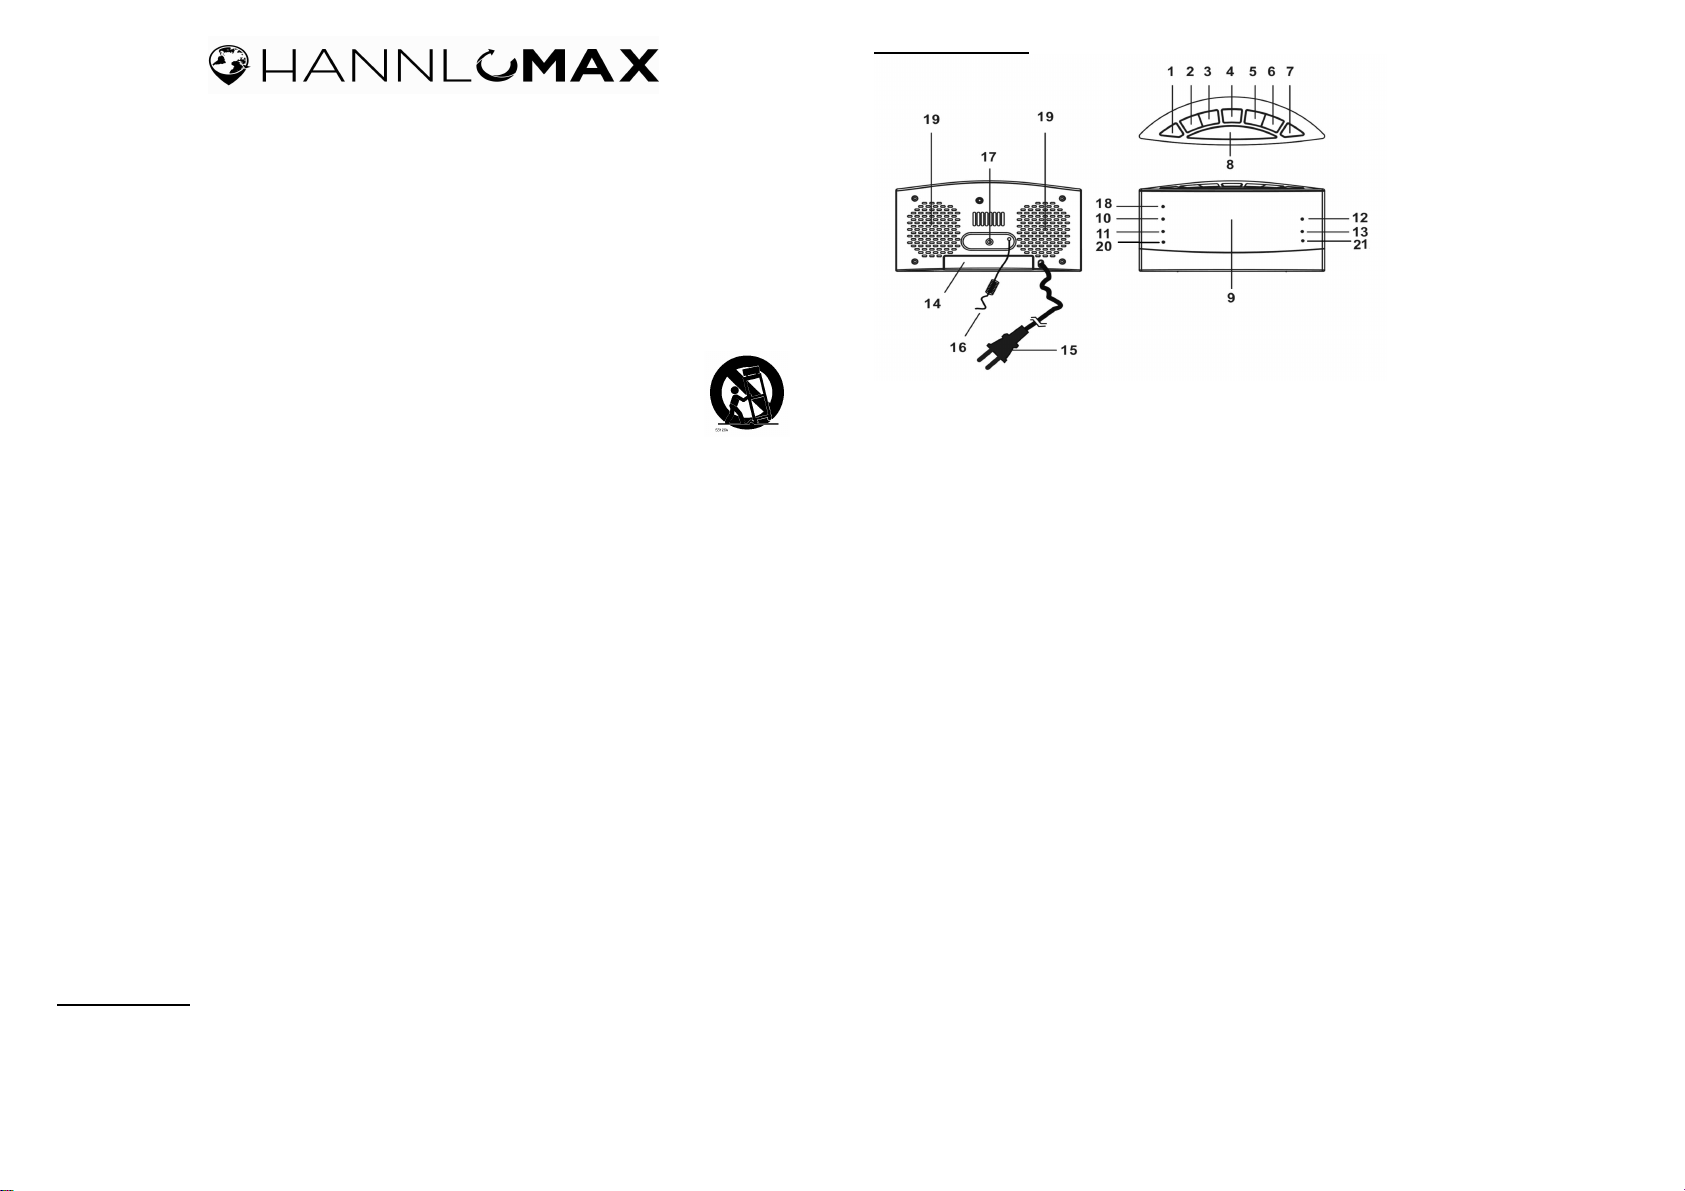
QUICK REFERENCE
1 CLK/MEM/NATURAL SOUND SELECT utton
In CLOCK mode, use this button to set the lo k
In RADIO mode, use this button to store radio stations in the memory.
In setting Alarm, press and hold this button sele t the desired natural sound.
2 /HR utton
In CLOCK mode, use this button to adjust the hour in CLOCK or ALARM time.
In RADIO mode, use this button to sear h the radio station in ba kward dire tion.
In NATURAL SOUND mode, use this button to skip to previous natural sound.
3 /MIN utton
In CLOCK mode, use this button to adjust the minute in CLOCK or ALARM time.
In RADIO mode, use this button to sear h the radio station in forward dire tion.
In NATURAL SOUND mode, use this button to skip to next natural sound.
4 DIMMER utton
Use this button to hange the brightness of the display.
5 ALM2/VOL− utton
In CLOCK mode, use this button to set the alarm time in ALARM2
In RADIO mode, use this button to de rease the volume
6 ALM1/VOL+ utton
In CLOCK mode, use this button to set the alarm time in ALARM1
In RADIO mode, use this button to in rease the volume
7 ALARM OFF/SOURCE utton
Use this button to turn the ALARM off after Alarm a tivates.
Use this button to sele t AM or FM RADIO or AUX or NATURE SOUND mode.
8 SNOOZE/SLEEP utton
Use to button to temporarily suspend the ALARM for a short period
In RADIO mode, use this set the SLEEP time.
9 LED Display
10
ALARM2 UZZER Indicator (This indi ator shows that the unit is set in ALARM 2 buzzer mode.)
11
ALARM2 RADIO Indicator (This indi ator shows that the unit is set in ALARM 2 radio mode.)
12
ALARM1 UZZER Indicator (This indi ator shows that the unit is set in ALARM 1 buzzer mode.)
13
ALARM1 RADIO Indicator (This indi ator shows that the unit is set in ALARM 1 radio mode.)
14
ATTERY Compartment (Compartment for the ba k-up battery.)
15
AC Power Cord (Conne t the unit to the wall outlet.)
-2-


