HANSCRAFT TP 800 User manual

USER MANUAL
TP 800

Contents
1 Hottubperformancespecications . . . . . . . . . . . . . . . . . . . . . . . . . 3
2 Preparation for the installation of the hot tub . . . . . . . . . . . . . . . . . . 4
2.1 Preparation of the place for installation and connection to electricity . . . . . . 4
2.2 Preparation for the interior hot tub installation . . . . . . . . . . . . . . . . . . . . 5
2.3 Preparation for the exterior hot tub installation . . . . . . . . . . . . . . . . . . . . 5
3 Installation of the hot tub . . . . . . . . . . . . . . . . . . . . . . . . . . . . . . . 5
3.1 General information. . . . . . . . . . . . . . . . . . . . . . . . . . . . . . . . . . . . . . 5
3.2 Filling the hot tub with water . . . . . . . . . . . . . . . . . . . . . . . . . . . . . . . . 6
3.3 Running the power supply of the hot tub . . . . . . . . . . . . . . . . . . . . . . . . 6
3.4 Programming of the hot tub control unit using the control panel . . . . . . . . . 6
4 Aquatic AV audio system . . . . . . . . . . . . . . . . . . . . . . . . . . . . . . . . 6
5 Control panel . . . . . . . . . . . . . . . . . . . . . . . . . . . . . . . . . . . . . . . 7
5.1 Main displayed data . . . . . . . . . . . . . . . . . . . . . . . . . . . . . . . . . . . . . . 7
5.2 Navigation . . . . . . . . . . . . . . . . . . . . . . . . . . . . . . . . . . . . . . . . . . . . 7
5.3 Hot tub settings . . . . . . . . . . . . . . . . . . . . . . . . . . . . . . . . . . . . . . . . 8
5.4 Filtration cycles. . . . . . . . . . . . . . . . . . . . . . . . . . . . . . . . . . . . . . . . . 8
5.5 Time. . . . . . . . . . . . . . . . . . . . . . . . . . . . . . . . . . . . . . . . . . . . . . . . 9
5.6 Temperature . . . . . . . . . . . . . . . . . . . . . . . . . . . . . . . . . . . . . . . . . . 9
5.7 Blower . . . . . . . . . . . . . . . . . . . . . . . . . . . . . . . . . . . . . . . . . . . . . . 10
5.8 Lighting . . . . . . . . . . . . . . . . . . . . . . . . . . . . . . . . . . . . . . . . . . . . . 10
5.9 Jets . . . . . . . . . . . . . . . . . . . . . . . . . . . . . . . . . . . . . . . . . . . . . . . . 10
5.10 Display rotation . . . . . . . . . . . . . . . . . . . . . . . . . . . . . . . . . . . . . . . . 10
5.11 Presets . . . . . . . . . . . . . . . . . . . . . . . . . . . . . . . . . . . . . . . . . . . . . . 10
5.12 Lock . . . . . . . . . . . . . . . . . . . . . . . . . . . . . . . . . . . . . . . . . . . . . . . . 10
5.13 Standby mode . . . . . . . . . . . . . . . . . . . . . . . . . . . . . . . . . . . . . . . . . 12
5.14 Tool s . . . . . . . . . . . . . . . . . . . . . . . . . . . . . . . . . . . . . . . . . . . . . . . 12
5.15 Information . . . . . . . . . . . . . . . . . . . . . . . . . . . . . . . . . . . . . . . . . . . 12
5.16 Scene settings . . . . . . . . . . . . . . . . . . . . . . . . . . . . . . . . . . . . . . . . . 13
6 Trouble shooting . . . . . . . . . . . . . . . . . . . . . . . . . . . . . . . . . . . . . 13
7 Upkeep of the hot tub . . . . . . . . . . . . . . . . . . . . . . . . . . . . . . . . . . 17
7.1 General information. . . . . . . . . . . . . . . . . . . . . . . . . . . . . . . . . . . . . . 17
7.2 Removalandcleaningoftheltercartridge. . . . . . . . . . . . . . . . . . . . . . . 17
7.3 Maintaining the quality of the water in the hot tub . . . . . . . . . . . . . . . . . . 17
7.4 Replacing the water . . . . . . . . . . . . . . . . . . . . . . . . . . . . . . . . . . . . . . 19
7.5 Cleaning the outer shell of the hot tub . . . . . . . . . . . . . . . . . . . . . . . . . . 19
7.6 Hot tub hygiene and disinfection. . . . . . . . . . . . . . . . . . . . . . . . . . . . . . 19
7.7 Thermo cover . . . . . . . . . . . . . . . . . . . . . . . . . . . . . . . . . . . . . . . . . . 19
7.8 Upkeep of the thermo cover and upkeep instructions. . . . . . . . . . . . . . . . . 20
8 Winter and summer time . . . . . . . . . . . . . . . . . . . . . . . . . . . . . . . . 20
8.1 Winter time – using the hot tub, all year operation (SLP) . . . . . . . . . . . . . . . 21
8.2 Summer time . . . . . . . . . . . . . . . . . . . . . . . . . . . . . . . . . . . . . . . . . . 21
9 Final establishments . . . . . . . . . . . . . . . . . . . . . . . . . . . . . . . . . . . 21
9.1 Guarantee conditions . . . . . . . . . . . . . . . . . . . . . . . . . . . . . . . . . . . . . 21
9.2 Safe disposal of the product after the service life . . . . . . . . . . . . . . . . . . . 21
9.3 Warranty claims and repair services . . . . . . . . . . . . . . . . . . . . . . . . . . . . 21
10 Repair services chart. . . . . . . . . . . . . . . . . . . . . . . . . . . . . . . . . . . 22
11 Supplements . . . . . . . . . . . . . . . . . . . . . . . . . . . . . . . . . . . . . . . . 22
12 Notes . . . . . . . . . . . . . . . . . . . . . . . . . . . . . . . . . . . . . . . . . . . . . 23

3
Hot tub performance specifications
1 Hot tub performance specifications
Performance specifications
nominal voltage:
three-phase connect. 230/400 V 50 Hz*
maximum work current: 3× 16 A
current surge: up to 3× 25 A
voltage resistance: 1 250 V/min. without puncturing
insulation resistance: >=1MΩ
water resistance: IPX5
electrical shock protection: rstlevel
*The product does not use 400 V phase to phase voltage. It is possible to adjust it to
1× 230 V; however, this is not recommended due to limitation of the functions.
(For more information on this connection, please refer to the Supplements, p. 22)
Stress load
heating: 1× 230 V/3 kW/13.6 A
ozone: 1× 230 V/50 Hz /80 mA
blower: 1× 230 V/0.66 kW/ 2.9 A
circulation pump 1/1 + 1/1: 2.2 kW + 2.2 kW + 0.4 kW
overall wattage (depends on the hot tub type):
8.5 kW / h
protection class: I.
lighting: LED 12 V/10 W
maximum output: 20 W
humidity resistant speakers: yes
Preparation and electrical connection options – AC three-phase
current 3× 230/400 V/16 A/20 A
Ensure that the hot tub is always connected to a circuit protected by a Residual Current
protective Device with a rated tripping current of 0,03 A. It is necessary to use
For your own safety and the safety of your product, please observe the
following instructions. Read the following information carefully and follow
the user manual exactly when using the hot tub to avoid damaging the product
or the risk of injury. This appliance is intended for use by children 8 years of
age or older with reduced physical, sensory or mental capabilities, or lack of
experience and knowledge, provided they are under supervision or have been
instructed on the use of the product and understand the risks. Children must
not play with the product. Cleaning and maintenance must not be performed by
children without supervision.

4
Preparation for the installation of the hot tub
a Type C or Type D circuit breaker with a rated current of 16 A (motor circuit breaker)
downstream of the Residual Current protective Device.
Recommended Type C circuit breaker
Hot tubs with two massage motors: 3× 16 A/C or D
Hot tubs with three massage motors: 3× 20 A/C or D
!!! THE HOT TUB MUST BE INSTALLED BY AN ELECTRICIAN WITH THE
APPROPRIATE QUALIFICATION ONLY !!!
2 Preparation for the installation of the
hot tub
Check the hot tub first before the installation. Immediately contact the
seller in case any of the parts are broken or missing. Make sure that all the
components correspond to your order
. Check the hot tub before every use.
In case of any damage, do not use the hot tub.
2.1 Preparation of the place for installation and connection to
electricity
The hot tub must be installed on a at, suciently solid base plate, taking into account
the load-bearing capacity of the building. If the hot tub is installed outdoors, we
recommend constructing a concrete monolithic base slab with a minimum strength
(thickness) of 10 cm. It is important to also always select the load-bearing capacity of
the base slab with regard to the dimensions and the weight of the hot tub. Consult your
building supervisor. The weight is specied in the technical description of the given
hot tub. The tubs are prepared by us for an electrical connection of 3× 230 V/400 V~
alternating current. Therefore, use a circuit breaker 3× 16 A/C or D, alternatively
3× 20 A/C or D and a Residual Current protective Device corresponding to this connection.
Furthermore, it is necessary to have a cable with parameters corresponding to the rightful
regulations for this type of connection. The cable must also have 4 usable meters at
the location of the hot tub, so that it can be pulled through and connected to the control
unit without complications. Do not route the cable under the hot tub!
NO
YES

5
Preparation/Installation of the hot tubPreparation for the installation of the hot tub
2.2 Preparation for the interior hot tub installation
If the hot tub is installed in an interior space, it is necessary to comply with safety
instructions. The basic safety requirements are mainly non-skid oors and drainage in
the place of the installation in case of a water overow. It is also crucial to keep in mind
that the humidity around the hot tub will rise and can damage surrounding electric ap-
pliances. Therefore we recommend customizing the place of the installation according
to these conditions. The hot tub should be accessible from all sides for future repair
services. If it is not suciently accessible during the guarantee period, the owner has
a duty to ensure the access.
2.3 Preparation for the exterior hot tub installation
If the hot tub is installed in an exterior space, it is necessary to comply with safety
instructions. The basic safety requirements are mainly non-skid oors and water drain-
age in case of a rainfall or water overow from the hot tub. Therefore we recommend
customizing the place of the installation according to these conditions.
3 Installation of the hot tub
Warning: connection to electricity must be done according to norms valid in
CzechRepublicČSN332000-7-701
3.1 General information
We strongly recommend you to hire professionally trained and qualied technicians
for the process of installation. If you decide to install the hot tub by yourself, please
abide by the following instructions.
a) Carefully remove all the packaging material from the hot tub and position the hot
tub on a beforehand selected place of installation.
b) Demount the front panel on the side of the hot tub control panel. Demount the
upper cover of an electrical wiring under which you can nd a residual current
device, a ground fault circuit interruptor (if it is part of the hot tub equipment)
and a ground staple. The connection itself must be done by a person with an
expert qualication.
c) Every hot tub is tested in real life conditions during the production process,
therefore there is a possibility some technical parts of the hot tub have remained
slightly dirty. We recommend you to clean the surface of the hot tub using a
suitable method; lukewarm water works best for this purpose. Clean the surface
using a soft cloth only. Don't use any rough abrasive means and cloths which could
permanently damage the surface of the hot tub. If you decide to use a generic
cleaning detergent, it cannot be aggressive towards the hot tub surface.

6
Installation of the hot tub/Audio system Aquatic
3.2 Filling the hot tub with water
Fill the hot tub with a sucient amount of water. The level of water in the hot tub
cannot ever fall under the skimmer level. If you notice a water leak, stop the water
until the defect is xed. Hot tubs do not possess the technology for water-softening
and hard water can be damaging to them. The damages caused by poor handling and
upkeep are not covered by the guarantee.
a) Fill the hot tub through a skimmer to prevent an over aeration of the circulation
pumps.
b) Do not ll the hot tub with water of temperature over 104 °F.
c) Once the water reaches the desired level, put the cartridge lter inside the
skimmer. Tilt the lter during the installation to prevent air bubbles. Only after
removing the air from the lter, install the lter into place.
3.3 Running the power supply of the hot tub
If the hot tub is connected by a moving supply cable, this cable cannot come in con-
tact with sharp objects or be exposed to external forces. Therefore we recommend
putting the supply cable inside a protective case. Turn on a residual current device
intended for a hot tub.
3.4 Programming of the hot tub control unit using the control
panel
Now you can start the programming of the hot tub. The process is described in the
chapter “Control panel”. After you are nish the programming, cover the hot tub with
a thermo cover and let the water temperature to stabilize. Check the water level
inside the hot tub regularly.
4 Aquatic AV audio system
Aquatic AV audio system AQUATIC/MY MUSIC (relevant only for hot tubs equipped
with the system)
If you want to play music from an external device, it is necessary to pair the device
with the hot tub rst (phone, tablet, computer). Turn on the bluetooth system on your
external device and search for the AQUATIC device. The connection is not restricted by
a code and only one connection can be active at a time. You can play music immediately
after the devices are successfully paired. You can control all the functions of the audio
system on your connected external device.
7
5.2 Navigation
Navigating through the whole menu is done by 5 control panel buttons. The item text
changes to white when selected. You can control or change the selected item by the
middle button. You can change the desired temperature on the main screen. Press
the left arrow button until the temperature value text turns white. Now you can
change the temperature by the up and down arrow buttons. Save the desired setting
by pushing the middle or right arrow button.
Control panelInstallation of the hot tub/Audio system Aquatic
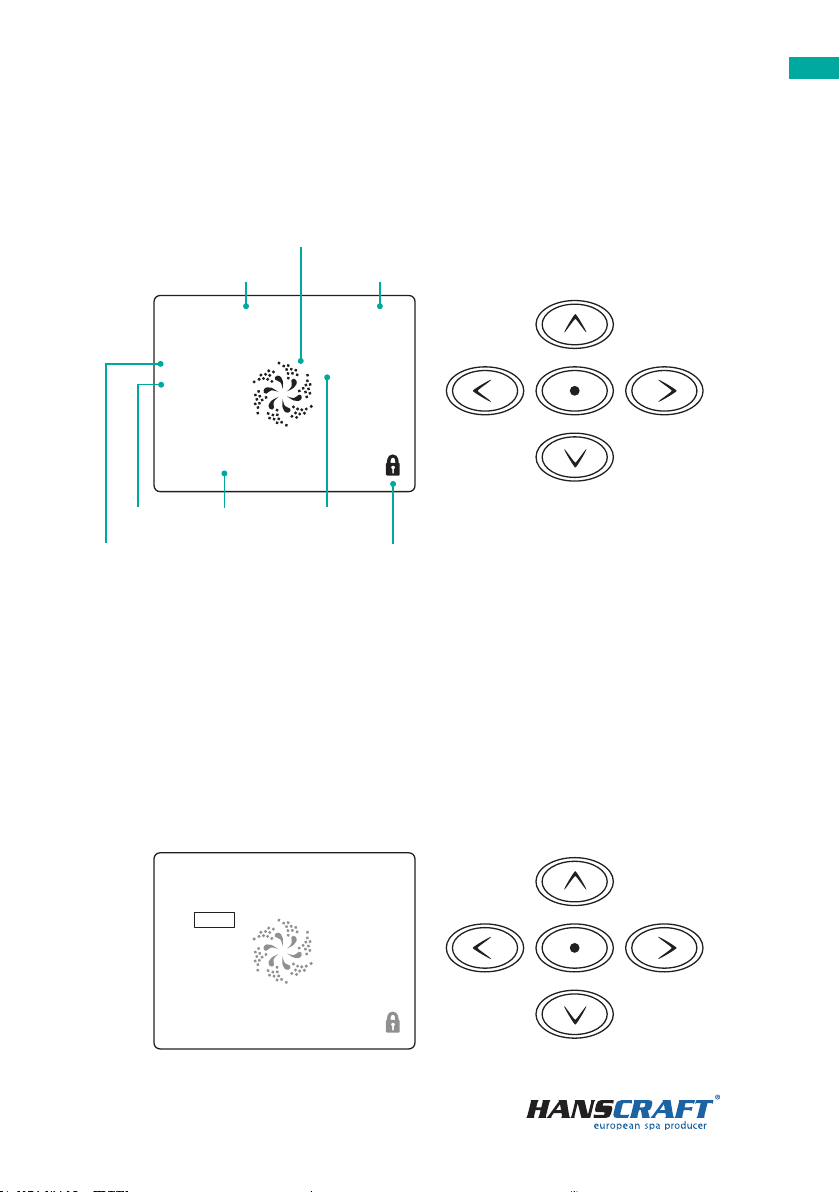
5 Control panel (BALBOA TP800)
5.1 Main displayed data
Filter 1
Ready in Rest Mode
Heating
SpaSet: 104°F
High Range
Shortcuts8:32 PM
SettingsOzone
102°F
Ready in Rest Mode
lock indicator
menumessages
status
circulation pump and heating
water temperature
desired temperature
temperature scale
Heating
Spa
Set: 104°F
Ozone
Filter 1
8:32 PM
High Range
Shortcuts
Settings
102°F
8
Control panel
Navigational buttons serve for the purpose of selecting individual functions. A selected
function is highlighted by a white outline and the text turns white. Once the function is
selected, you can control it by pressing the middle button.
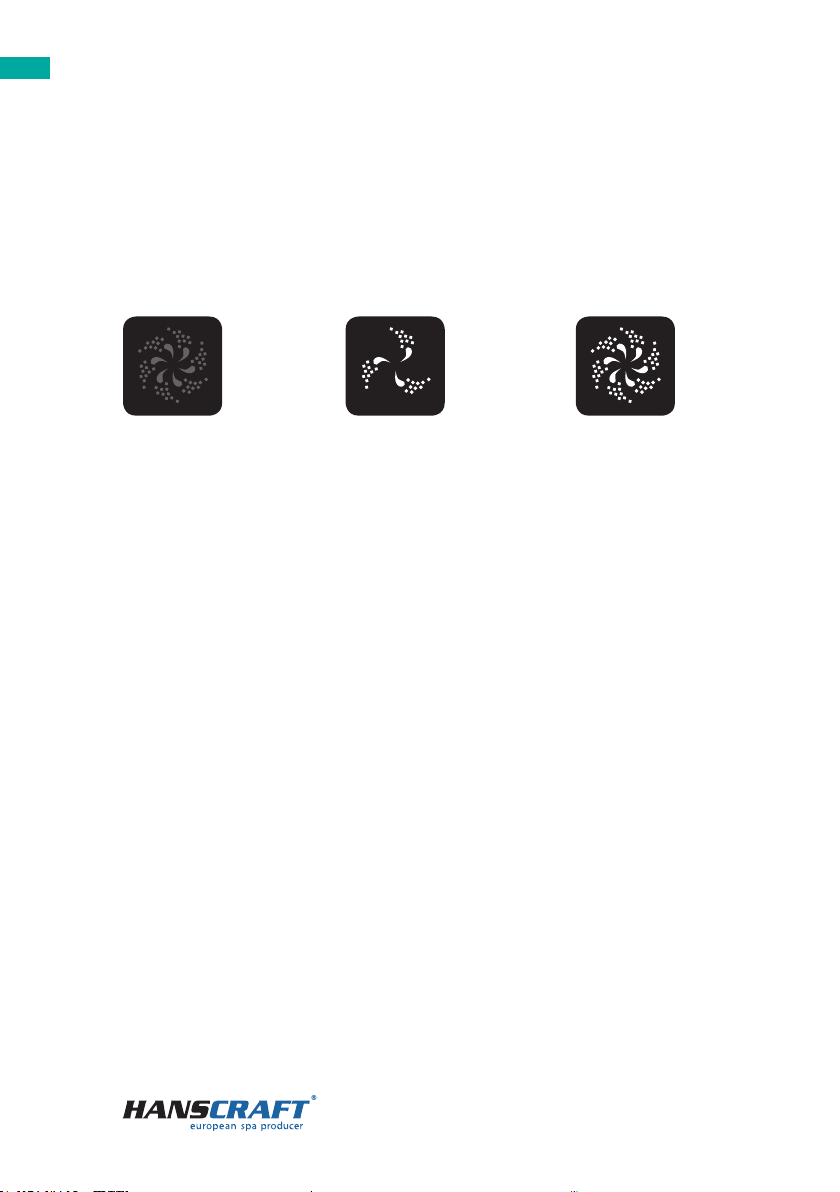
Some functions can have more than one operational mode. The icon will change accor-
ding to the set function mode. Some examples of two-speed circulation pump indicators
are shown below.
If the hot tub has a two-speed circulation pump, the icon will show up to indicate circu-
lation pump’s activity. When the heating is on, the circulation pump icon will turn red.
5.3 Settings
Select the settings option by the arrow buttons and conrm the selection by the mid-
dle button. Enter the main settings menu by pressing the right arrow button and now
you can navigate through the menu by up and down arrow buttons.
5.4 Filter
Select the desired function setting option and conrm the selection by pressing the
middle button. Enter the main settings menu by pressing the right arrow button and
now you can navigate through the menu by up and down arrow buttons.
a) Filter 1
Filter is set by a time of their beginning and duration. The display will show an auto-
matically calculated time of the end of the ltration. Set the time of the beginning
and the duration of the cycle.
b) Filter 2
Filter 2 is turned o by default. If you wish to turn it on, select the lter 2 option and
turn it on or o by the right arrow button.
Set the lters so that one runs in the morning and the second in the afternoon, at
least for 2 hours each, depending on the quality of the water and frequency of
use of the hot tub.
jets are
turned off
jets are
running on
a low speed
jets are
running on
a high speed

9
Control panel
5.5 Time
The time setting is important for the proper functionality of the hot tub. The display
will show set time if no time setting is saved in the memory. Select the time option in
the menu. Change the clock setting by the up and down arrow buttons. Set the hours,
minutes and 12/24 mode.
5.6 Temperature
Press the left arrow button until the temperature value text turns white. Now you
can change the temperature by the up and down arrow buttons. Save the desired
setting by pushing the middle or right arrow button.
a) Heating mode
ready
this mode heats up the water to the desired temperature
rest thismodeheatsupthewateronlyduringtheltrationcycle
b) Temp range
high 79.88–104 °F
low 50 –98.6 °F
Time of Day
12:00 PM 12 HR
Back
Save
Time of Day
10:05 PM 12 HR
Cancel

10
Control panel
5.7 Blower
Turn on the blower by pressing the AUX button on the left side of the control panel.
5.8 Lighting
Turn on the lights by pressing the LIGHT button on the left side of the control panel.
5.9 Jets
Massage jets control buttons JETS 1 and JETS 2 are located on the left side of the con-
trol panel. In case the ltration cycle is not running, it is required to press the JETS 1
button twice. The tide power can be controlled by rotating the jets left or right. If no
water funnels through a jet, it does not necessarily mean the jet is damaged, it can be
closed only. Not all jets can be controlled by this method.
It is also possible to control the strength of the massage (when the massage motor is
turned on) by rotating the air valve located near the upper edge of the hot tub.
5.10 Invert
In the SPA menu, select the Invert function. After conrming with the middle button,
the panel will automatically rotate.
5.11 Preferences
The preset menu enables the user to change some settings according to preferences:
temperature display toggle the temperature mode between degrees Celsius
and Fahrenheit
time display toggle the time display mode between 12 and 24h
clean-up set the cleaning time duration between 0.5– 4 hours after
you nish using the hot tub
colour choose one of the six colour settings by selecting the
colour option and pressing the middle button
language change the language setting of the control panel
set turn o the display or turn on a sleep mode
5.12 Lock
Both the screen and all settings can be locked. By locking the settings, the control
options become limited. Locking does not restrain the jets or functions set in advance.

11
Control panel
To unlock the display, press the middle button to enter the menu rst. Then press the
middle button twice and the down arrow button once to unlock the display.
To unlock a setting, select the desired item in the menu and follow by the same com-
bination of buttons as for the display unlock.
Lock
Settings OFF
Back Panel ON
Filter 1
Ready in Rest Mode
Heating
UnlockSet: 104°F
High Range
8:32 PM
Ozone
102°F
Fault Log
Entry 2
Message Code M026
High Range
1 Days Ago
Set Temp 104°F
Rest Mode
Sensors: A: 100
Back
2:21PM
B: 96
Message:
Sensors are out of sync
Preferences
Temp Display
Time Display
Reminders On
Cleanup 0.5 HR
Dolphin 5
Color
Language English
°F
12 HR
Blue
Back

12
Control panel
5.13 Hold
The hold mode is used to disconnect the circulation pumps during repair service work
such as cleaning or lter replacement. The mode lasts approximately 1 hour if it is not
cancelled manually rst. If the repair service work requires more time than that, it is
best to turn o the hot tub power supply completely.
5.14 Utilities
A/B (A/B temperatures)
turning this function on displays the temperature values
of the A and B sensors in the heating system (instead of
the water temperature value on the main screen)
error report
the error report keeps record of system failures in the
last 24 hours
5.15 Information
System information menu displays various settings and identications of a concrete
system. Because every item is highlighted in this menu, the detail of an item is showed
in the lower part of the screen.
software ID (SSID) shows the software ID system number
system model shows the number of the system model
current setup shows information required for conguration of the
button (repair services)
heating wattage shows the operational electrical wattage congured for
the heater
heater type standard heating
DIP switch settings shows the number indicating the position of S1 fuses on
the main distribution board
panel version shows the software number in the upper corner of the
control panel
System information
Software ID (SSID)
System Model
Current Setup
Conguration Signature
Heater Voltage
Heater Type
Back
Software ID (SSID)
M100_101 V0.6

13
Control panel/Trouble shooting
5.16 Scenes (only for hot tubs equipped with said settings)
Scenes are packages of function presets. They can be used to save preferred hot tub
settings of dierent users.
How to create a scene setting
a) Turn on the preferred hot tub functions you would like to save to a scene setting.
b)
Enter the scene settings in the main menu and select the chosen number for the scene.
c) Save the scene by holding the middle button.
d) Scene saved will show up on the screen.
6 Trouble shooting
Most of the messages show up in the lower left corner of the screen.
– – °F – – –°C
The water temperature is unknown
The current temperature will show up after 1 minute of the circulation
pump running.
conditions
of possible
freezing
Show up when conditions of possible water freezing are detected or the
AUX freeze switch has turned o while the circulation pumps and jets are
turned on. In some cases the circulation pumps can turn on and o and
the heater can run in the freeze protection mode. This is an informative
operational message, not a defect indicator.
M029
The water is too hot
One of the temperature sensors detected a water temperature of 109.94 °F
and the hot tub functions are disabled. The system will automatically
rest once the water temperature falls under 107.96 °F. Check whether
the circulation pump has been running for too long or the surrounding
temperature is too high.
M016
Thewaterowthroughtheheaterisreduced
This report says that not enough water ows through the heater for the
warmth from the heater to get eectively distributed. The heater will
turn on again after approximately 1 minute. See below for “Checking the
water ow”.
GENERAL REPORTS
HEATER REPORTS

14
Trouble shooting
M017
Thewaterowthroughtheheaterhasfailed
This report says that not enough water ows through the heater for the
warmth from the heater to get eectively distributed thus the heater
has turned o. After resolving the problem, press any button to reset the
heater and turn it on again.
M028
Apparently,thereisnowaterowingthroughtheheater
There is no or very little water in the heater for it to turn on. The hot tub
will turn o for 15 minutes. Press any button to reset the heater. See
below for “Checking the water ow”.
M027
Theheateriswithoutawaterow
There is not enough water in the heater for it to turn on. The hot tub is
turned o. After resolving the problem, press any button to reset the
heater and turn it on again. See below for “Checking the water ow”.
M030
The heater is too hot
One of the temperature sensors detected a temperature of 118.04 °F in
the heater and the hot tub turned o. Press any button to reset the heater
once the temperature falls under 107.96 °F. See below for “Checking the
water ow”.
Checking the water flow
Check whether the water ow is not too low, whether there is an obstacle in the
area of water suction, whether the valves are not closed, check for air pockets and
too many closed jets. Some devices can occasionally turn on by themselves to enable
temperature monitoring or requested freeze protection, even when the hot tub is
turned o.
M015
The sensor balance is off
The temperature sensor synchronization can be o by 60.98 °F up to
61.88 °F. Call the repair service.
M026
Thesensorbalanceiso
The sensors are not synchronized. The report is displayed longer than
1 hour. Call the repair service.
M031 (A)
M032 (B)
Sensor A failure, sensor B failure
Temperature sensor or electrical circuit sensor had failed. Call the repair
service
SENSOR RELATED REPORTS

15
Trouble shooting
communication
failure
The control panel does not receive reports from the system. Call the
repair service.
t
est
software
Test software is installed
Both the control system and the test system are running at the same
time. Call the repair service.
°T degrees °F or °C are replaced by °T degrees
The control system is running in a test mode. Call the repair service.
NON-CLASSIFIABLE REPORTS
M022 Memory failure – control fail summary
The programmed failure test has failed during the system start-up.
M021
The setting were reset (permanent memory error)
Contact your seller or repair services if this report is displayed more than
once during one start-up.
M020 Timer failure
Contact your seller or repair services.
hot tub will not
turn on
Congurationfailure(thehottubwillnotturnon)
Contact your seller or repair services.
M034
The circulation pump appears stuck
The water can be too hot. DISCONNECT THE HOT TUB FROM THE
POWER SUPPLY. DO NOT ENTER THE HOT TUB. Contact your seller or
repair services.
M035
Heating failure
The circulation pump appeared stuck during the last time the hot tub was
turned on. DISCONNECT THE HOT TUB FROM THE POWER SUPPLY. DO
NOT ENTER THE HOT TUB. Contact your seller or repair services.
SYSTEM RELATED REPORTS

16
Trouble shooting
general upkeep
General upkeep help
Reminder messages can be suppressed in the PREF. menu. See pg. 14.
Reminder messages can be individually selected by the producer. They
can be cancelled altogether or a restricted amount of reminders is
allowed for a specic model. The frequency of each reminder
(for example 7 days) can be specied by the producer in advance.
pH control
Shows up regularly, for example once every 7 days. Check the water
pH level with a testing kit and adjust the pH level by the suitable water
chemicals.
disinfection
control
Check the disinfection
Can show up regularly, once every 7 days. Check the disinfection and
other water chemicals level and adjust it by suitable chemicals.
cleanthelter Can show up regularly, once every 30 days. Clean the lter according to
the producer instructions. See pg. 12 for “Standby mode”.
GFCI test
(or RCD)
Shows up regularly, for example once every 30 days. GFCI – ground fault
circuit interrupter or Residual Current Device (RCD) are important safety
devices, which have to be regularly tested to check their reliability. Every
user should know how to run a safety GFCI or RCD test related to the
installation of the hot tub. GFCI or RCD have TEST and RESET buttons to
enable the user to test their proper functionality.
replace the
water
Shows up regularly, for example once every 90 days. Replace the water
regularly to keep the hot tub water chemically balanced and hygienic.
clean the cover Shows up regularly, for example once every 180 days. The vinyl covers
should be cleaned and treated to keep their maximum longevity.
treat the
wooden
surface
Shows up regularly, for example once every 180 days. The cabinet
and wooden equipment of the hot tub should be cleaned and treated
according to the producer instructions to keep their maximum longevity.
change the
lter
Shows up regularly, for example once every 365 days. The lters should
occasionally be replaced to ensure a proper functionality of the hot tub
and good hygiene.
REMINDER MESSAGES

17
Upkeep of the hot tub
7 Upkeep of the hot tub
7.1 General information
Do not expose the hot tub to sun without water inside or a cover on top. The direct
sunlight can cause fading and deformation of the surface material. When you are not
using the hot tub, cover it with the thermo cover, regardless of whether it is empty
or full. Protect the hot tub from rain and snow. Place the hot tub under a gazebo or a
roof if possible.
a) Do not open the control unit. There are no user-xable parts inside.
b) Drain, clean and ll the hot tub with clean water on regular schedule.
c) Clean the lter cartridge at least once a week.
d) The hot tub user should have a proper shower before and after the use of the
hot tub.
7.2 Removal and cleaning of the filter cartridge
The hot tub lter cartridge can get clogged by calcareous and mineral particles from
a hard water, which can lead to a restricted water ow inside the ltration system.
We recommend to clean the filter cartridge at least once a week.
Remove the cartridge and the skimmer insertion. Using a garden hose, clean the
cartridge so that no settled dirt remains in the corners of the lter. Once clean, put
the insertion back to the skimmer. Put the cartridge inside the skimmer tank next
and close it. Remember that the lter cartridge has to be replaced every 3– 6 months.
Replace it even sooner if it is damaged or clogged, it is not usable in such state.
Make-up, sunscreens and other types of body lotion decrease the quality of the wa-
ter and lower the lter cartridge longevity.
7.3 Maintaining the quality of the water in the hot tub
WARNING: Always add the chemicals to the water, never the other way around.
Add the chemicals to the water only when there are no people inside. Use the
circulation pumps to mix the chemicals with the water. Store the chemicals
according to the instruction on their label.

18
Upkeep of the hot tub
a) Use a suitable water hardness regulator regularly (the HANSCRAFT SPA Water
hardness regulator is recommended) and follow the instructions on the chemi-
cals‘ label.
b) Depending on the frequency of use of the hot tub, test the water quality regular-
ly by a suitable water quality tester.
c) Adjust the water pH level accordingly by suitable water chemicals
(the HANSCRAFT SPA – pH PLUS and pH MINUS is recommended).
d) Adjust the Cl (chlorine) level with suitable water chemicals (HANSCRAFT SPA
– MULTI MINI 3 in 1 tablets are recommended). Follow the instructions on the
chemicals‘ label.
For the chlorine to have the desired effect, the pH level needs to be
adjusted first.
e) We recommend you to clean/replace the lter cartridge before adding the
chemicals.
Chlorine shock – in case of extreme pollution, it is necessary to treat the water with
a dose of fast dissolving chlorine and thus perform a chlorine shock. The pH level of
the hot tub water has to be adjusted to 7.0 –7.6 rst and the chlorine level has to be
checked. Once a week or after adding a large amount of fresh water to the hot tub,
add a shock dose of chlorine 10 –20 g/m3(2 table spoons) into the water. Add the
chlorine only when there are no people in the hot tub. After you add the chlorine,
turn on the circulation pumps so that the chemicals mix well with the water. If you are
using a granulated form of the chemical, dissolve it in a small amount of water rst.
Let the chlorine level drop to 3 mg/l before you start using the hot tub.
Oxygen shock – in case of extreme pollution, it is necessary to treat the water with a
large dose of fast dissolving oxygen and thus perform an oxygen shock. The pH level
of the hot tub water has to be adjusted to 7.0–7.6 rst and the oxygen concentration
in the water has to be checked. Once a week or after adding a large amount of fresh
water to the hot tub, add a shock dose of oxygen (2 tablets) into the water. Add the
oxygen only when there are no people in the hot tub. After you add the oxygen, turn
on the circulation pumps so that the chemicals mix well with the water. Let the oxy-
gen level drop to 15 mg/l before you start using the hot tub.
Store the chemicals according to the instructions on the label.
Ideal chemical levels
Free chlorine concentration
(active oxygen concentration)
0.7–1.0 mg/l
(10–15 mg/l)
pH level 7.0 –7. 6

19
Upkeep of the hot tub
7.4 Replacing the water
It is important to keep the hot tub water fresh and clean. We recommend you to
replace the water at least every 3 months unless the water quality drops sooner. The
hot tub water can be used for watering the garden for example, given that it has not
been chemically treated at least one week prior.
a)
Disconnect the hot tub from the power supply (turn o the residual current device).
b) Check the power supply cable and make sure it is not wet.
c) Drain the water through a water drainage system, close it carefully and ll the
hot tub with fresh water.
d) Connect the hot tub back to the electrical circuit (turn on the residual current
device).
7.5 Cleaning the outer shell of the hot tub
Use a mild, not abrasive cleaning detergent and a soft cloth.
7.6 Hot tub hygiene and disinfection
Taking care of hygiene is extremely important for elimination of any germs, algae and
other harmful organisms polluting the water in the hot tub. Test the water using the
testing kit rst (to nd out the pH and Cl level) and follow by using suitable water
chemicals accordingly. Follow the instructions on the chemicals‘ label carefully.
7.7 Thermo cover
Using the thermo cover helps saving up energy expenditures by minimizing temper-
ature loss and evaporation. The cover is an eective way of protecting your hot tub
from impurities and fallen leaves.
WARNING: For safety and damage prevention reasons, do not sit, stand or lie
on top of the cover. Do not place any objects on top of it. The thermo cover
does not serve as a fence around the bathing area either. Do not let animals
walk on top of the thermo cover. Prevent a large snow layer build up on top of
the thermo cover.
Calcium 100–180 mg/l
Overall alkalinity 80 –120 mg/l

20
Winter and summer time/Final establishmentsUpkeep of the hot tub/Winter and summer time
7.8 Upkeep of the thermo cover and upkeep instructions
It is important to take a proper care of the thermo cover: clean it when necessary
and treat it with a product intended especially for an eco-leather or fake leather. The
guarantee does not cover damages caused by an inappropriate cleaning product.
a) The right balance of water chemicals represents an important factor in prolonging
the longevity of your hot tub thermo cover.
b) Remove the hot tub's cover and place it on the ground surface down.
c)
Wash the cover with a large amount of water from a garden hose or a water bucket.
d) Clean the thermo cover surface using a soft brush and a mild dish soap solution
(1 tea spoon of dish soap per 8 litres of water).
Attention: Do not let the dish soap solution dry on the thermo cover before
washing it off!
e) Wash o the cleaning solution thoroughly.
f) Return the cover back on the hot tub.
g) Open the thermo cover regularly so that the chemical vapours can disperse. Flip
the thermo cover inner side u at least twice a year for 3–4 hours.
h) If the thermo cover does not get regularly cleaned twice a month, the surface
material can become frail or age prematurely. The seams can separate. If you do
not clean the thermo cover appropriately, the guarantee becomes invalid.
WARNING: Do not lift the thermo cover by the handles. A vacuum forms between
the thermo cover and the hot tub therefore lifting by the handles could result in
a damage. It is necessary to support the thermo cover from below by hand.
8 Winter and summer time
Winterizing the hot tub, a process recommended by the producer.
It is required that all water gets drained from the hot tub during the process of
winterizing it, as well as water from all the technical parts of the hot tub (circulation
pumps, pipes, etc.) We recommend you to use our specialized service for this purpose
because awed winterizing of the hot tub can result in a loss of the guarantee. If
you decide to use our professional services, it is necessary to order them sucient
amount of time in advance. In case of winterizing the hot tub by yourself, it is crucial
to do it when the air temperature is still above zero. If the winterizing is done in tem-
peratures below zero, it can be very dicult because water in the motors could have
frozen already and damaged some parts of the hot tub.
Table of contents
Other HANSCRAFT Hot Tub manuals


Popular Hot Tub manuals by other brands


BullFrog
BullFrog A Series owner's manual

LMS
LMS AM-511RS owner's manual

Jacuzzi
Jacuzzi Luxura 5 Specification sheet

Lay-Z-Spa
Lay-Z-Spa Vegas 6942138928457 quick start guide

KIRAMI
KIRAMI Original Woody Instructions for use

Master Spas
Master Spas MICHAEL PHELPS CHILLY GOA COLD TUB VALARIS Owner's manual & limited warranty