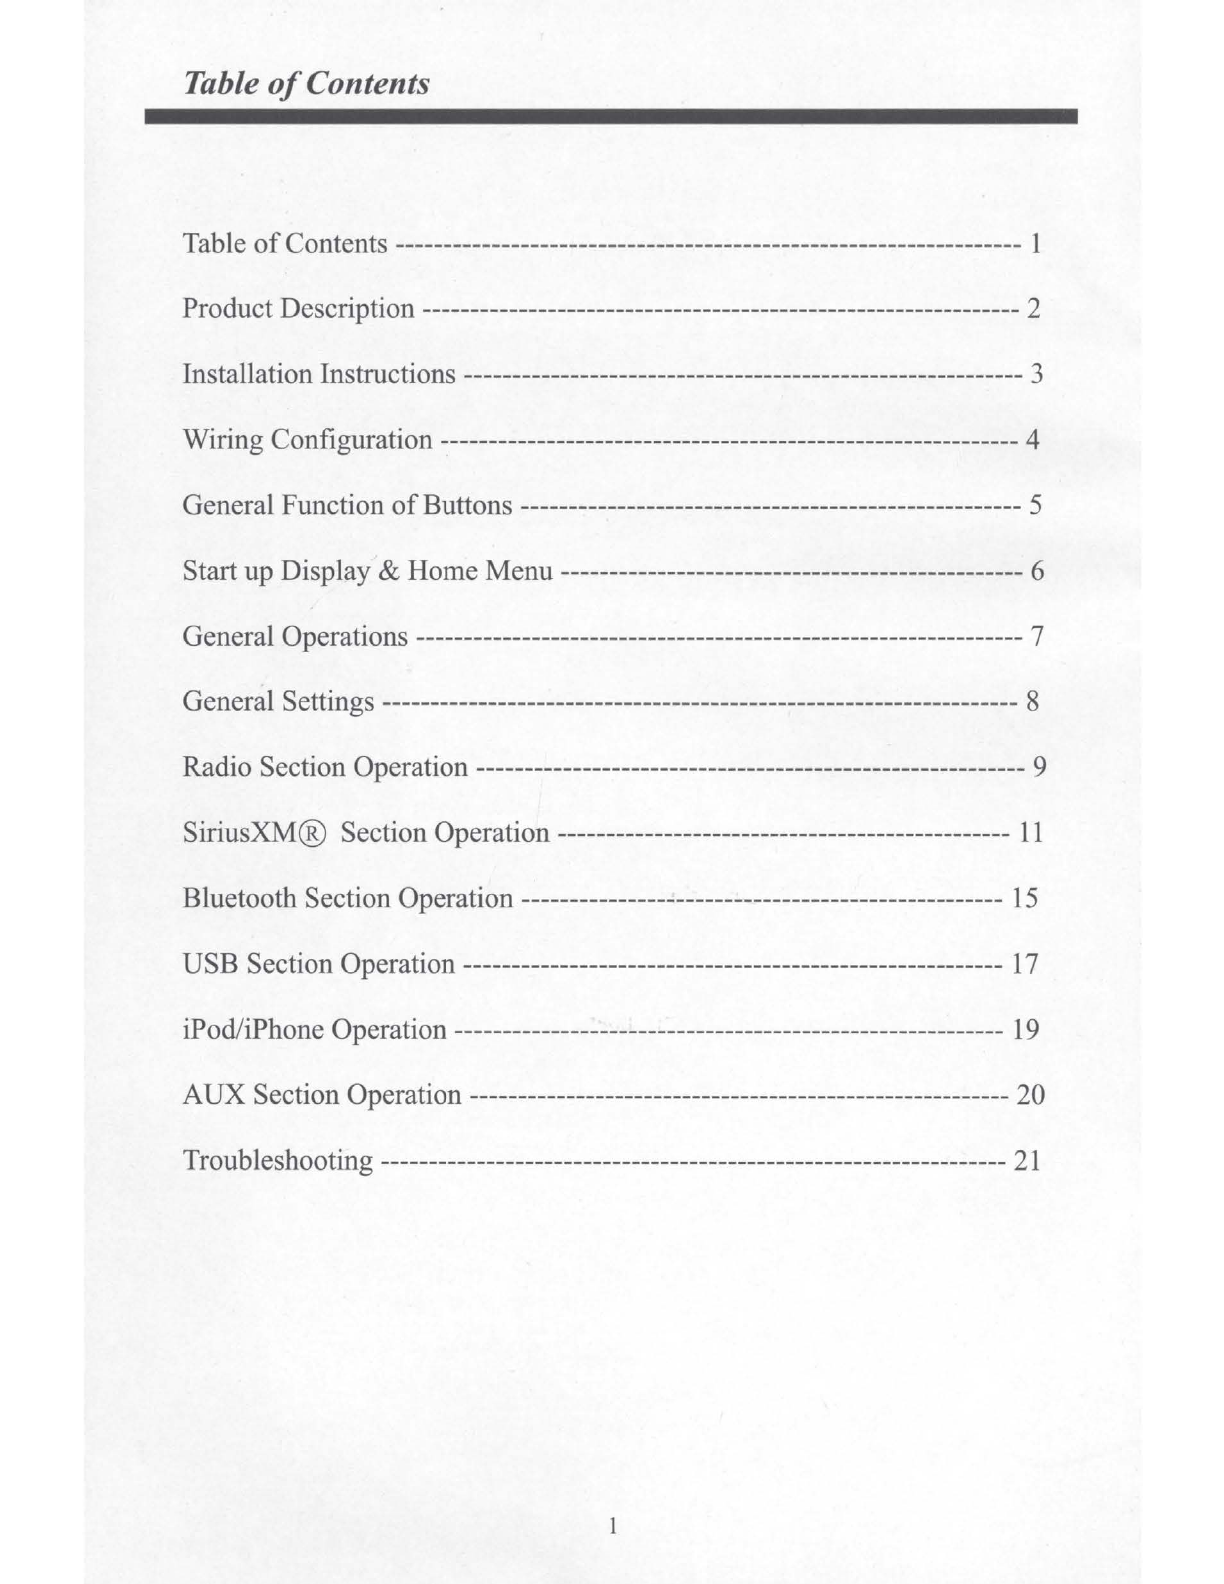
Harman Infinity REFPRV415 User manual

REFPRV415
User Manual
---
-- - .
----
-·-----
- - -
l\;
lninit.y :
Bluetooth
◄
t
45
_,Ji'
REF
pR\.f4.15
-
• • •• • •
M~
lo
P.UST
*This stereo should not be washed with a pressure
washer nor should it be washed with chemicals.
A wet sponge
or
damp cloth will suffice.*
-=-
Pi
Praspec
Electronics
-- -
~-
-Sound Systems
Fo
r
The
Out
door
Enthusiast
PROSPEC
3325 South Morgans Point
Rd
. IMt. Pleasant, SC 29466
P: 843·849·9037 Iwww.prospecelectronics.com

Table
of
Contents
Table
of
Contents ----------------------------------------------------------------- 1
ProductDescription -------------------------------------------------------------- 2
Installation Instructions ---------------------------------------------------------- 3
Wiring Configuration ------------------------------------------------------------ 4
General Function
of
Buttons ---------------------------------------------------- 5
Start
up
Display & Home Menu ------------------------------------------------ 6
General Operations --------------------------------------------------------------- 7
General Settings ------------------------------------------------------------------ 8
Radio Section Operation --------------------------------------------------------- 9
SiriusXM@ Section Operation -----------------------------------------------
11
Bluetooth Section Operation -------------------------------------------------- 15
USB
Section Operation -------------------------------------------------------- 17
iPod/iPhone Operation --------------------------------------------------------- 19
AUX
Section Operation --------------------------------------------------------
20
Troubleshooting -----------------------------------------------------------------
21

ProductDescription
This radio is another forward-thinking product from Infinity by Harman. Other Harman brands
include JBL, JBL Professional,AKG, Mark Levinson, Harman Kardon, and Revel. Harman
was purchased by Samsung in 2016. Prospec Electronics is Harman's exclusive distributor to
OEM's
in the marine, side by side,
golf
car, and hot tub industries. Our products range from
mechless receivers, amplifiers, subwoofers, speakers, to other accessories. Prospec is located
in Mount Pleasant, S.C., a stone's throw away from Charleston, S.C. Should you need our
expertise, please do not hesitate to give us a call. We're all about the music and this music
should resonate from components verified to complementyour hard-earned off-road purchase.
The REFPRV415 incorporates the following features:
O@
AM/FM/WB/ RBDS
SiriusXM-Ready™
(SiriusXM connect tuner and subscription required)
BluetoothAudio Streaming with ID tagging
USB input and control, iPod/iPhone compatible
Auxiliary input
3.5" colorTFT screen I Waterprooffaceplate
50W x 4 amplifier
Wired remote option
U.S., European and Japan tuning
Charging through USB
4 pair
of
RCA
output including subwoofer output
Can Bus Control via NMEA2000
Video input
ROB
Speaker
Control
(MIL-LEDPWR
required)
Sirius
XM
and all related marks and logos are trademarks
of
Sirius
XM
Radio
Inc. All rights reserved.
2

Installation
The unused portion
of
the mounting gasket has been included
to
for use
in
tracing the perfect 3
1/
2" mounting hole cut out.
1.Avoid installing stereo
below
cupholders!
Make
sure mounting
surface is flat to avoid
flexing
of
the plastic.
2.
Use
the
back
bracket
and
studs to affix the unit. Install
the U bracketbehind the
unit
,
using two nuts
per
bolt
for
ultra
hold.
3. To avoid possible
water
ingress into
wire
harness
area, route the harness
in
the downward direction
as
shown
above.
3
NO
.
PART
DESCRIPTION
1
RADIO
2 MOUNTING
PLATE
3 MOUNTING
STUDS
4 JAMB NUTS
5
MOUNTING
BRACKET
6
SPRING
WASHER
7
OUTER
NUTS
Instructions:
1.
Install
jamb
nuts (
4)
loosely
on
mounting
studs (3), so
they
will
not
touch mounting
brackets (5) when installed.
2. Slip mounting bracket (5)
on
and
make
flush with mounting surface (2).
DO
NOT
TIGHTEN
3. Snug spring washer (6) and outer nuts (7)
against mounting
plate
(2).
DO
NOT
TIGHTEN
4. Position
jamb
nuts (4) approximately
1/
16" from mounting bracket.
5. Tighten outernuts (7) completely.

Wire Configuration
6P
REMOTE
CONTROL
(Siriu
sXM)
c=:nnnm---_J
(NMEA2000)
(REAR CAMERA DET)
---
L..W""-
--
--'
12P
CONNECTOR
(REM)
----===----
_ B_L_U_E~
(ACC)
--IJ!!!!~-R~E=D;.._____.
(GROUND)-----B_LA_C_K_~
WHITE
(
FRONT
LEFT
)
WHITE/BLACK
GREEN
(
REAR
LEFT)
GREEN/BLACK
NOTE:
GRAY
GRAY/BLACK
VIOLET
VIOLET/BLACK
RED
(FRONT
LINE
OUT)
WHITE
RED
(REAR
LINE
OUT)
WHITE
RED
(ZONE LINE OUT)
WHITE
(LED RGB)
(REAR
CAMERA)
(USB)
(SUBWOOFER)
(FRONT
RIGHT)
(
REAR
RIGHT)
1. When wiring, the red lead is recommended
to
be wired to ACC/ignition power lead.
2. Ensure the black ground wire is connected to a good grounding point.
If
connecting the
ground to the chassis
of
a vehicle, make sure the grounding point is scraped clean
of
paint and rust before doing so. The application
of
an anti-corrosive agent in that area is
recommended.
Warning: in the case
of
an aluminum boat, it it never recommended to ground any
electronics to the chassis.
3. Before wiring your system, disconnect your boat battery's
positive(
+) cable. This helps
prevent damage in case
of
a short.
4

General Function
of
Buttons
(\::)
Infinity -0
Bluetooth
•
PRV•415
CD
························
-~
~--
...
.....
.
..
....
...
----
0·······················
----
8 [
ru;e
J -
----
--
........
t············@
((<Slr}~,m1)) J
--. -
I
GJ
~
0
f~
"J
[
v~w
j I
~
_j
l
.·
'--
i
® ® ®
1.
POWER,
SRC
button .
-With unit off, press to powerthe unit on.
-With the unit on, press and hold for over 3s to power the unit off.
-Press SRC button to switch modes amongAM/FM/WB/Bluetooth/USB/SXM/AUX.
2.
MENU
button
-In any source playing, short press to display sub-menu
of
current source.
-In any source playing, press and hold for 2s to enter Settings.
3. Tune
Up/
Down
button
-
In
Radio (FM/AM/WB) mode playing, short press to select previous
or
next station.
-
In
USB/
BT
Music source playing, short press to select the previous
or
next track.
-In USB source playing, press and hold to go fast forward or rewind.
4. Return button
-While in any menu, press to return to the previous screen.
-
If
not in a menu, press for Home menu to switch modes.
5. Pause,
Mute
button
-
In
USB,
BT
Music source playing, press to PAUSE playback, press again to
resume playback.
-In Radio, SiriusXM, AUX source, press to MUTE sound output, press again to
resume sound output.
6.
VOL,
Selection/Enter button
-
At
source playing status, turn the knob to increase or decrease volume level.
-
For
selection mode,
tum
the knob to highlight the desired feature/music track, then
press the knob to confirm that feature
or
music track.
7. P.LIST button
-In
FM
, AM, WB, SXM source, press to display Global Preset List.
-In USB source, press to display Fold/ File List.
8. View button
-In any source, press to activate Rear camera display, press again to exit.
5

Start
Up
Display & Home Menu
1. Start
up
Once the unit powers on, the introductory home screen appears for 5 seconds,
then switches to the lastplayed mode before powering
off
occurred.
n;i
E:J
Push
2. Home menu (source display)
Press -to enter
Home
Menu.
Tum
the VOL knob and toggle to the desired mode, then
confirm by pressing the
VOL
knob.
>
- -
....
-'
6

General Operations
1. VOLUME Control
1n
any source playing status, turn
VOL
knob to
adjust volume level.
2. MUTE Control
In Radio, SiriusXM,
or
AUX
mode, press
MUTE button
to
mute sound output; press
again to resume sound output.
3. SETUP
Press -to enter
Home
Menu,
tum
VOL knob and
press it to enter SETUP, then
turn
VOL
knob to move
amongstAudio,
Sy
stem, RGB Color, and Bluetooth,
About. Press the
knob
at
desired feature and turn the
knob again to adjust the level. Press the knob again to
exitcurrent feature adjustment.
Note:
If
no operation occurs, it will revert back after 5s.
You can also enter Setup by pressing and hold
MENU
button
at
any status.
3-1. Audio Settings
At
Audio Settings,
tum
VOL
knob and press
it
to select
the sub-item
of
what
you desire to adjust, then tum
VOL
knob to adjust the level, and press
VOL
knob again to
exitcurrent item adjustment. Then you can repeat above
operations to adjust other items to desired value.
-BASS: Minimum
-7
to maximum +7.
-MIDDLE: Minimum
-7
to maximum +
7.
-TREBLE:
Minimum -7 to maximum +7.
-
BALANCE:
Ll0
(full left) to RIO (full right).
-PRESET EQ:
OFF
, JAZZ,
POP
, CLASSIC,
ROCK
, VOCAL.
-LOUDNESS:
OFF
, ON
7
AUOIO
SYSTE
M
RGB
COLOR
BLUETOOTii
ABOUT
Setup
Audio Settings
tit.S'S
0
MIDDLE
TREBLE
BALANCE
PRESET
EQ
LOUDNESS

GeneralSettings
3-2. System Settings
At
System Settings, turn
VOL
knob and press it to select the
sub-item
of
what
you
desire to adjust, then
tum
VOL
knob
to adjust the level,
and
press
VOL
knob again to exit current
item adjustment. Then you can repeat above operations to
adjust other items to desired value.
-BRIGHTNESS: This feature controls the brightness
of
the display panel. It
is
adjustable from
Oto
7.
-I-VOL: This feature controls the initial vo
lu
me
level
of
next
power
on.
-BEEP:
This
feature controls the beep sound
when
button
was
pressed. With beep
2nd
selected, you will hear a beep
sound when the button
was
pressed
over
2s; With beep
on
selected, you will hear a beep sound
when
any button was
pressed; With beep
off
selected,
no
beep sound will
be
beard
when
button is pressed.
-REGION:
The
Tuner Region
is
optional for EURO, USA,
JAPAN. (Note: with
wrong
Region
se
lected, the tuner
reception might
be
affected.)
3-3. RGB ColorSettings
When
MIL-LEDPWR
is connected, long press
MENU
button to enter setting screen. Turn
VOL
knob to select
RGB
Color, thus enabling
you
to adjust the color which
you
desire.
3-4. Bluetooth Settings
At
Bluetooth Settings, turn
VOL
knob and press it to
select the sub-item that
you
desire to adjust, then
turn
VOL
knob
to adjust the level, and press
VOL
knob again to exit current item adjustment.
-Auto Connection: With
ON
selected, it will try to
connect with the last paired
BT
device once Bluetootb
source is
se
lected.
-Device Name: PRV415 will
show
once
you turn
VOL
knob to Device
Name
highlighted.
3-5. About
Setup
AUD
IO
SYSTEM
RGB
CO
L
OR
BLUETOOTH
ABOUT
System Settings
BRIGHTNESS
I-VOL
BEEP
REG
I
ON
RGB Color Settings
WHITE
YEL
L
OW
ORANGE
RED
GREEN
BLUE
RGB Color Settings
PURPLE
RANDOM
USER
RGB Color Settings
BRIGHTNESS
0 5
RED
0 25
GREEN
0 25
BLUE
0
25
Bluetooth Settings
AUTO
CONNECTION
DEVICE
NAME
Press
VOL
knob
at
About highlighted to sh
ow
the firmware information
of
the product.
-FACTORY RESET: The
unit
works like a computer
and
may
occasionally
get
"stuck".
If
encountered, initialize a Factory Reset. Press
and
hold
VOL
button for more than 5s to
display Factory Reset, then press
SEL
button
to
confirm.
7
32
32
32
(Note: once Factory Reset is carried
out
, prior presets will be cleared, and you will need to
setup the features and Global Presets once again.)
8

Radio Section Operation
1.
To
Select Radio mode
Press -to enterHome Menu.
Tum
the VOL knob and toggle to AM,
FM
or
WB mode,
then confinn by pressing the VOLknob.
You
can also press SRC to select the desired mode.
<
2. Radio Screen Description
Displays
EUR
, USA or JAPAN
to
indicate
the Region selected in the Settings.
>
Only displays when EQ / LOUD
ON
was
selected
in
the Settings.
[ Displays
FM,
AM,
WB.p
FM
,40
-O
+c1ass
ic
-
Only shows when
the station is a
Stereo Channel.
Manual
or
Auto
Tune status. "
_..e
'ff',,111-----,
87
.50
MHi
~ Frequency Mark
:;
.
-
'\'
1
Cl&
- _ ,
9
Only displays when the station
is a presetstation

Radio Section Operation
3.
Auto Tuning
By
default, pressing the Tune up
or
down buttons in AM,
FM
, WB modes results
in
the
tuner automatically stopping
at
the next station
of
sufficient signal strength.
4. Manual Tuning
For
manual tuning, press and hold either Tune up
or
Tune down for 2 seconds. This will
allow incremental tuning.
Note: Auto tuning mode will resume once the stereo is idle for 5 seconds.
5. Station Save
At
your favorite station,
pr
ess MENU button to enter
Radio Settings, press VOL knob at SAVE AS PRESET
to show the Global Preset List, then turn VOL knob
to
select a presetNo. and press
it
to save the station into
Preset List. The Preset No. will display once the station
is
saved.
Note: It will revert back to previous display after 5s
without operation.
6. Recall Preset Station
In Radio (FM, AM, WB)
or
SXM
source, press P.LIST
button to show the Global Preset List, then turn VOL
knob and press it
to
selectthe station saved on that
Preset No.
7. RDS Functions
Radio Settings
SAVF AS
PRFSFT
RDS
! -
OFF
- -
: Global
Preset
,,
01
,
AM
1120 KHz
·_
10
02
AM
530 KHz
__
11
~
~
5
MHz
1~
04
WB
162.
400
MHz
13
0ll
,~
'!_fl
, 15
O_!
1&
08
17
Oil ,
18
While in radio mode, press the menu button and select RDS using the VOL knob, then
press the knob
to
enter the RDS menu. Use the VOLto select from
ON
or
OFF, then press
the knob to confirm.
With RDS on, station information will display such as station name, song tile.
..
Note:
Not
all stations support RDS.
10

SiriusXMSection Operation
1. What is SiriusXM
Only SiriusXM® brings you more
of
whatyou love to listen to, all in one place.
Get
over
140 channels, including commercial-free music plus the best sports, news, talk, comedy and
entertainment. Welcome to the world
of
satellite radio. A SiriusXMVehicle Tuner and Sub-
scription are required.
For
more information, visit
www
.siriusxm.com
Activating your SiriusXM Subscription
1. After installing
your
SiriusXM Connect Tuner and antenna, power on your radio and select
SiriusXM mode. You should be able to hear the SiriusXM preview channel on Channel
l.
If
you
cannot hear the preview channels, please check the installation instructions
to
make
sure
your
SiriusXM Connect tuner is properly installed.
For more information
on
how to install the SiriusXM Connect Vehicle tuner, consult the
installation guide included with the tuner.
2. After you can
bear
the Preview channel, tune to Channel Oto find the Radio ID
of
y
our
tuner. In addition, the Radio
ID
is
located
on
the bottom
of
the SiriusXM Connect Vehicle
Tuner and its packaging. You will need this
number
to activate your subscription. Write the
number down for reference.
Note: the SiriusXM Radio ID does not include the letters I,
0,
S or
F.
ln the
USA
, you can activate online
or
by calling SiriusXM Listener care:
Visit www.siriusxm.com/activatenow
Call SiriusXM Listener Care at 1-866-635-2349
For Canadian Subscriptions, please contact:
Visit www.siriusxm.ca/activatexm
Call
XM
Customer Care at l-877-438-9677
As
part
of
the activation process, the SiriusXM satellites will send an activation message to
your tuner. When your radio detects that the tuner has received the activation message, your
radio will display: Subscription Updated, press Enter to continue. Once subscribed,
you
can
tune to channels in your subscription plan. Note, the activationprocess usually takes l0 to
15
minutes, but may take up
to
an hour. Your radio will need to be powered on and receiving
the SiriusXM signal to receive the activation message.
2.
To
Select SiriusXMMode
Press - to enter
Home
Menu.
Tum
the VOL
knob
and
toggle to
SXM
mode, then confirm
by pressing the
VOL
knob. You can also press
SRC to select the
SXM
mode
..
ll
< >

SiriusXMSection Operation
3. SiriusXM Screen Description
Only displays when
EQ
I
LOUD
ON
was
se
lected
in
the Settings.
!
SXM
--:,.,,
__:,
~5
f)
+ Classic -
CH.
028
- ·~
name
'
Display
se
quence
Channel
N
umb
er
Cha
nn
el
Name
Category
Name
Co
ntent
fnfo
.
4.
To
Display Radio
ID
~
-
Si
riusXffl
~
--..;:;.,
Artis
-
tis
----1
Song
Title
:\
L,;rn
Tune to Channel O
or
directTune to Channel Oto display the Radio ID.
5.MUTE
In
SiriusXM mode, press the MUTE button to mute sound output, and press it again
to resume sound output.
6.
To
Select the Previous /
Next
Channel
In SiriusXM mode, press TUNE
Up
or
Down button to select the previous or next
channel. Press and hold TUNE
Up
or Down button
to
rapid tune/browse channels, and
release the button when the desired channel
is
displayed.
7. Storing a Channel as a Preset
In SiriusXM playing mode, tune to or direct tune to a channel which you want to store
as a preset, then press P.LIST button. Itwill display the Global PresetList screen, turn
knob to select a preset number and press rotary button to save current channel into
Preset List.
The
unit willrevert back to the previous display
if
no operation is performed
in
5s.
12

SiriusXMSection Operation
8. Category List
In
SiriusXM mode, press menu button to enter Setting
menu. Tum the
VOL
knob
to
select CATEGORYLIST
and press VOLknob to view the category
List.
Tum the
VOL
knob to the desire catego,y and confirm
by pressing the
VOL
knob.
9. Direct Channel Input
In
SiriusXM mode, press menu button to enter Setting
menu.
Tum
the
VOL
knob to select DIRECT CHANNEL
and press
VOL
knob to confirm. Three fields will display.
To
enter a channel:
Tum
the
VOL
knob to select the
appropriate digit, then press the knob to confirm. Repeat
for each field.
Note:
If
a wrong digit is entered, turn knob to
move to previous digit input. Repeat above
operation until the correct channel is entered.
10. Preset ListChannel Tuning
In
SiriusXM playmode, press P.List
to
display
the Global Preset List.
Tum the VOLknob to select the desired preset.
then press the knob to confirm.
13
SiriusXM Settings
SAVE
AS
PRESET
CHANNEL
BROWSE
CATEGORY
DIRECT CHANNEL
PARENTAL
CONTROL
SXMRESET
~
t,
1~
~
··
'-'
03
~••
- _
12
~ . ,
13
05
,
14
,
oe
1
.!!l
07
18
Cle
,17
09
1
18

SiriusXMSection Operation
11. Parental Control
The
Parental Control feature allows you to limit access
to any Sirius channel, including those with mature
content.
If
a channel is locked, the user will be required
to enter the Parental Control code before access to that
channel is granted.
-Parental Control OnI
Off
Rotate the VOLknob to select PARENTAL CONTROLS
and press the
VOL
button to enter the setting menu.
With PARENTAL LOCK
on
, the code will be required
on
an
y channel which has been selected a locked.
If
PARENTAL LOCK is
off
, all channels can
be
accessed
without the code.
Note
: the code
is
required to change these settings.
-
To
Lock/Unlock channels
one
by
one
While in the Parental Controls menu, using the VOL
knob, select LOCK CHANNELS, then press the
VOL
knob to enter that menu. Use the VOL knob
to
select
a channel to lock, then press the VOLknob to confirm.
-
To
Unlock
all
channels
Turn VOL knob to move highlight to
ALL
UNLOCK,
then press the knob to unlock all channels.
-Change Code
While in the PARENTAL CONTROLS menu, select
CHANGE
MY
CODEusing the
VOL
knob, then press
the
VOL
knob to confirm. You will be prompted to
enter the new code twice.
To enter a code: in the first field, turn the VOLknob
to select the appropriate digit for that field, then press
the
VOL
knob to confirm. The next field will be
selected automatically. Repeat for each field.
Note: Factory default passcode was 0000.
14
PARENTAL CONTROLS
PARENTAL
CONlHOL
LOCK
CHANNELS OFF
ALL
UNLOCK
CHANGE MY CODE
PARENTAL CONTROLS
PARENTAL CONTROL
LOCK
CHANNELS
ALL
UNLOCK
CHANGE MY CODE

Bluetooth Section Operation
1.
To
SelectBluetootb mode
Press -to enter
Home
Menu
.
Tum
the
VOL
knob and toggle
to
BT
mode
, then confirm
by pressing
the
VOL
knob. You
can
also press
SRC
to sel
ect
BT
mode.
7
< WB >
\)
:,, .
.
',
:
-::
, -
~
2. Bluetooth Screen Description
:
Bluetooth
◄
>l
45
t)
~
Classic
ii•i•i••
'
-
0001
/0050
1 E
ol
g.
er
name
.
·
00
:
00
~
45
.
3. Pair
BT
Device
~
00
:
01
:
45
ID3
tag:
Artist
11'.
...
-i-----i
Song Title
Album
In Bluetooth source, pick "PRV415" option
on
your
Bluetootb enabled device.
(
if
you are prompted for a
password
, the code entered will
be
"0000".)
Note:
The
Bluetooth pairing only happens with
unit
in Bluetooth source.
15

Bluetooth Section Operation
4. Play/Pause Play
Once the
BT
device being paired is successful, music will begin to play.
Note:
For
some Bluetooth enabled phones, you may need to activate play from your
phone first. It depends
on
the
phone itself.
While BT
Music
is playing, press the PAUSE button to pause the playback, and press it
again to resume playback.
Note:
11
refers to PLAY;
►
refers to PAUSE.
5. Disconnect
In
BT
Music playing mode, in order to disconnect the
BT
device, press
MENU
to display Bluetootb Settings, turn
VOL
knob and press it
at
Disconnect.
Note:
When
your
BT
device battery is at low charge, the
Bluetootb connection may occasionally
be
lost.
To maintain
good
connectivity ensure that your
BT
device battery is adequately charged.
6. Connect
With
BT
device paired
OK
, but disconnected,
if
you want to re-establish the
BT
connection,
press
MENU
to display Bluetooth Settings, turn
VOL
knob and press it
at
Connect. Itwill
send a connect request to the last paired device.
Note: With the Bluetooth connection disconnected, once you power on the unit next time,
you should go into Bluetootb mode, then
it
will establish the Bluetooth connection
automatically. Sometimes, with Bluetooth Source
not
in use for over 1 hour, when you
switch to
BT
Source again, it might take some time (5~10s) to re-establish the
connection by itself.
16

USB Section Operation
1.
To
Se
lect USB
mode
Press -
to
enter Home Menu. Turn theVOL knob and toggle to USB mode, then confirm by
pressing the VOLknob. You can also press SRC to select USB mode.
Note: This input is designed to play USB flash drives (mp3 and
wma
file types).
Direct connection to other mectia devices is not supported except for iPod and iPhone.
< >
BT
2. USB Screen Description
Only displays when EQ /
LO
UD
ON
was selected in the Settings.
:
USB
□
,
45
f)
et&-
Classic -
[
Fo
ld
er
No.ffrack
No.
}-+
0001/00S~
JF;kjer name ·
...............
.
. /.
. ID3 tag:
'
: Song Title
-I
~
I Artist
.
I
I
: \ Alb
um
:
~
►
~
. ,..
00
:
00
~,
( Track elapse
time]
1-
__
_
___
__,
SCAN: Intro Sc
an
play (Track I Directory Scan play)
RPT: Repeat play (Track / Directory Repeat play)
RDM: Random play (Track / DirectoryRandom play)
3. Play
/Pa
use Play
While USB is playing, press the PAUSE button to pause the playback,
and
press
again to resume playback.
Note:
11
refers to PAUSE;
►
refers to
PLAY.
17

VSB
Section Operation
4. Track Up/Down
WhileUSB is playing, simply
tum
the TUNE button to select the
next
or
previous track.
To fast forward
or
rewind, press and hold TUNE button.
5. Repeat play
While USB is playing, press
MENU
button to show
USB
settings, turn
VOL
knob and preset it at Repeat, then tum
VOL
knob to select one, folder
or
all. Press the VOL knob
to confirm
your
selection.
-Select Repeat One to play current track repeatedly.
-Select Repeat Folder to repeatedly play the tracks
in
current folder.
-Select RepeatAll to repeatedly play all the tracks in drive.
6. Random play
While USB is playing, press
MENU
button to show USB
settings, turn
VOL
knob and press at Random, then turn
VOL knob to select
off
, folder
or
all. Press the
VOL
knob
to confirm your selection.
-Select Random
off
to disable Random play.
-SelectRandom Folder to play the tracks
in
current fold
er
in a random sequence.
USB Settings
Repeat
Random
Intro
Folder
USB Settings
Repeat
Random
Intro
Folder
-Sel
ect
Random All to play all the tracks
in
the
USB
device randomly.
5. Intro Play
While USB is playing, simply press
MENU
button to show
USB
settings, turn
VOL
knob andpress it at Intro, then tum
VOL
knob to select off, folder,
or
all. Press the
VOL
knob to
confirm your selection.
-Select lntro
off
to disable Random play.
-SelectIntro Folder to play the first l
Os
of
the tracks
in
current folder.
USB Settings
Repeat
Random
Intro
Fo
lder
-Sel
ect
Intro All to play the first 1
Os
of
all the tracks
in
current directory.
8. P.LIST
(Folder/
File Search)
While USB is playing, press P.LIST button to enter
track search mode,
it
will display all the tracks in
current playing folder.
-To select other tracks in current folder, tum VOL
knob and press it
at
desired track.
-To selectthe track in other folders, press
VOL
button at the desired folder.
18
File List
t.
0
:/
Favorite
~
/J
With
or
Without
You
/J
Hotel
California
/J
Nothing
Compares
to
You
/J
Where
Did
Our
Love
Go

iPodliPhone Operation
Made
fo
r
11
iPhone
I
iPod
Use
of
the Made for Apple badge means that an accessory has been designed
to
connect specifically
to
the Apple product(s) identified
in
the badge, and has been certified
by
the developer
to
meet
Apple performance standard
s.
Apple
is
not responsible for the operation
of
this device orits
compliance with safety and regulatory standards.
Please note that the
us
e
of
this accessory with
an
Apple product may affect wireless performance.
iPhone and Lightning are trademarks
of
Apple lnc., registered in the
U.S.
and other countries.
Made for iPhone
8,
iPhone 8 Plus, iPhone
7,
iPhone 7 Plus, iPhone SE, iPhone
6s
, iPhone
6s
Plus,
iPhone
6,
iPhone 6 Plus, and iPod touch
(6
th
generation). Minimum
iOS
10.3
.2 or later.
1.
Connect
Once you connect an iPod/iPhone
to
the
USB
input, the system will read the
fil
es automatically.
It can take
up
to
30 seconds
to
load all
of
the file
s,
so
please
be
patient. The more music you
have, the longer it will
talce.
:
USB
D
'45
0 +
Class
ic -
[
Folder
No.
ffrack
No.
r-+
0001/00
;~
&lger
nam;
.,¥
Album
Artist
}--+ ID3
tag:
--
-----1
Song
Title
Artist
Album
~
[ Track elapse time ]
tn
• ·
oo
:
00
:
45
~
◄
[
Play
mod
e ]
2. Pla
y/
Pau
se
Play
While iPod/iPbone
is
playing, press the
PAUSE
bu
tton
to
pause the playba
ck,
and press
it again
to
resume playback.
II
refers to
PLAY
;
►
refers
to
PAUSE.
3. Track Up/Down
While iPod/iPhone is playing, press TUNE UP/DN button
to
select the next or previous track.
4. Repeat play
While iPod/iPhone
is
playing, press MENU button to show
IPOD sett
in
gs, turn
VOL
knob and preset it at Repeat, then
tum VOL knob to select off, one, all. Press the VOL knob
to
confirm your selection.
5. Random play
While iPod/iPhone is playing, press MENU button to show
IPOD settings,
turn
VOLknob and press
at
R
an
dom, then
tum
VOL knob
to
select
off
or
on. Press the VOL knob to confirm your selection.
Note: Please make sure the iPod/iPhone cable is connected correctly.
It is recommended to use the original cable for connection.
19
Table of contents
Other Harman Marine Equipment manuals
Popular Marine Equipment manuals by other brands

NexSens
NexSens CB-450 Data Buoy quick start guide

Apollo
Apollo Discovery Open Area Voice Sounder installation guide

Garmin
Garmin Cessna Caravan G1000 Maintenance manual

Kongsberg
Kongsberg EM 2040C installation manual

ZF Marine
ZF Marine ZF 286 Series manual

Siren Marine
Siren Marine SirenSat Offshore Installation & user guide