HAUTAU LSF 24 User manual

11 / 2 0 14 2147 2 8 I
© HAUTAU GmbH
Nachdruck, auch auszugsweise, nur mit schriftlicher Genehmigung des Herausgebers.
Im Sinne des Fortschritts behalten wir uns Konstruktionsänderungen und dadurch bedingte Abweichungen von Abbildungen, Abmessungen, Leitungsangaben
usw. vor. Die Abbildungen zeigen die Artikel nicht in natürlicher Größe und stehen auch nicht im gleichen Verhältnis zueinander.
© HAUTAU GmbH
Reprint, even in excerpts, not without the publisher’s approval.
In consideration of progress, we reserve the right to apply construction modifications and to consequently change any figures, dimensions, wire specifications
etc. The figures do not show items in their actual size and are also not of the same proportion.
Betriebsanleitung
Lüftungssteuerung LSF 24
Operating instructions
Ventilation control unit LSF 24 t
D
HAUTAU LSF
AV
POWER
CH
VOL
Inhaltsverzeichnis
Sicherheits- und Montagehinweise ....................................... 2
Technische Daten................................................................. 2
Funktionsbeschreibung......................................................... 3
Anschluss............................................................................. 4
Sichtanzeige und Tasten ...................................................... 4
Einstellung und Programmierung .......................................... 4
IR-Fernbedienung SeKi Slim ................................................. 8
Einsatz einer beliebigen IR-Fernbedienung............................ 8
Contents
Safety and installation information......................................... 2
Technical data ...................................................................... 2
Functional description........................................................... 3
Installation ............................................................................ 4
Display and buttons.............................................................. 4
Adjustment and programming .............................................. 4
IR remote control SeKi Slim .................................................. 8
Use of any infrared remote control........................................ 8
IR-Fernbedienung SeKi Slim
(nicht im Lieferumfang enthalten)
IR-Remote control SeKi Slim
(not included in scope of delivery)

2
Technische Daten
Versorgungsspannung 24 V DC (21 V ... 32 V)
Lüftungsgruppen 1
Ausgang Relais-Brücke, 24 V / 1,5 A
Anschluss Zu 24 V DC (1. Priorität, z. B. Schlüsseltaster oder Wind-/Regenmelder)
Integrierter Lüftungstaster Auf/Zu/Stop (2. Priorität)
Anschluss externer potentialfreier Lüftungstaster max. 10 Stück
Sicherung T 1,6 A 250 V
Infrarotfernbedienung Auf/Zu/Stop (3. Priorität)
Reichweite max. 10 m;
zwischen Sender und Empfänger dürfen keine Hindernisse
vorhanden sein (Sichtkontakt);
jede Universal-Fernbedienung einsetzbar,
10 Tasten frei programmierbar
Antenne integriert
Ausführung UP-Dose
Schutzklasse IP 20
Abmessungen 71 x 71 x 43 mm
Technical Data
Supply voltage 24 V DC (21 V ... 32 V)
Ventilation groups 1
Output relay bridge, 24 V / 1.5 A
Connection close 24 V DC (1st priority, e. g. key pushbutton, wind-/rainsensor)
Integrated ventilation pushbutton Open/Close/Stop (2nd priority)
Connection additional potential-free ventilation pushbutton max. 10 units
Fuse T 1.6 A 250 V
Infrared remote control Open/Close/Stop (3rd priority)
field range max. 10 m;
no objects have to be between transmitter and receiver (visual contact);
every universal remote control applicable,
10 buttons freely programmable
Antenna integrated
Housing UP-Socket (concealed frame)
Protection class IP 20
Dimensions 71 x 71 x 43 mm
Sicherheits- und Montage-
hinweise
Die DIN, VDE sowie Vorschriften der Berufsgenossenschaf-
ten und die Landesbauordnung sind zwingend zu beachten
(Auswahl VDE 0100, VDE 0833, VDE 0800, BGV).
Alle Arbeiten an netzspannungsführenden Bauteilen dürfen
nur durch eine Elektrofachkraft durchgeführt werden. Bei allen
Arbeiten an der Steuerung ist die Netzspannung allpolig abzu-
schalten. Die Steuerung ist gegen unbeabsichtigtes Wieder-ein-
schalten abzusichern. Für die Netzzuleitung ist eine separate
und gekennzeichnete Vorsicherung vorzusehen.
Alle Leitungen, die 24 V DC führen, sind nicht mit Starkstrom-
leitungen zu verlegen (VDE-Vorschriften beachten).
Die Leitungslängen und Leitungsquerschnitte sind gemäß der
technischen Angaben auszuführen.
Nach der Installation der Steuerung sind alle Funktionen zu
überprüfen.
Safety and installation
information
The observance of applicable standards and government safety
organisation regulations as well as of the provisions of your
local power company is mandatory.
Any work on live components may only be performed by
a trained electrician. When working on the control system,
disconnect all poles of the mains supply by an isolating link.
This link must be marked accordingly. The control system must
be protected against accidental actuation.
No wires conducting 24 V DC must be laid together with
electric power lines (follow VDE or equivalent regulations).
All wire lengths and cross sections must correspond with the
technical specifications.
Check all functions of the control system after the completion of
the installation.

3
Funktionsbeschreibung Functional description
With the ventilation control unit LSF 24 electric window
drives of one ventilation group and venetian blind drives can
be controlled in 3 priorities.
The release can be realized with a superordinated command
CLOSE (e. g. key push-button, wind-/ rainsensor), max.
10 ventilation pushbuttons or with infrared remote control.
The command sent from a CLOSE contact is given first
priority, while the ventilation pushbutton signal receives the
second and the remote handling receives the third priority.
The pushbutton functions of the ventilation control unit are
OPEN, STOP, CLOSE. The display shows the functions
OPEN, CLOSE and DRIVE RUNS.
Ventilation time, ventilation cycle and opening width are
programmable with the keyboard and are indicated on the
triple-digit LED-display.
If an opening width is programmed and the drive will be
stopped manually before this value during opening, it first
closes completely by activating the OPEN button, and after-
wards it opens to the programmed opening width.
Operation modes
(to change the operation mode, press the buttons OPEN
and CLOSE simultaneously)
1. manually (display doesn’t light):
The LSF just will be operated by means of the buttons and
the remote controls. The user can declared an user-defined
opening width of the window.
2. time control (autom. programme 1, display shows A1):
In this operation mode the time programme, which is
programmed individually by the user, will be executed.
The following values can be set here:
- the opening width of the window
(run time of drives),
- the ventilation time
(after this time the window will be closed)
- the ventilation cycle
(after this time the opening shall be repeated)
The operation is also possible by means of buttons and
the remote control.
Attention: In case of manual actuation, the adjusted
ventilation cycle will be interrupted and shifted by the
manually actuated ventilation time.
3. Temperature control (optional)
(autom. programme 2, display shows A2):
This operation mode is only available, if a thermostat is
connected, which was recognized automatically at start
of the system:
In this operation mode the ventilation will be operated by
means of the thermostat (JUNG, TR236U). The switch
temperature will be adjusted at the thermostate directly.
The opening width of the window can be set by the user.
The thermostat will be read cyclically (time programmed
in minutes).
The operation is also possible by means of buttons and
the remote control.
The optional thermostat will be connected instead of the
external ventilation pushbutton.
Mit der Lüftungssteuerung LSF 24 können elektromotorische
Fensterantriebe einer Lüftungsgruppe und Jalousienantriebe
in 3 Prioritäten angesteuert werden.
Die Auslösung kann über einen übergeordneten Befehl ZU
(z. B. Schlüsseltaster, Wind-/ Regenmelder), max. 10 Lüftungs-
taster oder über Infrarot-Sender erfolgen.
Der Befehl von einem ZU Kontakt hat die erste Priorität, das
Lüftungstastersignal die zweite und die Fernbedienbarkeit die
dritte.
Die Tastfunktionen an der Steuerung sind AUF, STOP, ZU.
In der Sichtanzeige werden die Funktionen AUF, ZU und
ANTRIEB FÄHRT dargestellt.
Lüftungszeit, Lüftungszyklus und Öffnungsweite sind über
die Tastatur programmierbar und werden über das drei-
stellige LED-Display angezeigt.
Wenn eine Öffnungsweite programmiert ist und der Antrieb
beim Öffnen vor dieser Öffnungsweite manuell gestoppt wird,
fährt er beim Betätigen der AUF-Taste erst komplett zu und
öffnet anschließend bis zur programmierten Öffnungsweite.
Betriebsarten
(Umschalten erfolgt durch gleichzeitiges Drücken der Tasten
AUF und ZU)
1. manuell (Display dunkel):
Die LSF wird nur über die Tasten und die Fernbedienun-
gen gesteuert. Eine benutzer definierte Öffnungsweite des
Fensters kann angegeben werden.
2. Zeitsteuerung (Automatikprogramm 1, Display zeigt A1):
In dieser Betriebsart wird das individuell vom Benutzer
programmierte Zeitprogramm ausgeführt. Hier können
folgende Werte angegeben werden:
- die Öffnungsweite des Fensters
(Laufzeit der Antriebe),
- die Lüftungszeit
(Zeit, nach der das Fenster wieder geschlossen wird)
- der Lüftungszyklus
(Zeit, nach der diese Öffnung wiederholt werden soll)
Eine Bedienung über die Tasten und die Fernbedienung
ist ebenfalls möglich.
Achtung: Bei Betätigung per Hand wird der
eingestellte Lüftungszyklus unterbrochen und
um die manuell betätigte Lüftungszeit verschoben.
3. Temperatursteuerung (optional)
(Automatikprogramm 2, Display zeigt A2):
Diese Betriebsart ist nur verfügbar, wenn ein Thermostat
angeschlossen und beim Systemstart automatisch
erkannt wurde:
In dieser Betriebsart wird die Lüftung über den Thermostat
(JUNG, TR236U) ausgeführt. Die Schalttemperatur wird
direkt am Thermostat eingestellt. Die Öffnungsweite des
Fensters kann vom Benutzer vorgegeben werden. Der
Thermostat wird zyklisch abgefragt (programmierte Zeit in
Minuten).
Eine Bedienung über die Tasten und die Fernbedienung
ist ebenfalls möglich.
Der optionale Thermostat wird anstelle des externen
Lüftungstasters angeschlossen.
4
{
{
-
+
{
1
2
3
4
1
2
3
4
1
1234
24 V DC
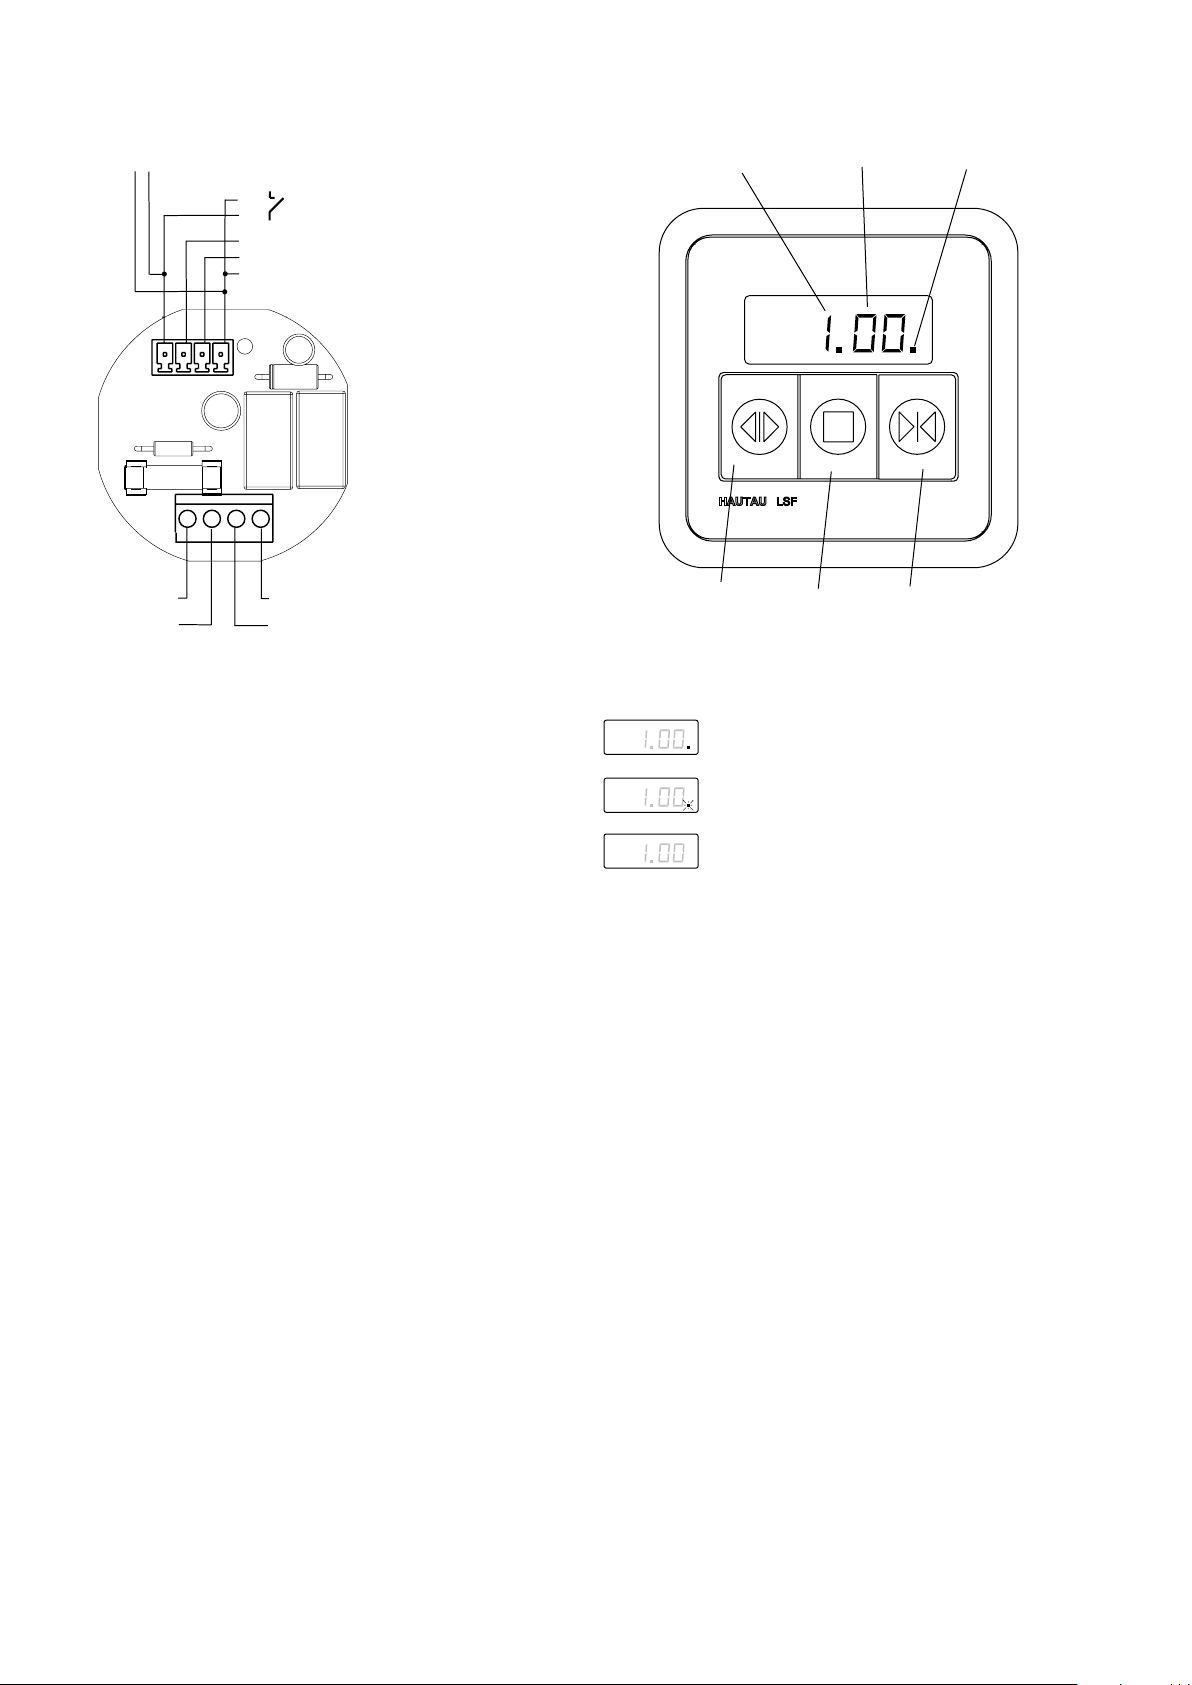
Sichtanzeige und Tasten /
Display and buttons
Anschluss / Installation
Adjustment & programming
All parameter values are factory-set to 0 by delivery.
All adjustments will be performed by means of the keyboard
and will be displayed by means of the triple-digit LED
display. The programming will be activated by pressing the
buttons OPEN, STOP and CLOSE simultaneously.
The following parameters can be adjusted:
1. ventilation time (1...60 minutes, 0=off)
2. ventilation cycle (1...24 hours, 0=off)
3. opening width (0=dead man version,
1=cutoff output after 3 min.,
2=no cutoff output)
running period drive 3...60 sec.)
4. (not occupied)
5. infrared remote control (max. 10 buttons)
6. reading cycle of the thermostat (1...60 min.)
7. setting for operation mode locking (reed contact)
When a reed contact is connected and the adjustment of
the LSF is therefor a locking is only able if the reed contact
is detected.
The parameter to be adjusted can be selected with the
buttons OPEN and CLOSE, when the parameter number
lights brightly. With the button STOP it is possible to switch
between parameter selection and adjustment of the value.
The value to be adjusted can be set with the buttons OPEN
and CLOSE, when it lights brightly.
With parameter 0 the programming will be finished.
Alle Parameterwerte sind bei der Auslieferung werkseitig auf
0 gesetzt.
Sämtliche Einstellungen werden über die Tastatur vorge-
nommen und über das dreistellige LED-Display angezeigt.
Die Programmierung wird durch gleichzeitiges Drücken der
Tasten AUF, STOP und ZU aktiviert.
Folgende Parameter können eingestellt werden:
1. Lüftungszeit (1...60 Minuten, 0=aus)
2. Lüftungszyklus (1...24 Stunden, 0=aus)
3. Öffnungsweite (0=Totmannbetrieb,
1=Abschaltung Ausgänge nach 3 Min.,
2=keine Abschaltung Ausgänge)
Laufzeit Antrieb 3...60 Sekunden)
4. (nicht belegt)
5. IR-Fernbedienung (max. 10 Tasten)
6. Lesezyklus für Thermostat (1...60 Minuten)
7. Einstellung für die Betriebsart Verriegelung (Reedkontakt)
Beim Anschluss eines Reedkontakts und der entsprechen-
den Einstellung der LSF hierfür, ist ein Verriegeln erst dann
möglich, wenn der Reedkontakt erkannt wird.
Der einzustellende Parameter kann mit den Tasten AUF und
ZU ausgewählt werden, wenn die Parameternummer hell
leuchtet. Mit der Taste STOP kann zwischen Parameter-
auswahl und Einstellung des Wertes umgeschaltet werden.
Der einzustellende Wert kann mit den Tasten AUF und ZU
eingestellt werden, wenn dieser hell leuchtet.
Über den Parameter 0 wird die Programmierung beendet.
Einstellung und
Programmierung
+/- (ZU / CLOSE)
-/+ (AUF / OPEN)
Wind-/Regenmelder
wind-/ rainsensor
Lüftungstaster
ventilation pushbutton
(optional: Thermostat)
(optional: thermostat)
ZU / CLOSE
AUF / OPEN
GND
Antrieb
drive
HAUTAU LSF
Parameter
parameter
Wert
value
Sichtanzeige
display
AUF
OPEN STOP
STOP ZU
CLOSE
Zustand der Sichtanzeige im Betrieb
Status of the display in operation
leuchtet ständig: Fenster nicht geschlossen
lights permanently: window not closed
blinkt: Motor ist aktiv
flashes: drive is active
leuchtet nicht: Fenster geschlossen
does not light: window closed
(optional: Reedkontakt)
(optional: reed contact)

5
1. Starten der Einstellung
1.Tasten AUF, STOP, ZU gleichzeitig drücken
(Display leuchtet).
2. Einstellen der Lüftungszeit
1. Parameter 1 über die Tasten AUF und ZU wählen.
2. Taste STOP drücken (Wert leuchtet hell und ist somit
einstellbar).
3. Mit den Tasten AUF und ZU die gewünschte Zeit in Min.
einstellen (Lüftungszeit kann von 1...60 min. eingestellt
werden); Der Wert 0 deaktiviert die Lüftungszeit.
4. Taste STOP drücken (Parameter leuchtet hell).
3. Einstellen des Lüftungszyklus
1. Parameter 2 über die Tasten AUF und ZU wählen.
2. Taste STOP drücken (Wert leuchtet hell).
3. Mit den Tasten AUF und ZU die gewünschte Zeit in
Stunden einstellen (Lüftungszyklus kann von 1...24
Std. eingestellt werden); Der Wert 0 deaktiviert den
Lüftungszyklus.
4. Taste STOP drücken (Parameter leuchtet hell).
4. Einstellen der Öffnungsweite
(ACHTUNG: Parameter nur bei
geschlossenem Antrieb einstellen!)
1. Parameter 3 über die Tasten AUF und ZU wählen.
2. Taste STOP drücken (Werteanzeige leuchtet hell).
3. Mit den Tasten AUF und ZU die gewünschte Öffnungs-
weite einstellen.
Die Öffnungsweite wird über die Laufzeit der Antriebe
definiert und kann von 3...60 sec. eingestellt werden;
Ist der Wert 0 eingestellt, läuft die Steuerung im
Totmannbetrieb. Dies gilt auch für die eingelerenten
Fernbedienungen;
Ist der Wert 1 eingestellt, werden nach 3 Minuten die
Ausgänge stromlos abgeschaltet;
Ist der Wert 2 eingestellt, findet keine Abschaltung statt.
4. Taste STOP drücken (Programmanzeige leuchtet hell).
1. Starting the adjustment
1.Press the buttons OPEN, STOP, CLOSE simultaneously
(display lights).
2. Adjustment of ventilation time
1. Choose parameter 1 by means of the buttons OPEN
and CLOSE.
2. Press button STOP (value lights brightly and is now
adjustable).
3. Adjust the requested time in minutes by means of the
buttons OPEN and CLOSE (adjustable ventilation time:
1...60 min.); value 0 deactivates the ventilation time.
4. Press button STOP (parameter lights brightly).
3. Adjustment of ventilation cycle
1. Choose parameter 2 by means of the buttons OPEN
and CLOSE.
2. Press button STOP (value lights brightly).
3. Adjust the requested time in hours by means of the
buttons OPEN and CLOSE (adjustable ventilation cycle:
1...24 hours); value 0 deactivates the ventilation cycle.
4. Press button STOP (parameter lights brightly).
4. Adjustment of opening width (Attention: adjust
parameter when drive is closed, only!)
1. Choose parameter 3 by means of the buttons OPEN
and CLOSE.
2. Press button STOP (value display lights brightly).
3. Adjust the requested opening width by means of the
buttons OPEN and CLOSE.
The opening width is defined by the run time of the
drives and can be adjusted between 3...60 sec.; If
the value is set to 0, the control unit runs in dead man
version. This also applies to the remote controls;
If the value is set to 1, after 3 min. the outputs get a
cutoff; If the value is set to 2, there is no cutoff.
4. Press button STOP (programme display lights brightly).
Adjustment & programming
(cont’d)
Einstellung und
Programmierung (Forts.)

6
5. Programming of the infrared remote control
(when using any IR remote control, only; the SeKi Slim
remote control is preset at the factory)
1. Choose parameter 5 by means of the buttons OPEN
and CLOSE.
2. Press button STOP (value display lights brightly).
3. Press button OPEN (value display flashes).
4. As long as the value 01 flashes, a button of the remote
control can be pressed for function OPEN.
5. As long as the value 02 flashes, a button of the remote
control can be pressed for function STOP.
6. As long as the value 03 flashes, a button of the remote
control can be pressed for function CLOSE. The value
display shows the number of programmed buttons of
the infrared remote control.
No increase of the value display after programming may
have the following reasons:
- The remote control does not transmit.
- The button is already programmed.
- All memory capacity are filled.
- Wrong code of transmitter.
6. Deletion of the infrared remote controls
1. Choose parameter 5 by means of the buttons OPEN
and CLOSE.
2. Press button STOP (value display lights brightly).
3. Keep button CLOSE pressed, until the value display
doesn’t flash anymore. All infrared remote controls are
deleted now.
7. Programming of reading cycle of the thermostat
1. Choose parameter 6 by means of the buttons OPEN
and CLOSE.
2. Press button STOP (value display lights brightly).
3. Adjust the requested time in minutes by means of the
buttons OPEN and CLOSE (adjustable reading cycle:
1...60 minutes). This reading cycle is the time between
two evaluations of the thermostat. If, between the
evaluations, the LSF will be operated by means of the
buttons or the remote control, the thermostat will be
ignored for the time of cycle. The value 0 reads the
thermostat constantly, the buttons and the remote
control are blocked.
4. Press button STOP (parameter lights brightly).
Adjustment & programming
(cont’d)
Einstellung und
Programmierung (Forts.)
5. Programmierung der IR-Fernbedienung
(nur bei Einsatz einer beliebigen IR-Fernbedienung; die
SeKi-Slim-Fernbedienung ist werkseitig voreingestellt)
1. Parameter 5 über die Tasten AUF und ZU wählen.
2. Taste STOP drücken (Werteanzeige leuchtet hell).
3. Taste AUF drücken (Werteanzeige blinkt).
4. Solange der Wert 01 blinkt, kann eine Taste der
Fernbedienung für die Funktion AUF gedrückt werden.
5. Solange der Wert 02 blinkt, kann eine Taste der
Fernbedienung für die Funktion STOP gedrückt werden.
6. Solange der Wert 03 blinkt, kann eine Taste der
Fernbedienung für die Funktion ZU gedrückt werden.
Die Werteanzeige zeigt die Anzahl der programmierten
Tasten der Infrarotfernbedienung an. Erhöht sich die
Werteanzeige nach dem Programmieren nicht, kann
dies folgende Ursachen haben:
-Die Fernbedienung sendet nicht.
-Die Taste ist schon programmiert.
-Alle Speicherplätze sind belegt.
-Falsche Codierung des Senders.
6. Löschen der IR-Fernbedienungen
1. Parameter 5 über die Tasten AUF und ZU wählen.
2. Taste STOP drücken (Werteanzeige leuchtet hell).
3. Taste ZU gedrückt halten, bis die Werteanzeige nicht
mehr blinkt. Alle IR-Fernbedienungen sind nun gelöscht.
7. Programmierung des Lesezyklus für Thermostat
1. Parameter 6 über die Tasten AUF und ZU wählen.
2. Taste STOP drücken (Werteanzeige leuchtet hell).
3. Mit den Tasten AUF und ZU die gewünschte Zeit in
Minuten einstellen. Der Lesezyklus kann von 1...60
min. eingestellt werden. Dieser Lesezyklus ist die Zeit
zwischen zwei Auswertungen des Thermostats. Wird
zwischen den Auswertungen die LSF über die Tasten
oder die Fernbedienung bedient, wird der Thermostat
für die Zykluszeit ignoriert. Der Wert 0 liest den
Thermostat ständig, die Tasten und die Fernbedienung
sind blockiert.
4. Taste STOP drücken (Parameter leuchtet hell).

7
8. Einstellung für die Betriebsart Verriegelung
(Reedkontakt)
1. Parameter 7 über die Tasten AUF und ZU wählen.
2. Taste STOP drücken (Werteanzeige leuchtet hell).
3. Mit den Tasten AUF und ZU den gewünschten Wert
einstellen.
Wenn Sie keinen Reedkontakt angeschlossen haben,
belassen Sie den Wert auf 0.
Wenn ein Reedkontakt angeschlossen ist, den Wert 1
einstellen.
9. Beenden der Einstellungen
1. Parameter 0 über die Tasten AUF und ZU wählen.
2. Taste STOP drücken (Display ist dunkel).
8. Setting for operation mode locking (reed contact)
1. Choose parameter 7 by means of the buttons OPEN
and CLOSE.
2. Press button STOP (value display lights brightly).
3. Adjust the value by means the buttons OPEN and
CLOSE .
If no reed contact is connected, leave the value at 0.
If a reed contact is connected, set the value to 1.
9. Finishing the adjustments
1. Choose parameter 0 by means of the buttons OPEN
and CLOSE.
2. Press button STOP (value display doesn’t light).
Adjustment & programming
(cont’d)
Einstellung und
Programmierung (Forts.)

HAUTAU GmbH | Wilhelm-Hautau-Str. 2 | 31689 Helpsen | Germany | Tel +49 5724/393-0 | info@hautau.de | www.hautau.de
The reomote control is not included in scope delivery.
Installing/changing the batteries
(not included in scope of delivery)
1. The remote control needs two “AAA”-alkaline batteries.
2. Remove the battery cover from the back of the remote
control by pressing down on the tab.
3. Insert the batteries in the battery case according to the
+/- marks.
4. Replace the battery cover.
5. Do not dispose of batteries with your normal househould
waste. Please dispose of used batteries acc. to the
battery collection system in your country.
IR-Fernbedienung SeKi Slim IR remote control SeKi Slim
Die Fernbedienung ist nicht im Lieferumfang enthalten.
Einsetzen/Wechseln der Batterien
(nicht im Lieferumfang enthalten)
1. Die Fernbedienung benötigt zwei “AAA”-Alkalibatterien.
2. Drücken Sie zum Abnehmen der Batteriefachabdeckung
auf der Rückseite der Fernbedienung die Lasche nieder.
3. Legen Sie die Batterien entsprechend der Plus- Minus-
Markierung in das Batteriefach ein.
4. Bringen Sie die Batteriefachabdeckung wieder an.
5. Batterien nicht in den Hausmüll entsorgen, sondern der
örtlichen Sammelstelle zuführen.
Tastenbelegung (werkseitige Voreinstellung)
Werkseitig ist die Fernbedienung mit folgender
Tastenbelegung voreingestellt:
Button configuration (preset at factory)
The IR remote control is preset at factory with the following
button configuration:
Falls Sie nicht die SeKi-Slim-Fernbedienung, sondern
eine beliebige andere IR-Fernbedienung einsetzen wollen,
müssen folgende Schritte durchgeführt werden:
1. Der Philips-Code (RC 5) muss auf ein beliebiges Gerät
(TV, Video etc.) gemäß der Anleitung der eingesetzten
Fernbedienung eingestellt werden.
2. Die Tastenbelegung, wie in der Anleitung der eingesetz-
ten Fernbedienung beschrieben, vornehmen.
Einsatz einer beliebigen
IR-Fernbedienung
If you wish not to use the SeKi-Slim remote control but any
other IR remote control, please make the following steps:
1. Set up the Philips-code (RC 5) of any unit (TV, Video etc.)
according the instruction of the used remote control.
2. For the button configuration, please follow the
instructions as described for the remote control to use.
Use of any infrared remote
control
AV
POWER
CH
VOL
AUF / OPEN
ohne Funktion
without function
ZU / CLOSE
ohne Funktion
without function
STOP
LED
Table of contents
Other HAUTAU Control Unit manuals


