HAUTAU ATRIUM comfort close User manual
HAUTAU GmbH | Wilhelm-Hautau-Str. 2 | 31691 Helpsen | Germany | Tel +495724/393-0 | [email protected] | www.hautau.de
Page
Fittings overview ............................................................ 2
Abbreviations ................................................................. 2
Preparation frame .......................................................... 3
Preparation sash, Mounting sash and frame ...................... 4
Mounting comfort close .................................................. 5
Reference dimension ...................................................... 6
Adjustment options ......................................................... 7
Mounting cover frame piece ............................................ 8
Technical data ............................................................... 8
ATRIUM®comfort close
verdeckt | concealed
Aluval Aluprom 40
Bestellhilfe und Montageanleitung | Ordering tool and mounting instructions
10/2022 510104
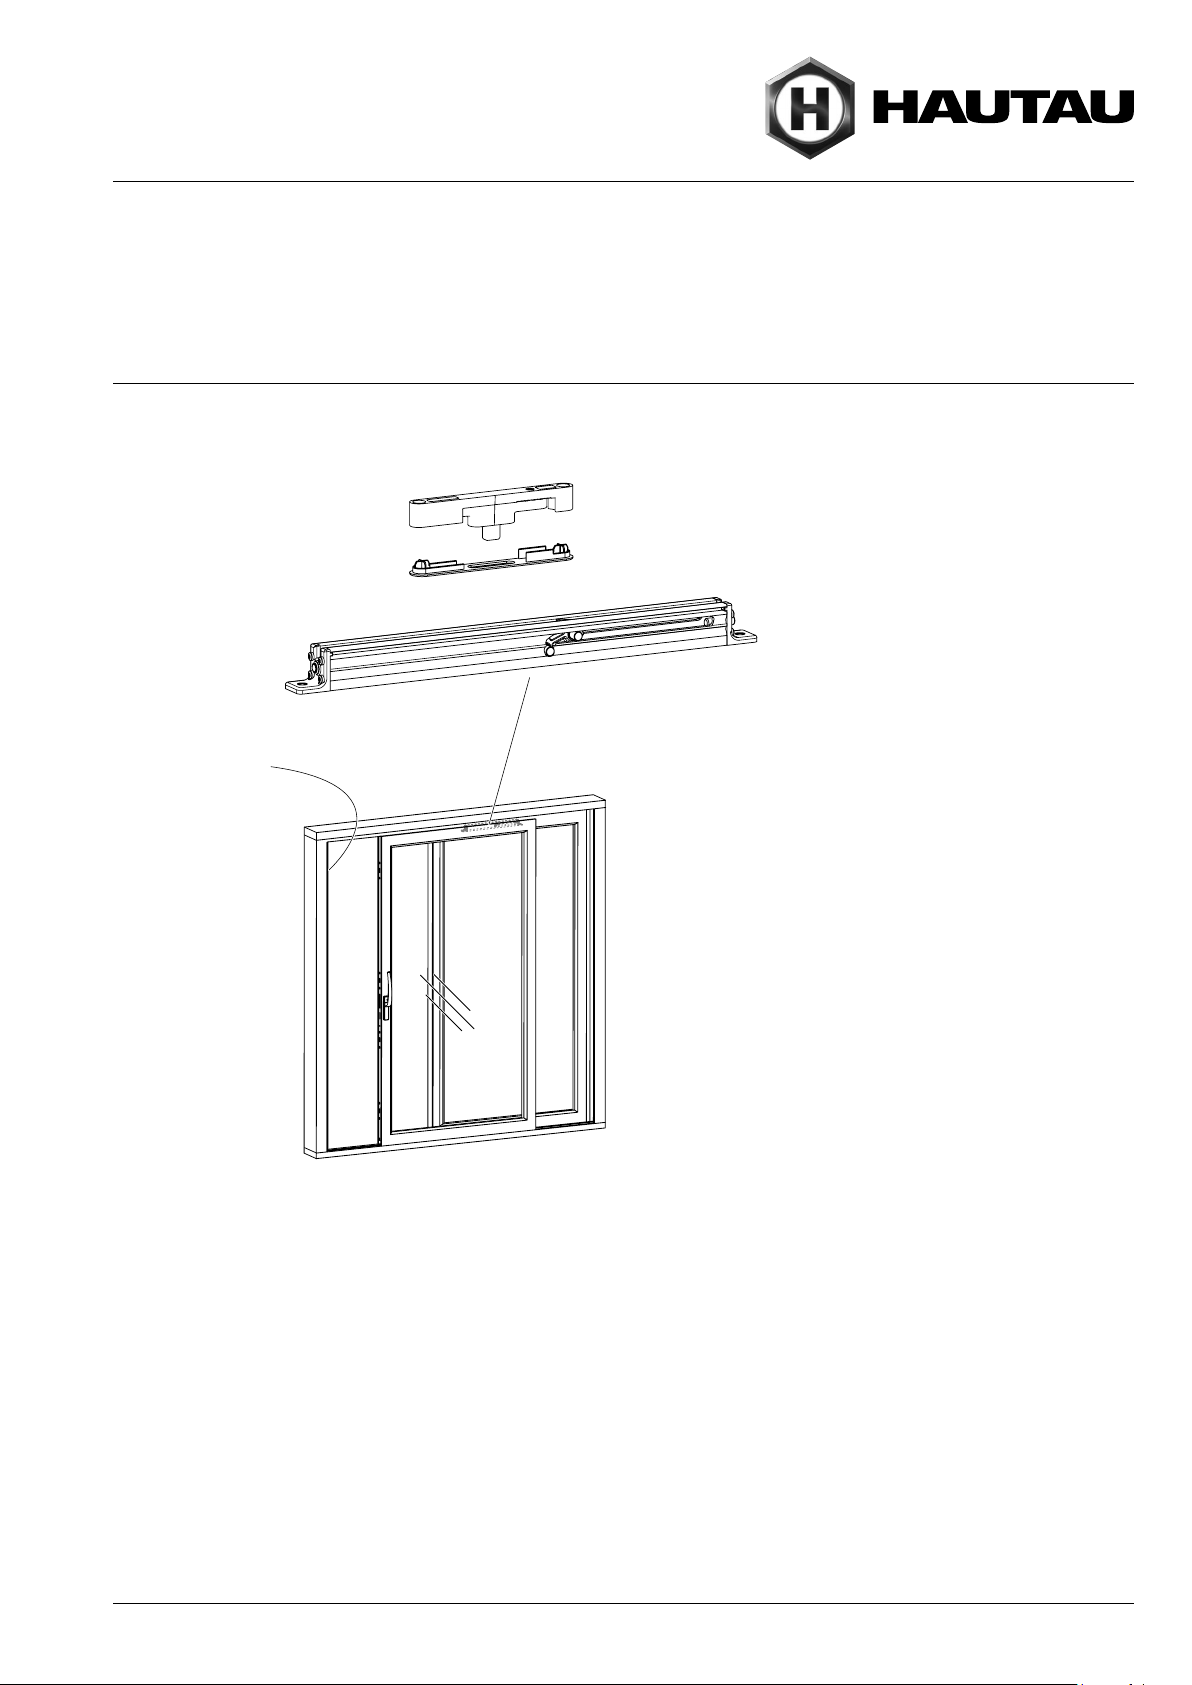
Rahmenteil | Frame piece
Hauptschließkante
Main closing edge
comfort close
Funktion comfort close
Kurz vor Erreichen der Hauptschließkante wird der
Flügel sanft abgebremst und automatisch in die
Geschlossenstellung gezogen.
Function comfort close
Shortly before reaching the main closing edge, the
sash is slowed down gently and is then retracted
automatically to the closed position.
Seite
Beschlagübersicht .......................................................... 2
Abkürzungen ................................................................. 2
Bearbeitung Rahmen ...................................................... 3
Bearbeitung Flügel, Montage Flügel und Blendrahmen ........ 4
Montage comfort close ................................................... 5
Kontrollmaß ................................................................... 6
Einstellmöglichkeiten ...................................................... 7
Montage Abdeckung Rahmenteil ...................................... 8
Technische Daten ........................................................... 8
DE |EN

Seite | Page 2
16.2
16.3
15.1
4,8 x 25
4,8 x 25
16.8
16.7
7.1
7.1
7.1
7.1
4,8 x 16 4,8 x 16
ATRIUM HS
Hersteller Profil
Aluval Aluprom 40
A
≤200 kg Flügelgewicht
sash weight
≤30 N Verschiebekraft
Sliding force
> 200 … 300 kg Flügelgewicht
sash weight
≤50 N Verschiebekraft
Sliding force
1
x) optional
304388
Rahmenteil, verstellbar 16.2
Frame piece, adjustable
Abdeckung Rahmenteil 16.3
Cover frame piece 304816
305134
1
1
Artikelbezeichnung
Article description
Gr. 2 / size 2
comfort close 15.1 z)
Gr. 1 / size 1
Artikel-Code
Item Code
z) Farbe Dämpfer: Gr. 1 - schwarz, Gr. 2 - silber-grau
Colour of damper: size 1 - black, size 2 - silver-grey
486417
Beutel Zubehör comfort close
Accessories comfort close 7.1, 16.7, 16.8
Stück bei Schema
Items required for scheme
304389
1
ATRIUM®comfort close, verdeckt | concealed, Aluval Aluprom 40 | 510104
Pos. Bezeichnung | Description
7.1 Schrauben | Screws
15.1 comfort close | comfort close
16.2 Rahmenteil | Frame piece
16.3 Abdeckung Rahmenteil | Cover frame piece
16.7 Anschraubwinkel | Screw-on bracket
16.8 Halteblech | Bracket
Abkürzungen | Abbreviations
FB Flügelbreite | Sash width
Beschlagübersicht, Abkürzungen
Fittings overview, Abbreviations
Hinweis: Alle Maße in diesem Dokument sind
in Millimeter.
Note: All measurements in this document
are indicated in millimetres.
Seite | Page 3
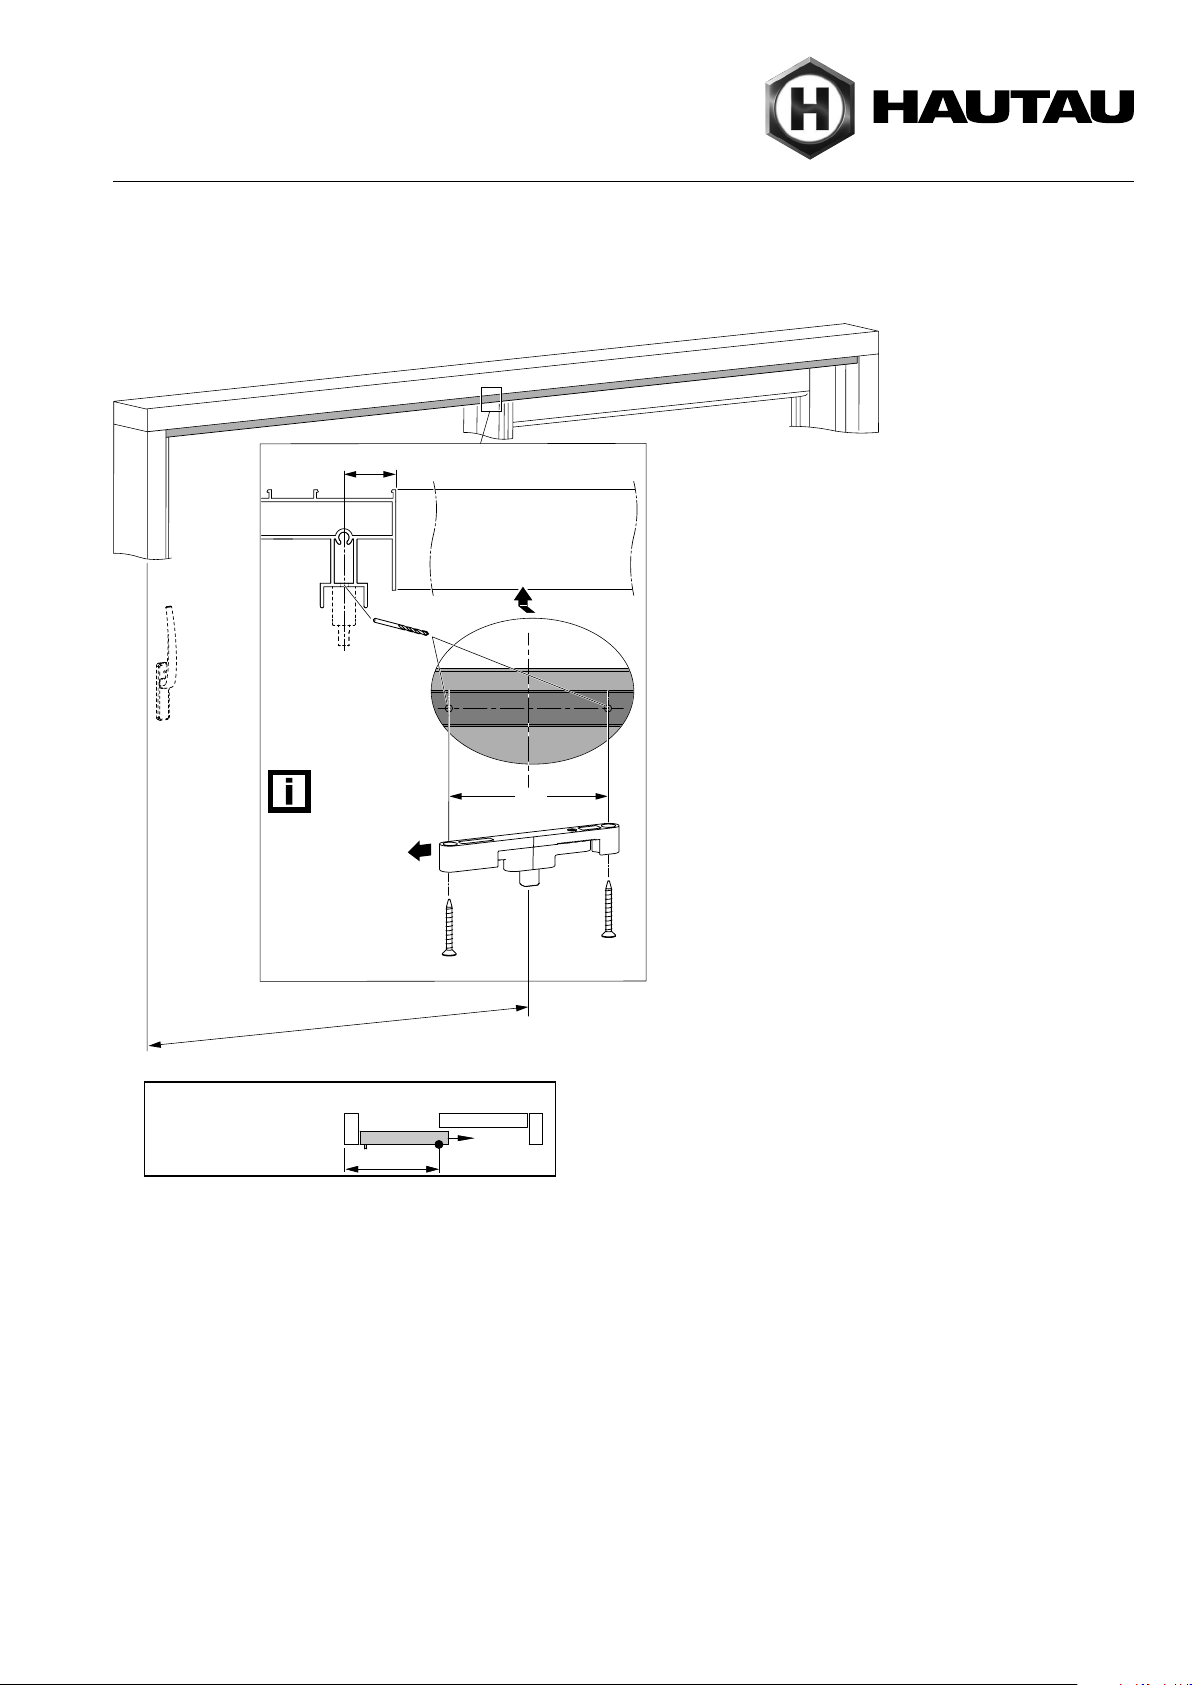
FB - 78,3
4,8 x 25
Ø 4,2
(1)
(2)
100
4,8 x 25
16.2
25,3
7.1 7.1
M
ATRIUM®comfort close, verdeckt | concealed, Aluval Aluprom 40 | 510104
Position Rahmenteil
Position frame piece
Diese Seite zur Griff-
seite ausrichten!
Position this side
to handle side!
FB -78,3
Bearbeitung Rahmen
Preparation frame
– (1) 2 Befestigungslöcher durch den unteren Steg Ø 4,2 vorbohren.
– (2) Rahmenteil (16.2) mit Schrauben 4,8 x 25 (7.1) einschrauben.
– (1) Pre-drill 2 fastening holes Ø 4,2 through the lower bar.
– (2) Fasten frame piece (16.2) with screws 4,8 x 25 (7.1).
Seite | Page 4
die Beschlagnut muss gratfrei sein
the fitting groove must be free of burrs
4,8 x 16
349
50
Ø 4,2
24
64
24
16.8
(1)
(2)
(3)
(4)
7.1
Ø 4,2
1.1
1.2
2.1
2.2
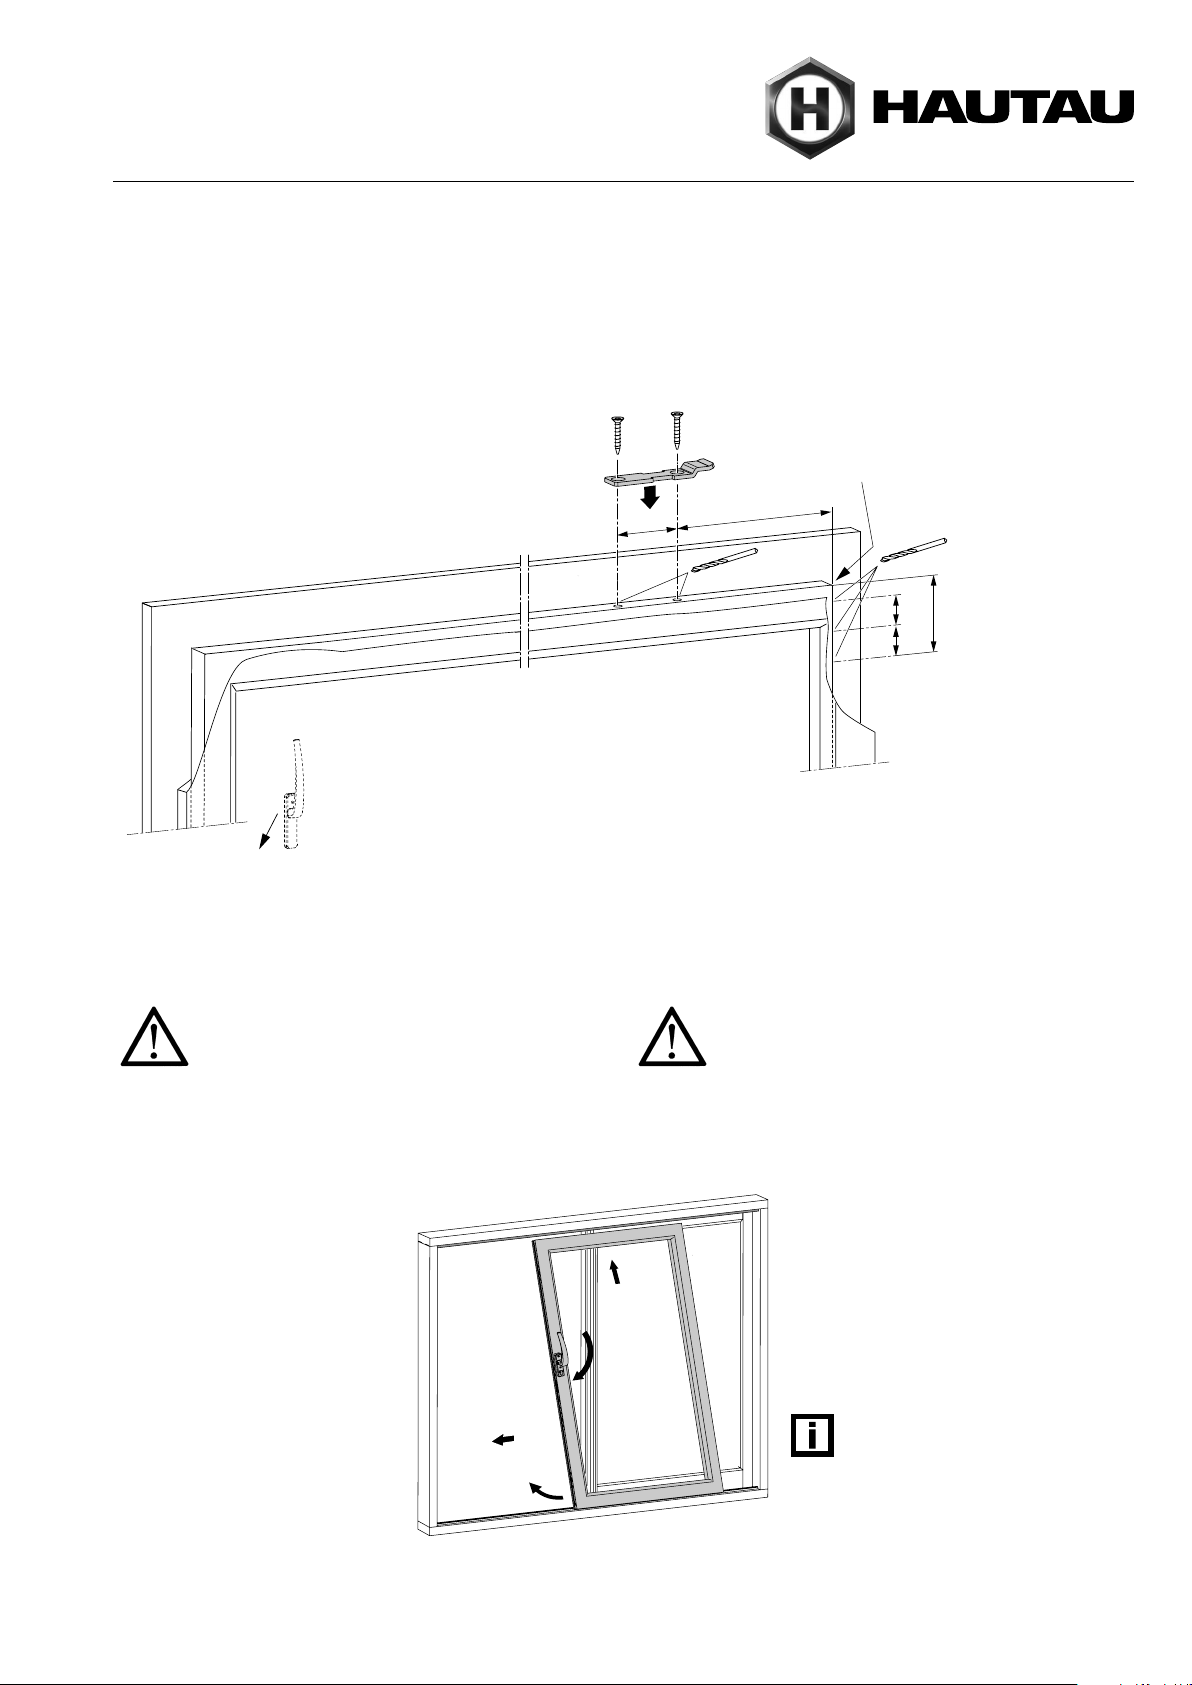
– (1) Den Schiebeflügel im Bereich des Festflügels in die Führungs-
schiene einhängen und in das Element schwenken.
– (2) Griff in „Geöffnet“-Stellung bringen und den Schiebeflügel in
den Durchgangsbereich schieben.
Achtung: Verletzungsgefahr durch umfallenden
Flügel! Zur Vermeidung der Verletzungsgefahr führen
Sie die folgenden Arbeitsschritte zu zweit aus.
– (1) Set down the sliding sash onto the guide track in the area of the
fixed sash and swivel it into the element.
– (2) Bring handle into „Open“ position and slide the sliding sash to
the transit area.
Attention: Risk of injury due to fallen sash!
To avoid the risk of injury, perform the following
steps with two workers.
Montage Flügel und Blendrahmen Mounting sash and frame
ATRIUM®comfort close, verdeckt | concealed, Aluval Aluprom 40 | 510104
Griffseite
Handle side
– (1) Montage des comfort close auf der Nichtgriff-Seite.
– (2) Die Beschlagnut muss gratfrei sein.
– (3) Halteblech (16.8) am Flügel positionieren. Löcher mit Ø 4,2
vorbohren. Halteblech mit Schrauben 4,8 x 16 (7.1) befestigen.
– (4) Bohrungen für Anschraubwinkel (16.7) mit Ø 4,2 bohren.
– (1) Mounting of the comfort close at non-handle side.
– (2) The fitting groove must be free of burrs.
– (3) Position bracket (16.8) at the sash. Pre-drill the holes
with Ø 4,2. Fasten bracket with screws 4,8 x 16 (7.1).
– (4) Drill holes for screw-on bracket (16.7) with Ø 4,2.
Bearbeitung Flügel, Montage Flügel und Blendrahmen
Preparation sash, Mounting sash and frame
Nicht-Griffseite
Non-handle side
Befestigung siehe auch Schnitt S. 6
Fastening refer to section page 6, too
Der Flügel muss leichtgängig gleiten können.
The sash has to slide smooth-running.

Seite | Page 5
(1)
comfort close
15.1
15.1
16.8
7.1
16.7
(2) (3)
4,8 x 16
WARNUNG: Verletzungsgefahr durch zurückschnellenden Mitnehmer und durch Spannwerkzeug!
Um Quetschung und offene Verletzung zu vermeiden, sorgen Sie für einen sicheren Halt des Produkts. Verwenden Sie
zum Spannen nur ein stumpfes Werkzeug. Fassen Sie beim Spannen und bei der Montage nicht in den Verfahrbereich
des Mitnehmers.
WARNING: Risk of injury due to back snapping catches and tensioning tool!
To prevent crushing or an open wound make sure that the product can‘t move while pretensioning it. Only use a blunt
tool for pretensioning and never touch inside the travel range of the catches.
ATRIUM®comfort close, verdeckt | concealed, Aluval Aluprom 40 | 510104
ungespannt
untensioned
vorgespannt
pretensioned
– (1) comfort close muss vorgespannt werden.
– (2) Gehäuse vom Mittelstoß her bis zum Halteblech (16.8) in den
halb geöffneten Flügel einschieben.
– (3) Anschraubwinkel (16.7) mit 3 Schrauben 4,8 x 16 (7.1)
befestigen.
– (1) comfort close has to be pretensioned.
– (2) Insert the housing into the half opened sash from middle post
until bracket (16.8)
– (3) Mount screw-on bracket (16.7) with 3 screws 4,8 x 16 (7.1).
Montage comfort close
Mounting comfort close

Seite | Page 6
0
25,3
0
69
ATRIUM®comfort close, verdeckt | concealed, Aluval Aluprom 40 | 510104
– Zur Kontrolle der Höhe des Rahmenteils den Flügel einschwenken,
anheben und in Schließstellung schieben.
– Kontrollmaß im Bereich des comfort close messen (SOLL = 69 mm).
– Ggf. den Flügel beiseite schieben und Differenz zum Kontrollmaß
durch Einstellung des Rahmenteils ausgleichen (siehe „Einstell-
möglichkeiten“).
– To check the height of the frame piece, swivel in the sash, lift it
and slide into closing position.
– Measure reference dimension within the range of the
comfort close (desired value = 69 mm).
– If necessary, slide the sash aside and compensate deviation
to the reference dimension by adjustment of the frame piece
(refer to „Adjustment options“).
Kontrollmaß
Reference dimension
Kontrollmaß Reference dimension
Flügel angehoben
Sash in raised position
Seite | Page 7
(1.1)
(1.3)
Torx 25 max. 3 Nm To rx 15
(2)
(1.2)
-
5
mm
+
5
mm
0
+
3
m
m
0 – 5 mm
0 + 5 mm
ATRIUM®comfort close, verdeckt | concealed, Aluval Aluprom 40 | 510104
Hinweis: Einstellungen können sich nach dem Verglasen des Flügels und dem Einbau des Rahmens ändern!
Note: Adjustments may be changed after glazing the sash and mounting the frame!
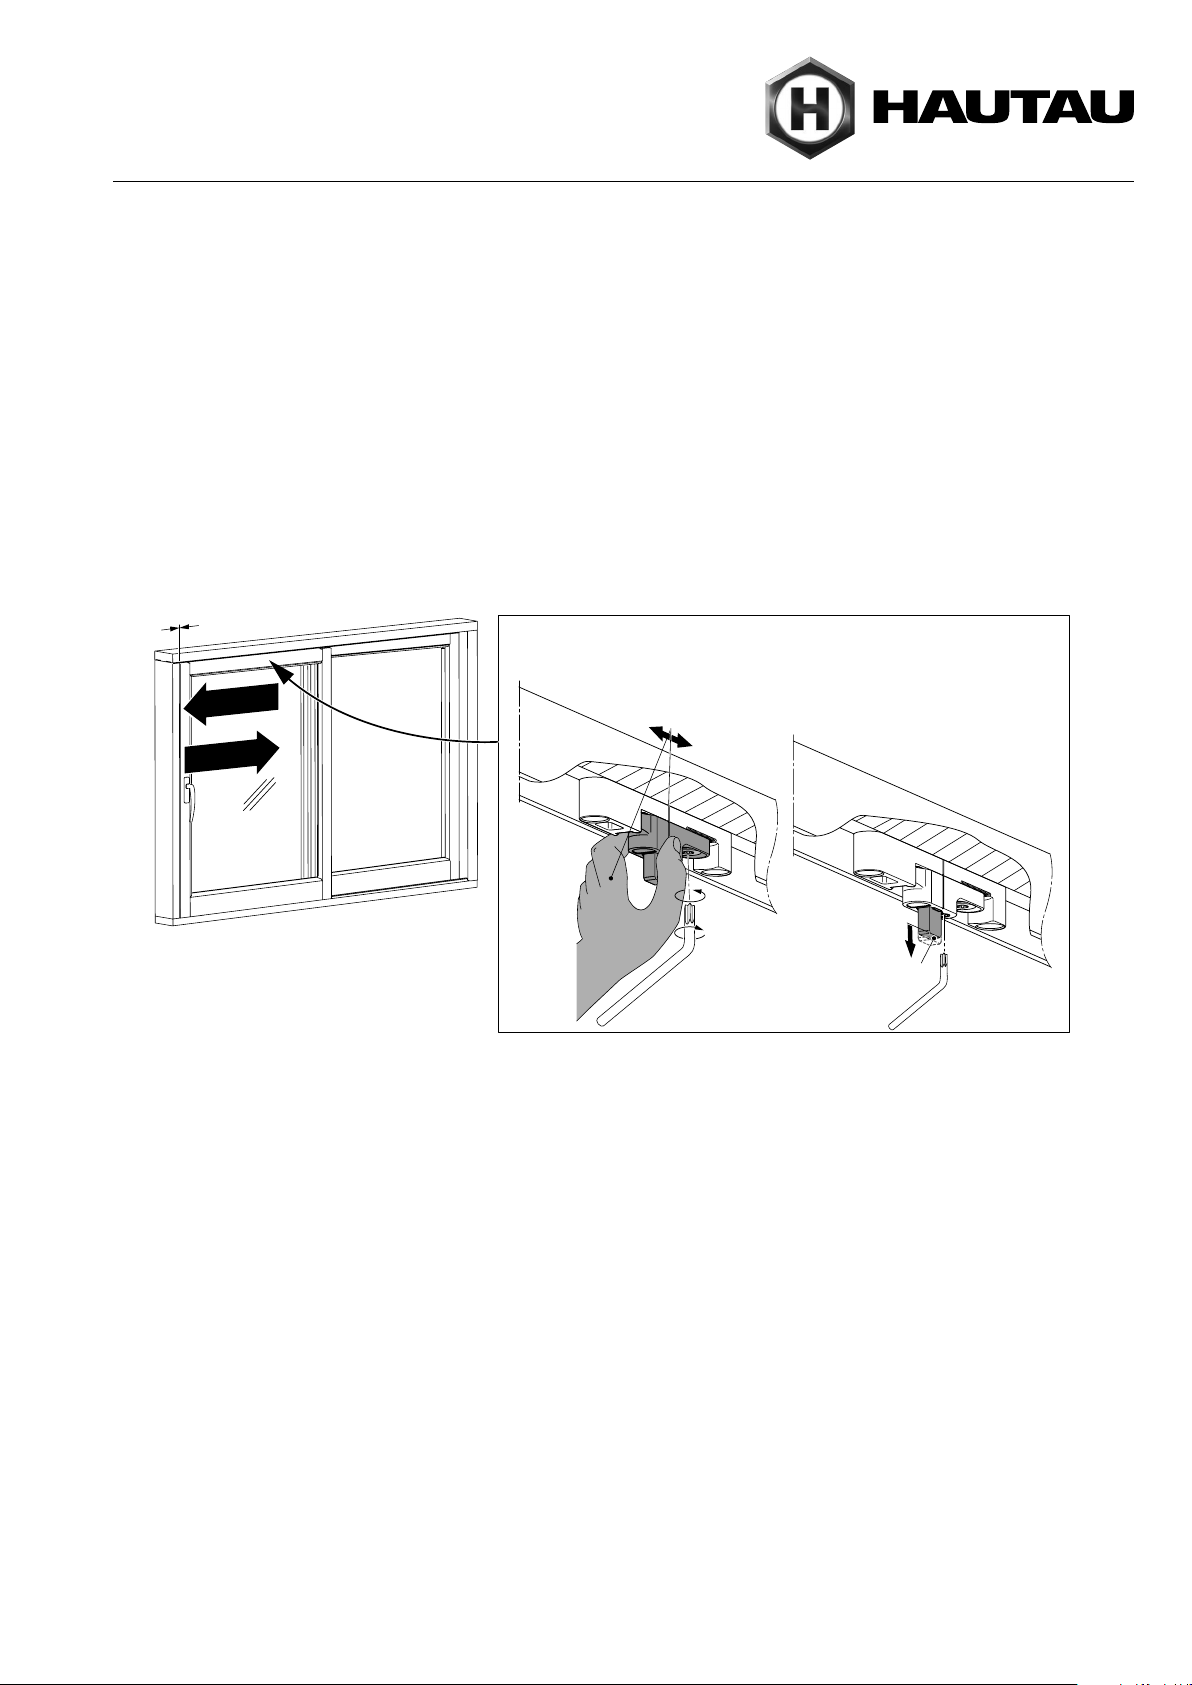
(Flügel geöffnet | Sash opened)
Bei Ungenauigkeiten bzgl. der Position des Rahmenteils kann das
Kontrollmaß bzgl. der Höhe des Rahmenteils sowie die Endposition
des Flügels zur Zarge eingestellt werden. Hierfür muss der Flügel
geöffnet werden.
– (1) Korrektur der seitlichen Position (+/- 5 mm):
(1.1) Schraube mittels Torx 25 lösen,
(1.2) Rahmenteil in die benötigte Richtung verschieben:
0 –5 mm: Schließen des Flügels wird in Richtung Griff-Seite
verlagert; 0 + 5 mm: Schließen des Flügels wird in Richtung
Nichtgriff-Seite verlagert.
(1.3) Schraube mit max. 3 Nm festziehen.
– (2) Korrektur der Höhe des Rahmenteils (+ 3 mm) mittels Torx 15.
In case of inaccuracy concerning position of the frame piece, the
reference dimension concerning the height of the frame piece and
the end position of the sash related to the frame can be adjusted.
To do this, the sash has to be opened.
– (1) Correction of the lateral position (+/- 5 mm):
(1.1) Loosen screw by means of Torx 25,
(1.2) Slide frame piece into the desired direction:
0 – 5 mm: closing of sash will be shifted in direction of
handle side; 0 + 5 mm: closing of sash will be shifted in
direction of non-handle side.
(1.3) Fasten screw with max. 3 Nm.
– (2) Correction of the height of the frame piece (+ 3 mm) with Torx 15.
Einstellmöglichkeiten
Adjustment options
0 – 5 mm: in Richtung Schließposition (Zarge)
towards closing position (frame)
0 + 5 mm: weg von der Schließposition (Zarge)
off the closing position (frame)
Einstellung an der Schließkante
Adjustment at closing edge
Einstellmöglichkeiten Adjustment options

Seite | Page 8
16.3
16.2
Technische Daten Technical data
Anwendungsbereich für Schema A:
Flügelbreite (FB) 720 – 3235 mm
Flügelhöhe (FH) 1200 – 2700 mm
Rahmenaußenbreite (RAB) 6500 mm
Flügelgewicht oder Größe 1: max. 200 kg oder
Verschiebekraft ohne max. 30 N
comfort close Größe 2: max. 300 kg oder
max. 50 N
(weitere Größen auf Anfrage)
Je nach Ausführung der verwendeten Profildichtungen kann es
dazu kommen, dass der Flügel nicht vollständig schließen kann.
Abmessungen (B x H x T) 336 mm x 24,5 mm x 22 mm
Softeinzug ca. 100 mm vor der
Schließkante beginnend
Erhöhung der Verschiebe- Größe 1: um 25 N (schwarz)
kraft mit comfort close Größe 2: um 45 N (silber-grau)
Abhängig vom verwendeten Profilsystem können sich abweichende
Anwendungsbereiche ergeben. Die Vorgaben der Profilhersteller
sind in jedem Fall zu beachten.
Range of application scheme A:
Sash width (FB) 720 – 3235 mm
Sash height (FH) 1200 – 2700 mm
Outer frame width (RAB) 6500 mm
Sash weight or size 1: max. 200 kg or
sliding force without max. 30 N
comfort close size 2: max. 300 kg or
max. 50 N
(further sizes on request)
Depending on version of the profile sealing to be used,
it can happen, that the sash cannot close completely.
Dimensions (W x H x D) 336 mm x 24,5 mm x 22 mm
Soft move-in starting approx. 100 mm off the
closing edge
Increase of sliding force size 1: by 25 N (black)
with comfort close size 2: by 45 N (silver-grey)
Range of application is depending on used profile systems.
Specifications of profile manufacturers to be observed.
ATRIUM®comfort close, verdeckt | concealed, Aluval Aluprom 40 | 510104
Montage Abdeckung Rahmenteil, Technische Daten
Mounting cover frame piece, Technical data
Montage Abdeckung Rahmenteil | Mounting cover frame piece
This manual suits for next models
1
Table of contents
Other HAUTAU Door Opening System manuals


Popular Door Opening System manuals by other brands

Jay-tech
Jay-tech RDO 1000 Installation instructions and user guide

Henderson
Henderson SIROCCO Fitting instructions

Siemens
Siemens 3VT9300-3HG.0 operating instructions

Saimatic
Saimatic BOXMATIC 13000 manual

REYNAERS
REYNAERS 062.8251 Technical manual

AMAZON COMMERCIAL
AMAZON COMMERCIAL Entry B07RV879LT Welcome guide


Nice
Nice Spider 6060 Instruction manual and spare parts catalogue

GEZE
GEZE FA GC 150 Instructions for installation

Assa Abloy
Assa Abloy UNION DoorSense 8755A user guide

Dormakaba
Dormakaba D-4990 manual

Tucker ZAP
Tucker ZAP 8800 User operating instructions

Automatic Technology
Automatic Technology Axess Pro 1505 installation instructions