Healthstream HC10TVUB User manual

HC10TVUB
OWNER’S MANUAL
_____________________________________________________________________________________________________

12010/2/26 Ver1.0+V1.0
Pre Installation Tips………………... ……………………………………………………………02
Selecting Where Your Bike Goes………………………………………………………………. .02
Specifications ……..……………………………………………………………………………..03
Assembly Parts …………………………………………………………………………………..04
Parts Details ………………………………………………………………………....…………...05
Assembly Procedures ……………………………………………………………………………06
Operation Instructions …………………………………………………………………………...12
Index

22010/2/26 Ver1.0+V1.0
The following are tips to aid you in the installation of the 850B Fitness Bike:
1. Prepare all relevant parts before starting, this will save you time!
2. All screws are tightened by turning to the right and loosened to the left.
3. All tools needed for complete installation are provided.
4. Having another person to help will make it easier.
5. All instructions are written as if the user is positioned on the bike facing the computer.
Positioning
- The ideal place to use your bike is on solid and even ground.
- There should be at least a 45cm gap either side and behind for ease of getting on and off.
- Make sure a power socket is a suitable distance away.
- Try and put your bike in a room that is used often, keeping it in sight will keep you using it!
Moving Your Bike
- The 850B Fitness Bike is very heavy, so please ensure two people are available to move it.
- DO NOT grasp the bike by the computer.
- Only wheel the bike when indoors and on a flat surface. When used outdoors on concrete or
gravel the wheels may chip or buckle.
Pre Installation Tips
Selecting Where Your Bike Goes

32010/2/26 Ver1.0+V1.0
Max. User Weight 400Ibs/180kg
Size of Machine 64cm x 131.7cm x 146.1cm
Packing Weight of
Machine 62.2kg
Net Weight of
Machine 52.2kg
Power Supply 15V/2A DC (Charger)
Specifications
42010/2/26 Ver1.0+V1.0
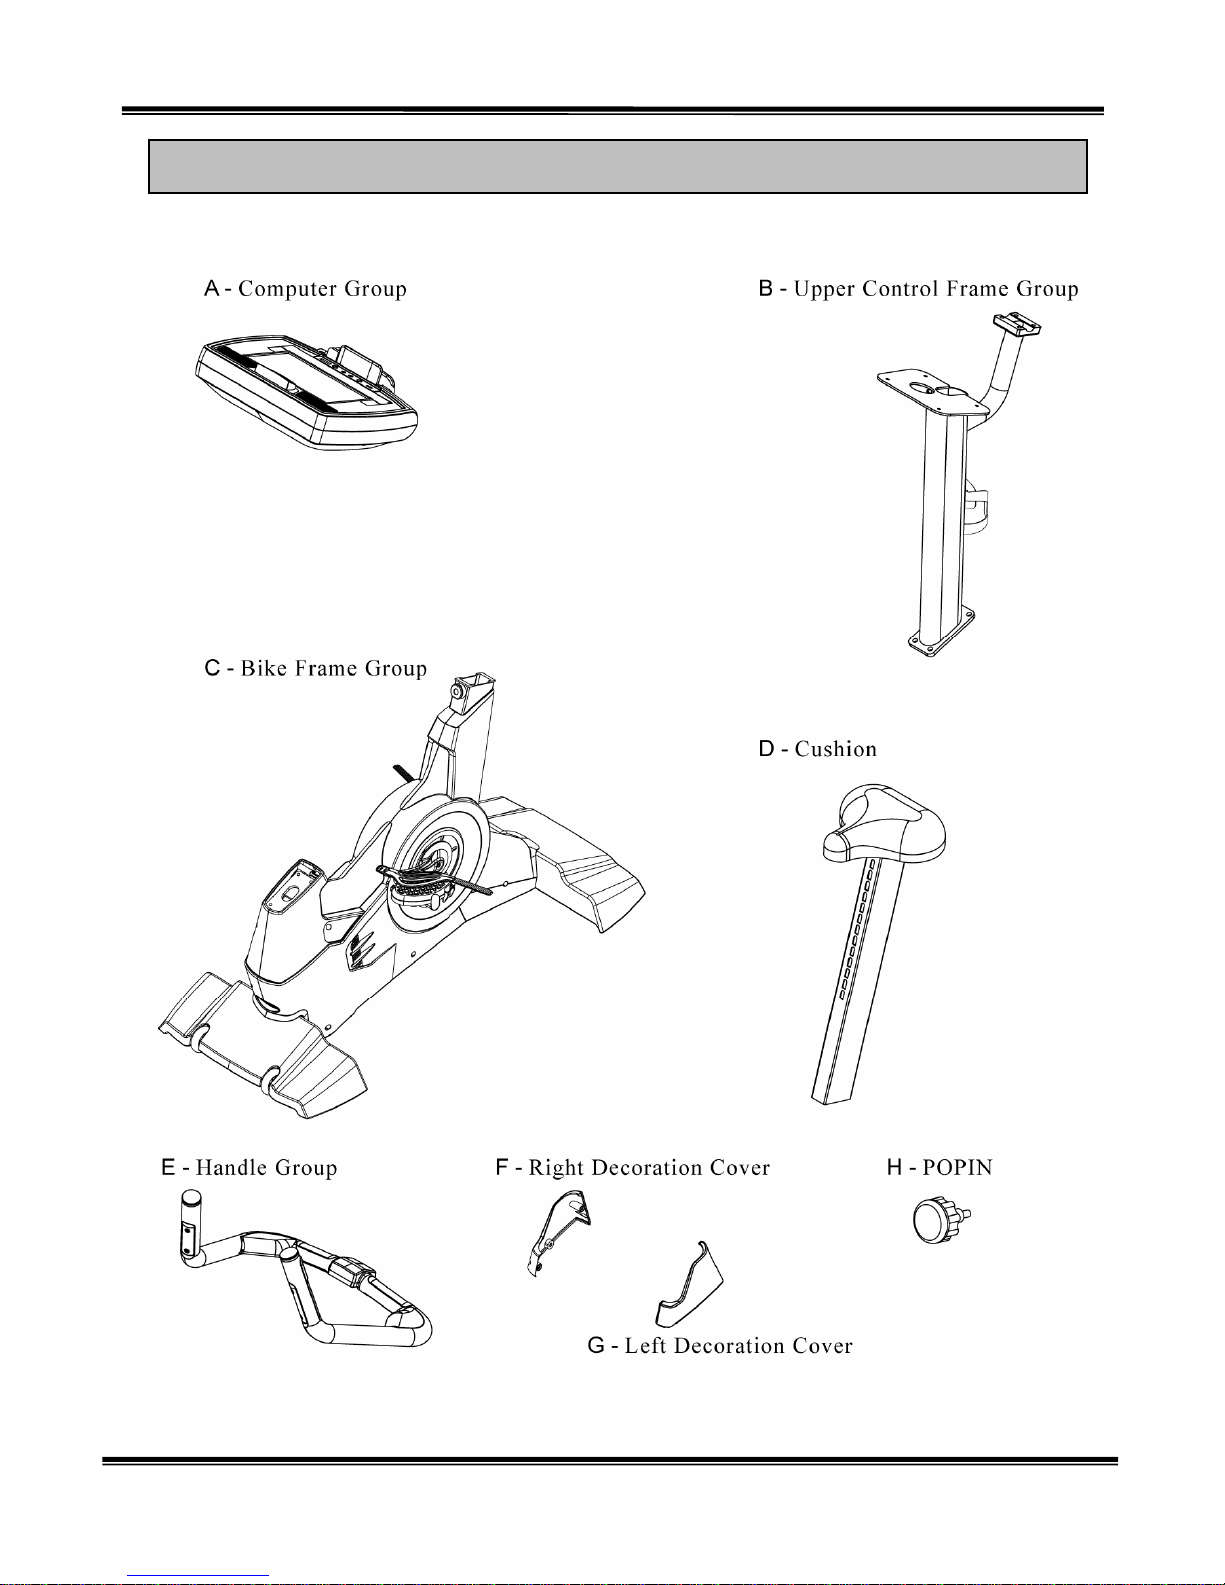
Assembly Parts
52010/2/26 Ver1.0+V1.0
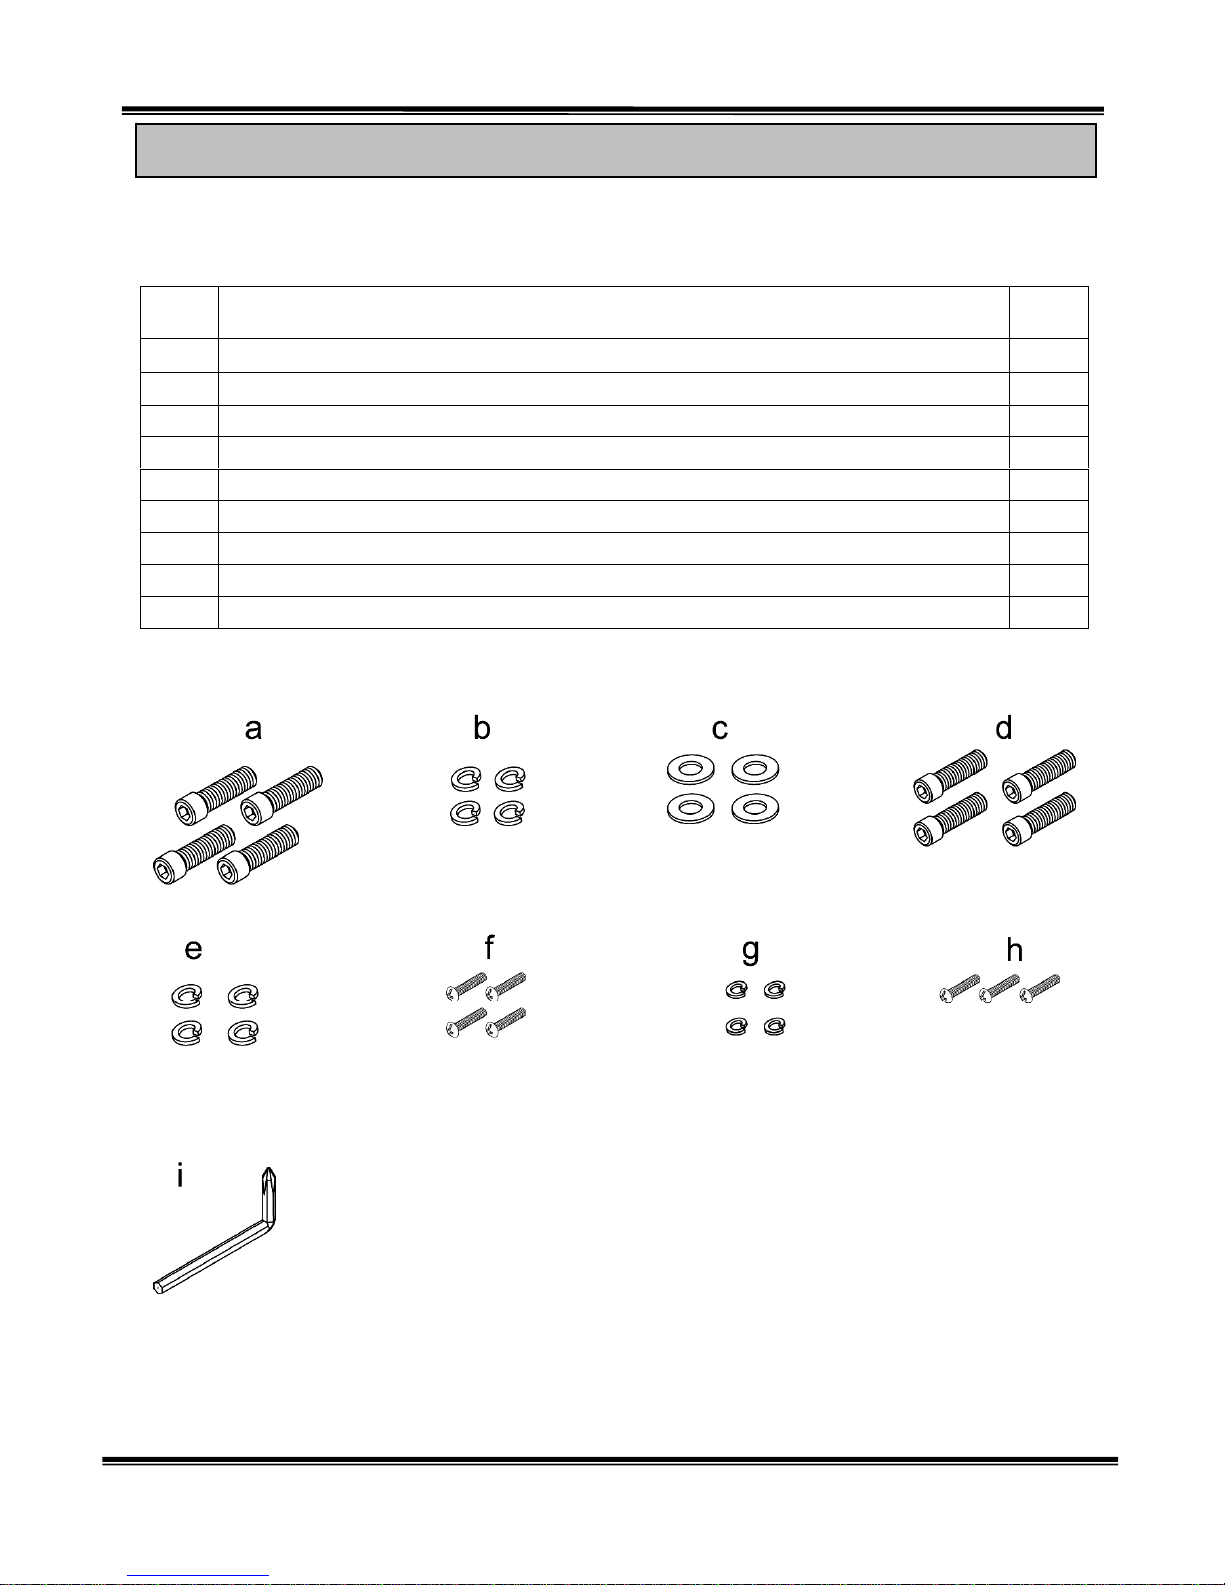
ITEM Description Qty
a Steel hexagon socket head screw M8xP1.25x25 Blue Nylok 4
b Spring Washer M8 4
c Flat Washer Ø8xØ16x2.0t 4
d Inner steel hexagon socket head screw M8XP1.25X20 Blue Nylok 4
e Spring Washer M8 4
f Umbrella-head cross screw Blue Nylok M4xP0.7x10 4
g Spring Washer M4 4
h Round-head cross screw M5x15 3
i Allen Wrench 6mmx40x120 <120 crossing for longer part> 1
Parts Details
62010/2/26 Ver1.0+V1.0
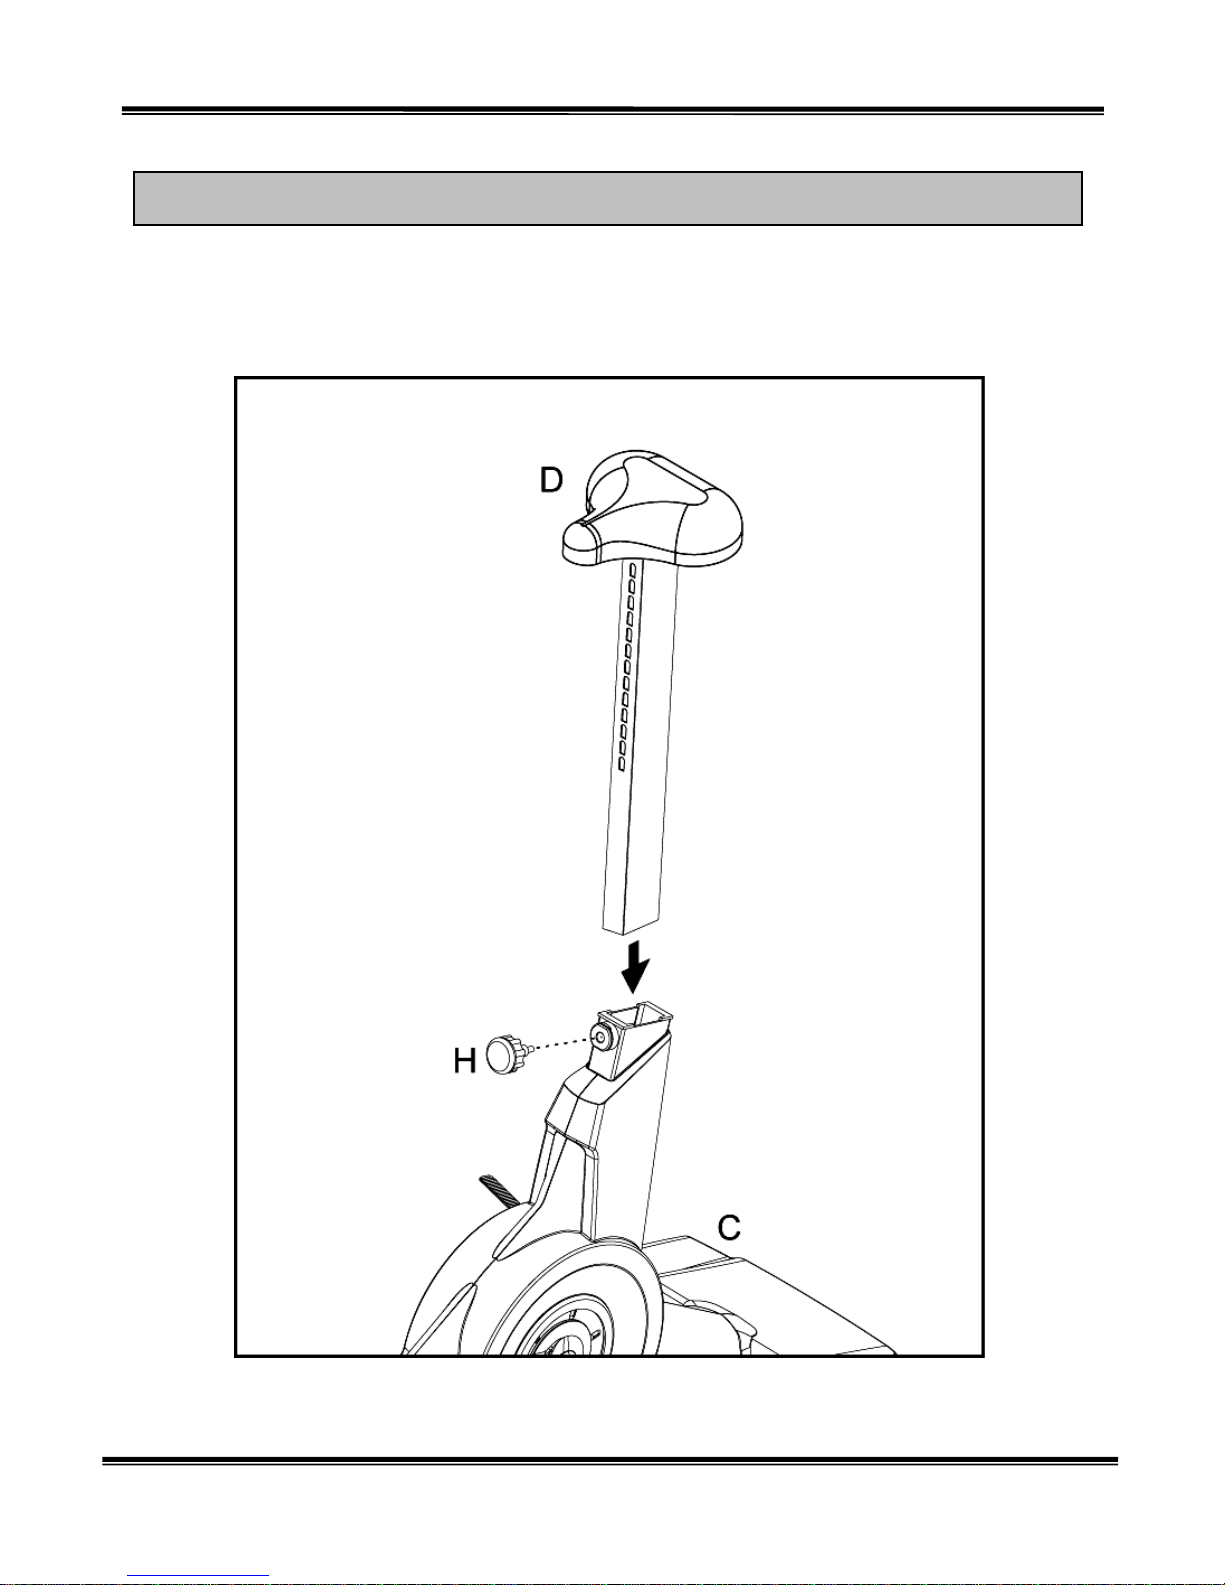
STEP 1. Attaching the Seat to the Main Frame of the bike
1. After must first loads POPIN(H), then seat cushion (D) depends on the arrow direction insertion
frame group (C) localization then.
Assembly Procedures
72010/2/26 Ver1.0+V1.0
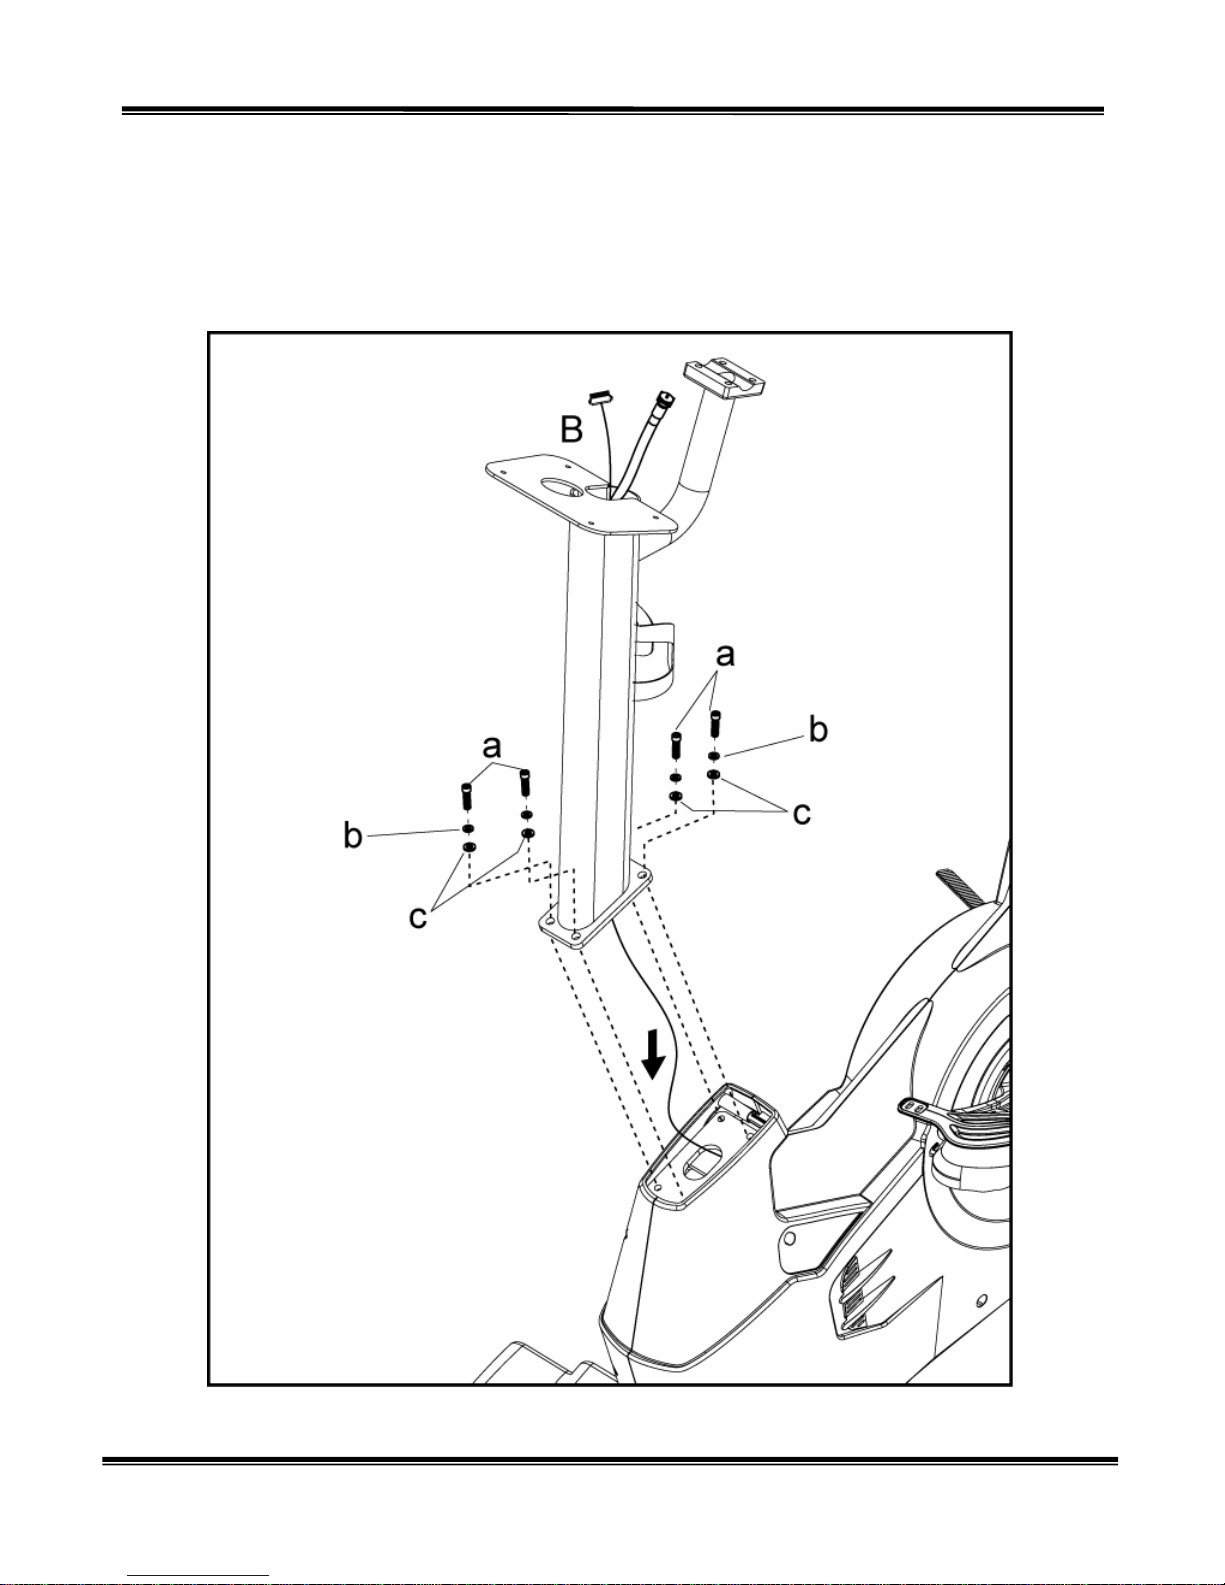
STEP 2. Attaching the Upper Control Frame to the Main Frame
1. The first pilot wire and the cable line passes through the frame on the control tube, then on the
control pedestal (B) assembly in frame group (C), bears again afterward the blue color falls receives
in the steamed bread hexagonal screw (a) and spring washer (b) puts down China to take charge of
(c), like chart insertion locking localization then.

82010/2/26 Ver1.0+V1.0
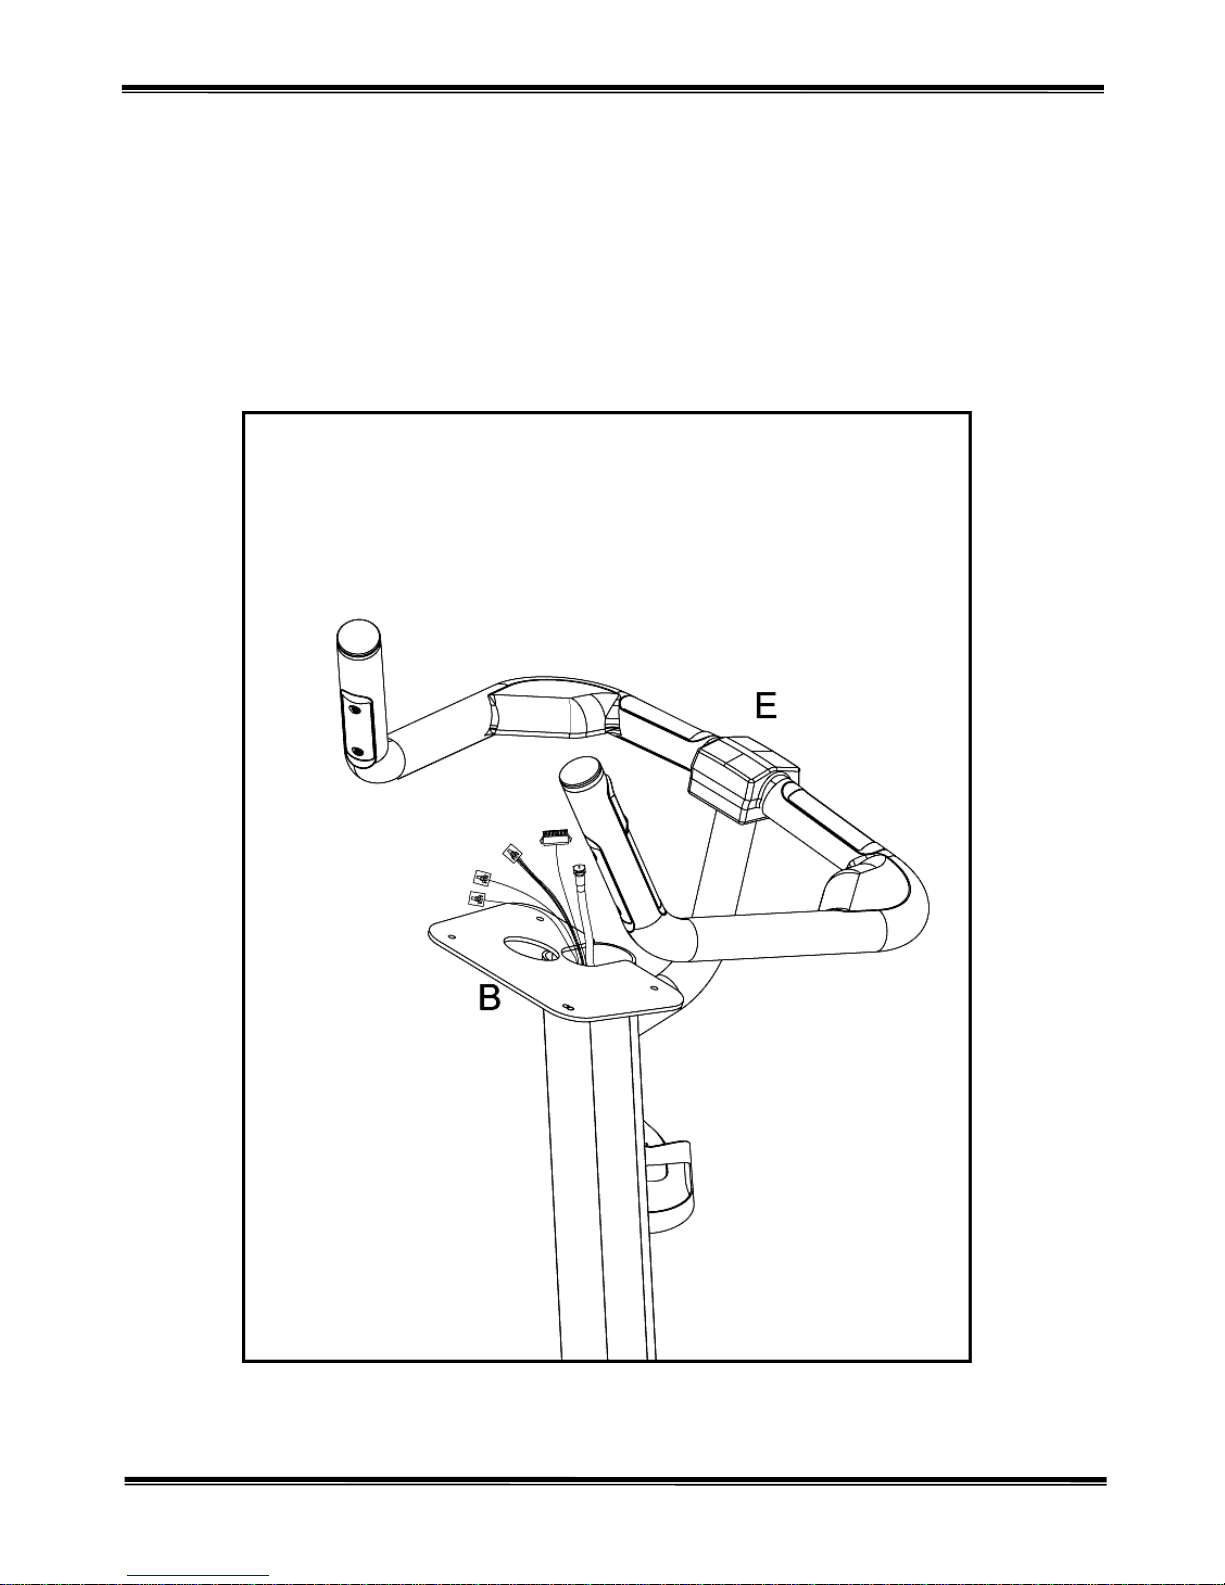
STEP 3. Attaching the Handlebars
1. Thread the 3 wires in the Handles (E) through the exit of the bend pipe on the Control Frame.
Then fix the handlebars by tightening with the CKS Hex Screws (d) and Spring Washers (e)
according to the drawing below.
Caution:
When assembling the handles and upper control frame, kneeling down may be needed.
Please take care when standing back up to avoid hitting your head or causing other injury.
92010/2/26 Ver1.0+V1.0
STEP 4. Wire connection of control pipe system
1. Pull out the wires in the tube of the Upper Control Frame (B) according to the drawing
below.

10 2010/2/26 Ver1.0+V1.0
STEP 5. Attaching the Computer
1. Connect the Computer (A) with the wires from the Upper Control Frame (B). Fix using Blue
Nylok Screws (f) and M4 Spring Washers (g). Make sure the screws have been tightened well
to avoid any loosening or possible damage to the computer.
Caution:
When assembling the Computer, kneeling down may be needed. Please take care when
standing back up to avoid hitting your head or causing other injury.
Make sure the bike is not plugged in when attaching the Computer to avoid a possible electric
shock.
When attaching the wires make sure they are connected securely and not wound around each
other or tangled in any way. This will avoid possible short circuiting.
No less than 2 persons are needed for assembly. One should hold the Computer in place while
the other connects the wires and tightens the screws.
11 2010/2/26 Ver1.0+V1.0
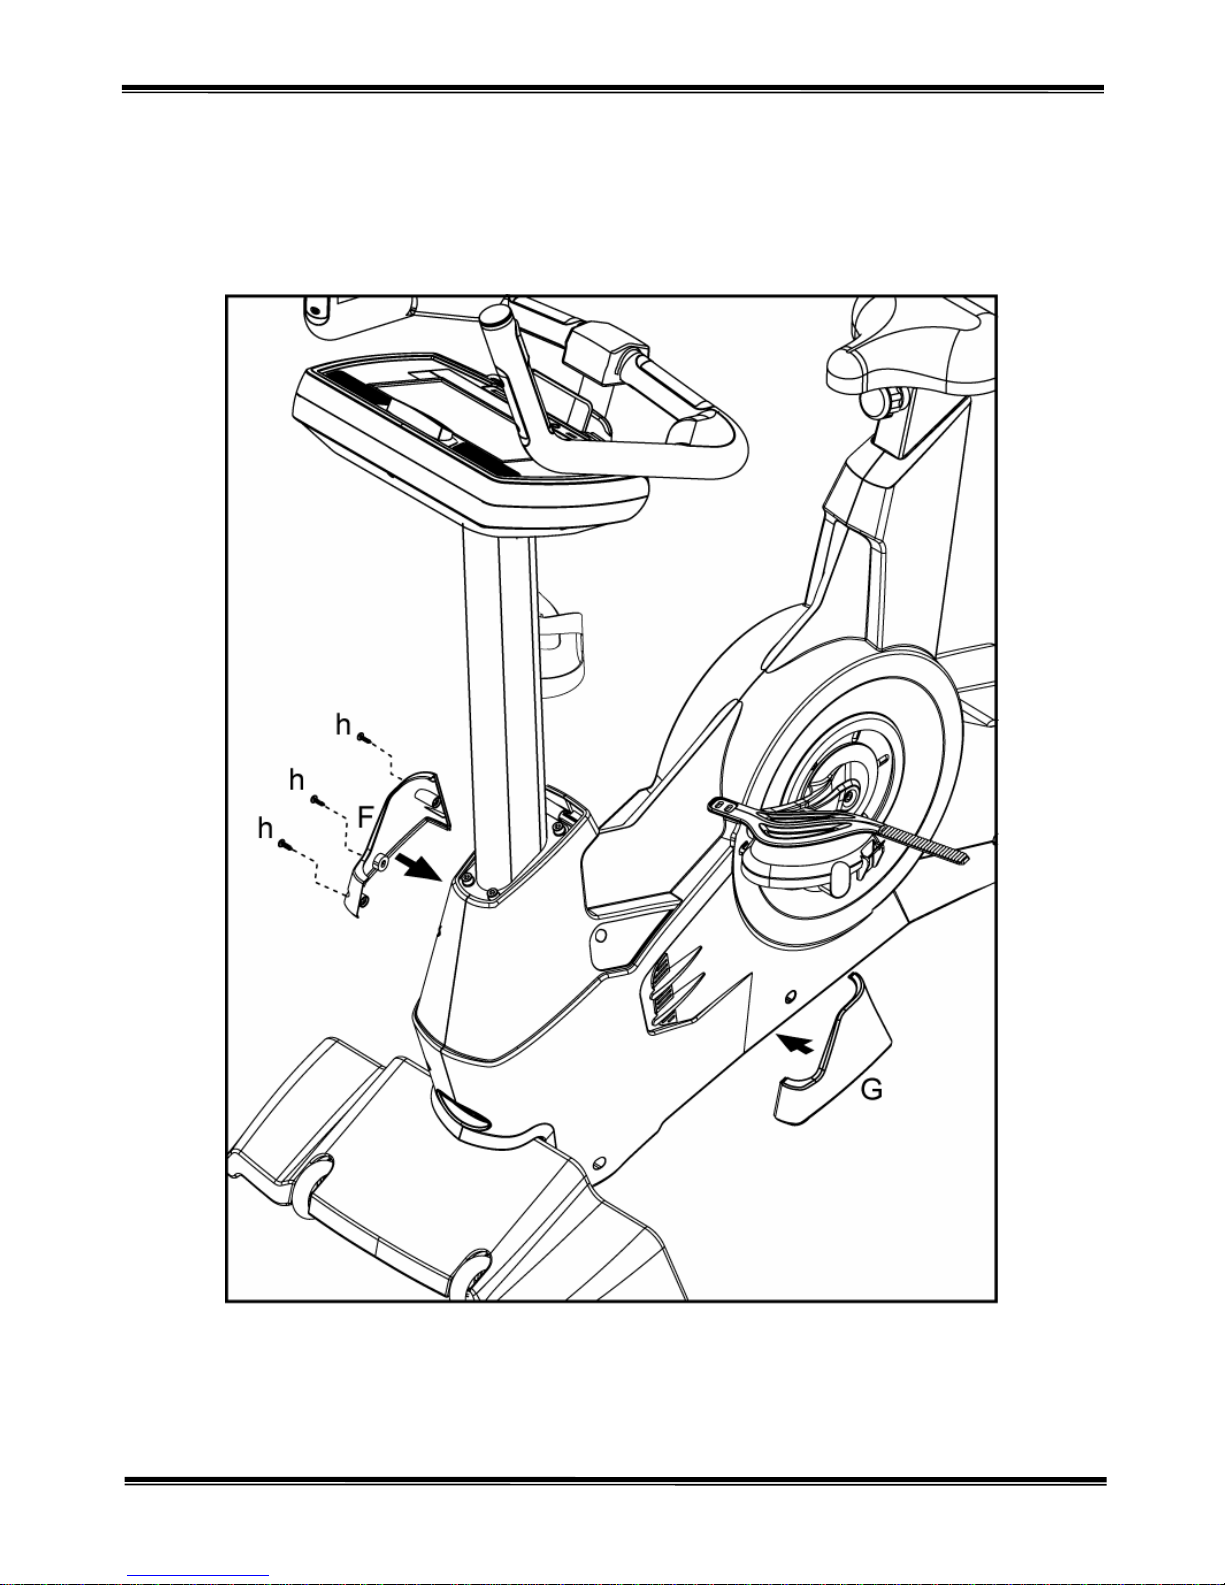
STEP 6. Attaching the Decoration Covers to the Bike Frame
1. Finally, fasten the left and right decoration covers (G and F) with Round Head Philips Screws
(h) according to the drawing below.
12 2010/2/26 Ver1.0+V1.0
Computer Operation Instructions
I. Subject Instruction
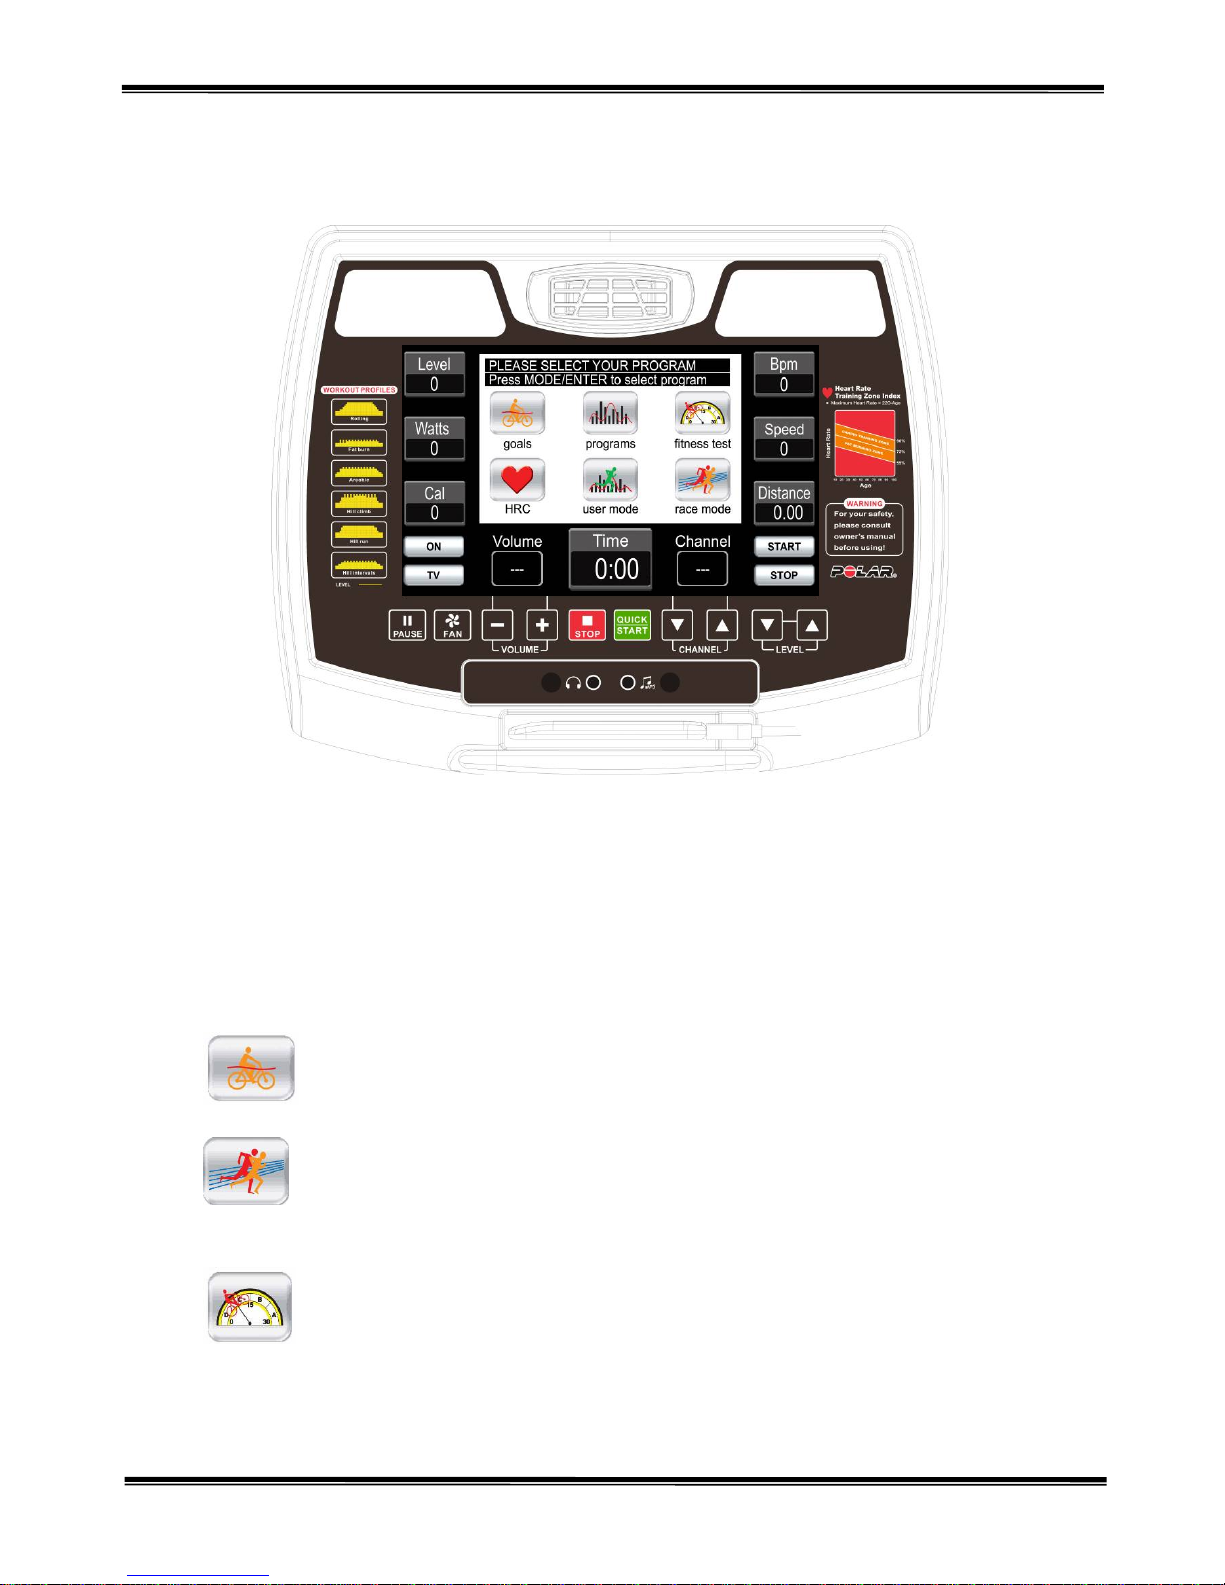
This computer has touch control 10.1”TFT-LCD window. It can display SPEED, LEVEL,
DISTANCE, CAL, TIME, WATTS, BPM, RPM, CHANNEL, VOLUME and PROGRAM
figures.
II. Display and booting of the starting-up window
goals mode:Target TIME, DISTANCE and CALORIE exercise mode.
Race mode: User can compete with computer according to the distance and time he
wants.
fitness test mode:6 minutes of self-movement model of physical fitness (heartbeat
health evaluating)

13 2010/2/26 Ver1.0+V1.0
HRC mode:Heartbeat exercise mode which has levels of 65%, 75%, 85% and THR.
Set the exercise levels in accordance with the coach or requirements of
self-direction.
programs mode:There are exercise program, stable exercise program and six
different kind of program to choose.
User mode: User can set up strength of excise in each level. The total levels are 32
levels.
III. Key Functions (Any effectively key should create one sound)
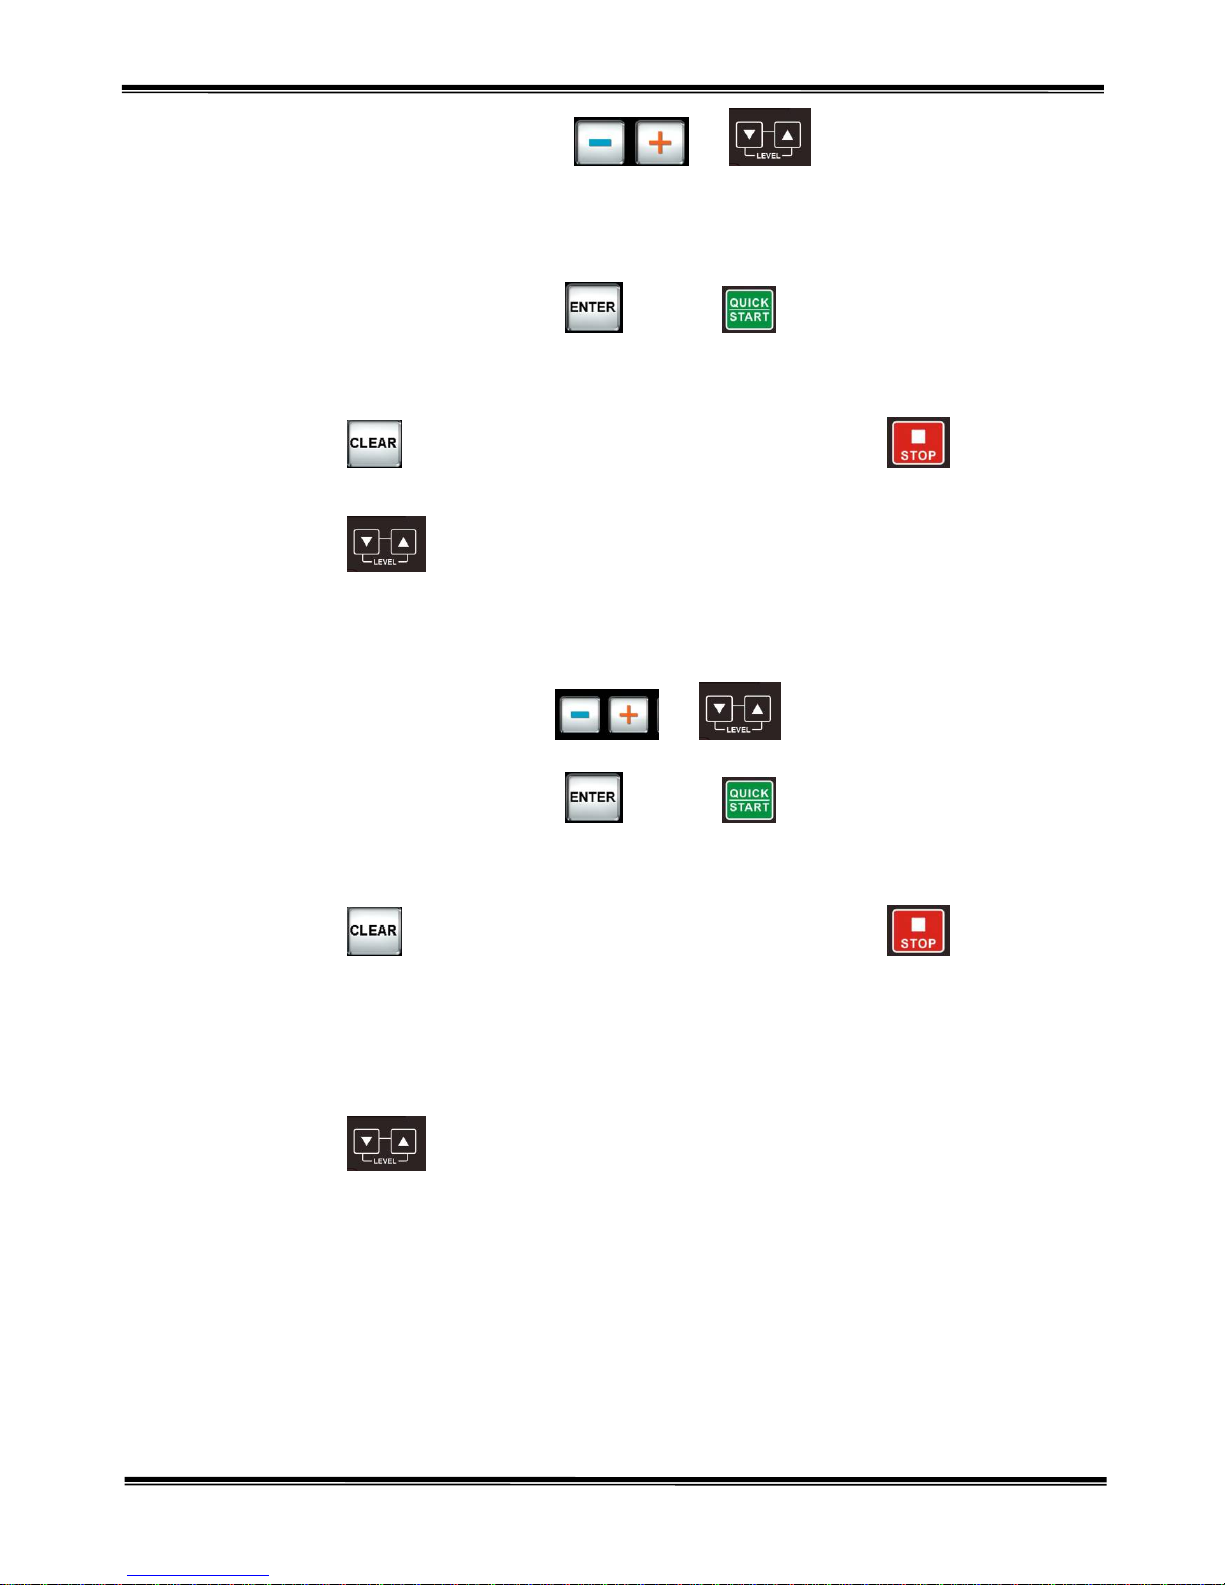
1. QUICK START:Press this key to start the machine directly and account numbers of all
kinds of function
2. STOP:Press this key to stop the counting of each program Under this data setting status,
press this KEY to return the standby mode.
3. PAUSE:Press PAUSE key to pause the program and all the windows will stop counting.
Press this key again to start.
4. LEVEL ↑:Press this key to increase level while running.
5. LEVEL ↓:Press this key to reduce level while running.
6. CHANNEL↑:Under TV or DTV mode, press this key to switch the channel up.
7. CHANNEL↓:Under TV or DTV mode, press this key to switch the channel down.
8. VOLUME+:Under TV, DTV, AV, MP3 mode, press this key to increase volume.
9. VOLUME-:Under TV, DTV, AV, MP3 mode, press this key to decrease volume.
10. FAN:After the motor starts, press this key to boot up the fan and in the running of the fan,
press this key to stop.
14 2010/2/26 Ver1.0+V1.0
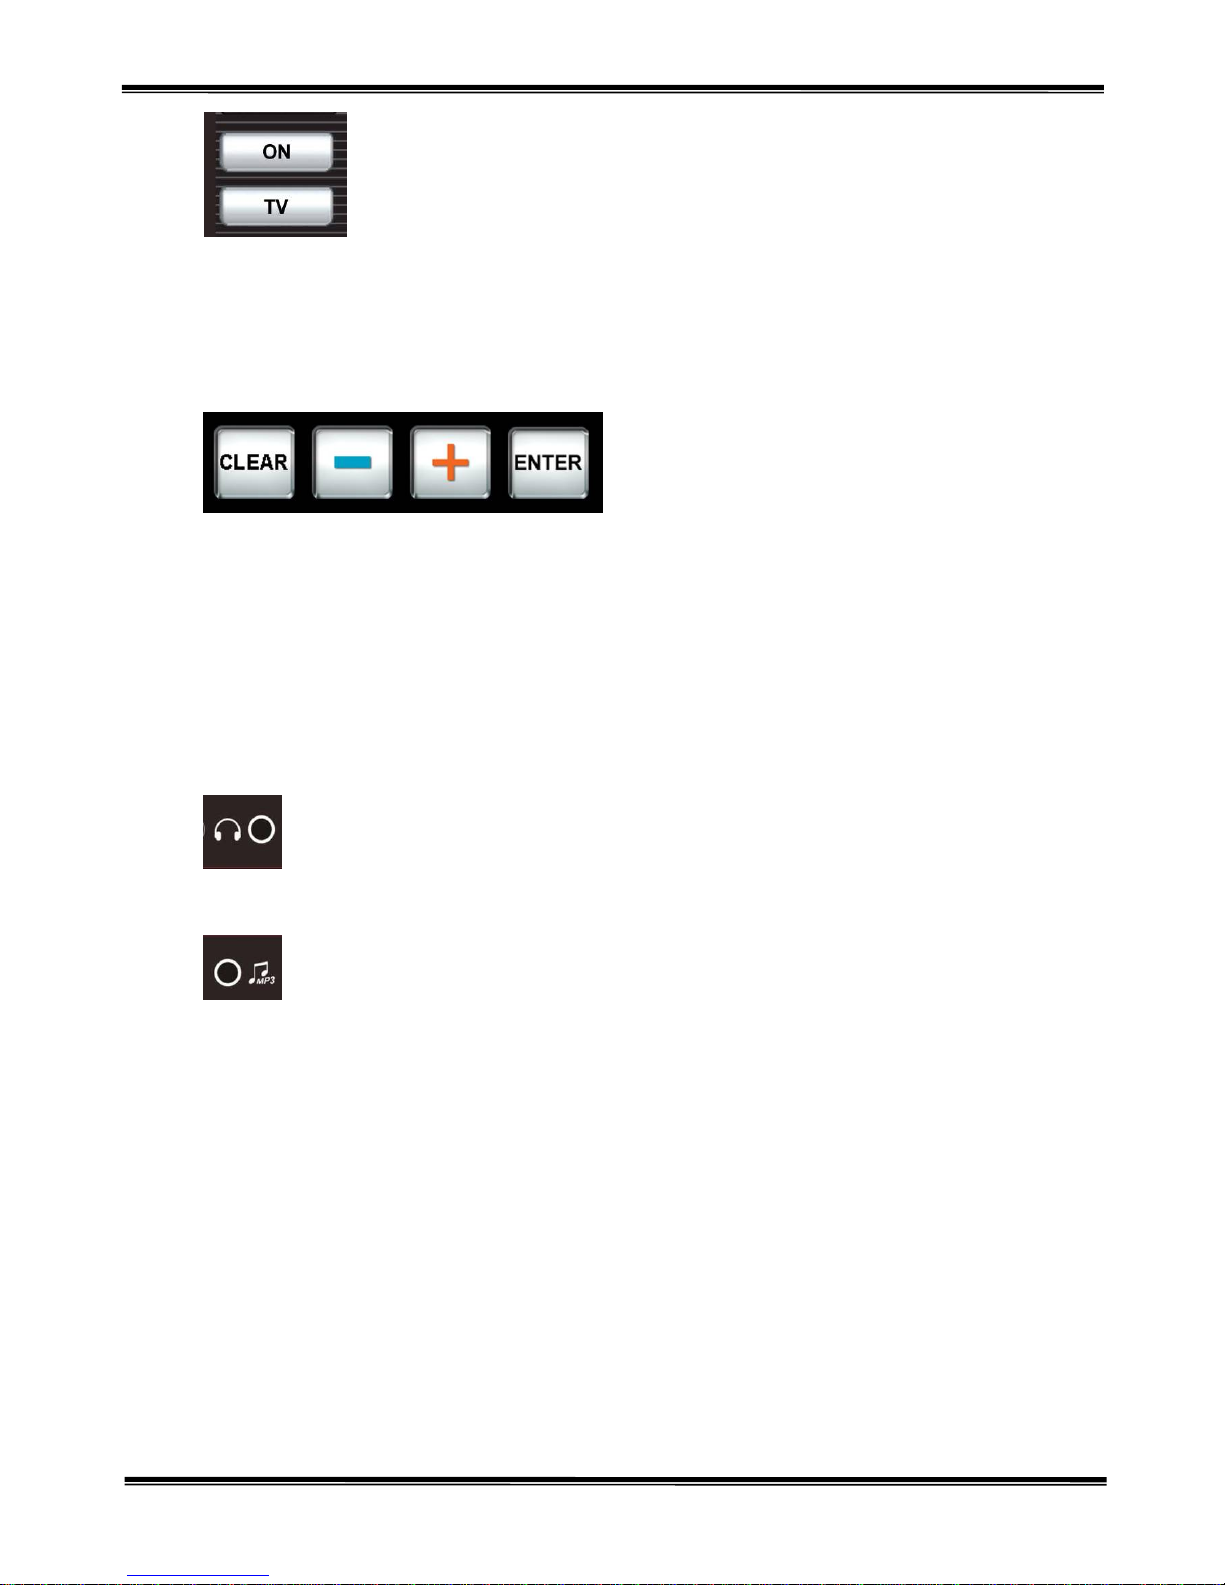
11. ON:Touch this key to start the video function(TV, DTV, AV, MP3 mode) and press again
to turn off.
12. TV:Touch this key to switch among TV, DTV, AV, MP3 mode (circle).
13. Touch the center of the image area under TV, DTV or AV mode to zoom in or zoom
out the screen.
14. ENTER:When entering program control mode to set parameters, touch this key for
confirmation.
15. +:When entering program control mode to set parameters, touch this key to increase the
parameter value.
16. -:When entering program control mode to set parameters, touch this key to decrease the
parameter value.
17. CLEAR:When entering program control mode to set parameters, touch this key to get
back the default value and return to the first parameter or item.
Insert the earphone device into this hole and the sound will be put out through
earphone.
Insert the MP3 PLAYER into the hole with Ø3.5 sound cable and you can listen to the
music under MP3 mode.

15 2010/2/26 Ver1.0+V1.0
IV. Mode Instructions
1. For the treadmill is dynamo type, it need 25PRM above or 15VDC/2000ma transformer to
start the computer continuously.
2. When the treadmill not plug to the transformer, the computer will be totally powered by
dynamo. While the rotate speed is lower than 40RPM, the computer will be powered by
batteries. If not operated for 1 minute and a half, it will enter into electric save mode (the
screen will shut down).
3. Step on the pedals (40RPM↑), then the electric power will be stored automatically.
4. While the rotate speed is lower than 40RPM, it will display ”RPM↑”icon.
When ”RPM↑”display for 15 seconds, it will enter into PAUSE mode and back to
start/ready menu after 45 seconds.
5. Under electric save mode or PAUSE mode, when the rotate speed is higher than 60RPM, it
will resume to start/ready menu.
6. Under Start/Ready mode or program control mode, if press key, it will enter into
start-up of Manual run directly.(Parameters adopt the default value)
7. In standby mode, it can choose Goal Mode, Programs Mode, Fitness Test Mode, HRC
Mode, User Mode, Race Mode in middle window; blue frame will show on mode which
use chooses.
8. Programs mode:After choosing PROGRAM, adjust parameter, or press directly to
start (It will be start by default if there is no parameter need to be adjust).
9. Workout has 32 levels in all. The setting time will be executed averagely by 32 levels.
10. During setting any parameter, you can press to cancel the setting and back to the
first parameter or program control menu. All the parameters will get back to the default
value.
11. There are character strings to instruct the user how to operate under mode edit menu or
parameter setting menu.
12. The runner goes counter-clockwise on racetrack. On the bottom left corner will display the
number of circles (LAPS). Every circle is 0.4KM (0.25MIL).You can switch it to project
mode by touching the small picture key on the bottom right corner.

16 2010/2/26 Ver1.0+V1.0
13. After the program is over or under pause mode for 1 minutes, the buzzer will beep for 30
seconds and then the accumulate sport values will display in the center window and after
20 seconds or press key, it will back to standby mode.
V. General Operation and Instructions:
1. Under start/ready status, press key, it will enter into MANUAL mode and after 3
seconds countdown, the treadmill will start running.
2. MANUAL mode has total 20 levels for your choice as you prefer.
3. There are 6 main program controls for choose under standby mode.
4. User can press to press change the range level when program execute. (As
different rotate speed, the same level has different resistance feedback.)
zGoal
Time Goal:Set the time goal required if running in the destination area and when the goal is
reached, the program will stop automatically.
Distance Goal:This program serves to test the endurance of the user. When the user
completes the set miles within limited time and reaches the goal, the program
will stop operation automatically.
Calories Goal:This program serves to lose and control weight. When certain quantity
of the calories is exhausted within limited time, the program will
stop operation automatically.
17 2010/2/26 Ver1.0+V1.0
1. User enter target value:Press or to adjust
WEIGHT(default:70kgs; range:23-180kgs), TIME(default:20minutes;range:0,
10-99minutes) or DISTANCE(default:5kilometers;range:0-99kilometer)or
CALORIES(default:500Kcal;range:0-999 Kcal)。
2. After setting parameter, press or press during setting to start program
(It will be start by default if there is no parameter need to be adjust).The target value
will be carried out by count down.
3. Press return to the first item to amend parameter, or press return to
standby directly to choose.
4. Press to adjust range of level anytime during parameter is carrying out.
(As different rotate speed, the same level has different resistance feedback.)
zFitness Test Mode (Physical fitness training)
1. User enter target value:Press or to adjust weight, age, male or
female.
2. After setting parameter, press or press during setting to start program
(It will be start by default if there is no parameter need to be adjust).The target value
will be carried out by count down. (Parameter will make measure according value
you enter)
3. Press return to the first item to amend parameter, or press return to
standby directly to choose.
4. The executing time is 6 minutes. Time of each level is 6 minutes divided by 32 levels.
The target value will be carried out by count down.
5. The max of resistance for male is defaulted to be 150 Watts; the max of resistance for
female is 100 Watts. It will be added to default value from 45Watts slowly after unit
starts.
6. Press to adjust range of level anytime during parameter is carrying out.
(As different rotate speed, the same level has different resistance feedback.)
7. After carrying out program, it will enter YOUR FITNESS TEST RESULT itself. The
window will show the number from 1 to 5. (1 means the worst score. 5 means the
best score.)
8. FITNESS TEST:
If Distance is :”0”, the result will be “0”also.

18 2010/2/26 Ver1.0+V1.0
zHRC Mode(need to wear wireless chest belt)
The purpose of this program is self-training based on heart rate. During the training, when
heart rate of runner achieves the setting number that you make, the LEVEL value will keep
within a certain range for best training effort.
1. The whole heartbeat control program has total four target pulse 65%, 75%, 85%, THR
(Target Heart Rate).
Calculate formula of heartbeat setting=(220-AGE)* heartbeat program control value
For example, age is 40,if the target pulse is 85% of maximum pulse, then the heartbeat
times:(220—40)×85%=153
2. User enter target value:Press or to adjust weight, age, male or
female.
3. Press return to the first item to amend parameter, or press return to
MALE
AGE HEART RATE
<35 >=186 >=170 >=139 >=129 <129
<45 >=183 >=165 >=124 >=112 <112
<55 >=186 >=167 >=127 >=100 <100
>=55 >=188 >=165 >=129 >=107 <107
RESULT 1 2 3 4 5
FEMALE
AGE HEART RATE
<35 >=197 >=181 >=150 >=140 <140
<45 >=212 >=197 >=161 >=150 <150
<55 >=228 >=212 >=181 >=169 <169
>=55 >=238 >=223 >=197 >=181 <181
RESULT 1 2 3 4 5

19 2010/2/26 Ver1.0+V1.0
standby directly to choose.
4. After setting parameter, press or press during setting to start program (It
will be start by default if there is no parameter need to be adjust).The target value will be
carried out by count down. (Parameter will make measure according value you enter)
5. Under THR mode, the target heartbeat value will automatically calculate according to the
input age of users.
6. If it can’t detect pulse, it will shoe NO PLUSE on the screen. If it can’t detect pulse for 45
seconds, it will turn back to standby itself.
7. RPM need be from70RPM to 80RPM during training. If RPM can’t reach 70RPM, it will
show ”RPM↑”on the screen. If RPM rather than 80RPM, it will show ”RPM↓”on the
screen
8. HR CONTROL Mode:
Preset heartbeat control mode is 50W (Level2). When computer detects the pulse, the
heartbeat value will be judged every 10 seconds.
Judgment method of Heartbeat value as follows:
A. While running, program will compare actual heartbeat value with preset
heartbeat value. If actual heartbeat value ≦preset heartbeat value 15, WAT T
will increase 20 automatically, the highest can reach 400 WATT.
B. While running, program will compare actual heartbeat value with preset
heartbeat value. If actual heartbeat value ≦preset heartbeat value 5, WAT T
will increase 10 automatically, the highest can reach 400 WATT.
C. While running, program will compare actual heartbeat value with preset
heartbeat value. If actual heartbeat value ≧preset heartbeat value 5, WAT T
will decrease 10 automatically, the lowest can reach 50WATT.
D. While running, program will compare actual heartbeat value with preset
heartbeat value. If actual heartbeat value ≧preset heartbeat value 15, WAT T
will decrease 20 automatically, the lowest can reach 50WATT.
9. While running, program will compare actual heartbeat value with preset heartbeat value. If
actual heartbeat value ≧preset heartbeat value 30, WATT will decrease down to
50WATT. The program will not carry out until heartbeat value ≦preset heartbeat value
5.
10. This chart is about Age and Pulse Value (default value) for THR Function.
Table of contents
Other Healthstream Exercise Bike manuals

Healthstream
Healthstream HS12.3BK User manual

Healthstream
Healthstream HS6.0B User manual

Healthstream
Healthstream HS12.5BK User manual

Healthstream
Healthstream HS2.ORW User manual

Healthstream
Healthstream CHEETAH / 402BK User manual

Healthstream
Healthstream HS12.6BK User manual

Healthstream
Healthstream FAN BIKE User manual

Healthstream
Healthstream HS12.4BK User manual

Healthstream
Healthstream HS12.2BK User manual


