Hendi 221082 User manual

You should read this user manual carefully before
using the appliance
Bevor Sie das Gerät in Betrieb nehmen, sollten
Sie diese Gebrauchsanweisung aufmerksam lesen
Alvorens de apparatuur in gebruik te nemen dient
u deze gebruiksaanwijzing aandachtig te lezen
Przed uruchomieniem urządzenia należy koniecznie
dokładnie przeczytać niniejszą instrukcję obsługi
Lisez attentivement ce mode d’emploi avant d’utiliser
l’appareil .
Prima di utilizzare l’apparecchio in funzione leggere
attentamente le istruzioni per l’uso.
Citiţi cu atenţie prezentul manual de utilizare înainte
de folosirea aparatului
Внимательно прочитайте руководство пользователя
перед использованием прибора
User manual
Gebrauchsanweisung
Gebruiksaanwijzing
Instrukcja obsługi
Mode d’emploi
Istruzioni per l’utente
Instrucţiunile utilizatorului
Руководство по эксплуатации
Item: 221082
JUICER

2
Keep this manual with the appliance.
Diese Gebrauchsanweisung bitte beim Gerät aufbewahren.
Bewaar deze handleiding bij het apparaat.
Zachowaj instrukcję urządzenia.
Gardez ces instructions avec cet appareil.
Conservate le istruzioni insieme all’apparecchio.
Păstraţi manualul de utilizare alături de aparat.
Хранить руководство вместе с устройством.
For indoor use only.
Nur zur Verwendung im Innenbereich.
Alleen voor gebruik binnenshuis.
Do użytku wewnątrz pomieszczeń.
Pour l’usage à l’intérieur seulement.
Destinato solo all’uso domestico.
Numai pentru uz casnic.
Использовать только в помещениях.

Dear Customer,
Thank you for purchasing this Hendi appliance. Before using the appliance for the first time, please read
this manual carefully, paying particular attention to the safety regulations outlined below.
Safety regulations
• This appliance is intended for commercial use only and must not be used for household
use.
• The appliance must only be used for the purpose for which it was intended and designed.
The manufacturer is not liable for any damage caused by incorrect operation and
improper use.
• Keep the appliance and electrical plug away from water and any other liquids. In the
event that the appliance should fall into water, immediately remove plug from the socket
and do not use until the appliance has been checked by a certified technician. Failure to
follow these instructions could cause a risk to lives.
• Never attempt to open the casing of the appliance yourself.
• Do not insert any objects in the casing of the appliance.
• Do not touch the plug with wet or damp hands.
• Danger of electric shock! Do not attempt to repair the appliance yourself. In case of
malfunctions, repairs are to be conducted by qualified personnel only.
• Never use a damaged appliance! Disconnect the appliance from the electrical outlet and
contact the retailer if it is damaged.
• Warning! Do not immerse the electrical parts of the appliance in water or other liquids.
Never hold the appliance under running water.
•Regularly check the power plug and cord for any damage. If the power plug or power cord
is damaged, it must be replaced by a service agent or similarly qualified persons in order
to avoid danger or injury.
•Make sure the cord does not come in contact with sharp or hot objects and keep it away
from open fire. To pull the plug out of the socket, always pull on the plug and not on the
cord.
•
Ensure that the cord (or extension cord) is positioned so that it will not cause a trip hazard.
• Always keep an eye on the appliance when in use.
•
Warning! As long as the plug is in the socket the appliance is connected to the power source.
• Turn off the appliance before pulling the plug out of the socket.
• Never carry the appliance by the cord.
• Do not use any extra devices that are not supplied along with the appliance.
• Only connect the appliance to an electrical outlet with the voltage and frequency
mentioned on the appliance label.
• Connect the power plug to an easily accessible electrical outlet so that in case of
emergency the appliance can be unplugged immediately. To completely switch off the
appliance pull the power plug out of the electrical outlet.
• Always turn the appliance off before disconnecting the plug.
3
NLEN

4
EN
• Never use accessories other than those recommended by the manufacturer. Failure to do
so could pose a safety risk to the user and could damage the appliance. Only use original
parts and accessories.
•This appliance is not intended for use by persons (including children) with reduced
physical, sensory or mental capabilities, or lack of experience and knowledge.
•This appliance must not be used by children under any circumstances.
•Keep the appliance and its cord out of reach of children.
•Always disconnect the appliance from the mains if it is left unattended or is not in use,
and before assembly, disassembly or cleaning.
•Never leave the appliance unattended during use.
Special safety precautions
•Keep the appliance away from any hot surfaces and open flames. Always operate the
appliance on a level, stable, clean and dry surface. Make sure the appliance is placed in
a safe manner.
•Do not use the appliance to process excessively hard or fibrous foods (e.g. rhubarbs).
•Danger of burns! Do not use the appliance during the cooking process, with boiling liq-
uids or hot fat.
•Danger of injury! Care shall be taken when handling the sharp cutting blades, emptying
the cutting tools and during cleaning.
•Warning! Never put your hands or any other object inside the feeding chute while the
appliance is operating.
•Keep fingers, hair, clothing and utensils away from all moving parts. Dry the appliance
and all the parts/accessories before connecting to the power supply and prior to attach-
ing the accessories.
•Never use a spoon, a spatula or similar to remove ingredients out of the appliance during
operation. In case, you have to remove something out of the feeding chute, always switch
off the appliance and unplug it before you do so.
•Make sure the lid is attached properly and securely locked before operating the juicer. Do
not unfasten the safety arm or remove the lid during operation.
Grounding installation
This is a class I appliance. This appliance must be
grounded. In the event of an electrical short circuit,
grounding reduces the risk of electric shock by pro-
viding an escape wire for the electric current. This
appliance is equipped with a cord having a ground-
ing wire with a grounding plug. The plug must be
plugged into an outlet that is properly installed and
grounded.
Before first use
• Remove all protective packaging and wrapping.
Make sure no packaging debris remain inside the
appliance.
• Check for the completeness and transport dam-
age. In case of damages or incomplete delivery,
please contact your supplier/importer.
• Keep the packaging for storing your appliance
when not in use for an extended period of time.
• Clean the appliance thoroughly (See → Cleaning
and Maintenance).
WARNING!
• Unplug the appliance from electrical power supply
before cleaning.
• Danger of electric shock! Do not immerse the

5
EN
power cord with plug or the motor unit in the water
or other liquids.
• Danger of hand inquiry! Handle the blade with
great care.
• Place the appliance on a dry, level and stable sur-
face with suction feet firmly stand with the surface.
Part list
Note: Three stoppers for the spout assembly are supplied to prevent the insects from entering.

6
EN
Assembly
• WARNING! Never connect the power plug into an
electrical outlet before the appliance is fully as-
sembled.
• Make sure the spout assembly is closed.
1.
2.
Position the motor unit firmly so that the OFF / ON buttons are facing you. Place the bowl on top of the motor unit.
3. 4.
Fit the flange onto the rim of the bowl. The ribs of the flange should be
lined up with the flat panel of the bowl. Make sure that the flange is cor-
rectly fitted.
Lower the basket assembly into correct place, holding it by the holders.
Rotate it until its slots into correct place.
5.
IMPORTANT: Make sure that the
pin on the motor shaft is correct-
ly lined up with the corresponding
notch in the basket hub.
Line the lid with feeding chute with the notches in the flange.
6.
7.
(Opposite view)
Correctly fit the pulp container with the hopper plate. Close the safety arm correctly.
The juicer will not start unless the safety arm has been closed properly
(safety switch).
Now, the appliance is assembled and ready for use.

7
EN
Operation
Notes:
• Due to the manufacturing process, this new-
ly bought appliance may emit some odour when
switched on for the first time. This odour might
remain for the first few operating cycles. This is
normal and does not indicate any defect or hazard.
• Do not put your hand or fingers into the feeding
chute to push food or remove clogged food. Use
the pusher only. Danger of serious injury due to
the rotating blade.
• Close the safety arm to operate.
• Always switch “OFF” the appliance and unplug it
when not in use.
• Check regularly the flange and lid are correctly fit-
ted especially when change to another food.
Preparing fruits and vegetables
• This juicer can be used to make juices from many
different types of fruit and vegetables, but some
preparations are needed to create flavorful and
tasty juices.
• Rinse fruits under fresh running water.
• Cut large fruit into small pieces that fit into the
feeding chute.
• Remove large seeds, stones, ad pits from cherries,
peaches, etc.
• Peel thick-skinned fruits (pineapples, oranges,
melons, etc).
Below instructions for fruits and vegetables preparation are just for reference only.
Fruit and vegetable preparation
Carrots Peeled and left whole, topped and tailed. Feed in 2 or 3 at a time.
Apples Washed and left whole (remove stalk and any labels).
Strawberry Remove stalks for the taste.
Citrus fruit Peel all citrus fruit. Oranges and lemons can be left whole.
Pineapples Peel and cut into eight chunks (3 cuts)
Melons Peel and cut into eight chunks.
Tomatoes Washed and left whole (remove hard green core). Food in 2 or 3 at a time.
Peppers Washed and cut into quarters lengthwise, according to shape.
Celeriac Cut into 6 - 7 cm chunks
Cucumbers Peeled. Cut into sections measuring approx. 15cm long
Fennel Cut into 6 - 7 cm chunks
Ginger Cut into pieces to make it easier to feed into the juicer. Do not put too many in at a time, to prevent a blockage.
Grapes Remove stalks to avoid bitterness.
Extracting juice
• Place a container (not supplied) under the spout
assembly with the spout open.
• Remove the pusher from the feeding chute.
• Connect the power plug to a suitable electrical
supply outlet.
• Switch ON the appliance by pressing the “ON”
(green) button.
• Fill the prepared ingredients into the hopper plate
gradually. Do not overload it. Add small pieces at a
time. Fruit pulp is ejected into the pulp container
while the extracted juice flows through the spout
into the container (not supplied).
• Use the pusher to push & guide the ingredients
through the lid with feeding chute.
• Press the “OFF” button when all the food has been
processed.

8
EN
Safety protection
• This juicer will not start unless the lid with feeding
chute has been correctly positioned and the safety
arm locked properly. The motor will be switched to
OFF as soon as you unlock the safety arm or press
the OFF button.
• This juicer is equipped with a powerful brake
which will stop the appliance in less than few sec-
onds if you unlock the safety arm while the juicer
is running.
• To switch your juicer ON again, simply lock the
safety arm properly over the lid and press the I
(ON) button.
Removing clogged foodstuff from lid with feeding chute
• If food is clogged, use the pusher to push it down.
If this fails to work, press the switch to the “OFF”
position and wait a while until the blade stops run-
nings.
• Dsconnect the power plug from the electrical sup-
ply outlet and remove the lid with feeding chute.
• Wait until the juicer has come to a complete stand-
still and has fully cooled before disassembling.
• Clear all clogged foodstuff off the lid with feeding
chute.
Useful Hints
Follow these helpful hints to obtain the best results from your juicer.
• Do not put any fruit or vegetables in your juicer
until power is turned ON and the motor is start
spinning.
• Allow juicer to run for a few seconds befor start
juicing.
• Do not force the food into the juicer. Allow the food
to drop through slowly & steadily using the pusher.
• Any fruit or vegetables that be fit will the feeding
tube can put through whole. Cut the food if it is too
big in order to fit in the feeding tube.
• Remove large pits such as peach, mango, etc., as
this will damage the blade and possibly the juicer.
• Let the juicer run for a few seconds before turning
off to allow any excess juice to be extracted from
the pulp. Once turned OFF, wait until the juicer has
come to a complete standstill and has fully cooled
before disassembling.
• Do not recommend using overripe fruit as it will
leave too much pulp in the filter and clog the juicer.
• Do not pour liquids into the appliance at any time
unless you are following instructions/recipe for
making soy, rice, or nut milk.
• When using small or thin fruits or vegetables, add
many of them at the same time. For example, in-
sert 2 or 3 carrots at a time into the feeding tube
for best results.
• When juicing herbs or wheat grass, wrap them
in larger leafed vegetables such as spinach, cab-
bage, etc., and follow by a fruit or vegetavle that
contains an abundance of juice such as pineapple,
apple, etc.
• When juicing carrots that are not the same size, do
not use pusher until the largest carrot ahs been
processed. Once they have the same size, you can
use pusher to continue until carrots have been
processed.
• Denser vegetables (i.e. beets) and fibrous vegeta-
bles (i.e.celery) should be chopped and fed slowly
into the feeding tube to reduce clogging.
Cleaning and Maintenance
• Warning! Always unplug the appliance from the
electrical power outlet before cleaning & storage.
• It is NOT recommended to wash the different parts
in dishwasher.
• Immediately after use each time, use the brush
(supplied) to thoroughly clean the fine mesh holes
of the cutting blade in the basket. Be careful of
the sharp edges! Brush the inside under running
water, holding it up towards the light to ensure the
fine mesh holes are not blocked.
• Danger of electric shock! Do not immerse the
power cord with plug or the motor base unit in the
water or other liquids.
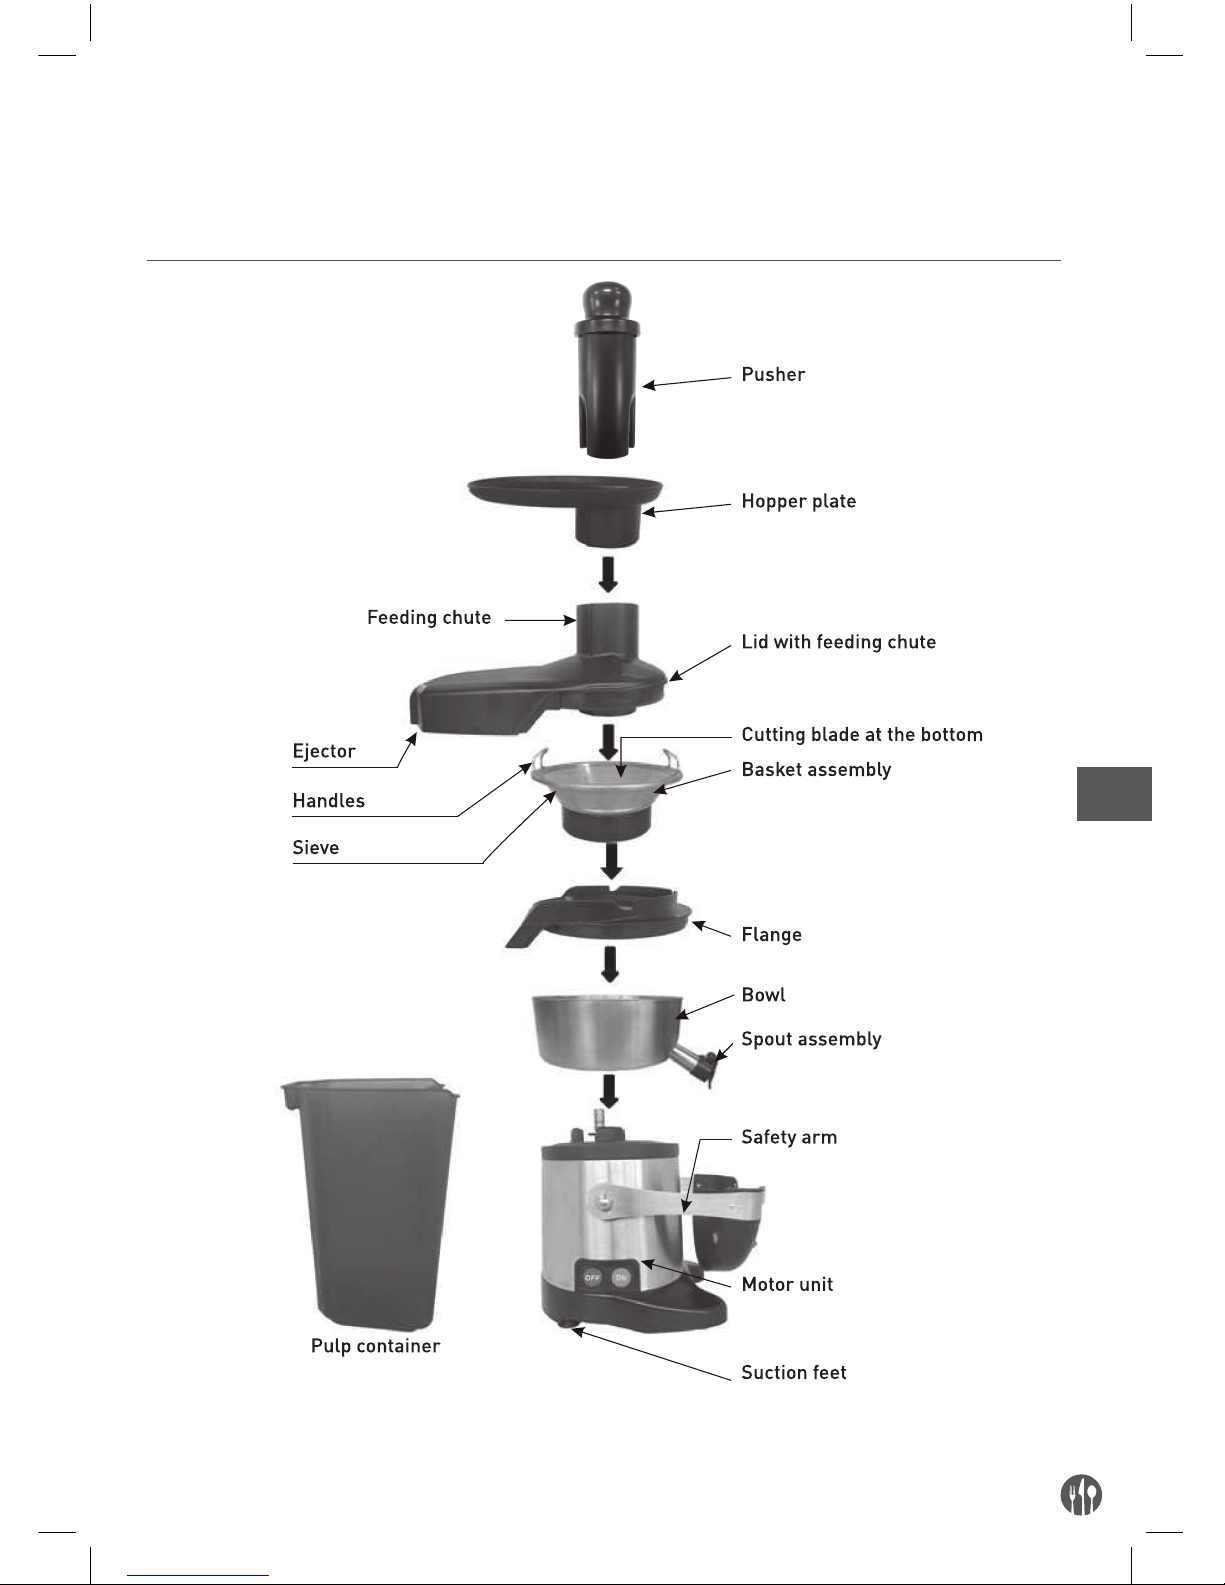
• Disassemble the juicer in the reverse order of as-
sembly (See → Assembly)
• Clean the motor base unit with a soft damp cloth.

9
EN
Parts Description
Pusher
- Immerse the parts in warm, mild dtergent for about 3 ~ 5 minutes. Never use abrasive cleaning de-
tergent.
- Rince under running water.
- Danger of hand injury! Handle with geat care with blade.
Lid with feeding chute
Basket assembly with blade
Bowl
Pulp container
• Dry all parts completely. • Reassemble the juicer (See → Assembly)
Storage
• Always make sure the applaince has already been
disconnected from the electrical wall outlet and
cooled down completely.
• Store the appliance in a clean, dry, out of the reach
of the children and pets.
Troubleshooting
If the appliance does not function properly, please
check the below table for the solution.
If you are unable to solve the problem, please con-
tact the supplier/service provider.
Problem Possible cause Possible solution
Motor does not run after being turned ON. The appliance does not plug in firmly with the
electrical power outlet. Check the plug to confirm the plug in firmly.
Motor is running with loud noises and great vi-
brations. - The appliance is not well assembled.
- Too many ingredients that clogged inside the
blade in the basket assembly
- Suction feet not have firm contact with the
surface
- Unplug it and reassemble the appliance cor-
rectly (See → Assembly).
- Unplug. Clear some food & restart.
- Make sure the suction feet have contact with
the surface firmly.
Inefficient juicing result The cutting blade inside the basket is worn. Replacement of the cutting blade inside the
basket.
Technical Specification
Item no.: 221082
Operating voltage and frequency: 220-240V~ 50/60Hz
Output power: 700W
Net weight: approx. 13kg
Protection class: class I
Waterproof class: IPX1
Noise level: < 72 dB (A)(Under no load operation)
Dimensions: 250 x 410 x (H) 530 mm
Rotation speed: approx. 3000 rpm
Remarks: Technical specification is subjected to change without prior noticification.
Material of different parts
Parts Material
Housing of motor unit Stainless steel SUS304
Bowl Stainless steel SUS304
Basket assembly Stainless steel SUS304
Grating disc Stainless steel SUS430

10
EN
Dimensions
Electric diagram (220-230V~ 50/60Hz)
EP Main phase
EA Starting phase
CD Starting capacitor
KD Starting relay
KM Electromagnetic relay
MA1 Start switch
MA2 Stop switch
SW Clamp safety switch
MF Breaking module
MO Single phase Motor
PTO Motor thermal protector

11
EN
RECIPES
Fruit and vegetables can be combined in an infinite
number of ways to create exciting, colorful and
totally natural drinks. Give your imagination free in
mind these few golden rules for making cocktails:
• Always use untreated fruit.
• Using a shaker will make an opaque mixture more
homogeneous.
• Fill the lower half of the shaker half-full with ice
cubes.
Avoid shaking your cocktail for too long, otherwise
the ice will melt and spoil it.
Here is a selection of cocktail recipes, each for ap-
proximately four people.
Note: Below recipes are for reference only. Lots of
recipes can be found in cooking books and on the
internet.
PEACH SPARKLE
Ingredients (serves 3):
• 6 peaches
• 1/2 lemon
• 1 generous pinch ground nutmeg
• 300ml soda water
• 1 thin slice fresh ginger
Preparation: stone the peaches and peel the lem-
on. There is no need to peel the ginger. Process the
peaches in your juicer first, followed by the ginger,
then the lemon. Next, combine the ground nutmeg
and soda water with the juice. Divide between three
glasses. Garnish: decorate the glasses with thin
slices of peach.
APPLE-KIWI
Ingredients (serves 3):
• 3 Granny Smith apples
• 1/2 lime
• 3 kiwi fruit
Preparation: peel the lime. Peel the kiwis so that the
cocktail retains a fresh green color.
Process all the ingredients in your juicer.
Stir with a spoon and serve immediately, before the
apple starts to go brown,
Idea: if you find the taste too acidic, simply add a lit-
tle honey or cane sugar syrup. You can also replace
the kiwi fruit with a cucumber or a stick of celery.
MELLOW GRAPEERUIT
Ingredients (serves 3):
• 250g orange
• 250g grapefruit
• 250g strawberries
Preparation: peel the oranges and grapefruit to
avoid a bitter taste . Process all the ingredients in
your juicer.
Stir well and divide between the glasses.
Idea: if you find the juice too acidic, simply add a lit-
tle honey or cane syrup.
ORIENTAL
Ingredients (serves 3):
• 1/2 pineapple
• 3 oranges
• 1 tsp vanilla extract
Preparation: peel the fruit. Process the pineapple in
your juicer first , followed by the oranges.

12
EN
APPLE-CELERY
Ingredients (serves 4):
• 4 Granny Smith apples
• 2 sticks celery
• 1 thin slice fresh ginger
• 1/2 lemon
• salt
Preparation: wash the celery sticks thoroughly and
process in your juice, followed by the ginger, then the
apples. Season with a little salt and serve immedi-
ately, before the apple starts to go brown. Idea: you
can use pears instead of apples.
SCARLET COCKTAIL
Ingredients (serves 4):
• 1 cooked beetroot
• 2 carrots
• 2 small bunches red grapes
• 2 Granny Smith apples
• Cayenne pepper
Preparation: process all the fruit and vegetables in
your juicer. Season the juice with Cayenne pepper
and serve chilled.
Garnish: decorate each glass with a slice of baby
beetroot. Idea: you can use either white or yellow
peaches for this juice.
HONEYED WATERMELON
Ingredients (serves 3):
• 750g watermelon
• 1/2 lemon
• 20g honey
• 20g water
Preparation: boil the honey and water together and
allow to cool. Remove the watermelon rind and pips
and cut the flesh into large chunks. Peel the lemon.
Process the fruit into large chunks. Peel the lemon.
Process the fruit in your juicer.
Pour the honey mixture into the glasses first, fol-
lowed by the watermelon juice. Garnish: serve with
thinly sliced watermelon.
CARROT CAPRICE
Ingredients (serves 4):
• 4 carrots
• 4 oranges
• 1 thin slice fresh ginger
• Ice cubes
Preparation: wash and scrub the carrots (no need to
peel them). Peel the oranges. Process all the ingre-
dients except for the ice cubes in your juicer.
Divide between four glasses, add the ice cubes and
serve immediately. Garnish: decorate with an olive
and a slice of orange.
Stir the vanilla extract into the juice and serve in
small shot glasses. Idea: replace the oranges with
coconut milk.
CLASSIC
Ingredients (serves 3):
• 4 carrots
• 3 apples
• 1 lemon
Preparation: peel the lemon. Wash and scrub the
carrots (no need to peel them). Process all the in-
gredients in your juicer.
Stir well and serve.
Idea: you can substitute pears for the apples.

13
EN
GAZPACHO
Ingredients (serves 3):
• 500g ripe tomatoes
• ½ small red pepper
• 1/2cucumber
• 1/2small stick celery
• 1 tbsp olive oil
• Drop of sherry vinegar
• Salt
•Pepper
Preparation: process all the vegetables in your juic-
er, then add the olive oil, sherry vinegar and salt.
Garnish: decorate with a twist of lemon peel and a
slice of tomato.
Idea: as tomato opens the appetite, serve the gazpa-
cho at the start of the meal.
ASPARAGUS SPEARS
Ingredients (serves 3):
• 1kg green asparagus
• 1pinch ground Espelette pepper
• 1 pinch flour do sel sea salt
Preparation: peel the asparagus spears and discard
the tough ends of the stalks. Process in your juicer.
Season with a little Espelette pepper and sea sea
salt. Idea: use this cocktail to accompany a salmon
dish.
CUCUMBER QUENCHER
Ingredients (serves 4):
• 1 cucumber
• 4 Granny smith apples
• 3 tbsp dill
• 1/2 lemon
• Goat’s milk
Preparation: wash the cucumber but do not peel it,
as the skin contains vitamins and will also lend color
to your cocktail. For this reason, use an organic cu-
cumber,if possible. Peel the lemon.
Process the cucumber, apples and dill in your juicer,
followed by the lemon. Combine the goat’s milk with
the juice.
PRETTY PINK
Ingredients (serves 4):
• 300 g strawberries
• 3 carrots
• 1/4 pineapple
Preparation: peel the pineapple and cut into chunks.
You do not need to hull the strawberries, as their
stalks will automatically be ejected into the pulp
container.
Process the pineapple, strawberries and carrots in
your juicer in that order. Stir well and divide between
glasses decorated with sliced strawberries.
Idea: liven up your cocktail with a pinch of ground
vanilla bean, cardamom or ginger.
MELON MELODY
Ingredients (serves 3):
• 400 g green-skinned melon
• 1 Granny Smith apple
• 1/2 lemon
Preparation: remove the melon rind and pips and
cut the flesh into large chunks. Peel the lemon. Pro-
cess all the ingredients in your juicer.
Stir with a spoon and serve immediately, flavored
with a few mint leaves. Idea: replace the melon with
watermelon.

14
EN
MELON-PEAR WITH TURMERIC
Ingredients (serves 4):
• 1400 g yellow honeydew melon
• 1 grapefruit
• 1/2 pear
• 1/2 Golden Delicious apple
• 1 thin slice fresh ginger
• 1/2 lemon grass stalk
• 1 tiny pinch turmeric
Preparation: peel the melon and grapefruit. Process
the apple, ginger, lemon and grapefruit in your juic-
er in that order. Stir well and divide between four
glasses.
Warranty
Any defect affecting the functionality of the appli-
ance which becomes apparent within one year after
purchase will be repaired by free repair or replace-
ment provided the appliance has been used and
maintained in accordance with the instructions and
has not been abused or misused in any way. Your
statutory rights are not affected. If the appliance is
claimed under warranty, state where and when it
was purchased and include proof of purchase (e.g.
receipt).
In line with our policy of continuous product devel-
opment we reserve the right to change the product,
packaging and documentation specifications with-
out notice.
Discarding & Environment
At the end of the life of the appliance, please dispose
of the appliance according to the regulations and
guidelines applicable at the time.
Throw packing materials like plastic and boxes in
the appropriate containers.

15
Sehr geehrte Kundin, sehr geehrter Kunde,
wir danken Ihnen für den Kauf des Gerätes Hendi. Machen Sie sich bitte mit dieser Anleitung noch vor der
Inbetriebnahme des Gerätes vertraut, um Schäden durch die unsachgemäße Bedienung zu vermeiden. Den
Sicherheitsregeln ist besondere Aufmerksamkeit zu widmen.
Sicherheitsregeln
• Die unsachgemäße Bedienung des Geräts kann zur schweren Beschädigung des Geräts
sowie zu Verletzungen führen.
• Das vorliegende Gerät ist ausschließlich für den gewerblichen Gebrauch bestimmt und
darf nicht im Haushalt verwendet werden.
• Das Gerät ist ausschließlich zu dem Zweck zu benutzen, zu dem es hergestellt wurde.
Der Hersteller haftet nicht für Schäden, die auf unsachgemäße Bedienung des Geräts
zurückzuführen sind.
• Den Kontakt des Gerätes und des Steckers mit Wasser oder einer anderen Flüssigkeit
vermeiden. Den Stecker unverzüglich aus dem Stecker ziehen und das Gerät von einem
anerkannten Fachmann prüfen lassen, wenn das Gerät unbeabsichtigterweise ins Was-
ser fällt. Bei Nichteinhaltung dieser Sicherheitsvorschriften besteht Lebensgefahr.
• Nie eigenständig das Gehäuse des Gerätes zu öffnen versuchen.
• In das Gehäuse des Gerätes keine Gegenstände einführen.
• Den Stecker nicht mit nassen oder feuchten Händen berühren.
• Gefahr eines Stromschlags! Das Gerät darf nicht selbstständig repariert werden. Sämtli-
che Mängel und Unzulänglichkeiten sind ausschließlich durch qualifiziertes Personal zu
beseitigen.
• Niemals ein beschädigtes Gerät benutzen! Das beschädigte Gerät vom Netz trennen
und sich mit dem Verkäufer in Verbindung setzen.
• Warnung: Die Elektroteile des Gerätes dürfen weder in Wasser noch in andere Flüssig-
keiten getaucht werden. Ebenso ist das Gerät nicht unter fließendes Wasser zu halten.
• Der Stecker und die Stromversorgungsleitung sind regelmäßig auf Beschädigungen zu
prüfen. Der beschädigte Stecker oder Leitung sind an eine Servicestelle oder einer an-
deren qualifizierten Person zur Reparatur zu übergeben, um eventuellen Gefahren und
Verletzungen des Körpers vorzubeugen.
• Man muss sich davon überzeugen, ob die Stromversorgungsleitung weder mit scharfkan-
tigen noch mit heißen Gegenständen in Berührung kommt; halten Sie die Leitung weit
entfernt von einer offenen Flamme. Um den Stecker aus der Netzsteckdose zu nehmen,
muss man immer am Stecker und nicht an der Leitung ziehen.
• Die Stromversorgungsleitung (oder Verlängerungsleitung) ist vor dem zufälligen Her-
ausziehen aus der Steckdose zu schützen. Die Stromversorgungsleitung muss so geführt
werden, dass niemand zufällig darüber stolpern kann.
• Das Gerät muss während seiner Anwendung ständig kontrolliert werden.
• Warnung! Wenn der Stecker in der Netzsteckdose ist, muss man das Gerät als an die
Stromversorgung angeschlossen betrachten.
DE

16
DE
• Bevor der Stecker aus der Netzsteckdose genommen wird, ist das Gerät auszuschalten.
• Das Gerät darf beim Tragen nicht an der Leitung gehalten werden.
• Benutzen Sie kein Zubehör, das nicht mit diesem Gerät mitgeliefert wurde.
• Das Gerät muss man ausschließlich an die Steckdose mit solch einer Spannung und
Frequenz anschließen, wie auf dem Typenschild angegeben wird.
• Stecken Sie den Stecker in die Steckdose, die an einem leicht und bequem zugänglichen
Ort angeordnet ist, und zwar so, dass das Gerät bei einer Störung sofort abgeschaltet
werden kann. Um das Gerät vollständig auszuschalten, muss man es von der Strom-
quelle trennen. Zu diesem Zweck muss man den Stecker, der sich am Ende der vom
Gerät getrennten Leitung befindet, aus der Netzsteckdose ziehen.
• Vor dem Abtrennen des Steckers ist das Gerät auszuschalten!
• Benutzen Sie kein Zubehör, das nicht vom Hersteller empfohlen wird. Die Anwendung
vom nicht empfohlenen Zubehör stellt eine Gefahr für den Nutzer dar und kann zur Bes-
chädigung des Gerätes führen. Benutzen Sie ausschließlich Ersatzteile und Zubehör im
Original.
• Dieses Gerät eignet sich nicht für den Gebrauch durch Personen (gilt auch für Kinder)
mit geringerer Motorik, Sensorik oder geistiger Fähigkeit oder mangelhafter Erfahrung
und Wissen.
• Auf keinen Fall darf das Bedienen des Gerätes durch Kinder zugelassen werden.
• Das Gerät mit Stromversorgungsleitung ist außerhalb der Reichweite von Kindern zu
lagern.
• Ebenso muss dafür gesorgt werden, dass die Kinder das Gerät nicht zum Spielen be-
nutzen.
• Das Gerät ist immer dann von der Stromversorgung zu trennen, wenn es ohne Aufsicht
bleiben soll bzw. auch vor der Montage, Demontage und Reinigung.
• Während der Nutzung darf das Gerät nicht ohne Aufsicht gelassen werden.
Besondere Sicherheitshinweise
•Halten Sie das Gerät von heißen Flächen und offenen Flammen fern. Stellen Sie das
Gerät auf eine ebene, stabile, saubere und trockene Fläche auf. Überprüfen Sie, ob das
Gerät stabil und sicher aufgestellt ist.
•Verwenden Sie das Gerät nicht zur Verarbeitung von zu sehr harten oder faserigen Leb-
ensmitteln (z.B. Rhabarber).
•Es besteht die Verbrennungsgefahr! Verwenden Sie das Gerät nicht zur Verarbeitung
von gekochten Produkten, siedenden Flüssigkeiten sowie einem heißen Fett.
•EsbestehtdieVerletzungsgefahr!Seien Sie vorsichtig im Umgang mit scharfen Messern,
indem Sie die Schneidelemente entfernen und reinigen.
•Warnung!Stecken Sie nie ihre Hände in den Einfüllschacht ein, wenn das Gerät in Be-
trieb ist.
•Während des Funktionsbetriebes darf man nicht die beweglichen Teile mit der Hand als
auch mit den anderen Küchengeräten berühren; die Haare zusammenbinden. Das Gerät
und alle Teile/Zubehör müssen vor dem Anschluss an die Stromquelle und der Montage
des Zubehörs genau getrocknet werden.

17
DE
•Verwenden Sie weder Löffel, Küchenschaufel noch andere Gegenstände zur Beseitigung
von Zutaten aus dem Gerät während seiner Nutzung. Wenn es notwendig ist, irgendein
Element/Obst aus dem Einfüllschacht zu beseitigen, muss man immer das Gerät auss-
chalten und es von der Stromversorgung trennen.
•Vergewissern Sie sich vor der Inbetriebnahme der Saftpresse, dass der Deckel richtig
und sicher aufgesetzt ist. Trennen Sie den Sicherungsarm nicht und nehmen Sie den
Deckel nicht während des Funktionsbetriebes ab.
Montage der Erdung
Die Saftpresse ist ein Gerät der I. Schutzklasse und
erfordert eine Erdung. Beim Kurzschluss verrin-
gert die Erdung durch die Anwendung eines Stro-
mableiters das Risiko eines elektrischen Strom-
schlags. Das Gerät ist mit einer Erdungsleitung mit
einem Erdungsstecker ausgerüstet. Stecken Sie
den Stecker nicht in die Steckdose, bevor das Gerät
nicht entsprechend installiert und geerdet wurde.
Vor erstem Gebrauch
• Die Verpackung und Sicherungen abnehmen und
entfernen. Vergewissern Sie sich, dass es im Gerät
keine Verpackungsreste mehr gibt.
• Überprüfen Sie das Gerät auf Vollständigkeit und
eventuelle Beschädigungen während des Trans-
ports. Im Falle von Beschädigungen oder einer
unvollständigen Lieferung setzen Sie sich mit dem
Lieferanten/Importeur in Verbindung.
• Bewahren Sie die Verpackung zwecks der La-
gerung des Geräts, wenn es über eine längere Zeit
nicht verwendet wird.
• Reinigen Sie genau das Gerät (siehe: → Reinigung
und Wartung).
• WARNUNG! Trennen Sie das Gerät von der Strom-
quelle, bevor Sie es reinigen.
• Es besteht die Gefahr des Stromschlags! Tauchen
Sie weder das Stromkabel noch die Motoreinheit
in Wasser oder andere Flüssigkeiten ein.
• Es besteht die Gefahr von Handverletzungen!
Seien Sie vorsichtig im Umgang mit der Schneide
des Geräts.
• Stellen Sie das Gerät auf eine trockene, stabile
Fläche auf, indem Sie sich vergewissern, dass die
Füße mit Gummisaugern entsprechend an den
Boden befestigt wurden.

18
DE
Teileverzeichnis
Hinweis: Drei Stöpsel am Trichter verhindern das Eindringen von Insekten ins Innere des Geräts.

19
DE
Montage
• WARNUNG! Schließen Sie nie die Saftpresse
an die Steckdose an, bevor alle Teile des Geräts
eingebaut werden.
• Vergewissern Sie sich, dass der Stöpsel des
Trichters geschlossen ist.
1.
2.
Stellen Sie die Motoreinheit stabil auf - Tasten AUS / EIN sind dem Bedi-
ener zugewandt. Setzen Sie die Schüssel auf die Motoreinheit.
3. 4.
Setzen Sie den Flansch auf den Schüsselrand. Die Rillen des Flansches
sollten an die Vertiefungen der Schüssel angepasst werden. Vergewissern
Sie sich, dass der Flansch richtig angesetzt wird.
Setzen Sie den Korb an die entsprechende Stelle, indem Sie die Henkel
halten. Drehen Sie den Sieb in die richtige Position.
5.
WICHTIG: Vergewissern Sie sich,
dass der Bolzen der Motorwelle
gegenüber der entsprechenden
Vertiefung in der Mitte des Korbes
richtig eingesetzt wird.
Passen Sie den Deckel mit dem Einfüllschacht an die Vertiefungen am
Flansch an.
6.
7.
(Gegenüberansicht)
Montieren Sie den Fruchtfleischbehälter entsprechend an den Einfüll-
trichter. Schließen Sie den Sicherungsarm richtig.
Die Saftpresse startet nicht, wenn der Sicherungsarm nicht richtig
geschlossen wurde (Notschalter).
Das Gerät ist zusammengebaut und betriebsbereit.

20
DE
Anwendung
Hinweis:
• Aufgrund des Herstellungsverfahrens kann
das neu gekaufte Gerät einen unangenehmen
Geruch ausströmen, wenn es zum ersten Mal
eingeschaltet wird. Der unangenehme Geruch
kann bei einigen ersten Arbeitszyklen ausgeströmt
werden. Das ist aber normal und bedeutet weder
eine Beschädigung des Geräts noch eine Gefähr-
dung für den Nutzer.
• Stecken Sie nie ihre Hände oder Finger in den
Einfüllschacht ein, um das Pressgut zu verschie-
ben oder die blockierenden Fragmente zu ent-
fernen. Zu diesem Zweck ist nur der Stopfer zu
verwenden. Es besteht die Gefahr schwerer Ver-
letzungen durch die drehende Schneide.
• Um das Gerät zu verwenden, schließen Sie den
Sicherungsarm.
• Wenn das Gerät nicht mehr verwendet wird, ist es
auszuschalten und das Stromkabel aus der Steck-
dose zu ziehen.
• Überprüfen Sie regelmäßig, ob der Flansch und
der Deckel richtig montiert werden, insbesondere
nach dem Wechsel der Sorte von zu pressendem
Obst und Gemüse.
Vorbereitung von Obst und Gemüse
• Die Saftpresse kann zur Zubereitung des Saftes
aus verschiedenen Sorten von Obst und Gemüse
verwendet werden, aber in manchen Fällen sind
spezielle Tätigkeiten auszuführen, damit die zube-
reiteten Säfte eine vollen und reichen Geschmack
haben können.
• Waschen Sie Obst unter fließendem Wasser.
• Schneiden Sie großes Obst in kleinere Stücke, so
dass sie gut durch den Einfüllschacht passen.
• Entfernen Sie die Kerne (z.B. Kirschen, Pfirsiche).
• Schälen Sie Obst mit dicker Schale (Ananasse, Or-
angen, Melonen usw.).
Die nachfolgende Anleitung zur Vorbereitung von Obst und Gemüse dient nur als Referenz.
Vorbereitung von Obst und Gemüse
Karotten Schälen und im Ganzen (nach dem Abschneiden von beiden Enden) einführen. 2-3 zugleich einführen.
Äpfel Waschen und im Ganzen (nach dem Entfernen von Stielen und Aufklebern) einführen.
Erdbeeren Für den besseren Geschmack Stängel entfernen.
Zitrusfrüchte Sämtliche Zitrusfrüchte vor deren Einlegen in die Saftpresse schälen. Orangen und Zitronen kann man im Ganzen ein-
führen.
Ananasse Schälen und in acht Stücke (3 Schnitte) schneiden.
Melonen Schälen und in acht Stücke schneiden.
Tomaten Schälen und im Ganzen (nach dem Entfernen des grünen Teils der Tomate) einführen. 2-3 zugleich einführen.
Paprikas Schälen und längs in Viertel schneiden (in Abhängigkeit von der Gestalt).
Sellerien In Stücke von 6-7 cm schneiden.
Gurken Schälen. In Stücke von ca. 15 cm schneiden.
Fenchel In Stücke von 6-7 cm schneiden.
Ingwer Zum leichteren Einführen in die Saftpresse in Stücke schneiden. Nicht zu viele Stücke zugleich einlegen. So vermeidet
man das Verstopfen.
Weintrauben Stiele entfernen, um den bitteren Geschmack zu vermeiden.
Table of contents
Languages:
Other Hendi Juicer manuals