Hillrom Likorall 242 User manual
Ceiling lift Page 1 of 2
St. James-Assiniboia School Division
Client Handling Program
I have been trained and have successfully demonstrated this procedure.
I understand that these techniques are to be used to comply with St. James-Assiniboia School Division
Ceiling lift
Reviewed by:
Created by:
Paul Deacon Last revision date:
March 28, 2011
Hazards Present:
Potential for musculoskeletal injuries
Sudden weight shift, Awkward positions,
Signs & Symptoms include:
Pain, tingling, numbness, tightness, swelling, and
discomfort.
Personal Protective Equipment
or Devices may be Required:
Assist rail
Bed slider
Ceiling lift & manufacturer
specific sling.
Additional Training Requirements:
Training program includes the following:
-Read and understand the owner’s manual
-Initial orientation by Occupational Therapist
-In-servicing as required
Supportive Information:
Client may be unable to weight bear or risk factors are present which threaten the safety of a manual transfer or use of a sit-stand lift. Two or
more Caregivers needed who ensure lift is in working order, battery charged & aware of operation of emergency buttons/controls.
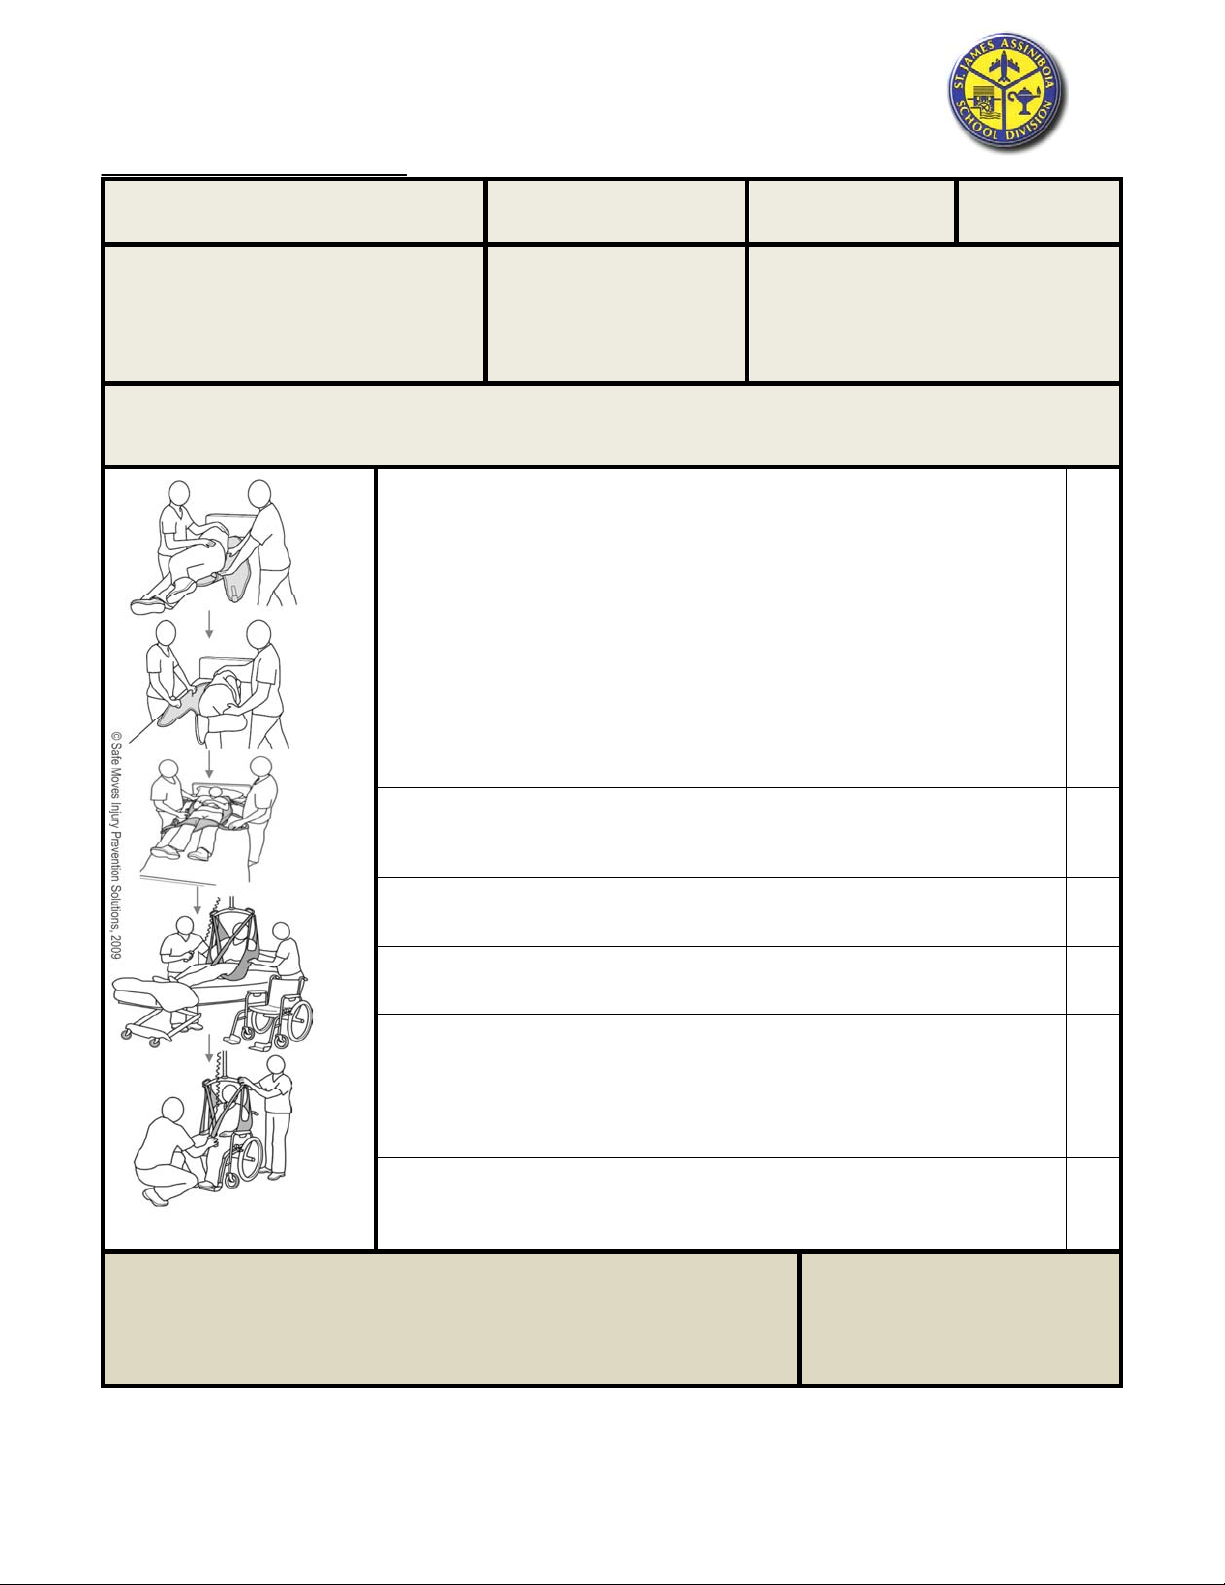
Apply the Sling:
The sling is positioned under the Client in bed by:
Caregivers roll Client onto her side while one Caregiver rolls sling halfway &
places it under Client (tag facing out) so that bottom of sling is level with Client’s tail
bone & sling is providing support to thighs & shoulders.
Roll Client in opposite direction. The rolled up sling is pulled through &
straightened out.
The sling is positioned under the Client in the chair by:
Removing or swinging away armrests if required.
A Caregiver leans Client forward by standing beside the Client in the power
position placing one hand across the Client’s upper back & the other in front of her
shoulder. Other Caregiver slides sling (tag facing out) down the back of chair so
bottom of sling is level with Client’s tail bone.
The leg straps are folded. While crouching or kneeling, one Caregiver lifts Client’s leg
slightly while the other passes leg strap underneath. Repeat process for other leg.
Position Lift & Attach Sling:
Carry bar is positioned directly over Client. Lower carry bar to ~4-5 inches above
Client. Choose loops based on Client’s size then attach to carry bar. Ensure loops
are securely attached according to manufacturer’s instructions.
Client is Lifted:
Use remote to raise Client just high enough to clear surface. Prior to continuing
ensure sling is free of wrinkles & positioned correctly.
Lift Moved to Destination:
While being aware of obstructions (lights, assist rails, trapeze bars, etc.) move Client
along track by pushing carrying bar to the position over receiving equipment.
Disengage Client from Lift:
Using remote lower Client to receiving equipment until there is enough slack in straps
to remove without difficulty. The chair may tip slightly backwards while lowering;
however this will correct when Client comes close to the seat. Remove loops. Sling
is removed in the opposite way as indicated in the “Apply the Sling” section. Ensure
pelvis is positioned to back of wheelchair.
Comfort & Positioning:
Ensure Client is comfortable & positioned properly. Thank the Client for her efforts.
Guidance Documents/Standards/Applicable Legislation:
Manitoba Workplace Safety and Health regulation
2.1 Safe Work Procedures
St. James-Assiniboia School Division Policy:
EBB-R Safe Work Procedures
NOTE: This task will be monitored
periodically to ensure compliance and safety

Ceiling lift Page 2 of 2
Client Handling Program.
*Failure to follow this safe work procedure will increase use of manual lifting, awkward postures & forceful exertions.
This increases the risk of pain, stiffness & injury to the back, neck & arms of Caregivers.
EMPLOYEE NAME: ___________________________ EMPLOYEE SIGNATURE: _______________________
TRAINER NAME: _____________________________ TRAINER SIGNATURE: __________________________
DATE: _____________________

Charging of Batteries
4
IMPORTANT!
This quick reference guide does not replace
the lift´s instruction guide, which can be down-
loaded from www.liko.com.
Safety Instructions
• Never lift manually – let the lift do the lifting.
• Take it easy. Work calmly and methodically.
• Don’t strain your back! Work in a walking stance
with your back straight.
• Use the bed’s raising and lowering functions.
•
Reduce the lever effect. Work close to the
patient and the lift.
7EN120501-04
Quick Reference Guide
Cleaning
Check to ensure that:
• emergency stop is not pressed in
• the battery is charged
• the hand control is properly connected
• the mechanical emergency lowering device
has been reset.
Other Quick Reference Guides
Quick reference guides for Liko’s lifts and slings
are available for downloading from www.liko.com.
English
•
Read the instruction guides for the lift and
lifting accessories before use.
• Before the patient is lifted from the underlying
surface, but after the straps have been fully
extended, make sure the straps are properly
connected to the sling bar.
• Max. load Likorall 242: 200 kg (440 lbs).
Max. load Likorall 243: 230 kg (507 lbs).
Max. load Likorall 250: 250 kg (550 lbs).
To retain max. load it is essential to use accesso-
ries rated for the same max. load or greater.
Ergonomics
Simple Troubleshooting
When necessary, clean the lift with a moist cloth,
using common surface cleaners or disinfectants.
Mechanical Emergency Lowering
• Charge the lift regularly after
use.
• The lift does not function
during charging.
•
Ensure that the emergency
stop is not pressed in
during charging.
© Copyright Liko AB
Emergency Stop
Likorall
242/243/250
R2R Quick-release Hook
Lifting movement:
Up/Down
Control:
Switch system
Movement direction:
Transfer motor
Activate:
Press down repeatedly on
the emergency lowering
handle.
Reset:
Remove load from the lift
strap. Hold the emergency
lowering handle down at
the half-way position while
at the same time turning
the black knob clockwise.
Exclusively: 242 S, ES
Reset:
Activate:
The lifting motion is interrupted when load on the
lift strap is biased or when the lift strap is twisted.
SSP Limit Switch
Sling Bar Connection
6. The R2R sling bar has hooks for two lift straps
to enable transfer between two lifts.
7. A sling bar with a Quick-release Hook enables
fast and easy exchange of sling bars.
3
5
67
5
3
1
67
2
4
www.liko.com
Manufacturer:
Liko AB
SE-975 92 Luleå
Sweden
Alt.1
Alt. 2
0–5 m
HandControl IR:
2
1Hand Control
Emergency Lowering/Raising (Electrical)
This manual suits for next models
2
Other Hillrom Lifting System manuals

Hillrom
Hillrom Liko Ultra Series User manual

Hillrom
Hillrom Liko Golvo 7000 Series User manual

Hillrom
Hillrom Liko M220 Manual

Hillrom
Hillrom Likorall 200 User manual

Hillrom
Hillrom Liko Multirall 200 User manual

Hillrom
Hillrom Liko User manual

Hillrom
Hillrom Liko SafetyVest 93 Manual

Hillrom
Hillrom Liko HygieneVest 50 Manual


