Hirschmann solarus User manual

1
Hirschmann Laborgeräte GmbH & Co. KG
Hauptstraße 7-15 • 74246 Eberstadt Germany
Fon +49 7134 511-0 • Fax +49 7134 511-990
www.hirschmannlab.com · info@hirschmannlab.com
Bedienungsanleitung
Bitte genau durchlesen!
Instruction manual
Please read before use!
Digitales Titriergerät
Digital titration apparatus
X2120460000

2
Inhalt
Seite
1. Sicherheitsvorschriften ..................................................................4
2. Einzelteile .......................................................................................8
3. Funktionsprinzip............................................................................. 9
4. Einsatzverbote ..............................................................................10
5. Einsatzbeschränkungen ...............................................................11
6. Gerät vorbereiten .........................................................................12
6.1 Einsetzen des Lichtschutzfensters ...............................................12
6.2 Befestigung Ansaugschlauch .......................................................13
6.3 Befestigung Rückführschlauch .................................................... 14
6.4 Befestigung Ausstoßeinheit ........................................................14
6.5 Gerät auf Flasche aufschrauben ..................................................16
6.6 Gerät zum Flaschenetikett ausrichten .........................................16
7. Titrieren ........................................................................................17
7.1 Verschlusskappe abnehmen........................................................ 17
7.2 Gerät entlüften .............................................................................18
7.3 Befüllen der Digitalbürette ..........................................................19
7.4 Titration ........................................................................................20
7.5 Modifikation der Anzeige .............................................................21
7.6 Kundenspezifische Kalibrierung Quick-Cal ..................................22
8. Reinigung .....................................................................................24
8.1 Wartung / Reinigung ....................................................................25
8.2 Intensivreinigung .........................................................................29
9. Sterilisation ..................................................................................32
9.1 Vorbereitung .................................................................................32
Content
page
1. Warnings and safety instructions ..................................................4
2. Individual components ..................................................................8
3. Principle of operation ....................................................................9
4. Prohibited applications ................................................................10
5. Restricted applications .................................................................11
6. Preparation of device ...................................................................12
6.1 Using the light protection window ..............................................12
6.2 How to connect the suction tube ................................................13
6.3 How to connect the recirculation tube ........................................14
6.4 How to connect the discharge tube ............................................14
6.5 Secure device on bottle ...............................................................16
6.6 Align device with bottle label .....................................................16
7. Titrating ........................................................................................17
7.1 Remove closure cap .....................................................................17
7.2 How to prime the device .............................................................18
7.3 How to fill the digital burette ......................................................19
7.4 Titration ........................................................................................20
7.5 Display modification ....................................................................21
7.6 Customer-specific calibration Quick-Cal ......................................22
8. Cleaning ........................................................................................24
8.1 Maintenance / cleaning ...............................................................25
8.2 Thorough cleaning ........................................................................29
9. Sterilization ...................................................................................32
9.1 Preparations for sterilization .......................................................32

3
Inhalt
Seite
9.2 Demontage .................................................................................... 33
9.3 Ansaug-/Ausstoß- und Rückführventil lockern ............................ 33
9.4 Sterilisation durchführen ............................................................... 35
9.5 Kolben wieder einbauen ............................................................... 35
9.6 Ansaug-/Ausstoß-/Rückführventil festdrehen ............................. 37
9.7 Gerät zusammenbauen ................................................................. 38
10. Ventile auswechseln ..................................................................... 39
10.1 Ansaugventil auswechseln ........................................................... 39
10.2 Ausstoßventil auswechseln .......................................................... 41
10.3 Rückführventil auswechseln ......................................................... 42
11. Reparatur beim Hersteller ............................................................ 42
12. Volumenprüfung ............................................................................ 44
13. Problemlösungen .......................................................................... 46
14. Technische Daten / Materialien .................................................... 50
15. Zubehör- und Ersatzteile ............................................................... 53
16. Vordruck der Unbedenklichkeitsbescheinigung ........................... 55
Content
page
9.2 Disassembly .................................................................................. 33
9.3 How to loosen the suction, discharge and
recirculation valve ........................................................................ 33
9.4 How to perform a sterilization ..................................................... 35
9.5 How to reassemble the piston ..................................................... 35
9.6 How to secure suction, discharge and recirculation valve .......... 37
9.7 How to assemble the device ........................................................ 38
10. How to exchange valves ............................................................... 39
10.1 How to exchange the suction valve ............................................. 39
10.2 How to exchange the discharge valve ......................................... 41
10.3 How to exchange the recirculation valve ..................................... 42
11. Repairs at the manufacturer ......................................................... 42
12. How to test the correct volume ................................................... 44
13. Trouble-shooting ........................................................................... 48
14. Technical data / materials ............................................................ 50
15. Accessories - spare parts .............................................................. 53
16. Clearance certificate form ............................................................. 56

4
1. Sicherheitsvorschriften
Achtung!
Vor Gebrauch die Bedienungsanleitung und die
Sicherheitsvorschriften sorgfältig lesen und beach-
ten. Jeder im Labor beschäftigten Person sind diese
Sicherheitshinweise vor Benutzung bekannt zu
machen und jederzeit griffbereit zu halten.
Die Gebrauchsanleitung ist jedoch nicht in der Lage,
alle auftretenden Sicherheitsprobleme darzustellen.
Jeder Anwender ist selbst verantwortlich, Sicher-
heits- und Gesundheitsvorschriften einzuhalten und
Einschränkungen vor Gebrauch des Gerätes zu
bestimmen und zu beachten.
- Beachten Sie sämtliche allgemeinen Sicherheits-
vorschriften für das Labor, wie z. B. das Tragen von
Schutzkleidung, Schutzbrille und Schutzhandschuhen
beim Einsatz entsprechender Flüssigkeiten.
1. Warnings and safety instructions
Please note:
Please read the user manual and safety instructions
carefully. Each person working in the laboratory
must be familiar with these safety instructions prior
to using the device. The manual must be accessible
at any time. Not every possible safety issue is
covered in this manual. Each applicant of the device
is solely responsible to maintain safety and
health standards and to determine and follow
restrictions prior to using the device.
- All general safety instructions of the laboratory such as
wearing protective clothing, safety goggles and gloves
appropriate for the application of certain fluids must be
followed at all times.

5
1. Sicherheitsvorschriften
- Beachten Sie die Hinweise und Vorschriften des
Reagenzherstellers.
- Das Gerät darf nur zum Titrieren von Flüssigkeiten
eingesetzt werden, wobei definierte Einsatzverbote
und Einsatzbeschränkungen unbedingt einzuhalten
sind (ggf. Rücksprache beim Hersteller).
- Vor Gebrauch jeweils Dichtigkeit aller Verbindungen
und sicheren Sitz der Ausstoßeinheit und des Ansaug-
schlauches überprüfen. Eine nicht fest sitzende
Ausstoßeinheit könnte beim Betrieb der Digitalbürette
Spritzer verursachen.
- Vor dem Titrieren unbedingt die Verschlusskappe
vom Ausstoßschlauch nehmen. Handräder niemals
bewegen, solange die Verschlusskappe aufgesetzt
ist.
1. Warnings and safety instructions
- Instructions provided by the reagent manufacturer
must be observed at any time.
- This device is only intended for titrating fluids.
Certain applications are either prohibited or
restricted. These instructions must be strictly
adhered to (If in doubt contact the manufacturer).
- Prior to use, all connections must be checked for
leakage. The correct positioning of the discharge
spout and the suction tube must be verified. If the
discharge spout is not secured properly fluid could
leak or splatter out during the operation of the
burette.
- The closure cap must be removed from the
discharge tube prior to titrating. Hand wheels
should not be turned as long as the closure cap
is still positioned on the device.

6
1. Sicherheitsvorschriften
- Achten Sie darauf, dass weder Sie selbst noch
eine andere Person gefährdet werden. Nie in
Richtung einer Person arbeiten; Spritzer vermeiden;
geeignete Aufnahmegefäße verwenden. Titrieren
Sie jeweils an die Innenwand des Aufnahmegefäßes
anstatt auf dessen Inhalt oder Boden.
- Keinesfalls Gewalt anwenden!
- Nach Gebrauch den Ausstoßschlauch mit der
Verschlusskappe verschließen. Vorsicht! Reagenz
kann heraustropfen!
- Nur Original-Zubehör und Original-Ersatzteile
verwenden.
- Nach der Sterilisation (siehe Punkt 9) die Digital-
bürette auf Raumtemperatur abkühlen lassen.
1. Warnings and safety instructions
- Make sure that you do not endanger yourself or
any other person. Never work towards another
person. Avoid splattering. Use the appropriate
receiving vessels. Always titrate onto the inner wall
of the receiving container instead of its content or
onto the bottom of the container.
- Never use force!
- As soon as a titration has been completed position
closure cap on discharge tube. Caution! Reagent
may leak out!
- Use original accessories and replacement parts
only.
- Once sterilization has been completed (refer to
section 9) let the digital burette cool down to room
temperature before use.

7
1. Sicherheitsvorschriften
- Bei Störungen, z. B.
- schwergängiger oder festsitzender Kolben
- verklebtes oder undichtes Ansaug-/Ausstoß-/
Rückführventil
- undichte Stellen
- Bruch von Bauteilen
- Schläuche
- Dichtungsringe
sofort aufhören zu arbeiten. Vor weiterer
Benutzung des Gerätes die Hinweise zur
Reinigung (siehe Punkt 8) und Problemlösungen
(siehe Punkt 13) beachten. Ggf. zur Reparatur an
Hersteller senden. Beachten Sie hierzu Punkt 11.
- Eine normgerechte Volumenabgabe kann nur mit
dem mitgelieferten Standardzubehör garantiert
werden.
- Wird das auf der Flasche aufgeschraubte Gerät an
einen anderen Arbeitsplatz getragen, darf die
Kombination nicht nur am Gerät getragen werden.
Die Flasche muss ebenfalls gesichert gehalten
werden.
1. Warnings and safety instructions
- In the event of errors, such as
- slow moving or jammed piston
- sticky or leaking suction/
discharge/recirculation valve
- leakage
- broken parts
- Tubes
- Sealing rings
stop working immediately. Before you continue to
use the device read the instructions for cleaning of
the device (section 8) and trouble-shooting
(section 13). If necessary send the unit to the
manufacturers‘ service center for repair.
Please read section 11 for more information.
- Volume dispensing complying with standards can
only be guaranteed if the standard accessories
provided are used.
- Where the instrument screwed to the bottle is to be
carried to another working location, refrain from
lifting the combination by holding the instrument
alone. The bottle should also be securely held
during carrying.

8
2. Einzelteile
1. Ausstoßeinheit komplett
2. Rückführventil
3. Ansaugventil
4. Ausstoßventil
5. 3-Weg-Hahn mit Griff,
Mutter, Scheibe, O-Ring
6. Deckel
2. Individual components
1. Discharge tube complete
2. Recirculation valve
3. Suction valve
4. Discharge valve
5. Stopcock with recirculation valve control,
nut, washer, O-ring
6. Cover
- 8 -
2.Einzelteile
1. Ausstoßeinheit komplett
2. Rückführventil
3. Ansaugventil
4. Ausstoßventil
5. 3-Weg-Hahn mit Griff,
Mutter, Scheibe, O-Ring
6. Deckel
42
3
1
5
6
2. Individual Components
1. Discharge tube complete
2. Recirculation valve
3. Suction valve
4. Discharge valve
5. Stopcock with recirculation valve control,
nut, washer, O-ring
6. Cover

9
3. Funktionsprinzip
- Das Gerät ist ein manuell bedienbarer
Flaschenaufsatz-Titrierer mit Digitalanzeige zum
Titrieren von Flüssigkeiten. Das Grundgerät
(Gewinde A45) und die Adapter-Varianten (siehe
Zubehör) ermöglichen den Einsatz von handelsüblichen
Reagenzflaschen.
- Durch Drehen der Handräder vom Körper weg
öffnet sich das Ansaugventil und aus einer Vorrats-
flasche wird über den Ansaugschlauch Flüssigkeit
in den Zylinder der Digitalbürette gesaugt. Eine
Unterbrechung, beziehungsweise Beendigung
des Ansaugvorganges schließt das Ansaugventil
wieder.
3. Principle of operation
- The device is a manually operated bottle top burette
with digital display for the titration of fluids.
The basic unit has thread A45 built in. Multiple
adapters (refer to accessories) permit the use of
standard bottles.
- Hold the hand wheels with your thumbs and index
fingers, move your thumbs upward, turning the
hand wheels away from the body, the suction
valve opens and fluid is drawn into the cylinder of
the digital burette via the suction tube from the
bottle. As soon as the suction process is either
interrupted or completed the suction valve closes.

10
3. Funktionsprinzip
- Werden die Handräder nach dem Befüllen der
Bürette auf den Körper zu gedreht, öffnet sich
das Ausstoßventil und gibt Flüssigkeit aus dem
Zylinder durch die Ausstoßeinheit ab. Das titrierte
Volumen kann einfach im LC-Display der Digitalbürette
abgelesen werden.
4. Einsatzverbote
Das Gerät ist nicht zu verwenden bei:
- Flusssäure, da sie Glas angreift
- Flüssigkeiten, die Glas, Halar (ECTFE), FEP und
Hastelloy angreifen
- Suspensionen, da feste Partikel die Ventile
verstopfen können
- Leicht entzündlichen Medien (Flammpunkt
beachten)
- Einsatz in explosionsgefährdeter Umgebung
3. Principle of operation
- Once the burette has been filled, hold the hand
wheels with the thumbs and index fingers, move
your thumbs downward, turning the hand wheels
towards the body, the discharge valve opens and
dispenses fluid from the cylinder through the
discharge tube. The titrated volume is shown in the
LC-Display of the digital burette as the process
proceeds.
4. Prohibited applications
The digital burette may not be used with:
- Hydrofluoric acid, since it attacks glass
- Fluids that attack glass, Halar (ECTFE), FEP and
Hastelloy
- Suspensions, since solid particles may clog or
block valves
- Easily-combustible media (note the flashpoint)
- Use in a potentially-explosive environment

11
5. Einsatzbeschränkungen
- hochkonzentrierte Säuren, Laugen- und
Salzlösungen, HF.
- die Digitalbürette ist für einen Arbeitstemperatur-
bereich von +4 °C bis +50 °C geeignet.
- Einsatz des Gerätes (und laden des Akkus) nur in
Bereichen, in denen gewährleistet ist, dass keine
gefährliche explosionsfähige Atmosphäre auftritt.
- Nicht im explosionsgefährdeten Bereich ablegen.
5. Restricted applications
- highly concentrated acids, alcalines, salt solutions,
HF.
- the burette is suitable for operating temperatures
between +4°C and +50°C.
- The unit should only be used (and the batteries
charged) in areas in which it can be assured that
no hazardous potentially-explosive atmosphere
will occur.
- Do not deposit in potentially-explosive areas.

12
6. Gerät vorbereiten
Achtung, vor Montagebeginn beachten!
- Ein einwandfreier und sicherer Betrieb ist
nur bei Verwendung der beiliegenden Original-
Zubehörteile gewährleistet.
- Niemals fremde oder beschädigte Zubehörteile
verwenden.
6.1 Einsetzen des Lichtschutzfensters
Um lichtempfindliche Medien zu schützen, kann das beige-
legte eingefärbte Lichtschutzfenster mit dem vorhandenen
klaren Sichtfenster ausgetauscht werden.
Zum Entfernen des klaren Sichtfensters muss es zunächst auf
einer Seite angehoben werden, damit es aus der Veranke-
rung rutscht, danach auf der gegenüberliegenden Seite.
Nun kann das eingefärbte Lichtschutzfenster (Richtige Lage
beachten) entsprechend eingesetzt werden.
6. Preparation of the device
Attention, please note prior to assembly!
- Proper and safe operation is only warranted if
the enclosed original parts are used.
- Never use aftermarket or damaged parts.
6.1 Using the light protection window
The existing clear inspection window can be replaced
with the colored light protection window to protect media
which are sensitive to light.
The clear inspection window should be raised initially
on one side for removal to ensure that it slides out of its
fixture, and then raised again on the other side.
The colored light protection window can now be suitably
fitted (note correct position).

13
6.2 Befestigung Ansaugschlauch
- Ansaugschlauch neben Vorratsflasche
stellen, dabei zeigt das Schlauchende
mit der Überwurfmutter zum Boden
der Flasche.
- Schlauch in Höhe Unterkante Sicherungsring
der Vorratsflasche schräg abschneiden.
- Ansaugschlauch bis zum Anschlag
aufstecken.
- Anschließend Überwurfmutter auf
Ventilmantel drehen.
6.2 How to connect the suction tube
- Hold suction tube next to supply bottle
with the retainer ring pointing towards
the bottom of the bottle.
- Cut the tube at an angle at the height
of the lower edge of the rim on the
reservoir bottle.
- Attach suction tube securely.
- Next screw retainer ring onto suction
valve.
- 13 -
- Attach suction tube securely.
- Next screw retainer ring onto suction
valve.
- Ansaugschlauch bis zum Anschlag
aufstecken.
- Anschließend Überwurfmutter auf Ventil-
mantel drehen.
- 12 -
6. Preparation of the Device
Attention, please note prior to assembly!
- Proper and safe operation is only warranted if the
enclosed original parts are used.
- Never use aftermarket or damaged parts.
6.1 How to Connect the Suction Tube
- Hold suction tube next to supply bottle
with the retainer ring pointing towards
the bottom of the bottle.
- Cut the tube at an angle at the height
of the lower edge of the rim on the
reservoir bottle.
6. Gerät vorbereiten
Achtung, vor Montagebeginn beachten!
- Ein einwandfreier und sicherer Betrieb ist
nur bei Verwendung der beiliegenden Original-
Zubehörteile gewährleistet.
- Niemals fremde oder beschädigte Zubehörteile
verwenden.
6.1 Befestigung Ansaugschlauch
- Ansaugschlauch neben Vorratsflasche
stellen, dabei zeigt das Schlauchende
mit der Überwurfmutter zum Boden
der Flasche.
- Schlauch in Höhe Unterkante Sicher-
ungsring der Vorratsflasche schräg
abschneiden.
14
6.3 Befestigung Rückführschlauch
- Rückführschlauch in Rückführöffnung
des Ventilblocks fest einstecken.
6.4 Befestigung Ausstoßeinheit
- Ausstoßeinheit mit
- Schlauchführung
- Überwurfmutter
- Ausstoßschlauch
- Verschlusskappe
6.3 How to connect the recirculation tube
- Firmly press recirculation tube in the
designated recirculation outlet of valve
block.
6.4 How to connect the discharge tube
- Discharge tube includes:
- tube guide
- retainer ring
- dispensing tube
- closure cap
- 14 -
6.2 How to Connect the
Recirculation Tube
- Firmly press recirculation tube in the
designated recirculation outlet of valve
block.
6.3 How to Connect the
DischargeTube
- Discharge tube includes:
- tube guide
- retainer ring
- dispensing tube
- closure cap
6.2 Befestigung
Rückführschlauch
- Rückführschlauch in Rückführöffnung
des Ventilblocks fest einstecken
6.3 Befestigung Ausstoßeinheit
- Ausstoßeinheit mit
- Schlauchführung
- Überwurfmutter
- Ausstoßschlauch
- Verschlusskappe

15
6.4 Befestigung Ausstoßeinheit
- Ausstoßeinheit bis zum Anschlag auf-
stecken.
- Überwurfmutter gut festdrehen und auf
festen Sitz prüfen.
Achtung!
- Festen Sitz der Ausstoßeinheit prüfen
- Nur Original-Ausstoßeinheit verwenden
(siehe Zubehör und Ersatzteile)
- Keine deformierte oder beschädigte
Ausstoßeinheit einsetzen.
6.4 How to connect the discharge tube
- Attach discharge tube securely.
- Firmly tighten retainer ring and verify
correct positioning.
Please note:
- Confirm correct positioning of the discharge
tube.
- Only use original discharge tube (refer
to accessories and replacement parts).
- Never install a deformed or defective
discharge tube.
- 15 -
- Attach discharge tube securely.
- Firmly tighten retainer ring and verify
correct positioning.
Please note:
- Confirm correct positioning of the discharge tube.
Only use original discharge tube (refer to accesso-
ries and replacement parts). Never install a defor-
med or defective discharge tube.
- Ausstoßeinheit bis zum Anschlag auf-
stecken.
- Überwurfmutter gut festdrehen und auf
festen Sitz prüfen.
Achtung!
- Festen Sitz der Ausstoßeinheit prüfen
- Nur Original-Ausstoßeinheit verwen-
den (siehe Zubehör und Ersatzteile)
- Keine deformierte oder beschädigte
Ausstoßeinheit einsetzen.

16
6.5 Gerät auf Flasche aufschrauben
- Gerät mit oder gegebenenfalls ohne
Gewindeadapter auf Vorratsflasche
aufschrauben.
6.6 Gerät zum Flaschenetikett ausrichten
- Gerät in gewünschte Position zur
Flaschenbeschriftung drehen
Warnhinweise!
- Sämtliche Sicherheitsbestimmungen, Einsatz-
verbote und Einsatzbeschränkungen beachten.
- Schutzkleidung, Schutzbrille und Schutzhand-
schuhe verwenden.
- 16 -
6.4 Secure Device on Bottle
- Screw device either with or without
adapter onto reservoir bottle.
6.5 Align Front of Device with
Bottle Label
- Rotate device to desired position of
bottle label
Warning!
- Always follow all safety instructions and avoid pro-
hibited and restricted applications.
- Always wear protective clothing, glasses and
gloves.
6.4 Gerät auf Flasche aufschrauben
- Gerät mit oder gegebenenfalls ohne
Gewindeadapter auf Vorratsflasche
aufschrauben.
6.5 Gerät zum Flaschenetikett
ausrichten
- Gerät in gewünschte Position zur
Flaschenbeschriftung drehen
Warnhinweise!
- Sämtliche Sicherheitsbestimmungen, Einsatzverbo-
te und Einsatzbeschränkungen beachten.
- Schutzkleidung, Schutzbrille und Schutzhand-
schuhe verwenden.
6.5 Secure device on bottle
- Screw device either with or without
adapter onto reservoir bottle.
6.6 Align front of device with bottle label
- Rotate device to desired position of
bottle label
Warning!
- Always follow all safety instructions and avoid
prohibited and restricted applications.
- Always wear protective clothing, goggles and
gloves.

17
7. Titrieren
Achtung!
- Sicherheitsvorschriften (siehe Punkt 1) einhalten
- Einsatzverbote und Einsatzbeschränkungen
beachten (siehe Punkt 4 und 5).
- Digitalbürette nur so bedienen, dass Ausstoßein-
heit stets vom Bediener und anderen Personen
abgewandt ist.
- Kolben nicht niederdrücken, wenn Verschluss-
kappe aufgesteckt ist.
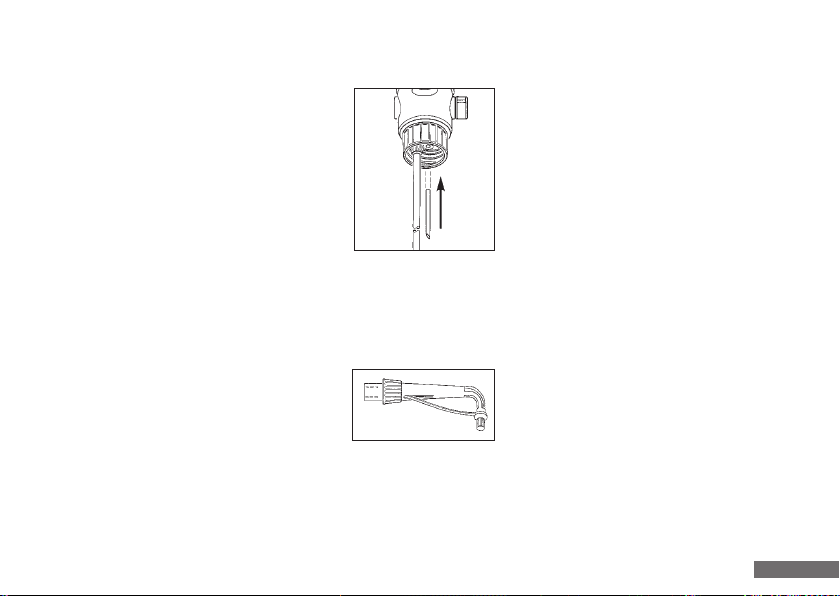
7.1 Verschlusskappe abnehmen
- Auffanggefäß unter Ausstoßeinheit stellen.
- Verschlusskappe wie in der Abbildung
gezeigt, abziehen.
Achtung: Dabei kann Reagenz
heraustropfen!
7. Titrating
Please note:
- Always follow safety instructions (refer to
section 1) as well as application prohibitions
and restrictions (refer to sections 4 and 5).
- Only use digital burette in such a way that the
discharge tube is never directed towards the
user or other people.
- Do not press piston down when closure cap is in
place.
7.1 Remove closure cap
- Place receiving container underneath
discharge tube.
- Remove closure cap as shown in the figure.
Please note: Reagent may drip
during this process!
- 17 -
7. Titrating
Please note:
- Always follow safety instructions (refer to section
1) as well as application prohibitions and restric-
tions (refer to sections 4 and 5).
- Only use digital burette in such a way that the
discharge tube is never directed towards the user
or other people.
- Do not press piston down when closure cap is in
place.
7.1 Remove Closure Cap
- Place receiving container underneath
discharge tube.
- Remove closure cap as shown in the figure.
Please note: Reagent may drip
during this process!
7. Titrieren
Achtung!
- Sicherheitsvorschriften (siehe Punkt 1) einhalten
- Einsatzverbote und Einsatzbeschränkungen
beachten (siehe Punkt 4 und 5).
- Digitalbürette nur so bedienen, dass Ausstoßein-
heit stets vom Bediener und anderen Personen
abgewandt ist.
- Kolben nicht niederdrücken, wenn Verschluss-
kappe aufgesteckt ist.
7.1 Verschlusskappe abnehmen
- Auffanggefäß unter Ausstoßeinheit stellen.
- Verschlusskappe wie in der Abbildung
gezeigt, abziehen.
Achtung: Dabei kann Reagenz
heraustropfen!
18
7.1 Verschlusskappe abnehmen
- Verschlusskappe entsprechend der Ab-
bildung nach hinten schieben.
- Während des Arbeitens kann die Ver-
schlusskappe in der Aufbewahrungs-
position verbleiben.
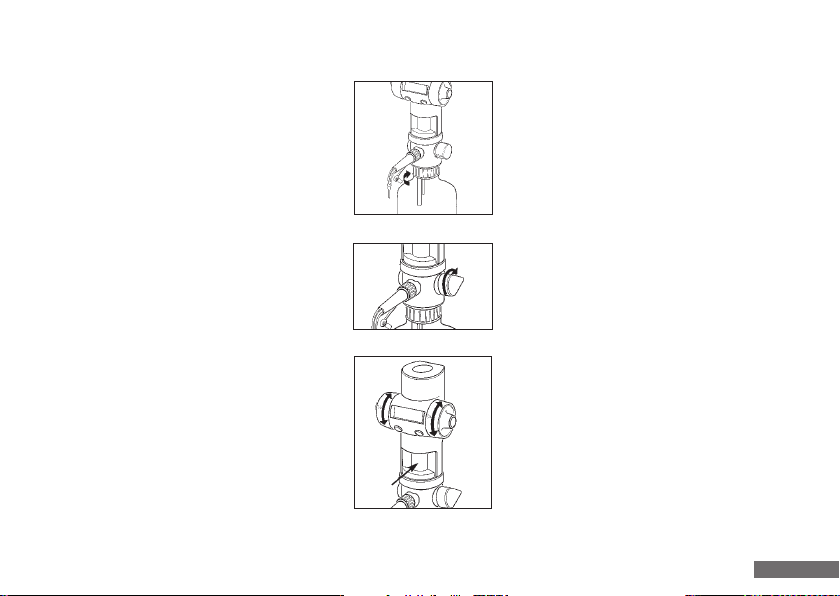
7.2 Entlüften des Gerätes
Beim Erstbefüllen der Digitalbürette oder
bei evtl. Luftblasenbildung im Zylinderraum
ist der Rückführhebel auf Rückführen
(Rückführhebel zeigt nach hinten)
zu stellen. Danach ist durch drehen
der Handräder auf den Körper zu dem
Kolben ganz nach unten zu bringen.
Jetzt müssen einige kurze Drehbewegungen
der Handräder durchgeführt werden
sodass der Kolben jeweils bis zum
unteren Anschlagpunkt gebracht wird.
7.1 Remove closure cap
- Press closure cap back on as shown.
- During operation the closure cap should
be placed in the safe storage position.
7.2 How to prime the device
During the initial filling of the digital
burette or in case air bubbles should occur in
the cylinder chamber, the recirculation valve
control must be set to point towards the back
of the device. Then hold the hand wheels
with your thumbs and index fingers, move
the thumbs downward, turning the hand
wheels towards the body until the piston
is moved down completely. Turn the hand
wheels a few times briefly in both directions.
- 18 -
- Press closure cap back on as shown.
- During operation the closure cap
should be placed in the safe storage
position.
7.2 How to Prime the Device
During the initial filling of the digital
burette or in case air bubbles should
occur in the cylinder chamber, the recir-
culation valve control must be set to point
toward the back of the device. Then hold
the hand wheels with your thumbs and
index fingers, move the thumbs down-
ward, turning the hand wheels toward
the body until the piston is moved down
completely. Turn the hand wheels a few
- Verschlusskappe entsprechend der Ab-
bildung nach hinten schieben.
- Während des arbeiten kann die Ver-
schlusskappe in der Aufbewahrungs-
position verbleiben
7.2 Entlüften des Gerätes
Beim Erstbefüllen der Digitalbürette oder
bei evtl. Luftblasenbildung im Zylinder-
raum ist der Rückführhebel auf Rück-
führen ( Rückführhebel zeigt nach hin-
ten) zu stellen. Danach ist durch drehen
der Handräder auf den Körper zu der
Kolben ganz nach unten zu bringen.
Jetzt müßen einige kurze Drehbeweg-
ungen der Handräder durchgeführt wer-
den so das der Kolben jeweils bis zum

19
7.2 Entlüften des Gerätes
Sind keine Luftblasen mehr im Schauglas
zu sehen, so ist der Rückführhebel auf
Titration (Rückführhebel zeigt nach vorne)
zu stellen und die eigentliche Titration kann
beginnen.
7.3 Befüllen der Digitalbürette
Um das Gerät einzuschalten eine der
beiden Tasten kurz antippen. Durch
Betätigen der linken Taste das Gerät in
den Füllen - Modus bringen (Pfeil im
Display zeigt nach oben). Die Volumen-
anzeige im Display wird hiermit automatisch
auf Null gestellt. Danach wird durch Drehen
der Handräder nach hinten (vom Körper
weg) die Digitalbürette befüllt.
7.2 How to prime the device
Make sure that the piston is moved
completely to the bottom. When bubbles
are no longer visible in the view glass the
recirculation valve control should be set
to titration (pointing toward the discharge
tube) and the actual titration may begin.
7.3 How to fill the digital burette
Touch one of the two keys briefly to
switch on the device. Press the left key
to switch the device to the „Fill“ mode
(arrow points up in the display). The
volume indication in the display is then
automatically set to zero. - Fill the burette
by holding the hand wheels with your
thumbs and index fingers, move your
thumbs upwards, turning the hand
wheels away from the body.
- 19 -
times briefly in both directions. Make
sure that the piston is moved completely
to the bottom. When bubbles are no lon-
ger visible in the view glass the recirculation valve
control should be set to titration (pointing toward the
discharge tube) and the actual titration may begin.
7.3 How to Fill the Digital Burette
Touch one of the two keys briefly to
switch on the device. Press the left key
to switch the device to the "Fill" mode
(arrow points up in the display). The
volume indication in the display is then
automatically set to zero. - Fill the buret-
te by holding the hand wheels with your
thumbs and index fingers, move your
thumbs upward, turning the hand
unteren Anschlagpunkt gebracht wird.
Sind keine Luftblasen mehr im Schauglas
zu sehen, so ist der Rückführhebel auf
Titration (Rückführhebel zeigt nach vorne)
zu stellen und die eigentliche Titration kann
beginnen.
7.3 Befüllen der Digitalbürette
Um das Gerät einzuschalten eine der
beiden Tasten kurz antippen. Durch Be-
tätigen der linken Taste das Gerät in
den Füllen - Modus bringen (Pfeil im
Display zeigt nach oben). Die Volumen-
anzeige im Display wird hiermit auto-
matisch auf Null gestellt. Danach wird
durch Drehen der Handräder nach hin-
ten (vom Körper weg) die Digitalbürette

20
7.3 Befüllen der Digitalbürette
Dies kann entweder bis zum Gesamtvolumen
(10 ml, 20 ml bzw. 50 ml) oder nur bis zu
einem gewünschten Teilvolumen erfolgen.
7.4 Titration
Um das Gerät einzuschalten eine der
beiden Tasten kurz antippen. Durch
Betätigen der linken Taste das Gerät in
den Titrations - Modus bringen (Pfeil im
Display zeigt nach unten). Das zuletzt
abgegebene Volumen erscheint im
Display. Durch Drücken der rechten
Taste kann der Anzeigewert auf Null
zurückgesetzt werden. Die Abgabe des
Titriermediums beginnt durch Drehen
der Handräder nach vorne (auf den
Körper zu). Es ist ratsam, vor der
7.3 How to fill the digital burette
The burette may either be filled completely (10 ml, 20 ml
or 50 ml) or only partially.
7.4 Titration
To switch on the device touch one of the
two keys briefly. Press the left key to
switch the device to the „Titration“ mode
(arrow points down in the display). The
last volume dispensed appears in the display.
The displayed value can be reset to
zero by pressing the key on the right.
Holding the hand wheels with the thumbs
and index fingers, moving your thumbs
downwards, turning the hand wheels
towards the body starts the dispensing of
the titrant. The manufacturer suggests
- 20 -
wheels away from the body. The burette may either
be filled completely (20 ml or 50 ml) or only parti-
ally.
7.4 Titration
To switch on the device touch one of the
two keys briefly. Press the left key to
switch the device to the "Titration" mode
(arrow points down in the display). The
last volume dispensed appears in the dis-
play. The displayed value can be reset to
zero by pressing the key on the right.
Holding the hand wheels with the thumbs
and index fingers, moving your thumbs
downward, turning the hand wheels
toward the body starts the dispensing of
the titrant. The manufacturer suggests
befüllt. Dies kann entweder bis zum Gesamt-
volumen ( 20 ml bzw. 50 ml) oder nur bis zu
einem gewünschten Teilvolumen erfolgen.
7.4 Titration
Um das Gerät einzuschalten eine der
beiden Tasten kurz antippen. Durch Be-
tätigen der linken Taste das Gerät in
den Titrations - Modus bringen (Pfeil im
Dis-play zeigt nach unten). Das zuletzt
abgegebene Volumen erscheint im
Display. Durch Drücken der rechten
Taste kann der Anzeigewert auf Null
zurückgesetzt werden. Die Abgabe des
Titriermediums beginnt durch Drehen
der Handräder nach vorne (auf den
Körper zu). Es ist ratsam, vor der
Table of contents
Other Hirschmann Laboratory Equipment manuals


