HME DX340 HD User manual

HME# 400G743
Rev D 5/15/17
DX340|HD
HD Wireless Headset System
Operating Instructions


SECTION 1. INTRODUCTION............................................................. 1
Basic 5-Coach System ........................................................................1
Expanded 10-Coach System ...................................................................1
SECTION 2. EQUIPMENT IDENTIFICATION ................................................. 2
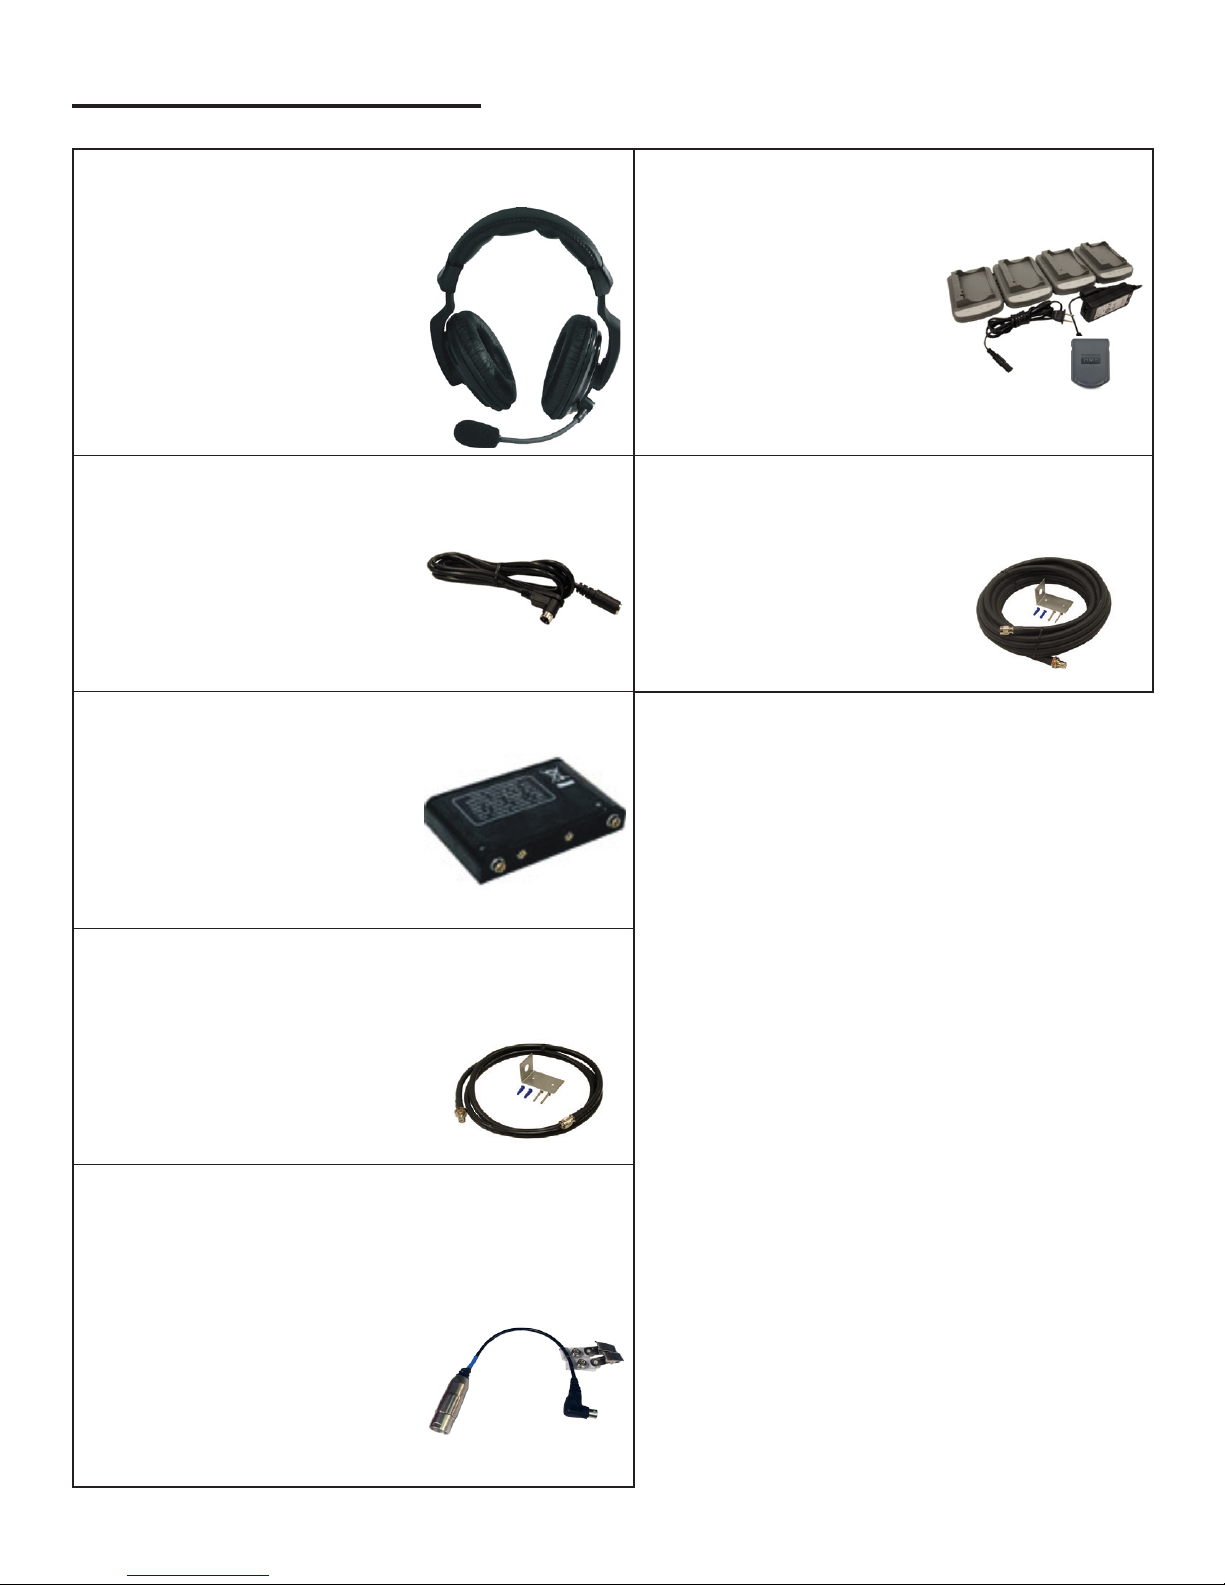
STANDARD EQUIPMENT........................................................................2
OPTIONAL EQUIPMENT ........................................................................3
EQUIPMENT FEATURES ........................................................................4
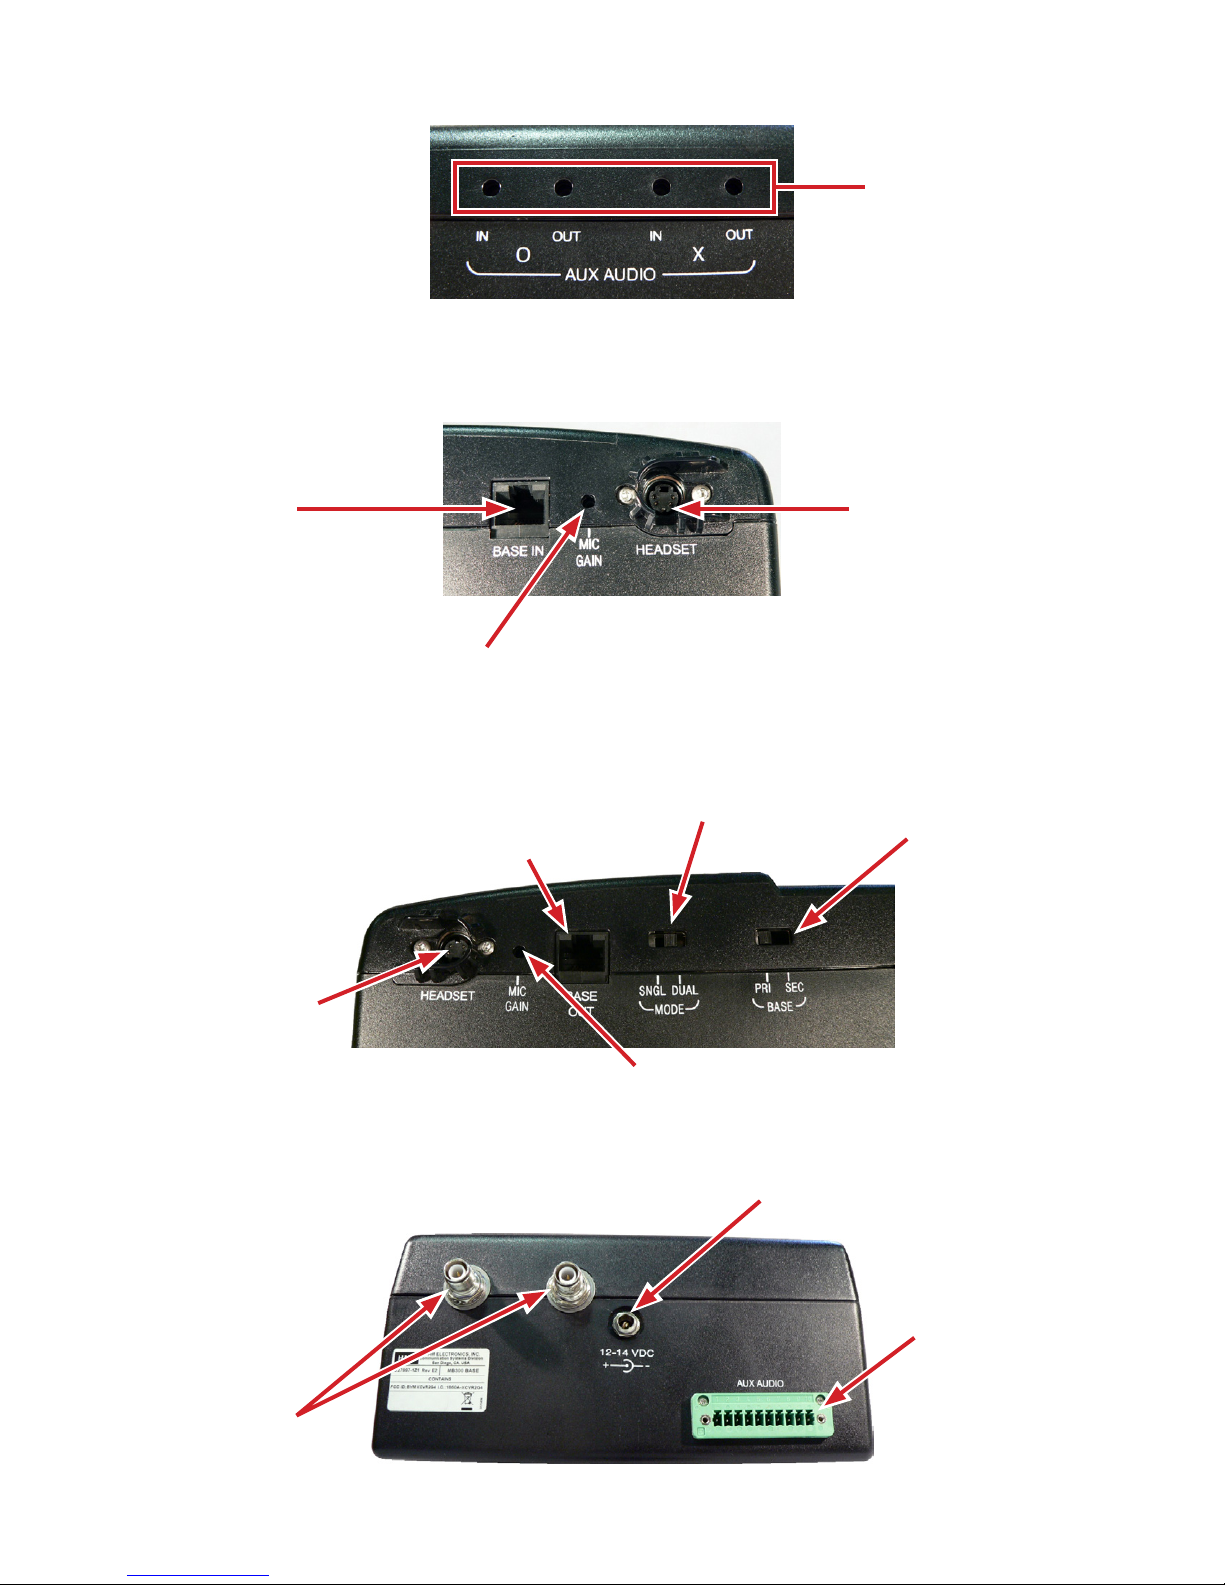
Base Station ................................................................................4
Beltpac ....................................................................................6
SECTION 3. EQUIPMENT SETUP ......................................................... 7
BATTERY CHARGER ...........................................................................7
BASE STATION ................................................................................8
Optional Battery Operation of Base Station ........................................................9
Spectrum Friendly™Interference Avoidance .....................................................10
Base Switch (Disabled in this version) ........................................................... 11
Audio Connection ........................................................................... 11
Single/Dual Channel Setting................................................................... 11
Base Station Microphone Gain Adjustment ....................................................... 11
BELTPACS ..................................................................................12
Beltpac Registration .........................................................................12
Beltpac Operating Mode Setup.................................................................13
Beltpac Adjustments .........................................................................14
OPTIONAL REMOTE ANTENNA INSTALLATION ....................................................15
OPTIONAL AUXILIARY EQUIPMENT CONNECTION .................................................16
SECTION 4. EQUIPMENT OPERATION .................................................... 17
THE BASICS .................................................................................17
Base Station Operation.......................................................................17
Beltpac ...................................................................................18
Changing Batteries ..........................................................................19
SECTION 5. TROUBLESHOOTING ....................................................... 20
FREQUENTLY ASKED QUESTIONS ..............................................................22
SECTION 6. TECHNICAL DATA .......................................................... 23
EQUIPMENT SPECIFICATIONS..................................................................23
Base Station ...............................................................................23
Beltpac ...................................................................................24
SECTION 7. SECTION INDEX............................................................ 25
TABLE OF CONTENTS

FCC NOTICE
This device complies with Part 15 of the FCC rules. Operation is subject to the following two conditions:
(1) This device may not cause harmful interference, and (2) This device must accept any interference received, including
interference that may cause undesired operation.
NOTE: This equipment has been tested and found to comply with the limits for a Class A digital device, pursuant to Part 15
of the FCC rules. These limits are designed to provide reasonable protection against harmful interference when the equipment
is operated in a commercial environment. This equipment generates, uses and can radiate radio frequency energy and, if
not installed and used in accordance with the instruction manual, may cause harmful interference to radio communication.
Operation of this equipment in a residential area is likely to cause harmful interference, in which case the user will be required
to correct the interference at his own expense.
Changes or modications not expressly approved by HM Electronics, Inc. could void the users authority to operate this
equipment.
Hereby, HM Electronics, Inc. declares that the DX340|HD is in compliance with the essential requirements and other relevant
provisions of R&TTE Directive 1999/5/EC.
This product operates in the 2400 to 2483.5 MHz frequency range. The use of this frequency range is not yet harmonized
between all countries. Some countries may restrict the use of a portion of this band or impose other restriction relating to power
level or use. You should contact your Spectrum authority to determine possible restrictions.
WASTE ELECTRICAL AND ELECTRONIC EQUIPMENT (WEEE)
The European Union (EU) WEEE Directive (2012/19/EU) places an obligation on producers (manufacturers, distributors and/or
retailers) to take-back electronic products at the end of their useful life. The WEEE Directive covers most HME products being
sold into the EU as of August 13, 2005. Manufacturers, distributors and retailers are obliged to nance the costs of recovery
from municipal collection points, reuse, and recycling of specied percentages per the WEEE requirements.
Instructions for Disposal of WEEE by Users in the European Union
The symbol shown below is on the product or on its packaging which indicates that this product was put on the market after
August 13, 2005 and must not be disposed of with other waste. Instead, it is the user’s responsibility to dispose of the user’s
waste equipment by handing it over to a designated collection point for the recycling of WEEE. The separate collection and
recycling of waste equipment at the time of disposal will help to conserve natural resources and ensure that it is recycled in
a manner that protects human health and the environment. For more information about where you can drop off your waste
equipment for recycling, please contact your local authority, your household waste disposal service or the seller from whom you
purchased the product.

1
SECTION 1. INTRODUCTION
The DX340|HD provides secure communication among the coaching staff.
Spotters in the press box can communicate with offense “O” only, defense “X” only or “ALL” coaches via headsets
connected directly to the base station.
Coaches on the sideline wear beltpacs with headsets to communicate with each other and the spotters.
Beltpacs can be set up for communication with any combination of offense, defense and ALL.
This manual includes detailed setup and operating instructions for your DX340|HD system.
Basic 5-Coach System
●1 base station
●3 beltpacs
●5 headsets
●2 base stations
●6 beltpacs
●10 headsets
Expanded 10-Coach System

2
SECTION 2. EQUIPMENT IDENTIFICATION
STANDARD EQUIPMENT

3
Headset with dual ear muffs
Model #HS15D
Battery charger for base station batteries
Model # AC850
Headset extension cable, 6 ft (1.83 meter) Remote antenna kit with 30 foot (9.14 meter) cable
and bracket
Rechargeable battery for base station Model # BAT850
Remote antenna kit with 6 foot (1.83 meter) cable and
bracket
Adapter cable for headset with dynamic microphone and
XLR connector
Model # MD-XLR4F, MD-XLR4M, MD-XLR5F
OPTIONAL EQUIPMENT

4
EQUIPMENT FEATURES
Base Station
Top Panel
Antennas
Battery compartment latches
Power button
Right talk lights
Left talk lights
Right SELECT button
Left SELECT button
Right TALK button
Left TALK button
Active communicator lights
Clear/Band button Status indicator Reset switch
Registration
button
Right headset volume control
Left headset
volume control

5
Front Panel
Left Side Panel
Right Side Panel
Rear Panel
Auxiliary audio in/out
volume adjustments
(recessed)
Microphone gain adjustment
for left headset
Cable “input” from
another base station
Left headset connector
Rear headset connector
Single/Dual channel
mode selection switch
Cable “output” to
another base station
(Disabled on this version)
Microphone gain adjustment
for right headset
Auxiliary audio
input/output
connector
Antenna connectors
Power supply connector

6
Beltpac
Defense
button
All
button
Offense
button
Power
button
Volume Up
button
Volume Down
button
Headset cable
connector
Power/Offense
talk light
Battery
release
latch
Battery

7
SECTION 3. EQUIPMENT SETUP
BATTERY CHARGER
NOTE: Set up the battery charger and charge all beltpac batteries while you are setting up the
base station.
Power Supply Power Supply Cord
1 Connect power supply to charger and electrical outlet.
2 Charge all beltpac batteries. Charging time is approximately three hours.
Put up to 4 batteries
in charging ports
Storage ports for
charged batteries
Status lights next to each charging port
Red light
• Stays on steady while battery is charging
Green light
• Goes on when battery is fully charged
Yellow light
• Stays on steady when charging port is empty
• Flashes if battery is too hot to charge
• Next to battery in charging port means charge has failed – See instructions on side of charger

8
BASE STATION
1 Fasten both antennas onto the connectors on the back of the base station.
Tighten at 90° angle.
2 Plug the power adapter into the base station, and tighten the nut onto the
connector. Next, plug power cord into power adapter and electrical outlet.
Antenna connectors
90°
angle
NOTE: A fully charged battery can be kept in the base station as a backup in case of AC power
interruption.
3 Set up the base station in the press box with no objects blocking the
line-of-sight from base station to your sideline.
If interference occurs due to objects in the line-of-sight or sun screen
on press box windows, see remote antenna installation on page 15.
4 Press POWER button to turn power on.
5 Plug headsets into the base station, inserting headset plugs all the
way into connectors.
Left headset
connector
Right headset
connector
Power adapter Power cord

9
Optional Battery Operation of Base Station
A base station can operate on battery power when AC power is unavailable.
Typical base station battery life when used continuously is as follows:
Energizer ULTIMATE Lithium ................5 hours
BAT850 Rechargeable Battery ...............2¼ hours
Duracell Quantum .........................35 minutes
1 If you are using the battery sled, insert six “AA” batteries.
2 Pull back on the battery compartment latches, and lift the battery compartment cover on the base station.
NOTE: A fully charged battery can be kept in the base station as a backup in case of AC
power interruption.
NOTE: When base station battery power is low, everyone connected or registered to that base
station will hear a headset tone that repeats every 8 seconds. Additionally, both headset
select lights will blink.
BAT850 Battery
Battery sled
3 Insert the battery sled or rechargeable BAT850 battery (optional) into the battery
compartment, and close the cover.
4 If you are using the BAT850 battery, insert it in the AC850 battery charger (optional)
for recharging after each use.
Follow the instructions received with the charger. Charging time is approximately 3 hours.
AC850 Battery Charger
Battery
compartment
cover
Battery
compartment
latches

10
Spectrum Friendly™Interference Avoidance
Most Wi-Fi access points allow the administrator to set the channel and bandwidth for the system. Some systems employ
an “Auto” mode, in which the Wi-Fi access point will automatically select the channel.
With Wi-Fi access points, it is sometimes advantageous to manually select a channel number to keep the Wi-Fi
transmission at a xed location. Common Wi-Fi channels used are 1 and 11.
To avoid the Radio Frequency interference caused by Wi-Fi routers and Wi-Fi access points, the DX340|HD Base
Station offers three user selectable Hop Bands of radio operation. Making use of these bands can assure that base
communication is always free of interference.
Interference may be characterized as mechanical sounding voices; voices breaking up while talking; or hearing a “Busy”
prompt in the headset when a button is pressed.
All Band
When the DX340|HD is congured in All Band, the Base Station uses the entire broadcast frequency range, offering the
greatest opportunity for headsets to communicate with the base. Base Stations are shipped in the “A” position, which is
the default setting. However, when in All Band, the base can be susceptible to interference from Wi-Fi routers and Wi-Fi
access points. To avoid this interference, the DX340|HD offers two other bands: Low and High.
Low Band
Using Low Band sets the frequency range in which the Base Station operates to the lower end of the broadcast range. If
you know that the Wi-Fi access point is set to Wi-Fi channel 11, then you should set the base station to operate in “Low”
band so the base avoids the Wi-Fi channel 11 frequency range.
High Band
Using High Band sets the frequency range in which the Base Station operates to the upper end of the broadcast range. If
you know that the Wi-Fi access point is set to channel 1, then you should set the base station to operate in “High” band so
the base avoids the Wi-Fi channel 1 frequency range.
A Base Station’s frequency band setting can be changed as follows:
1 Turn the base station power on.
The STATUS window will show “8” for a few seconds.
After the “8” disappears, the STATUS window will be blank.
2 Press and hold the CLEAR/BAND button, then simultaneously press and hold
the REGISTER button.
The STATUS window will show L, H, Aor E(Europe).
3 Press the CLEAR/BAND button repeatedly to cycle through the frequency band:
L= Low end, H= High end, A= All and E= Europe.
Stop at the desired setting and wait until “c” appears on the STATUS display.
NOTE:
Base stations are shipped in the “A” (default) position.
The letter “c” will only appear on the STATUS display if you are setting the frequency band the rst
time or if you are changing the setting.
If you stop at L, H, Aor Ethat was previously set, an “8” will appear for a few seconds and the
STATUS display will turn blank.
If you change a base station’s existing frequency band setting, you will have to re-register all beltpacs
that were registered to that base station.

11
Base Switch (Disabled in this version)
PRI or SEC setting functionality for the BASE Switch is disabled in
this version. The switch can be set to either position.
BASE IN
connector
BASE OUT
connector
Interconnect cable
First base station Next base station
Audio Connection
Connect base stations with the provided interconnect cable, from the
BASE OUT connector on one to the BASE IN connector on the other.
Single/Dual Channel Setting
In the single-channel (SNGL) mode ― four beltpacs can be used in the
hands-free mode, communicating in “O” channel only.
In the dual-channel (DUAL) mode ― three beltpacs can be used in the
hands-free mode, communicating in either “O” or “X” channel, or “ALL”
(both channels).
On the right side of the base station(s), set the MODE switch to the single
or dual-channel position. Right side of base station
MODE switch
Base Station Microphone Gain Adjustment
The microphone gain adjustment allows you to adjust the level of your voice
as it is transmitted from the headsets plugged into the base station
Microphone gain must be adjusted for each base station headset.
1 Using a headset plugged into the right side of a base station, locate the
recessed MIC GAIN adjustment hole on the right side of the base station.
2 Insert a small screwdriver in the hole, and turn the adjustment clockwise
(to increase) or counterclockwise (to decrease) microphone gain.
3 Speak into the right headset microphone and listen to your voice level
(sidetone) as you adjust the microphone gain.
4 Using a headset plugged into the left side of the base station, locate the
MIC GAIN adjustment on the left side of the base station, and then repeat
Steps 2 and 3.
5 Repeat Steps 1 through 4 for each base station.
Base station microphone
gain adjustment
Insert small screwdriver
NOTE: Base station microphone
gain is factory set at about one-third
from minimum level.
BASE switch
Right side of base station

12
1 Turn the base station power on, and the beltpac power off.
2 Plug the headset into the beltpac, and put the headset on your head.
3 Press the REGISTER button on the base station registration panel.
A lower case “o” will appear on the STATUS window.
4 Press and hold the ALL button on the beltpac as you press
and release its PWR (power) button. After a brief delay, you
should hear “Registration complete”. An ID number for the
beltpac will appear briey on the STATUS window.
5 Repeat Steps 1 through 4 for each beltpac.
BELTPACS
Beltpac Registration
NOTE: If registration is not successful, you will hear “Registration failed” and the STATUS
window will be blank. If this happens, refer to TROUBLESHOOTING in Section 5, page 20.
NOTE:
If you’re attempting to register more than 15 beltpacs to a base station:
●An “F” (Full) will appear in the STATUS window, and you will hear “Registration failed” in
the headset.
●Clear all current registrations by pressing and holding the CLEAR/BAND button while you
press and release the RESET button with the point of a pen. Continue holding the CLEAR/BAND
button after you release the RESET button until the clear code “c” (lower case) appears on the
STATUS window.
●Register all beltpacs, one at a time, including previously registered beltpacs.
Power button
ALL button
REGISTER
button
STATUS
window

13
Beltpac Operating Mode Setup
Set up beltpacs to operate in the desired mode by pressing and holding the button combinations shown below. Button
combinations work in unison with the PWR (power) button.
Mode Button Combination Button Functions
Head Coach (default) Hold X + O + ALL and press PWR X, O & ALL have normal
functions
NOTE: Beltpacs are shipped in the Head Coach mode.
Offense only Hold O and press PWR X & O work as O
ALL has no function
Offense + ALL Hold O + ALL and press PWR X & O work as O
ALL has normal function
Defense only Hold X and press PWR X & O work as X
ALL has no function
Defense + ALL Hold X + ALL and press PWR X & O work as X
ALL has normal function
Offense + Defense only Hold X + O and press PWR X & O have normal functions
ALL has no function
Latching (Hands-Free, Full-Duplex) Hold ALL + and press PWR
X & O will latch on when
pressed and released, for a
normal two-way conversation
Push-To-Talk (PTT) Hold ALL + and press PWR X, O & ALL must be pressed
and held while you talk, and
released to listen
NOTE: Mode settings will be stored to memory, so your beltpacs will have the same mode
settings each time you power them off and on.
NOTE: ALL does not latch on, and must be held down to hear both Oand X.

14
Beltpac Adjustments
Sidetone Adjustment
When you speak into the microphone, you can hear sidetone (your own voice) in the beltpac headset.
Sidetone can be adjusted as follows:
1 Be sure the beltpac power is on.
2 While holding down the “O” button, press the volume-up or volume-down button as many times as needed to
reach an acceptable level. If you reach the high limit, you will hear “maximum” in the headset. If you reach the low
limit, you will hear double beeps.
Maximum sidetone level is recommended.
Microphone Gain Adjustment
Some users speak louder or softer than average.
The microphone gain adjustment helps to compensate for extremes in speaking level of coaches using beltpacs.
NOTE: The microphone gain can be monitored through sidetone, at the base station or preferably
by someone else using a beltpac.
NOTE: Microphone gain and sidetone adjustments will be saved in memory. A reset is not
required when the unit is turned off and on.
1 Be sure the beltpac power is turned on.
2 While holding down the “X” button, press the volume-up or volume-down button as many times as needed to
reach an acceptable level. If you reach the high limit, you will hear “maximum” in the headset. If you reach the low
limit, you will hear double beeps.
Recommended microphone gain levels are:
• Beltpacs – 12 presses down from maximum.

15
OPTIONAL REMOTE ANTENNA INSTALLATION
It may be necessary to place the antennas away from the base station if it is not possible to avoid obstructions between
it and the sideline, or if the press box has windows that are coated with a metalized sun reecting lm. Either of these
situations may block signals from the press box base station to the beltpacs on the eld.
Remote antenna kits with either 6 foot (1.83 meter) or 30 foot (9.14 meter) cables can be used to mount the antennas
wherever necessary to alleviate this problem.
To order a remote antenna kit, refer to the optional equipment shown on page 3. Installation instructions are enclosed with
the remote antenna kit

16
OPTIONAL AUXILIARY EQUIPMENT CONNECTION
Auxiliary equipment such as audio/video recorder or a hardwired intercom can be connected to the rear panel of the
base station.
1 Connect the wires from your auxiliary audio equipment to the enclosed 10-pin connector in accordance the
table below.
10-pin spring clamp connector
Pin Connections
1Aux In − O Differential pair
2Aux In − O
3Aux Out − O Differential pair
4Aux Out − O
5Ground
6No Connection
7Aux In − X Differential pair
8Aux In − X
9Aux Out − X Differential pair
10 Aux Out − X
2 Plug the connector into the back panel of the base station as shown above.
3 By inserting a small screwdriver in the holes on the front panel of the base station,
you can adjust the IN and OUT sound level of “O” and “X” communication channels
as needed.
Other manuals for DX340 HD
1
Table of contents
Other HME Headset manuals