manuals.online logo
Brands
  1. Home
  2. •
  3. Brands
  4. •
  5. Hollywood Racks
  6. •
  7. Automobile Accessories
  8. •
  9. Hollywood Racks Trike Adapter 2 Instruction manual

Hollywood Racks Trike Adapter 2 Instruction manual

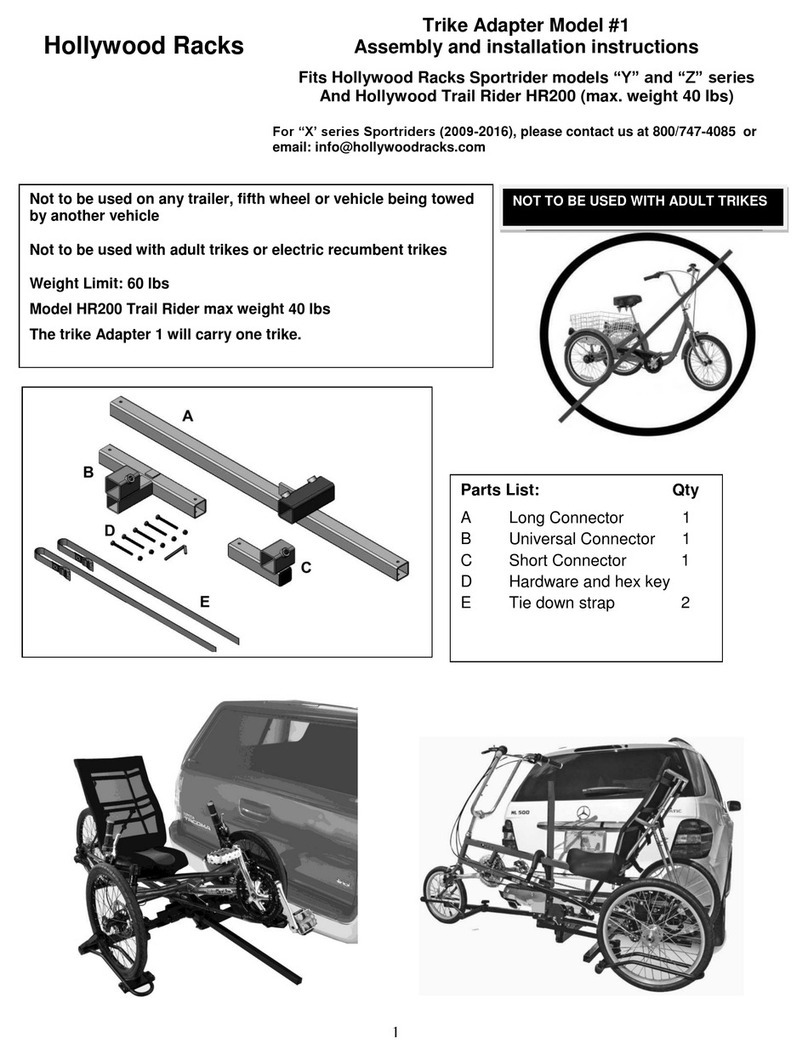
Trike Adapter Model #2
Assembly and installation instructions
Fits Hollywood Racks Sportrider model HR1450R
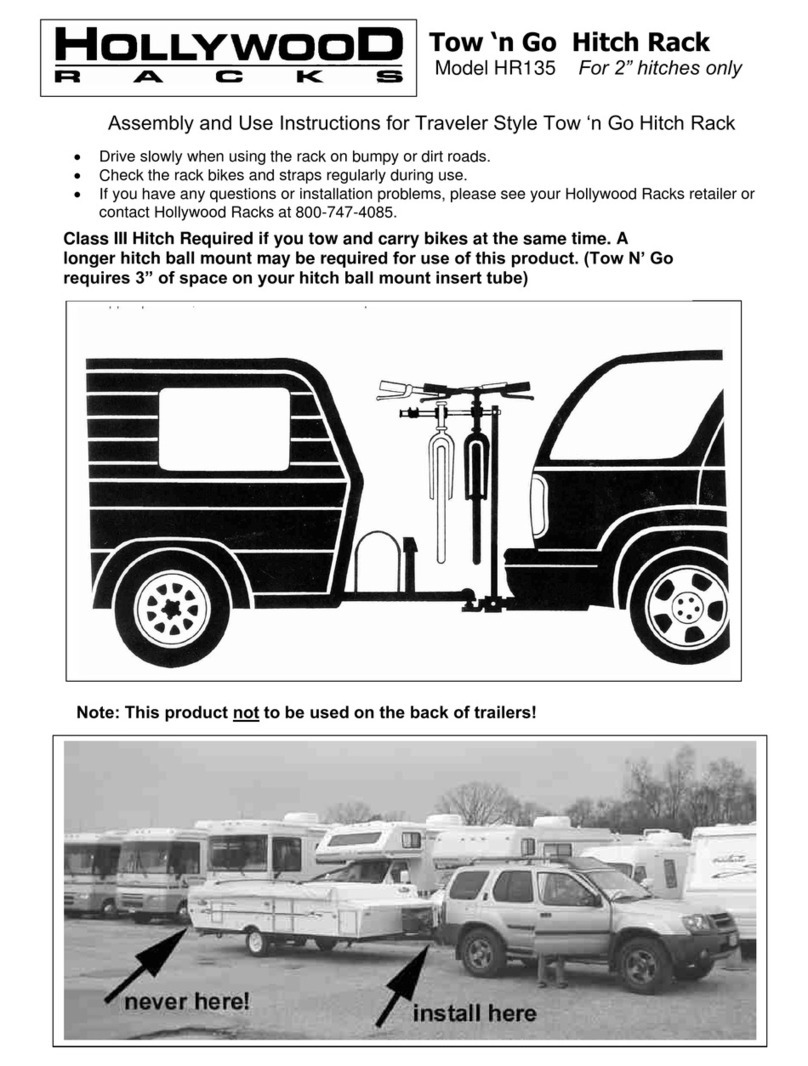
Not to be used on any trailer, fifth wheel or vehicle being towed by another vehicle
Weight Limit: 135 lbs
Not warranted to be used for carrying electric or motorized bicycles/tricycles or motorcycles
BIKE RACK PARTS LIST
Item Description Qty
Avertical post 1
Bbase assembly 1
B1 Front Cap 1
Cshort hook clamp 1
D“Z” hook clamp 1
Eleft wheel holder*2
Fright wheel holder*2
Gpivot bolt 1
Hreceiver tube 1
I pivot nut 1
Jpivot washers 2
Klocking hitch pin 1
Lsecurity cable 1
Mwheel support tube 4
Nextension lever 1
P “stop” screws 4
Rclip 2
SSmall Wheel Adapter 2
Thex key
1
U Tie down straps 2
*Extra wide for recumbents
A
1
TRIKE ADAPTER PARTS LIST
Item Description Qty
TA-1 straight tube 1
TA-2 long connector 1
TA-3 medium connector 1
TA-4 short connector 2
TA-5 universal connector 1
TA-6 cross connector 1
TA-7 front main bracket 1
TA-8 left side wheel holder*1
TA-9 small wheel adapter 1
TA-10 safety flag 1
TA-11 tie down straps 2
*standard width
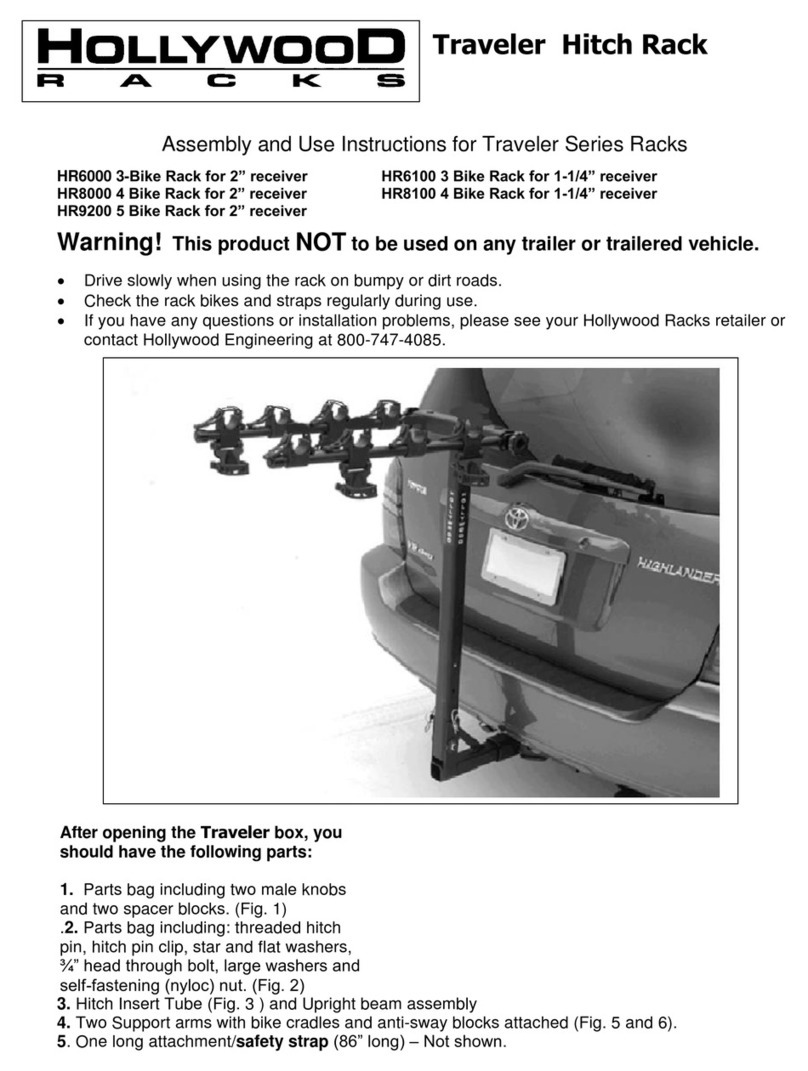
Hollywood Racks
NOTE: THIS BIKE RACK
(HR1450R) IS SHOWN
FOR REFERENCE ONLY
AND IS NOT INCLUDED
WITH THE TRIKE
ADAPTER MODEL #2.
(The Trike Adapter Model # 2
is included with the
Hollywood-Sunlite® Model
HRT220).
2
Trike Adapter:
Assembly for carrying one trike
TRIKE ADAPTER PARTS LIST
Item Description Qty
TA-1 straight tube 1
TA-2 long connector 1
TA-3 medium connector 1
TA-4 short connector 2
TA-5 universal connector 1
TA-6 cross connector 1
TA-7 front main bracket 1
TA-8 left side wheel holder 1
TA-9 small wheel adapter 1
TA-10 safety flag 1
TA-11 tie down straps 2
A)
Assembly
:
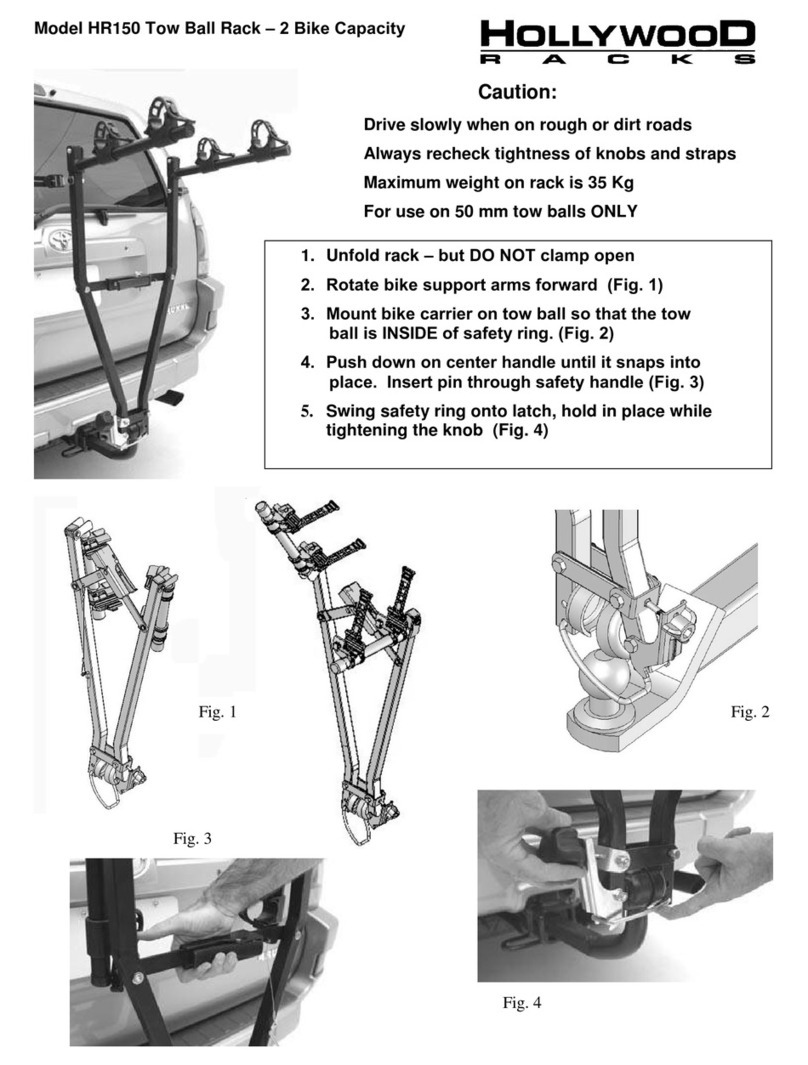
Install rack on vehicle without wheel holders, center mast must be folded down.
1. Install item E left side wheel holder onto driver’s side wheel tube.
2. Remove front reflector cap and install front main bracket TA-7. Do not tighten set screw on bottom yet.
3. Slide long connector TA-2 onto passenger side wheel tube.
4. Install universal connector onto long connectorTA-2. (Please note it may have to be reverse later
depending on the width between the trikes wheels.)
5. Install cross connector TA-6 (empty hole on bottom) onto long connector TA-2
6. Install straight tube TA-1 between front main bracket and cross connector.
7. Install short connector TA-4 onto long connector.
Note: when carrying one three wheeler only, the medium connector TA-2 and one of the short
connectors TA-4) will not be required.
3
Tip: the small wheel adapters must be used on 16” wheels,
but we also suggest using them on 20” wheels as well for
better clearance between the trike’s frame and the rack.
B: Carrying one “Tadpole” style trike
Installation procedure:
1. Measure width between center of tires (track) and distance between center of hubs (wheelbase).
2. Place bike directly behind rack (rear wheel on driver’s side), then “center” the trike between vehicle’s side
view mirrors.
3. Slide the long connector along passenger side wheel tube so it is a few inches behind front wheels.
4. If the center plate is preventing the long connector from positioning behind the front wheels, try rolling the
trike a little to the right.
5. Check to make sure your chain rings are not protruding beyond your side view mirror.
If you are sticking out too far on the right, please see SETUP “B”.
6. Universal connector: If the track is less than 29”, use position B1 shown below. If the track is 29” or more,
use position B2 shown below.
7. Install item E left side wheel holder. For very narrow tracks, you can use item TA-9 wheel holder.
8. Using the measurements taken in step 1, adjust for the track and wheelbase.
9. Place the trike onto the wheel holders to make sure it is sitting correctly in the wheel holders.
10. When the final positions are determined, remove the trike from the rack and tighten all set screws and
knobs securely. Install stop screws into wheel holders (Fig. 2D) and install the connector tube hardware.
11. When carrying the trike, be sure to use the velcro straps for the wheels AND both tie down straps (TA-11)
to secure the trike to the rack. Install the safety flag to the outside front wheel.
4
C: Carrying one “delta” style or adult trike
Follow the same installation procedure on page 7 for tadpole style trikes, except have
the center mast on the bike rack in a vertical position. Use either the standard or “Z”
style hook to clamp down on the frame depending on frame height. Please follow
frame clamping procedure as described in section 4, page 4.
Special notes for carrying adult bikes
Due to awkward weight distribution and short
wheel base for adult trikes, the distance
between the long connector and center of
rack should be very small (as small as
possible). This will allow the heaviest part of
the rack to be as close to the base assembly
as possible. The trike will probably not be
Centered behind the car, so check to make
sure the front wheel is not protruding beyond
the side view mirror.
Trike Assembly & setup
(Different than section B)
Slide medium connector tube TA-3 onto driver’s
side wheel holder.Then slide the universal
connector TA-5 onto the medium connector.
Install the wheel holder TA-8 onto universal
connector. Refer to Fig. D-1
Remove front reflector cap and install front main
bracket TA-7. Do not tighten set screw.
Slide the long connector TA-2 onto the passenger
side wheel tube. Slide short connector TA-4 onto
long connector so it is close to the passenger side
wheel tube. Next, slide the cross connector TA-6
onto the long connector, “empty hole” on bottom.
Install the straight tube between the cross
connector and front bracket. Slide the other short
connector onto the long connector, then install
the wheel holders onto the short connectors.
Measure width between center of tires (track) &
distance between center of hubs (wheelbase).
Place bike directly behind rack (rear wheel on
driver’s side), then “center” the trike between
vehicle’s side view mirrors. Check to make sure
your chain rings are not protruding beyond your
side view mirror. If you are protruding too far on
the right, please see SETUP “B” (Fig. D-3). Note
wheel holder orientation.
Fig. D-2
Fig. D-1
(D) INSTALLING TRIKE ADAPTER: CARRYING ONE TRIKE AND ONE “TWO WHEELER”
5
Using the measurements taken in step 1, adjust for the
track and wheelbase. Place the trike onto the wheel
holders to make sure it is sitting correctly in the wheel
holders. When the final positions are determined,
remove the trike from the rack and tighten all set
screws and knobs securely.
When carrying the trike, be sure to use the Velcro
straps for the wheels AND both tie down straps (TA-11)
to secure the trike to the rack. Install the safety flag to
the outside front wheel. Install stop screws into wheel
holders (Fig. 2D) and install the connector tube
hardware.
Installing the bike:
The two wheel bike, (whether it is a recumbent or
standard bike)will sit between the tadpole and
vehicle. When setting up the trike adapter, be sure
to slide the inside short connector “outwards”.
See fig. D-2 and D-3 so that the wheel holders can
be set up “side by side” if necessary (Fig. D-10)
The universal connector mounted may be rotated
to provide more “outward” distance if necessary.
See Fig. D-6
Note Fig. D-4: The wheel holders are pointing
inwards. This allows for installation of standard
bikes or shorter wheel base recumbents so you
don’t have to tear down the trike setup. Fig. E-3
shows setup for tadpole plus long wheel base
recumbent.
Fig. D-3
Fig. D-4
Fig.
D
-
5
Fig. D-6
CARRYING A DELTA TRIKE AND BIKE
If carrying a delta trike and a bike, it will probably
not be possible to use the center mast/frame hook
on the trike due to the track width and interference
with the inside bike. In this case, follow the
procedures given in the previous section on
tadpoles and use the center mast/frame hook for
the inside bike.
6
Fig. D
-
7:
It is very important to use the tie downs
(item
TA
-
11
)
to secure the trike to the rack due to its high center of gravity.
Use additional tie downs as required.
Fig. D-8A shows the setup for carrying just one 3-wheeler,
Fig.D-8B shows same setup with tadpole installed.
Fig. D-9A shoes setup for carrying one trike and one bike,
Fig. D-9B shows with one bike installed and
Fig. D-9C (next page) shows with both bike and trike installed.
Fig. 10: “Side by Side” wheel holders
Fig. D-7
Fig. D-8A Fig. D-8B
Fig. D-9A Fig. D-9B
7
Hollywood Racks
Limited Lifetime Warranty (effective January 1, 2008):
Hollywood Racks will warranty its car racks and accessories during the time that an original retail purchaser owns the product
subject to the exclusions and limitations of this warranty. Hollywood Racks will remedy defects in materials and workmanship by
repairing or replacing (at its option) the complete rack or a defective part without charge for labor or parts. Hollywood Racks may
elect (at its option) to issue a refund equal to the purchase price paid for the product.
This warranty does not cover problems caused by normal wear and tear including (but not limited to) weather, scratches, dents,
rust, accidents, unlawful vehicle operation, misuse, abuse, neglect, theft, unauthorized modifications, or unauthorized repair. No
warranty is given for defects resulting in incorrect assembly, incorrect installation onto the vehicle, installation on a “no fit” vehicle,
incorrect attachment of bicycles onto the rack, or overloading of the rack’s weight restrictions. This warranty terminates if the
original retail purchaser transfers the product to any other person.
If a product is believed to be defective, the original retail purchaser should contact either the original retailer or Hollywood Racks
directly at 800-747-4085 or at [email protected]
Disclaimer of Liability: Repair or replacement of a defective product or the issuance of a refund or credit (as determined by
Hollywood Racks) is a purchaser’s exclusive remedy under this warranty. Damage to a purchaser’s vehicle, cargo, bicycles and
or to any other person is excluded. This warranty is expressly made in lieu of any and all other express warranties, whether oral
or written.
Hollywood Racks shall not be liable for any direct, indirect, consequential, incidental, special, punitive or any other damages in
connection with the purchase, use or handling of this product. Some states do not allow the exclusion or limitation of
consequential or incidental damages and the above limitation may not apply to you. This warranty gives you specific legal rights
and you have other rights, which vary from state to state.
Hollywood Racks
12812 S. Spring St. Los Angeles, CA 90061
Tel (310) 516-8600 (800) 747-4085 FAX (310)516-8955
www.hollywoodracks.com email: [email protected]
Customer Service Hours: M-F 8:00AM to 3:00 PM PST
Made in Taiwan
V1 122011
Fig. D-9C
Note “side-by – side” position
of wheel holders when carrying one
bike and one trike (Fig. D-10).
Fig. D-10
8

Other Hollywood Racks Automobile Accessories manuals
Hollywood Racks F6 User manual

Hollywood Racks

Hollywood Racks F6 User manual

Hollywood Racks HR150 User manual

Hollywood Racks

Hollywood Racks HR150 User manual

Hollywood Racks HR1200 User manual

Hollywood Racks

Hollywood Racks HR1200 User manual

Hollywood Racks HR3000-E User manual

Hollywood Racks

Hollywood Racks HR3000-E User manual

Hollywood Racks HR4000 User guide

Hollywood Racks

Hollywood Racks HR4000 User guide

Hollywood Racks HR6000 Quick setup guide

Hollywood Racks

Hollywood Racks HR6000 Quick setup guide

Hollywood Racks Sport Rider HR1475 User manual

Hollywood Racks

Hollywood Racks Sport Rider HR1475 User manual

Hollywood Racks HR3000 User manual

Hollywood Racks

Hollywood Racks HR3000 User manual

Hollywood Racks 1 Instruction manual

Hollywood Racks

Hollywood Racks 1 Instruction manual

Hollywood Racks Road Runner 3 Series Instruction manual

Hollywood Racks

Hollywood Racks Road Runner 3 Series Instruction manual

Hollywood Racks Road Runner 5 Bike Hitch Rack Instruction manual

Hollywood Racks

Hollywood Racks Road Runner 5 Bike Hitch Rack Instruction manual

Hollywood Racks Sportrider HR1500 Instruction manual

Hollywood Racks

Hollywood Racks Sportrider HR1500 Instruction manual

Hollywood Racks HR135 Quick setup guide

Hollywood Racks

Hollywood Racks HR135 Quick setup guide

Popular Automobile Accessories manuals by other brands

Star Headlight & Lantern Mini Phantom ULB9 Installation and instruction manual

Star Headlight & Lantern

Star Headlight & Lantern Mini Phantom ULB9 Installation and instruction manual

Hyundai D7211ADE00ST installation instructions

Hyundai

Hyundai D7211ADE00ST installation instructions

Fortin EVO ONE THAR-ONE-HON6 Installation

Fortin

Fortin EVO ONE THAR-ONE-HON6 Installation

Adaptiv Mini CAM-AU6-AD FITTING & USER GUIDE

Adaptiv Mini

Adaptiv Mini CAM-AU6-AD FITTING & USER GUIDE

Dometic FJX4233EEH quick start guide

Dometic

Dometic FJX4233EEH quick start guide

Big Mikes Performance Parts STO N SHO SNS 83 Installation procedures

Big Mikes Performance Parts

Big Mikes Performance Parts STO N SHO SNS 83 Installation procedures

Mopar 77072498AC manual

Mopar

Mopar 77072498AC manual

STL G-A6X4 instruction manual

STL

STL G-A6X4 instruction manual

BURY CC 9060 Plus manual

BURY

BURY CC 9060 Plus manual

SCT X4 Power Flash quick start guide

SCT

SCT X4 Power Flash quick start guide

Magnum RemusShield Finger Touch Immobilizer Installation instructions manual

Magnum

Magnum RemusShield Finger Touch Immobilizer Installation instructions manual

Truma Caravan Mover operating instructions

Truma

Truma Caravan Mover operating instructions

BMW 65 12 0 029 843 installation instructions

BMW

BMW 65 12 0 029 843 installation instructions

Pioneer CA-HM-UNI-EVO.009 installation manual

Pioneer

Pioneer CA-HM-UNI-EVO.009 installation manual

Sima CDM-1 user guide

Sima

Sima CDM-1 user guide

Sune Technology SUNE10-NTG55 installation manual

Sune Technology

Sune Technology SUNE10-NTG55 installation manual

Ranger design 16-UCT66 installation guide

Ranger design

Ranger design 16-UCT66 installation guide

ATD Tools SPI-77300 user manual

ATD Tools

ATD Tools SPI-77300 user manual

manuals.online logo
manuals.online logoBrands
  • About & Mission
  • Contact us
  • Privacy Policy
  • Terms and Conditions

Copyright 2025 Manuals.Online. All Rights Reserved.