honor 8A User manual

User Guide

Contents
Exciting Features
Featured Usage Tips 1
Camera Tips 2
Manage Your Phone 5
New Device
New Device Conguration 8
Gestures and Operations
Record Exciting Moments on Your Screen 11
Home Screen
Navigation Bar 13
Use Shortcut Switches to Quickly Enable Frequently Used Features 14
Notication Panel and Status Bar 14
Screen Lock and Unlock 17
Home Screen Management 18
Contacts
Search Contacts 22
Managing Contacts 22
Dialling
Basic Calling Functions 26
VoLTE 27
Use VoWi-Fi for a New Calling Experience 28
Message
Basic Messaging Functions 29
Camera
Basic Camera Functions 31
Use Panorama Mode to Take Panoramic Photos 33
Pro Mode 34
Gallery
Photo Management 37
Phone Manager
Use One-touch Optimisation 39
Manage Mobile Data Usage 39
Enable Smart Power-Saving Management to Optimise Power
Consumption 39
i

Email
Add Email Accounts 41
Manage Email Accounts 41
Manage VIP Email Contacts 42
Import Important Events to Calendar 42
Set Auto Response for Exchange Email 42
Calendar
Navigate the Calendar 43
Import To-Dos to Keep Your Work Organised 44
Clock
Use the Clock 45
Notepad
Manage Your Notes to Keep Your Records in Order 47
Utilities
Check Your Screen Time 49
Device Connection
Bluetooth 50
Connecting USB Device 52
Security and Privacy
Face Unlock 54
Fingerprint 55
Enable or Disable Location Services 58
Enable App Lock 58
Backup and Restoration
Data Backup Using HiSuite 60
Data Backup to a Memory card 60
Data Backup to a USB Storage Device 60
Reset Your Phone 61
Wi-Fi and Network
Wi-Fi 62
Connecting to the Internet 65
Share Your Mobile Network with Other Devices 65
Sound and Display
Congure Do Not Disturb Mode 68
Congure Your Sound Settings 68
Enable Eye Comfort Mode to Prevent Eye Strain 69
More Display Settings 69
Contents
ii


Exciting Features
Featured Usage Tips
Enrol Your Facial Information to Enable Face Unlock
Face unlock allows you to quickly unlock your Phone by holding it up to your face.
lOnly the owner can enable Face unlock. This feature is not available for users or guests, and
not supported in PrivateSpace either.
lFace unlock is not available if the screen unlock password has not been entered for three or
more days in a row, or if your Phone has been remotely locked, or has been restarted.
lWhen using Face unlock to unlock your Phone, keep your eyes open, face yourself directly
towards your Phone, and keep your face at a distance of 20 cm (7.87 in.) to 50 cm (19.69 in.)
from your device. In order to scan your face accurately, avoid using this feature when you are in
a dark environment or when facing direct light.
1Open Settings. Go to Security & privacy > Face recognition and enter your lockscreen
password.
If you haven't set a lockscreen password, follow the onscreen instructions to do so. Face
unlock is only available if the unlock method is set to Pattern, 4-digit PIN, Custom PIN, or
Password.
2If you have selected Enable pick up to wake, your Phone will turn the screen on and recognise
your face to unlock the screen automatically after you pick up your Phone and hold it to your face.
If you do not wish to use this feature, deselect this option. Touch Enrol face and follow the
onscreen instructions to enrol your facial information.
3Methods to set Face unlock:
lDirect unlock: Turn on the screen. Your Phone will recognise your facial features and unlock
the screen after they are matched.
lSwipe to unlock: Turn on the screen. After your Phone has recognised your facial
information, swipe your nger on the lockscreen to unlock your device.
lSmart lock screen notication display: If you have enabled Slide to unlock and Smart
lock screen notications, notication details will not display on the lockscreen until your
Phone recognises your facial features.
lAccess app lock: If you enable Access app lock, the face unlock function can be used to
access apps and locked apps.
Pick Up to Unlock
Open Settings, go to Security & privacy > Face recognition. When enroling the face data,
select Enable pick up to wake, and set the Face unlock method to Direct unlock. Once the setup is
complete, you can simply raise your Phone to unlock the screen, without a password or ngerprint.
1
If you haven't selected Enable pick up to wake when enroling the face data, you can set up this
feature later: Open Settings, go to Security & privacy > Face recognition, set the Face unlock
method to Direct unlock. Then open Settings, go to Smart assistance > Motion control >
Pick up, and select Wake device.
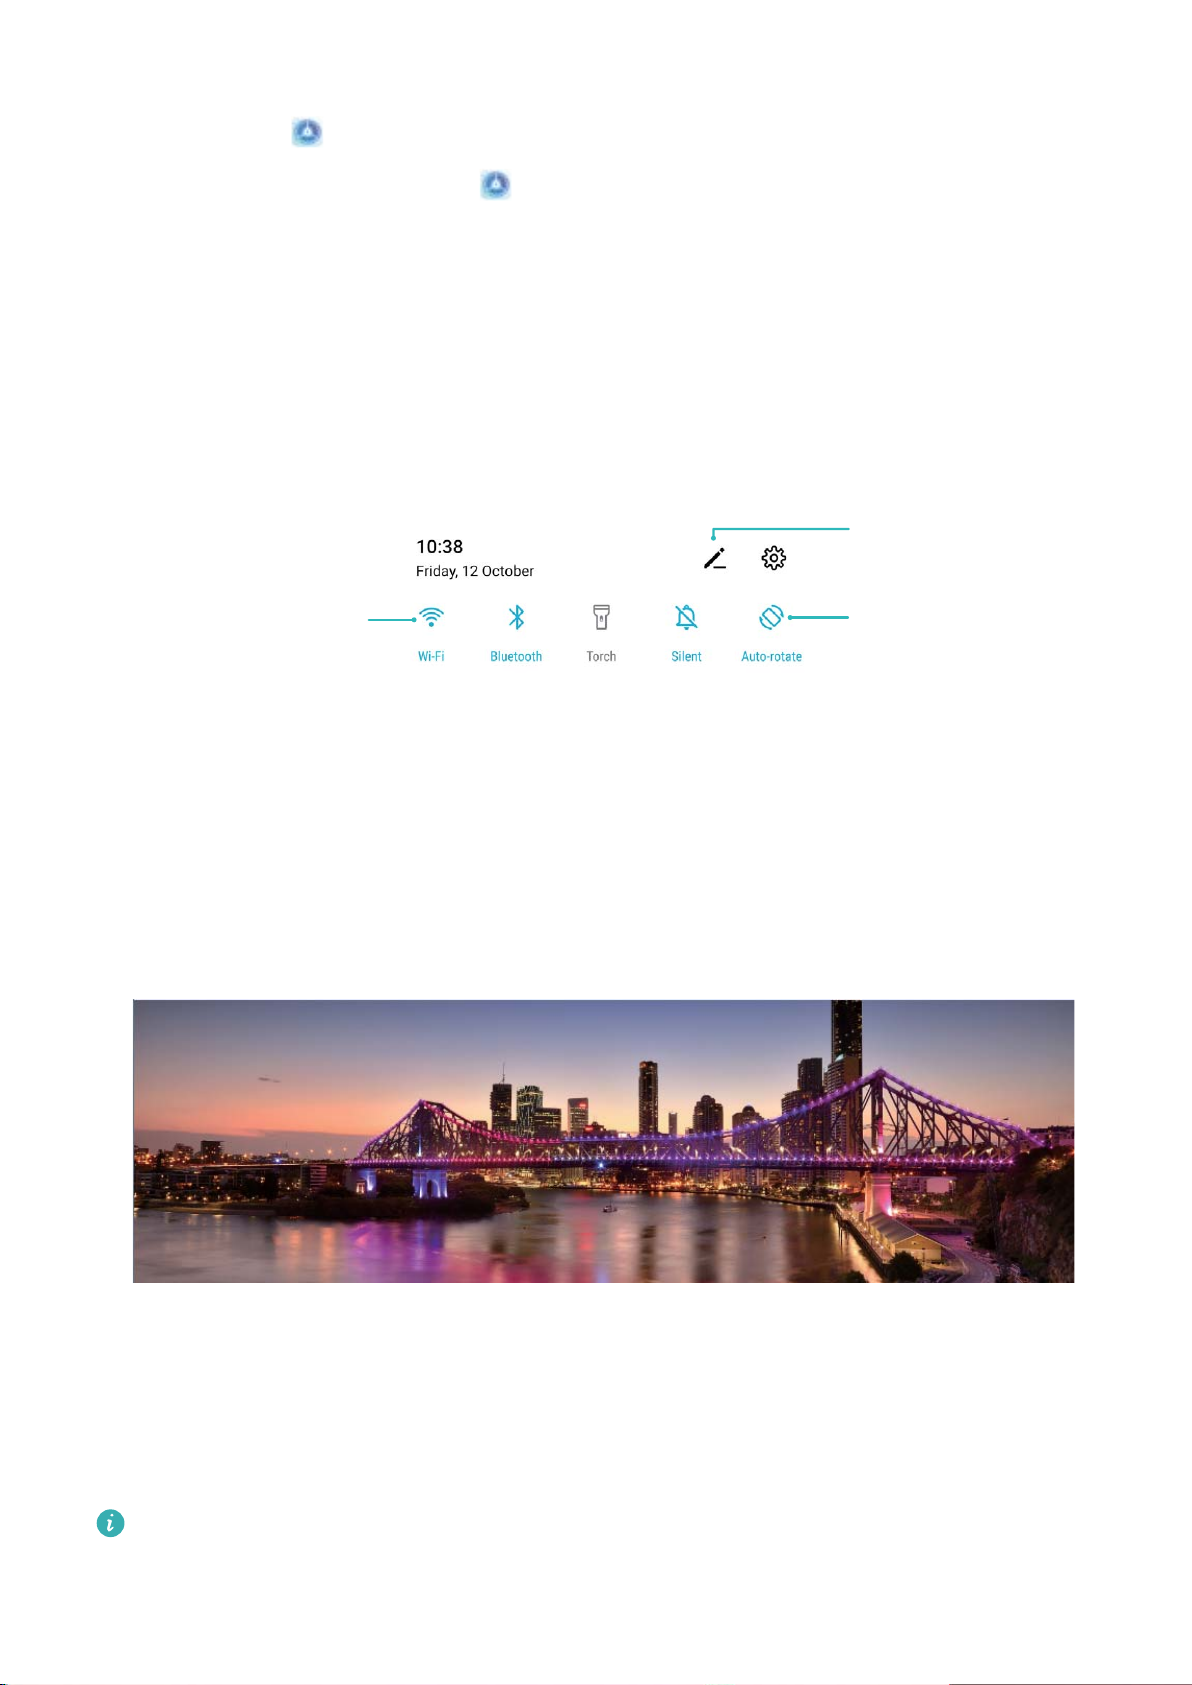
Use Shortcut Switches to Quickly Enable Frequently Used Features
Want to quickly enable or disable mobile data or Wi-Fi? Swipe down from the status bar and open the
shortcuts panel, then touch the corresponding shortcut switch to enable or disable a feature. Touch
and hold a shortcut switch icon to enter the feature's settings page.
Touch to enable
this feature
Touch and hold to
enter Settings
Organize shortcuts
Camera Tips
Use Panorama Mode to Take Panoramic Photos
Panoramas provide a wider viewing angle than ordinary photos, letting you take sweeping landscape
shots.
To capture a panorama shot, the camera takes multiple photos of objects within our visual eld and
stitches them together into a single photo.
When taking a panorama, nd a wide, open space that is some distance away from the subject
and try to avoid backgrounds that are all in one colour.
Exciting Features
2

1Go to Camera > More > Panorama.
2Touch at the bottom of the screen to congure the shooting direction.
3Hold your Phone steady, and then touch to start shooting. Slowly move the Phone in the
direction indicated, holding the device steady and ensuring that the arrow stays level with the
centre line.
4Touch when you are nished. The camera will automatically stitch the photos together to
create a panorama.
Use Pro Mode to Take Scenic Photos
Want to make your scenic photos more vibrant and interesting? Use Pro mode to take unique and
personalised scenic photos.
Open Camera > More > Pro to enter Pro mode.
Select a metering mode based on the shooting subject: On the Pro mode screen, touch ,
and select a metering mode accordingly.
Metering mode Application scenario
Centre The subject is in the centre of the picture, and stands out from the
background.
Spot The subject to be highlighted in the picture is relatively small, such as a
ower or a tree.
Adjust brightness based on the shooting environment:
lAdjust ISO: On the Pro mode screen, touch , and swipe left or right on the ISO slider to adjust
its value.
To avoid excessive noises, the recommended ISO is below 400. The recommended ISO for the
daytime is between 100 and 200 and above 400 for night scenes.
lAdjust the shutter speed: On the Pro mode screen, touch (shutter speed), slide on the
shutter speed slider, and drag your desired speed to the centre.
The recommended shutter speed for static scenes (such as mountains) is between 1/80 and
1/125; and faster (less than 1 second) for moving subjects (such as waves). For the best result,
using a tripod when shooting a moving subject.
lAdjust EV compensation: On the Pro mode screen, touch
(9
, slide on the EV slider and drag the
selected value to the centre.
Adjust AWB: On the Pro mode screen, touch
"8#
, slide on the AWB slider and drag the selected
value to the centre.
Exciting Features
3
lWhen shooting under sunlight, you can select . In a weak light environment, you can select
.
lTouch
to adjust the colour temperature. If you want to give your photo a cosy, nostalgic
tone, increase the K value. For a cold, calm or futuristic tone, select a lower K value.
Adjust AF based on the shooting subject: On the Pro mode screen, touch
$)
, slide on the AF
slider and drag your desired mode to the centre.
AF modes Application scenario
AF-S mode Static scenes (such as mountains).
AF-C mode Moving scenes (such as owing water and sea waves).
MF mode Protruding objects (such as a close-up of a ower).
Hold your device steady when shooting: In Pro mode, touch and enable Horizontal level.
After this feature is enabled, two horizontal guiding lines will appear in the viewnder. When the
dotted line overlaps with the solid line, it indicates that the camera is horizontally aligned.
lSome settings in Pro mode may change after you change a setting. You may adjust them based
on your actual needs.
lThe recommended settings above are for reference only. You may adjust them based on the
actual condition to achieve your desired effect.
Use Pro Mode to Capture Portraits
Want to take more professional portraits? The Pro mode allows you to adjust your camera settings to
shoot professional portraits.
Open Camera > More > Pro.
Select a Metering mode: or mode is recommended for taking portraits. Place your
shooting subjects (their faces for example) in the centre of the viewnder.
Adjust brightness based on the shooting environment
lAdjust ISO: To avoid excessive noises, it is recommended that you adjust the ISO to a low level
when shooting portraits. You may adjust the ISO based on the actual shooting environments.
Shooting Environment Recommended ISO
Outdoors Between 100 and 200
Indoors Around 400
Night scenes Between 400 and 800
lAdjust shutter speed: The shutter speed should be slow if the ambient light is low and fast when
the ambient light is strong. The recommended shutter speed for static portraits is between 1/80 and
1/125. To shoot moving subjects, select a shutter speed at or above 1/125.
Exciting Features
4

lAdjust EV compensation: You may increase the EV compensation if the light on the subjects or
background is low, and decrease the EV compensation if there is too much light.
Adjust AWB: Select AWB depending on the lighting conditions. When shooting under sunlight, you
can select . In a low light environment, you can select .
Adjust Focus: To better highlight a subject, it is recommended that you use manual focus (MF) when
shooting portraits. In the viewnder, touch to focus on the part (the subject's face for example) you
want to highlight.
lIn Pro mode, some settings may change after you change a setting. You may adjust them
based on your actual needs.
lThe recommended settings above are for reference only. You may adjust them based on the
actual usage conditions to achieve your desired effect.
Manage Your Phone
Enable App Lock
App lock allows you to set a password for your WeChat, Alipay, and other important apps. Once you
restart your Phone or unlock the screen, you will be asked to enter your App lock password when
opening the apps for the rst time. App lock enhances the protection of your private information and
prevents unauthorised access to important apps on your device.
Enable App lock: Open Settings. Go to Security & privacy > App lock. When you access the
app for the rst time, follow the onscreen instructions to set the password and enter the app lock. In
subsequent access, you can directly enter the app lock password. On the App lock screen, enable App
lock for the apps you want to protect. When accessing a locked app for the rst time, you need to
enter the password in the password text box. If you forget the password, touch Forgot password,
enter the answer in the password protection question box, and reset the password. If you have not
set the password protection, the Forgot password option is not available.
Modify your App lock password and password protection: Touch on the App lock screen,
and then touch Change password or Change password protection to modify your App lock
password or password protection.
Set Your Home Screen Wallpaper
Tired of default wallpapers? Set a photo you like as your home screen wallpaper to personalise your
home screen.
Open Settings, and then go to Home screen & wallpaper > Wallpaper. You can:
Set a picture as your home screen wallpaper: Touch Gallery or select a preset wallpaper in your
device, and follow the onscreen instructions to select Lock screen, Home screen or Both.
Exciting Features
5
Set a photo as your wallpaper from Gallery: Have a great photo you want to set as your
wallpaper? In Gallery, open the photo that you like, go to > Set as > Wallpaper, and
follow the onscreen instructions to set the photo as your home screen wallpaper.
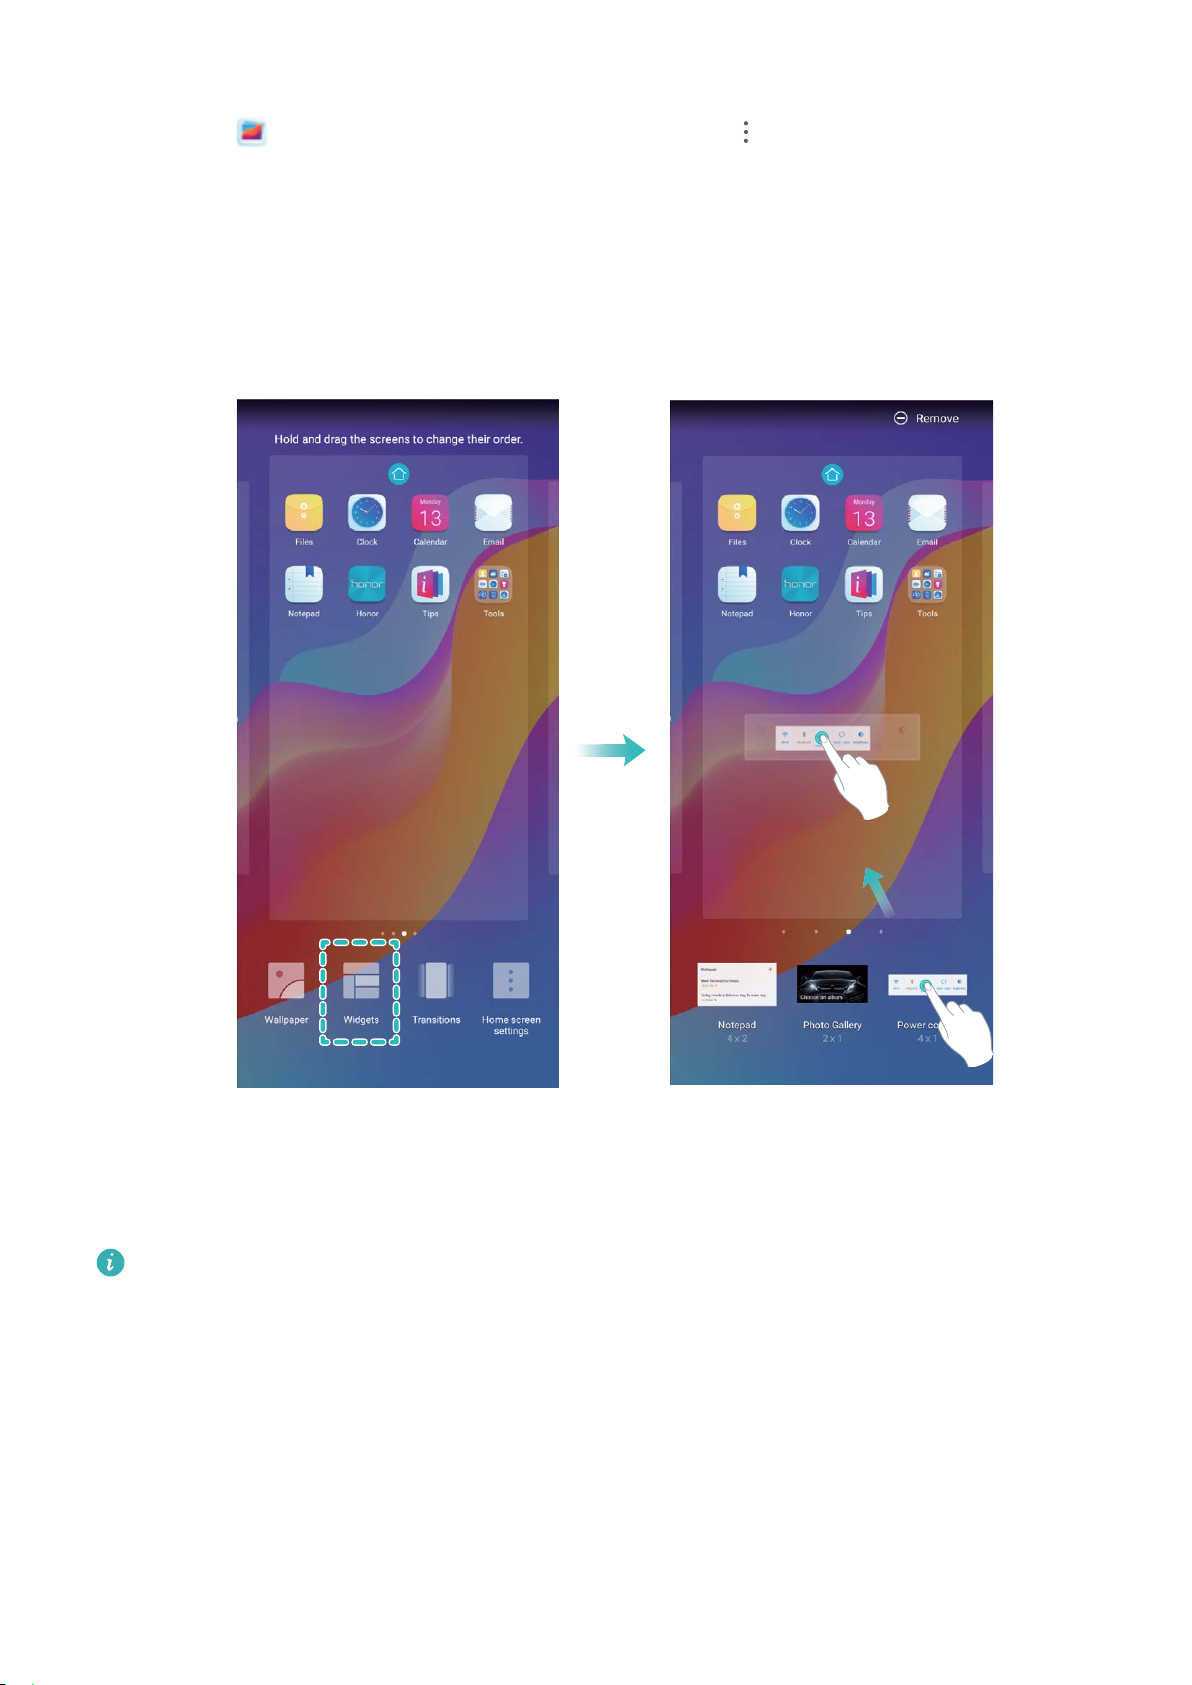
Manage Your Home Screen Widgets
Want to quickly manage widgets on your home screen? You can add, move or delete home screen
widgets to tidy up your home screen and make it easier to use.
Add widgets: Touch and hold an empty area on the home screen to enter home screen editing
mode. Touch Widgets, touch and hold a widget and drag it to an empty area on the home screen, or
touch the widget you want.
Check that there are enough empty spaces on the home screen for the widget. If there is not
enough space, add an empty screen page or free up some space on the current home screen
page.
Delete widgets: Touch and hold a widget on the home screen until your Phone vibrates, and then
select Remove.
Move widgets: Touch and hold a widget on the home screen until your Phone vibrates. Drag the
widget to any position on the screen.
Exciting Features
6

Use App Drawer to Store Apps
Want to store your apps in one location on your home screen to make your home screen look
cleaner? You can enable app drawer on your home screen to store all your apps and free up space on
your home screen.
Open Settings, go to Home screen & wallpaper > Home screen style, and select Drawer. If
you want to switch back to a standard home screen, select Standard.
Add an app icon from app drawer to the home screen: After you enable app drawer, touch
on the home screen to enter the app list. From the app list, touch and hold the app icon that
you want to add until your Phone vibrates, and then drag it to the desired position on the home
screen.
Enable TalkBack to Have Onscreen Content Read Aloud
TalkBack reads aloud content on the screen that you touch, select, or activate. It is a useful tool that
helps visually impaired users interact with their Phone.
1Open Settings and go to Smart assistance > Accessibility > TalkBack > to open the
TalkBack settings screen.
2Enable TalkBack and touch OK. Your device will launch a tutorial when you enable TalkBack for
the rst time. If you need to listen to the tutorial again, touch , open the TalkBack settings
screen, and then launch the tutorial.
3Touch and enable Explore by touch. When Explore by touch is enabled, your device will
read out content that you touch.
Why does my Phone suddenly start reading out content on the screen? How do I disable this
feature? You may have enabled TalkBack by accident. To disable TalkBack, press and hold the Power
button until your device vibrates, and then touch the screen with two ngers for at least three
seconds.
Exciting Features
7
New Device
New Device Conguration
Connecting to the Internet
Connect to Wi-Fi networks effortlessly with your device.
Connecting to a Wi-Fi network
1Swipe down from the status bar to open the notication panel.
2Touch and hold to open the Wi-Fi settings screen.
3Switch on Wi-Fi. Your device will list all available Wi-Fi networks at your location.
4Select the Wi-Fi network you want to connect to. If you select an encrypted network, you will also
need to enter the Wi-Fi password.
Connecting using mobile data
Before using mobile data, ensure that you have a data plan with your network provider to avoid
incurring excessive data charges.
1Swipe down from the status bar to open the notication panel.
2Touch to enable mobile data.
When you don't need to access the Internet, disable mobile data to save battery power and
reduce data usage.
Enrol Your Facial Information to Enable Face Unlock
Face unlock allows you to quickly unlock your Phone by holding it up to your face.
lOnly the owner can enable Face unlock. This feature is not available for users or guests, and
not supported in PrivateSpace either.
lFace unlock is not available if the screen unlock password has not been entered for three or
more days in a row, or if your Phone has been remotely locked, or has been restarted.
lWhen using Face unlock to unlock your Phone, keep your eyes open, face yourself directly
towards your Phone, and keep your face at a distance of 20 cm (7.87 in.) to 50 cm (19.69 in.)
from your device. In order to scan your face accurately, avoid using this feature when you are in
a dark environment or when facing direct light.
1Open Settings. Go to Security & privacy > Face recognition and enter your lockscreen
password.
If you haven't set a lockscreen password, follow the onscreen instructions to do so. Face
unlock is only available if the unlock method is set to Pattern, 4-digit PIN, Custom PIN, or
Password.
8

2If you have selected Enable pick up to wake, your Phone will turn the screen on and recognise
your face to unlock the screen automatically after you pick up your Phone and hold it to your face.
If you do not wish to use this feature, deselect this option. Touch Enrol face and follow the
onscreen instructions to enrol your facial information.
3Methods to set Face unlock:
lDirect unlock: Turn on the screen. Your Phone will recognise your facial features and unlock
the screen after they are matched.
lSwipe to unlock: Turn on the screen. After your Phone has recognised your facial
information, swipe your nger on the lockscreen to unlock your device.
lSmart lock screen notication display: If you have enabled Slide to unlock and Smart
lock screen notications, notication details will not display on the lockscreen until your
Phone recognises your facial features.
lAccess app lock: If you enable Access app lock, the face unlock function can be used to
access apps and locked apps.
Pick Up to Unlock
Open Settings, go to Security & privacy > Face recognition. When enroling the face data,
select Enable pick up to wake, and set the Face unlock method to Direct unlock. Once the setup is
complete, you can simply raise your Phone to unlock the screen, without a password or ngerprint.
If you haven't selected Enable pick up to wake when enroling the face data, you can set up this
feature later: Open Settings, go to Security & privacy > Face recognition, set the Face unlock
method to Direct unlock. Then open Settings, go to Smart assistance > Motion control >
Pick up, and select Wake device.
Enrol a Fingerprint
You can enrol a ngerprint on your Phone and then use your ngerprint to unlock your screen or
access your Safe or App Lock without a password.
lFingerprint unlocking is only available when your unlock method is set to Pattern, PIN or
Password. You will be required to unlock your Phone using the screen unlock password after
the device is restarted or if your ngerprint is not recognised.
lBefore enrolling a ngerprint, make sure your nger is clean and dry.
1Open Settings.
2Go to Security & privacy > Fingerprint ID > Fingerprint management > Change unlock
method, select Pattern, 4-digit PIN, 6-digit PIN, Custom PIN or Password, and then follow
the onscreen instructions to set an unlock password.
3Once you have set an unlock password, touch New ngerprint to enrol a ngerprint.
4Place your ngertip on the ngerprint sensor. Press down lightly on the sensor until your device
vibrates. Repeat this step using different parts of your ngertip.
5After enrolment is complete, touch OK.
New Device
9

To unlock the screen, simply place your ngertip on the ngerprint sensor.
Connect to Wi-Fi
By connecting your device to a Wi-Fi network, you can effectively save mobile data.
To avoid potential security risks (such as unauthorised access to your personal data and nancial
information), please exercise caution when connecting to a public Wi-Fi network.
Connect to a Wi-Fi Network: Open Settings, go to Wireless & networks > Wi-Fi, and enable
Wi-Fi. Touch a Wi-Fi network to access it, and enter the network password or complete the
authentication if required. Alternatively, you can scroll to the bottom of the menu, touch Add
network, and follow the onscreen instructions to add a network hotspot by entering its name and
password.
New Device
10

Gestures and Operations
Record Exciting Moments on Your Screen
The screen recording feature comes in handy when you are making tutorial videos or if you want to
record your gaming exploits to share with your friends using your Phone.
lScreen recording will end if you make or answer a call.
lIf you are using the sound recording function of your Phone before screen recording, Enable
microphone is disabled by default.
lIf you have enabled Enable microphone, your device will record all ambient sounds in the
recording. It is recommended that you record your screen in a quiet environment.
Use shortcut to start recording: Swipe down from the status bar to open the notication panel,
and then touch > to start recording the screen. You can enable or disable Enable
microphone based on your needs. To end the recording, touch in the upper left corner of the
screen.
11
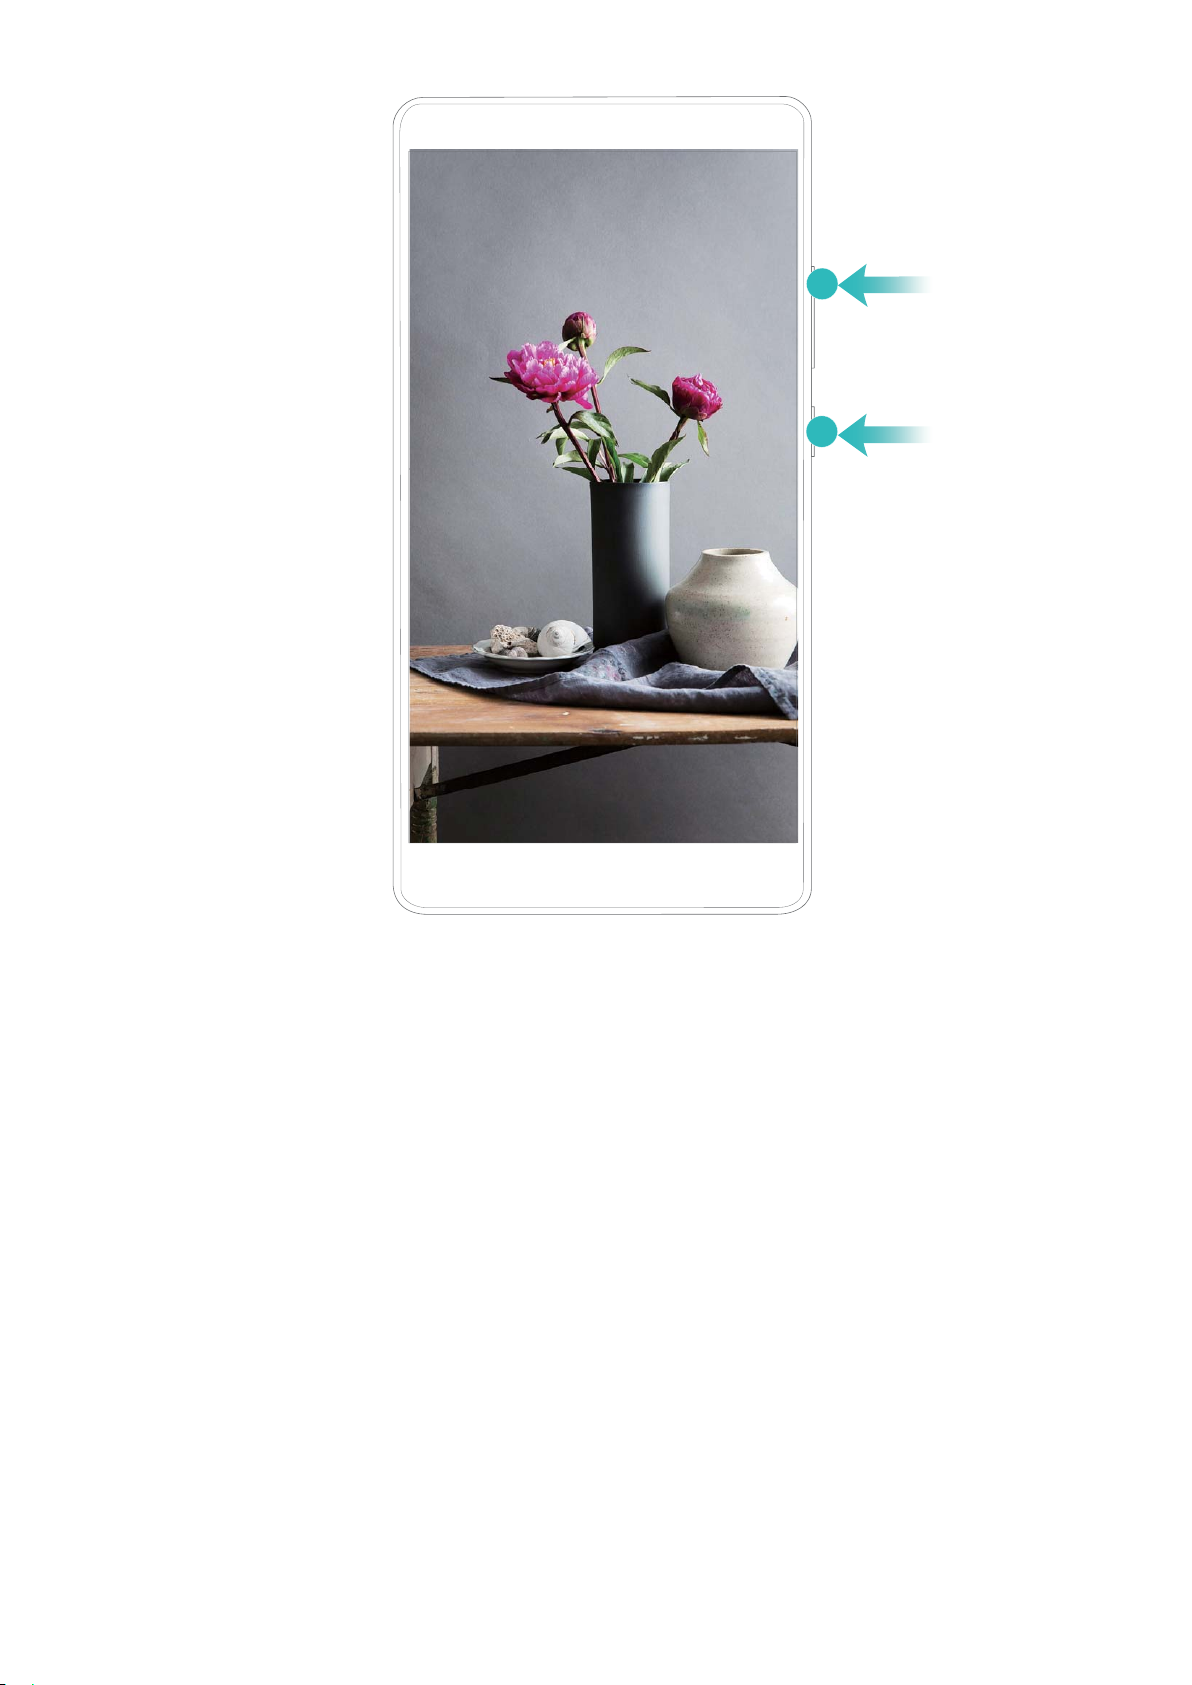
Use key combination to start recording: Simultaneously press and hold the Power button and the
Volume up button to begin recording. You can enable or disable Enable microphone based on your
needs. To end the recording, simultaneously press and hold the Power button and the Volume up
button again.
You can view your screen recordings in Gallery.
Gestures and Operations
12

Home Screen
Navigation Bar
Congure Your Navigation Bar Layout
Using the navigation bar, you can conveniently access the home screen, return to the previous page,
exit an app, or view recent apps used.
To congure your navigation bar layout, go to Settings, then go to System > System
navigation > Three-key navigation > Settings, and select the navigation key combination and
enable or disable Hide navigation keys based on your usage habits.
l Back key: Touch to return to the previous page or exit an app. Touch to close the onscreen
keyboard when inputting text.
l Home key: Touch to return to the home screen. Touch and hold to display the HiVoice icon
and swipe upwards on the icon to enable HiVoice features.
l Recent key: Touch to open a list of recently used apps. Touch and hold to enable split screen
mode.
l Downward swipe notication key: Touch to open the notication panel.
Use the Recent Key to Manage Background Apps
If you want to quickly switch to a recently used app, you might try using the Recent key. The Recent
key can help you quickly switch between several recently used apps. You can also use it to close your
background apps to increase your Phone's operating speed.
Touch . You can view, switch to, close, or lock recently used background apps:
lView recently used apps: Recently used apps will be displayed on the screen and you can check
them by swiping left or right.
13

lSwitch to a recently used app: Swipe left or right on the screen to nd the app you want to use,
and touch the app tab.
lClose an app: Swipe up on an app tab to close the corresponding app.
lClose all apps: Touch to close all apps.
Use Shortcut Switches to Quickly Enable Frequently
Used Features
Want to quickly enable or disable mobile data or Wi-Fi? Swipe down from the status bar and open the
shortcuts panel, then touch the corresponding shortcut switch to enable or disable a feature. Touch
and hold a shortcut switch icon to enter the feature's settings page.
Touch to enable
this feature
Touch and hold to
enter Settings
Organize shortcuts
Notication Panel and Status Bar
Notication and Status Icons and Descriptions
The icons in the status bar give you a quick view of the overall status of your device, including its
network connection, battery level, and any new messages received when your device is in Silent
mode.
Status icons: By glancing at the status icons, you can quickly learn the status of your device, such as
network connection, signal strength, battery level, time, and more.
The network status icons may vary by regions and service providers.
Signal strength No signal
4G+ network connected 3G network connected
4G network connected HSPA network connected
2G network connected
LTE
LTE
LTE network connected
LTE
LTE
LTE+ network connected NFC enabled
Home Screen
14
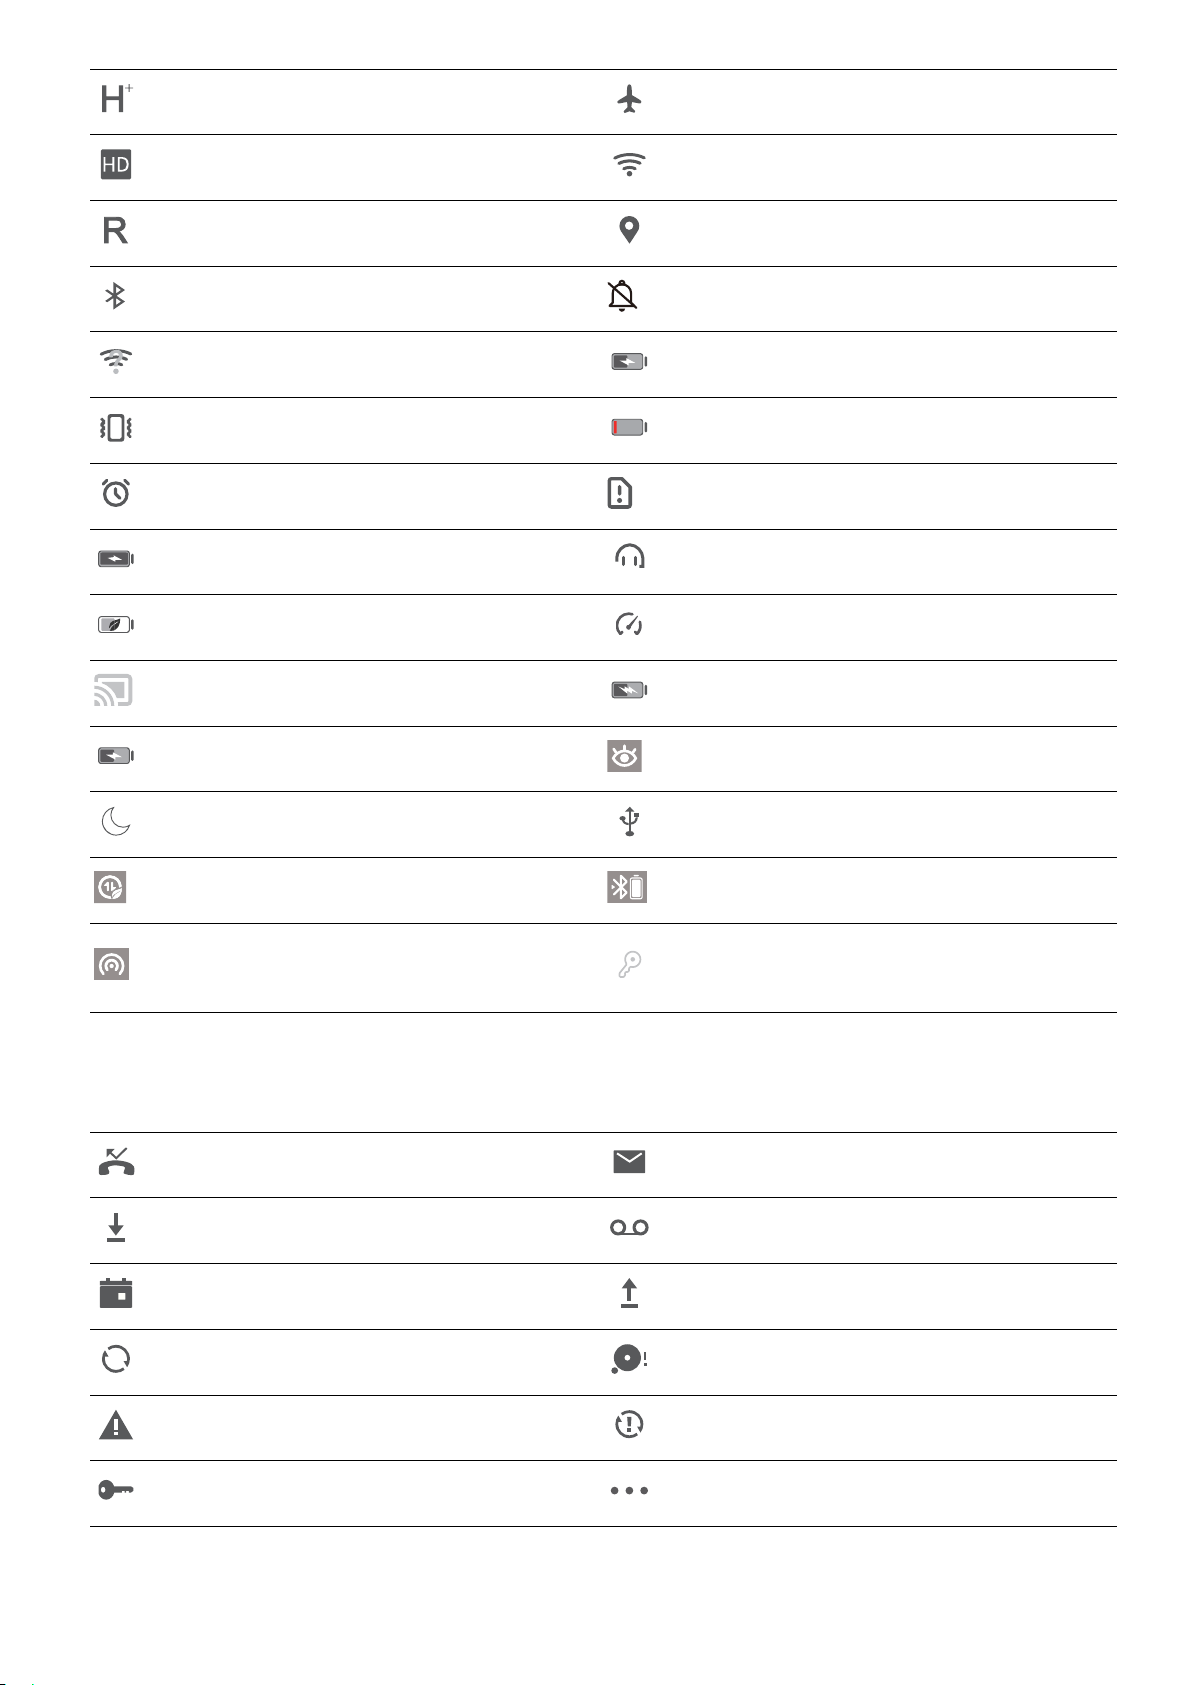
HSPA+ network connected Airplane mode enabled
VoLTE available Wi-Fi network connected
Roaming Receiving location data from GPS
Bluetooth enabled Silent mode enabled
Wi-Fi network detected Charging
Vibration mode enabled Battery level low
Alarm enabled No SIM card detected
Battery fully charged Headset plugged in
Power saving mode enabled Performance mode enabled
Wired or wireless projection in use Super charging
Quick charging Eye comfort mode enabled
Do not disturb mode enabled USB connection
Data saving mode enabled Bluetooth power
Hotspot enabled New notication from Phone
Manager
Notication icons: When there is a new message, notication or reminder on your device, the
relevant icon will be displayed in your status bar.
Missed call New emails
Downloading data New voicemails
Event reminder Uploading data
Synchronising data Device memory full
Sign-in or synchronisation problem Sync failed
VPN connected More notications
Home Screen
15

Open the Notication Panel to Get Important Information
Want to ensure that you do not miss out on any important notications? From your Phone's status
bar, you can view real time notication information and your device's operating status.
When there is a notication reminder, you can turn on the screen and swipe down from the status bar
to view the notication. You can access notication and status bar settings in the following ways:
Access notication panel when the screen is unlocked: Swipe down from the status bar to open
the notication panel. You can turn on or off shortcut switches, or touch notications to view the
details.
Want the notication and status bar to display only the number of notications or to display no
notications? Touch Settings, and go to Notications > More notication settings >
Notication method. Then, select Numbers or None as required.
Disable Disruptive App Notications
Find it annoying to receive so many different types of app notications? You can set and disable app
notications to prevent this from happening.
Open Settings, and go to Notications. You can:
lPrevent all apps from pushing notications: Touch Batch management, and then turn off All.
Customise Notications
Not a fan of the default notication reminders? You can customise your notication reminders so that
you get your notications the way you want them.
Open Settings, then go to Notications > More notication settings. From here you can:
lSet Pulse notications light: Turn on Pulse notication light, and the notication light will ash
whenever you receive new notications.
Home Screen
16
This manual suits for next models
2
Table of contents
Other honor Cell Phone manuals

honor
honor 9X PRO User manual

honor
honor HRY-LX1T User manual

honor
honor RMO-NX3 User manual

honor
honor P60 Pro User manual

honor
honor 9X Premium User manual

honor
honor CLK-LX2 User manual

honor
honor Play COR-L29 User manual

honor
honor 50 5G User manual

honor
honor CRT-LX1 User manual

honor
honor RKY-LX2 User manual


