Move the power switch to ON. Replace the Top Panel
and Front Panel†. Move the control switch to ICE.
Make ice using the cleaning solution until it stops.
†This unit will not run if the safety switch is not engaged.
Move the control switch to DRAIN. Allow the
icemaker to drain for 5 minutes. Open the water
supply line shut-off valve to supply water to the
icemaker.
Move the control switch to ICE. After the gear
motor starts, move the control switch to DRAIN.
Allow the icemaker to drain for 5 minutes.
Move the control switch to OFF.
Close the icemaker water
supply line shut-off valve.
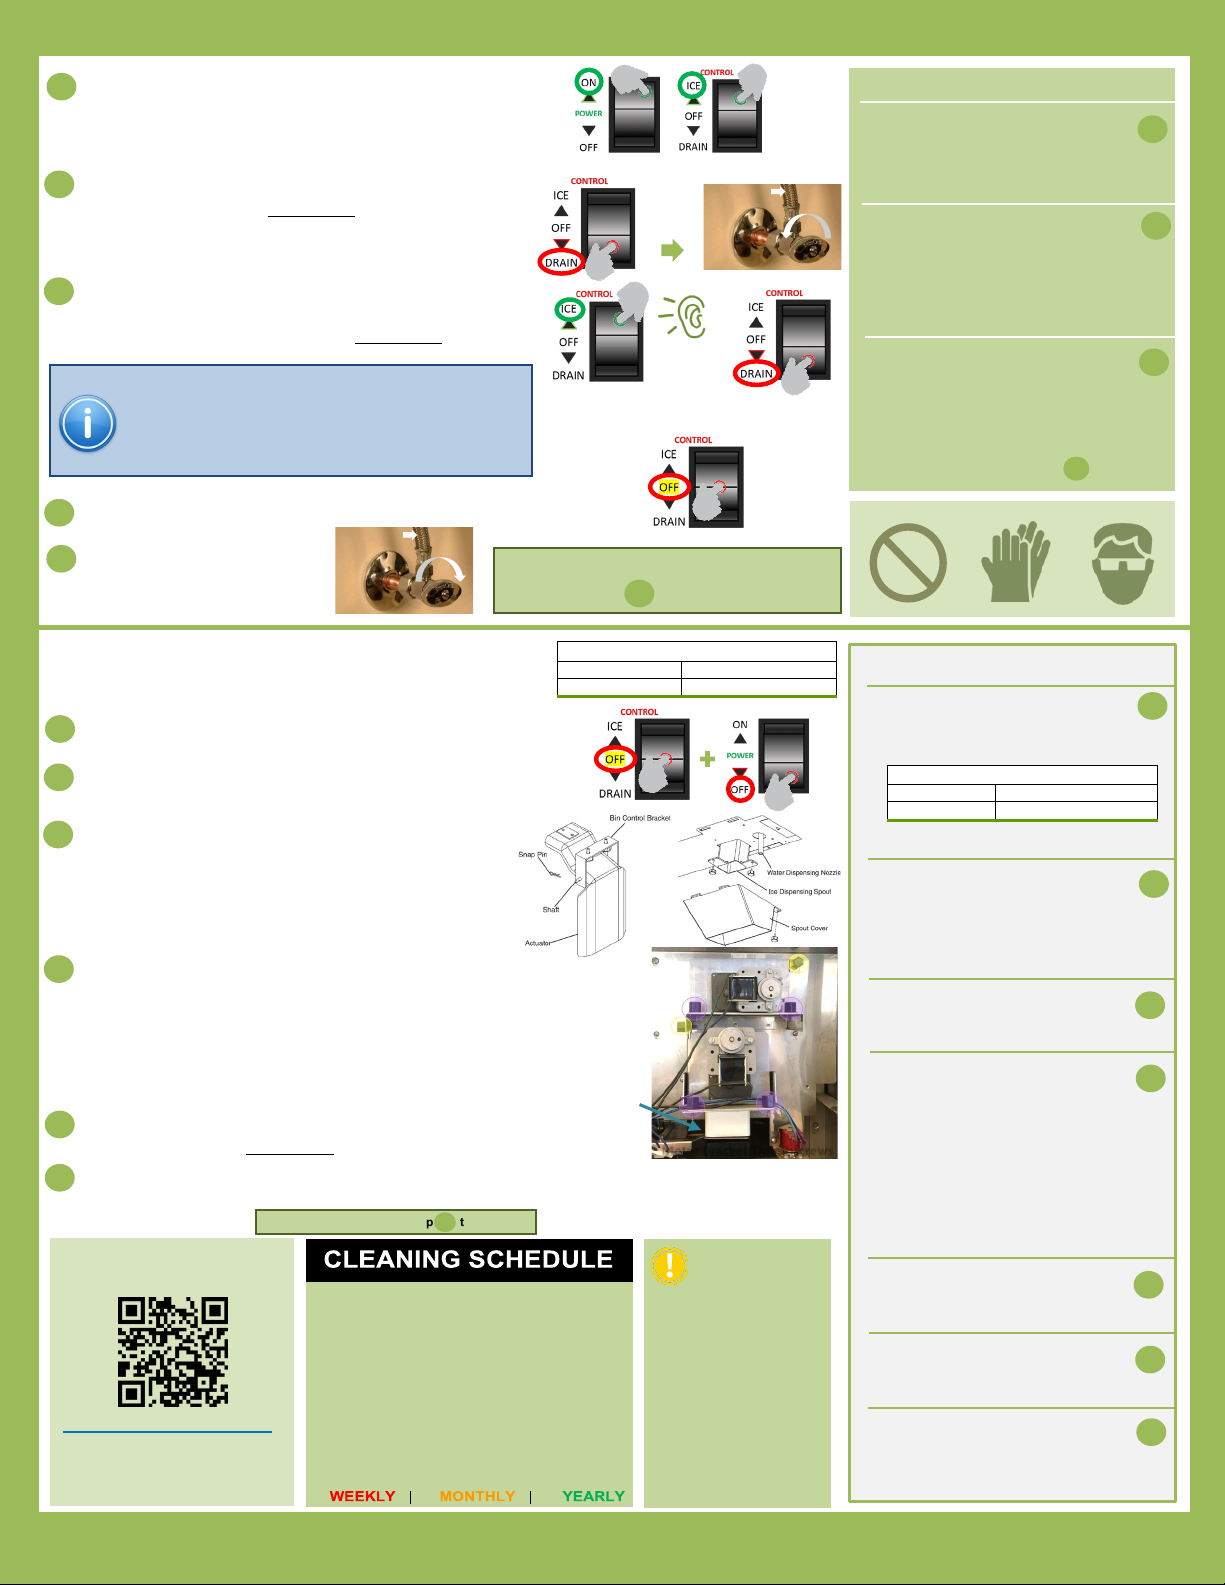
Dilute Hoshizaki Scale Away with warm water (see
Table). Move the control switch to OFF.
Remove the Front Panel and Top Panel, move the power
switch to OFF.
Remove the Storage Bin Cover**, Bin Control
Assembly (snap pin, shaft, and actuator), Spout B,
Spout A, Spout Gaskets, Spout Cover, Ice
Dispensing Spout**, and then the Water
Dispensing Nozzle. Place in bin with cleaning
solution.
Remove Motor Bracket Thumbscrews** first from
the vertical plane and then from horizontal plane. One hand should
hold the agitator or dispensing auger, while the other hand pulls the
corresponding Agitating Motor or Dispensing Motor out the front of
the icemaker. Now remove the Agitator and Dispensing Auger
from the ice storage bin and place them in the bin with cleaning
solution. **Use a 15mm socket to easily remove thumb screws.
Soak the parts removed in Steps 23 – 24 (except the motors) in
cleaning solution for 15 minutes.
Wipe the exterior of optical-sensors or push buttons with the cleaning solution and then a
clean damp cloth. Wipe the ice shutter (located above the ice dispensing spout) thoroughly
with a clean cloth.
Air Filter
Water Filters
Exterior
Pan/Gear Drain
Icemaker/Dispenser
Water Supply Inlet
Extruding Head
Water Hoses
change if req’d
& damp cloth
Clear w/ warm water + brush
Follow these instructions
/valves
Inspect seal bolts/ bearing
wear. Tighten or replace
Replace if req’d
Tech Support: 1.800.233.1940
sanitizing continued…
•Move control switch to ICE
•Open the icemaker water
supply line shut-off valve
•After the gear motor starts,
move control switch to DRAIN
•Allow the icemaker to drain for
5 minutes
•Move control switch to ICE
•Allow the icemaker to run for
30 minutes, then clean and
sanitize the dispensing
components – Step
INSTRUCTION MANUAL:
hoshizakiamerica.com/manuals
Type in the model number of your
icemaker (including dashes) to
DO NOT use
ammonia type
cleaners. Can cause
damage to icemaker
WEAR liquid-proof
gloves and goggles
protect skin & eyes
from cleaning &
sanitizing chemicals
Need Service or Repair? Locate your closest Hoshizaki Certified Service Tech: hoshizakiamerica.com/locate-service-rep
with
solution
until
machine
Or Water Filter
Gear Motor
Or Water Filter
Clean Dispenser Components:
Motor Bracket Thumbscrews
Sanitize Dispenser Components:
•Dilute 5.25% chlorine bleach‡
with warm water and place it in
another bin (see Table below)
‡Use bleach without additives.
•Soak the parts removed in
Steps 23–24 (except the
motors) in sanitizing solution for
15 minutes. Rinse all the parts
thoroughly with clean water
•Reassemble and replace all
parts removed in Steps 23-24
(except storage bin cover)
•Pour warm water into the
storage bin to melt any
remaining ice
•Clean the storage bin liner and
cover with dish soap and a damp
cloth. Rinse thoroughly with clean
water
•Replace the storage bin cover
•Move the power switch to ON,
then replace top and front
panels.
•Move control switch to ICE, to
start the automatic icemaking
process
•Set dispense mode switch to
preference (portion or
continuous)
Motor
Continue to Sanitation –
Step on front…
Continue to Sanitation – Step to right…
The icemaker might make a noise/squealing
when first started due to scale removal from
auger/evaporator. This is normal in bad water
conditions and will subside after 20 minutes.


 User manual")


