Host Reliant User manual

The Dry Extraction
Cleaning System
INSTRUCTION MANUAL
HOST®System
IMPORTANT: READ CAREFULLY BEFORE USE.
Questions or concerns? For assistance, please call Customer Service
at 800-558-9439 Mon-Fri 8am-4:30pm CST.
Español-página E1

2
TABLE OF CONTENTS
SAFETY INSTRUCTIONS ..........................................
WHAT’S IN THE BOX?..............................................
ASSEMBLY ............................................................
GETTING STARTED.................................................
USING THE RELIANT............................................ -
MACHINE MAINTENANCE
Replacing the Reliant Belts................................................8
Cleaning the Motor Vents...................................................8
GROUNDING INSTRUCTIONS...................................
TROUBLESHOOTING ..............................................
WARNING
! ! To reduce the risk of personal injury -
Unplug before cleaning or servicing.
WARRANTY
LIMITED WARRANTY FOR RELIANT
This limited warranty applies only to
products purchased in the U.S. When
used and maintained in normal use and in
accordance with the instruction manual,
this product is warranted against original
defects in material and workmanship
for ONE year from the date of original
purchase excluding expendable parts
subject to normal wear.
IMPORTANT: READ CAREFULLY BEFORE USE.
Questions or concerns? For assistance, please call Customer Service
at 800-558-9439 Mon-Fri 8am-4:30pm CST.

3
THE CLEANING SYSTEM that makes A DIFFERENCE hostdry.com | 800-558-9439
When using electrical equipment, basic precautions should always be followed, including the following:
WARNING—TO REDUCE THE RISK OF FIRE, ELECTRIC SHOCK, OR INJURY:
1. Do not leave machine when plugged in. Unplug from outlet when not in use and before servicing.
2. Do not use outdoors or on wet surfaces.
3. Do not allow to be used as a toy. Close attention is necessary when used by or near children.
4. Use only as described in manufacturer’s Instruction Manual. Use only manufacturer’s recommended attachments.
5. Inspect cord for damage before each use. Do not use with damaged cord or plug. If machine is not working as it should,
has been dropped, damaged, le outdoors, or dropped into water, return it to the manufacturer or authorized repair center.
6. Do not pull or carry by cord, use cord as a handle, close a door on cord, or pull cord around sharp edges or corners.
Do not run machine over cord. Keep cord away from heated surfaces.
7. Do not unplug by pulling on cord. To unplug, grasp the plug not the cord.
8. Do not handle plug or machine with wet hands.
9. Do not put any object into openings. Do not use with any opening blocked; keep free of dust, lint, hair, and anything that
may reduce air flow.
10. Keep hair, loose clothing, fingers, and all parts of body away from openings and moving parts.
11. Turn o all controls before unplugging.
12. Use extra care when cleaning on stairs.
13. Connect to a properly grounded outlet only. See Grounding Instructions.
14. This machine is to be used with HOST® carpet cleaning products only. Use of other cleaning products may damage
this machine.
SAVE THESE INSTRUCTIONS. READ ALL INSTRUCTIONS BEFORE USING THIS MACHINE.
SAFETY INSTRUCTIONS
WARNING
To reduce the risk of fire and electric shock due to internal component damage, use only
HOST products intended for use with the machine. Non-HOST products may harm the
machine and void the warranty.
:
HOST Products
HOST Handy
Bag HOST Handy
Jar HOST
Bucket HOST
SJ HOST
Spot Remover HOST PREP®
Traic Lane Booster HOST Odor
Exploder HOST Pre-Clean
for Carpet

4
WHAT’S IN THE BOX?
Reliant with Wheeled Storage Caddy
NOTE: When Reliant is o, do not allow Reliant to sit in one location for an extended period of time, as damage to
brushes can result. Place Reliant on its side or in the caddy when not in use.
Two White Standard Nylon
Carpet Brush
ASSEMBLY
Your HOST Reliant comes pre assembled.
The only assembly required is the handle. Slide
handle top (1) and handle bottom (2) together
making sure that the long top section of the foam
handgrip and the short sha are both pointing
in the same direction. Install lock washers (3)
onto screws (4). Start screw through the cord clip
and into the handle sha. Once all two screws
are started, tighten each one using the supplied
allen wrench (5).
1
2
3
4
1. Handle Top with Foam Handgrip
2. Handle Bottom
3. Lock Washer
4. Screw
5. Allen Wrench (Supplied)
5

5
THE CLEANING SYSTEM that makes A DIFFERENCE hostdry.com | 800-558-9439
How to Get the Best Results Using the HOST Reliant®
GETTING STARTED
1. Operating Handle
2. Cord Clip
3. Power Cord
4. Handle Release Knob for Removing
Operating Handle
5. Handle Socket
6. Liing Handle
7. Power Cord Receptacle
8. Spring Lock Button for Brush
Guard/End Cover (Not Shown)
9. Motor Vents
10. Gear Case Cover
11. Hood
12. Caddy
13. ON/OFF Foot Switch (Not Shown)
1
2
3
4
5
6
7
8
9
10
11
12

6
Attach handle to the
machine by liing and
turning the handle release
knob on top of the liing
handle 1/4 turn (1.1). With
the operating handle
parallel to the floor, insert
the handle into the handle
socket. Unscrew handle
locking knob completely.
Turn the handle release
knob until it drops into
place. You’ll hear a click
when it does. If the knob
does not click into place,
push on handle sha to
insert fully (1.2). Rotate
operating handle to upright
position. Tighten handle
locking knob completely
for stationary use. To use
the operating handle free
swinging, do not tighten
locking knob. Install the
power cord by pressing
the cord end fully into the
power cord receptacle on
machine base.
Plug the Reliant power cord
into electrical outlet. Do not
use an extension cord.
USING THE RELIANT
1
2
Note: Standard (white) and firm (zebra) brushes must be broken in before using for the
first time. To break in brushes, run the Reliant on hard surface for three minutes.
4
Remove Reliant from caddy
by unlocking bolt on front
of the caddy. Locate brush
motor switch on the back side
of the Reliant base and turn
machine brushes on. Drive
the Reliant o the caddy.
Before Applying HOST Dry Extraction Cleaner
Before applying HOST Dry Extraction Cleaner to the floor, place bucket on its side for 10 minutes. This will
help to distribute the liquid ingredients evenly throughout the cleaner. Be sure to wipe o the edge of bucket
before replacing the lid. This will prevent leaking.
(1.1)
Handle Release
Knob
(1.2)
Liing
Handle
Handle
Socket
Release
Knob
Locking
Knob
5
Apply HOST Dry Extraction
Cleaner to the floor,
either by hand or with
the Applicator. If applying
HOST cleaner by hand use
about one handful size for
each square yard (3' x 3')
(1.3). Do not apply more
than 100 to 200 square
feet at a time or the HOST
cleaner could dry out and
not clean as well. For the
HOST Applicator, place
HOST cleaner into the
applicator and choose
light, medium, or heavy
setting. Then guide the
HOST Applicator over the
area to be cleaned. As
it rolls, it dispenses the
chosen amount of micro-
sponges (1.4).
(1.3)
(1.4)
Locking
Bolt
Caddy
3
Use a standard vacuum to
vacuum the area first in
2 directions: north/south
and east/west. The more
vacuuming the better to
remove as much dry dirt
as possible.

7
THE CLEANING SYSTEM that makes A DIFFERENCE hostdry.com | 800-558-9439
When Cleaning
Stairs with
the Reliant
To clean the stairs with the Reliant, handle will
need to be removed from the machine. Unwind
the power cord from the handle. Press in the
clips on the cord end and pull up to unplug cord
from power cord receptacle. Unscrew handle
locking knob completely. Lower the handle to a
90° angle (parallel to the floor). Li and turn the
handle release knob on top of the liing handle
1⁄4 turn. Slide the handle straight out to the side.
Use the base to clean stairs.
6Once you apply the HOST
Dry Extraction Cleaner to the
floor, turn the foot switch at
the base of the Reliant ON.
Work HOST into the soiled
area, using push-pull strokes
just like when you vacuum,
make three passes over the
area (1.5). This brushing
action distributes the HOST
micro-sponges and brings
them in contact with the
dirty surfaces of what you
are cleaning.
1st Pass
2nd Pass
3rd Pass (1.5)
7Allow the HOST to dry. Use a
standard vacuum to vacuum
the area in two directions:
north/south and east/west.
Continue to vacuum in two
directions until all visible
HOST is recovered.
Removing Spots with the
HOST spotZAPPER®
Spots can also be removed using the
HOST spotZAPPER. Apply HOST Dry
Extraction Cleaner and brush in many
directions. The more brushing, the better.
Aer brushing, let dry and then vacuum.
NOTE: CLEAN AND ROTATE
BRUSHES HOURLY. The
brush bristles acquire a
“set” in the direction they
revolve unless switched
regularly. Unplug machine
from power. Press spring
lock button to release brush
guard/end cover. Pull back
on clip; li out brushes.
Remove brushes and clean
out underside of machine.
Switch brushes to opposite
drive shas. Brushes fit
down over sha and engage
on 3 pins near bottom of
sha. Be sure brush clip
snaps into position. Insert
hinged bar of brush guard/
end cover into lower
slot. Push all the way up,
depress lock button and
slip brush guard into place.
Reliant brushes can also
be switched end-to-end
if desired. Remove screw
holding brush clip in place,
reassemble at other end of
brush and replace.
8Spring
Lock
Button
9Return the Reliant to the
caddy by locking the handle
in place and turn machine
brushes ON and guide it
back into the caddy. Lock
bolt back into place. Simply
wheel the Reliant away. Locking
Bolt
Caddy
Li and
turn handle
release knob
1/4 turn
Unscrew handle locking
sha completely, lower
handle parallel to floor
and slide handle out
Pull Handle
Out

8
Motor
Vents
Follow these guidelines for routine maintenance on your Reliant to obtain optimal
performance of both the HOST equipment and cleaning system.
MACHINE MAINTENANCE
CLEANING THE MOTOR VENTS
It’s important that the motor vents on the hood are kept free of any buildup.
Failure to keep these vents clean could cause the Reliant to overheat. Vacuum
the motor vents frequently.
REPLACING THE RELIANT BELTS
1. Disconnect Reliant from power.
2. Remove the gear case cover by
removing 5 screws.
3. Remove the screw in center of small
pulley and slide out pulley cap.
4. Remove the 2 screws on large pulley
and li o flange.
5. Cut damaged belt with scissors and
remove it.
6. Put new belt on small pulley first
and work it onto the large pulley by
turning the cleaning brushes by hand.
7. Replace pulley cap, flange, screws and
gear case cover.
Applying HOST Dry Extraction Cleaner with the Applicator
Fill the Applicator with up to 12 pounds (5.4 kilos) of
HOST. DO NOT OVERFILL. Open hole covers for the HOST
application. Choose light (1 cover open), medium (2 covers
open) or heavy (3 covers open). Walk the Applicator over the
area of dirty flooring. DO NOT apply to an area larger than 10
feet x 50 feet (approx. 50 sq. meters). Keep Applicator 2 foot
away from wall. It is not necessary to apply HOST next to
the wall or to areas which do not appear dirty. Apply only to
dirty areas of the flooring.
Fill Here
Hole Cover
Fill Port Cover
Large Pulley Flange &
Screws for Flange
Small Pulley Cap
& Screw for Cap

9
THE CLEANING SYSTEM that makes A DIFFERENCE hostdry.com | 800-558-9439
GROUNDING INSTRUCTIONS
This machine must be grounded. If it should malfunction or
break down, grounding provides a path of least resistance
for electric current to reduce the risk of electric shock. This
machine is equipped with a cord having an equipment-
grounding conductor and grounding plug. The plug must be
inserted into an appropriate outlet that is properly installed and
grounded in accordance with all local codes and ordinances.
WARNING: Improper connection of the equipment-grounding
conductor can result in the risk of electric shock. Check with
a qualified electrician or service person if you are in doubt as
to whether the outlet is properly grounded. Do not modify the
plug provided with the machine. If it will not fit the outlet, have
a proper outlet installed by a qualified electrician.
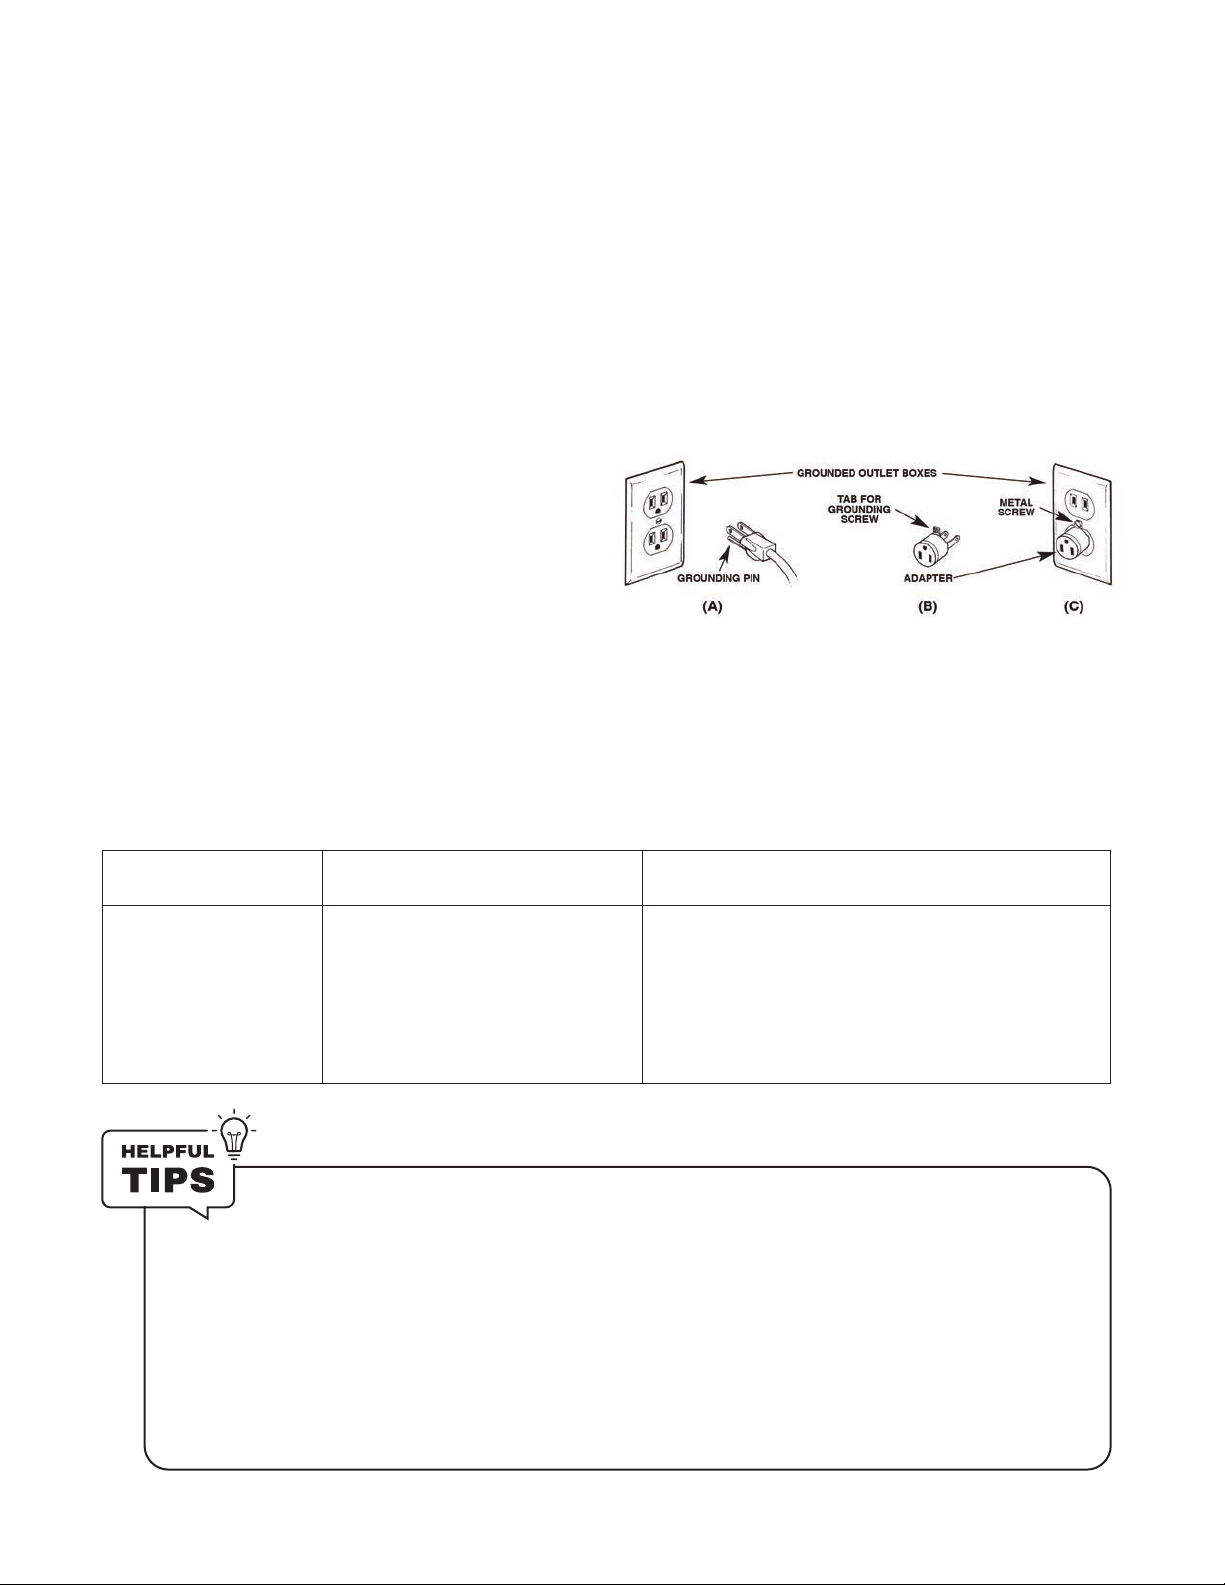
This machine is for use on a nominal 120 volt circuit, and has
a grounded plug that looks like the plug illustrated in Diagram
A. A temporary adapter that looks like the adapter illustrated
in Diagram B may be used to connect this plug to a 2-pole
receptacle as shown in Diagram C if a properly grounded
outlet is not available. The temporary adapter should be used
only until a properly grounded outlet can be installed by a
qualified electrician. The green colored rigid ear, lug, or the like
extending from the adapter as illustrated in Diagram B, must be
connected to a permanent ground outlet box cover. Whenever
the adapter is used, it must be held in place by a metal screw as
shown in Diagram C.
Note: In Canada, the use of a temporary adapter is not
permitted by the Canadian Electrical Code.
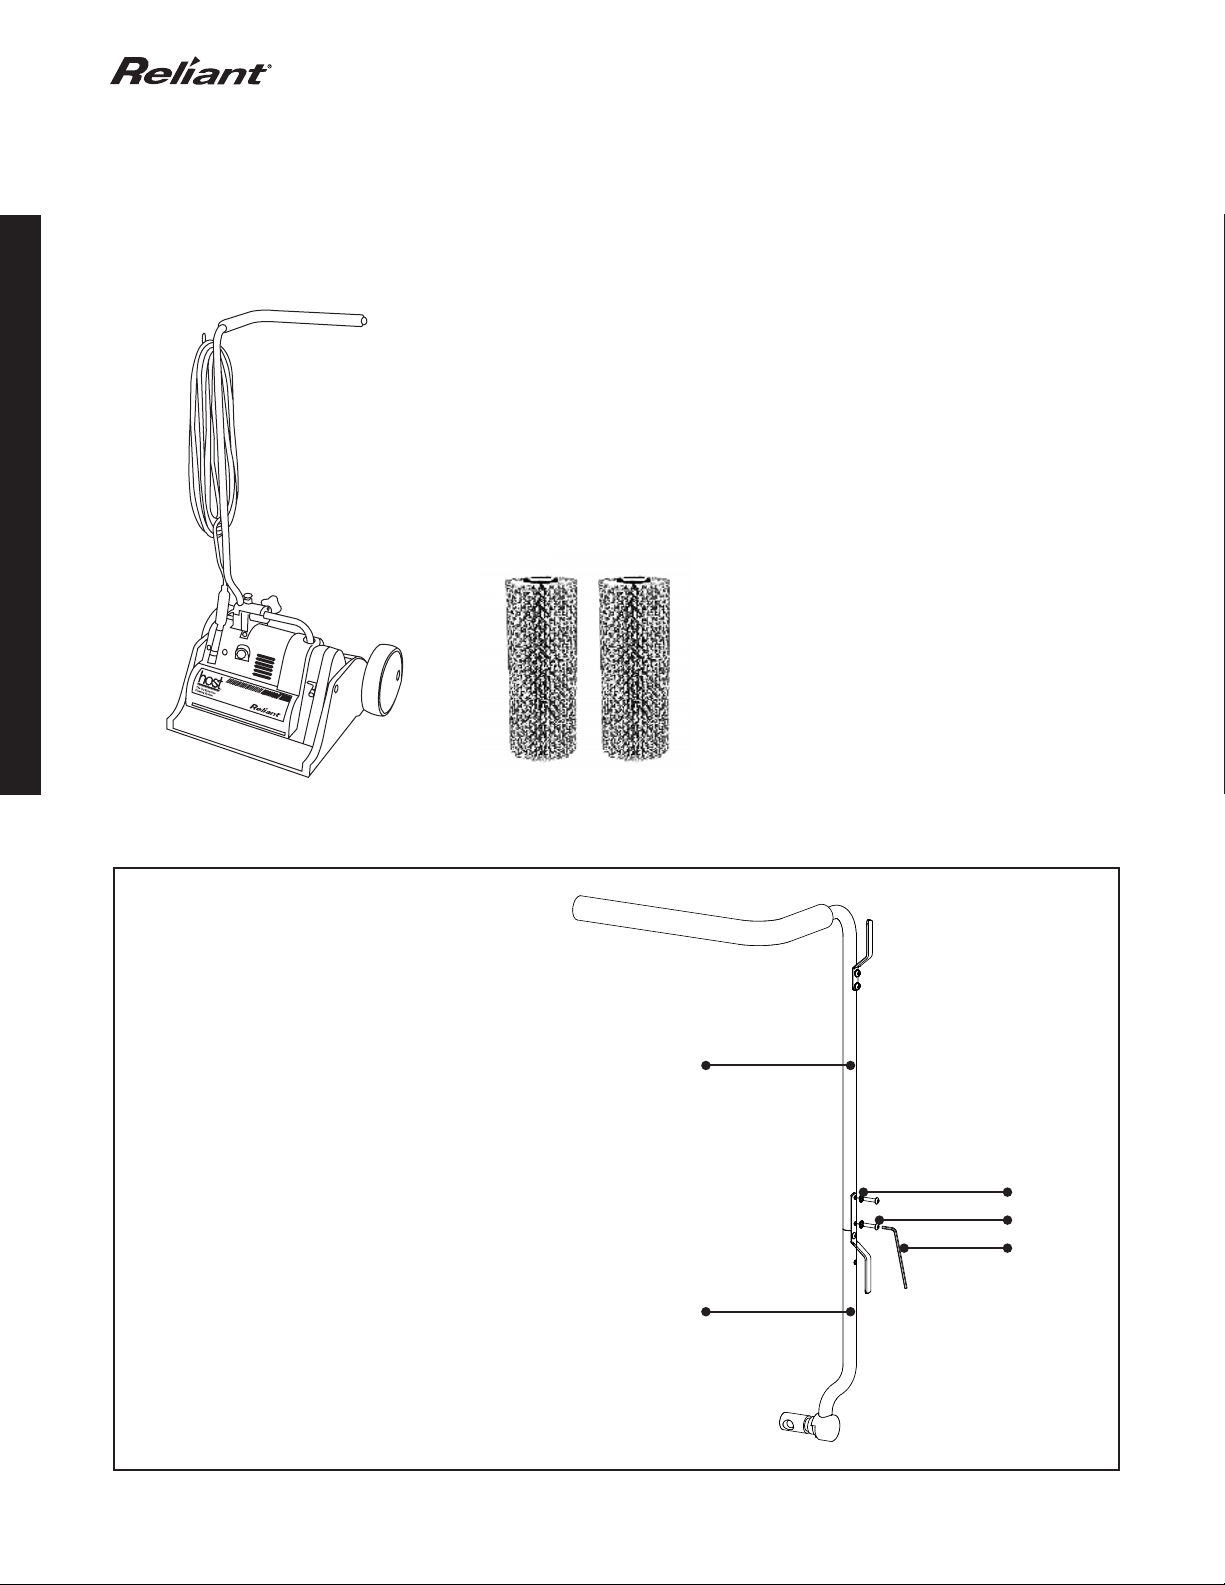
The electrical cord on the Reliant has been designed to give the proper power to the motor through both the gauge and length
of the cord. Do not use an extension cord. The grounding plug at the end of the cord should NOT be removed.
TROUBLESHOOTING
PROBLEM POSSIBLE CAUSE POSSIBLE SOLUTION
Reliant does not run. Power cord is not properly secured in
the power cord receptacle.
Blown a fuse.
Not turning the motor switch on.
Check the power cord is properly secured in the power cord
receptacle on the top of machine hood.
Fix fuse.
Turn the motor switch on. If the switches are on and it still
doesn’t run, it should be returned to the manufacturer or
authorized repair center. Contact your HOST Distributor.
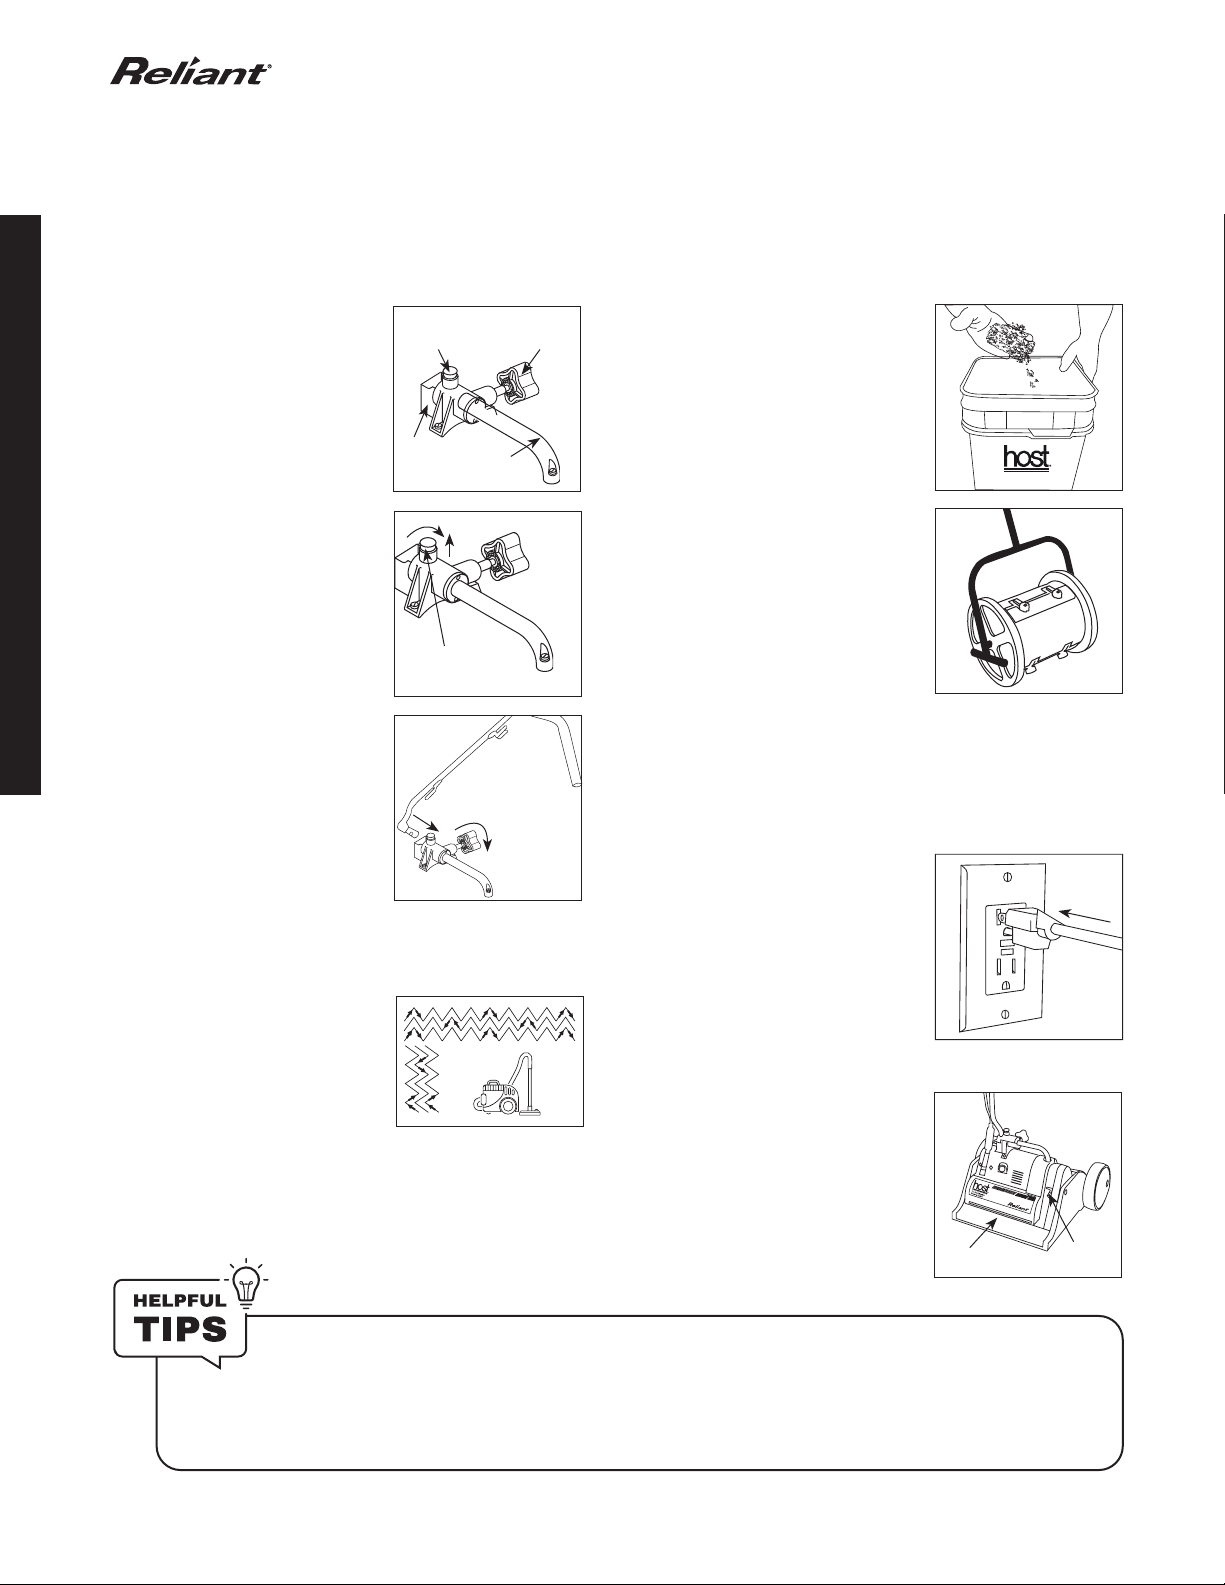
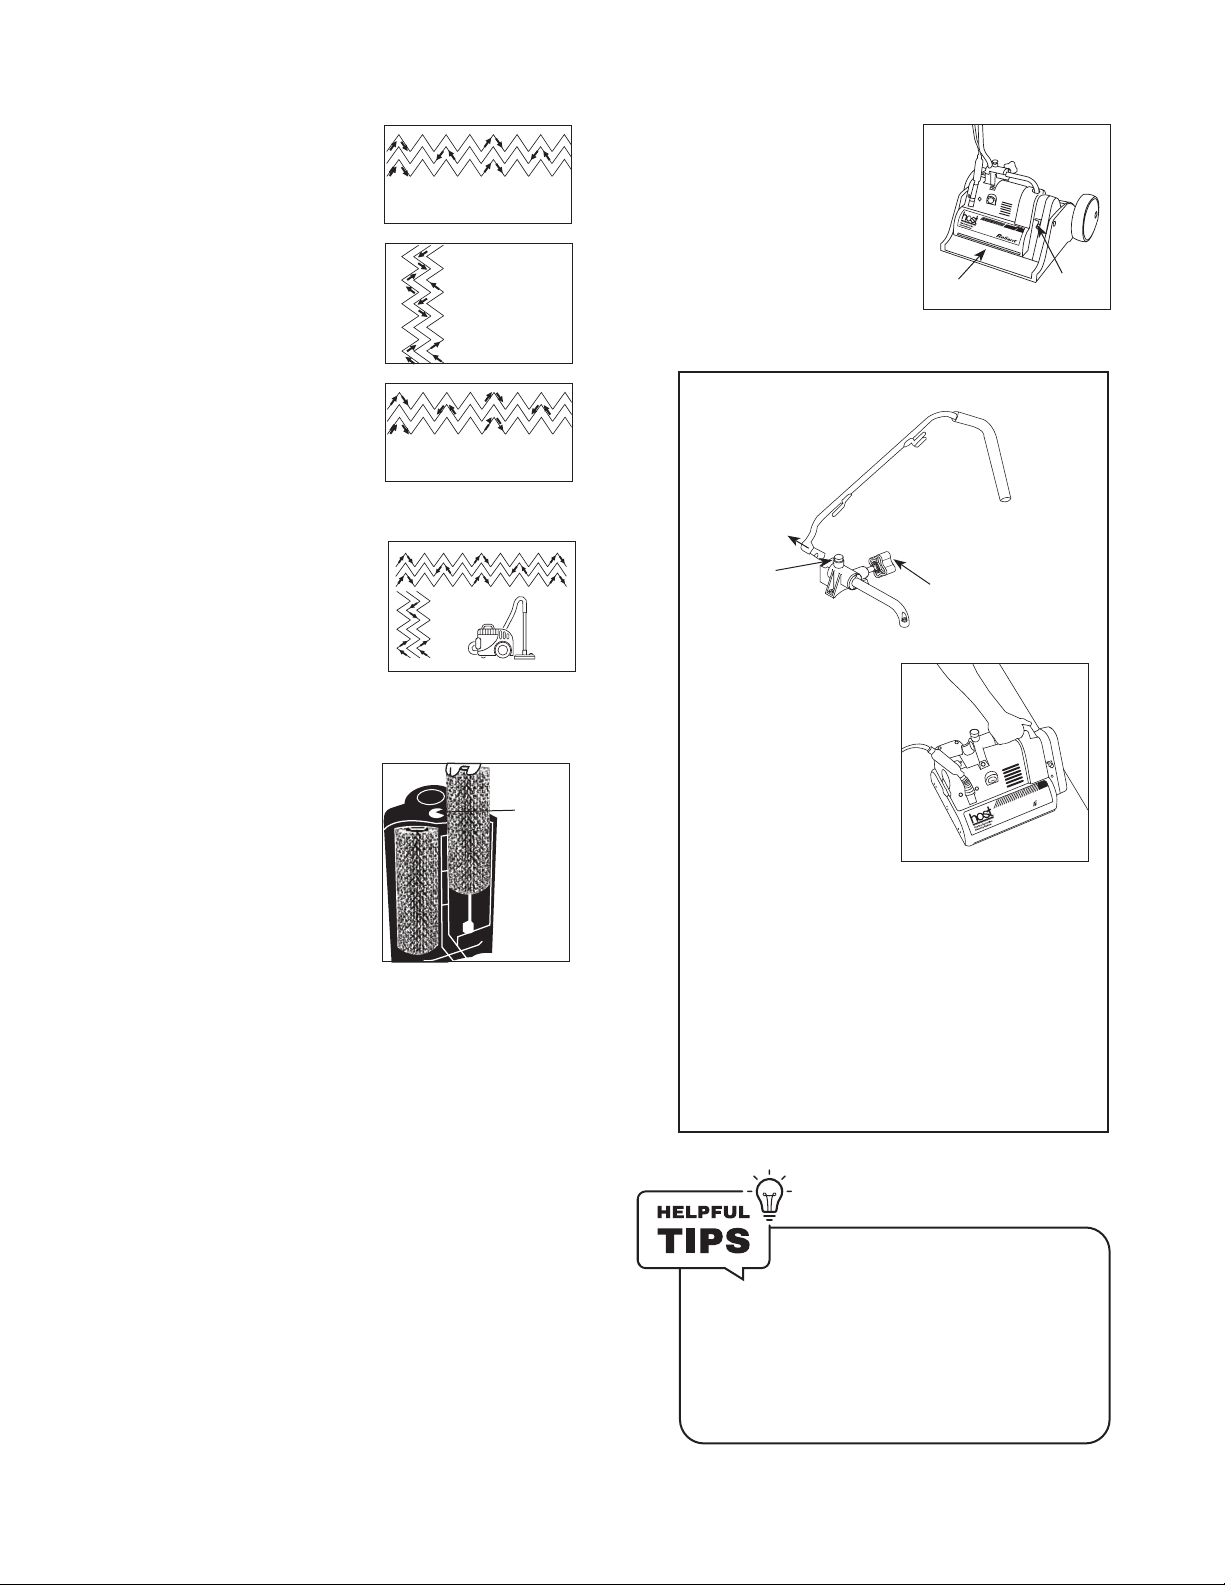
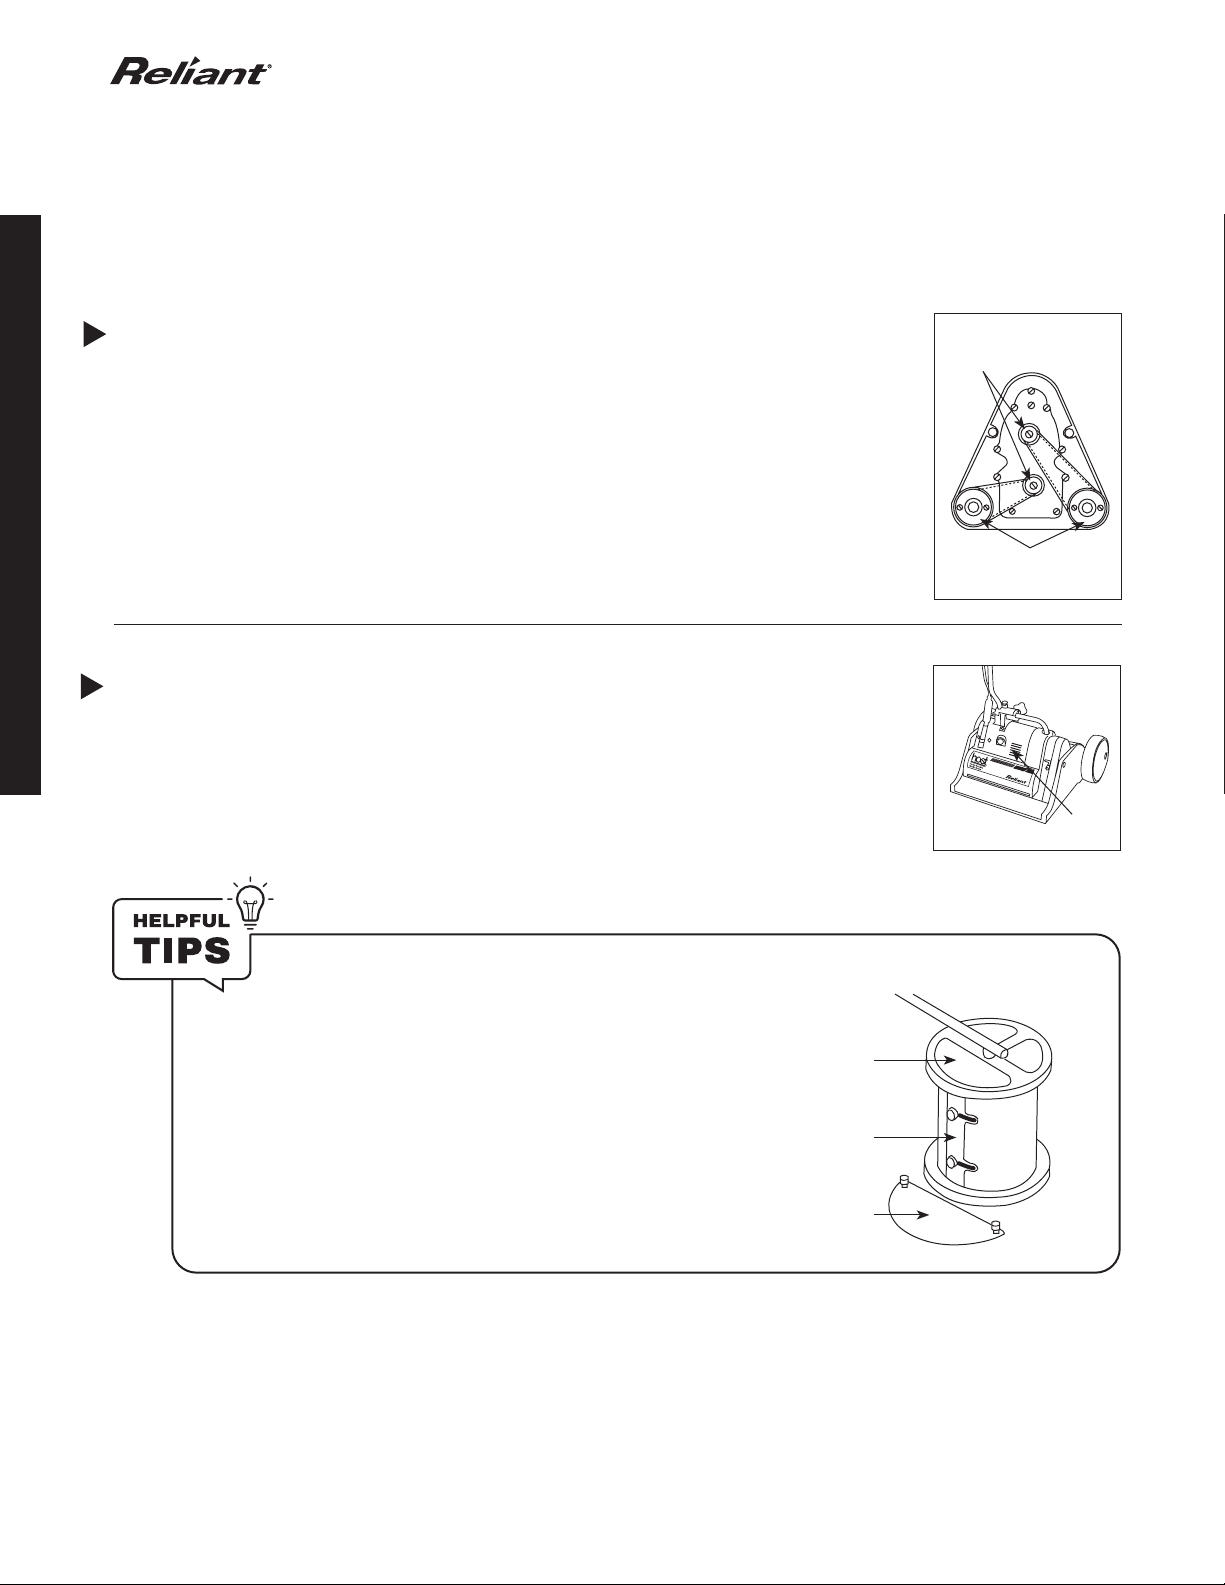
Prepare the spot, for dry spots and spills, vacuum area first, or for wet spots and spills blot or scrape
area first. Scatter HOST Dry Extraction Cleaner on the spot. Concentrate the brushing in a circle over
the spot. Brush an area slightly larger than the area with the spot. Aer brushing, vacuum up with a
standard vacuum.
If carpet is very dirty or has tough spots and spills, PREP® Traic Lane Booster may be necessary. To
use PREP mix 1 part PREP in 4 parts water in a trigger spray bottle, then mist PREP lightly on dirty
carpet/spot. Apply HOST Dry Extraction Cleaner as before and brush with Reliant then vacuum.
CAUTION: Improper use or dilution may cause damage to surface and increased risk of health eects.
How to Remove Tough Spots & Spills with the Reliant

10
NOTES

E1
The Dry Extraction
Cleaning System
MANUAL DE INSTRUCCIONES
Sistema HOST®
IMPORTANTE: LEER ATENTAMENTE ANTES DE USAR.
¿Preguntas o dudas? Si necesita ayuda, llame al Servicio de Atención al Cliente
al 800-558-9439, de lunes a viernes, de 8:00 a 16:30, hora central europea.

E2
ÍNDICE
INSTRUCCIONES DE SEGURIDAD............................ E
¿QUÉ HAY EN LA CAJA? ......................................... E
MONTAJE............................................................ E
PRIMEROS PASOS ................................................ E
UTILIZACIÓN DE LA RELIANT .............................E-E
MANTENIMIENTO DE MÁQUINAS
Sustitución de las correas Reliant ...................................E8
Limpieza de los respiraderos del motor..........................E8
INSTRUCCIONES DE CONEXIÓN A TIERRA ............... E
SOLUCIÓN DE PROBLEMAS ................................... E
GARANTÍA
GARANTÍA LIMITADA PARA RELIANT
Esta garantía limitada sólo se aplica
a los productos adquiridos en los
EE.UU. Cuando se utiliza y mantiene
en condiciones normales de uso y de
acuerdo con el manual de instrucciones,
este producto está garantizado contra
defectos originales de material y mano de
obra durante UN año a partir de la fecha
de compra original, excluyendo las piezas
fungibles sujetas a desgaste normal.
! !
IMPORTANTE: LEER ATENTAMENTE ANTES DE USAR.
¿Preguntas o dudas? Si necesita ayuda, llame al Servicio de Atención al Cliente
al 800-558-9439, de lunes a viernes, de 8:00 a 16:30, hora central europea.
ADVERTENCIA Para reducir el riesgo de lesiones personales -
Desenchufe el aparato antes de limpiarlo o repararlo.

E3
el sistema de limpieza que marca la diferencia hostdry.com | 800-558-9439
Al utilizar equipos eléctricos, deben seguirse siempre unas precauciones básicas, entre las que se incluyen las siguientes:
ADVERTENCIA: PARA REDUCIR EL RIESGO DE INCENDIO, DESCARGA ELÉCTRICA O LESIONES:
1. No deje la máquina enchufada. Desenchúfela de la toma de corriente cuando no la utilice y antes de repararla.
2. No utilizar al aire libre ni sobre superficies mojadas.
3. No permita que se utilice como juguete. Es necesario prestar mucha atención cuando sea utilizado por niños o cerca de ellos.
4. Utilice sólo como se describe en el manual de instrucciones del fabricante. Utilice sólo los accesorios recomendados por
el fabricante.
5. Compruebe que el cable no esté dañado antes de cada uso. No utilice la máquina con el cable o el enchufe dañados. Si la
máquina no funciona como debería se ha caído, se ha dañado, se ha dejado a la intemperie o se ha caído al agua, devuélvala
al fabricante o a un centro de reparaciones autorizado.
6. No tire del cable ni lo transporte, no lo utilice como asa, no cierre una puerta sobre el cable ni tire del cable alrededor de
bordes o esquinas afilados. No pase la máquina por encima del cable. Mantenga el cable alejado de superficies calientes.
7. No desenchufe la máquina tirando del cable. Para desenchufar, sujete el enchufe, no el cable.
8. No manipule el enchufe ni la máquina con las manos mojadas.
9. No introduzca ningún objeto en las aberturas. No la utilice con ninguna abertura bloqueada; manténgala libre de polvo,
pelusas, pelos y cualquier cosa que pueda reducir el flujo de aire. pueda reducir el flujo de aire.
10. Mantenga el pelo, la ropa suelta, los dedos y todas las partes del cuerpo alejados de las aberturas y de las piezas móviles.
11. Apague todos los controles antes de desenchufar.
12. Tenga especial cuidado al limpiar en escaleras.
13. Conéctela únicamente a una toma de corriente con toma de tierra. Consulte las instrucciones de conexión a tierra.
14. Esta máquina sólo debe utilizarse con productos de limpieza de alfombras HOST® . El uso de otros productos de
limpieza puede dañar dañar la máquina.
GUARDE ESTAS INSTRUCCIONES. LEA TODAS LAS INSTRUCCIONES
ANTES DE UTILIZAR ESTA MÁQUINA.
INSTRUCCIONES DE SEGURIDAD
Para reducir el riesgo de incendio y de descarga eléctrica debidos a daños en los
componentes internos, utilice únicamente productos HOST previstos para su uso con la
máquina. Los productos que no sean HOST pueden dañar la máquina y anular la garantía.
ADVERTENCIA:
Productos HOST
HOST Handy
Bolsa HOST Handy
Tarro HOST
Cubo HOST
SJ HOST
Quitamanchas HOST PREP®
Prelimpieza
Concentrada
HOST Odor
Exploder® HOST PREP®
Prelimpieza Lista
Para Usar

E4
¿QUÉ HAY EN LA CAJA?
Reliant con carrito de almacenamiento
con ruedas
NOTA: Cuando la Reliant esté apagada, no permita que la Reliant permanezca en un mismo lugar durante un período de
tiempo prolongado, ya que se pueden dañar los cepillos. Coloque la Reliant en su lado o en el caddy cuando no esté en uso.
Dos cepillos blancos estándar de
nylon para alfombras
MONTAJE
Tu HOST Reliant viene premontado. El único ensamblaje
necesario es el del mango. Deslice la parte superior de la
empuñadura (1) y la parte inferior de la empuñadura (2)
juntas asegurándose de que la sección superior larga de
la empuñadura de espuma y el eje corto apunten en la
misma dirección. Coloque las arandelas de seguridad (3)
en los tornillos (4). Empiece a atornillar a través del clip
del cordón y en el eje de la empuñadura. Una vez que los
dos tornillos estén iniciados, apriete cada uno utilizando la
llave Allen suministrada (5).
1
2
3
4
1. Asa superior con empuñadura de espuma
2. Parte inferior de la empuñadura
3. Arandela de seguridad
4. Tornillo
5. Llave Allen (incluida)
5

E5
el sistema de limpieza que marca la diferencia hostdry.com | 800-558-9439
Cómo obtener los mejores resultados con HOST Reliant®
CÓMO EMPEZAR
1. Asa de manejo
2. Clip del cable
3. Cable de alimentación
4. Pomo de liberación de la empuñadura
para extraer la empuñadura de
accionamiento
5. Enchufe de la empuñadura
6. Mango de elevación
7. Receptáculo del cable de alimentación
8. Botón de bloqueo de muelle para
el protector del cepillo/tapa final
(no se muestra)
9. Ventilaciones del motor
10. Cubierta de la caja de engranajes
11. Capó
12. Caddy
13. Interruptor de pedal ON/OFF
(no se muestra)
1
2
3
4
5
6
7
8
9
10
11
12
Prepare la mancha, para manchas secas y derrames, aspire primero la zona, o para manchas húmedas y
derrames, seque o raspe primero la zona. Esparza el Limpiador de Extracción en Seco HOST sobre la mancha.
Concentre el cepillado en un círculo sobre la mancha. Cepille una zona ligeramente mayor que la zona con la
mancha. Después de cepillar, aspire con un aspirador normal.
Si la moqueta está muy sucia o tiene manchas difíciles y derrames, PREP® Traic Lane Booster puede ser
necesario. Para usar PREP mezcle 1 parte de PREP en 4 partes de agua en una botella de spray con gatillo, luego
rocíe PREP ligeramente sobre la moqueta/mancha sucia. Aplique HOST Dry Extraction Cleaner como antes y
cepille con Reliant luego aspire.
PRECAUCIÓN: El uso o la dilución inadecuados pueden causar daños en la superficie y aumentar el riesgo de efectos sobre la salud.
Cómo eliminar manchas y derrames difíciles con la Reliant

E6
Fije la empuñadura a la
máquina levantando y girando
1/4 de vuelta el pomo de
liberación de la empuñadura
situado en la parte superior de
la empuñadura de elevación
(1.1). Con la empuñadura
de accionamiento paralela
al suelo, introdúzcala en el
alojamiento de la empuñadura.
Desenrosque completamente
el pomo de bloqueo de la
empuñadura. Gire el pomo de
desbloqueo de la empuñadura
hasta que encaje en su sitio.
Oirá un clic cuando lo haga. Si
el pomo no encaja en su sitio,
empuje el eje de la empuñadura
para insertarla completamente
(1.2). Gire la empuñadura
de accionamiento hasta la
posición vertical. Apriete
completamente el pomo de
bloqueo de la empuñadura
para uso estacionario. Para
utilizar la empuñadura de
accionamiento con giro libre,
no apriete el pomo de bloqueo.
Instale el cable de alimentación
presionando el extremo del
cable completamente en
el receptáculo del cable de
alimentación en la base de la
máquina.
Enchufe el cable de
alimentación de la Reliant
en la toma de corriente. No
utilice un cable alargador.
UTILIZANDO EL RELIANT
1
2
Nota: Los cepillos estándar (blanco) y firmes (cebra) deben rodarse antes de usarlos por primera vez. Para
acostumbrar los cepillos, haga funcionar la Reliant sobre una superficie dura durante tres minutos.
4
Retire la Reliant del caddy
aflojando el perno de la parte
delantera del caddy. Localizar
el interruptor del motor de
escobillas en la parte trasera
de la base de la Reliant y
encender las escobillas de la
máquina. Sacar la Reliant del
caddy.
Antes de aplicar el limpiador por extracción en seco HOST
Antes de aplicar el Limpiador de Extracción en Seco HOST al suelo, coloque el cubo de lado durante 10
minutos. Esto ayudará a distribuir uniformemente los ingredientes líquidos por todo el limpiador. Asegúrese
de limpiar el borde del cubo antes de volver a taparlo. Así se evitarán fugas.
(1.1)
Mango de
liberación Pomo
(1.2)
Elevación
Asa
Enchufe
del asa
Liberar
Pomo
Bloqueo
Pomo
5
Aplique el Limpiador de
Extracción en Seco HOST
al suelo, a mano o con
el Aplicador. Si aplica el
limpiador HOST a mano,
utilice aproximadamente
un puñado por cada metro
cuadrado (3' x 3') (1,3). No
aplique más de 100 a 200
pies cuadrados a la vez o
el limpiador HOST podría
secarse y no limpiar tan
bien. Para el aplicador HOST,
coloque el limpiador HOST
en el aplicador y elija la
configuración ligera, media
o fuerte. A continuación,
guíe el aplicador HOST
sobre la zona a limpiar. A
medida que rueda, dispensa
la cantidad elegida de
microesponjas (1,4).
(1.3)
(1.4)
Bloqueo
Perno
Caddy
3
Utilice una aspiradora estándar
para aspirar primero la zona en
2 direcciones: norte/sur y este/
oeste. Cuanto más aspire, mejor
para eliminar la mayor cantidad
de suciedad seca suciedad seca.

E7
el sistema de limpieza que marca la diferencia hostdry.com | 800-558-9439
Al limpiar
escaleras con
la Reliant
Para limpiar las escaleras con la Reliant, deberá
retirar el asa de la máquina. Desenrolle el cable
de alimentación del mango. Presione los clips
en el extremo del cable y tire hacia arriba para
desenchufar el cable del receptáculo del cable
de alimentación. Desenrosque completamente
el pomo de bloqueo del asa. Baje el mango
hasta un ángulo de 90° (paralelo al suelo).
Levante y gire 1⁄4 vueltas el botón de liberación
del asa situado en la parte superior del asa de
elevación. Deslice el mango recto hacia un lado.
Utilice la base para limpiar escaleras.
6Una vez que hayas aplicado
el Limpiador de Extracción
en Seco HOST en el suelo,
enciende el interruptor de
pedal en la base de la Reliant.
Trabaja HOST en el área sucia,
usando movimientos de
empujar y jalar como cuando
aspiras, haz tres pasadas
sobre el área (1.5). Esta acción
de cepillado distribuye las
microesponjas HOST y las
pone en contacto con las
superficies sucias de lo que
estás limpiando.
1er pase
2º pase
3er pase (1.5)
7Deje que el HOST se seque.
Utilice una aspiradora estándar
para aspirar la zona en dos
direcciones: norte/sur y este/
oeste. Continúe aspirando en
dos direcciones hasta que se
haya recuperado todo el HOST
visible.
Eliminación de manchas con
el spotZAPPER® de HOST
Las manchas también pueden eliminarse
con el HOST spotZAPPER. Aplique el
Limpiador de Extracción en Seco HOST
y cepille en muchas direcciones. Cuanto
más se cepille, mejor. Después de cepillar,
dejar secar y aspirar.
NOTA: LIMPIAR Y ROTAR LOS
CEPILLOS CADA HORA. Las
cerdas del cepillo adquieren
un “juego” en el sentido en
que giran si no se cambian
con regularidad. Desenchufe
la máquina de la corriente.
Presione el botón de bloqueo
del muelle para soltar la tapa
del cepillo. Retire los cepillos
y limpie la parte inferior de la
máquina. Las escobillas encajan
sobre el eje y se enganchan en
3 pasadores cerca de la parte
inferior del eje. Asegúrese de
que el clip de las escobillas
encaja en su posición. Insertar
la barra articulada del protector
del cepillo/tapa final en la
ranura inferior. Empuje hacia
arriba hasta el tope, presione el
botón de bloqueo y deslice el
protector del cepillo en su lugar.
Si se desea, los cepillos Reliant
también se pueden cambiar
de extremo a extremo. Retire
el tornillo que sujeta el clip
del cepillo en su sitio, vuelva a
montarlo en el otro extremo del
cepillo y vuelva a colocarlo.
8Muelle
Cerradura
Botón
9Regrese la Reliant al caddy
trabando la manija en
su lugar y encienda los
cepillos de la máquina y
guíela de regreso al caddy.
Bloquee el perno en su
lugar. Simplemente aleje la
Reliant. Bloqueo
Perno
Caddy
Levantar
y girar 1/4
de vuelta
el botón de
desbloqueo
de la
empuñadura
Desenrosque
completamente el
eje de bloqueo de la
empuñadura, baje la
empuñadura paralela
al suelo y deslícela
hacia fuera
Tirar del asa
hacia fuera

E8
Motor Rejillas de
ventilación
Siga estas directrices para el mantenimiento rutinario de su Reliant para obtener un
rendimiento óptimo tanto del equipo HOST como del sistema de limpieza.
MANTENIMIENTO DE MÁQUINAS
LIMPIEZA DE LOS RESPIRADEROS DEL MOTOR
Es importante que los respiraderos del motor en el capó se mantengan libres
de cualquier acumulación. De lo contrario, la Reliant podría sobrecalentarse.
Aspira las rejillas de ventilación del motor con frecuencia.
SUSTITUCIÓN DE LAS CORREAS RELIANT
1. Desconecte la Reliant de la corriente.
2. Retire la tapa de la caja de engranajes
quitando 5 tornillos.
3. Quite el tornillo en el centro de la polea
pequeña y deslice hacia afuera la tapa de
la polea.
4. Quite los 2 tornillos de la polea grande
y levante la brida.
5. Cortar la correa dañada con tijeras y
retirarla.
6. Coloque primero la correa nueva en la
polea pequeña y colóquela en la polea
grande girando los cepillos de limpieza con
la mano.
7. Vuelva a colocar la tapa de la polea, la
brida, los tornillos y la cubierta de la caja de
engranajes.
Aplicación del limpiador de extracción en seco de HOST con el aplicador
Llene el aplicador con un máximo de 5,4 kilos (12 libras)
de HOST. NO LLENAR EN EXCESO. Abra las tapas de los
orificios para la aplicación de HOST. Elija entre ligero (1
tapa abierta), medio (2 tapas abiertas) o pesado (3 tapas
abiertas). Pase el aplicador por la zona de suelo sucio. NO
aplique el producto en una zona de más de 10 pies x 50 pies
(aprox. 50 metros cuadrados). Mantener el aplicador a 60 cm
de la pared. No es necesario aplicar HOST junto a la pared o
en zonas que no parezcan sucias. Aplicar sólo en las zonas
sucias del suelo.
Rellene aquí
Tapa del orificio
Tapa del orificio
de llenado
Brida de polea grande y
tornillos para brida
Tapa de polea pequeña
& Tornillo para tapa

E9
el sistema de limpieza que marca la diferencia hostdry.com | 800-558-9439
INSTRUCCIONES DE CONEXIÓN A TIERRA
Esta máquina debe conectarse a tierra. En caso de mal
funcionamiento o avería, la conexión a tierra proporciona
una vía de menor resistencia a la corriente eléctrica para
reducir el riesgo de descarga eléctrica. Esta máquina está
equipada con un cable que tiene un conductor de conexión
a tierra del equipo y un enchufe de conexión a tierra. El
enchufe debe insertarse en una toma de corriente adecuada
que esté correctamente instalada y conectada a tierra de
acuerdo con todos los códigos y ordenanzas locales.
ADVERTENCIA: Una conexión incorrecta del conductor
de puesta a tierra del equipo puede provocar riesgo de
descarga eléctrica. Consulte a un electricista o técnico
cualificado si tiene dudas sobre si la toma de corriente está
correctamente conectada a tierra. No modifique el enchufe
suministrado con la máquina. Si no encaja en la toma de
corriente, solicite a un electricista cualificado que instale
una toma de corriente adecuada.
Esta máquina es para uso en un circuito nominal de 120
voltios, y tiene un enchufe con conexión a tierra que se
parece al enchufe ilustrado en el Diagrama A. Se puede
utilizar un adaptador temporal que se parece al adaptador
ilustrado en el Diagrama B para conectar este enchufe a un
receptáculo de 2 polos como se muestra en el Diagrama
C si no se dispone de un tomacorriente con conexión a
tierra adecuada. El adaptador temporal sólo debe utilizarse
hasta que un electricista cualificado pueda instalar una
toma de corriente con toma de tierra adecuada. La oreja
rígida de color verde, orejeta o similar que se extiende
desde el adaptador como se ilustra en el Diagrama B,
debe conectarse a una cubierta de caja de toma de tierra
permanente. Siempre que se utilice el adaptador, debe
sujetarse con un tornillo metálico como se muestra en el
Diagrama C.
NOTA: En Canadá, el uso de un adaptador temporal no está
permitido por el Código Eléctrico Canadiense.
El cable eléctrico del Freestyle ha sido diseñado para proporcionar la potencia adecuada al motor tanto por el calibre como
por la longitud del cable. No utilice un alargador. El enchufe de conexión a tierra al final del cable NO debe retirarse.
TROUBLESHOOTING
PROBLEMA POSSIBLE CAUSE POSIBLE SOLUCIÓN
Reliant no funciona. El cable de alimentación no está bien sujeto
en el receptáculo del cable de alimentación.
Se ha fundido un fusible.
No se ha encendido el interruptor del motor.
Compruebe que el cable de alimentación esté bien sujeto en
el receptáculo del cable de alimentación situado en la parte
superior del capó de la máquina.
Fije el fusible.
Encienda el interruptor del motor. Si los interruptores están
encendidos y sigue sin funcionar, debe devolverse al fabricante
o a un centro de reparación autorizado. Póngase en contacto con
su distribuidor HOST.
CAJAS DE TOMA DE TIERRA
LENGÜETA PARA
TORNILLO DE
PUESTA A TIERRA
CLAVIJA DE TOMA
DE TIERRA ADAPTADOR
METAL
TORNILLO

Phone: 800-558-9439
Fax: 262-637-0558
E-mail: cust[email protected]om
Racine International, LLC
1405 16th Street
Racine, WI 53403
the cleaning SYSTEM that
makes a difference
HOST® Dry Extraction Cleaning System delivers a range of environmentally
preferable equipment and products to clean carpet and other hard floors.
© 2023 Racine International, Inc. Racine, WI, USA
The Dry Extraction
Cleaning System
M30758
Other manuals for Reliant
1
Table of contents
Languages:
Other Host Cleaning Equipment manuals
Popular Cleaning Equipment manuals by other brands

IPC
IPC CT15R quick guide

Becca
Becca Solvent Saver 9711 Operator's guide

COMAC
COMAC CM43 Use and maintenance manual

Streamline
Streamline HIGHLINE TRIKLEENER HP-GP2100306 instruction manual

General Pump
General Pump BIKLEENER 2100473 Operator's manual

HOSPECO
HOSPECO SPHERGO POP TUCK n' GO Starter Kit user guide