HP Pavilion dv9600 - Entertainment Notebook PC User manual

Multimedia
User Guide

© Copyright 2007 Hewlett-Packard
Development Company, L.P.
Windows is a U.S. registered trademark of
Microsoft Corporation.
The information contained herein is subject
to change without notice. The only
warranties for HP products and services are
set forth in the express warranty statements
accompanying such products and services.
Nothing herein should be construed as
constituting an additional warranty. HP shall
not be liable for technical or editorial errors
or omissions contained herein.
First Edition: April 2007
Document Part Number: 438902-001

Product notice
This user guide describes features that are common to most models. Some features may not be
available on your computer.
ENWW iii

iv Product notice ENWW

Table of contents
1 Using multimedia hardware
Using the audio features ...................................................................................................................... 1
Using the audio-in (microphone) jack .................................................................................. 2
Using the audio-out (headphone) jack ................................................................................. 2
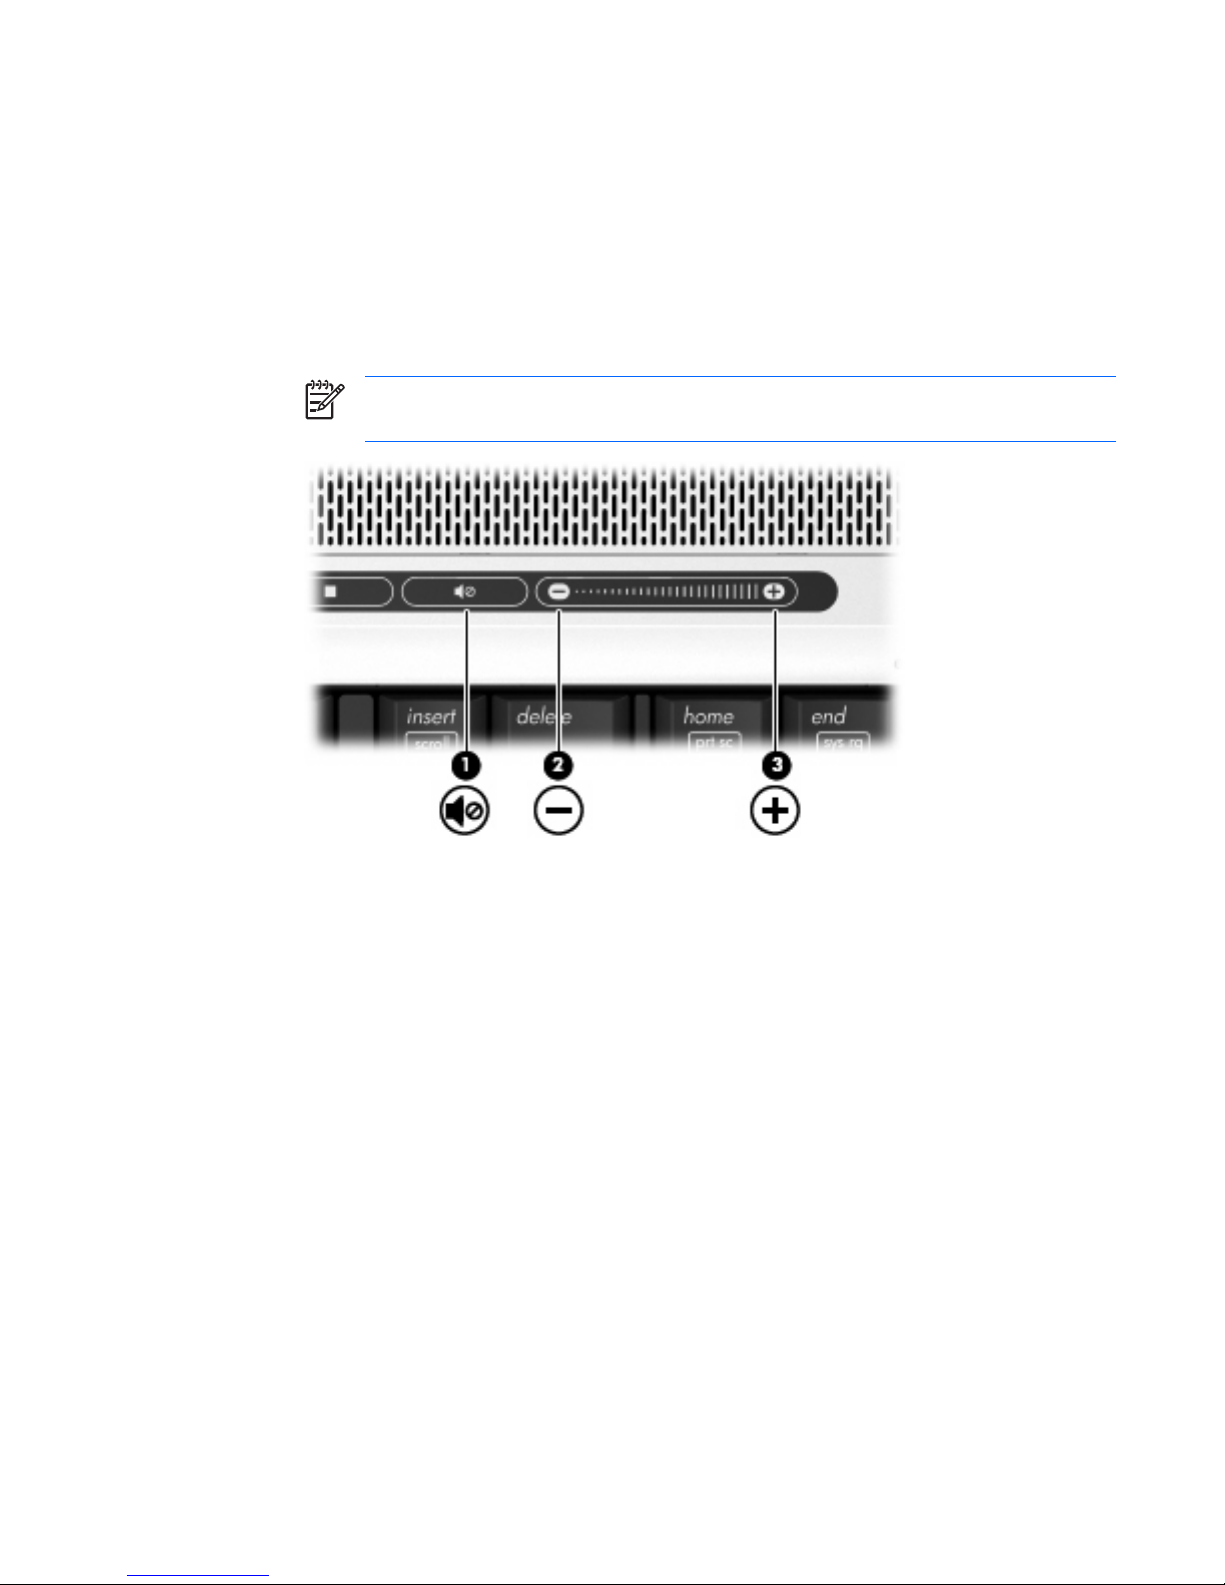
Adjusting the volume ........................................................................................................... 3
Using the Quick Launch buttons .......................................................................................................... 4
Using the video features ....................................................................................................................... 5
Using the external monitor port ............................................................................................ 5
Using the S-Video-out jack (select models only) ................................................................. 6
Using the camera (select models only) ................................................................................................ 7
Adjusting camera properties ................................................................................................ 8
Using an optical drive ........................................................................................................................... 9
Identifying the installed optical drive .................................................................................... 9
Inserting an optical disc ....................................................................................................... 9
Removing an optical disc when running on battery or external power .............................. 10
Removing an optical disc when no computer power is available ....................................... 11
Using the media activity functions ...................................................................................................... 12
Using the media activity hotkeys ....................................................................................... 12
Using the media activity buttons ........................................................................................ 13
Previous/rewind button ...................................................................................... 13
Play/pause button ............................................................................................. 13
Next/fast forward button .................................................................................... 14
Stop button ........................................................................................................ 14
2 Working with multimedia software
Opening preinstalled multimedia software ......................................................................................... 16
Installing multimedia software from a disc .......................................................................................... 16
Using multimedia software ................................................................................................................. 16
Preventing playback disruptions ......................................................................................................... 17
Changing DVD region settings ........................................................................................................... 18
Observing the copyright warning ........................................................................................................ 18
Index ................................................................................................................................................................... 19
ENWW v

vi ENWW

1 Using multimedia hardware
Using the audio features
The following illustration and table describe the audio features of the computer.
Component Description
(1) Internal microphones (2) Record sound.
(2) Speakers (2) Produce sound.
(3) Audio-in (microphone) jack Connects an optional computer headset microphone, stereo array
microphone, or monaural microphone.
(4) Audio-out (headphone) jack (1 or 2; second jack
included on select models only)
Connects optional powered stereo speakers, headphones, ear
buds, a headset, or television audio.
(5) Volume mute button Mutes and restores speaker sound.
(6) Volume scroll zone Adjusts speaker volume. Slide your finger to the left to decrease
volume and to the right to increase volume. You can also tap the
minus sign on the scroll zone to decrease volume, or tap the plus
sign on the scroll zone to increase volume.
ENWW Using the audio features 1

Using the audio-in (microphone) jack
The computer is equipped with a stereo (dual-channel) microphone jack that supports an optional stereo
array or monaural microphone. Using sound recording software with external microphones allows for
stereo recordings.
When connecting a microphone to the microphone jack, use a microphone with a 3.5-mm plug.
Using the audio-out (headphone) jack
WARNING! To reduce the risk of personal injury, adjust the volume before putting on
headphones, earbuds, or a headset.
CAUTION: To prevent possible damage to an external device, do not plug a single sound
channel (monaural) connector into the headphone jack.
In addition to connecting headphones, the headphone jack is used to connect the audio input function
of an audio device such as external powered speakers or a stereo system.
When connecting a device to the headphone jack, use only a 3.5-mm stereo plug.
When a device is connected to the headphone jack, the speakers are disabled.
2 Chapter 1 Using multimedia hardware ENWW

Adjusting the volume
You can adjust the volume using the following controls:
●Computer volume buttons:
●To mute or restore volume, press the mute button (1).
●To decrease volume, press the volume down button (2).
●To increase volume, press the volume up button (3).
NOTE: The tapping sound made by the volume button is enabled at the factory. You
can disable the sound in the Setup Utility (f10).
●Windows® volume control:
a. Click the Volume icon in the notification area, at the far right of the taskbar.
b. Increase or decrease the volume by moving the slider up or down. Click the Mute icon to mute
the volume.
– or –
a. Right-click the Volume icon in the notification area, and then click Open Volume Mixer.
b. In the Device column, increase or decrease the volume by moving the slider up or down. You
can also mute the volume by clicking the Mute icon.
If the Volume icon is not displayed in the notification area, follow these steps to add it:
a. Right-click in the notification area, and then click Properties.
b. Click the Notification Area tab.
c. Under System icons, select the Volume check box.
d. Click OK.
●Program volume control:
Volume can also be adjusted within some programs.
ENWW Using the audio features 3

Using the Quick Launch buttons
The media button (1) and DVD button (2) functions vary by model and installed software. With these
buttons, you can watch movies, listen to music, and view pictures.
Pressing the media button launches the QuickPlay program.
Pressing the DVD button launches the DVD playback feature of the QuickPlay program.
NOTE: If the computer has been set up to require a logon password, you may be asked to log
on to Windows. QuickPlay launches after you log on. Refer to the QuickPlay online Help for more
information.
4 Chapter 1 Using multimedia hardware ENWW

Using the video features
Using the external monitor port
The external monitor port connects an external display device, such as an external monitor or a projector,
to the computer.
▲To connect a display device, connect the device cable to the external monitor port.
NOTE: If a properly connected external display device does not display an image, press fn
+f4 to transfer the image to the device. Repeatedly pressing fn+f4 alternates the screen image
between the computer display and the device.
ENWW Using the video features 5

Using the S-Video-out jack (select models only)
The 7-pin S-Video-out jack connects the computer to an optional S-Video device such as a television,
VCR, camcorder, overhead projector, or video capture card.
To transmit video signals through the S-Video-out jack, you need an S-Video cable, available from most
electronics retailers. If you are combining audio and video functions, such as playing a DVD movie on
your computer and displaying it on your television, you also need a standard audio cable, available from
most electronics retailers, to connect to the headphone jack.
The computer can support one S-Video device connected to the S-Video-out jack, while simultaneously
supporting an image on the computer display or on any other supported external display.
NOTE: The S-Video connection provides a higher quality image than a composite-video
connection.
To connect a video device to the S-Video-out jack:
1. Plug one end of the S-Video cable into the S-Video-out jack on the computer.
NOTE: If the S-Video-out jack on the computer is not accessible because the computer is
docked in an optional docking device, connect the S-Video cable to the S-Video-out jack on
the docking device.
2. Plug the other end of the cable into the video device, as instructed in the user guide included with
the device.
3. Press the fn+f4 keys to switch the image between display devices connected to the computer.
6 Chapter 1 Using multimedia hardware ENWW

Using the camera (select models only)
Select computer models include an integrated camera, located on the top of the display. The camera
can be used with a variety of software for the following functions:
●Capturing video
●Streaming video with instant message software
●Taking still photos
NOTE: For information about using software designed for use with the integrated camera, refer
to the online Help for that software.
The camera light (1) turns on when video software accesses the camera (2).
For optimum performance, observe the following guidelines while using the integrated camera:
●Be sure that you have the latest version of an instant message program before attempting a video
conversation.
●Your integrated camera may not work properly across some network firewalls. If you are having
trouble viewing or sending video to someone on another LAN or outside your network firewall,
contact your Internet service provider for assistance.
●Whenever possible, place bright light sources behind the camera and out of the picture area.
ENWW Using the camera (select models only) 7

Adjusting camera properties
You can adjust the following camera properties:
●Brightness—Controls the amount of light that is incorporated into the image. A higher brightness
setting creates a brighter image; a lower brightness setting creates a darker image.
●Contrast—Controls the difference between lighter and darker areas on the image. A higher contrast
setting intensifies the image; a lower contrast setting maintains more of the original information’s
dynamic range but leads to a flatter image.
●Hue—Controls the aspect of color that distinguishes it from another color (what makes a color red,
green, or blue). Hue is distinct from saturation, which measures the intensity of the hue.
●Saturation—Controls the strength of color in the final image. A higher saturation setting creates a
bolder image; a lower saturation setting creates a more subtle image.
●Sharpness—Controls the definition of edges in an image. A higher sharpness setting creates a
more defined image; a lower sharpness setting creates a softer image.
●Gamma—Controls the contrast affecting the mid-level grays or midtones of an image. Adjusting
the gamma of an image allows you to change the brightness values of the middle range of gray
tones without dramatically altering the shadows and highlights. A lower gamma setting makes
grays look black, and makes dark colors even darker.
The Properties dialog box is accessible from various programs that use the integrated camera, usually
from a configuration, settings, or properties menu.
8 Chapter 1 Using multimedia hardware ENWW

Using an optical drive
Depending on the type of optical drive and software installed in your computer, the optical drive plays,
copies, and creates CDs or DVDs.
Identifying the installed optical drive
▲Select Start > Computer.
Inserting an optical disc
1. Turn on the computer.
2. Press the release button (1) on the drive bezel to release the media tray.
3. Pull out the tray (2).
4. Hold the disc by the edges to avoid touching the flat surfaces and position the disc label-side up
over the tray spindle.
NOTE: If the tray is not fully accessible, tilt the disc carefully to position it over the spindle.
5. Gently press the disc (3) down onto the tray spindle until the disc snaps into place.
6. Close the media tray.
NOTE: After you insert a disc, a short pause is normal. If you have not selected a media player,
an AutoPlay dialog box opens. It prompts you to select how you want to use the media content.
ENWW Using an optical drive 9

Removing an optical disc when running on battery or external power
1. Press the release button (1) on the drive bezel to release the media tray, and then gently pull out
the tray (2) until it stops.
2. Remove the disc (3) from the tray by gently pressing down on the spindle while lifting the outer
edges of the disc. Hold the disc by the edges and avoid touching the flat surfaces.
NOTE: If the tray is not fully accessible, tilt the disc carefully as you remove it.
3. Close the media tray and place the disc in a protective case.
10 Chapter 1 Using multimedia hardware ENWW

Removing an optical disc when no computer power is available
1. Insert the end of a paper clip (1) into the release access in the front bezel of the drive.
2. Press in gently on the paper clip until the tray is released, and then pull out the tray (2) until it stops.
3. Remove the disc (3) from the tray by gently pressing down on the spindle while lifting the outer
edges of the disc. Hold the disc by the edges and avoid touching the flat surfaces.
NOTE: If the tray is not fully accessible, tilt the disc carefully as you remove it.
4. Close the media tray and place the disc in a protective case.
ENWW Using an optical drive 11

Using the media activity functions
The media activity hotkeys and the media activity buttons (select models only) control the play of an
audio CD or a DVD that is inserted into the optical drive.
Using the media activity hotkeys
A media activity hotkey is a combination of the fn key (1) and a function key.
●When an audio CD or a DVD is not playing, press fn+f9 (2) to play the disc.
●When an audio CD or a DVD is playing, use the following hotkeys:
●To pause or resume playing the disc, press fn+f9 (2).
●To stop the disc, press fn+f10 (3).
●To play the previous track of an audio CD or the previous chapter of a DVD, press fn+f11
(4).
●To play the next track of an audio CD or the next chapter of a DVD, press fn+f12 (5).
12 Chapter 1 Using multimedia hardware ENWW

Using the media activity buttons
The following illustration and topics describe the functions of the media activity buttons.
●Previous/rewind button (1)
●Play/pause button (2)
●Next/fast forward button (3)
●Stop button (4)
Previous/rewind button
Media
status
Button Function
Playing Previous/rewind button Plays a previous track or chapter.
Playing fn + previous/rewind button Rewinds the playback.
Play/pause button
Media
status
Button Function
Not
playing
Play/pause button Plays the media.
Playing Play/pause button Pauses the playback.
ENWW Using the media activity functions 13

Next/fast forward button
Medi
a
statu
s
Button Function
Playin
g
Next/fast forward button Plays the next track or chapter.
Playin
g
fn + next/fast forward button Fast forwards the playback.
Stop button
Medi
a
statu
s
Button Function
Playin
g
Stop button Stops the playback.
14 Chapter 1 Using multimedia hardware ENWW
This manual suits for next models
10
Table of contents
Other HP Laptop manuals

HP
HP Pavilion XT115 Quick start guide

HP
HP 4510s - ProBook - Celeron 1.8 GHz User manual

HP
HP Compaq 6710b User instructions

HP
HP 340 G5 Manual

HP
HP Compaq Presario User manual

HP
HP 8710p - Compaq Business Notebook User instructions

HP
HP OMNIBOOK 4150 Reference guide

HP
HP PAVILION G6 Manual

HP
HP Pavilion dv2-1000 - Entertainment Notebook... User manual

HP
HP HDX X16-1000 - Premium Notebook PC User manual