For advice on the safety and suitability of this
equipment contact HSS Hire.
There is a serious risk of personal injury if you do
not follow all instructions laid down in this guide.
The hirer has a responsibility to ensure that all
necessary risk assessments have been completed
prior to the use of this equipment.
This equipment should only be used by an
operator who has been deemed competent to do
so by his/her employer.
This equipment should be used by a competent
adult who has read and understood these
instructions. Anyone with either a temporary or
permanent disability, should seek expert advice
before using it.
Keep children, animals and bystanders away from
the work area. Cordon off a NO GO area using
cones and either barriers or tape, available for
hire from HSS Hire.
Never use this equipment if you are ill,
feeling tired, or under the influence of
alcohol or drugs.
Wear sensible, protective clothing and
footwear offering good grip, plus gloves
and a hard hat. Tie back long hair and avoid loose
garments and jewellery that could get in your way.
Never work on the tower if you suffer from vertigo.
Never suspend the tower from another structure.
Always climb onto the tower from the upper end,
entering through the gate in the handrail frame.
Keep your feet in the middle of the rungs and grip
the frame sides firmly with both hands.
Never carry anything when climbing, unless you
can do so leaving both hands free. Haul things up
after you, using a stout rope and secure knots.
Always check the condition of components before
use – and at regular intervals thereafter. If any
show signs of damage or excessive wear, do not
use them. Return them to HSS Hire.
Always ensure the tower is correctly built and
level before use – and check regularly thereafter.
GENERAL SAFETY
GETTING STARTED
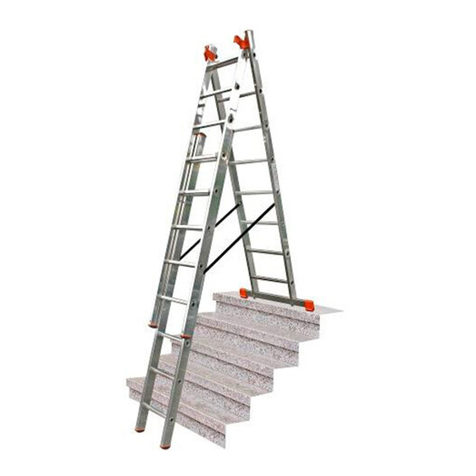
The tower must be constructed on the stairwell,
therefore ensure that you are not contravening
any health and safety law (blocking a fire exit for
example) before proceeding.
Make sure that you understand these instructions
and are familiar with the tower’s components
CLIPS & CLAWS
Components are linked using two kinds of fitting...
INTERLOCK CLIPS join frame
uprights. Unlock those on the
frame to be added, fit its
sockets over the spigots of the
lower frame and re-lock the
clips.
LOCKING CLAWS join braces to
frames. Pull back the trigger to
open the jaws, then snap the
claw onto the rail or upright,
ensuring the open side faces
down or out. The jaws should
lock automatically.
Whichever fitting you are using, though, always
double-check that it is locked and secure
before continuing.
before you begin.
Make sure too, that you have everything you need
to hand and refer to the illustrations for
construction. Unlock the interlock clips on all
frames, fit base plate legs securely to two standard
frames. These will now be referred to as the base
frames.
Fit an additional frame to one of the base frames
and engage the interlock clips.
Place the base frame, fitted with an extra frame, on
the lower stair and the singular base frame on the
upper stair, allowing the correct distance between the
frames for the platform to fit (1.6 metres).
Link these frames with two horizontal and two
diagonal braces as shown in the illustration, to form
the tower base – easiest if you start by clipping the
horizontal brace to the frame uprights.
Now adjust the feet as necessary to leave the
tower absolutely level – check this using a builder’s
level on the uprights and horizontal braces.
Fit the platform to the top rungs of the two end
frames. Make sure all four platform end hooks are in
contact with the top rungs, then secure in place by
engaging the locking claws.
Fit a standard frame to the top of the frame that is
at the lower step, securing it in place with the
interlock clips.
Fit the gate frame to the top of the frame that is
resting on the upper step. Make sure that the
access bar is positioned so that it opens in towards
the tower.
STABILISATION
Refer to the table below for the correct method(s) of
stabilising the tower for the stairwell in which you
intend to erect it:
For additional stability more than one stabilisation
method may be used. The HSS Hire strongly
recommends that ballast be used in all applications
in addition to the alternative methods indicated by
this guide.
METHODS OF STABILISATION
A- Strongly recommended: The tower is fitted with
150kg of ballast uniformly spread along the bottom
rung of each base frame (i.e. 75kg at each end).
Please contact your supplier or hire shop for details.
B - The tower is positioned up against a wall on one
side, and a stabiliser is fitted on the other, to the end
frame on the lower step. The stabiliser must have a
minimum sideways extension of 650mm, and reach
down the stairs for a minimum distance of 650mm.
C - The tower is fitted with a stabiliser on both sides,
each with a minimum sideways extension of
650mm, and reaching down the stairs for a
minimum distance of 650mm. Additional stabiliser
available from your supplier or hire shop.
D - The tower is fixed solidly to a wall on one side
with ties. They should be rigid, two-way ties
fastened to both uprights of the frame with load
bearing right-angled or swivel couplers. Only
couplers suitable for the 50.8mm diameter tube of
the tower should be used. Ideally ties should secure
to either the face of a solid structure or by means of
anchorages. Tying in with rope or non-rigid
members is not acceptable.
Position of
tower in
Stairwell
0.8 to 1.4m 1.4 to 2.0m 2.0m or
greater
Free-Standing
(No walls on
either side of
staircase)
A A A or C
Up against a wall
on one side of
the staircase A or D A or B or D A or B or D
Mid-way
between walls
on each side of
staircase
A or D A or D A or C
To complete the tower, attach the four guard rails
(see illustration) ensuring that the claws face
outward.
