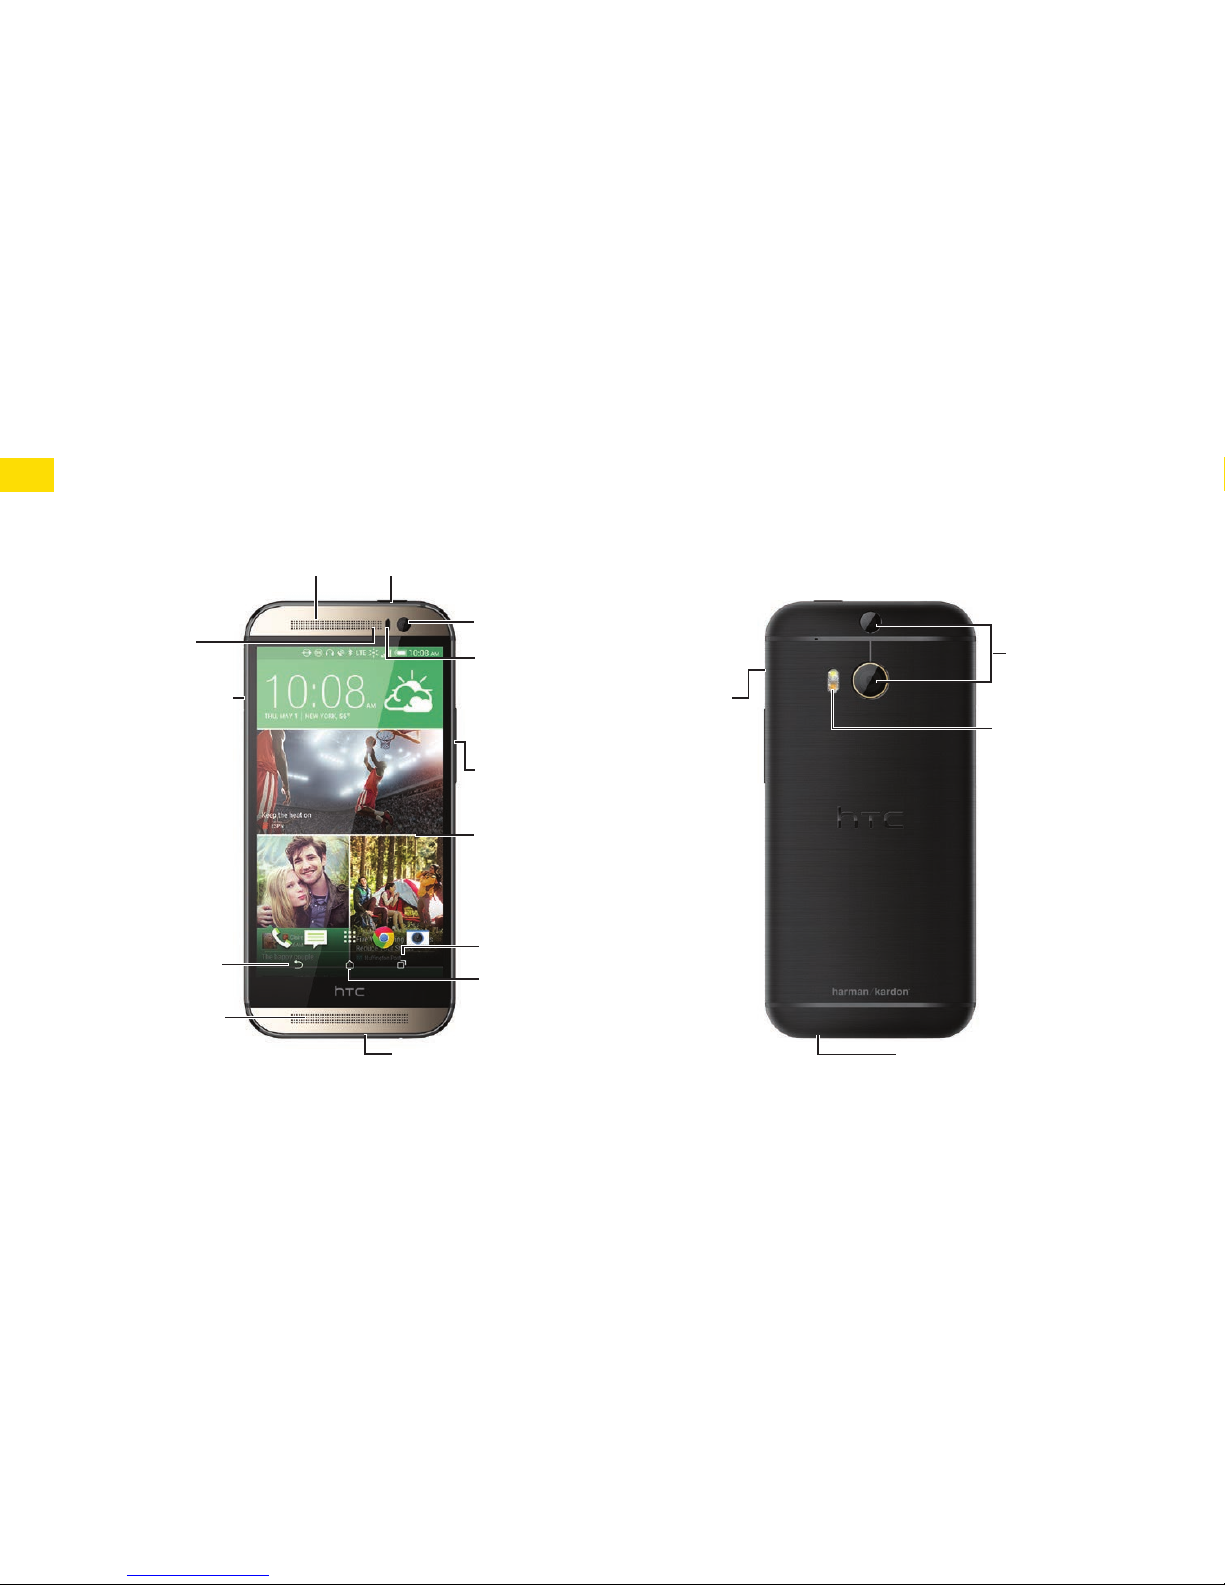
HTC One (M8) Specification sheet

Get
Started
All you need to know to get going.

Thanks for choosing Sprint. This booklet helps you get started
with your Sprint Spark™ and HD Voice capable* new HTC One®
(M8) harman/kardon® edition.
ReadyNow – For more help in getting up and running with
your new phone, take advantage of exclusive Ready Now
resources at sprint.com/readynow. You can even schedule a
one-on-one appointment at a Sprint Store near you.
For ongoing support and resources, visit sprint.com/support.
There, you’ll ind guides, tutorials, and more to help you get
the most out of your phone.
Note: Available applications and services are subject to change at any time.
* The Sprint Spark enhanced LTE™ network and HD Voice capability are available in select markets.
Visit sprint.com/coverage for more information.
Welcome!

Using This Guide
3
This Get Started guide is designed to help you set up and use your new
HTC One (M8) harman/kardon edition. It’s divided into four sections to
help you nd the information you need quickly and easily.
Using This Guide
Get Ready − page 5 − Find out what
you need to do before you use your
phone the rst time, including charging
the battery and activating Sprint service
on your phone.
Android Basics − page 8 − Learn some
basics about how to move around on
your phone, use the Home screen, and
enter text. If you’re familiar with Android™
phones, you can probably skip these
pages (although a refresher course never
hurt anyone).
Use Your Phone − page 12 − Take
advantage of your phone’s features
and Sprint services, from the basics
(making calls) to the more advanced
(using Google Play™, Wi-Fi®, and more).
Tools & Resources − page 31 − Find
useful tips for your phone and discover
resources and other helpful Sprint
information. For additional information
including the full User Guide, videos,
tutorials, and community forums, visit
sprint.com/support.

4
Your HTC One (M8) harman/kardon edition
Flash
Volume
Button
Duo Camera
Front Indicator
Light (LED)
Nano SIM Card
Tray with
Eject Hole
Touchscreen
3.5 mm Headset Jack
Speaker
Back Key Home Key
Recent Apps Key
Charger/Accessory Jack
Front Camera
Proximity Sensor
microSD™ Card
Tray with
Eject Hole
Power Button and IR PortSpeaker

Get Ready
visit sprint.com/readynow for more information to get your phone up and running 5
Get Your Phone Ready
Before you start: Visit sprint.com/readynow
to learn about transferring contacts,
calendars, and more from your old phone.
Charge the Battery
1. Insert the small end of the USB cable into
the charger/accessory jack on the bottom
of your phone.
2. Insert the larger end of the USB cable into
the AC adapter.
3. Plug the AC adapter into an electrical outlet.
Note: Charging may take up to three hours.
Turn the Phone On
►Press and hold the Power button to turn
your phone on.
Turn the Screen On and O
• To quickly turn the display screen o, press
the Power button on top of the phone.
• To turn the screen on, press the
Power button.
Unlock the Screen
• Swipe up to unlock the screen, swipe right
to go directly to HTC BlinkFeed™, or swipe
left to go to the Home widget panel.
• You can also press and hold the lock icon,
and then drag it up, right, or left.
Turn the Phone O
►Press and hold the Power button on top of
the phone and then touch Power o to
turn the phone o.

6
Activate Your Phone
Activate Your Phone
If you purchased your phone at a
Sprint Store, it is probably
activated and ready to use.
If you received your phone in the
mail, and it is a new Sprint account
or a new phone number, your
phone is designed to activate
automatically when you irst turn it
on. You will see a Hands Free
Activation screen at startup. When
it’s inished, touch OK to continue.
To conirm your activation, make a
phone call.
If you received your phone in the
mail and it is going to be activated
on an existing number (you’re
swapping phones), go to
sprint.com/activate and follow the
instructions. When you have
inished, make a phone call to
conirm your activation.
If your phone is still not activated, visit
sprint.com/support for assistance. If you
do not have access to the Internet, call
Sprint Customer Service at 1-888-211-4727
from another phone.

Get Ready
visit sprint.com/readynow for more information to get your phone up and running 7
Complete the Setup Application
1. Touch START to begin. Touch NEXT or SKIP
to skip any of the screens.
• Connect to Wi-Fi. Connect to a network.
• Got Google? Sign in to your Google® Account.
• Fast and easy setup. Use the HTC Get
Started service to set up your new phone
from your computer.
• Transfer or restore. Transfer content
from an old phone to your HTC One (M8)
harman/kardon edition. Choose Get
content from old phone and touch NEXT.
Or select Restore from HTC Backup, and
touch NEXT.
• Accounts & sync. Set up your email and
social network accounts.
• Personalize & secure. Give your new
phone a name or set up a screen lock to
help secure your phone.
• HTC Backup. This screen shows what
you’ve backed up to your online storage.
• Tell HTC & location services. Choose
whether to allow HTC to collect
anonymous data in the background
about how you use your phone.
2. Touch FINISH.
Note: You do not need to sign up for a Google
Account to use your phone; however, to
download content from the Google Play
Store app, you must link your phone to a
Google Account.
Setup Application

8
Android Basics: Your Home Screen
Display Your Home Screen
Your phone’s Home screen extends
horizontally up to six panels.
• To display the main Home screen, touch
from any screen.
• To view additional panels, swipe the
screen left.
• To add more panels (up to ive total), touch
and hold a Home screen panel and then
touch Manage home screen pages > .
Notiications Panel
When you see a notiication icon on the left
side of the status bar, drag the status bar
down to display the Notiications panel.
Touch a notiication to open the related
application, such as Messages, Call History,
or Calendar.
To close the panel, drag the bottom bar up
or just touch .
Add Items to a Home Screen Panel
1. Swipe the main Home screen left to
display an additional panel.
2. Touch and hold the screen and select Add
apps and widgets.
3. Touch to select the type of content you
want to add. You will see thumbnails of the
current Home screen panels and a menu
of items you can add.
4. Touch and hold an item and drag it to the
desired thumbnail at the top of the screen.
5. Touch the thumbnail to display the panel
or touch to return to the main
Home screen.

visit sprint.com/support for guides, tutorials and more 9
Android Basics
Keys and Icons
Keys
Just below the touchscreen, you’ll ind three
static key icons that let you do most of your
navigating around the phone.
• Back Key ( ) – Touch to return to the
previous screen view.
• Home Key ( ) – Touch to return to the main
Home screen.
• Recent Apps Key ( ) – Touch to view your
recently-accessed apps list.
Open Apps
• If an app is on one of your Home screen
panels or is in the Launch bar, just touch it
to open it.
• If an app is not available from your Home
screen, touch
(if you’re not already on the
Home screen), touch
to display the app
list, and then touch the app icon. You may
have to swipe up or down through the list.
Note: To manage your app list, touch and
select an option from the drop-down menu
(Hide/unhide apps, Manage apps, and
Grid size).
Home Key
Recent
Apps Key
Back
Key

10
Your Onscreen Keyboards
Your phone comes loaded with two
keyboards: HTC Sense® Input keyboard
(default) and Swype®. When you select a
ield that requires text or numbers, an
onscreen keyboard will appear. (If you don’t
see the keyboard when, for instance, you’re
entering contact information, just touch the
ield you’re working on to bring it up.) The
phone’s onscreen keyboards can be used in
either portrait or landscape mode.
Note: To switch between keyboard types
while a keyboard is displayed, drag the
notiications bar down from the top of the
screen, touch Choose input method, and
then touch the method you want to use.
Typing with HTC Sense Input
Entering text using the traditional HTC
Sense Input keyboard is easy: just touch the
letters to type the words.
1. From a screen where you can enter text,
touch the input ield to reveal the
onscreen keyboard.
2. If needed, select a text mode option: ABC
to enter alphabetic characters or 12# to
enter numbers or symbols.
3. Touch the corresponding onscreen keys to
begin typing.
• If you make a mistake, touch to erase.
Note: With HTC Sense Input, you can also enter
text by sliding your inger continuously over the
keyboard. Select the Trace keyboard option in
the keyboard settings to enable this option.
Enter Text

visit sprint.com/support for guides, tutorials and more 11
Android Basics
Using Swype to Enter Text
Swype lets you enter words by tracing over
the letters in a single motion.
1. Touch an onscreen character, and then,
while maintaining your inger onscreen,
drag to the next character in the
desired word.
2. Repeat this process until the desired
characters have been drawn over. Select
from an onscreen list of possible word
matches (if prompted). This occurs if your
current action has generated more than
one possible word match.
Your Keyboard Settings
You can customize your onscreen keyboard
settings to suit your needs.
►Touch > > Settings > Language and
keyboard, and then tap a keyboard option
(HTC Sense Input or Swype).
Dierent keyboards will provide dierent
options. The HTC Sense Input menu may
include options such as:
• Keyboard selection
• Sound feedback
• Vibration feedback
• Arrow keys
• Trace keyboard
• Advanced (Calibration and Word prediction)
• Personal dictionary
Enter Text

12
Use Your Phone: Voicemail
Set Up Your Voicemail
All unanswered calls are automatically
transferred to your voicemail, even if your
phone is in use or turned o. You should set
up your voicemail and personal greeting as
soon as your phone is activated:
1. Touch > to display the phone dialpad,
and then touch and hold .
2. Follow the voice prompts to create
your password and record your name
and greeting.
Sprint strongly recommends setting a
voicemail password.
Retrieve Your Voicemail
►Touch > and then touch
and hold .
From any other phone:
1. Dial your wireless phone number.
2. When your voicemail answers, press *.
Note: You can also set up and access your
voicemail using the Visual Voicemail app.
Touch > Voicemail and follow the prompts
to set up and access your voicemail.

visit sprint.com/support for guides, tutorials and more 13
Use Your Phone
Calls
Make a Phone Call
1. Touch
>
to display the phone keypad.
2. Touch the digits of the number you want
to call on the keypad. Touch to delete
one or more digits.
3. As you enter digits, the top matching contact
will display. Touch the name to call it.
Note: If there is more than one match, you’ll
see a number (such as “8 matches”) below
the top match. Touch the number to see
additional matches, and then touch a name
to call it.
4. Touch to place the call.
Tip: If you want to enter numbers easier,
touch > Large dial pad. To return to Smart
dial mode with matches, touch > Standard
dial pad.
Answer an Incoming Call
►Whether the display is active or locked,
touch ANSWER.
Note: While on a call and holding the phone
near your face to speak, the touchscreen
automatically turns o to avoid accidental
screen presses. When you move the phone
away from your face, the touchscreen
automatically turns back on.
• Touch to mute the microphone. Touch
to unmute the microphone.
• Touch
to route the phone’s audio through
the speakers.
Warning: Because of higher volume levels, do
not place the phone near your ear during
speakerphone use.

14
People
Your phone’s People application lets you access and manage contacts from a variety of
sources, including Gmail™, Exchange, Facebook, contacts synced from your computer, and
contacts you’ve entered manually.
View Contacts
1. Touch > > People.
2. Scroll through the list to view your contacts,
or touch
and enter a contact’s name to
go directly to it.
Tip: You can also access People through the
Phone app. Touch >and then swipe
to the PEOPLE tab.
Save a Phone Number
1. Touch >.
2. Enter a number using the keypad and then
touch Save to People.
3. Touch Create new contact or Save to
existing contact.
4. If prompted, select a contact type, enter a
name and any other additional information,
and then touch SAVE.

visit sprint.com/support for guides, tutorials and more 15
Use Your Phone
People
Add a New Contact
1. Touch > > People > .
2. Add as much or as little information as
you want.
• To add information in a ield, touch the
ield to display the onscreen keyboard.
• To assign a number type (such as Home,
Mobile, Work, etc.), touch the label next
to the number ield.
• To assign a picture, touch
, select a
photo source (Gallery or Camera), and
touch or take a picture.
3. Touch SAVE when you’re inished.
Note: If you have contacts associated with
your Gmail Account, they are automatically
synced with your phone.
Edit Contacts
1. Touch > > People.
2. Touch a contact to open it, and then touch
> Edit contact.
• Touch a ield to add or edit information.
3. Touch SAVE when you’re inished.
Note: To delete a contact from your contacts
list, touch > Delete contacts.
Sync Contacts
When you change one of your contacts that
syncs with your social networking account,
your phone automatically updates the
account. Also, your phone updates your
People and social networking accounts
whenever you change a friend in your social
networking accounts.

16
Messages
Send a Message
1. Touch > >
.
2. Enter a contact name or mobile number in
the To ield.
3. Tap the Add text box and type your message.
4. Touch
and then attach a photo, video, or
audio to your message.
5. When you are inished, touch
.
Note: For information on taking pictures and
recording videos with your phone, see
“Camera & Camcorder” on page 23.
Access Messages
View all your text and multimedia messages
in one place.
►Touch
>
.
Read and Reply to Messages
►Touch >
.
• To open a message, touch it.
• To reply to a text or multimedia message,
open it and enter your reply in the text
box at the bottom.
• To forward a text message, touch a
message conversation, touch the
message (do not touch a link or a phone
number) you want to forward, and then
touch Forward.
Be a hero. Don’t drive distracted.
sprint.com/focusondriving

visit sprint.com/support for guides, tutorials and more 17
Use Your Phone
Email Setup
Set Up a Gmail Account
You likely signed into your Gmail Account
when you irst turned your phone on. If not,
you can add it or another account at any time.
1. Touch >
>
Gmail.
2. Follow the instructions to set up or sign in
to a Gmail Account.
Note: Although you need a Google Account
to use certain features such as Google Play,
you do not have to use Gmail as the default
email account for your phone.
Note: When setting up a new Google
Account, you will be prompted to add a
secondary email address. Enter a second
Gmail address or any other email address
from which you currently send and receive
email. This address is used to authenticate
your account should you ever encounter
problems or forget your password. It is
strongly encouraged for Android users so
you can regain access to Google services
and purchases on your phone.
You can link multiple email accounts to your
HTC One (M8) harman/kardon edition
,
including Exchange ActiveSync® accounts. You can set up email accounts through the
setup application or directly through the settings menu or email application.

18
Set Up an Email Account
1. Touch >
>
Mail.
2. Touch either Yahoo Mail, Outlook.com, or
Other (POP3/IMAP).
3. Follow the instructions to sign in to your
email account.
• If you’re adding an account from a
common email provider, such as
Outlook.com or Yahoo!® Mail, enter your
email address and password and touch
NEXT. Your email should be set
up automatically.
• Enter the Account name and Your name
and touch FINISH SETUP.
Note: Follow the instructions to provide the
required information.
Set Up an Exchange ActiveSync Account
Before setting up Microsoft
®
Exchange
ActiveSync
work email accounts, contact
your IT administrator for account
sign-in requirements.
1. Touch >
>
Mail.
2. Touch Microsoft Exchange ActiveSync.
3. Enter the Exchange server account details
and then touch NEXT.
• Contact your Exchange Server administrator
for required sign-in information.
4. Select the type of information you want to
synchronize and touch FINISH SETUP.
Email Setup

visit sprint.com/support for guides, tutorials and more 19
Use Your Phone
Access Email Messages
1. Touch > > Mail.
2. Touch and select an account view.
3. Touch the message you want to view.
Send an Email Message
1. Touch > > Mail.
• Select the email account you want to use.
2. Touch .
3. Enter an email address or contact name.
4. Enter a subject and a message.
• To add attachments, touch and select
an attachment.
5. Touch to send the message.
Access Gmail Messages
1. Touch > > Gmail.
2. Touch Inbox and select an account view.
3. Touch the message you want to view.
Send a Gmail Message
1. Touch > > Gmail.
2. Touch .
3. Enter an email address or contact name.
4. Enter a subject and a message.
• To add attachments, touch > Attach ile
and select an attachment.
5. Touch
to send the message.
Using Email

20
Connect to a Wi-Fi Network
When you’re in range of an available Wi-Fi
network you can use your phone’s Wi-Fi
feature to access the Internet and other
data services.
1. Touch >
>
Settings.
2. Touch the ON/OFF switch next to Wi-Fi.
3. Touch Wi-Fi to display a list of
available networks.
4. Touch a Wi-Fi network to connect. If
necessary, enter the security key and
touch CONNECT.
• When you’re connected to a Wi-Fi
network, you’ll see the Wi-Fi icon ( ) in
the status bar.
Note: When you’re not using Wi-Fi, touch the
ON/OFF switch next to Wi-Fi on the phone
settings to extend battery life.
Find sports scores, news, and weather.
Shop online. Your phone’s built-in browser
lets you surf the Web just the way you
want to.
Go Online
►Touch > .
• To go to a speciic website, touch the
address bar and enter the Web address.
• To access and manage bookmarks, touch
and touch Bookmarks in the browser
options menu.
Note: Additional browser options, such as
Google Chrome™, may also be available on
your phone.
Wi-Fi Web
Other manuals for One (M8)
13
Table of contents
Other HTC Cell Phone manuals

HTC
HTC Sensation User manual

HTC
HTC PNE E8 Specification sheet

HTC
HTC T-Mobile Shadow Hotspot User manual

HTC
HTC Desire 612 User manual

HTC
HTC Touch Pro User manual

HTC
HTC Advantage 7501 User manual

HTC
HTC Dream User manual

HTC
HTC Velocity 4G User manual

HTC
HTC Desire 626 User manual

HTC
HTC Power Vision User manual