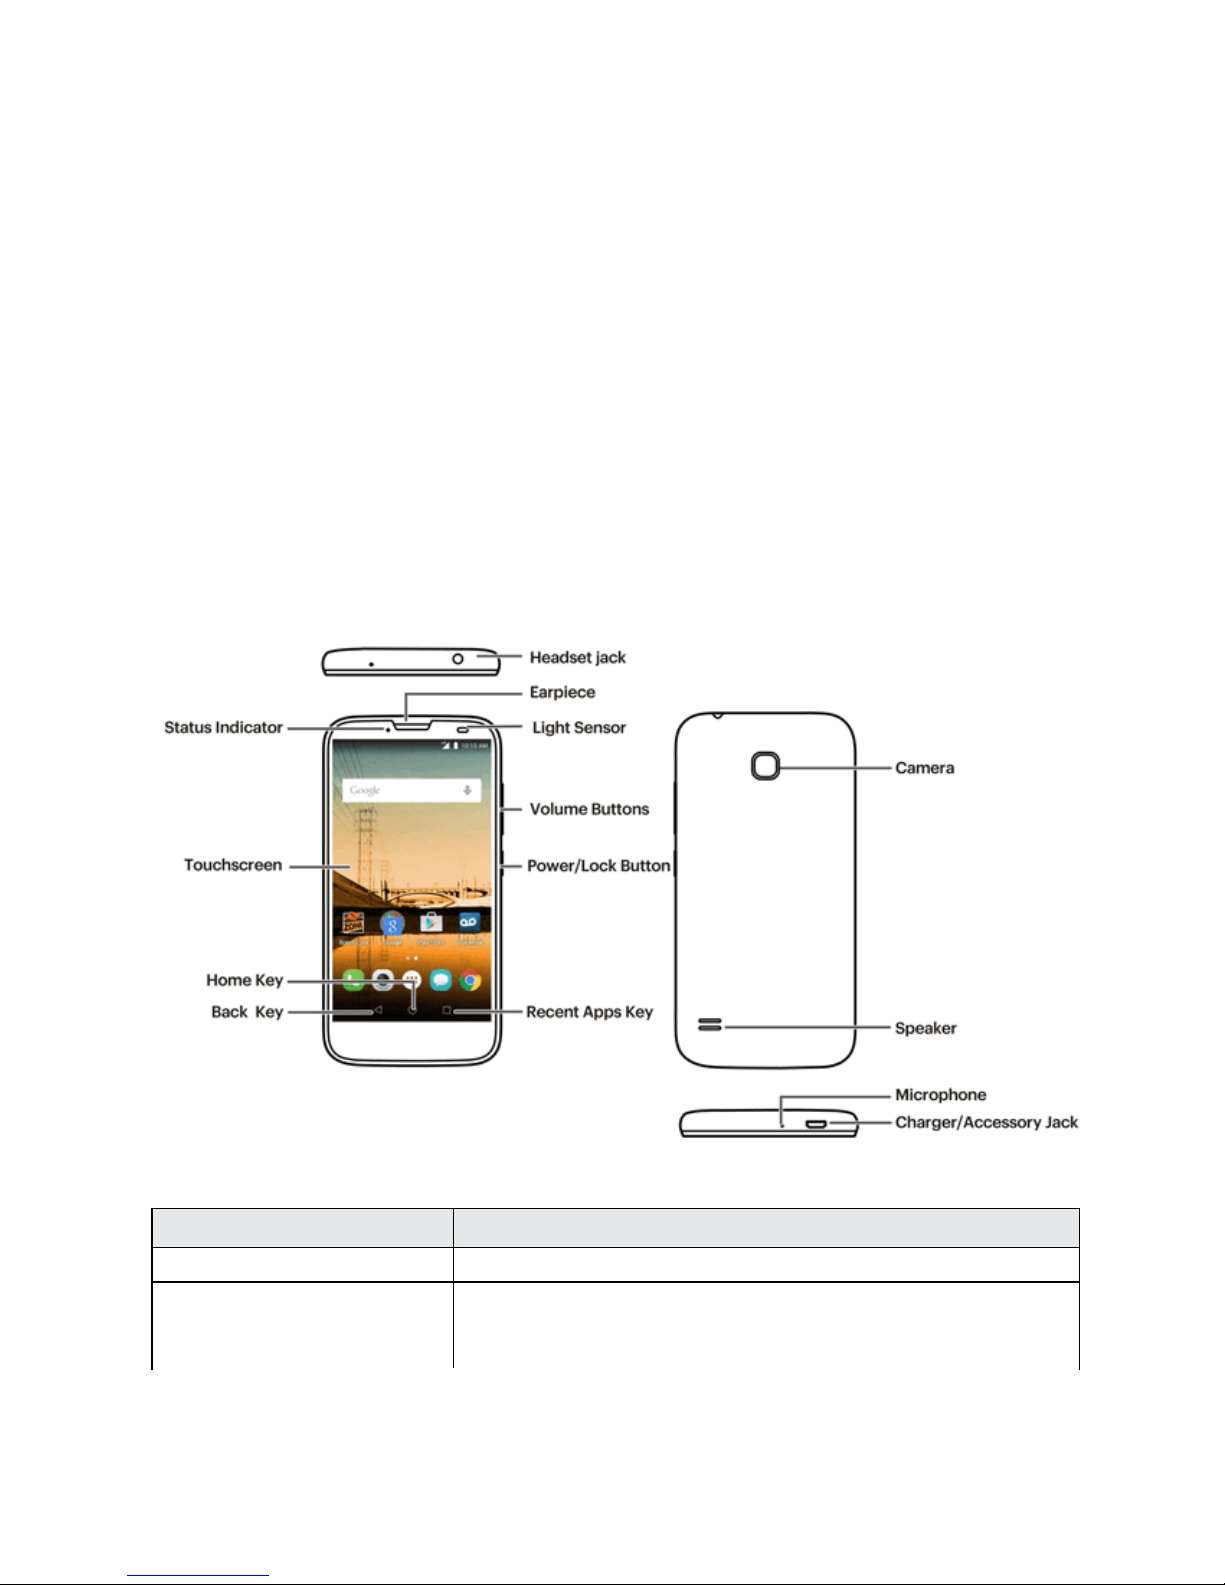
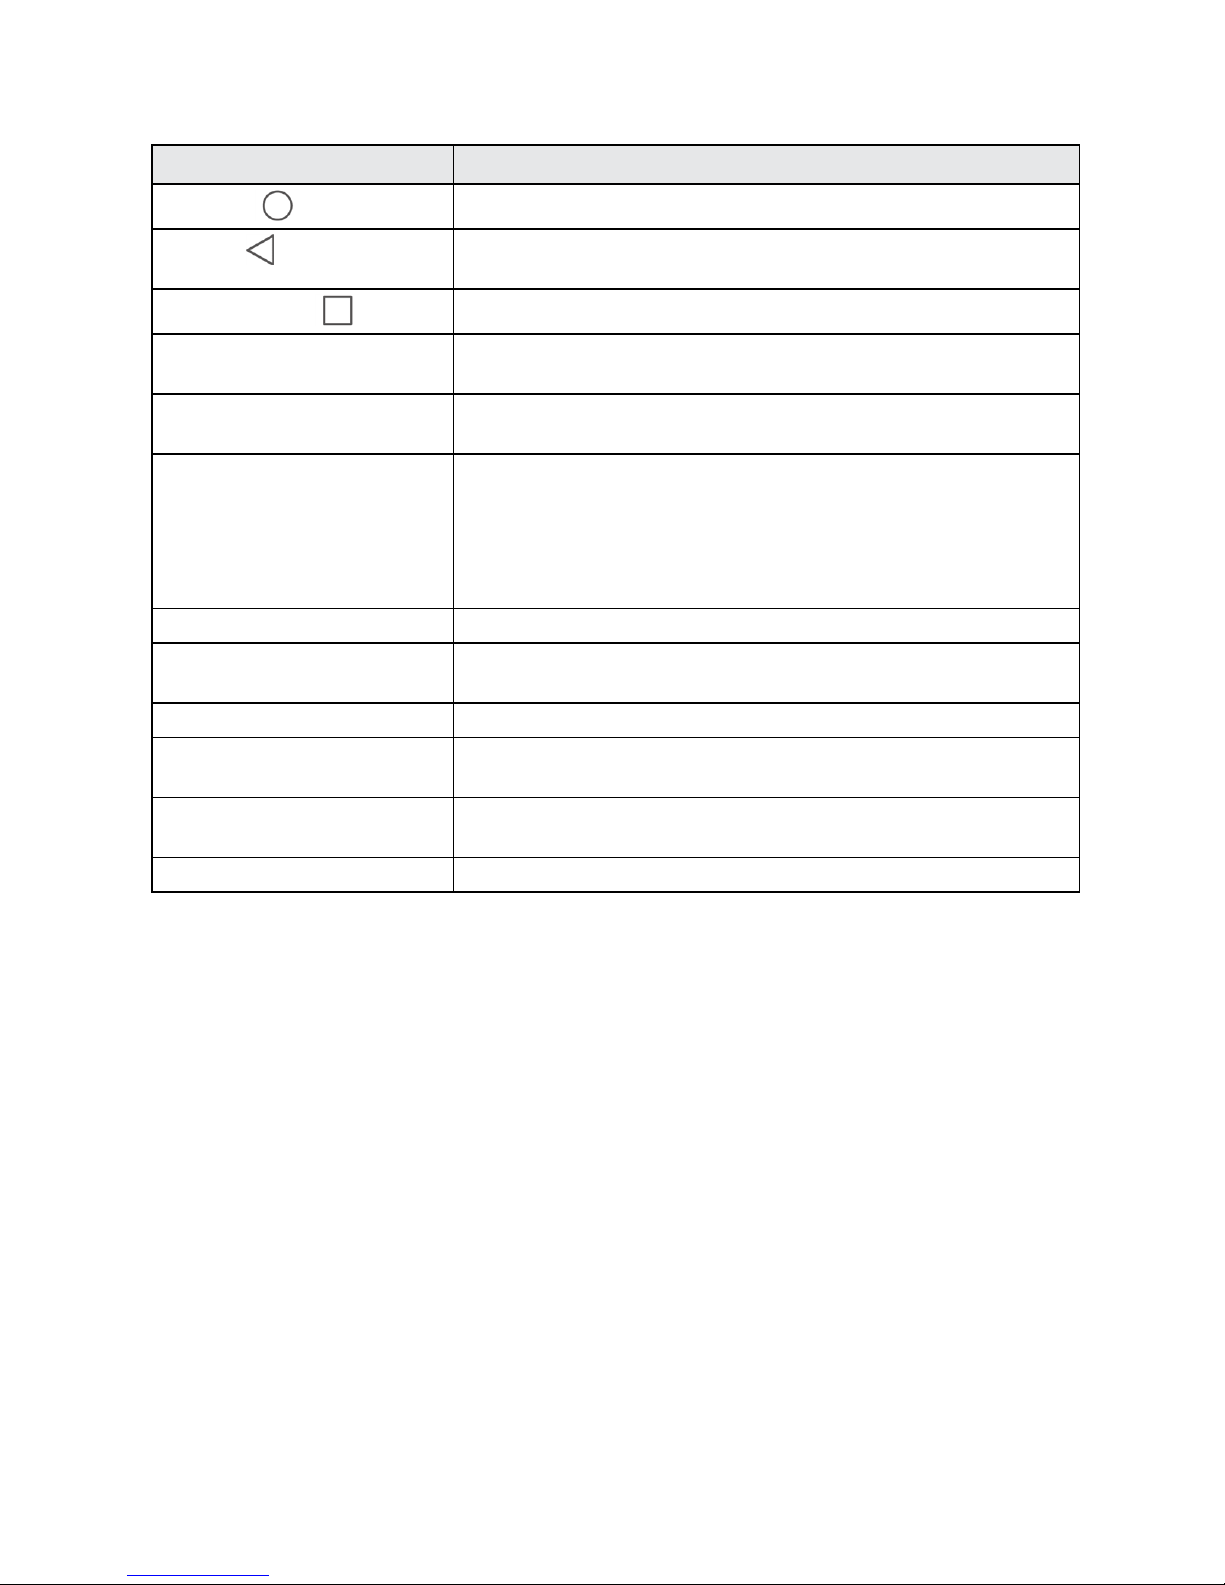
Huawei UNION User manual

Available applications and services are subject to change at any time.

i
Table of Contents
Introduction 1
AbouttheUserGuide 1
AccessInstructionsonPhone 1
LaunchtheGuide 1
GetStarted 2
PartsandFunctions 2
SIMCard 3
SDCard 5
InsertSDCard 5
RemoveSDCard 7
FormatSDCard 8
BatteryUse 9
InserttheBattery 9
RemovetheBattery 10
ChargetheBattery 11
TurnYourPhoneOnandOff 12
UsetheTouchscreen 13
ActivationandService 15
CompletetheSetupScreens 16
BasicOperations 18
Basics 18
HomeScreenandApplications(Apps)List 18
PhoneSettingsMenu 18
PortraitandLandscapeScreenOrientation 18
CaptureScreenshots 19
Applications 19
LaunchApplications 19
AppsList 20
PhoneNumber 20
SilentMode/AirplaneMode 21
SilentMode 21
AirplaneMode 21
EnterText 22
TouchscreenKeyboards 22
AndroidKeyboard 22

ii
TipsforEditingText 23
GoogleAccount 24
CreateaGoogleAccount 24
SignIntoYourGoogleAccount 25
GooglePlayStore 25
FindandInstallanApp 26
RequestaRefundforaPaidApp 26
UpdateanApp 27
UninstallanApp 27
GetHelpwithGooglePlay 27
LockandUnlockYourScreen 28
UpdateYourPhone 28
UpdateYourPhoneSoftware 28
UpdateYourProfile 30
UpdateYourPRL 30
YourPhoneInterface 31
HomeScreenBasics 31
HomeScreenLayout 31
ExtendedHomeScreens 32
StatusBarandNotificationPanel 32
StatusBar 32
NotificationPanel 34
CustomizetheHomeScreen 34
ChangetheWallpaper 34
AddShortcutstotheHomeScreen 35
AddWidgetstotheHomeScreen 35
CreateaFolder 35
PhoneApp 37
PlaceandAnswerCalls 37
CallUsingthePhoneDialer 37
CallEmergencyNumbers 38
AnswerPhoneCalls 39
In-CallScreenLayoutandOperations 40
PlaceaCallfromContacts 41
CallfromCallLogs 41
OptionalServices 41
VoicemailSetup 41
VisualVoicemail 42

iii
SetUpVisualVoicemail 42
ReviewVisualVoicemail 43
ListentoMultipleVoicemailMessages 43
VisualVoicemailOptions 44
ConfigureVisualVoicemailSettings 44
CallerIDBlocking 45
CallWaiting 45
ConferenceCalling 46
CallForwarding 46
CallSettings 47
AccessCallSettings 47
CallSettingsOptions 47
TTYMode 48
Contacts 50
AddaContact 50
SaveaPhoneNumber 51
ViewContacts 51
EditaContact 52
DeleteaContact 52
ShareaContact 52
ImportContacts 53
BackUpContacts 53
MessagingandInternet 55
TextandMultimediaMessaging 55
SendaTextMessage 55
SendaMultimediaMessage(MMS) 56
SaveandResumeaDraftMessage 56
NewMessagesNotification 56
ManageMessageConversations 57
TextandMMSOptions 59
Gmail 60
CreateandSendaGmailMessage 60
GmailCompositionOptions 60
CheckReceivedGmailMessages 61
UseGmailLabels 61
ArchiveGmailThreads 62
MuteGmailThreads 62
DeleteGmailThreads 62

iv
SearchGmailMessages 62
ReportSpamorPhishingGmail 62
AddAnotherGoogle(Gmail)Account 63
SwitchingBetweenGmailAccounts 63
Email 63
SetUpanEmailAccount 63
AddanEmailAccount 64
AddanExchangeActiveSyncAccount 64
ComposeandSendEmail 65
CheckYourEmail 65
OptionsWhenReviewingEmailMessages 66
DeleteanEmailAccount 66
ManageYourEmailInbox 66
Browser 67
UsetheBrowser 67
BrowserSettings 68
AddaBookmark 68
ViewBrowserHistory 68
ChromeBrowser 69
CameraandVideo 70
TakePicturesandRecordVideos 70
TakeaPicture 70
LaunchtheCameraFromtheGallery 70
CaptureModes 71
RecordVideos 72
ViewPicturesandVideosUsingGallery 73
EditPictures 74
SharePicturesandVideos 74
SendPicturesorVideosbyEmail 74
SendaPictureorVideobyMultimediaMessage 75
SendPicturesorVideosUsingBluetooth 75
SharePicturesandVideosonFacebook 76
SharePicturesonFlickr 76
SharePicturesonPicasa 77
ShareVideosonYouTube 77
CameraSettings 78
AppsandFeatures 79
NavigationApps 79

v
GoogleMaps 79
Hangouts 79
GoogleSearch 79
Calculator 80
Calendar 80
AddanEventtotheCalendar 80
ViewCalendarEvents 81
SyncCalendars 81
SynchronizeanExchangeActiveSyncCalendar 82
Clock 82
SetAlarms 83
AdditionalClockFeatures 83
Safe 84
Backup 84
PhoneManager 85
YouTube 86
ViewYouTubeVideos 86
PostaVideotoYouTube 86
GooglePlayMusicApp 87
PlayMusicwithGooglePlay 87
GooglePlayMusicScreenLayout 87
CreatePlaylistsinGooglePlayMusic 88
Notepad 88
Connectivity 89
TransferFilesbetweenYourPhoneandaComputer 89
FileTransferTips 89
TransferFilesbetweenthePhoneandaComputer 89
Wi-Fi 90
TurnWi-FiOnandConnecttoaWirelessNetwork 90
Wi-FiSettings 90
DisconnectWi-Fi 91
Wi-FiDirect 91
Bluetooth 91
BluetoothInformation 92
EnabletheBluetoothFeature 92
PairBluetoothDevices 92
ConnecttoaPairedBluetoothDevice 93
SendInformationUsingBluetooth 94

vi
ReceiveDataviaBluetooth 94
Settings 96
BasicSettings 96
Wi-FiSettingsMenu 96
BluetoothSettings 97
LocationAccessSettings 98
DataTrafficManagementSettings 98
MoreSettings 99
DisplaySettings 99
SoundSettings 100
StorageSettings 101
BatterySettings 101
ApplicationsSettings 101
SecuritySettings 102
LockScreenSettings 103
ScreenLock 103
DisabletheScreenLock 104
Language&InputSettings 105
BackupandReset 106
Accounts 107
Date&TimeSettings 108
AccessibilitySettings 108
AboutPhone 110
ForAssistance 112
Troubleshooting 112
Specifications 113
BoostAccountInformationandHelp 114
ManageYourAccount 114
Re-Boost 115
CopyrightInformation 116
Index 117

Introduction 1
Introduction
Thefollowingtopicsdescribethebasicsofusingthisguideandyournewphone.
About the User Guide
ThankyouforpurchasingyournewHuaweiUnion.Thefollowingtopicsexplainhowbesttousethis
guidetogetthemostoutofyourphone.
Before Using Your Phone
ReadtheGetStartedguideandImportantInformationbookletthatwerepackagedwithyourphone
thoroughlyforproperusage.
Accessibleservicesmaybelimitedbysubscriptioncontractconditions.
Descriptions in the User Guide
Notethatmostdescriptionsinthisguidearebasedonyourphone'ssetupatthetimeofpurchase.
Unlessotherwisenoted,instructionsbeginfromthephone'shomescreen,whichisdisplayedby
tapping .Someoperationdescriptionsmaybesimplified.
Screenshots and Key Labels
Screenshotsandotherillustrationsinthisuserguidemayappeardifferentlyonyourphone.Key
labelsintheuserguidearesimplifiedfordescriptionpurposesanddifferfromyourphone'sdisplay.
Other Notations
Intheuserguide,thephonemaybereferredtoeitheras"phone,""device,"or"handset."A
microSD™ormicroSDHC™cardisreferredtoasan"SDCard"ora"memorycard."
Access Instructions on Phone
Thesetopicswillhelpyoufindhelponyournewphoneandwillintroducethebasicsofusingyour
phone'stouchscreenifyouareanewuser.
Launch the Guide
Forthefulluserguide,gotohttp://devicehelp.boostmobile.com/andsearchforHUAWEIUnion.

Get Started 2
Get Started
Thefollowingtopicsgiveyoualltheinformationyouneedtosetupyourphoneandwirelessservice
thefirsttime.
Parts and Functions
Thesetopicsillustrateyourphone’sprimarypartsandkeyfunctions.
Note:Yourphone'sscreensandappslayoutsaresubjecttochange.Thisuserguideusessample
imagesonly.
Phone Layout
Thefollowingillustrationoutlinesyourphone’sprimaryexternalfeaturesandkeys.
Note:Beforeyoustart,removetheTPprotectivefilm.
Part Description
Statusindicator Displaysaphonenotification,chargingstatus,oralert.
Touchscreen Displaysalltheinformationneededtooperateyourphone,suchasthe
callstatus,theContactslist,andthedateandtime.Alsoprovidesone-
tapaccesstoallofyourfeaturesandapplications.

Get Started 3
Part Description
Home keyReturnsyoutotheHomescreen.
Back keyLetsyoureturntothepreviousscreen,orcloseadialogbox,options
menu,theNotificationspanel,oronscreenkeyboard.
Recent apps keyDisplaysalistofrecentlyusedapplications.
Power key Letsyouturnthephoneonorofforturnthescreenonoroff,orswitch
yourphonetosilentmode,vibrationmode,orairplanemode.
Volume key Allowsyoutoadjusttheringtoneormediavolumeoradjustthevoice
volumeduringacall.
Light sensor Detectshowcloseanobjectistothesurfaceofthescreen.Thisis
typicallyusedtodetectwhenyourfaceispressedupagainstthe
screen,suchasduringaphonecall.
Whiletalkingonthephone,thesensordetectstalkactivityandlocks
thekeypadtopreventaccidentalkeypresses.
Earpiece Letsyouhearthecallerandautomatedprompts.
Headset jack Allowsyoutoplugineitherastereoheadsetoranoptionalheadsetfor
convenient,hands-freeconversations.
Camera Letsyoutakepicturesandvideos.
Speaker Letsyouhearthedifferentringtonesandsounds.Thespeakeralsolets
youhearthecaller’svoiceinspeakerphonemode.
Microphone Transmitsyourvoiceforphonecallsorrecordsyourvoiceorambient
soundsforvoicerecordingsandvideos.
Micro USB port AllowsyoutoconnectthephonechargerortheUSBcable(included).
CAUTION!Insertinganaccessoryintotheincorrectjackmaydamagethephone.
SIM Card
TheSIMcardisanICcardcontainingphonenumberandothercustomerinformation.
Handling a SIM Card
KeepthefollowinginmindwhenhandlingaSIMcard.
n CustomerisresponsibleforanydamagecausedbyinsertingSIMcardinanother-brandICcard
reader,etc.Thecompanyisnotresponsibleinsuchcase.
n AlwayskeeptheICchipclean.
n Wipecleanwithadry,softcloth.
n Avoidapplyinglabels.MaydamageSIMcard.
n SeeinstructionsincludedwithSIMcardforhandling.
n SIMcardisthepropertyofthecompany.

Get Started 4
n SIMcardisreplaceable(atcost)incaseofloss/damage.
n ReturnSIMcardtothecompanywhencancellingsubscription.
n ReturnedSIMcardsarerecycledforenvironmentalpurposes.
n NotethatSIMcardspecificationsandperformancemaychangewithoutnotice.
n ItisrecommendedthatyoukeepaseparatecopyofinformationthatisstoredonSIMcard.The
companyisnotresponsiblefordamagesfromstoredinformationthatislost.
n AlwaysfollowemergencyprocedurestosuspendserviceifyourSIMcardorphone(SIMcard
inserted)islost/stolen.Fordetails,contactCustomerService.
n Alwayspoweroffphonebeforeinserting/removingSIMcard.
Insert a SIM Card
FollowtheseinstructionstoinsertaSIMcard.Remembertopoweroffyourphonebeforeinserting
aSIMcard.
Note:Yourphone’sSIMcardispreinstalled.Theseinstructionsareforreferenceonly.
1. Removethebatterycover.
l Liftgentlyinthedirectionshown.
2. InsertaSIMcard.
l InsertgentlywithgoldICchipfacingdownward.

Get Started 5
3. Insertthebattery.
l Angletheedgelabeleda(withthecontacts)intothebottomendofthebattery
compartment.
l Pushtheedgelabeledbintothecompartmentuntilthebatteryclicksfirmlyintoplace.
4. Attachthebatterycover.
l Makesureallthetabsaresecureandtherearenogapsaroundthecover.
SD Card
YourphonesupportstheuseofanoptionalSDcard(notincluded)toexpanditsstoragecapacity.It
supportscardsupto32GB.Somecardsmaynotoperateproperlywithyourphone.
SD Card Cautions
Data:InformationstoredonSDCardcanbecomelostorchangedaccidentlyorasaresultof
damage.Itisrecommendedthatyoukeepaseparatecopyofimportantdata.Thecompanyis
notresponsiblefordamagesfromdatathatislostorchanged.
Reading/Writing Data:Neverpowerofforremovebatterywhilereadingorwritingdata.
Battery Level:Alowbatterychargemaypreventreading/writingtoSDCard.
Handling SD Card:Use/storeSDCardsawayfromthereachofinfants.Maycausechokingif
swallowed.
Insert SD Card
FollowthesestepstoinsertanoptionalSDcard(notincluded).Makesuretopoweryourphoneoff
beforeinsertingorremovingaSDcard.

Get Started 6
1. Removethebatterycover.
l Liftgentlyinthedirectionshown.
2. InsertaSDcard.
l InsertSDCardallthewaygentlywithoutbendingandwithterminalsfacingdown.
l InsertonlySDCards.
3. Insertthebattery.
l Angletheedgelabeleda(withthecontacts)intothebottomendofthebattery
compartment.

Get Started 7
l Pushtheedgelabeledbintothecompartmentuntilthebatteryclicksfirmlyintoplace.
l Makesureallthetabsaresecureandtherearenogapsaroundthecover.
Remove SD Card
FollowtheseinstructionstoremoveanSDcard.Alwayspowerthephoneoffbeforeinsertingor
removinganSDcard.
1. Removethebatterycover.
l Liftgentlyinthedirectionshown.
2. Removethebattery.
l Liftupwardgentlyasshown.

Get Started 8
3. RemovetheSDcard.
4. Insertthebattery.
l Angletheedgelabeleda(withthecontacts)intothebottomendofthebattery
compartment.
l Pushtheedgelabeledbintothecompartmentuntilthebatteryclicksfirmlyintoplace.
5. Attachthebatterycover.
l Makesureallthetabsaresecureandtherearenogapsaroundthecover.
Format SD Card
WhenyouinsertanoptionalSDcardforthefirsttime,itisrecommendedthatyouformatitonyour
phone.
1. Fromhome,tapApps >Settings .
2. TapStorage>My SD card>Erase SD card.
3. TapErase SD cardagain.
4. TapErase everythingtoconfirm.

Get Started 9
AlldataontheSDcardiserased,andthecardisformattedforuseonyourphone.
Battery Use
Thefollowingtopicsexplainhowtoinsertandremoveyourphone’sbattery.
Battery Cautions
Storage:Avoidstoringorleavingbatterywithnochargeremaining.Savedinformationand
settingsmaybecomelostorchanged,orbatterymaybecomeunusable.Chargeonceeverysix
monthsbeforestoringorleavingunusedforalongperiod.
Bulges:Dependingonuse,bulgesmayappearnearendofbatterylife.Thisdoesnotaffect
safety.
Replacing Battery:Thebatteryisaconsumableitem.Itneedstobereplacedifoperatingtime
shortensnoticeably.Purchaseanewbattery.
Cleaning:Cleansoiledterminalsbetweenbatteryandphonewithaclean,drycottonswab.
Soiledterminalscanresultinapoorconnectionandpreventcharging,etc.
Insert the Battery
Followtheseinstructionstoinsertyourphone’sbatterysafelyandproperly.
1. Removethebatterycover.
l Liftgentlyinthedirectionshown.
2. Insertthebattery.
l Alignthecontactsofthebatterywiththecontactsinthephone.

Get Started 10
3. Attachthebatterycover.
l Makesureallthetabsaresecureandtherearenogapsaroundthecover.
Remove the Battery
Followtheseinstructionstoremoveyourphone’sbattery.Alwayspowerthephoneoffbefore
removingthebattery.
1. Removethebatterycover.
l Liftgentlyinthedirectionshown.
2. Removethebattery.
l Liftupwardgentlyasshown.

Get Started 11
3. Attachthebatterycover.
l Makesureallthetabsaresecureandtherearenogapsaroundthecover.
Charge the Battery
Followtheseinstructionstochargeyourphone’sbatteryusingeithertheincludedACadapterorvia
aUSBconnectiononyourcomputer.
Charge Using the AC Adapter
1. PlugtheUSBconnectorintothecharger/accessoryjackonthebottomofyourphone.
2. PlugtheotherendoftheUSBcableintotheACadapter.
3. PlugtheACadapterintoanelectricaloutlet.
Theindicatorlightilluminateswhenchargingstarts.Thelightturnsgreenwhenthebatteryis
almostfulloralreadyfull.
4. Aftercharging,disconnectthephonefromthecharger.
l UnplugtheACadapterfromtheoutlet,andremovetheUSBcablefromthephoneandthe
ACadapter.
Charge Using a PC Connection
BeforeusingaPCconnectiontochargeyourphone,ensurethatthecomputeristurnedon.
Dependingonthetypeofconnection,yourphone’sbatterymaynotcharge.
1. InsertthesmallendoftheUSBcordintothecharger/accessoryjackonthebottomofyour
phone.

Get Started 12
2. InsertthelargeendoftheUSBcordintoanexternalUSBportonyourcomputer.
3. Aftercharging,removetheUSBcablefromboththephoneandthecomputer.
Turn Your Phone On and Off
Theinstructionsbelowexplainhowtoturnyourphoneonandoff.
Turn Your Phone On
n PressandholdthePower/Lockbutton.
Yourphonewillpoweron.Dependingonthesettings,youmayseethelockscreen.
l SeeLockandUnlockYourScreenandScreenLockforinformationaboutusingthescreen
lock.
l Thefirsttimeyouturnthephoneon,youwillseethestartupscreens.SeeCompletethe
SetupScreensfordetails.
l Ifyourphoneisnotyetactivated,seeActivationandServiceformoreinformation.
Turn Your Phone Off
1. PressandholdthePower/Lockbuttontoopenthephoneoptionsmenu.
2. TapPower offtoturnthephoneoff.
Yourphonewillpoweroff.
Yourscreenremainsblankwhileyourphoneisoff(unlessthebatteryischarging).

Get Started 13
Use the Touchscreen
Yourphone’stouchscreenletsyoucontrolactionsthroughavarietyoftouchgestures.
Tap or Touch
Whenyouwanttotypeusingtheonscreenkeyboard,selectitemsonscreensuchasapplicationand
settingsicons,orpressonscreenbuttons,simplytaportouchthemwithyourfinger.
Touch and Hold
Toopentheavailableoptionsforanitem(forexample,acontactorlinkinaWebpage),touchand
holdtheitem.
Other manuals for UNION
1
Table of contents
Other Huawei Cell Phone manuals

Huawei
Huawei C8100 User manual

Huawei
Huawei Honor AUM-L29 User manual

Huawei
Huawei UM840 User manual

Huawei
Huawei POT-LX3 User manual

Huawei
Huawei G5510 User manual

Huawei
Huawei Mate 8 User manual

Huawei
Huawei MATE S User manual

Huawei
Huawei MAR-LX3Am User manual

Huawei
Huawei Ascend G7 User manual

Huawei
Huawei PAR-LX1 User manual

Huawei
Huawei G5510 User manual

Huawei
Huawei P10 LITE User manual

Huawei
Huawei ATU-L31 User manual

Huawei
Huawei GLA-LX1 User manual

Huawei
Huawei JKM-LX1 User manual

Huawei
Huawei Ascend P1 User manual

Huawei
Huawei ELE-L09m User manual

Huawei
Huawei P9 Lite 2017 User manual

Huawei
Huawei nova 11i User manual

Huawei
Huawei Ascend G7 User manual