Huffy Disney Princess Royal Horse and Carriage User manual

© Copyright Huffy Corporation 2019
This manual contains important safety, assembly,
operation and maintenance information.
Please read and fully understand this manual before
operation.
Save this manual for future reference.
Always wear approved helmet and safety equipment when
using this product.
Date Code Label
Here
BC
H-RO-Princess-Hrse EN 07-26-18 m0511
Battery Ride-on
Owner’s Manual

2 This product meets ASTM F963 and CPSIA requirements for electric vehicles.
IMPORTANT! Before using the unit for the rst time the battery needs to
be charged for at least 8to 12 hours - no more than 20 hours. Only an adult
who has read and understands the safety warnings should handle, charge
or recharge of the battery (see Operation section).
Owner’s Manual Index
Safety and Warnings ...........................................................................................2-5
Assembly and Parts..............................................................................................6-13
Operation and Charging Battery....................................................... 14-15
Maintenance and Service ............................................................................ 15-16
• General Info, Battery Storage, Replacement and Disposal
Troubleshooting .................................................................................................... 17-18
Warranty .............................................................................................................................19
Contact Information ..................................................Back Cover
• CHOKING HAZARD
• Small parts, adult assembly required.
• To reduce the risk of injury, adult supervision is required.
• Never use in roadways, near motor vehicles, on or near steep inclines or steps, swimming
pools or other bodies of water; always wear shoes, and never allow more than one rider.
• The user must be 3 to 7 years, and weigh no more than 65 lbs (30kgs).
WARNING!

3
• An adult must always supervise a child that is
using the vehicle.
• Before using the vehicle the user must
understand the controls and safety issues. They
must also demonstrate the capability to handle
the vehicle and operate its controls.
• Seat Models: Always sit in the seat when using
the vehicle. Do not stand on side boards.
• This product contains small parts that are for
adult assembly only. Keep small children away
when assembling. Remove and dispose of
all protective material and poly bags before
assembly. Be sure to remove all packaging
materials and parts from underneath the vehicle
body.
• Always use the vehicle in a safe, secure
environment with continuous adult supervision.
• Body parts such as hands, legs, hair and clothing
can get caught in moving parts. Never place
a body part near a moving part or wear loose
clothing while using the vehicle. Always wear
shoes when using vehicle.
• Use on flat, smooth paved surfaces only.
• Using the vehicle on or near streets, motor
vehicle, drop-offs such as: steps, water
(swimming pools), sloped surfaces, hills, wet
areas, flammable vapors, in alleys, at night or in
the dark could result in an accident.
• Do not use the vehicle in unsafe conditions such
as snow, rain, loose dirt, mud sand or ne gravel.
This may result in unexpected action such as tip
over and skidding.
• Models with no brakes: Motor friction will
gradually stop the unit.
• Do not use the vehicle in an unsafe manner.
Examples include but are not limited to:
• Pulling the vehicle with another vehicle or
similar device.
• Allowing more than one rider.
• Pushing the vehicle.
• Traveling at an unsafe speed.
• There are additional hazards of using the vehicle
in areas other than private grounds.
• Not to be used in traffic.
• The vehicle shall be used with caution since skill
is required to avoid falls or collisions.
• Do not overload the vehicle.
• Do not tow anything behind the vehicle.
• Do not drive up steep slopes.
• Do not drive into xed objects, which may
cause the wheels to spin, causing the motor to
overheat.
• Do not drive in very hot weather, components
may overheat.
• Do not allow water or other liquids to come
in contact with the battery or other electric
components.
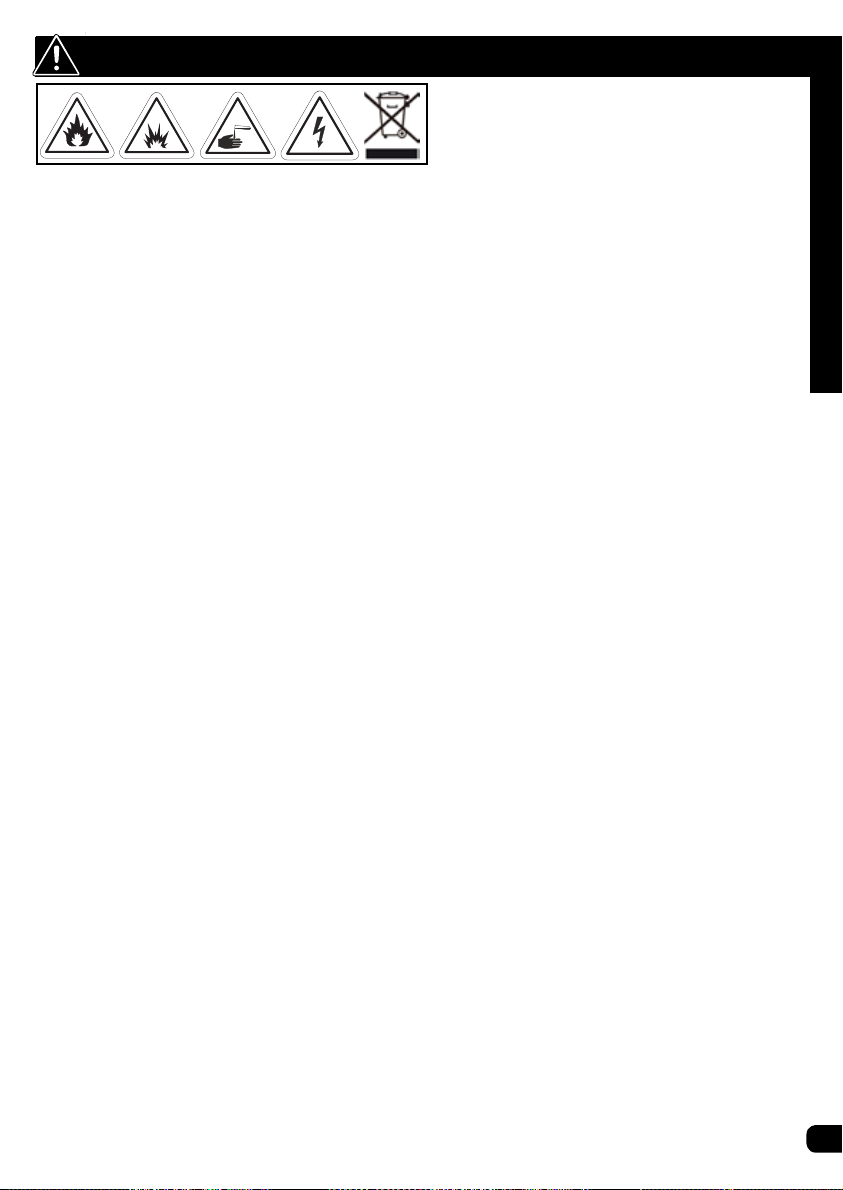
• Do not tamper with the electrical system. Doing
so may create a short, causing the fuse to trip or
other damage including re.
• Do not stand on or in vehicle while moving.
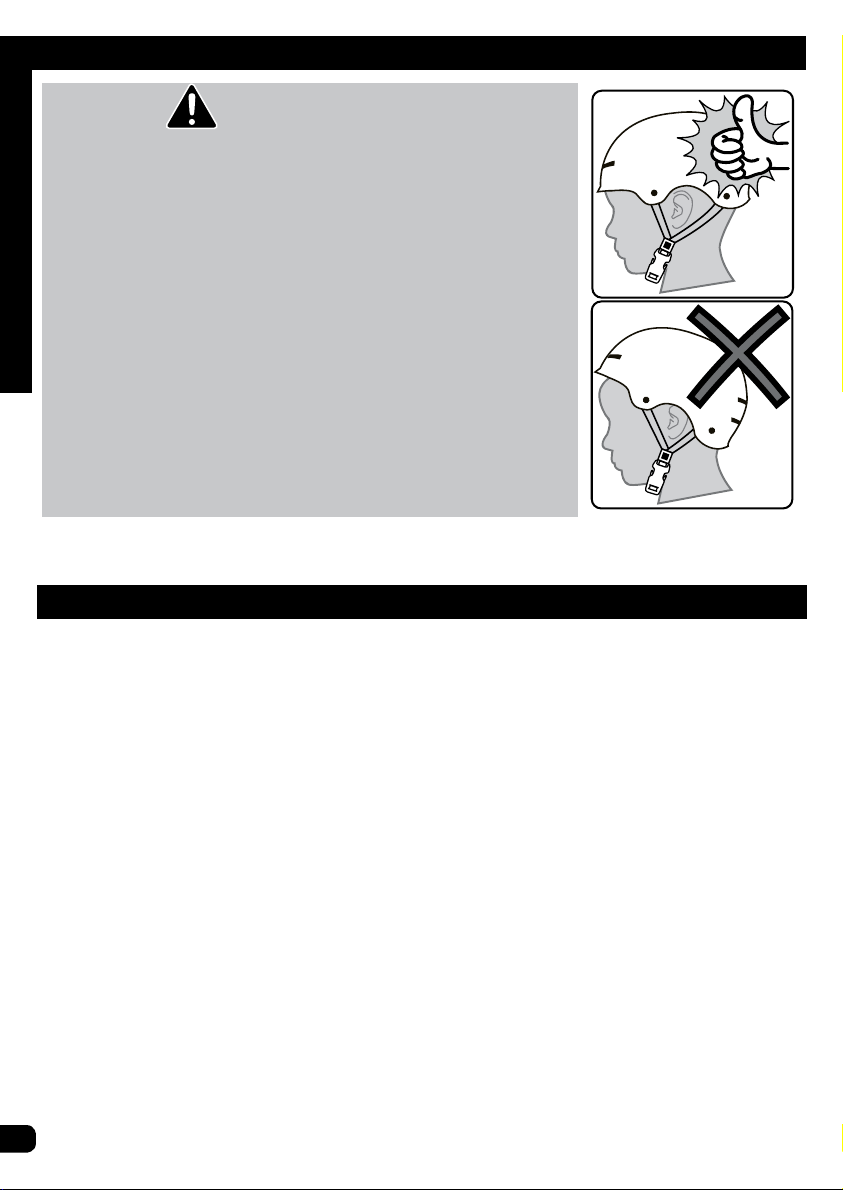
• Child should always wear an approved helmet
when using this product.
• If equipped, child should always use properly
and securely attached Seat Belt.
• Only use authorised replacement parts.
• Operators shall adhere to all recommendations
and instructions as well as comply with all laws
and ordinances.
WARNINGS
Here are basic, common sense safe riding practices you should read aloud to your child
and anyone who may use the vehicle.
It is the responsibility of the adult to educate the child, determine if they are t to
operate the vehicle, and supervise use.
Safety & Warnings

4
Helmet Warning Information
WARNING:
ALWAYS WEAR YOUR HELMET
WHEN RIDING THIS PRODUCT!
• Helmet should sit level on your head and low on your fore-
head. Exposed forehead can result in serious injury.
• Adjust the strap sliders below the ear on both sides.
• Buckle the chin strap. Adjust strap until it is snug.
• No more than two ngers should t between the strap and
your chin.
• A proper tting helmet should be comfortable and not rock
forward/backward or side to side.
Safety & Warnings
CAUTION: Changes or modications to
this unit not expressly approved by the party
responsible for compliance could void the
user’s authority to operate the equipment.
This device complies with Part 15 of the FCC
Rules. Operation is subject to the following
two conditions:
(1) this device may not cause harmful
interference, and (2) this device must
accept any interference received, including
interference that may cause undesired
operation.
NOTE: This equipment has been tested and
found to comply with the limits for a Class B
digital device, pursuant to Part 15 of the FCC
Rules. These limits are designed to provide
reasonable protection against harmful
interference in a residential installation. This
equipment generates, uses and can radiate
radio frequency energy and, if not installed
and used in accordance with the instructions,
may cause harmful interference to radio
communications.
However, there is no guarantee that
interference will not occur in a particular
installation. If this equipment does cause
harmful interference to radio or television
reception, which can be determined by
turning the equipment off and on, the user is
encouraged to try to correct the interference
by one or more of the following measures:
• Reorient or relocate the receiving antenna.
• Increase the separation between the equip-
ment and receiver.
• Connect the equipment into an outlet on
a circuit different from that to which the
receiver is connected.
• Consult the dealer or an experienced radio/
TV technician for help.
Radio Frequency Information (charger/adapter/controller)

5
Helmet Warning Information
WARNING:
ALWAYS WEAR YOUR HELMET
WHEN RIDING THIS PRODUCT!
• Helmet should sit level on your head and low on your fore-
head. Exposed forehead can result in serious injury.
• Adjust the strap sliders below the ear on both sides.
• Buckle the chin strap. Adjust strap until it is snug.
• No more than two ngers should t between the strap and
your chin.
• A proper tting helmet should be comfortable and not rock
forward/backward or side to side.
BATTERY & CHARGER WARNINGS:
The following safety hazards may result in
serious injury or death to the user of the
vehicle:
• Battery Charger for Indoor use only.
• Use of a battery or charger other than the supplied rechargeable battery and charger
may cause a re or explosion. Only use the supplied rechargeable battery (or lead-acid or
lithium suitable replacement) and charger with the vehicle.
• Using the rechargeable battery and charger for any other product may result in over-
heating, re or explosion. Never use the rechargeable battery and charger with another
product.
• Explosive gases are created during charging. Charge the battery in a well ventilated area.
Do not charge the battery near heat or flammable materials.
• Contact between the positive and negative terminals may result in re or explosion. Avoid
direct contact between the terminals. Picking up the battery by the wires or charger can
cause damage to the battery and may result in a re. Always pick up the battery by its case
or handles.
• Battery must be handled by adults only. Liquids on the battery may cause re or electric
shock. Always keep all liquids away from the battery and keep the battery dry.
• Contact or exposure to battery leakage (lead acid) may cause serious injury. If contact or
exposure occurs immediately call your physician. If the chemical is on the skin or in the
eyes, flush with cool water for 15 minutes. If the chemical was swallowed, immediately
give the person water or milk. Do not give water or milk if the patient is vomiting or has
a decreased level of alertness. Do not induce vomiting.
• Battery Posts, terminals and related accessories contain lead and lead compounds (acid),
chemicals known to cause cancer, reproductive harm and are toxic and corrosive. Never
open the battery.
• Tampering or modifying the electric circuit system may case a shock, re or explosion and
permanently damage the system. Exposed wiring and circuitry in the charger may cause
electric shock. Always keep the charger housing closed.
• Non-rechargeable batteries are not to be recharged
• Batteries are to be inserted with the correct polarity
• The supply terminals are not to be short-circuited
• Batteries are only to be charged by adults
• The battery chargers used with the toy are to be regularly examined for damage to the
cord, plug, enclosure and other parts, and in the event of such damage, they must not be
used until the damage has been repaired.
Safety & Warnings

6
Assembly
Parts View
Parts View
12 3 4
12
17 16
6
21
7
9
8
5
10
13 14
15
19
11
18
20

7
Parts List
Parts List
# Description # Description
1 Horse 12 Steering Wheel
2 Head Piece 13 Power and Directional Switches with
Panel
3 Harness 14 Foot Pedal and Switch
4 Harness Brackets pair 15 Battery Bracket
5 Harness sub Frame 16 Seat
6 Harness Bolts (x4) 17 Seat Locking Pin
7 Storage Door with snap 18 Door Hinges
8Axle Washers (x4) 19 Drive Battery
9Front Wheels (x2) 20 Battery Charger
10 Rear Wheels (x2) Not Shown: Charger Port
11 Motor with Gearbox 21 Caster Wheels (x3)
Tools Needed
Screwdriver Set

8
Assembly
Installing the Rear Wheels:
STEPS TURN UNIT UP SIDE DOWN:
NOTE: The Rear Wheels are the two larger wheels with Gears H.
1. NOTE: Axle and Motor may be pre-installed at factory - Ensure Washers are in position
before assembly.
2. If UN-assembled: Position Motor Aso that the Axle Bts fully through from the right
side.
3. Ensure Washer Cis fully against Car Body.
4. Ensure second Washer Dis fully against Axle Stop (as shown).
5. Insert one larger Rear Wheel Efully onto Axle until it SNAPS locked into place. If
needed, push Lock Button Fwhen installing.
6. Install Drive Wheel Gonto axle so that Gears Hline up.
7. Push Drive Wheel fully into Motor Auntil it SNAPS locked into place. If needed, push
Lock Button Fwhen installing.
WARNING:Gently pull outward on wheels to ensure they are locked into
position.
CB A
H
G D E
F

9
Assembly
Install the Front Wheels:
STEPS TURN UNIT UP SIDE DOWN:
NOTE: The Front Wheels are the two smaller wheels.
1. Ensure Washers Aare in place on Axles as shown.
2. Install each Wheel Bfully onto Axle until it SNAPS into place. If needed, push Lock
Button Cwhen installing.
3. Repeat for opposite side.
WARNING:Gently pull outward on wheels to ensure they are locked into
position.
AB A B
C

10
Assembly
Install Steering Wheel:
STEPS:
1. Position Steering Wheel Aover Locking Tabs Band pointing FORWARD.
2. Connect Power Plugs Crmly and completely. - Tuck plug and excess wire into car
body and steering wheel.
3. Press Steering wheel down over Locking Tabs Buntil Lock Buttons DSNAP locked.
WARNING: Gently pull upward on Steering Wheel and turn side to side to
ensure it is locked into position.
D
A
B
C

11
Assembly
Connect Battery and Install Seat:
A
B
B
D
C
STEPS:
1. If in place, remove Seat by turning Lock Knob
Acounter-clockwise.
2. Lift front edge of Seat UP and move forward to
release Seat back from Slots B.
3. Connect Power Plugs Crmly and
completely.
4. Install Seat by tilting back and inserting Tabs
Dinto Slots B.
5. Put front edge of Seat down and Lock into
place by turning Lock Knob Aclockwise. Do
not over-tighten - this can damage Lock.

12
Assembly
Attaching Horse:
B
C
A
C
D
2
1
B

13
Assembly
Attaching Horse:
STEPS:
VIEW 1
1. Unfold Harness Assembly Aas shown.
VIEW 2
2. Position Horse in front of Carriage so that Harness Ends Cline up with Body/Harness
Mounts B.
3. SNAP each Harness End rmly in place.
NOTE: All Caster Wheels Dmay not sit on the ground evenly. This is normal.
WARNING:
• Do Not sit or ride on horse.
• Do Not place objects or dolls on horse.
• Do Not run over curbs or other objects with horse.
• Do Not drive into grass with horse.
• Only use on hard surfaces.
See other warnings at beginning of this manual.
NOTE: Turn unit on each side for easier Harness Installation.
Caution!
Doors swing UP to open!
Operating Doors:

14
IMPORTANT! Before using the unit for the rst time the battery needs to
be charged for at least 8to 12 hours - no more than 20 hours. Once battery
is depleted, recharge for 8to 12 hours - no more than 20 hours.
Charging the Drive Battery:
IMPORTANT!
Check the drive battery and charger (supply
cord, connector) for wear and damage
before charging. Do not charge the battery if
damage has occurred. Only replace with the
same type and voltage rechargeable battery
and charger supplied by the manufacturer.
• Only use the rechargeable battery (or
equivalent replacement) and charger sup-
plied with your vehicle.
• Always turn power off and charge battery
after riding.
• The drive battery should be charged when
depleted, or if not used regularly, once a
month. Failure to charge the battery as
directed will cause permanent damage to
the battery and will void the warranty.
STEPS:
1. Turn power switch OFF.
2. Locate Charging Port A.
3. Plug Charger plug into unit Charging
Port.
4. Plug Charger into Wall outlet B.
5. When battery is fully charged, un-
plug charger from the wall outlet and
disconnect from charger port.
NOTE: The charger may feel warm during
the charging. If excessively hot, unplug and
replace.
NOTE: This product has charging protection:
When charging, all functions are turned OFF.
Operation
AB

15
IMPORTANT! Before using the unit for the rst time the battery needs to
be charged for at least 8to 12 hours - no more than 20 hours. Once battery
is depleted, recharge for 8to 12 hours - no more than 20 hours.
Charging the Drive Battery:
IMPORTANT!
Check the drive battery and charger (supply
cord, connector) for wear and damage
before charging. Do not charge the battery if
damage has occurred. Only replace with the
same type and voltage rechargeable battery
and charger supplied by the manufacturer.
• Only use the rechargeable battery (or
equivalent replacement) and charger sup-
plied with your vehicle.
• Always turn power off and charge battery
after riding.
• The drive battery should be charged when
depleted, or if not used regularly, once a
month. Failure to charge the battery as
directed will cause permanent damage to
the battery and will void the warranty.
STEPS:
1. Turn power switch OFF.
2. Locate Charging Port A.
3. Plug Charger plug into unit Charging
Port.
4. Plug Charger into Wall outlet B.
5. When battery is fully charged, un-
plug charger from the wall outlet and
disconnect from charger port.
NOTE: The charger may feel warm during
the charging. If excessively hot, unplug and
replace.
NOTE: This product has charging protection:
When charging, all functions are turned OFF.
Operation / Maintenance
Operation:
Maintenance Repair and Service
GENERAL: The vehicle should be checked
for damage, missing or badly worn parts
before each use. If any part of the product
does not operate properly – discontinue use.
• Check the tightness of the fasteners before
each use. Replace any fasteners that are dam-
aged.
• Inspect the product frequently. Failure to in-
spect the product and to make repairs or ad-
justments, as necessary, can result in injury to
the rider or to others. Make sure all parts are
correctly assembled and adjusted as written
in this manual and any“Special Instructions”.
• Immediately replace any damaged, missing,
or badly worn parts.
• Make sure all fasteners are correctly tightened
as written in this manual and any“Special
Instructions”. Parts that are not tight enough
can be lost or operate poorly. Over tight-
ened parts can be damaged. Make sure any
replacement fasteners are the correct size and
type.
• Check the tightness of the wheels:
NOTE: If the drive wheel is not tight, it will not
engage the gears and the vehicle will not run.
• Ensure the battery bracket is securely in place
before use.
• Store the vehicle indoors. Keep it away from
sources of heat, such as stoves and heaters.
• Keep the product clean and free of dirt, dust
and water. This will prolong the useful life of
the product.
• Clean the vehicle with a soft, dry cloth. To
restore shine to plastic parts, use a non-wax
furniture polish. Do not use automotive wax,
abrasive cleaners or wash the vehicle with
soap and water.
NOTE: If the instructions in this manual or
any “Special Instructions” are not sufficient
for you, please contact customer service.
CAUTION: Self-locking nuts and other self-
locking devices may lose their effectiveness
when re-used.
Battery Storage and Disposal
The drive battery should be charged when
depleted, or if not used regularly, once a
month. Failure to charge the battery as
directed will cause permanent damage to the
battery and will void the warranty.
Follow these guidelines if the battery is
removed:
• Do not store battery in extreme hot or cold
temperatures.
• Wipe the battery clean with a dry cloth prior
to storage. Wash cloth separate from other
clothes.
BATTERY DISPOSAL:
• The sealed lead-acid battery must be recycled
or disposed of in an environmentally sound
manner.
• Do not dispose of battery in a re. The bat-
tery may explode or leak acid.
• Do not dispose of the battery in household
trash. The incineration, land lling or mixing
of sealed lead-acid batteries with household
trash is prohibited by law.
• Return an exhausted battery to a federal or
state approved lead-acid battery recycler,
such as a local seller of automotive batteries
(check local battery disposal regulations).
B
A
C
D
• Press Power Button Ato
turn on unit.
• Push Forward / Reverse
Switch Bto chose direc-
tion.
• Press Foot Switch Cto
move vehicle in desired
direction.
• Press Steering Wheel
Switch Dfor sound and/
or light features.

16
FOLLOW THESE STEPS IF THE BATTERY
NEEDS TO BE REPLACED:
1. Remove the Screws and Deck/Seat A.
2. Remove Hold-down Bracket and Screws
B.
3. Carefully lift the Battery C.
• Depending on the condition of the
battery (i.e.: leakage) you may want to
wear protective rubber gloves before
removal.
• Do not lift the battery by its connectors
or cables.
4. Disconnect the battery connectors D.
(Remove Battery Cover if installed.)
5. Place the dead battery in a plastic bag.
NOTE: Replacement batteries are available
at most battery supply stores. Document
battery size and type (found on battery).
6. Install replacement battery and reconnect the connectors - Red to Red and Black to
Black D.
7. Reinstall Hold-down Bracket B, Deck/Seat and Screws securely.
Drive Battery Replacement
Battery Storage and Disposal
The drive battery should be charged when
depleted, or if not used regularly, once a
month. Failure to charge the battery as
directed will cause permanent damage to the
battery and will void the warranty.
Follow these guidelines if the battery is
removed:
• Do not store battery in extreme hot or cold
temperatures.
• Wipe the battery clean with a dry cloth prior
to storage. Wash cloth separate from other
clothes.
BATTERY DISPOSAL:
• The sealed Li-ion/lead-acid battery must be
recycled or disposed of in an environmentally
sound manner.
• Do not dispose of battery in a re. The bat-
tery may explode or leak acid.
• Do not dispose of the battery in household
trash. The incineration, land lling or mixing
of sealed Li-ion/lead-acid batteries with
household trash is prohibited by law.
• Return an exhausted battery to a federal
or state approved Li-ion/lead-acid battery
recycler, such as a local seller of automotive
batteries (check local battery disposal
regulations).
Maintenance
FOLLOW THESE STEPS IF THE BATTERY
NEEDS TO BE REPLACED:
1. Remove Seat A.
2. Remove Battery Compartment Cover B
and screws.
3. Disconnect the battery connectors C.
4. Remove Hold-down Bracket and Screws D.
5. Carefully lift the Battery E.
• Depending on the condition of the battery
(i.e.: leakage) you may want to wear
protective rubber gloves before removal.
• Do not lift the battery by its connectors or
cables.
6. Place the dead battery in a plastic bag.
NOTE: Replacement batteries are available at
most battery supply stores. Document battery
size and type (found on battery).
7. Install replacement battery and reinstall Hold-down Bracket and Screws D.
8. Reconnect the Connectors - Red to Red and Black to Black C.
9. Re-install Battery Compartment Cover Band screws.
10. Re-Install Seat by tilting back and inserting Tabs into back Slots.
11. Put front edge of Seat down and Lock into place by turning Lock Knob clockwise. Do
not over-tighten - this can damage Lock..
Drive Battery Replacement
B
A
D
E
C

17
Troubleshooting
Troubleshooting Guide
Problem Possible Cause Solution
Vehicle does not
run when switch is
activated
Battery wires not connected
or are loose
Connect battery wires according to
assembly instructions,
Check that the battery connectors are rmly
plugged into each other. If wires are loose
around the motor call Customer Service.
Battery low on power Recharge battery (see Battery: Recharge
interval and time)
Battery Charger still plugged
in
Unplug Battery Charger from unit and wall
Thermal fuse has tripped Let Fuse reset
Battery is dead Replace battery (see Battery: Replacement
and Disposal)
Electrical system or motor is
damaged
Call Customer Service.
Vehicle does not run
very long or runs slug-
gishly
Battery is undercharged. Check that the battery connectors are rmly
plugged into each other when recharging
(see Battery: Recharge interval and Time)
Battery is old and cannot be
fully charged
Replace battery (see Battery: Replacement
and Disposal)
Vehicle is overloaded Reduce weight on vehicle (see user require-
ments and Safety Warnings)
Vehicle is being used in
harsh conditions
Avoid using vehicle in harsh conditions (see
User Requirements and Safety Warnings)
Vehicle makes loud
noise when in use
Chain is dry (on chain drive
models)
Lubricate chain with light oil.
Loud grinding or
clicking noises coming
from motor or gear
box
Motor or gears are damaged Call Customer Service.
Drive Wheel is partially
engaged
Check drive wheel - to motor engagement.
Battery will not
recharge
Battery connector or
adapter connector is loose
Check that the battery connectors are
rmly plugged into each other.
Charger is not working Check that the battery charger is plugged
into a working wall outlet.
Battery is dead Replace battery.
Charger feels warm
when recharging
This is normal and not a
cause for concern
If excessively hot, unplug and replace.
The following are examples of potential problems. Completely read through this manual and
the troubleshooting guide table before calling. If you still need help resolving the problem
please contact Customer Service.
NOTE: Vehicle should be turned off and fully changed before doing troubleshooting.

18
Troubleshooting
BEFORE YOU CALL SUPPORT:
1. What is the model and date code?
2. When was the product purchased?
3. Has the product ever worked for a time or has never worked at all since purchase?
• Yes, When did the product last operate correctly?
• No, were the battery wires connected?
4. How long was the battery charged?
5. Is the charger plugged into the unit when you try to operate the product?
• (The unit will not operate with charger plugged in)
6. Do any lights or sounds come on when you power the product on?
• Yes, Does the lights and sounds go away when you press the drive switch?
7. When you press the drive switch, does an electric motor start?
• Yes, Did you check that the correct drive wheel was installed?
• Yes, Does the insert in the gearbox rotate?
Troubleshooting Guide - continued

19
Warranty
Limited Warranty - US
General:
Part or model specications are subject to change
without notice.
This Limited Warranty is the only warranty for the
product. ALL WARRANTIES OTHER THAN STATED
HEREIN ARE DISCLAIMED INCLUDING IMPLIED
WARRANTIES OF MERCHANTABILITY AND
FITNESS FOR A PARTICULAR PURPOSE, TO THE
EXTENT ALLOWABLE BY APPLICABLE LAW. ALL
LIABILITY FOR INCIDENTAL, PUNITIVE, SPECIAL,
OR CONSEQUENTIAL DAMAGES ARE EXPRESSLY
DISCLAIMED, TO THE EXTENT ALLOWABLE BY
APPLICABLE LAW.
The only uses for this product are described in this
manual.
Warranty registration is not required.
The Limited Warranty extends only to the original
consumer and is not transferable to anyone else.
What does this Limited Warranty cover?
This Limited Warranty covers defects in
workmanship and materials for all parts of the
product except those indicated below as not
warranted.
What must you do to keep the Limited
Warranty in eect?
This Limited Warranty is effective only if:
• Product is completely and correctly assembled.
• Product is used under normal conditions for its
intended purpose (see the following section for
excluded activities).
• Product receives all necessary maintenance and
adjustments.
• Product is used for general transportation and
recreational use only.
What is not covered by this Limited
Warranty?
This product is designed for recreational use only.
This Limited Warranty does not cover normal
wear and tear, normal maintenance items, or any
damage, failure, or loss that is caused by improper
assembly, maintenance, adjustment, storage, or
use of the product. This Limited Warranty does not
extend to future performance.
This Limited Warranty will be void if the
product is ever:
• Used in any competitive sport
• Used for stunt riding, jumping, aerobatics or
similar activity
• Modied in any way
• Modied with the addition of a motor
• Ridden by more than one person at a time
• Rented, sold, or given away
• Used in a manner contrary to the instructions
and warnings in this Owner’s Manual
What will The Manufacturer do?
Manufacturer’s sole and exclusive obligation
under this Limited Warranty is to repair and/or
replace, at its sole option, any covered defect in
workmanship or materials.
How do you get service?
Contact the Customer Service Department.
• See included list for Customer Contact informa-
tion.
What rights do you have?
This Limited Warranty gives you specic legal
rights. You may also have other rights which vary
from State to State.
For how long does this Limited Warranty
last?
• When used in this Limited Warranty, the phrase
“for life” means for as long as the original con-
sumer owns the product.
• Drive Battery - 30 days
• Electronics - 90 days
• All other Components - 6 months
• All parts are subject to the Conditions of
Warranty

[ In the US and Canada]
PLEASE
BEFORE RETURNING TO STORE:
Contact Huff y Customer Service.
We are glad to assist you with any parts or
assembly problems you might have!
~
VEUILLEZ NOTER : AVANT DE
RETOURNER AU MAGASIN :
Communiquez avec le service à la
clientèle de Huff y. Nous vous aiderons
volontiers avec tout problème concernant les
pièces ou le montage!
For Fast Customer Service:
Pour un Service à la clientèle rapide :
www.huff ybikes.com/contact
To Order Parts (US):
Pour obtenir des pièces (CANADA) :
www.huff ybikes.com/parts
OR TEL: 1 800 872 2453 (US)
OU appelez le 1 800 872 2453 (CANADA)
For e-mail: www.huff ybikes.com/contact
Pour communiquer par courriel : huff ycanada@huff y.com
[ MÉXICO ]
ANTES DE DEVOLVER EL
PRODUCTO A LA TIENDA:
Comuníquese Con Servicio
Al Cliente De Huff y. Nos
Complace Ayudarlo Con Cualquier
Parte O Problema De Ensamblado
Que Pudiera Tener.
Para obtener Servicio al cliente
rápido, visite:
www.huff ybikes.com/
O LLAME AL TEL: 01800 1483 391
(Mexico only)
Para comunicarse por correo electrónico:
servicio.mexico@huff y.com
www.huff ybikes.com/home/globalcontact/
for current contact information / para obtener la información de contacto actual /
pour les informations de contact actuelles
Table of contents
Other Huffy Motorized Toy Car manuals
Popular Motorized Toy Car manuals by other brands

Horizon Hobby
Horizon Hobby TLR 22 5.0 DC manual

Jamara
Jamara Ultra BL 8 2,4 GHz Instruction

Jamara
Jamara 405148 Instruction

Associated Electrics
Associated Electrics Element RC Enduro Bushido RTR Owners build manual

Supertrax
Supertrax UTV SCREEMER Assembly and operation instructions

Terrasect
Terrasect US858320 instruction manual