Huffy FLIP SCOOTER User manual

© Copyright Huffy Corporation 2021
Date Code Label
Here
This manual contains important safety, assembly, operation
and maintenance information.
Please read and fully understand this manual before
operation.
Save this manual for future reference.
Always wear approved helmet and safety equipment when
using this product.
See back page for Customer Service Information
EN
H-FlipScoot EN 03-23-21 m0429
FLIP SCOOTER
OWNER’S MANUAL

Index
• Safety Information ......................................................3-4
• Parts List .................................................................5
• Assembly ...............................................................6-7
• Operating the Scooter...................................................8-9
• Maintenance.............................................................10
• Warranty.................................................................11
Contact Information .................................................. Back Cover
SCOOTER MANUAL INFORMATION
Tools Needed
Allen Wrench (supplied)
WARNINGS:
• CHOKING HAZARD: Small parts, adult assembly required.
• To reduce the risk of injury, adult supervision is required. Not suitable for children under 3
years. The user must be 5+ years, and weigh no more than 100lbs (45kgs).
• Avoid sharp bumps, drainage grates, and sudden surface changes. Scooter may suddenly
stop.
• Avoid excessive speed associated with downhill rides.
• Watch out for pedestrians.
• Check and secure all fasteners before every ride.

3
Safety and Warning Information
This product, like all wheeled vehicles, will provide safe, enjoyable transportation and
recreation when used and maintained properly. Like bicycling, skateboarding, and in-line
skating, riding this product can be dangerous even under the best of circumstances. We
do not want you to get hurt. Please follow these safety rules. Keep children away during
assembly.
This symbol is important. It is the WARNING symbol. The warning symbol precedes
safety instructions. Make sure the child understands these instructions. Failure to follow
these instructions may result in injury to the rider or to others, or damage to the product.
WARNING TO AVOID SERIOUS INJURY:
• Adult assembly required. An adult must unfold and fold this product (as equipped).
Continuous adult supervision required. Do Not modify the product.
• CHOKING HAZARD: Not suitable for children under 3 years. Contains small parts.
• Keep small loose parts and plastic bags out of the reach of children.
• Not suitable for children under 3 years as foam pieces may break off and pose a choking
hazard. Keep small children away when assembling.
• Never use near motor vehicles.
• Never ride with more than one person. Excessive weight may cause a hazardous or
unstable condition.
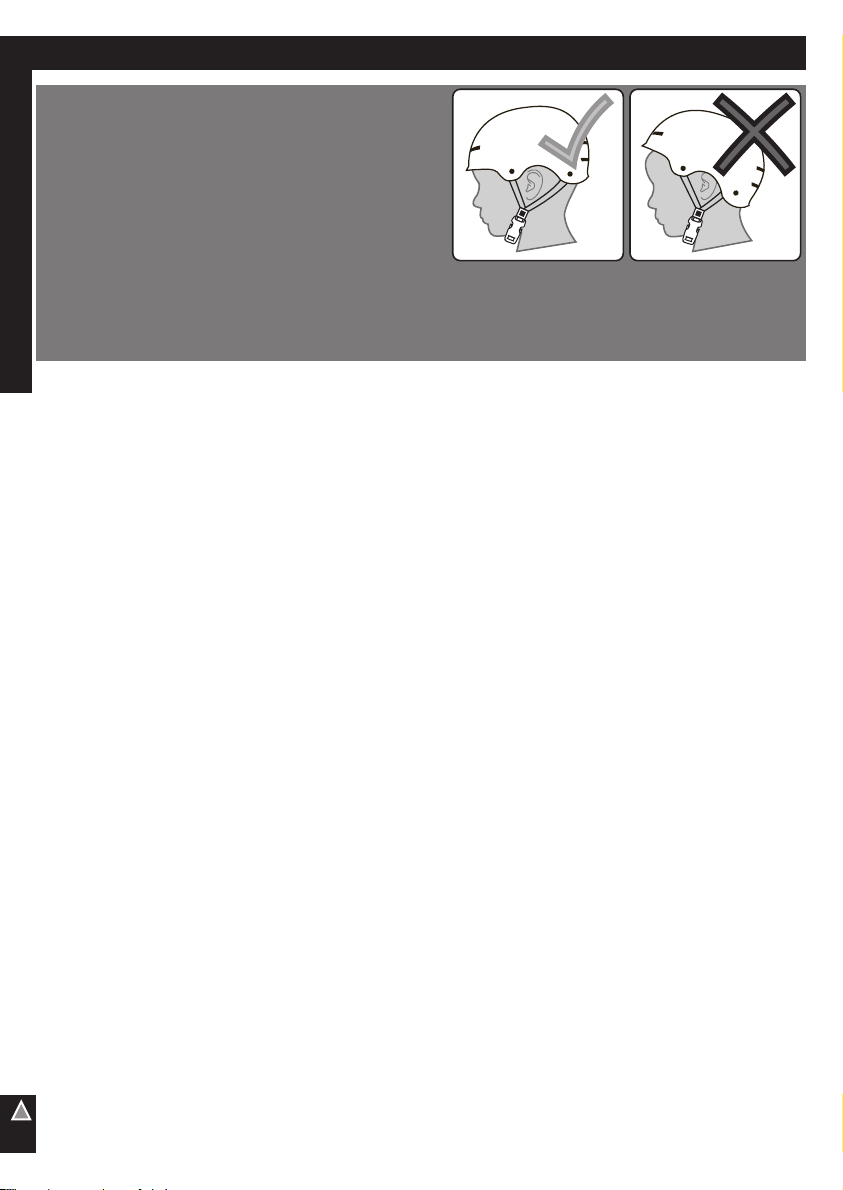
• Protective Equipment must be worn: Always wear safety equipment such as a helmet
that meets CPSC (or equivalent standard for your country) with chinstrap securely fas-
tened, knee pads, elbow pads, wrist guards, gloves and shoes.
• Do not use in traffic.
• Do not allow a child to ride the product at dusk, at night or at times of limited visibility.
• Do not allow a child to ride on roadways or alleys.
• Do not allow a child to ride off road, on grass or wet surfaces.
• Never use near streets, swimming pools (or other bodies of water), hills, steps, or sloped
driveways.
• For use on smooth paved surfaces only.
• Understand all operating procedures before use.
• Do not tow or pull any objects with the product.
• Do not push or pull a child riding on the product.
• Use with caution, since skill is required to avoid falls or collisions causing injury to the user
or third parties.
• Always comply with local laws and regulations.
• If anything does not operate properly, discontinue use.
• Replace worn or broken parts immediately with genuine replacement parts.
• Handlebar hand grip or tube end plugs should be replaced if damaged as bare tubes have
been known to cause injury. All products with capped handlebar ends should be checked
regularly to ensure that adequate protection for the ends of the handlebars are in place.
• Self-locking nuts and other self-locking xings may lose their effectiveness when re-used.
• The toy shall be used with caution, since it requires great skill, so as to avoid falls or colli-
sions causing injury to the user and third parties.
• Ensure all locking devices are engaged before each ride.
Warnings and Safety

4
Helmet Warning Information
ALWAYS WEAR
YOUR HELMET
WHEN RIDING THIS
PRODUCT!
Always read the user manual that comes with your helmet to make sure it is tted and
attached properly to the wearer’s head according to the tting instructions described in the
user manual.
Warnings and Safety

5
# Description # Description
1Front Wheel 8Grips (x2)
2Front Wheel Axle Hardware 9Steering Tube
3Fork 10 Steering Tube Clamp
4Top and Bottom Fork Bushings 11 Deck
5Fork Headset Nut 12 Fender/Brake
6Handlebars (x2) 13 Rear Wheel
7Handlebar Clip
9
1
2
4
3
5
10
11 12 13
8
7
6
Parts Assembly
Parts Assembly

6
Assembly Instructions: Assembly Level may vary
Assembly
F
BI
H
A
J
G
G
C
D
E
K
B
L
L
M
NOTES:
• Clamp Amay be
pre installed from
factory on Handlebar
Post Band may
need to be loosened
before assembly.
• Fork Tube Bushings
(C, D) may be
pre installed from
factory. If not,
remove them from
the Fork Tube F
before assembly.
1. Insert Short
Bushing Cinto
top of Frame Tube
E.
2. Insert Tall Bushing
Dinto bottom of
Frame Tube E.
3. Insert Fork Tube
Fthough Frame Tube as shown.
4. Install Head Set Nut Gfully onto Fork Tube
Threads Hhand tight.
• Ensure Fork Assembly turns easily and is
facing forward as shown.
5. Place Clamp Aonto Handlebar Post Bso
that Clamp is even with bottom of Handlebar
Post and Slot Iis facing backward.
6. With Fork Assembly Ffacing forward, Slide
Handlebar and Clamp fully onto Fork Tube
Threads Huntil they are fully seated against
the Head Set Nut G.
7. With Clamp facing backwards, tighten Screws
Jevenly and securely so that the Handlebar
does not move.
8. Insert the Hand Grip Posts Kinto the
Handlebar Post B.
9. Ensure the lock buttons Lon each Hand
Grip Post are fully engaged with the Locking
Hole Stops Min each side of the Handlebar
Post.

7
Handlebar Bags/Pads (not all models):
• Attach Handlebar Pad A(if equipped) to Handlebar by opening and placing straight
down over handlebar and using Hook & Loop Straps to secure. Fasten securely.
• Attached Handlebar Bag B(if equipped) by securing bag straps around Handlebar/
Bag. Fasten securely.
WARNING: Bag Weight Limit: 5 lbs (2.3 kgs)
A
B
Assembly

8
Flipping the Scooter Deck and Brake:
Loosen
Tighten
1
2
3
4
See instructions Next Page
Operation

9
Operating the Scooter:
Flipping the Scooter Deck and Brake continued:
RIDING: The scooter is operated by placing
one foot on the deck and pushing with the
other foot.
STEERING: Steering is accomplished by
turning the handlebar while leaning slightly
into the turn.
BRAKING: With both feet on the deck, use
the heel of one foot to press down on Rear
Fender to stop Scooter. The secondary stop
method is to use the foot used to propel the
scooter to stop the scooter.
WARNING:
• Always wear shoes when riding the scooter.
• Brake will get hot from continuous use. Do not touch after braking.
STEP 1:
• Loosen Thumb Wheel until Deck turns easily.
STEP 2:
• Rotate Deck 180°
STEP 3:
• Tighten Thumb Wheel (hand tight) until Deck locks solidly and is level.
• NOTE: Wiggle Deck slightly as you tighten the Thumb Wheel.
STEP 4:
• Press IN Fender/Brake Lock Button and rotate Fender until it locks in the UP position for
riding and braking.
WARNING:
• Failure to tighten Deck securely can result in serious injury to child.
Operation

10
Maintenance and Service
WARNING:
• Inspect the product frequently. Failure to inspect the product and to make repairs or
adjustments, as necessary, can result in injury to the rider or to others. Make sure all
parts are correctly assembled and adjusted as written in this manual and any “Special
Instructions”.
• Immediately replace any damaged, missing, or badly worn parts with original
equipment.
• Make sure all fasteners are correctly tightened as written in this manual and any
“Special Instructions”. Parts that are not tight enough can be lost or operate poorly. Over
tightened parts can be damaged. Make sure any replacement fasteners are the correct
size and type.
• Self-locking nuts and other self-locking fasteners may lose their effectiveness when re-
used.
NOTE: Have a bicycle service shop make any repairs or adjustments for which you do not
have the correct tools or if the instructions in this manual or any “Special Instructions” are not
sufficient for you.
Maintenance

11
Limited Warranty
General:
Part or model specications are subject to change
without notice.
This Limited Warranty is the only warranty for the
product. ALL WARRANTIES OTHER THAN STATED
HEREIN ARE DISCLAIMED INCLUDING IMPLIED
WARRANTIES OF MERCHANTABILITY AND
FITNESS FOR A PARTICULAR PURPOSE, TO THE
EXTENT ALLOWABLE BY APPLICABLE LAW. ALL
LIABILITY FOR INCIDENTAL, PUNITIVE, SPECIAL,
OR CONSEQUENTIAL DAMAGES ARE EXPRESSLY
DISCLAIMED, TO THE EXTENT ALLOWABLE BY
APPLICABLE LAW.
The only uses for this product are described in this
manual.
Warranty registration is not required.
The Limited Warranty extends only to the original
consumer and is not transferable to anyone else.
What does this Limited Warranty cover?
This Limited Warranty covers defects in
workmanship and materials for all parts of the
product except those indicated below as not
warranted.
What must you do to keep the Limited
Warranty in eect?
This Limited Warranty is eective only if:
• Product is completely and correctly assembled.
• Product is used under normal conditions for its
intended purpose (see the following section for
excluded activities).
• Product receives all necessary maintenance and
adjustments.
• Product is used for general transportation and
recreational use only.
What is not covered by this Limited
Warranty?
This product is designed for recreational use only.
This Limited Warranty does not cover normal
wear and tear, normal maintenance items, or any
damage, failure, or loss that is caused by improper
assembly, maintenance, adjustment, storage, or
use of the product. This Limited Warranty does not
extend to future performance.
This Limited Warranty will be void if the
product is ever:
• Used in any competitive sport
• Used for stunt riding, jumping, aerobatics or
similar activity
• Modied in any way
• Modied with the addition of a motor
• Ridden by more than one person at a time
• Rented, sold, or given away
• Used in a manner contrary to the instructions
and warnings in this Owner’s Manual
What will The Manufacturer do?
Manufacturer’s sole and exclusive obligation
under this Limited Warranty is to repair and/or
replace, at its sole option, any covered defect in
workmanship or materials.
How do you get service?
Contact the Customer Service Department.
• See included list for Customer Contact
information.
What rights do you have?
This Limited Warranty gives you specic legal
rights. You may also have other rights which vary
from state to state, region to region.
For how long does this Limited Warranty
last?
• When used in this Limited Warranty, the phrase
“for life” means for as long as the original
consumer owns the product.
All components are warranted for 6 months from
the date of purchase. Electronics and Wheels: 90
days.
Maintenance and Service
WARNING:
• Inspect the product frequently. Failure to inspect the product and to make repairs or
adjustments, as necessary, can result in injury to the rider or to others. Make sure all
parts are correctly assembled and adjusted as written in this manual and any “Special
Instructions”.
• Immediately replace any damaged, missing, or badly worn parts with original
equipment.
• Make sure all fasteners are correctly tightened as written in this manual and any
“Special Instructions”. Parts that are not tight enough can be lost or operate poorly. Over
tightened parts can be damaged. Make sure any replacement fasteners are the correct
size and type.
• Self-locking nuts and other self-locking fasteners may lose their effectiveness when re-
used.
NOTE: Have a bicycle service shop make any repairs or adjustments for which you do not
have the correct tools or if the instructions in this manual or any “Special Instructions” are not
sufficient for you.
Warranty

www.huybikes.com/home/globalcontact/
for current contact information / pour les informations de contact actuelles / para obtener la
información de contacto actual
USA
PLEASE - BEFORE RETURNING TO STORE:
Contact Huy Customer Service.
We are glad to assist you
with any parts or assembly problems you might have!
For Fast Customer Service and email:
www.huybikes.com/contact
To Order Parts:
www.huybikes.com/parts
OR TEL: 1 800 872 2453 (US)
CANADA
PLEASE - BEFORE RETURNING TO STORE:
Contact Huy Customer Service.
We are glad to assist you with any parts or assembly problems you might have!
AVANT DE RETOURNER AU MAGASIN :
Communiquez avec le service à la clientèle de Huy. Nous vous aiderons
volontiers avec tout problème concernant les pièces ou le montage!
For fast customer service in Canada / Pour un service à la clientèle rapide au Canada :
Call / Appelez : 1-800-872-2453
Or Email / Ou Courriel : huffycanada@huffy.com
Or visit / Ou visitez : : www.huffybikes.com/global-contacts
[ MÉXICO ]
ANTES DE DEVOLVER EL PRODUCTO A LA TIENDA:
Comuníquese Con Servicio Al Cliente De Huy. Nos Complace Ayudarlo Con
Cualquier Parte O Problema De Ensamblado Que Pudiera Tener.
Para obtener Servicio al cliente rápido, visite:
www.huybikes.com.mx
Contáctanos por WhatsApp al 222 422 4955
Visita nuestra página de Facebook HuffyMexico
O LLAME AL TEL:
800 1 HUFFY 1 (800 1 48339 1)
(Mexico only)
Para comunicarse por correo electrónico:
servicio.mexico@huffy.com
For ASSEMBLY Help:
Aide à l’ASSEMBLAGE :
Ayuda de la ASAMBLEA:
Please REGISTER your Product:
Veuillez ENREGISTRER l’article :
Por favor, REGISTRE su producto:
Other Huffy Scooter manuals

Huffy
Huffy In-Line User manual

Huffy
Huffy m0381 User manual

Huffy
Huffy Bubble User manual

Huffy
Huffy m0095 User manual

Huffy
Huffy 3 Wheel Scooter User manual

Huffy
Huffy Green Machine User manual

Huffy
Huffy m0199 User manual

Huffy
Huffy H-eScooter User manual

Huffy
Huffy Tilt N Turn User manual

Huffy
Huffy In-Line LED Scooters User manual