HWAM 3740 User manual

Users manual EN
01.11.2020 / 97-9705
www.hwam.com
3740 3760


Table of contents
Drawings ....................................................4-8
HWAM®SmartControlTM ......................................9
Installation...................................................10
Firing manual - wood ..........................................15
Firing in general...............................................18
Maintenance .................................................19
Operational problems..........................................21
Declaration of Performance .....................................22
Product information EcoDesign ..................................23

Page 4 of 20 pages
B. C.
A.
4
3
2
I
45°
I
4
3
I
Page 1 of 9
CAD-0194166
-
Sheet1
A
27-04-2020
nis Frigivet
Frigivet
nis
04-05-2020
B
Comment
Init.
Date
Rev.
Frigivetnis
07-05-2020
C
nis
21-04-2020
DS/EN 22768-m
1:10
A3
Com-Released
Created date:
Format:
Item number:
kg.
Part:
Weight:
Tolerance:
HWAM A/S
Nydamsvej 53-55
DK - 8362 Hørning
Tel. (+45) 86 92 18 33
Fax (+45) 86 92 22 18
Material:
Created by:
Configuration name:
Item:
Status:
Scale:
Drawing number:
Model:
HWAM 3740 manual
Thickness:
mm
4
3
2
I
45°
I
4
3
I
Page 1 of 9
CAD-0194166
-
Sheet1
A
27-04-2020
nis Frigivet
Frigivet
nis
04-05-2020
B
Comment
Init.
Date
Rev.
Frigivetnis
07-05-2020
C
nis
21-04-2020
DS/EN 22768-m
1:10
A3
Com-Released
Created date:
Format:
Item number:
kg.
Part:
Weight:
Tolerance:
HWAM A/S
Nydamsvej 53-55
DK - 8362 Hørning
Tel. (+45) 86 92 18 33
Fax (+45) 86 92 22 18
Material:
Created by:
Configuration name:
Item:
Status:
Scale:
Drawing number:
Model:
HWAM 3740 manual
Thickness:
mm
11
4
2b
15
6
5
8
2a
3
16
17
12
14
13
3
4
9
1
2c
11
4
2b
156
5
8
2a
3
16
17
12
14
13
3
4
9
1
14 14
12
11
15

Page 5 of 20 pages
D1.
D2.

Page 6 of 20 pages
D3.

Page 7 of 20 pages
E.
6
2
1
3
4
5

Page 8 of 20 pages
F.

Page 9 of 20 pages
HWAM® SMArtControl™
Congratulations on your new wood-burning stove complete with a HWAM®SmartControlTM
We are pleased that you have chosen a HWAM woodburning stove and confident that it will give you
much pleasure.
The HWAM®SmartControlTM is a digital control of the combustion in your new wood-burning stove.The
purpose of the HWAM®SmartControlTM is to control the combustion in an environmentally optimal and
economically efficient way, with a view to generating greater user comfort.
The HWAM®SmartControlTM is a new patented technology, which electronically adjusts the air supply to
the combustion chamber.Your new wood-burning stove continually measures the temperature and the
oxygen levels of the combustion. Moreover, it is programmed to supply oxygen to the fire through three
important air inlets in the right amount, and at the right time and place in the combustion chamber. By
downloading a free app for your smartphone or tablet, you can use the app among other things: to set
the thermostat to the desired room temperature level, choose time for night-time reduction and keep
your stove updated.The app also gives you current information on burning in the stove. See details in
separate manuals for the app IHS Smart ControlTM or in the Quickguide.
.
Your new wood-burning stove and the HWAM®SmartControlTM will ensure the cleanest possible com-
bustion as well as a good fuel economy, regardless of external conditions such as the type of firewood
used, the chimney, the user’s experience, and other external circumstances.
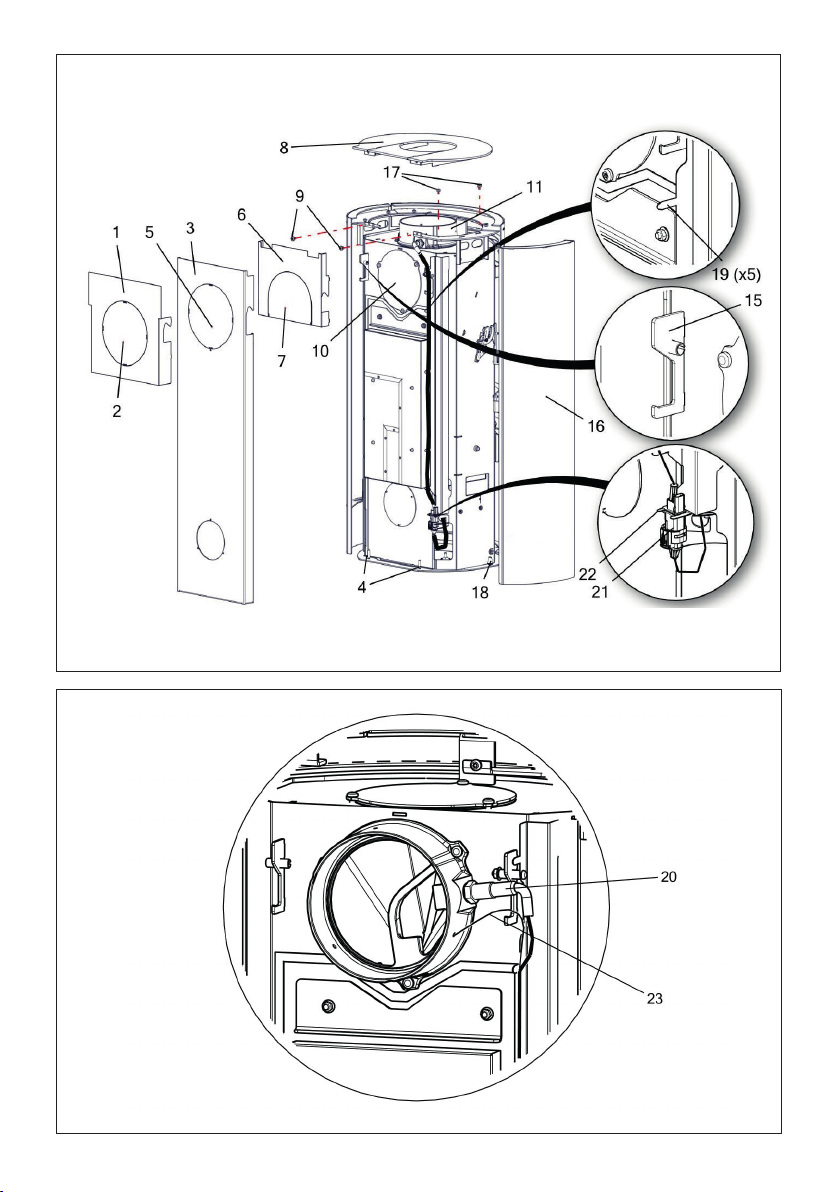
The HWAM®SmartControlTM consists of the following components:
• Air box: the Air box contains a printed circuit board/software, as well as three motors and dampers
that control primary, secondary, and tertiary combustion air.The fresh air system can be mounted
on the Air box to the back or in the bottom.
• Two sensors: a temperature sensor and an oxygen sensor transmit information from the wood-
burning stove to the Air box.
• Room temperature sensor: The room temperature sensor with batteries communicates with the
HWAM®SmartControlTM via a wireless connection. It should be placed so it does not have direct
radiant heat from the stove. Note that the maximum distance between stove and room temperature
indicator is about 4-5 metres.The range is reduced if there are walls or other obstructions between
the stove and the room temperature indicator.
• Electricity supply: from the Air box to the nearest wall socket.
• App "IHS Smart ControlTM:The app can be downloaded free from the App Store or Google Play
Store. See details in separate manuals for the app IHS Smart ControlTM or in the Quickguide.

Page 10 of 20 pages
InStAllAtIon
In general
Congratulations on your new HWAM woodburning stove.We are pleased that you have chosen a HWAM
woodburning stove and confident that it will give you much pleasure.To ensure optimum operation and
safety, we recommend that the installation should be carried out by an authorised HWAM retailer or
a fitter recommended by the retailer. For an overview of HWAM retailers, visit www.hwam.com under
“Retailer locations”.
Safety
The installation of your HWAM woodburning stove must always comply with all European, national and
local building regulations.The installation must be carried out in accordance with the instructions in the
installation and user manuals and subsequently registered with the local authorities. Upon installation,
the chimney sweep must approve the installation before you can start using the woodburning stove.All
HWAM woodburning stove packaging material must be handled in accordance with local waste manage-
ment regulations.
Room requirements
Always ensure a supply of fresh combustion air to the room where the stove is to be installed. The
woodburning stove uses approx. 4-15 m3 of air per hour.A window that can be opened or an adjustable
air valve will be sufficient. It must not be possible to block the adjustable air valve/grate. In newly built/
airtight dwellings, we recommend that a fresh air system should be installed for the direct supply of
external air to the combustion.This fresh-air system may be bought separately.
Before installing the stove, you must ensure that the load-bearing capacity of the floor can withstand
the weight of the stove and the chimney. The weight of the chimney should be calculated according to
its dimensions and height.
Technical measures and data
Test results from nominal test EN 13240
Nominal heating effect 4,5 kW
Flue gas temperature EN 13240 measurement point 238ºC
Flue gas temperature measured in the outlet socket 307ºC
Exhaust gas flow 3,66 g/s
Efficiency 83,4 %
Annual efficiency (EcoDesign) 73,4 %
PM 20 mg/m3
OGC 51 mg/m3
NOx 108 mg/m3
CO at 13% O21000 mg/m3
CO at 13% O20,08 %
Energy efficiency index 111
Energy efficiency class A+
Test result based on NS 3058
Particle emissions 2,45 g/kg
The declaration of performance (DoP) can be downloaded from our website, www.hwam.com.

Page 11 of 20 pages
Model Weight Height Width Depth
HWAM 3740c/3740m: 104/101 kg 102.5 cm 49.9 cm 37.5 cm
HWAM 3760c/3760m: 117/113 kg 125.4 cm 49.9 cm 37.5 cm
Heat storing slabs, HWAM 3760 32 kg
Floor plate
European, national and local regulations must be observed in terms of the size and thickness of a non-
combustible floor covering the floor in front of the combustion chamber opening. Ask your HWAM
retailer for assistance.The combustion chamber opening is 34.0 cm wide.
Distance to combustible materials
Min. distances - uninsulated flue gas pipe (drawing A) HWAM 3740
HWAM 3760
1. Recommended for brick wall 10 cm
1. For combustible back wall 10 cm
2. For combustible side wall 35 cm
1.To combustible wall,corner installation, 45º 9 cm
3. Distance to furnishings in front 90 cm
Remember to pay attention to applicable regulations concerning the required distance
between the wall and smoke pipe.
The distance to a brick wall is set to faciliate the servicing of the HWAM®SmartControl™ system.
Please be aware that not all glass parts are heat-resistant. For this reason, a glass wall should sometimes
be treated as a combustible wall, in which case we ask you to contact your local chimney sweep or glass
producer to hear at what distance the stove should be kept from glass.
Requirements for chimney and smoke pipe
The height of the chimney must ensure sufficient draught and prevent any smoke nuisance.As a general
rule, satisfactory draught conditions are achieved if the chimney is 4 m above the stove and at least 80
cm above the ridge. If the chimney is placed at side walls, the top of the chimney should always be higher
than the ridge or the tallest point of the roof.Always be aware of any national and/or local regulations
applying to thatched roofs and the location of the chimneys.
The stove requires a draft of at least 12 Pa.
The chimney must have a minimum clearing of Ø 150 mm. The chimney must be provided with an
easily accessible cleaning door.The chimney and flue duct must be of flue class T400 and be CE marked.
Furthermore, it must have obtained the classification of G in soot fire testing.The required distance to
combustible material must be complied with in accordance with the brand label.Ask your HWAM retailer
for further information.
Changing the smoke outlet from top outlet to back outlet - HWAM 3740 (drawing D)
If a wood-burning stove from the factory is supplied with a top outlet but you want to change it to a
back outlet, this can be done by following the instructions below. If this change is made, a closed top plate
without a hole for the top outlet can be purchased.
1. Removing the external heat shield (1). Lift the heat shield (1) up and remove it from the stove.The
heat shield has a cut-out for the flue duct. Break off the pre-cut plate (2); the resulting hole fits the
flue duct.
2. Removing the rear plate (3). Lift the rear plate and pull it away from the stove so that it disengages

Page 12 of 20 pages
from the guide pins (4) on the bottom plate of the stove.There is a cut-out in the rear plate for the
smoke outlet. Break off the plate (5) within this cut-out to make a hole in the rear plate so there is
room for the smoke outlet.
3. Removing the internal heat shield (6). Lift the heat shield (6) up and remove it from the stove. The
heat shield has a cut-out for the flue duct. Break off the pre-cut plate (7); the resulting hole fits the
flue duct.
4. Removing the top plate (8). Remove the two screws (9) beneath the top plate and lift the top plate
(8) off.
5. Removing side (16). Remove the 2 screws (17) Lift one side about 10 mm and pull it away from the
stove so that it disengages from the guide pins on the bottom plate of the stove. Repeat on the other
side.
6. Open the metallic tabs (19) and take the wires out.
7. Removing the cover plate (10). Remove the cover plate (10) on the back of the stove by removing
the three screws (Torx Bit no. 30). Now the cover plate can be removed from the rear-facing smoke
8. Removing the flue spigot (11). Remove the three screws.The flue spigot (11) can now be removed
from the upward-facing smoke outlet.
9. Installing the flue spigot (11). Place the flue spigot (11) in front of the smoke outlet on the rear of the
stove and secure it with the three screws.
10.Installing the cover plate (10). Place the cover plate (10) above the smoke outlet on the top of the
stove and secure it with the three screws.
11.Fix the two wires by closing the metallic tabs (19) again.
12.Installing side. Put the side (16) on the guide pins in the bottom plate of the stove and press it in towards
the stove. Lift the side and press it lightly inwards until it engages with the guide pins. Secure the side
with the two screws (17).
13.Installing the top plate of the stove (8). Place the top plate (8) on the fittings and secure it with the
two screws (9).
14.Installing the internal heat shield (6). Replace the heat shield (6) at the back of the stove.
15.Installing the rear plate (3). Place the rear plate (3) on the guide pins at the back of the bottom plate
of the stove; then press it in towards the stove. Lift the rear plate and press it lightly inwards until it
engages with the guide pins.
16.Installing the external heat shield (1). Replace the heat shield (1) at the back of the stove.
Changing the smoke outlet from top outlet to back outlet - HWAM 3760 (drawing D)
If a wood-burning stove from the factory is supplied with a top outlet but you want to change it to a
back outlet, this can be done by following the instructions below. If this change is made, a closed top plate
without a hole for the top outlet can be purchased.
1. Removing the external heat shield (1). Lift the heat shield (1) up and remove it from the stove.The
heat shield has a cut-out for the flue duct. Break off the pre-cut plate (2); the resulting hole fits the
flue duct.
2. Removing the rear plate (3). Lift the rear plate and pull it away from the stove so that it disengages
from the guide pins (4) on the bottom plate of the stove.There is a cut-out in the rear plate for the
smoke outlet. Break off the plate (5) within this cut-out to make a hole in the rear plate so there is
room for the smoke outlet.
3. Removing the internal heat shield (6). Lift the heat shield (6) up and remove it from the stove. The
heat shield has a cut-out for the flue duct. Break off the pre-cut plate (7); the resulting hole fits the
flue duct.
4. Removing the top plate (8). Remove the two screws (9) beneath the top plate and lift the top plate
(8) off.
5. Removing side (16). Remove the 2 screws (17) Lift one side about 10 mm and pull it away from the
stove so that it disengages from the guide pins on the bottom plate of the stove. Repeat on the other
side.

Page 13 of 20 pages
6. Removal of the front of the heat storage compartment (12). Loosen the two screws (13) at the top of
the front. Loosen the two screws (14) on each side of the front of the heat magazine – these screws
should not be removed, only partially loosened. Now pull the front forward.
7. Removing the cover plate (10). Remove the cover plate (10) on the back of the stove by removing
the three screws (Torx Bit no. 30). Now the cover plate can be removed from the rear-facing smoke
outlet.
8. Open the metallic tabs (19) and take the wires out.
9. Pull the lambda sensor coupling (21) free of the wire fastener (22).
10.Remove the temperature monitor (23) from the flue spigot (11).
11.Removing the flue spigot (11). Remove the three screws.The flue spigot (11) can now be removed
from the upward-facing smoke outlet.
12.Installing the flue spigot (11). Place the flue spigot (11) in front of the smoke outlet on the rear of the
stove and secure it with the three screws.
13.Reattach the temperature monitor (23) in the flue spigot (11),leading the sensor about 3 cm into the
flue spigot.
14.Reposition the lambda sensor coupling (21) in the wire fastener (22).
15.Fix the two wires by closing the metallic tabs (19) again.
16 Installing the cover plate (10). Place the cover plate (10) above the smoke outlet on the top of the
stove and secure it with the three screws.
17.Installing the front of the heat storage compartment (12). Put the front of the heat storage compart-
ment in place and tighten the 2 screws (13) at the top of the front and the 2 screws (14) on each side
of the front.
18.Installing side. Put the side (16) on the guide pins in the bottom plate of the stove and press it in towards
the stove. Lift the side and press it lightly inwards until it engages with the guide pins. Secure the side
with the two screws (17).
19.Installing the top plate of the stove (8). Place the top plate (8) on the fittings and secure it with the
two screws (9).
20.Installing the internal heat shield (6). Replace the heat shield (6) at the back of the stove.
21.Installing the rear plate (3). Place the rear plate (3) on the guide pins at the back of the bottom plate
of the stove; then press it in towards the stove. Lift the rear plate and press it lightly inwards until it
engages with the guide pins.
22.Installing the external heat shield (1). Replace the heat shield (1) at the back of the stove.
Connection to chimney
All the stoves have both back and top smoke outlet that can be connected to an approved steel chimney on
top or directly out at the rear to a chimney.
Make sure that the chimney is tight and that no false draft is caused around neither the cover plate, in
connection with a covered smoke outlet, nor the cleanout door and pipe connections. Please note that
bent and/or horizontal smoke pipes will reduce the effect of the chimney draft.
Vertical cross-section of smoke flue (Drawing B and C)
B: Top smoke outlet
C: Back outlet
• Steel chimney (9).
• Flue gas elbow (10). Fits into smoke flue socket.
• Brick-built jamb of flue (11).
• Built-in pipe sleeve (12). Fits smoke flue.
• Wall rosette (13). Covers disruption to wall around pipe sleeve.
• Joint (14). Sealed with packing material.
• Smoke outlets (15) of the HWAM stove.
• Smoke flue regulating damper (16).
• Soot door (17).

Page 14 of 20 pages
Fitting the loose parts
Before the stove is installed,you must ensure that all loose parts are fitted correctly. Check that all insula-
tion plates of the combustion chamber have been properly placed, i.e. that the bottom plate is horizontal
and that the side plates are vertical and reach all the way up to the steel sides of the combustion chamber
and down to the bottom plate.
Vertical cross-section of the stoves (Drawing B):
• The smoke shelf (5).To be placed on top of the steel rail and on the holders in the sides.
• Two-piece smoke defector plate (6). Each half is hung on the hooks located beneath the top plate.The two
halves join in the holders (7) behind the air pipe. Once the stove has been installed, twist the protection
off the two hooks by using pliers or a screwdriver.
• Removable rear plate (2a), covering HWAM®Autopilot™.This must always be mounted if the stove
is placed next to a combustible wall.
• Removable external heat shield (2b).This must always be mounted if the stove is placed next to a
combustible wall.
• Removable internal heat shield (2c). This must always be mounted if the stove is placed next to a
combustible wall.
• Loose heat shield (8) under the ash pan.This can be used as a lid when the ash pan is removed for
emptying.This must always be mounted when the stove is burning
Connection of the HWAM®SmartControlTM
Before using the stove it must be connected to power. See the instructions in the separate manuals for
the app IHS SmartControlTM or in the Quickguide in order to connect to stove with the app and the
wireless room temperature sensor.
Chimney
The chimney is the “engine” of the stove and it is crucial for the functioning of the woodburning stove.
The chimney draft provides a partial vacuum in the stove. This vacuum removes the smoke from the
stove, sucks air through the dampers in the Air box for the so-called glass pane rinse which keeps the
glass free of soot, and for the combustion.
The chimney draft is created by the differences in temperature inside and outside the chimney.The higher
the temperature within the chimney, the greater the draft (a brick chimney takes longer to warm up than
a steel chimney). On days where the weather and wind conditions create insufficient draught inside the
chimney, it is even more important to warm up the chimney as quickly as possible.The trick is to quickly
get some flames going. Split the wood into extra fine pieces, use an extra firelighter, etc.
If the stove has not been used for a longer period, it is important to check that the chimney pipe is not
blocked. It is possible to connect several devices to the same chimney. However, it is important to first
check the applicable rules.
Chimney sweeping
To prevent the risk of chimney fires, the chimney must be cleaned every year.The flue duct and the smoke
chamber above the baffle plate must be cleaned together with the chimney. If the chimney is too tall to
be cleaned from above, it must be equipped with a soot door.
In case of a chimney fire and overheating, the HWAM®SmartControlTM will enter a security mode and
automatically adjust all dampers in the Air box, effectively quenching the fire. Do not open the door for
the burning chamber, since that might cause the fire to rekindle. Contact the fire brigade. After a fire, the
stove should be checked by a chimney sweep before use.

Page 15 of 20 pages
FIrIng MAnuAl - Wood
Your first heating session
The lacquer will be fully hardened after the stove has been used, and the door and the ashpan should be
opened very carefully as there will otherwise be a risk that the gaskets will stick to the lacquer. In addi-
tion the lacquer may initially give off an unpleasant odour, so make sure that the room is well ventilated.
Tips about fuel
Approved fuel types
The wood burning stove is EN approved for combustion of wood only. It is recommended to use dried
chopped wood with a water content of 12-18%.Stoking a fire with wet wood results in soot,environmental
problems,and a less efficient fuel economy. It is recommended to purchase a hygrometer to continuously
check that the firewood has the correct moisture content before using it for firing.
Recommended wood types
All types of wood,for instance birch,beech, oak,elm,ash, conifers,and fruit trees can be used as fuel in your
insert.The great difference is not in the fuel value, but in the weight of the wood types per cubic metre.
Beech weighs more per m3of wood than common spruce, for instance.This is why more common spruce
is required, in terms of volume, to obtain an amount of heat similar to that of beech. Heavy types of wood
such as ash, beech, oak and elm are generally not that easy to light up. In addition, they burn more slowly and
give off more embers. Light types of wood such as birch, maple, spruce and pine are more easy to light up.
They burn faster and give off fewer ambers.You may therefore take advantage of the light types of wood for
lighting and use the heavier types of wood to ensure a longer burning time.
Banned fuel types
It is not allowed to stoke a fire with the following: printed matter, plywood, plastic, rubber, fluid fuels,
and rubbish such as milk cartons, lacquered wood or impregnated wood and fossil fuels.The reason that
you should not apply any of the above is that during combustion they develop substances that are health
hazardous and harmful to the environment.These substances could also damage your wood burning stove
and chimney, rendering the product warranty void.
Storage of wood
A moisture content of 12-18% is achieved by storing recently felled wood outdoors under a lean-to
for at least one year, preferably 2 years. Wood stored indoors has a tendency to become too dry and
combust too quickly. However, it might be advantageous to store fuel for lighting a fire indoors for a few
days prior to use.
It is recommended to purchase a wood moisture meter to continuously check that the firewood has the
correct moisture content before using it for firing.Split the wood and measure the moisture content of
the split surfaces.
Recommended dimensions
The dimensions of the fuel are important to good combustion.The dimensions should be as follows:
Fuel type Length in cm Diameter in cm
Wood for kindling a fire (finely chopped) 25-30 2-5
Chopped wood 25-30 7-9

Page 16 of 20 pages
Lighting the stove
A successful combustion process requires that the wood is lit in the right way.A cold stove and a cold
chimney challenge the combustion process. Be careful to make a good lighting with suitably dry wood,
using kindling and lighting the fire in the top layers of kindling. It is important to achieve a high flue gas
temperature quickly.
Open the door. Place two pieces of wood (5-8 cm in diameter) horizontally in the
bottom of the combustion compartment. Place 5-8 pieces of kindling randomly
on top. Place two fire-lighters in between the top layers of kindling. Light up the
fire-lighters and close the stove door. Select the desired room temperature level.
As soon as the door is opened the HWAM®SmartControlTM is activated. If lighting up does not occur
within 15 minutes, the HWAM®SmartControlTM will automatically go back to standby and the dampers
in the Air box will be closed. If the smoke temperature does not reach a high enough level after lightning
or stoking, the app IHS Smart ControlTM and the wireless room temperature sensor emit a restoking
alarm, even if there is still unburned wood and flames in the combustion chamber.The restoking alarm
is emitted to make you aware that the fire needs more energy. Restoking with small pieces of kindling
wood can often provide a more rapid and sufficient temperature rise.
The HWAM
®
SmartControl
TM
closes all three air dampers in the Air box when the stove is in standby mode.
This prevents hot air from the room to enter the chimney (heat loss). This might on the other hand result in a
very cold chimney when the stove is lit. In certain cases it is necessary to assist the draught in the chimney by
opening the door to the burning chamber 3-5 minutes before lightning the stove. Read more on www.hwam.com
about the function of the chimney.
Important!
The ash pit must not be opened when lighting up. It must always be closed when the stove is in use.
Otherwise the HWAM®SmartControlTM does not function.The door should only be opened when
lighting up, when restoking, and when cleaning the stove. Never leave a stove before there are lasting
flames in the wood after firing!
The Thermostat Function
The HWAM®SmartControlTM will in general have an environmentally friendly combustion and adapt to
the desired room temperature.The thermostat function is designed as a radiator valve.The user enters
a desired heat level, which suits the room in which the stove is installed.When the thermostat is set at
a heat level, the control function will adapt to this temperature.
• If the room temperature is lower than the desired heat level, the HWAM®SmartControlTM increases
the flue gas temperature in order to increase the heat radiation from the stove.
• If the room temperature is higher than the desired heat level, the HWAM®SmartControlTM decreases
the flue gas temperature, thereby giving the layer of embers as long a life as possible before restoking.
This will reduce the heat radiation from the stove and facilitate restoking without having to light up
the fire anew. If the room temperature drops below the desired level, the ember phase will be short-
ened, and the HWAM®SmartControlTM will activate a restoking alarm.The HWAM®SmartControlTM
will signal that a restoking is due at the flue gas temperature of 180° C, and at 100° C the HWAM®
SmartControlTM will enter standby mode and all dampers will close.
• Should the room temperature be much lower than the desired heat level, the HWAM®SmartControlTM
increases the flue gas temperature. If a satisfactory increase in temperature does not occur, the control
will activate a restoking alarm, since it expects that more wood is needed to increase the heat level in
the room.
• If the room temperature after a new restoking still does not reach the desired level,the water content
in the firewood may be too high or the draught in the chimney too weak.The HWAM
®
SmartControl
TM
always strives for a sufficiently high flue gas temperature to ensure an environmentally friendly combus-
tion.

Page 17 of 20 pages
Stoking
When alarm for restoking sounds the stove is ready for restoking.The alarm for restoking will come via
the room temperature sensor or the acquired remote control.The app IHS Smart ControlTM will also
come with a notification that it is time for restoking if the app is opened. For more information on the
app, see details in separate manuals for the app IHS Smart ControlTM or in the Quickguide.
The amount of wood that is used for restoking should be adjusted based on the current heat demand.
In terms of combustion technique, you should always stoke the stove with at least two pieces of wood
at a time even if you only use a small amount of wood.You can also choose not to restoke. After a while
the stove will then automatically go in stand-by mode.
During combustion, the outer surfaces of the stove will become hot, and due care must
therefore be shown.
Cleaning the glass
We recommend wiping the glass after a fire.This is best done using a paper towel.
Fuelling with coal or pet coke
The stove is not approved to use coal or pet coke as a fuel.

Page 18 of 20 pages
FIrIng In generAl
Rapid or fierce heat
Rapid or fierce heat is obtained by burning many small pieces of wood.
Maximum amounts of fuel:
The maximum allowed amount of fuel per hour is:
Wood: 2.4 kg
If these limits are exceeded,the stove will no longer be covered by the factory guarantee, and it may also
become damaged due to excessive heat,the glass may turn white,for example.If the flue gas temperature
exceeds 580oC, the HWAM®SmartControlTM will revert to safety adjustments and automatically turn
down the air valves to avoid overheating.When the temperature is reduced to 450oC, the normal
functions apply again.The stove has been approved for intermittent use.
Typical re-firing interval
Typical re-firing interval at nominal performance
Wood: 45 min (0,89 kg)
Long burning times
You achieve the slowest combustion by setting the desired room temperature at level 0. At this level
the combustion takes place with the lowest possible flue gas temperature and the ember phase will be
drawn out as long as possible.
How to achieve the best combustion
The HWAM®SmartControlTM is purposely designed to generate the cleanest and the most economical
combustion. A good combustion is achieved when the fire gets the right amount of oxygen supply at
the right time and place in the combustion chamber.The HWAM®SmartControlTM allows for variations
in external circumstances. Nevertheless, it is important to use clean and dry wood (humidity approx.
12-18%). Read more on www.hwam.com.

Page 19 of 20 pages
MAIntenAnCe
Cleaning
Any maintenance of the stove should only be carried out when it is cold. Daily maintenance is limited to
vacuum cleaning the stove externally, using the soft brush attachment.You can also dust the stove using a
dry, soft cloth or brush. But remember, only when the stove is cold. Do not use water, spirit or any other
kind of cleaner, as this will damage the lacquer.
Once a year, the stove should be thoroughly serviced.The combustion chamber should be cleared of ashes
and soot.The hinges and the closing hook must be greased with liquid copper fat spray (heat-resistant up
to 1100°C), see drawing F. Lift the door approx. ½ cm and spray copper fat onto the hinge leaf.
Service inspection
Your stove should be given a thorough, preventive inspection once every two years.This includes:
• Thorough cleaning of the stove.
• Checking gaskets. Replace gaskets if they are not intact or have softened.
• Checking of heat insulating material and possibly replacement.
• Checking of the bottom/shaking grate.
• Use copper grease for hinges and locking hooks (see drawing F).
All service checks must be performed by an authorised fitter. Use only original spare parts.
Inside Cleaning
Unless the safety fittings for transportation have not already been removed, twist the safety fittings for
transportation off the two hooks by using pliers or a screwdriver.TThe smoke shelf and baffle plate is to be
removed from the stove before cleaning (Drawing E):
• First lift the smoke shelf (1) out of the steel rail (2) at the back of the combustion chamber.Next, lower
it beneath the holders (3) and slide it out.
• Lift each half of the steel smoke plate (4) off the holder (5) behind the smoke pipe, and remove them
from the hook (6) beneath the top plate.
Ashes
The ash pan is best emptied by pulling a waste bag over the pan, tipping it and then carefully pulling it out
of the bag.Ashes are disposed of via the domestic waste collection.
Please note that there may be embers in the ashes for up to 24 hours after the fire has
gone out!
Insulation
The efficient,but porous insulation of the combustion chamber may,in time,be worn and damaged. Cracks
in the insulation are irrelevant to the efficiency of the stove. However, it should be replaced, if there are
actual holes due to parts of the lining falling off or when, due to wear and tear, it has been reduced to
less than half its original thickness.
Door/glass
A sooty glass door can easily be cleaned with a piece of moist kitchen roll dipped in ash. Go about it in
vertical movements (up and down). Follow up with a dry piece of kitchen roll.
Seals
Check frequently to ensure that seals in the door and ash pan are intact and not brittle. Failing this, they
should be replaced. Use original seals only.

Page 20 of 20 pages
Surface
Usually,it is not necessary to any treatment to the painted surfaces of the wood-burning stove.Any damage
to the paint may, however, be remedied with spray paint, which can be bought from your stove retailer.
Guarantee
The guarantee does not cover damage due to insufficient maintenance!
Maintenance Alarms
If a maintenance alarm goes off, you can continue using the wood-burning stove, but contact your dealer
as soon as possible.Your stove could be affected by impure combustion.
Other manuals for 3740
3
This manual suits for next models
3
Table of contents
Other HWAM Wood Stove manuals
Popular Wood Stove manuals by other brands

Quadra-Fire
Quadra-Fire 31M-ACC-AU installation instructions

Regency
Regency Alterra CS1200 Owners & installation manual

Ventis
Ventis HES350 owner's manual

BuckMaster
BuckMaster 94NC Operation & installation manual

Kuma Stoves
Kuma Stoves K-ASP: Aspen Installation and operating instructions

ADURO
ADURO 9.7 Lux user manual