Hwasung HP-283 User manual

Technical Manual
HP-283

Title
Rev.
Page
HP-283 Technical Manual
Ver1.01
P.1
※Safety Caution!
Caution : Please follow the direction in using the product as it may become the reason of malfunction,
serious injury, or even death.
Do not disassemble or modify the product.
Do not remove jammed paper while power is turned on.
Do not go over the specified voltage.
Do not wash the product.
Do not hit or cause an impact to the product.
Do not store the product in the wet / humid place.
Caution : Please follow the direction in using the product as it may become the reason of malfunction,
serious injury, or even death.
Please contact us to take an action when product fails.
Please power off during the removal of any matter.
Please ventilate the air circulation in closed area.
Please install the product away from the near interferences.
Please install the wiring in a safe place.
Please follow the directed terms of compliance in using the electrical product.

Title
Rev.
Page
HP-283 Technical Manual
Ver1.01
P.2
Content
1. Name of Part 3
1-1) Name 3
1-2) Connector 4
2. How to use 6
2-1) Paper set up 6
2-2) Paper jam 7
2-3) Self test 8
2-4) HEX Dump 8
2-5) On board update 9
2-6) Dip Switch 10
2-7) Memory switch 12
2-8) Recover firmware (Reboot) 14
3. Specification 17
3-1) Printer 17
3-2) Interface 18
4. Cash drawer / Melody box 23
4-1) Cash drawer 23
4-2) Melody box 24
5. Command 26
6. Windows Driver 67
6-1) Printer 67
6-2) Paper 68
6-3) New paper 69
7. USB (User Interface) 71
8. Ethernet 77
9. Wi-fi setting 79
*Spec revision 82

Title
Rev.
Page
HP-283 Technical Manual
Ver1.01
P.3
1.Name of Part
1-1) Name
1) LED
◈POWER LED(Green): It indicates the power is on
◈ERROR LED(Red): 1. It indicates, when the printing is not available, when the paper detected
2. It indicates, when the status is error (twinkle).
Notice : It doesn‟t indicate, when the status is normal.
◈PAPER LED(Orange) : 1. It indicates, when the paper is ending, and not available.
Notice : It doesn‟t indicate, when the paper is set up normally.
◈FEED : : 1. It is a button to feed the paper.
2. It is a button to conduct the self-test, when you power on during you press down this button.
2) Power switch
It is a switch to power on/ powerr off.
3) Cover open
It is a lever to change the paper, and to open the cover.
Notice : When you press down the cover open lever, please do not open the cover if it is not open.
Please look at the article of paper jam this manual.
It is very important to prevent the product from the damage.
4) Cutter open (Front cover)
It is to remove the paper jam. Please look at the article of paper jam.
POWER
COVER OPEN
FEED
PAPER OUT LED
ERROR LED
POWER LED
CUTTER OPEN
(FRONT COVER)

Title
Rev.
Page
HP-283 Technical Manual
Ver1.01
P.4
1-2) Connector
: It is to connect any device with the printer.
1) Power : It is to connect the external power 24Voltage. Please use the power supply we provide.
Notice : Please make sure about the direction of connector.
2) Cash drawer / Melody box : It is to connect the cash drawer / the melody box with the printer.
Notice : Please use the standard cash drawer.
Please read „4.Cash drawer / Melody box‟at this manual.
Please do not connect with the cable of Modem / Lan.
It is very important to prevent the product from the damage.
3) Interface card : It is to connect the interface cable with each hosts.
You are able to connect RS232C,PARALLEL,USB type B, Serial extension RJ-45, and Ethernet.
◈RS232C : Connector DSUB25 pin Female.
Power
Cash drawer / Melody box
Interface card
(Ex,RS232C Card)
USB type B
Notice: The sign „arrow‟should be downward to connect with the printer.
24V
GND
N.C

Title
Rev.
Page
HP-283 Technical Manual
Ver1.01
P.5
◈Parallel : IEEE-1284 type B 36pincs Receptacle / Bi-directional interface card..
◈Ethernet : LAN 8 pins
◈Serial extension RJ-45 :
It is to extend the serial RJ-45.
It is to communicate with rs232c, when you use the RS232c cable 9 pins,
or the Lan cable 6 pins one to one
DSUB- 9 pins RJ-45 6 pins receptacle
Notice : Please do not connect with the cable of Modem / Lan .
It is very important to prevent the product from the damage.

Title
Rev.
Page
HP-283 Technical Manual
Ver1.01
P.6
2.How to use
2-1) Ppaer set up
1) Please press the button (Cover open) as the image below, and open the cover.
2) Please make sure the paper direction as the images below.
Notice : Please make sure the paper is out as image below, when you close the cover.
You can see the paper is printing and cut, when you close the cover, after you power on.
3) You can see the paper is printing and cut, when you close the cover, after you power on.

Title
Rev.
Page
HP-283 Technical Manual
Ver1.01
P.7
2-2) Paper Jam.
Please follow the instruction as belows., when the paper jam occurred.
1) Please power off the pritner.
Notice :
Please power off the printer, once you remove the paper jam, and the foreign materials.
Pleaes power off the product, when you conduct this step.
Otherwise, the auto cutter / the thermal print head could be operated incorrectly.
The printer, and you will be damaged.
2) Please pull out the cutter cover to open as image below.
3) Please make sure the cutter is moving, when you turn the gear into one direction.
You can turn the gear into any direction, such as from the lower and the upper, from the upper and the lower.
4) Notice : Please do not turn the gear any more,
when you see the cutter is not moving any more.
Please try to change the direction which you turn the gear.
Notice : Please turn the gear, till you make sure you are able to press the cover open lever.
5) If you can press the cover open lever, please open the cover, and remove the paper jam.
Notice : Please make sure again you do not turn the gear any more,
when you see the cutter is not moving any more.
Please change the direction which you turn the gear.
Please turn the gear, till you make sure you are able to press the cover open lever.
Cutter open
gear

Title
Rev.
Page
HP-283 Technical Manual
Ver1.01
P.8
2-3) Self test :
Without the host, or the communication, it is to print the status of printing.
Please power on, once you press down the button of feed.
It is printing the status of printing with the detail as belows.
◈Model
◈Firmware / Date
◈Interface
◈Dip switch
2-4) HEX Dump
2.4.1. Please power on after the dip switch 8 (up) of 1.
2.4.2. Then it prints all data in hex character (16 antilogarithm).
2.4.3. You can see the status of receipt.
2.4.4. It will be useful for the appilcation you do.
◈It prints the data, once it receives the data 10 digit.
◈You can print the data less than 10 digit, when you press down the button of feed.
◈It prints the control code (1F16 below) as “.”
◈It prints the data 8016 more as “^”.
[Sample]
16 antilogarithm ASCII
[HEX DUMP MODE]
41 42 43 44 45 46 47 47 49 4A ABCDEFGHIJ
30 31 32 33 34 35 36 37 38 39 0123456789
1B 4A FF .J^

Title
Rev.
Page
HP-283 Technical Manual
Ver1.01
P.9
2-5) On board update :
Notice : Please make you conduct the following instructions, when you get to know completely.
1) Please power off and on, after you do *up the eighth (8th) of Dip Switch 2.
Then the error LED (Red) will be lighted on, after the light goes on and off twice.
*up :on
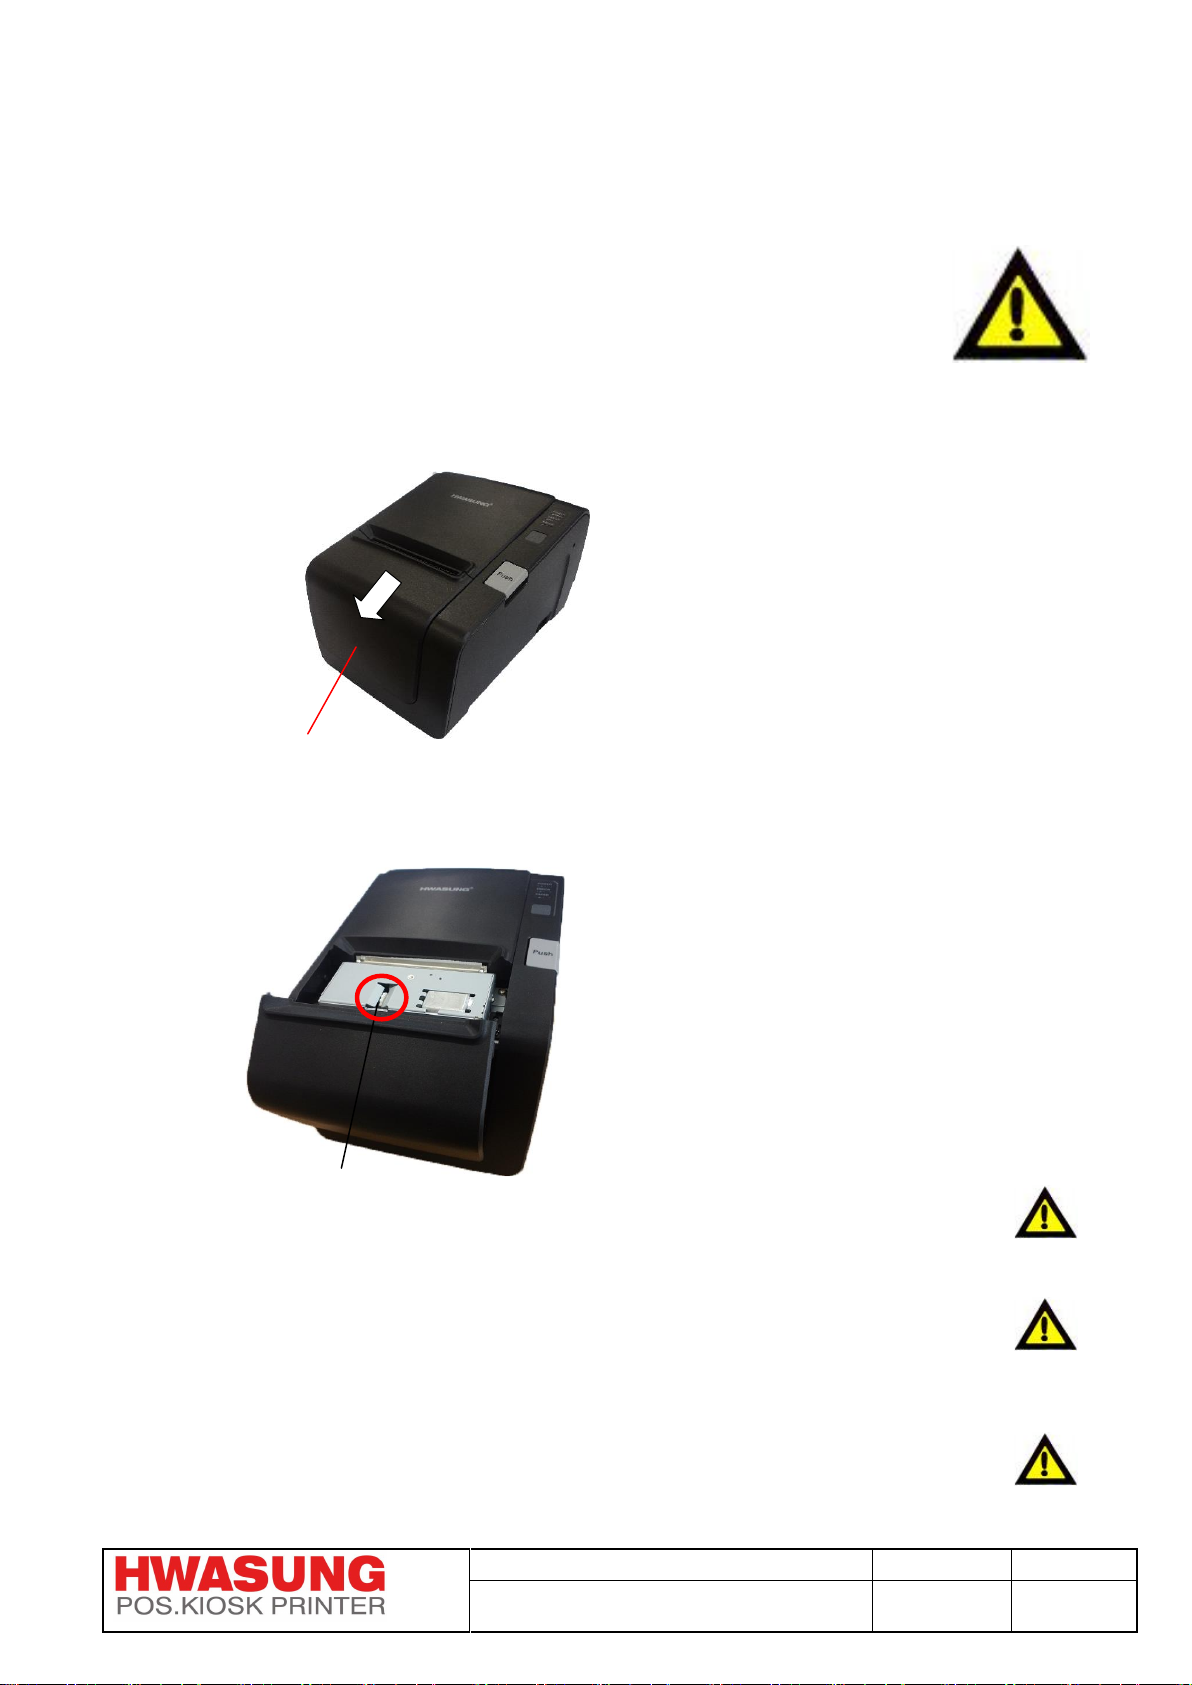
2) Please connect the *data cable with the printer.
*data cable : interface cable (ex.serial cable, parallel cable, usb cable,etc.)
Notice : Please make sure you connect the cable of standard, or the cable provided.
3) Please conduct the update program we provide, after you set up the model / the port.
The update starts,when the error LED (Red) will be lighted on,after the light LED goes off 4 seconds.
Notice : Please do not power off, before the update is complete.
4) The update is completed, when you see the indication in the program.
5) After you complete the update, please power off and on,
after you do *down the eighth (8th) of Dip Switch 2.
*down :off
6. Then you can use the printer which is updated.
Notice : You have to stop updating, if the error LED (Red) continues flickering,
because it means error of update.
Please close the program you open.
Please check the cable if it is correct.
Please go back to the instruction of step 1), and do it again.

Title
Rev.
Page
HP-283 Technical Manual
Ver1.01
P.10
2-6) Dip Switch
Please adjust the DIP switch according to the environments you are using, such as host, and port.
You can see two switches, SW1, SW2,if you open the cover of DIP switch.
Dip Switch 1
SW1
Serial Baud rate
SW1
SW2
SW3
SW4
SW5
SW6
SW7
SW8
9,600
OFF
OFF
19,200
OFF
ON
38,400
ON
OFF
115,200
ON
ON
Serial Data Bit Length
SW1
SW2
SW3
SW4
SW5
SW6
SW7
SW8
7
ON
8
OFF
Serial Party
SW1
SW2
SW3
SW4
SW5
SW6
SW7
SW8
None
OFF
Even
ON
OFF
Odd
ON
ON
Serial Stop bit
SW1
SW2
SW3
SW4
SW5
SW6
SW7
SW8
2 stop
ON
1 stop
OFF
Serial Flow contorl
SW1
SW2
SW3
SW4
SW5
SW6
SW7
SW8
Software Xon/Xoff
ON
Hardware (RTS/CTS or DTR/DSR)
OFF
Print Mode
SW1
SW2
SW3
SW4
SW5
SW6
SW7
SW8
Hexadecimal Mode
ON
Normal Mode
OFF
Ethernet IP mode
SW1
SW2
SW3
SW4
SW5
SW6
SW7
SW8
Dynamic IP mode
ON
Static IP mode
OFF
Ethernet Boot mode
SW1
SW2
SW3
SW4
SW5
SW6
SW7
SW8
Factory mode
ON
Default user mode
OFF
Notice : You can read the details of Ethernet at this manual / 8. Ethernet.
DIPSwitch Cover
DIPSwitch 1
DIPSwitch 2

Title
Rev.
Page
HP-283 Technical Manual
Ver1.01
P.11
Dip switch 2
SW2
Print Quality 1)
SW1
SW2
SW3
SW4
SW5
SW6
SW7
SW8
Reserved
RSD
Reserved
RSD
Print Density 2)
SW1
SW2
SW3
SW4
SW5
SW6
SW7
SW8
Normal
OFF
OFF
Medium
ON
OFF
Dark
OFF
ON
Reserve
ON
ON
External Auto Melody
SW1
SW2
SW3
SW4
SW5
SW6
SW7
SW8
Play
ON
No play
OFF
Firmware Update
SW1
SW2
SW3
SW4
SW5
SW6
SW7
SW8
Update
ON
Print Mode
OFF
Cutting mode
SW1
SW2
SW3
SW4
SW5
SW6
SW7
SW8
Partial cut
ON
Full cut
OFF
Buzzor of printing
SW1
SW2
SW3
SW4
SW5
SW6
SW7
SW8
Play
ON
No play
OFF
Notice : The auto melody will be invalid, if the buzzer is on.

Title
Rev.
Page
HP-283 Technical Manual
Ver1.01
P.12
2-7) Memory Switch
Use non-volatile memory to set the function.
※Please use the provided ‘Memory Switch Utility’for the setting.
※Once you’ve set the value, it will not reset even if you turn off the power so the value will maintain until
you make the change.
Memory SW
Set Value
Description
SW1
p OR m
SW2
0~1200 OR 0~136
SW3
248 ~ 4000
SW4
Basic Code Page
Setting one of the Code Page out of the option
to be a default
SW5
Basic Font
2byte code will set the default from Korean
(24x24), Korean (16x16), Japanese(24x24),
Chinese(24x24). 1byte code will set the default
from ASCII(12x24), ASCII(8x16,9x16).
SW6
Reserve
SW7
Reserve
SW8
Reserve
Code Page Mesnu
Font Menu
Click on the transmit button
after setting all variables
Reserve

Title
Rev.
Page
HP-283 Technical Manual
Ver1.01
P.13
1)SW1 :
p(7016) Setting : When executing cutting command (DC3 + “i”), move from the black mark point
to the plus position up to the value set in SW2, then cut from that position.
m(6D16) Setting : When executing the cutting command (DC3 + "i", move up to the value set in
SW2, then cut in that position.
2)SW2 : Setting the distance from the black mark point to the cutting position
When SW1 is @ p : You can set from 0~1200(0 ~ 150mm).
When SW1 is @ m : You can set from 0~120(0 ~ 15mm).
※Indicates 0.125mm per set value ex) When set on 100 : 100 x 0.125 = 12.5mm
※SW1 and SW2 are also used in Windows Driver to set the Cutting option to Black Mark Search (Full
Cut). (Windows Driver : use DC3+”i” command)
ex)
ABCD ABCD
When SW1 = p, SW2 = 100 When SW1 = m, SW2 = 100
[Front, Printing Side] [Front, Printing Side]
12.5mm
Blackmark
point
Cutting position
Blackmark
Point
Cutting
Position
12.5mm
1page
2page
1page
2page
※Left
Blackmark
(Backside)

Title
Rev.
Page
HP-283 Technical Manual
Ver1.01
P.14
3)SW3 : Sets the distance from the ticket start point to the black mark point.
When setting the Dip switch to First Page No Cut, it is used to set the initial position of the first
piece of paper.
0~120(0 ~ 15mm : When cutting position is in front of blackmark) OR
You can set up to 120~4000(15 ~ 500mm when cutting position is behind the blackmark)
※Indicates 0.125mm per set value ex) When setting it 300 : 300 x 0.125 = 37.5mm
※The default setting is based on the blackmark on right side and set to 1048(131mm).
※Please reference the ticket standards 7. for the detailed information.
ex)
ABCD
[Front, Printing Side]
2)Memory Switch Modification Check
※After adjusting the memory switch, check the modified details by running a self test.
When you turn on the power while holding down the FEED button, start self-test and stop printing.
Press the FEED button one more time to display the contents of the memory switch.
0~15mm OR
15~500mm
Blackmark
Point
1page
2페이지
※left side
blackmark
(backside)
[Memory Switch information]
================================
Code Page = PC437(U.S)
2Byte Font = Korean(24x24)
1Byte Font = ASCII(12x24)
Mem1:FFh
Mem2:FFh,FFh
Mem3:FFh,FFh
Mem4:00h
Mem5:00h
Mem6:FFh
Mem7:FFh
Mem8:FFh
Mem9:FFh
Mem10:FFh
(Example of memory switch content checking
self test printing)

Title
Rev.
Page
HP-283 Technical Manual
Ver1.01
P.15
Firmware Restoration (Boot Restoration)
You can use the restoration methods below when printer does not boot up due to the firmware
corruption or update errors.
.
1)Check the jumper location next to the Dip Switch at the bottom.
2)Connect the two pins of JP2 using 2.5mm pin header.
3)Turn on the power after connecting the data cable.
4)Set the ports on the provided booting program then select “at91sam4e16-ek" at the select your board
prompt and click on the Connect Button. (Use only one data cable for connection) (You can reduce
the load time if you use USB port)
5)Please releast the JP2 short after running the Booting Program.
(If you skip this process, the data will get wiped after the firmware restoration)
Connect

Title
Rev.
Page
HP-283 Technical Manual
Ver1.01
P.16
6)Click on “File open” icon next to Send File Name field, to select the target model’s firmware and click
on ‘Send File’ Button
(※Caution : Do not modify other parameter’s value)
7)There will be a prompt after the file transmit is complete, Click (YES) button on the prompt.
①
②

Title
Rev.
Page
HP-283 Technical Manual
Ver1.01
P.17
8)Under Scripts field, set the value to ‘Boot from Flash(GPNVM1)’ and then click on Execute.
9)Restart the printer by turning the power off and back on.

Title
Rev.
Page
HP-283 Technical Manual
Ver1.01
P.18
3. Specification
3-1) Printer
Printing
Direct Thermal
Printing Speed
*250mm/sec(Max)
Resolution
7dot/mm,180DPI
Printing width
72.19mm, 512Dots/Line
Printing way
Line mode, page mode.
Character
Font AASCII (12x24) 42 columns.
Font B ASCII (9x16) 56 columns.
Font C Korean (24x24, character and Chinese characters).
Font D Korean (16x16, character and “non”Chinese
characters).
Font E Japanese (24x24)
Font F Chinese (24x24)
Paper
Width 79.50mm +-0.5mm
Paper dia.
80mm(Max)
Paper caliper
80micron
TPH life
130km ( Printing duty 12.50%)
MCBF
60,000,000 lines
Barcode
EAN-8,EAN-13,CODE39,CODE93,ITF,
UPC-A,UPC-E,CODE128
2D barcode
QR, PDF417, Data Matrix
Emulation
ESC/POS command compatible / HWASUNG
Driver
Windows(2000,2003,XP,Vista,7,8) 32Bit,64Bit
Interface
Serial/Parallel/USB/serial extension RJ-45 /Ethernet.
Power
24VDC 2.5A
Buffer
4K Bytes
Cutter
Life 1,700,000 cuts / Guillotine / Full or Partial
Temperature
Operation 0 ~ 40℃/ Storage -20 ~ +60℃
Humidity
40∼80%RH
Size
151.00 (W)x 205.00(D) x134.00(H) mm
*1) The printing speed is subject to change with the amount of data transmitted and command.

Title
Rev.
Page
HP-283 Technical Manual
Ver1.01
P.19
3-2) Interface
3-2-1) RS-232C
1) Data transmission : Serial
2) Hand shake : Hardware (RTS/CTS or DTR/DSR )
Software (XON/XOFF)
3) Baud rate : 9600, 19200, 38400, 115200 bps
4) Data bit length : 7, 8 bits
5) Parity : None, Odd, Even
6) Stop bits : 1 or 2
7) Connector : DSUB-25(Female)
8) Pin
No
Signal
In / Out
Remark
1
FG
-
Frame Ground
2
TxD
OUT
Transmit Data
3
RxD
IN
Receive Data
4
RTS
OUT
Printer Busy( the same with DTR)
5
CTS
IN
Host Busy
7
GND
-
Signal Ground
20
DTR
OUT
Printer Busy
22
Power
OUT
*1) +5Volt or +3.3Volt
6,8-19,21,23-25
N.C
-
None Connection
*1)Option : JP1 short : Provide +5 Volts
JP2 short : Provide +3.3 Volts
Notice : Do NOT short JP1 and JP2 at the same time.
9) Connection Example
: It‟s connected inside the printer.
Host (PC)
Pin
Signal
2
RxD
3
TxD
8
CTS
7
RTS
5
GND
6
DSR
Printer
Pin
Signal
2
TxD
3
RxD
4
RTS
5
CTS
7
GND
20
DTR
Other manuals for HP-283
1
Table of contents
Other Hwasung Printer manuals