Hwasung HPP-240 User manual
User Manual
HPP-240

Title
Rev.
Page
HPP-240
Ver1.0
P.1
List of Contents
1. Printer features & External dimension ...........................................................................3
1-1) Name of each parts.................................................................................................3
1-2) External Dimension.................................................................................................4
1-3) Product Composition...............................................................................................5
1-4) Model Specification.................................................................................................6
2. Operation...........................................................................................................................7
2-1) Paper Change ..........................................................................................................7
2-2) Self-Test .................................................................................................................8
2-3) HEX Dump Print ......................................................................................................9
2-4) On-Board Update..................................................................................................10
2-5) Dip SW ...................................................................................................................11
2-5-1) Manual Configuration..............................................................................11
2-6) Memory SW ...........................................................................................................14
2-7) Internal Connector ................................................................................................16
3. General Specification .....................................................................................................18
3-1) Printer Specification .............................................................................................18
3-2) Font........................................................................................................................18
3-3) Internal Buffer .......................................................................................................18
3-4) Power.....................................................................................................................18
3-5) Operating Temperature / Humidity......................................................................18
3-6) MCBF .....................................................................................................................18
4. Interface Specification ...................................................................................................19
4-1) RS232C/TTL .........................................................................................................19
4-2) USB ........................................................................................................................19
5. Commands.......................................................................................................................20
6. Windows Driver ..............................................................................................................50
6-1) Printer Function Configuration.............................................................................50
6-2) Paper Supply Configuration..................................................................................51
6-3) Making New Paper Format...................................................................................52
7. USB Communication User Interface..............................................................................54
7-1) Function .................................................................................................................54
7-2) Caution when using USB interface ......................................................................55
*Manual Update Records....................................................................................................71

Title
Rev.
Page
HPP-240
Ver1.0
P.2
※Safety Caution!
Caution : Please follow the direction in using the product as it may become the reason of
malfunction, serious injury, or even death.
Do not disassemble or modify the product.
Do not remove jammed paper while power is turned on.
Do not go over the specified voltage.
Do not wash the product.
Do not hit or cause an impact to the product.
Do not store the product in the wet / humid place.
Caution : Please follow the direction in using the product as it may become the reason of
malfunction, serious injury, or even death.
Please contact us to take an action when product fails.
Please power off during the removal of any matter.
Please ventilate the air circulation in closed area.
Please install the product away from the near interferences.
Please install the wiring in a safe place.
Please follow the directed terms of compliance in using the electrical product.
Title
Rev.
Page
HPP-240
Ver1.0
P.3
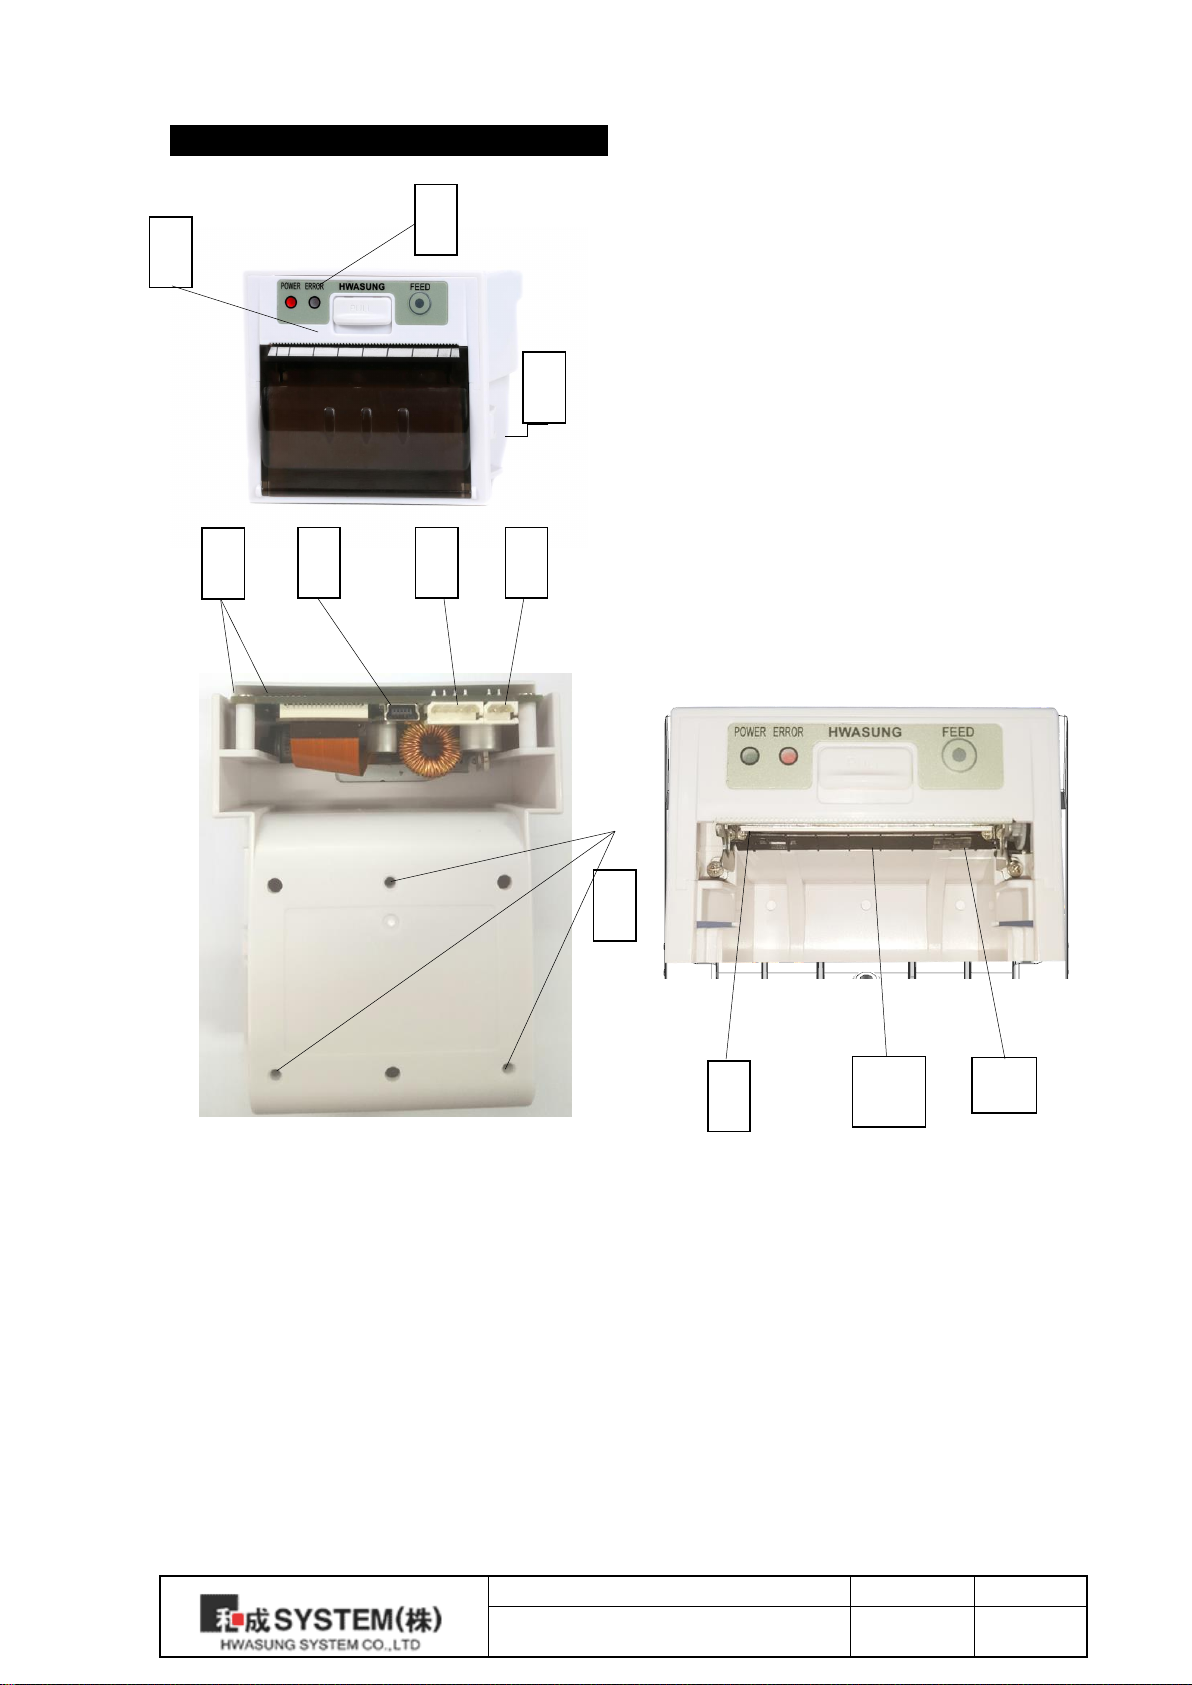
1. Printer features & External dimension
1-1) Printer Features
1. Open Lever
2. Front Indicator Panel (LED, FEED)
3. Fixture Hook
4. Dip switch(Option)
5. I/F USB Connector
6. I/F Serial Connector
7. Power Connector
8. Fixture Hole
9. Manual Cutter
10. Thermal Head
11. Paper Sensor
1
2
3
4
5
6
7
8
9
10
11
Title
Rev.
Page
HPP-240
Ver1.0
P.4
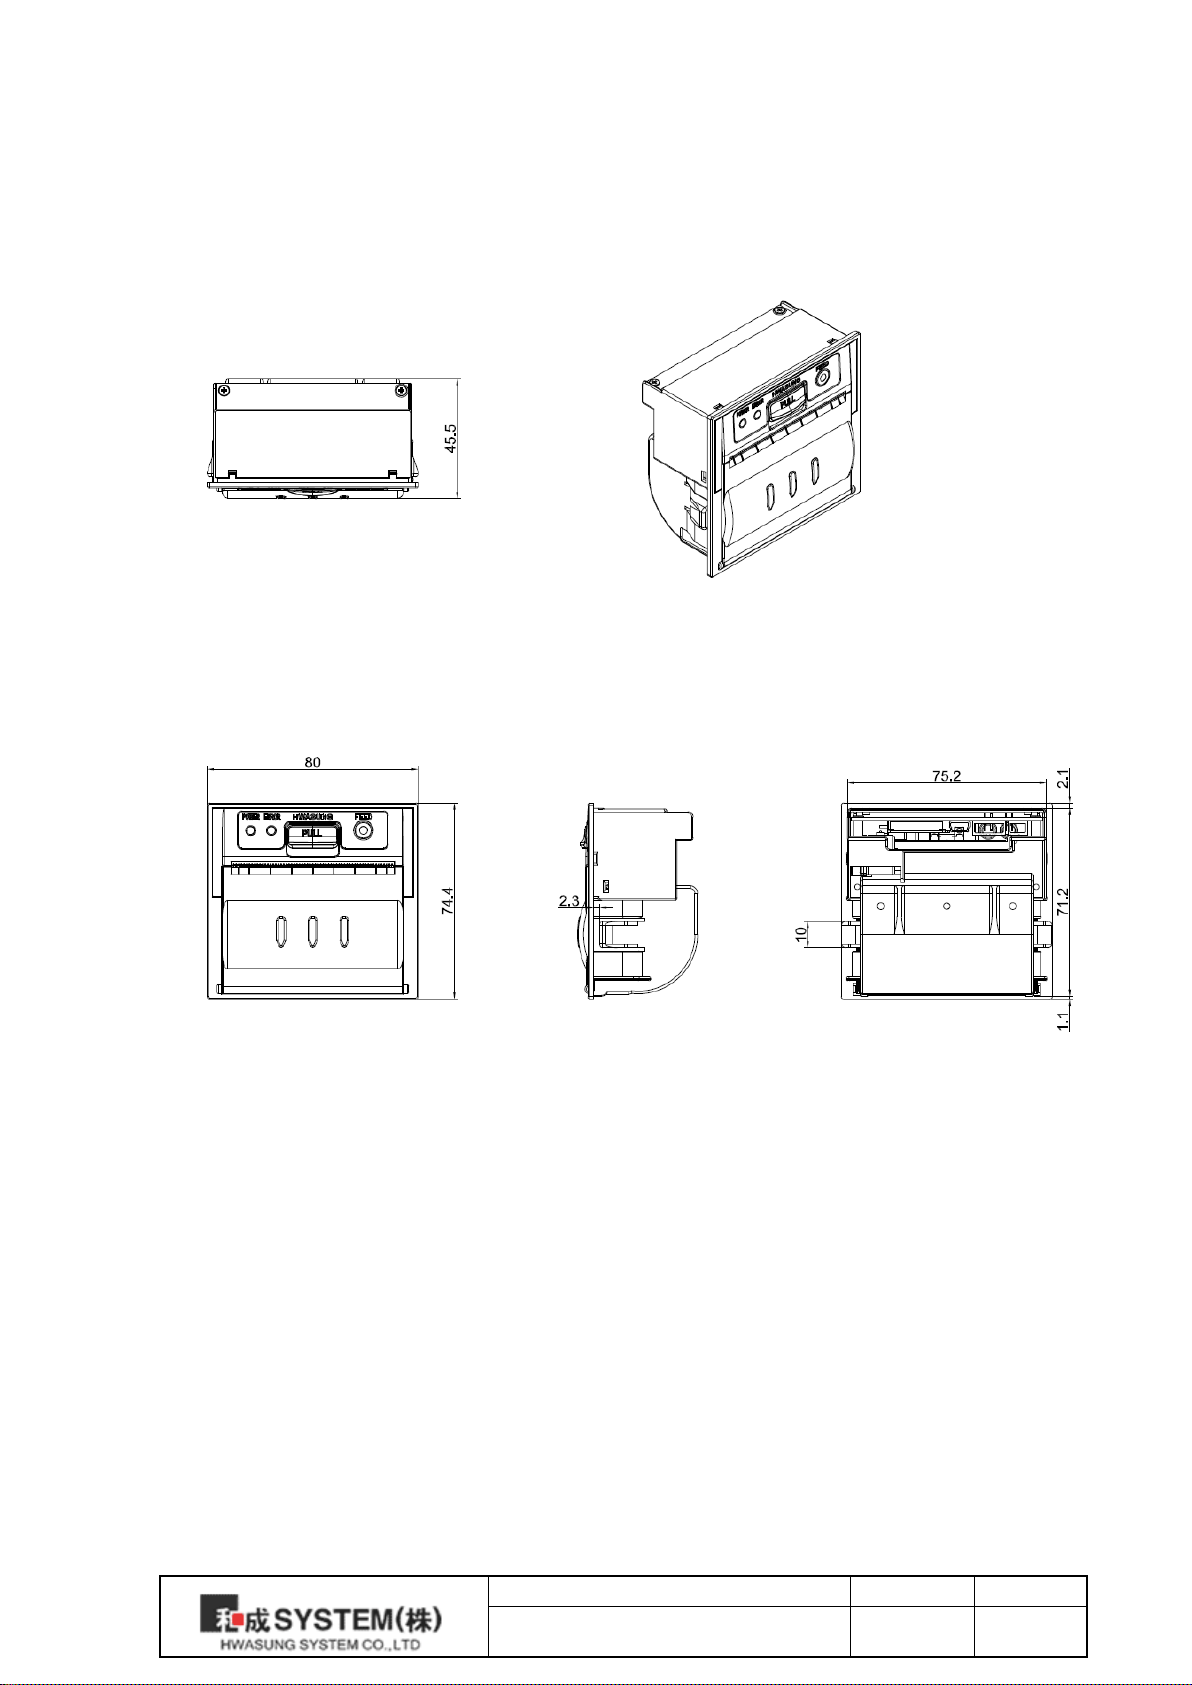
1-2) External Dimension

Title
Rev.
Page
HPP-240
Ver1.0
P.5
1-3) Product Composition
1. Printer
2. Power Cable (20Cm)
3. Communication Cable (20Cm USB Optional)
2
3
1

Title
Rev.
Page
HPP-240
Ver1.0
P.6
1-4) Model Number
HPP-240 □□
Ex)Ordered Model Name
HPP-240HS --- 9 ~ 24V, Serial(RS-232C)
HPP-240LS --- 5 ~ 8.5V, Serial(RS-232C)
HPP-240LT --- 5 ~ 8.5V, Serial(TTL)
※Interface Type
S : RS-232C or USB or Combo
T: Serial(TTL)
※Power Input
H : 9 ~ 24V
L : 5 ~ 8.5V

Title
Rev.
Page
HPP-240
Ver1.0
P.7
2. Operation
2-1) Paper Change
Follow the direction below for the paper change.
Pull out
②Set the paper orientation so that the end of the
paper is clear as shown in the picture.
①Open the cover by pressing down
on the lever.
③ Paper direction should not be flipped as
shown on the picture
④ Close the cover, press feedswitch, feed
a certain amount, then cut it manually.
Feed Switch

Title
Rev.
Page
HPP-240
Ver1.0
P.8
2-2) Self Test Print
You can start the self test by turning on the printer while pressing down on the feed
button, and the suggested material on the self test print is shown below.
●Model Name
●Firmware Version and Created
Date
●Interface Configuration
●Dip SW Configuration
●Sample Print
※When shipped out, the Dip Switch is not included in the factory default and it will be
set on 19200 baudrate, 8 bit, non-parity mode as a default.
******************************
HPP-240 Control Board
Firmware :: VerX .XX
Create : 20XX/XX/XX
******************************
Interface and Setting information
Interface : USB & RS-232C
Baud Rate : 19200
Data Bit : 8 Bit
Parity : None
Stop Bit : 1 or 2
Peripheral & Setting Information
USB Status : B
Auto Cutter :: BuiIt-in

Title
Rev.
Page
HPP-240
Ver1.0
P.9
2-3) HEX Dump Print
Turn on the power after placing the Dip SW1 number 8 to ON position. After printing as
[HEX DUMP MODE], it will print all receiving datas to 16 hexadecimal data for all
receiving datas. This would be useful when developing an application because this
notifies the transmission status.
Prints if 12 digits is received.
Data under 12 digits will print when you press the feed button.
Control Code (Below 1F16) prints as “.”
Prints as “^” when 8016 or above.
[Print Sample]
16 hexadecimal indicator ASCII indicator
[HEX DUMP MODE]
41 42 43 44 45 46 47 47 49 A B C D E F G H I
30 31 32 33 34 35 36 37 38 0 1 2 3 4 5 6 7 8
FF 1B 69 ^ . i
This manual suits for next models
1
Table of contents
Other Hwasung Printer manuals


