I-Data 95 User manual


Table of Contents
1 Introduction ............................................................................................................1
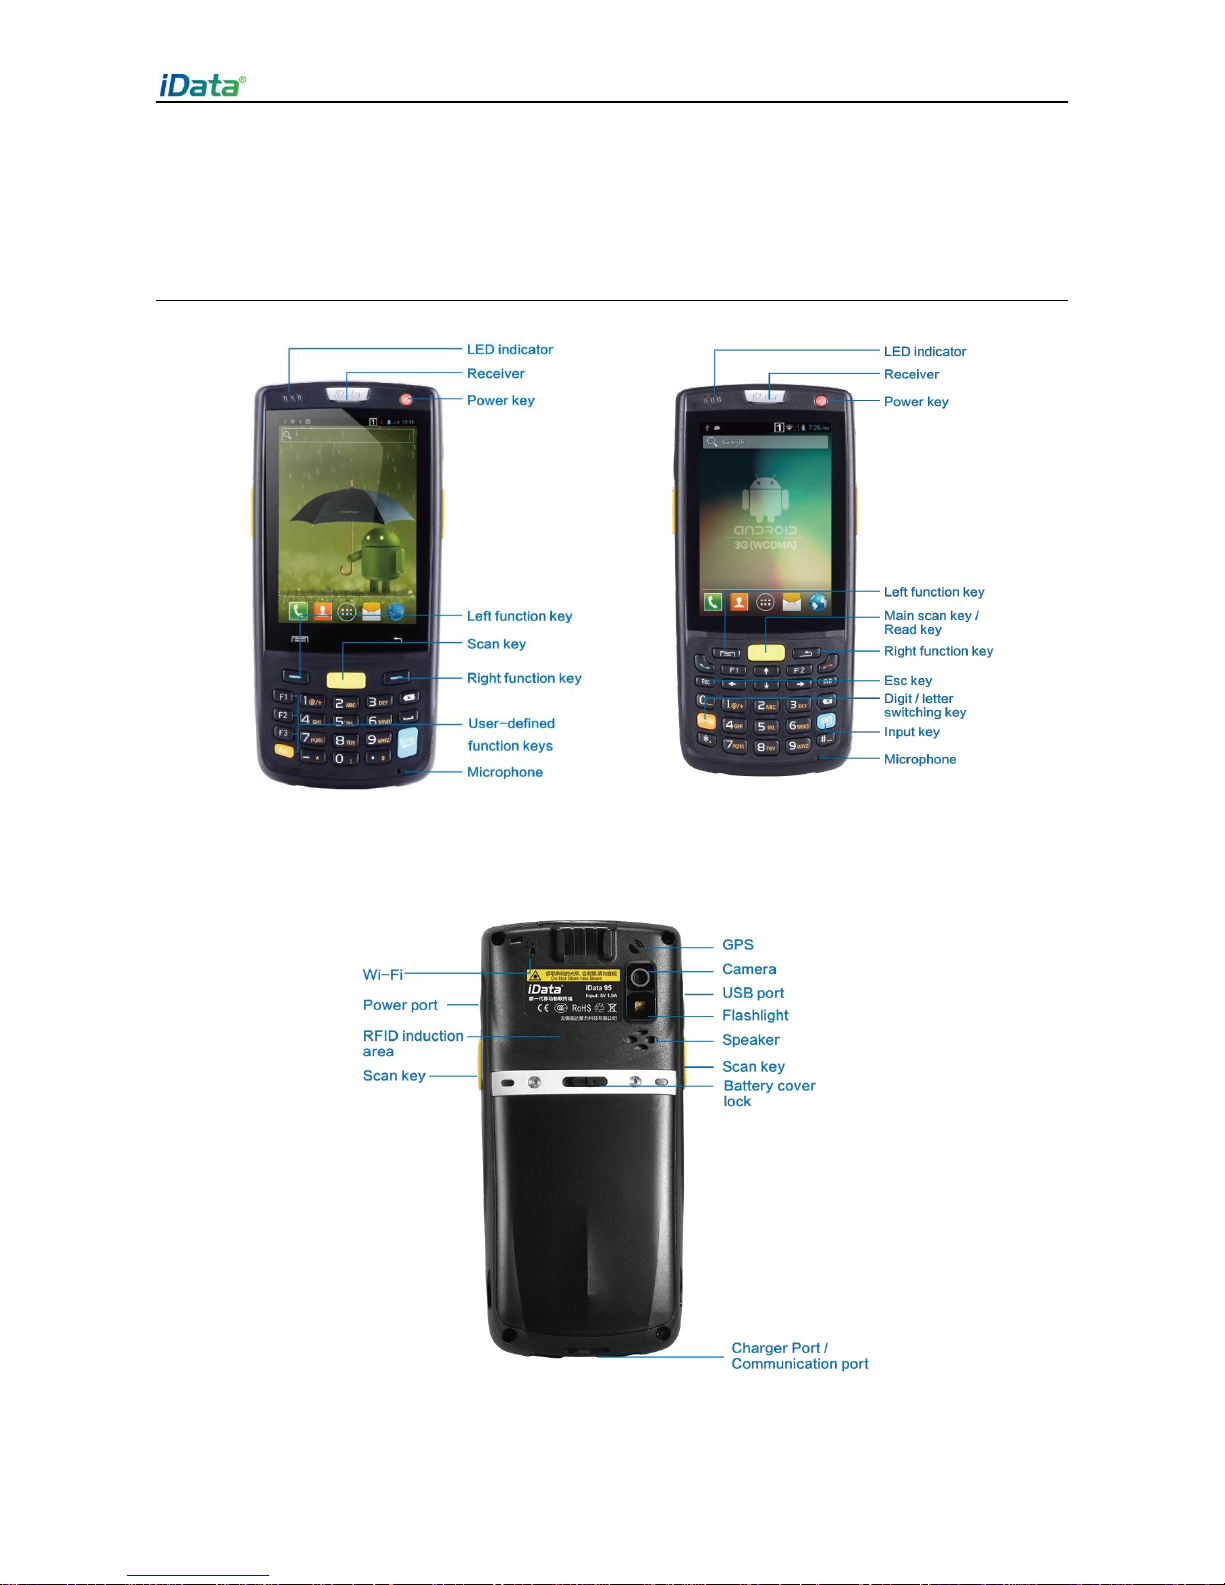
1.1 Appearance of iData 95.............................................................................................................1
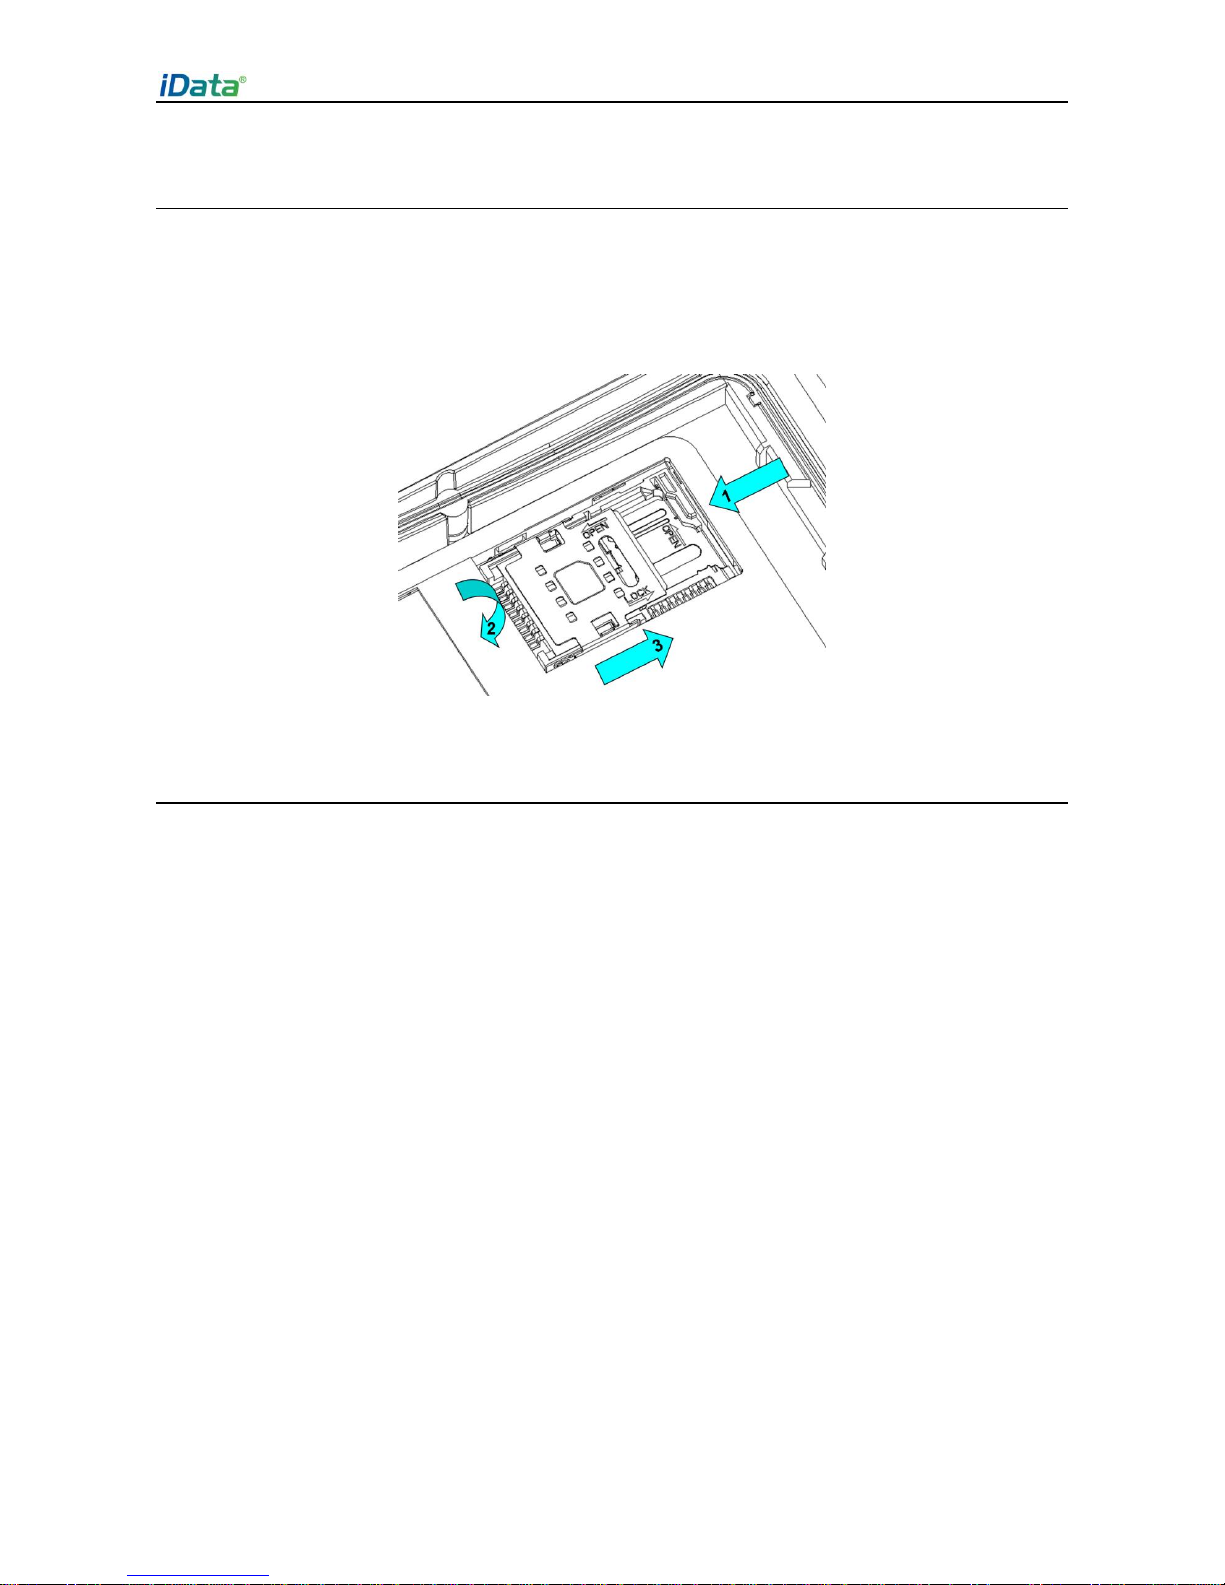
1.2 Installing an SD Card.................................................................................................................2
1.3 Installing a SIM Card..................................................................................................................3
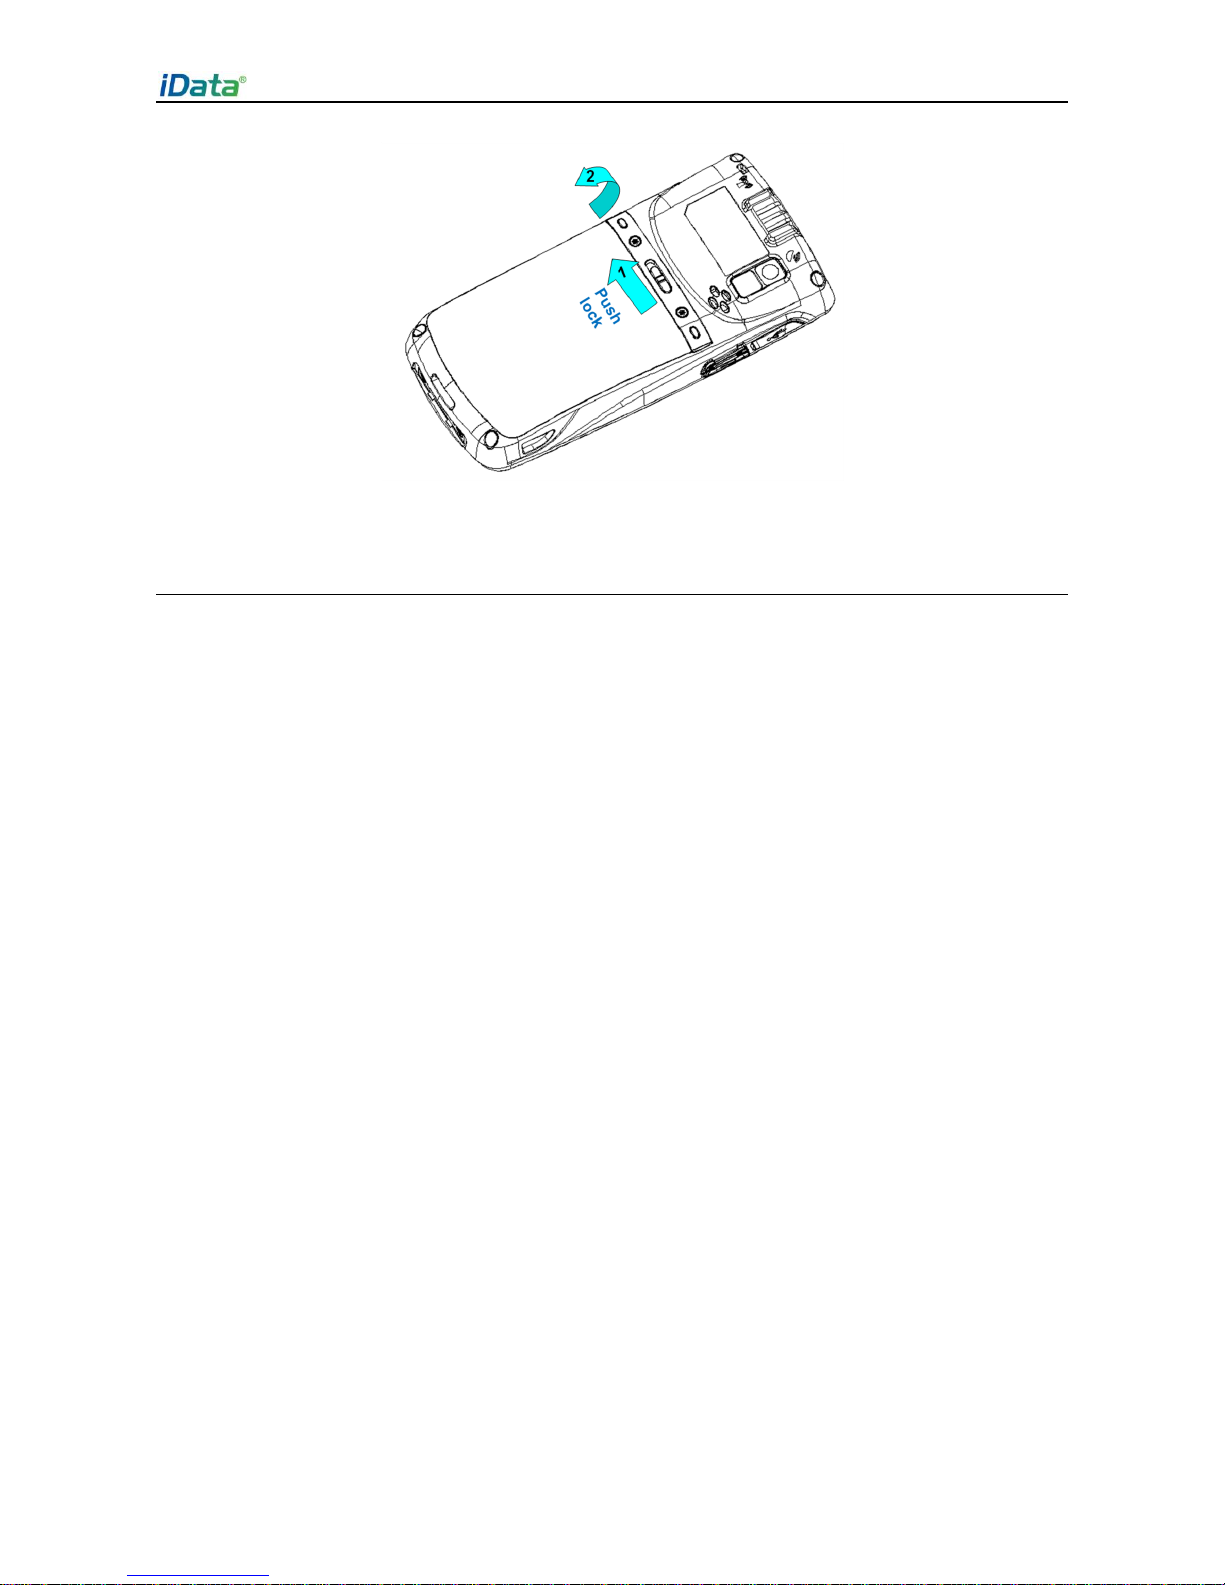
1.4 Installing a Battery......................................................................................................................3
1.5 Disassembling the Battery Cover.............................................................................................4
1.6 Charging.......................................................................................................................................5
2 Instructions on the iData 95...............................................................................6
2.1 Power-on and Power-off............................................................................................................6
2.2 Locking and Unlocking the iData 95........................................................................................6
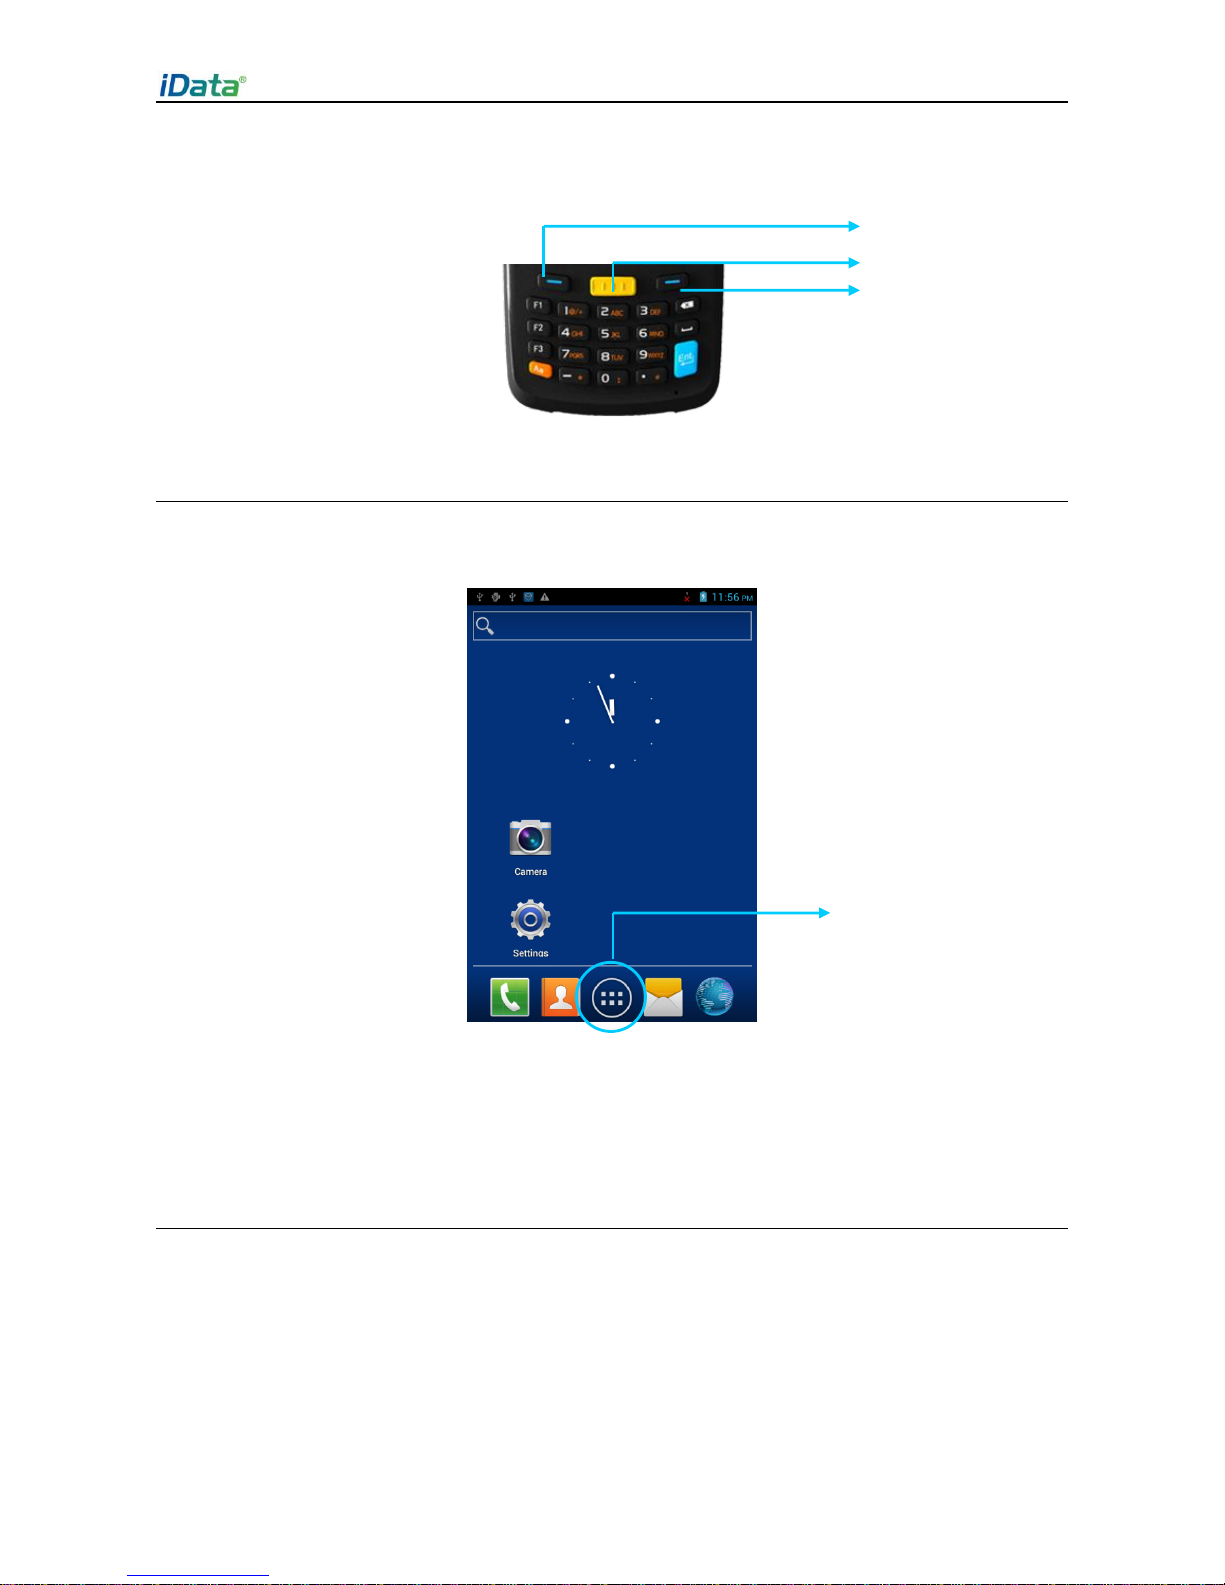
2.3 Keys of iData 95..........................................................................................................................6
2.4 Home............................................................................................................................................7
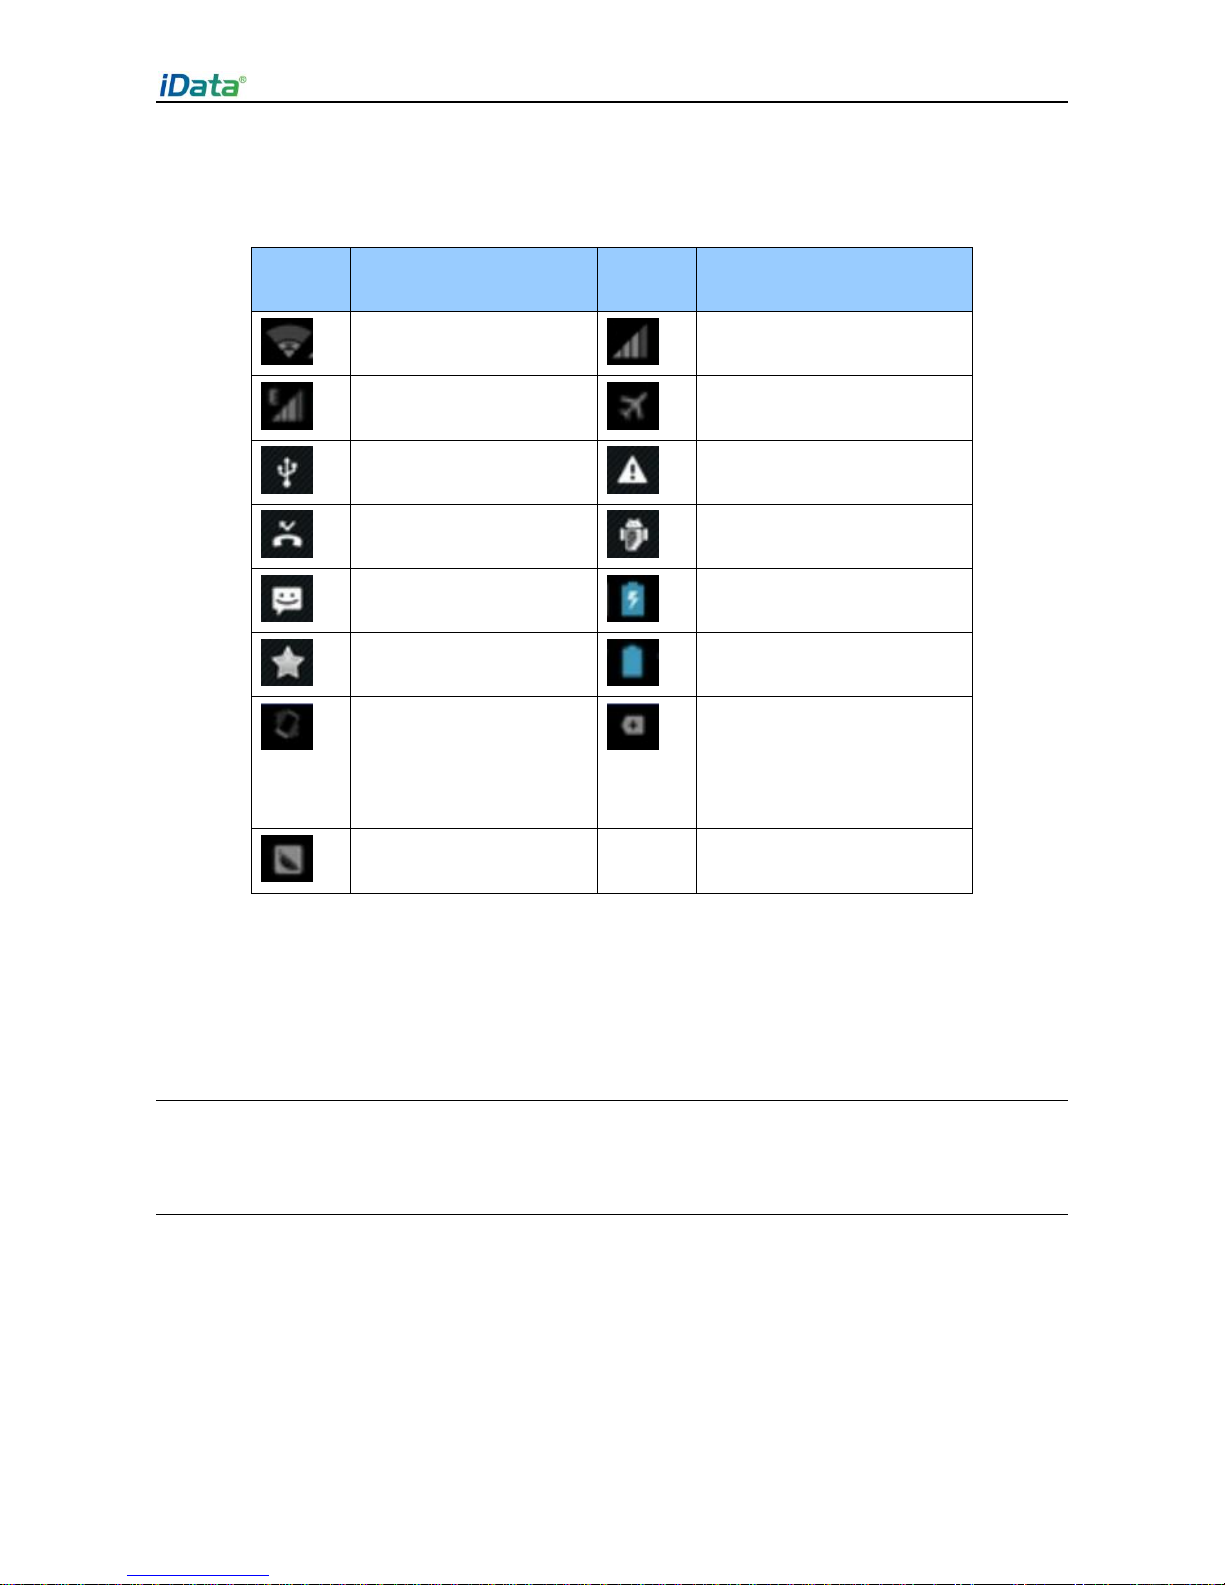
2.5 Status Icons and Indicators.......................................................................................................7
2.6 Basic Settings..............................................................................................................................8
3 Call Function ........................................................................................................12
3.1 Making a Call.............................................................................................................................12
3.2 Contacts.....................................................................................................................................12
3.3 SMS and MMS..........................................................................................................................13
3.4 Email...........................................................................................................................................14
4. Network and Connection Synchronization.................................................16
4.1 Data Connection.......................................................................................................................16
4.2 Wi-Fi Network Connection.......................................................................................................18
4.3 GPS.............................................................................................................................................18
4.4 Connecting iData 95 to a Computer......................................................................................19
4.5 Synchronization.........................................................................................................................20
5. Introduction to iScan of the iData 95............................................................21
5.1 Installing and Using iScan.......................................................................................................21
6 Managing iData 95...............................................................................................22
6.1 Installing Software ....................................................................................................................22
6.2 Uninstalling Programs..............................................................................................................22
6.3 Managing Applications.............................................................................................................23
7 Precautions and Troubleshooting..................................................................24
7.1 Precautions for iData 95..........................................................................................................24
7.2 Troubleshooting.........................................................................................................................25
Appendix...................................................................................................................28

iData 95 User Manual
- 1 -
1 Introduction
1.1 Appearance of iData 95
Figure 1-1 Front view of iData 95W Figure 1-2 Front view of iData 95V
Figure 1-3 Rear view of iData 95

iData 95 User Manual
- 2 -
1.2 Installing an SD Card
To install an SD card, do as follows:
1. Push the card cover along the direction marked on the cover and open the cover.
2. Insert an SD card.
3. Press the SD card downward and lock the card along the IN direction marked on the
cover.
1
Figure 1-3 Inserting an SD card

iData 95 User Manual
- 3 -
1.3 Installing a SIM Card
To install a SIM card, do as follows:
1. Insert a SIM card along the direction, as shown in Figure 1-4.
2. Press the card cover downward.
3. Push the SIM card along the LOCK direction to lock the card cover.
Figure 1-4 Inserting a SIM card
1.4 Installing a Battery
To install a battery, do as follows:
1. Push the battery to the bottom of the battery compartment.
2. Press the top of the battery downward to tighten the battery.
3. Push the joint at the bottom of the battery cover into the back shell.
4. Push the lock to the left and press the battery cover downward until the lock
automatically returns to the location on the right.

iData 95 User Manual
- 4 -
Figure 1-5 Installing a battery
1.5 Disassembling the Battery Cover
To disassemble the battery cover, do as follows:
1. Insert your left forefinger into the upper left part of the battery cover and push the lock to
the left by using the thumb.
2. Pull out the battery cover.

iData 95 User Manual
- 5 -
Figure 1-6 Disassembling the battery cover
1.6 Charging
You can charge the iData 95 in the following ways:
1. Charge the iData 95 by using bottom charging cable.
2. Connect the iData 95 to a PC by using a USB cable to charge the iData 95.
In the charging status, the LED is red. When the LED becomes blue, charging is complete.
When the battery volume is insufficient, the iData 95 displays alarm information.
When the battery volume is too low, the iData 95 is automatically powered off.
★Caution
The battery can be charged for more than or less than three hours. The battery will not be
damaged if charging is interrupted. The duration of the battery depends on different
applications of the iData 95, for example, selected functions of iData 95, usage mode, and
data transmission.
★Tips
To ensure a longer standby time of the iData 95, follow the following tips:
Always connect the iData 95 to the AC power supply when you do not use it.
In settings, set the time to sleep to a smaller value for the iData 95 by selecting Home >
Applications > Settings > Display > Screen Delay.
Stop all wireless activities when you do not use the iData 95.

iData 95 User Manual
- 6 -
2 Instructions on the iData 95
2.1 Power-on and Power-off
After installing a SIM card and a battery and fully charging the iData 95, you can use the
iData 95.
1. To power on the iData 95, press and hold the On/Off key for some time. The
power-on page is displayed. After the guiding progress is complete, the iData 95 enters
the Android system. It takes some time to initialize the iData 95. Please wait patiently.
2. To power off the iData 95, press and hold the On/Off key for some time. After a
dialog box for powering off the iData 95 is displayed, click Power Off.
2.2 Locking and Unlocking the iData 95
Locking iData 95
Press and hold the On/Off key for a short time to lock the iData 95. If you do not
perform any operation within the default and preset time to lock the iData 95, the iData 95 is
locked automatically.
Unlocking the iData 95
Press and hold the On/Off key for a short time and
slide the unlock key on the screen to the right to unlock the iData 95.
2.3 Keys of iData 95
The iData 95 provides a physical keypad that has 22 keys, as shown in the following figure.
Keys are divided into function keys, numeric keys, symbolic keys, and scan keys.
On the physical keypad of the iData 95, the left and right function keys and the yellow scan
key correspond respectively to the menu key, return key and scan key.

iData 95 User Manual
- 7 -
Scan key: Used to scan data.
Return key: Used to return to the previous operation page.
Menu key: Used to display a menu.
2.4 Home
The iData 95 has five home pages. Slide to the left or right to switch among the pages.
Click any application on the home page to start the application.
★Tips
You can add application icons in blank space of the home page.
Click the application tray to view all applications.
2.5 Status Icons and Indicators
Status icons and indicators are in the status bar in the upper part of the screen and show
device status and notifications.
Return key
Application tray
Home key
Menu key

iData 95 User Manual
- 8 -
Table 2-1 Status icons
Icon
Description
Icon
Description
WLAN
Signal strength
EDGE
Offline mode
USB connection
Internet access restricted
Missed calls
USB debug
New messages
Charging
Modem logs
Full power
Mute mode
There are multiple
notification icons, which are
beyond the scope of display.
Connect to Pea
★Note
The applications of the iData 95 are often upgraded. Therefore, the status icons may be
different from those on the iData 95. The actual status icons prevail.
2.6 Basic Settings
2.6.1 Date and Time Setting
To change the date and time in the iData 95, do as follows:
Select Settings > Date & time and click Set Date or Set time.

iData 95 User Manual
- 9 -
2.6.2 Display Settings
Find the following icon:
Select Settings > Display and set display options such as Brightness, Wallpaper,
Auto-rotate screen, and Font size.
2.6.3 Ringtone Setting
Select Settings > Audio Profiles and click General/Silent/Meeting/Outdoor to set the
ringtone in the corresponding mode.

iData 95 User Manual
- 10 -
2.6.4 Security Setting
Select Settings > Reset > Factory date reset.
Click Clear all. The iData 95 starts to restore the factory settings.
★Caution
This operation will clear the following data in the iData 95:
Account
Data and settings of the system and applications
Downloaded applications
This operation does not clear the following data:

iData 95 User Manual
- 11 -
Current system software and bound applications
Files in the SD card, for example, music and pictures
2.6.5 Language and Input Setting
Select Settings > Language and input. In the displayed list, select the desired language.
Click Default and select the desired input in the list.
2.6.6 Shortcuts
You can add shortcut icons on the home page of the iData 95.
On the home page, click the application tray icon, select and drag the icon to be added to
the home page.
2.6.7 Widgets
You can add widgets such as clock, music player, and calendar on the home page of the
iData 95.
On the home page, click the application tray icon, slide the screen to the widget page,
select and drag the widget to be added to the home page.
Click the icon of the widget to open the widget.

iData 95 User Manual
- 12 -
3 Call Function
3.1 Making a Call
Find the following icon:
1. Enter a telephone number by pressing number keys.
2. Click .
3. Click to terminate the call.
3.2 Contacts
Find the following icon:
1. Click Contacts to open the contact list.
2. To add a contact, click .
3. To import or export contacts, press the menu key to open the menu and click
Import/export.
4. To edit or delete a contact, select a contact, press the menu key to open the menu and
click Edit or Delete.
Contact
Call record
Voice call
Virtual numeric keypad

iData 95 User Manual
- 13 -
3.3 SMS and MMS
Find the following icon:
1. Click and enter the message recipient and the text to be sent.
2. Click to send the message.
3. On the message editing page, press the menu key to open the menu and click Add
Subject. Convert the message to be sent into a multimedia message and click .
★Tips
Click to add attachments such as picture, video, and audio files.

iData 95 User Manual
- 14 -
3.4 Email
You can send or receive emails.
★Note
To create an email account on the iData 95, you need to set the account on a PC. For
example, to create a QQ email account, log in to the QQ mailbox, click Settings in the
upper right corner of the mailbox to access the account options. Find the server options and
email receiving options, select all, and click Save.
To set a mailbox on the iData 95, do as follows:
Find the following icon:
1. Enter the email address and password and click Next. The system starts to connect the
email account.
2. Set Inbox checking frequency and click Next.
3. Create a name for this account and click Next. The Inbox page is displayed.

iData 95 User Manual
- 15 -
To delete an account, do as follows:
1. On the mailbox page, press the menu key and click Settings.
2. Click the email account to be deleted and access the setting page.
3. Click Remove account.

iData 95 User Manual
- 16 -
4. Network and Connection Synchronization
4.1 Data Connection
By default, the network is configured for the device upon delivery. If you delete the network
configuration by mistake, you can manually select a network through software
configuration.
In hardware, different antennas are used in two network modes. In software, you need to
perform the following configuration: Select Settings > More > Mobile Networks >
Network Mode and manually select the CDMAor GSM network.
Select one of the options in the figure accor
ding to actual conditions.

iData 95 User Manual
- 17 -
After a GPRS data connection is established, you can access the Internet.
To establish a GPRS data connection, ensure that a SIM card is installed in the iData 95.
Generally, the iData 95 has configured Internet access. If you delete the default
configuration by mistake, set the network as follows (assume that China Mobile’s network is
used):
Select Settings > More > Wireless & networks > APN > CMNET and set the following
options as follows:
Name: CMNET
APN: cmnet
APN type: default,supl,net
Proxy: null
Port: null
User name: null
Password: null
Server: null
MMSC: null
MMS proxy: null
MMS port: null
MCC: 460
MNC: 02
Identity authentication type: null
APN protocol: IPv4
Enable/disable APN: APN enabled
Bearer system: null

iData 95 User Manual
- 18 -
4.2 Wi-Fi Network Connection
Select Settings > Wireless & networks > WLAN.
1. Click On for Wi-Fi. The system starts to search for the network. If the WLAN is enabled,
click Scan. The iData 95 list the searched networks.
2. Click the network to be connected and enter the password in the displayed dialog box.
3. Click Connect to complete the Wi-Fi connection.
4.3 GPS
The iData 95 is equipped with a high-performance navigation chip and can obtain position
information quickly and accurately. The manufacturer of the iData 95, Wuxi iData
Technology Company Ltd., provides GPS Test, which is a GPS demonstration program.
Before using the GPS, install GPS Test. You can download GPS software (for the
information related to GPS software and HiMarket, see relevant description in 6.1 Installing
Software) from HiMarket and view position information.
点按连接至网络
Click to enable Wi-Fi and
search for networks
Click to connect to the
network
Other manuals for 95
2
Table of contents
Other I-Data Cell Phone manuals