i-team i-mop XL Plus User manual

2
Original user manual, written in the English Language
Future Cleaning Technologies B.V.
Hoppenkuil 27b, 5626 DD Eindhoven, The Netherlands
Telephone: +31402662400
Email: hello@i-teamglobal.com
Internet: www.i-teamglobal.com
Model: i-mop XL Plus
Date: 28/04/2020
Product code: K.1.IMOPXLP.FCT.7
Version: 2.0

3
Preface
Thank you for choosing the i-mop® XL Plus, the industrial auto scrubber that cleans faster, cleaner,
safer, greener, and is better for everyone. The i-mop XL Plus' compact design allows you to clean
right to the edge and under obstacles, minimizing manual scrubbing. The battery operated i-mop XL
Plus is equipped with two counter-rotating brushes that provide a deep scrub and a great cleaning
result. The i-mop XL Plus significantly reduces the amount of water and chemicals needed which both
leads to a greener result and reduces the risk of slippery floors.
Please read this manual carefully for important information and operating instructions before using
the i-mop XL Plus. Save this manual for future reference. This i-mop XL Plus will provide excellent
performance. The best results will be obtained when the i-mop XL Plus is:
•Regularly maintained per the i-mop XL Plus preventive maintenance instructions in this manual.
•Operated with reasonable care and caution.
•Maintained with manufacturer-supplied parts.
When this manual refers to “the manufacturer”, this means Future Cleaning Technologies B.V., an
affiliate company of i-team in Eindhoven, the Netherlands. When this manual mentions “the
partner”, this refers to your local i-team resell and support service partner.
Purpose of the user manual
The purpose of the user manual is to provide the user with information in such a way that during the
life of the i-mop XL Plus the machine is used correctly, efficiently and safely, even in the event of
reasonably foreseeable misuse, as described in section 1.2 of this manual.
The user manual contains instructions regarding:
•Personal operator safety
•Intended and non-intended use of the i-mop XL Plus
•Instructions for daily use
•Maintenance instructions
•Storage conditions
•Disposal of the i-mop XL Plus
These instructions must be considered to avoid risks that could lead to physical and/or material
damage.
Target audience
This user manual is intended for operators of the i-mop XL Plus and their supervisors, as well as
partners and importers.
Operators of the i-mop XL Plus
The i-mop XL Plus may only be operated by a person who has correctly read and understood the
instructions in this manual or is trained by an experienced operator who has read and understood
the instructions in this manual.

4
Reading guide
The following symbols and terms are used throughout this manual to alert the reader to
safety issues and important information:
Symbol
Term
Explanation
WARNING
Indicates a hazardous situation which, if the safety
instructions are not followed, can lead to injuries of the
operator or bystanders and light or moderate damage
to the product or the environment.
CAUTION
Indicates a hazardous situation which, if the safety
instructions are not followed, can lead to light and / or
moderate damage to the product or the environment.
ATTENTION
Indicates a liability situation, where the manufacturer
or its partners and affiliates cannot be held accountable
for damages caused by non-compliance.
STRONG MAGNET
Indicates the machine contains strong magnets. These
can cause pacemakers to stop working or cause
electronic data to be damaged, such as information
stored on access passes.
PACEMAKER
Indicates operators and maintenance crew wearing
pacemakers should keep a minimal distance of 6 in / 15
cm. In this specific case operators may not use the
machine as a backpack.
BATTERIES
Indicates a battery-operated machine, batteries must
be charged according to the instructions in the separate
class I battery charger user manual. Batteries must be
disposed of according to your local laws and
regulations.
SLIPPERY SURFACE
Indicates the machine can cause floors to become
slippery. In the workplace, it is advised to place slippery
surface signs in these areas.

5
Content
Preface .................................................................................................................................................................... 3
Purpose of the user manual.................................................................................................................................... 3
Target audience ...................................................................................................................................................... 3
Operators of the i-mop XL Plus ............................................................................................................................... 3
Reading guide.......................................................................................................................................................... 4
1Introduction.................................................................................................................................................... 7
1.1 Intended use of the product.................................................................................................................. 7
1.2 Non-intended use of the product.......................................................................................................... 8
1.3 Lifespan.................................................................................................................................................. 8
1.4 Modifications......................................................................................................................................... 8
1.5 Specifications......................................................................................................................................... 9
1.6 Warranty.............................................................................................................................................. 10
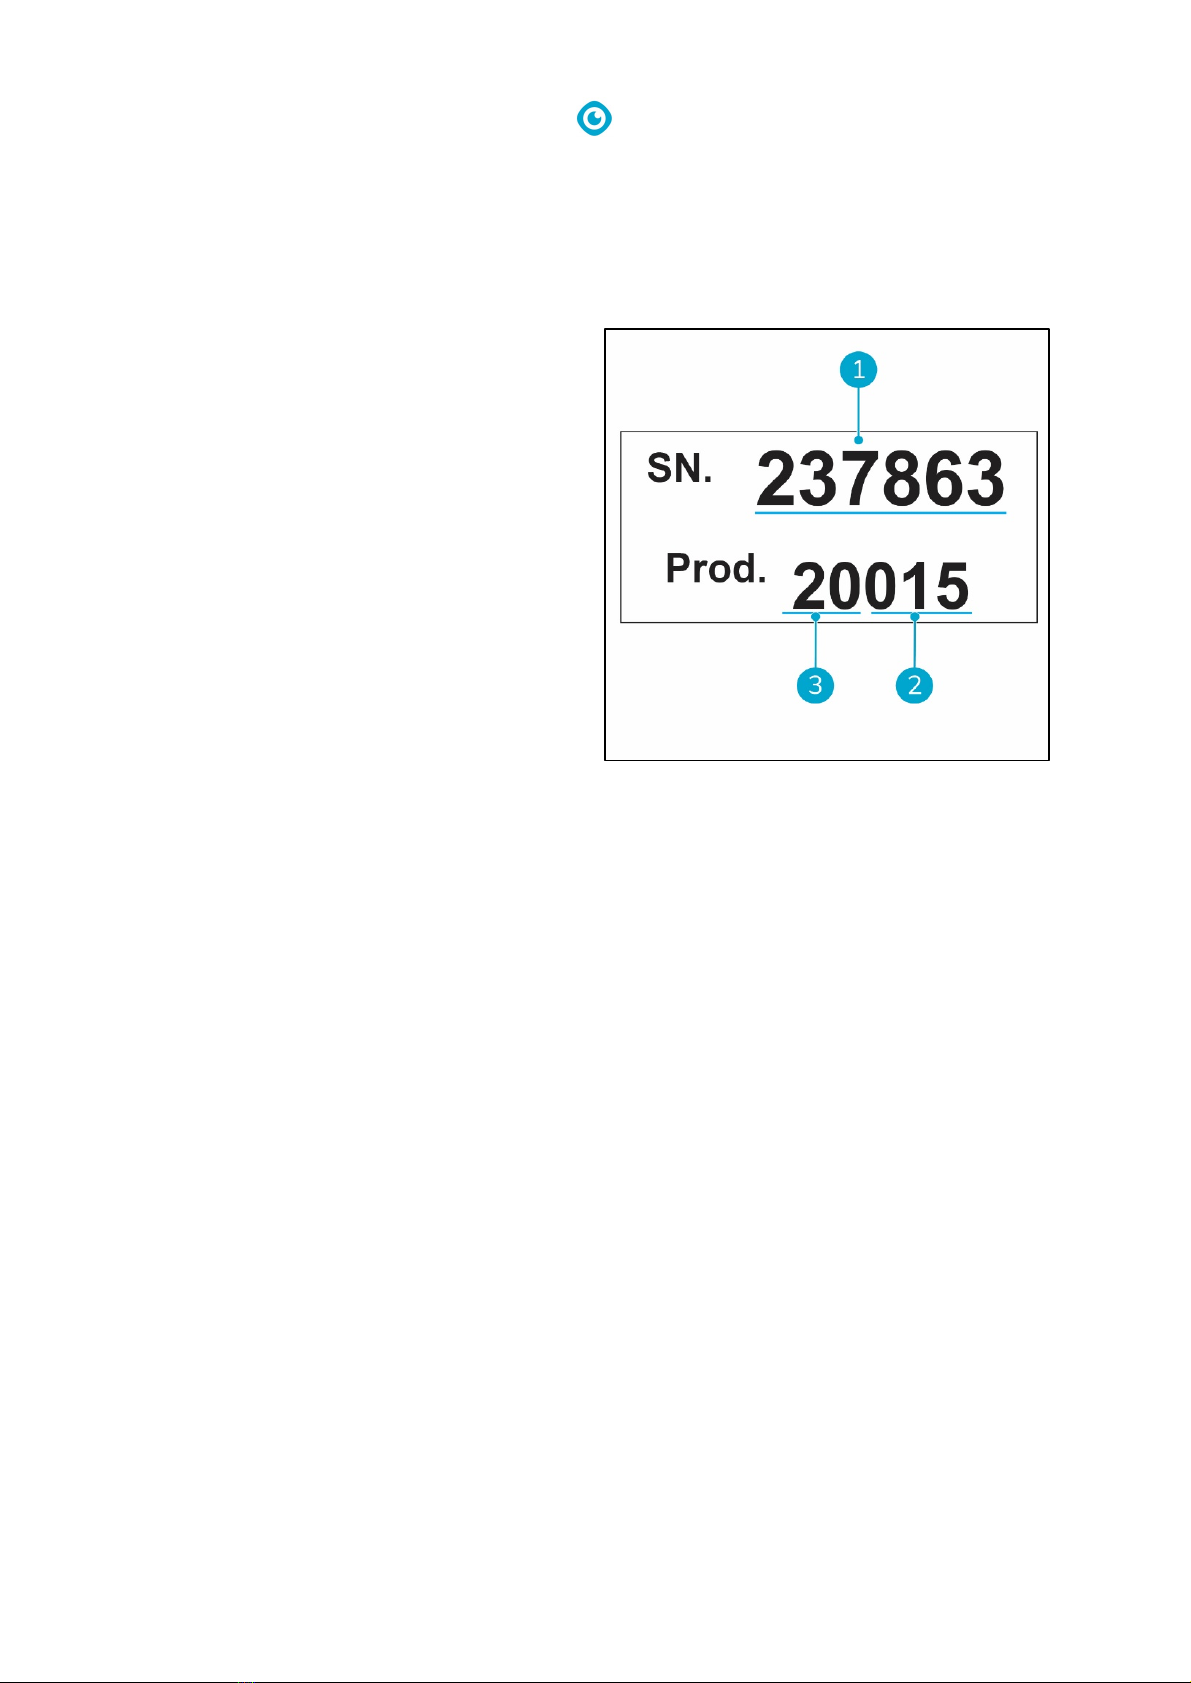
1.7 Identification ....................................................................................................................................... 10
2Description ................................................................................................................................................... 11
3Safety............................................................................................................................................................ 12
3.1 General safety instructions.................................................................................................................. 12
3.1.1 Sweep before scrub......................................................................................................................... 12
3.1.2 Brush condition ............................................................................................................................... 12
3.1.3 Machine orientation........................................................................................................................ 12
3.1.4 Strong magnets ............................................................................................................................... 12
3.1.5 Batteries .......................................................................................................................................... 12
3.2 Risks during operation......................................................................................................................... 13
3.2.1 Dress safely ..................................................................................................................................... 13
3.2.2 Mark the job site ............................................................................................................................. 13
3.2.3 Careful when parking ...................................................................................................................... 13
3.3 Risks after operation............................................................................................................................ 13
3.3.1 Remove battery packs..................................................................................................................... 13
3.3.2 Machine orientation........................................................................................................................ 13
4Transport and storage .................................................................................................................................. 14
4.1 General ................................................................................................................................................ 14
4.2 Park position........................................................................................................................................ 14
4.3 Transport outside ................................................................................................................................ 15
4.4 Transport in a vehicle .......................................................................................................................... 16
5Assembly and installation............................................................................................................................. 17
5.1 Unboxing.............................................................................................................................................. 17
5.2 Assembly.............................................................................................................................................. 18
5.2.1 Charge the batteries........................................................................................................................ 18

6
5.2.2 Attach the brushes .......................................................................................................................... 18
5.2.3 Attach the squeegee ....................................................................................................................... 19
5.2.4 Install recovery tank ........................................................................................................................ 19
5.2.5 Install cleaning solution tank........................................................................................................... 20
6Operation ..................................................................................................................................................... 21
6.1 Before you start................................................................................................................................... 21
6.1.1 Insert the batteries.......................................................................................................................... 21
6.1.2 Fill the cleaning solution tank ......................................................................................................... 21
6.2 Operation procedure........................................................................................................................... 22
6.2.1 Walking to the job site .................................................................................................................... 22
6.2.2At the job site .................................................................................................................................. 23
6.2.3 ECO mode........................................................................................................................................ 25
6.2.4 Water level warning indicator......................................................................................................... 26
6.2.5 Turn off the i-mop® XL Plus ............................................................................................................. 26
6.2.6 Emptying tanks................................................................................................................................ 26
6.3 Cleaning and storage ........................................................................................................................... 27
6.3.1 Flush the system.............................................................................................................................. 27
6.3.2 Cleaning the tanks........................................................................................................................... 27
6.3.3 Removing battery packs .................................................................................................................. 27
6.3.4 Check the brushes and squeegee.................................................................................................... 28
6.3.5 Store in an upright position............................................................................................................. 28
7Maintenance ................................................................................................................................................ 29
7.1 Brush replacement .............................................................................................................................. 29
7.2 Squeegee replacement........................................................................................................................ 30
7.2.1 Detach the squeegee....................................................................................................................... 30
7.2.2 Flip/replace the squeegee blade..................................................................................................... 30
7.2.3 Attach the squeegee ....................................................................................................................... 31
7.3 Replace vacuum hose .......................................................................................................................... 31
7.4 Recommended additional cleaning ..................................................................................................... 31
7.5 Recommended service time ................................................................................................................ 32
7.6 Accessories .......................................................................................................................................... 32
8Troubleshooting ........................................................................................................................................... 33
9Decommissioning and disposal .................................................................................................................... 34
10 Attachments ................................................................................................................................................. 35
10.1 CE Certificate ....................................................................................................................................... 35

7
1Introduction
The i-mop® XL Plus is an easy and safe machine to use. This manual helps you to get started and
explains the operation and maintenance procedure. You will be pleasantly surprised by the fast and
effective use of the battery operated i-mop XL Plus. The batteries used in the i-mop XL Plus are the
same as a variety of battery powered i-team products. The batteries must be fully charged before
use. Please refer to the user manual of the class I battery charger for correct procedure.
This manual is intended for those who work with the i-mop XL Plus and/or perform daily
maintenance. The manual must be read in full before the first actions. This manual describes the
correct method of use, safety measures, maintenance and transport.
The manufacturer continuously improves all their products based on user experience and feedback.
Any deviations between the texts and/or images from the manual and your i-mop XL Plus can
therefore arise from the difference in model or from possible changes due to continuous
development and innovation.
1.1 Intended use of the product
The i-mop XL Plus is a specialized machine for
scrubbing hard floor surfaces. You can use any
type of water
-based scrubbing detergent.
The fluid tank, brushes and squeegee come in
HACCP color coded
versions (blue, green, red,
yellow and orange). All th
ree items are easily
replaced. T
his allows you to use different
cleaning solutions
, — for instance, when you
move from the food preparing area to the
restaurant.
ALWAYS use the same color for fluid
tank
, brush and squeegee.
Figure 1

8
1.2 Non-intended use of the product
WARNING
Non-intended use can have consequences for the safety of operators and bystanders
and will void the warranty on the product.
•NEVER operate the i-mop® XL Plus near flammable dusts, liquids or vapors.
•NEVER operate the i-mop XL Plus when flammable or poisonous liquids like gasoline, oil, acids, or
other volatile substances are on the floor.
•DO NOT fill the i-mop XL Plus with any flammable detergent. ONLY use the water-based cleaning
solutions.
•DO NOT use water that exceeds 113° F/45° C. Using water above this temperature will void the
tank warranty.
•DO NOT use cleaning solutions with pH below 3 or above 11 in order to prevent damage to
sensitive components.
•DO NOT use the i-mop XL Plus outdoors or on uneven surfaces.
•DO NOT operate this i-mop XL Plus over electrical floor outlets in order to avoid electrical shock.
•NO RIDERS!Do not carry passengers on top of the i-mop XL Plus.
•DO NOT use the i-mop XL Plus as stepladder or platform.
•DO NOT store the i-mop XL Plus outside in order to avoid damage to electronic components.
•ONLY use manufacturer-supplied parts for maintenance.
•KEEP AWAY from children! The i-mop XL Plus is a professional cleaning machine to be used by
trained adults only.
1.3 Lifespan
Each i-mop XL Plus is guaranteed to operate for at least 2000 hours. The wear on brushes and
squeegee heavily depends on the roughness of the surface. They need to be checked regularly.
CAUTION
To ensure proper and safe operation throughout the life of the i-mop XL Plus, the
machine must be checked every 500 hours by an authorized i-team partner.
1.4 Modifications
It is not permitted to make modifications to the design of the i-mop XL Plus without consultation and
permission from the manufacturer. This affects the warranty, refer to section 1.6 of this manual.

9
1.5 Specifications
Product size:
120 x 48 x 46 cm
Product size in park position:
120 x 48 x 36 cm
Weight (including batteries):
22.5 kg
Li-on battery:
DC (25.2V, 14Ah, 353Wh)
Battery capacity:
2 batteries
Operation time of batteries:
90 min
Brush pressure:
31.5 gr / cm2
Brush speed:
350 RPM
Detergent tank capacity:
4 L
Recovery tank capacity:
6 L / 4 L recommended max
Vibration:
Amplitude (mm): <0.4442
Velocity (m/s): <0.008
Acceleration (m/s²): 0.943
Noise level (1m):
79.6 Db
Theoretical performance:
Up to 1800 m2per hour
Practical performance:
1000 - 1300 m2per hour
Scrub deck coating
YES
Castor wheels:
YES
Power cut off at park position:
YES
Angle power cut off:
YES < 45°
Floating ball for recovery tank:
YES
Timer:
YES
Figure 2

10
1.6 Warranty
The i-mop® XL Plus should be used as intended and described in this manual. Using the i-mop XL Plus
outside will void the warranty on the product.
1.7 Identification
The ID tag, containing a serial number and
production number, can be found on the bar
behind the wastewater tank.
1.
Serial number
2.
Production day
3.
Production year
Figure 3

11
2Description
The compact i-mop® XL Plus consists of two main parts:
•The body that contains the motor, cleaning solution tank, recovery tanks, handle with triggers and
control panel.
•The scrub deck that contains the brushes and squeegee.
The i-mop XL Plus can be folded into a park position; this is recommended for storage.
The i-mop XL Plus consists of:
Figure 4
Legend
1.
Trigger
6.
Vacuum hose
2.
Control panel
7.
Rotating brushes
3.
Batteries
8.
Squeegee
4.
Scrub deck
9.
Solution tank
5.
Recovery tank

12
3Safety
Safety comes first. Therefore, please take your time to read and understand these safety
instructions. Improper use can cause harm or void the manufacturer’s warranty.
3.1 General safety instructions
3.1.1 Sweep before scrub
Remove objects from the floor that can be propelled by the rotating brushes.
3.1.2 Brush condition
Make sure to check the condition of the brush before use. Change the brush only when the machine
is turned off in a park position.
3.1.3 Machine orientation
Always keep the body of the i-mop® XL Plus in an upright position when cleaning fluid or batteries
are inserted.
3.1.4 Strong magnets
CAUTION
Please be aware of the integrated magnets that hold the fluid tanks in place.
WARNING
Operators and maintenance crew wearing pacemakers should keep a minimal distance
of 6 in/15 cm.
3.1.5 Batteries
Always use the automatic battery charger provided by the manufacturer.
CAUTION
During normal operation, the 24V batteries cause no safety hazard on their own. Please
keep the following safety instructions regarding the batteries in mind:
•Do not crush, pierce or damage in any way.
•Do not heat or incinerate.
•Do not short-circuit.
•Do not dismantle.
•Keep dry.
•Only charge between 5° C~40° C / 41° F~104° F.
•Only use between 5° C~45° C / 41° F~113° F.

13
3.2 Risks during operation
3.2.1 Dress safely
Do not wear a necktie, scarf, or any loose or dangling clothing or jewelry while operating the i-mop®
XL Plus. These can tangle in rotating parts, causing serious injury or death.
3.2.2 Mark the job site
The i-mop XL Plus is designed to leave a dry floor without slippery patches, no additional drying is
required. When running the i-mop XL Plus with the vacuum function OFF please mark the job site
with a wet floor marker.
CAUTION
Marking the jobsite with a wet floor marker is not required when using the vacuum
function of the i-mop XL Plus. Unless this is a mandatory work safety requirement by
local law. When unsure: mark the job site to warn passersby.
3.2.3 Careful when parking
Do not park the i-mop XL Plus on ramps or slopes. Always park the i-mop XL Plus on a level, hard
surface.
3.3 Risks after operation
3.3.1 Remove battery packs
It is best practice to remove the batteries before executing any cleaning or maintenance task, or
before storage.
3.3.2 Machine orientation
Always keep the body of the i-mop XL Plus in an upright (park) position when replacing brushes or
squeegee.

14
4Transport and storage
4.1 General
CAUTION
Always keep the body of the i-mop® XL Plus in an upright position when filling the cleaning
solution tank or inserting the batteries.
Before storage or transport, drain the machine and remove the batteries after each use.
4.2 Park position
The park position is the upright vertical position for storage and maintenance tasks.
1. Make sure the vacuum hose (Figure 5, pos 2) is pushed back into the machine so it cannot get
squeezed.
2. Crouch down and hold the handle (Figure 5, pos 1) with one hand while holding the scrub deck
(Figure 5, pos 3) with your other hand.
3. Lift the scrub deck slowly until it stands upright on the front wheels (Figure 5, pos 4). Guide the
body towards the scrub deck until it snaps into a resting position.
Figure 5

15
4.3 Transport outside
Figure 6
When outside:
1. Put the i-mop® XL Plus in park position (refer to section 4.2).
2. Carry the i-mop XL Plus with one hand while holding the handle (Figure 6, pos 1) with your other
hand.
CAUTION
The transport wheels are not designed to roll over dirty surfaces, sand can cause the
wheels to block. Lift the i-mop XL Plus going from one building to another.

16
4.4 Transport in a vehicle
The preferred way to transport your i-mop® XL
Plus
is in an upright position and safely secured.
1.
Make sure both tanks are empty.
2.
Put the i-mop XL Plus in park position (refer
to section 4.2).
3.
Remove the batteries.
4.
Lift the i-mop XL Plus into the vehicle.
5.
Secure the i-mop, using a tension belt or
another appropriate restraint (Figure 7,
pos 1).
As the i-mop XL Plus is a compact machine, it fits in the trunk of your car. Before loading the i-mop XL
Plus into your vehicle, make sure both tanks and battery packs are removed.
1. Put the i-mop XL Plus in park position (refer to section 4.2).
2. Remove the batteries and both tanks and pack them separately for transport.
3. Lift the i-mop XL Plus into your vehicle. Don't forget the tanks and batteries.
4. Prevent the i-mop XL Plus from moving around during transport by using a tension belt or
another appropriate restraint.
CAUTION
The seal of the solution and recovery tank can be damaged during transport in
horizontal position. Make sure you remove them before loading the machine into your
car. Improper use will void the warranty.
TIP:
The i-stand wall mount accessory (IS.I-V.0000A) can be installed in the back of a truck. It allows
you to secure the i-mop and transport the i-mop in an upright position. Please contact our sales
department for more information.
Figure 7

17
5Assembly and installation
The i-mop® XL Plus does not require much assembly. Most importantly, you will have to attach the
brushes and squeegee.
5.1 Unboxing
The i-mop XL Plus body is packed in a single box. The battery and charger are delivered in a separate
box and can be ordered separately.
Figure 8
Legend
1.
1x i-mop XL Plus main body
6.
1x squeegee assembly
2.
2x batteries (when ordered)
7.
2x brushes
3.
1x battery charger (when ordered)
8.
1x cleaning solution tank
4.
1x battery charger manual (when ordered)
9.
1x recovery tank
5.
1x power cord (when ordered)
10.
1x this manual

18
5.2 Assembly
5.2.1 Charge the batteries
Charge the batteries according to the instructions in the battery charger manual. Make sure the
battery packs are charged monthly.
5.2.2 Attach the brushes
To attach the brushes:
1. Put the i-mop® XL Plus in park position (refer to section 4.2).
2. Hold the scrub deck firmly with one hand.
3. Align the left brush (Figure 9, pos 1) with the left motor disk (Figure 9, pos 2). Align the latches
and cut-outs in the brush and motor disk.
4. Push the brush on the motor disk.
5. Turn the left brush clockwise until you see the motor disk turning. The brush is now in place.
6. Align the right brush with the right motor disk. Align the latches and cut-outs in the brush and
motor disk.
7. Push the brush on the motor disk.
8. Turn the right brush anticlockwise until you see the motor disk turning. The brush is now in
place.
Figure 9

19
5.2.3 Attach the squeegee
Figure 10
To attach the squeegee:
1. Take the vacuum hose (Figure 10, pos 1).
2. Insert the hose connector (Figure 10, pos 2) in the squeegee (Figure 10, pos 3).
3. Twist the hose connector 1/4 turn for a firm fit (Figure 10, pos 2).
4. Carefully pull the vacuum hose back into the machine.
5. Hold the scrub deck firmly with one hand.
6. Align the pins on the scrub deck (Figure 10, pos 4) with the holes on the squeegee (Figure 10,
pos 5).
7. Push the left side of the squeegee in place.
8. Push the right side of the squeegee in place.
5.2.4 Install recovery tank
1. Put the bottom of the recovery tank (Figure
11, pos 1 and pos 3) on the front of the
i-mop® XL Plus.
2.
Push the top of the tank into place until you
hear a "click" sound, the magnet (Figure 11,
pos 2) will lock the recovery tank into place.
Figure 11
Table of contents
Other i-team Scrubber manuals
Popular Scrubber manuals by other brands

NSS
NSS WRANGLER 2616 DB Operation manual

Tornado
Tornado OB 28/20 Operation & maintenance manual

Advance acoustic
Advance acoustic 9084417010 Instructions for use - original instructions

Tennant
Tennant M17 Series Instruction bulletin

CleanFreak
CleanFreak 20B-Z Operator's & parts manual

COMAC
COMAC Vega 2019 Use and maintenance manual

Nilfisk-Advance
Nilfisk-Advance Advance SC400 operating guide

Kemper
Kemper ProfiMaster operating manual

Wascomat
Wascomat H7-55 installation manual

Axminster
Axminster WORKSHOP AW118CE Original instructions

Tennant
Tennant CS16 Operator's manual

Westin
Westin STRATUS Air Installation, operation and maintenance