manuals.online logo
Brands
  1. Home
  2. •
  3. Brands
  4. •
  5. i3 International
  6. •
  7. Security Camera
  8. •
  9. i3 International Di721 User manual

i3 International Di721 User manual

QUICK START GUIDE
Di721-series Indoor Vandal Camera
SAFETY
1. This quick start guide is designed for users who have an adequate
knowledge of CCTV cameras.
2. For maximum optical clarity, the camera or lens must remain clean.
Use a soft, dry cloth to remove finger prints and dust from the
dome cover
3. Ensure the supplied voltage meets the power consumption
requirements of this camera before powering the camera on.
4. To avoid electrical shock and to preserve the product warranty,
DO NOT disassembles the camera. Refer servicing to qualified
personnel only.
5. For more details on installation and operation, please refer to the
CD provided.
PACKAGE CONTENTS
• Flat Head Screw (Tapping Type) x4
• Plastic Anchor x4
• Flat Head Screw (Machine Type 26L) x3
• Security Tort wrench x1
• 2nd video monitor output cable x1
• Guide Pattern sticker x1
• Flush Mount template (the box lining) x1
• Fully Assembled Camera x1
MOUNTING THE CAMERA (SURFACE MOUNT)
1. Attach the Guide Pattern Sticker to the wall or ceiling.
2. Drill two holes on the mounting surface and insert the plastic anchors (#1) into the
holes.
3. Secure the bottom case to the wall or ceiling with the Flat Head Screws (tapping
type) (#2).
For your convenience, the holes on the outdoor housing are started but not drilled
all the way through for moisture control.
Note: Depending on the material of your mounting surface, you may require different
screws and anchors than those supplied.
INSTALLATION
The dome camera is a fully integrated enclosure with camera and lens.
1. Bottom case
2. Camera base
3. Tilt adjustment
bracket
4. Inner liner
(Not present on
Di721R model
series)
5. Dome cover
6. Anti drop hook
1. Plastic Anchors
2. Flat Hand Screws
(Tapping Type)
Figure 2. Disassembling the camera
Figure 3. Camera Surface Mounting
Applicable to the following models: Di721, Di721B,
Di721R, Di721RB, Di721P, Di721RP, Di721BP, Di721RBP
a
b
8
1. Conduit holes used for surface run
power/video connector
a. Side conduit hole (1/2”).
b. Top conduit hole (3/4”) (can also
be used for pendant mount).
2. Bottom case
3. Camera Base
4. Dome cover
5. Focus lever
6. Zoom lever
7. Video output connector
8. 24 VAC / 12 VDC power input connector
(red +, black -)
Figure 1. Camera Parts
i3-TRNG-CAMS-Di721-series-QuickGuide.indd Rev. 130130
QUICK START GUIDE Di721-series Indoor Vandal Camera
ADJUST THE CAMERA POSITION
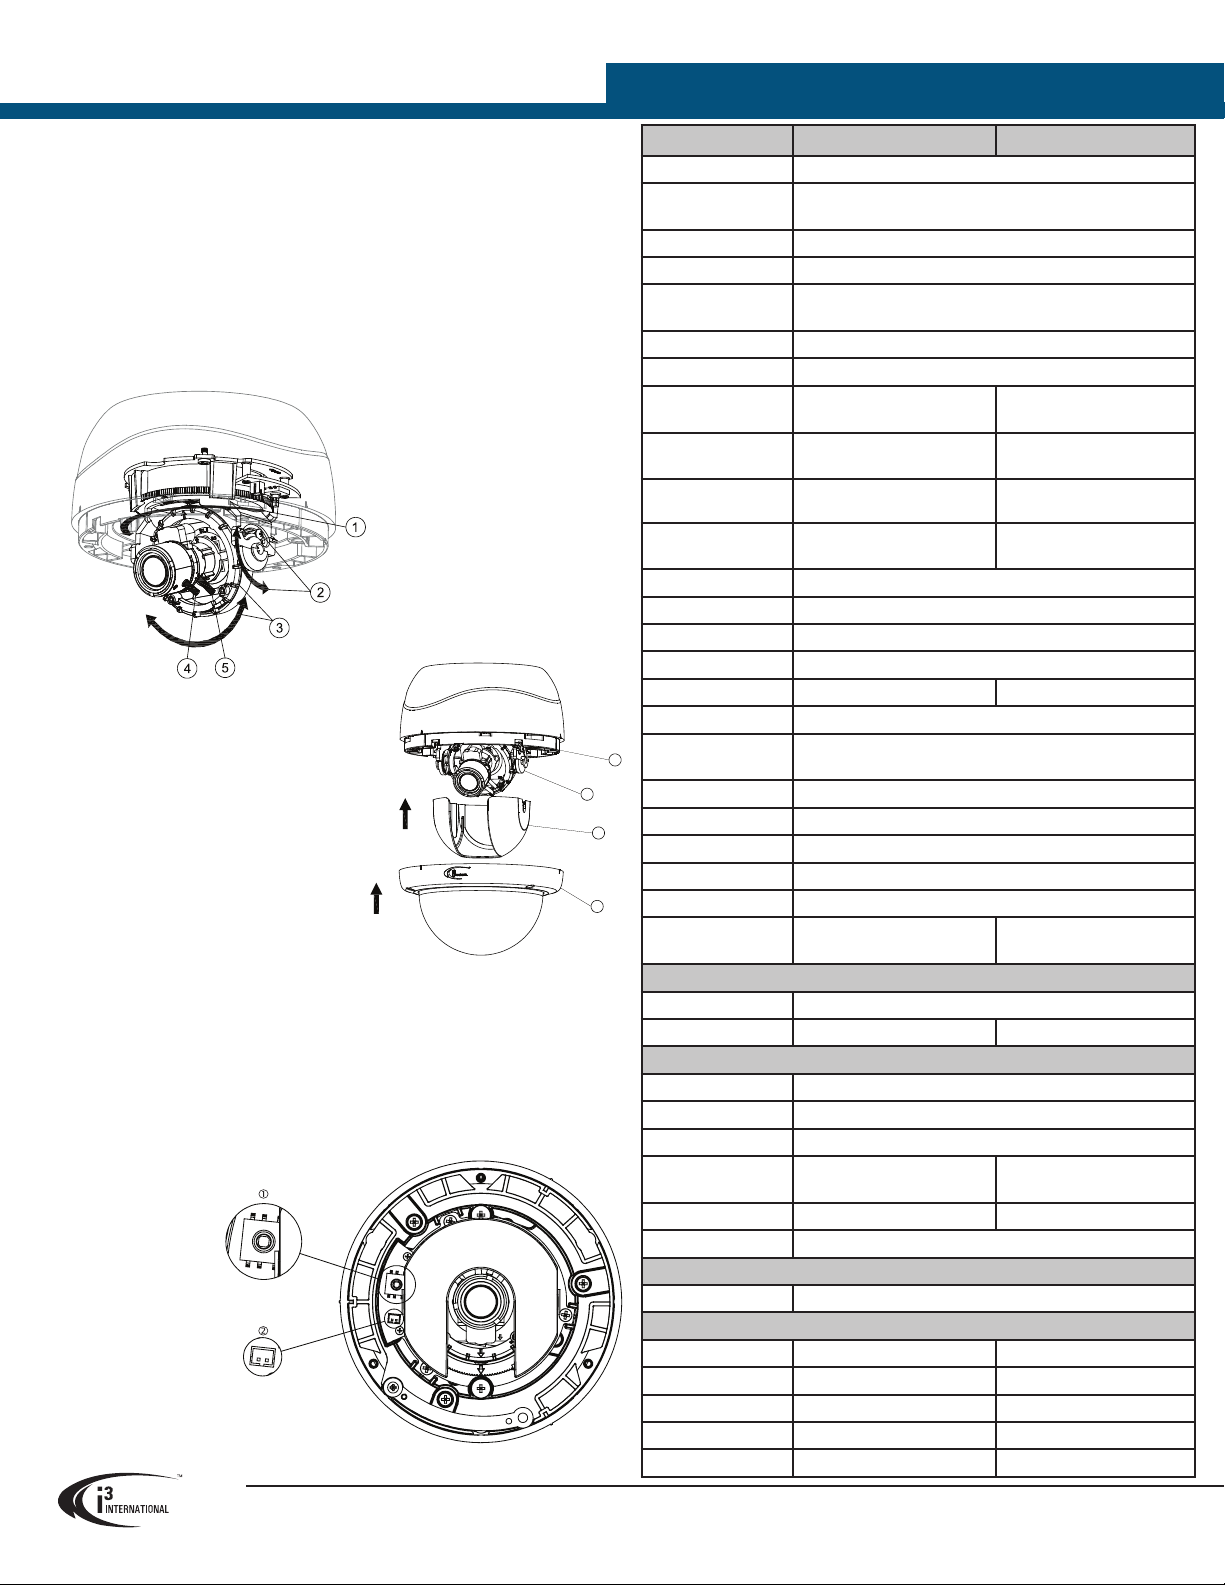
The dome camera has three axis for positioning the camera. While live viewing
on the monitor, adjust the camera position as follows:
• Horizontal adjustment rotates 3D assembly in the base.
• Vertical adjustment: After loosening the screw on the bracket, position the
camera as desired, and tighten the screw back to the bracket.
• Horizontal rotation for wall mount and tilted ceilings: rotate the lens base
(maximum 354°) until you are satisfied with the field of view.
1. Rotate 3D assembly in base for hori-
zontal adjustment
2. Loosen screw and adjust Tilt. Tighten
screw when desired vertical angle is
achieved.
3. Turn axis ring for horizontal rotation.
4. Focus lever
5. Zoom lever
ADJUST THE LENS
1. Loosen the focus lever (#4 on Fig 4.)
counter-clockwise a little and adjust for
optimum picture sharpness.
2. Loosen the zoom lever (#5 on Fig.4)
counter-clockwise a little and rotate to
determine the image view.
3. Re-tighten the zoom lever and focus lever
after adjustment.
Please note: It is important that you lock
the zoom and focus levers after making
adjustments. This will avoid the positions
moving (for example, from temperature changes or vibrations).
4. Once all adjustments are done, attach and secure the camera housing:
a. Use a soft and lint-free cloth to wipe the dome cover and remove
fingerprints.
b. Attach the inner liner (#3) to the tilt adjustment bracket (#2). Push down
until it clicks into place.
(Not applicable to IR models)
c. Assemble the dome cover (#4) and the camera base (#1).
To use the OSD joystick
control:
1. Press the OSD
joystick control
straight down to
enter the Main
menu or a selected
item.
2. Move the OSD
joystick control UP,
DOWN, LEFT and
RIGHT to navigate
through menus and
options.
1. OSD Joystick Control 2. Monitor Output
Figure 4. Camera Adjustment
Figure 5. Camera Adjustment Controls
Features/Model Di721 Di721R
ATR/D-WDR Digital Wide Dynamic Range On/Off (Selectable)
Multi language
support
English, French, Spanish, Portuguese, German, Russian,
Simplified Chinese, Japanese
DNR Yes
Signal system NTSC/PAL
Scanning system NTSC 2:1 Interlace V: 59.94 Hz , H: 15.734KHz /
PAL: 2:1 Interlace V: 50 Hz , H: 15.625 KHz
Image sensor 1/3” SONY Exview HAD CCD II
Effective pixels NTSC: 976 (H) × 494 (V) / PAL: 976 (H) × 582 (V)
Lens Built-in f=2.8mm~10.5mm,
F1.2 DC iris varifocal
Vari-focal, f=2.8mm~10.5mm,
F1.2 DC iris
View angle (NTSC) Wide: 92°(H), 67°(V)
Tele: 27°(H), 20°(V)
Wide: 93° (H), 66° (V)
Tele: 26° (H), 20° (V)
View angle (PAL) Wide: 89°(H), 56°(V)
Tele: 26°(H), 17°(V)
Wide: 94° (H), 58° (V)
Tele: 26° (H), 16° (V)
Minimum illumination F1.2 @50IRE, 0.02lux,
@30IRE, 0.01lux B/W: 0 lux (IR on)
Sync system Internal
Horizontal resolution 700 TV lines
Privacy zone Yes, 8 zones (max)
Motion detection Yes, 4 areas (max)
Day & Night mode Digital Day/Night Mechanical Day/Night
White balance ATW/ Manual/ User/ Push/ Push lock
AGC, BLC AGC: On / Off (selectable); BLC: Off/ BLC/ HLC (High light
compensation) (selectable)
Flickerless Auto adjusted
Gamma correction 0.45
OSD Yes
Video output level 1Vpp composite output, 75 ohm
S/N Ratio More than 50dB (AGC off)
Shutter time NTSC: 1/60 sec
PAL: 1/50 sec
NTSC: 1/60~1/10K sec
PAL: 1/50~1/10K sec
Power supply
Power requirement DC 12V & AC 24V ± 10%
Power consumption 2.5W (max) 4W (max)
Environment
Operating temperature -10ºC ~ 50ºC (14 ºF ~ 122 ºF)
Operating humidity 90% MAX
Storage temperature -20ºC ~ 60ºC (-4 ºF ~ 140 ºF)
Dimensions (øxH) ø 136mm x 126mm ø140 x 132 mm
(ø5.51” x 5.20”)
Weight approx. 566g (1.25 lb) approx. 573g (1.26 lb)
Protection Class CE, FCC, Class A, Vandal-Proof
Warranty
Standard Warranty i³ Superior 3 year warranty
IR
IR Distance N/A 15M (49ft)
IR LED N/A 14pcs
IR Wavelength N/A 850nm
IR turn on status N/A by photocell auto controlled
LEF Life N/A More than 10,000 hours (50ºC)
i3 INTERNATIONAL INC. 1.866.840.0004
www.i3international.com
U.S.A 1967 Wehrle Drive,
Suite 1, PMB# 034 Buffalo
NY, 14221
Canada 780 Birchmount Road,
Unit 16, Scarborough,
ON, M1K 5H4
1
2
3
4
Figure 4. Lens Adjustment
OSD CONTROL SWITCH

Other manuals for Di721

2

This manual suits for next models

8

Other i3 International Security Camera manuals

i3 International C-Di210 User manual

i3 International

i3 International C-Di210 User manual

i3 International Ax73RM-series User manual

i3 International

i3 International Ax73RM-series User manual

i3 International Ax61 series User manual

i3 International

i3 International Ax61 series User manual

i3 International Ax46DC User manual

i3 International

i3 International Ax46DC User manual

i3 International Ax52D2MV User manual

i3 International

i3 International Ax52D2MV User manual

i3 International Ax52 Series User manual

i3 International

i3 International Ax52 Series User manual

i3 International Ax61 series Operating and maintenance instructions

i3 International

i3 International Ax61 series Operating and maintenance instructions

i3 International Ax32VD14 User manual

i3 International

i3 International Ax32VD14 User manual

i3 International A 47DC Series User manual

i3 International

i3 International A 47DC Series User manual

i3 International Am73 User manual

i3 International

i3 International Am73 User manual

i3 International C-AX401D1M User manual

i3 International

i3 International C-AX401D1M User manual

i3 International Ax40W2 series User manual

i3 International

i3 International Ax40W2 series User manual

i3 International Ax45RM series User manual

i3 International

i3 International Ax45RM series User manual

i3 International Ax63Z Series User manual

i3 International

i3 International Ax63Z Series User manual

i3 International M79 User manual

i3 International

i3 International M79 User manual

i3 International Ax78R User manual

i3 International

i3 International Ax78R User manual

i3 International Ax51B User manual

i3 International

i3 International Ax51B User manual

i3 International ANNEXXUS Ax41V1MVR User manual

i3 International

i3 International ANNEXXUS Ax41V1MVR User manual

i3 International Ax85 User manual

i3 International

i3 International Ax85 User manual

i3 International Ax36 series User manual

i3 International

i3 International Ax36 series User manual

i3 International Am42 Series User manual

i3 International

i3 International Am42 Series User manual

i3 International H59B2 User manual

i3 International

i3 International H59B2 User manual

i3 International Am53 User manual

i3 International

i3 International Am53 User manual

i3 International Am52RM User manual

i3 International

i3 International Am52RM User manual

Popular Security Camera manuals by other brands

eyecloud.ai eyecloudCam user manual

eyecloud.ai

eyecloud.ai eyecloudCam user manual

Grundig GD-CI-AT2637VH quick guide

Grundig

Grundig GD-CI-AT2637VH quick guide

Allied Vision Technologies Prosilica GC1280 user manual

Allied Vision Technologies

Allied Vision Technologies Prosilica GC1280 user manual

American Dynamics AD715LS Series Installation and service guide

American Dynamics

American Dynamics AD715LS Series Installation and service guide

OPTICOM T-565-VD-C datasheet

OPTICOM

OPTICOM T-565-VD-C datasheet

Vanderbilt CCPW3025-IR Quick installation guide

Vanderbilt

Vanderbilt CCPW3025-IR Quick installation guide

Speco O2P20X user manual

Speco

Speco O2P20X user manual

Canon VB-S32D installation guide

Canon

Canon VB-S32D installation guide

Moog Videolarm SM7C12N-3 Installation and operation instructions

Moog Videolarm

Moog Videolarm SM7C12N-3 Installation and operation instructions

Sony Ipela SNC-P1 Brochure & specs

Sony

Sony Ipela SNC-P1 Brochure & specs

TRASSIR TR-D9151IR2 manual

TRASSIR

TRASSIR TR-D9151IR2 manual

Epcom EYD105VDR user manual

Epcom

Epcom EYD105VDR user manual

Digital Watchdog Starlight D2363TIR Series user manual

Digital Watchdog

Digital Watchdog Starlight D2363TIR Series user manual

Live LW2175R SERIES quick start guide

Live

Live LW2175R SERIES quick start guide

D-Link DCS-8302LH Quick installation guide

D-Link

D-Link DCS-8302LH Quick installation guide

AVGO NOXOX user manual

AVGO

AVGO NOXOX user manual

Iget HomeGuard HGDOA5666 operating instructions

Iget

Iget HomeGuard HGDOA5666 operating instructions

Axis V59 Series installation guide

Axis

Axis V59 Series installation guide

manuals.online logo
manuals.online logoBrands
  • About & Mission
  • Contact us
  • Privacy Policy
  • Terms and Conditions

Copyright 2025 Manuals.Online. All Rights Reserved.