Nektar Impact LX Mini User manual

www.nektartech.com Nektar Impact GX49 & GX61 User Guide 1
www.nektartech.com
Owner’s Manual
Impact LX Mini

2Nektar Impact LX Mini owner’s manual www.nektartech.com
Index
Introduction 3
Box content 3
Minimum system requirements 3
Impact LX Mini overview 4+5
DAW & MIDI control 6
Updating firmware & downloading Nektar DAW Integration software 6
Using Impact LX Mini as a generic USB MIDI controller 6
Power on and get started 6
Keyboard 6
Octave buttons 6
Keyboard & real-time controls 7
Part 2 and transpose buttons 7
Hold Note (Latching) 7
Arpeggiator and Note Repeat 8
Activating Arp/Repeat 8
Switching Arp/Repeat on/off independently for keys and pads 8
Resetting Arp/Repeat settings to default 8
Programming Arp/Repeat settings 8
Rate 9
Swing 9
Accent Level 9
Interval 9
Tempo & sync 9
MIDI clock 9
Arp Mode 10
Arp Octave 10
Gate 10
Controlling Arp/Repeat velocity with joystick modulation 10
Simultaneously adjusting parameters for both keys and pads 10
Internal & Instrument mode 11
Quick Adjust Parameters in Another Mode 11
Pads 12
Pad Maps 12
Pad Learn 12
Programming MIDI messages to pads 12
Pad Velocity Curves 12
Clips & Scenes buttons 12
Pads colors 13
Factory Pad Maps 14
Setup mode 15
Cancel 15
Assign a MIDI cc message to a control 15
Program Assign 16
MIDI Channel Assign 16
Pad Learn 16
Save Pad Map 16
Set Foot Switch to trigger Part 2 17
Part 2 Octave, MIDI Channel, Transpose and Layer 17
Global MIDI Channel 18
Keyboard Velocity Curve 18
Pad Curve 18
Panic 19
Memory Dump 19
Low Power mode 19
Set tempo 19
MMC Transport and Pro Tools Control 20
Factory Restore 21
Declaration of Conformity - CE, FCC, UKCA 21

www.nektartech.com Nektar Impact LX Mini owner’s manual 3
Introduction
Thank you for buying the Nektar Impact LX Mini keyboard and pad controller.
The Impact LX Mini comes with great interactive performance features such as joystick for pitch bend and modulation control, foot switch
socket (foot switch not included), Part 2, Arpeggiator/Repeat, 8 velocity sensitive pads and of course Nektar DAW integration. Nektar DAW
expanding your creative horizon while exploring the many features.
We hope you enjoy Impact LX Mini as much as we have enjoyed creating it.
Box content
Your Impact LX Mini box contains the following items:
• The Impact LX Mini keyboard/pad controller
• Printed owner’s manual
• A standard USB cable
• 1/8” to 1/4” adapter cable for foot switch connectivity options
If any of the items above are missing, please let us know via email:
Minimum system requirements
As a USB class compliant device, Impact LX Mini can be used from Windows XP or higher and any version of Mac OS X.

4Nektar Impact LX Mini owner’s manual www.nektartech.com
Impact LX Mini Overview
1. Keyboard: The 25 note mini keyboard is velocity sensitive
and doubles as function and value selector, when Setup mode
is active.
2. Joystick: Controls pitch bend (left/right), MIDI cc #1
modulation (up), MIDI cc #4 foot controller (down). Press the
shaft to trigger MIDI cc #1 at max value (127). Up, down
and push options are MIDI assignable.
3. [Octave down/up] buttons: Shift octave down by
4 octaves or up by 5 octaves. Press both buttons at the
same time to change the octave setting to 0.
4. Part 2 / Transpose buttons: Press and hold either
of the two buttons to temporarily change settings for Part 2
functions octave, transpose, MIDI channel for the duration the
button is held. For details, go to page 17.
The buttons can also transpose the keyboard. See page 7.
5. Transport buttons:The 7 buttons are primarily used by
Nektar DAW Integration, delivering comprehensive control over
a supported DAW’s arrangement features. The buttons are also
MIDI assignable (see Setup mode page 16) or can be used for
MIDI learn.
6. [Shift]: The LED illuminated [Shift] button switches the 7
transport buttons between two assignments, which means a
total of 14 MIDI messages can be sent using the 7 buttons.
With Nektar DAW Integration, [Shift] provides access to
secondary DAW functions as indicated by the screen printing.
7. [Shift]+[Internal]: Pressing these two buttons activates
Setup mode which includes the features listed above the keys.
See page 15.
8. Arp/Repeat [On/O]: Enable or disable the
Arpeggiator/Repeat function. The button’s white LED blinks to
indicate the current tempo when Arp/Repeat is active.
9. Arp/Repeat [Function]: The Arp/Repeat Function menu
allows programming of settings for pads and keyboard
independent of each other. To hear changes, make sure the
10. [Internal]: Selects Internal mode which loads MIDI
assignments for the 8 pots. [Internal]+[Pad 1-4] in addition load
Pad Maps 1-4.
11. [Instrument]: If Nektar DAW Integration is installed and
active, select [Instrument] to control plugin instruments in your
DAW using the 8 pots. When Nektar DAW Integration is not ac-
tive, the mode can be selected to use the pots for MIDI learn.
12. Volume pot and LEDs:The large control pot is by default
assigned to send MIDI cc #7 (volume) but can be assigned to
any MIDI cc message. To change the assignment, access Setup
mode as explained on page 16. When Nektar DAW
integration is used, the pot controls the currently selected
track’s volume. The two LEDs below the pot are only used with
Nektar DAW Integration.
2
3
4
5
6
7
8
9
10
11
12
1
14
13
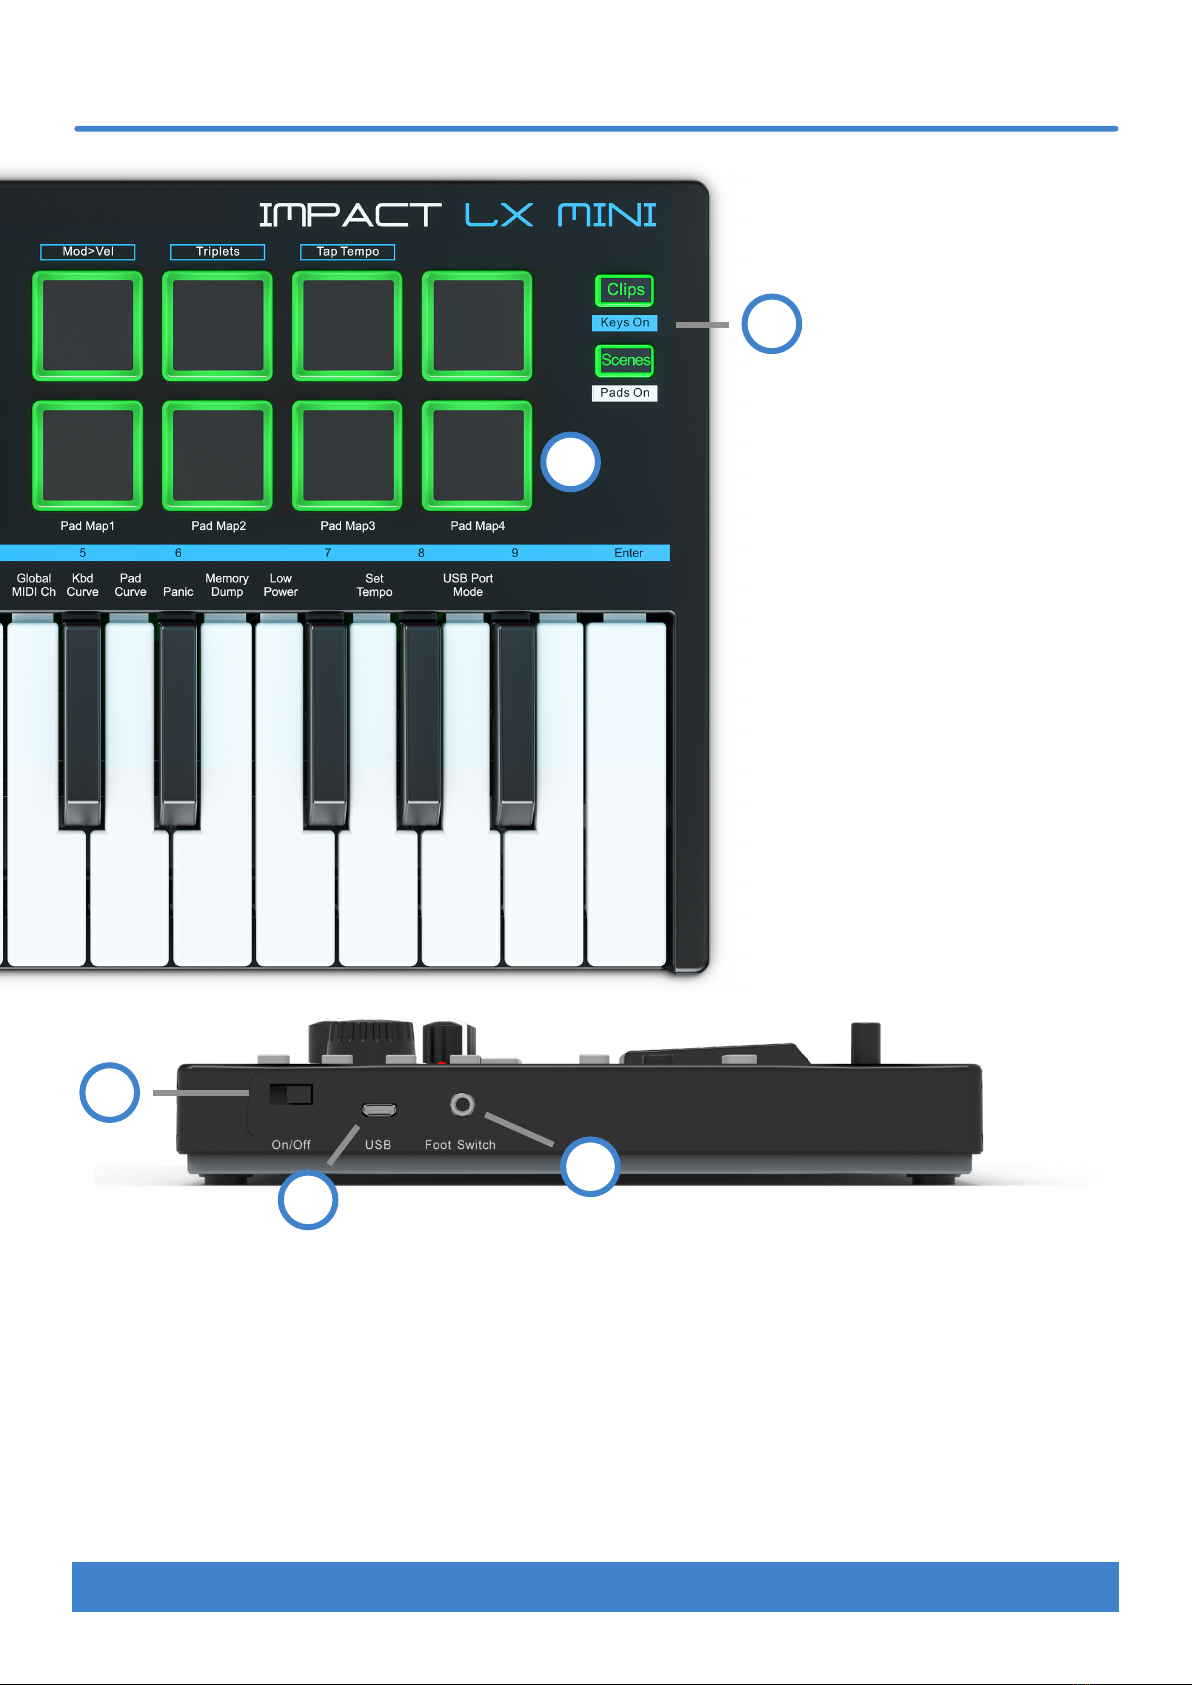
www.nektartech.com Nektar Impact LX Mini owner’s manual 5
Impact LX Mini Overview
13. Pots (eight):Functionality changes according to the mode
selected. When Arp/Repeat [Function] is selected, Arp/Repeat
parameters are controlled according to the screen printing.
When [Internal] is selected, the pots send their assigned MIDI
messages. [Instrument] is mainly used to control plugin
instruments via Nektar DAW Integration software.
14. [Page] button:With [Internal] mode active, [Page] toggles
the MIDI assignments for the 8 pots. The blue and white LEDs
indicate the current selection. It works similarly in most cases
when [Instrument] mode is selected with Nektar DAW
integration running.
15. Pads: The velocity sensitive pads can be programmed to send
MIDI Note, CC and Program messages. Read more about pads
on page 12.
16. [Clips] and [Scenes] buttons: When Arp/Repeat
[Function] is selected, the buttons are used to disable the
repeat function for either keyboard or pads, as indicated by
the screen printing. The buttons are otherwise used for Nektar
DAW Integration, if supported by the DAW.
17. Power [On/O] switch:
18. USB connector: Connect the included USB micro-B cable
to the socket and the other end to a USB computer/device.
19. Foot switch socket: 1/8” TRS jack for connecting a foot
switch pedal (not included). The socket controls sustain by
default and polarity is automatically detected on power up.
Connect the included 1/8” to 1/4” adaptor cable for use with a
1/4” jack foot switch.
15
16
17
19
18

6Nektar Impact LX Mini owner’s manual www.nektartech.com
DAW & MIDI Control
Impact LX Mini can be used to play and control a Digital Audio Workstation (DAW), MIDI software instruments and MIDI hardware
connected to your computer. Getting Impact LX Mini set up with your computer may require some basic setup but for the most part
is straight forward.
Updating firmware & downloading Nektar DAW Integration software
your product. Make sure to select any DAW you use as well as your OS. Without completing this part correctly, you may not see the DAW
Start by creating a Nektar user account here: www.nektartech.com/registration
Using Impact LX Mini as a generic USB MIDI controller
Impact LX Mini works as a generic USB MIDI controller straight out of the box. For MIDI control, the LX Mini’s large pot (12) sends MIDI cc#7
to control volume and in Internal mode, the eight pots (13) send MIDI messages that can be used to control instruments.
To get the most out of your setup you may need to customize the LX Mini setup, which can all be done in the Setup menu.
Power on and get started
The Impact LX Mini is USB Class compliant. This means there is no driver to install. Impact LX Mini uses the built-in USB MIDI driver which
is already part of operating systems such as Windows, Mac OS and iOS (via the optional camera connection kit). On Linux you will need to
install JACK and ALSA for MIDI.
• Locate the included USB cable and plug one end in to your computer and the other in to your Impact LX Mini (see page 5, bullet 18).
• If you want to connect a foot switch to control sustain, plug it in to the 1/8” jack socket on the side of the keyboard (see page 5 bullet
19). Use the included 1/8” to 1/4” adaptor cable if your foot switch has a 1/4” jack.
• Set the power switch to On.
Keyboard
The Impact LX Mini features a 25 note mini velocity sensitive keyboard which, despite its compact size, allows surprisingly expressive
control. There are 3 different keyboard velocity curves and 3 fixed velocity levels to choose from, depending on how sensitive and dynamic
you want the Impact LX Mini keyboard to play.
We recommend you spend a little time playing with the default velocity curve and then determine if you need more or less sensitivity.
You can learn more about velocity curves, and how to select them, in the “Setup” section on page 18.
Octave buttons
T
• With each press, the left Octave button will shift the keyboard down one octave.
• The right Octave button will similarly shift the keyboard up 1 octave at a time, when pressed.
• Pressing both Octave buttons at the same time resets the setting to 0.
Using octave shift, the keyboard covers the entire MIDI keyboard range of 128 notes.

www.nektartech.com Nektar Impact LX Mini owner’s manual 7
Keyboard & Real-time Controls
The below chart shows you the color coding for each octave setting.
Octave Color Octave Color
0 [Oct Down]+[Oct Up] both orange +1 [Oct Up] orange
-1 [Oct Down] orange +2 [Oct Up] green
-2 [Oct Down] green +3 [Oct Up] red
-3 [Oct Down] red +4 [Oct Up] yellow
-4 [Oct Down] yellow +5 [Oct Up] orange
Part 2 / Transpose buttons
return to original settings on button release. With this feature you can instantly shift the octave or transpose up/down, trigger two octaves
Activating Part Two - momentary or latching
Part Two is active when one of the Part 2 buttons [Arrow down] or [Arrow up] are pressed and held. Release the button to deactivate Part
Two. If you prefer Part 2 to latch, press and hold [Arrow down] while pressing [Arrow up]. The [Arrow down] button is now illuminated
green to illustrated it’s latched. Press and hold [Arrow up], then press [Arrow down] to latched [Arrow up]. To deactivate Part 2 from a
latched state, press the green button.
With the default settings, Impact LX Mini plays an additional note, one octave higher than the note played when Part Two is activated. In
parameter terms, this means that Octave is set to +1 and Layer is set to on. Try it, and experience how you can dynamically extend the
range of notes available beyond the keyboard, in real time. [Part 2 Arrow down] shifts octave and transpose settings down and [Part 2
Arrow up] shifts them up. Learn how to change the Part 2 parameters in the ‘Part Two Programming Options’ section on page 17.
Transpose
The arrow buttons can also be used to transpose the keyboard by up to -/+ 12 semi-tones.
•Hold [Shift] and press [Arrow down] to transpose the keyboard down one semi-tone for every [Arrow down] press.
• Hold [Shift] and press [Arrow up] to transpose the keyboard up one semi-tone for every [Arrow up] press.
•Hold [Shift] and press both [Arrow down]+[Arrow up] at the same time to reset the transpose setting to zero.
• Hold [Shift] at any time to view the transpose status. If both [down/up] buttons are orange, transpose is set to zero.
Hold Note (Latching)
With hold active, a MIDI note on message is sent when a key is pressed but a MIDI note off message is not sent when the key is released, as
would normally happen. Instead, playing the same key again will send the MIDI note off message. Here is how you activate hold:
• Press and hold [Shift]. The status of the [Clips/Keys] buttons now indicate whether key hold is on or off. Press the button to activate
key hold.
• Press one or more notes on the keyboard. The notes triggered will continue playing, until the same key is pressed again.
• Deactivate hold by pressing [Shift]+[Clips/Keys] one more time. This doesn’t change the status of any held notes but you can now play
the keyboard normally while notes are held. If however you press a held note, a MIDI note off message will be sent.
• To terminate all currently held notes, hold [Shift] and double-press [Clips/Keys].
• You can use the pad hold function as described in the steps above, by pressing [Scenes/Pads] instead of [Clips/Keys].
The hold function can be used while Arp/Repeat is active so you have your hands free to adjust parameters.
8Nektar Impact LX Mini owner’s manual www.nektartech.com
Impact LX Mini’s arpeggiator and note repeat feature can help create interesting musical parts by adjusting a few controls. There are two
Arp/Repeat engines, one for the keyboard and another for the pads. Settings are programmed independently for keyboard and pad with
only the tempo source shared.
Played notes are quantized to the nearest 1/16 note value. If you are a little behind the beat you may get unintentional or intentional
note offsets. Play a little ahead of the beat if you need the notes to be right on the downbeat.
Activating Arp/Repeat
When LX Mini is switched on for the first time, the Arp/Repeat [On/Off] button is in its on position.
• Press the [On/Off] button at any time to activate or deactivate Arp/Repeat.
• When the button is on, the LED blinks in time with the current tempo setting.
• Press the [Function] button to program arp/repeat settings.
Switching Arp/Repeat on/off independently for keys and pads
It is possible to deactivate Arp/Repeat for the keyboard or pads independently.
• Press the [Keys On (Clips)] button to activate/deactivate keyboard arp/repeat.
• Press the [Pads On (Scenes)] button to activate/deactivate pads arp/repeat.
• If both keyboard and pads are deactivated, the arp/repeat [On/Off] button continues to blink (if on) but arp/repeat
does not respond to triggered notes.
When the LX Mini is switched on for the first time, both keyboard and pads are enabled to trigger their arp/repeat engine.
Resetting Arp/Repeat settings to default
Arp/Repeat settings can be reset to their default values independently for keys and pads.
• To reset the keyboard Arp/Repeat settings hold [Function] until the pads change color, then press [Clips (Keys On)].
• To reset the pads Arp/Repeat settings hold [Function] until the pads change color, then press [Scenes (Pads On)].
Programming Arp/Repeat settings
Arp/Repeat settings are programmed independently for keyboard and pads.
• Press the [Page] button to change selection.
The blue LED is illuminated when programming settings for the keyboard and the white LED is illuminated for pads.
With the above all set correctly and [Function] active, the 8 pots are now used to adjust Arp/Repeat settings as illustrated by the silk
screen printing.
Arpeggiator and Note Repeat

www.nektartech.com Nektar Impact LX Mini owner’s manual 9
Arpeggiator and Note Repeat
Rate
The Arp/Repeat Rate parameter determines the timing value that notes are played at.
• Move the pot labelled “Rate” and position the indicator to point at any rate of 1/4, 1/8, 1/16, 1/32 or 1/64 as shown by the screen
printing.
• To select triplets, hold [Function] while pressing [Pad 6], labelled “Triplets”, until the pad is illuminated red. When triplets are active
the rate values are 1/4T, 1/8T, 1/16T, 1/32T or 1/64T.
• Press [Function]+[Pad 6] again to switch triplets off (illuminated yellow).
Swing
Swing moves every second note closer to the next or previous note. This results in a shuffle rhythm. By default the swing value is 0%
which means that swing is off.
• Move the pot labelled “Swing” counterclockwise to select a value from 0 to -50%. A negative value will move every second note
closer to the preceding note.
• Move the Swing pot clockwise to select a swing value from 0 to +50%. A positive value will move every second note further away
from the preceding note.
• When the Swing pot is at 0 (center position) swing is off.
Accent Level
An accent plays a repeated note at its played velocity +/- accent level. The accent level range is set from 0 to -/+50 in increments of 10.
• Move the “Accent Level” pot clockwise to increase the accent velocity level.
• Move the pot ccw (counterclockwise) to set accent level to 0.
Interval
Sets the repeat interval for the set Accent Level (from 2 to 8). An interval setting of 2 means every second note will be played with
the accent offset value, and a setting of 8 plays every 8th note with the accent offset value, etc.
• Move the “Interval” pot. The pad LEDs are updated to indicate the currently selected value from 2-8.
Tempo & sync
Tempo can be set between 30 and 240 BPM using 3 different methods:
• Move the pot labelled “Tempo” to change tempo in real-time.
• Hold [Function] and strike [Pad 7 - Tap Tempo] in a steady rhythm until the tempo is set.
• Enter a specific tempo value in Setup mode. See page 19.
MIDI clock
Impact LX Mini automatically detects if MIDI clock is received on USB MIDI port 1. Clock will then switch from internal clock to MIDI clock.
When the Arp/Repeat engine is sync‘ed to MIDI clock, tempo can only be set on the master clock device (such as a DAW or MIDI
equipment sending MIDI clock).
To learn how to route MIDI clock to Impact LX Mini’s USB MIDI port 1, read the documentation of the product acting as master clock
source. If you want to send MIDI clock from your DAW to LX Minit, check this page for setup instructions.

10 Nektar Impact LX Mini owner’s manual www.nektartech.com
Arp Mode
When multiple notes are played, they can be broken up to play as an arpeggio instead of repeating.
• Move the “Arp Mode” pot and position it to point at one of the selection options Up, Up/Down, Down, As played.
The notes triggered are played in the direction selected. If ‘As played’ is selected, the arpeggio will play the notes in the order the keys
are pressed.
• Point the Arp Mode pot at its minimum position to set it to off. Played notes now repeat.
Arp Octave
An arpeggio can be extended to play up to 3 octaves above the triggered notes. Arp Octave does not have any impact on played notes if
Arp Mode is set to its off position.
• Move the “Arp Octave” pot and set it to +1, +2 or +3.
• Set Arp Octave to 0 to only arpeggiate the notes played.
Gate
The 8th pot is used to change the note gate parameter.
• Move the pot towards its minimum position to shorten the length of the notes played.
• Move the pot towards its maximum position to increase the length of the notes played. At the max position, notes are played legato.
Gate is a fun real-time parameter which can have an effect somewhat similar to controlling an envelope decay parameter with the added
advantage of allowing edits if you record the note data in your DAW.
Controlling Arp/Repeat velocity with joystick modulation
Velocity values can be adjusted in real-time using the joystick modulation control (up), instead of playing notes at the triggered velocity
value. This feature can bring excitement to any Arp/Repeat part and is well worth exploring.
• To activate, hold [Function] and press [Pad 5 - Mod>Vel] until pad 5 is red. Arp/Repeat velocity is now controlled by the joystick up
movement. When Mod>Vel is on, the joystick up movement no longer controls modulation.
Simultaneously adjusting parameters for both keys and pads
Parameters controlled by the pots can be adjusted for both keys and pads at the same time.
• Press and hold [Shift]+[Page] while moving the pot that controls the parameter you want to change.
• Release the buttons when done.
Arpeggiator and Note Repeat

www.nektartech.com Nektar Impact LX Mini owner’s manual 11
The [Internal] and [Instrument] modes change the use of the eight pots (13) and the associated [Page] button. Either modes can be used
for parameter control but in slightly different ways.
Internal mode
The Internal mode is intended to allow quick assignment of parameters either by using a software product’s MIDI learn mode or by
assigning specific MIDI messages to each of the controls in Setup mode.
The [Page] button switches assignments enabeling access to 16 different parameters from the eight pots, at any time. The default
assignments for each of the pages are listed in the two tables below. You can assign your own MIDI messages as described on page 16.
Changes are stored in the two page locations as soon as they are assigned and stored over power cycling.
Instrument mode
If you have installed Nektar DAW Integration, your DAW’s instruments most likely are ready to be controlled when [Instrument] is selected.
Check the dedicated PDF user guide included with the DAW integration file package for more details regarding controlling plugins from
Impact LX Mini.
You can also use Instrument mode for MIDI learn when Nektar DAW Integration is not active.
Quick Adjust Parameters in Another Mode
The quick adjust feature allows you to change a parameter in another mode and immediately jump back to the current mode following.
For example, If you are adjusting instrument plugin parameters with [Instument] active and just need to change the Arp/Repeat tempo,
this feature is what you need.
Press and hold the mode button that controls the parameter you want to adjust. In our above example, you would hold [Function].
While holding the mode button, the pot controlling the parameter you want to change. In our above example it would pot 5 : Tempo.
Release the mode button. LX Mini now jumps back to the preveious mode which in the above example was [Instrument].
The option is available from any of the 3 modes Instrument Internal and Function.
Internal & Instrument mode
Page 1 - Default
Pot MIDI
cc #
Description/function MIDI
Chan.
173 Attack Global
275 Decay Global
372 Release Global
476 Control change (Vibrato Rate) Global
574 Cutoff/brightness Global
671 Resonance/timbre Global
75 Portamento time Global
884 Portamento control Global
Page 2 - User
Pot MIDI
cc #
Description/function MIDI
Chan.
177 Control Change (Vibrato Depth) Global
278 Control Change (Vibrato Delay) Global
391 Effect depth 1 (Reverb Send Level) Global
492 Effect depth 2 Global
593 Effect depth 3 (Chorus send level) Global
694 Effect depth 4 Global
795 Effect depth 5 Global
810 Pan Global

12 Nektar Impact LX Mini owner’s manual www.nektartech.com
The 8 pads are velocity sensitive and programmable with either note or MIDI switch messages. This means you can use them as regular MIDI
buttons as well as to punch out your drum beats and percussive melody parts. In addition, the pads have 4 velocity curve options and 3 fixed
velocity options you can choose between.
Pad Maps
You can load and save up to 4 different pad setups in 4 memory locations called Pad Maps. Here is how you load Pad Maps:
• Press and hold the [Internal] button. The pad corresponding to the currently loaded Pad Map is now illuminated.
• Press the pad that corresponds to the Pad Map you want to recall. That’s it. The Pad Map has been loaded.
shows the 4 Pad Maps‘ default assignments. Map 1 is a chromatic scale which is continued in Map 2. If you have a drum setup that’s
laid out this way (many are), you can access drums 1-8 using Map 1 and drums 9-16 using Map 2.
Pad Learn
It’s easy to change a pad note assignment using the Pad Learn function. It works as follows:
1. Press [Shift]+[Internal] to activate Setup mode. The Internal button’s LED now blinks white.
2. On the keyboard, press E1, labelled ‘Pad Learn’.
3. All pad LEDs are now off, except the currently select pad. Press any pad to select it.
4. Press a key on the keyboard to learn its note to the selected pad. Use the octave buttons if necessary.
5. Repeat steps 3 and 4 to select pads and assign notes.
6. Press [Instrument], [Internal] or [Function] to exit when done.
The pad assignments are retained in memory until changed or a pad map is loaded. Make sure to store in one of the 4 pad maps if you want
to be able to recall your assignments at any time.
Programming MIDI messages to pads
The pads can also be programmed as MIDI switch buttons. To learn more, check the Setup section on page 16 that covers how controls are
programmed to send MIDI control messages.
Pad Velocity Curves
You can choose between 4 velocity curves and 3 fixed velocity value options. For more information about the velocity curves and how to
choose them, go to page 18.
Clips & Scenes buttons
The two Clips & Scenes buttons are sometimes used by Nektar DAW Integration to enhance the use of the pads with certain DAWs.
Pads

www.nektartech.com Nektar Impact LX Mini owner’s manual 13
The pads‘ color coding provides information about their current status. As you change Pad Maps for instance, you will notice that the MIDI
note off color changes. This tells you which Pad Map is currently loaded:
Pad Map COLOR
1 Green
2 Orange
3 Yellow
4 Red
The above Pad Map color coding is true when pads are programmed to send MIDI note or MIDI cc messages. If you program the pads to
send MIDI Program change messages, all pad LEDs are off except the one that corresponds with the last sent MIDI Program message. The
active pad is illuminated orange. This enables you to always see at a glance which MIDI Program is active, even if you have a mix of pads
sending notes and program messages.
Pad Colors
14 Nektar Impact LX Mini owner’s manual www.nektartech.com
Map 1 - Chromatic scale
Note Note No. Data 1 Data 2 Data 3 Chan
P1 C1 36 0 127 0 Global
P2 C#1 37 0 127 0 Global
P3 D1 38 0 127 0 Global
P4 D#1 39 0 127 0 Global
P5 E1 40 0 127 0 Global
P6 F1 41 0 127 0 Global
P7 F#1 42 0 127 0 Global
P8 G1 43 0 127 0 Global
Map 2 - Chromatic scale (cont)
Note Note No. Data 1 Data 2 Data 3 Chan
P1 G#1 44 0 127 0 Global
P2 A1 45 0 127 0 Global
P3 A#1 46 0 127 0 Global
P4 B1 47 0 127 0 Global
P5 C2 48 0 127 0 Global
P6 C#2 49 0 127 0 Global
P7 D2 50 0 127 0 Global
P8 D#2 51 0 127 0 Global
Map 3 - Major scale in C
Note Note No. Data 1 Data 2 Data 3 Chan
P1 C3 60 0 127 0 Global
P2 D3 62 0 127 0 Global
P3 E3 64 0 127 0 Global
P4 F3 65 0 127 0 Global
P5 G3 67 0 127 0 Global
P6 A3 69 0 127 0 Global
P7 B3 71 0 127 0 Global
P8 C4 72 0 127 0 Global
Map 4 - GM drum kit
Note Note No. Data 1 Data 2 Data 3 Chan
P1 C1 36 0 127 0 Global
P2 D1 38 0 127 0 Global
P3 F#1 42 0 127 0 Global
P4 A#1 46 0 127 0 Global
P5 G1 43 0 127 0 Global
P6 A1 45 0 127 0 Global
P7 C#1 37 0 127 0 Global
P8 C#2 49 0 127 0 Global
Factory Pad Maps

www.nektartech.com Nektar Impact LX Mini owner’s manual 15
Setup mode gives access to additional functions such as selecting Part 2 button options, control assign, selecting velocity curves and more.
To enter the menu, press the [Shift]+[Internal] buttons. [Internal] blinks while Setup mode is active and the keyboard’s MIDI output is
deactivated so it can be used to select menus instead.
All settings are stored immediately and retained over power cycling.
The screen printing above the keys shows which function or option is selected by each key.
The functions and how they can be used is covered over the following pages. Note that the documentation assumes you have an
understanding of MIDI, including how it works and behaves. If you are not familiar with MIDI, we recommend you study MIDI before
making control assignment changes. The MIDI Manufacturers Association website www.midi.org, is a good place to start.
Cancel
You can cancel any value entry or menu selection by pressing ‘Cancel’ (C1) as long as you have not already pressed [Enter] (C3).
Assign a MIDI cc message to a control
MIDI cc messages can be assigned to joystick up, joystick down, joystick push button, the 7 transport buttons + its shift status, the large
volume pot, any of the 8 pots in 2 pages (16 total), the foot switch socket and the 8 pads.
them.
Here is how you assign a MIDI cc message to a control:
• Press [Shift]+[Internal] to activate Setup mode. The [Internal] button blinks while Setup is active.
• Press C#1 on the keyboard to select #cc Assign.
• Move or press a control to select it for assignment.
• Enter a MIDI CC value between 0-127, using the black number keys labelled 0-9.
• Press [Enter] (C3) to accept the change and exit Setup.
Setup mode
C1 C2

16 Nektar Impact LX Mini owner’s manual www.nektartech.com
Setup mode
Program Assign
Program messages are used to change a program (also sometimes called preset or patch) on a receiving device. This type of message is
typically used on MIDI hardware, but in some cases it is also used to change sounds on software plugins.
Each of the assignable buttons and pads can be programmed to send a MIDI Program change message. You will need to know which
messages your receiving device expects to get this right, so make sure to consult the documentation available for that product.
• Press [Shift]+[Internal] to activate Setup mode. The [Internal] button blinks while Setup is active.
• Press D1 on the keyboard to select Prg Assign.
• Move or press a control to select it for assignment.
• Enter a program value between 0-127, using the black number keys labelled 0-9.
• Press [Enter] (C3) to accept the change and exit Setup.
MIDI Channel Assign
value 0.
• Press [Shift]+[Internal] to activate Setup mode. The [Internal] button blinks while Setup is active.
• Press D#1 on the keyboard to select MIDI Ch Assign.
• Move or press a control to select it for assignment.
• Enter a MIDI channel value between 0-16, using the black number keys labelled 0-9.
• Press [Enter] (C3) to accept the change and exit Setup.
Pad Learn
It’s easy to change a pad note assignment using the Pad Learn function. Try these steps:
• Press [Shift]+[Internal] to activate Setup mode. The Internal button’s LED now blinks white.
• On the keyboard, press E1, labeled ‘Pad Learn’.
• All pad LEDs are now off, except the currently select pad. Press any pad to select it.
• Press a key on the keyboard to learn its note to the selected pad. Use the octave buttons if necessary.
• Repeat the previous 2 steps to select pads and assign notes.
• Press [Instrument], [Internal] or [Function] to exit when done.
Save Pad Map
If a Pad Map is loaded, all current assignments will be replaced by the settings of the loaded Pad Map. To retain current settings, save to
one of the 4 Pad Map locations for recall at any time.
• Press [Shift]+[Internal] to activate Setup mode. The [Internal] button blinks while Setup is active.
• Press F1 on the keyboard to select ‘Save Pad Map’. The 4 pads corresponding to Pad Maps 1-4 are now each illuminated in their
identifying color.
•
• Press [Enter] (C3) to save to the selected Pad Map location and exit Setup.

www.nektartech.com Nektar Impact LX Mini owner’s manual 17
Part 2 - Setup mode
Set Foot Switch to trigger Part 2
Part 2 can be activated by an attached foot switch after completing the following steps.
• Press [Shift]+[Internal] to activate Setup mode. The [Internal] button blinks while Setup is active.
• Press F#1 on the keyboard to select ‘FC Trg Part 2’.
• The [Arrow down/up] Part 2 buttons now blink. Press one of the [Arrow down/up] buttons depending on which behaviour you want
assigned to the foot switch.
• Press [Enter] (C3) to accept the change and exit Setup. The foot switch now activates part 2.
To revert to previous foot switch settings, repeat the above steps, then press the button currently assigned in step 3, to de-assign it.
Part 2 Octave
Part 2 buttons can be assigned to shift the octave of played notes by up to 3 octaves in either direction depending on whether you press
the Part 2 [Arrow down] or [up] button. The default octave setting is set to 1, but because Layer is also on, the octave is layered with the
played note.
• Press [Shift]+[Internal] to activate Setup mode. The [Internal] button blinks while Setup is active.
• Press G1 on the keyboard to select Part 2 ‘Octave’.
•
• Press [Enter] (C3) to accept the change and exit Setup.
Part 2 MIDI Channel
changing the MIDI channel when a Part 2 button is pressed. If Layer is on, MIDI note events will be sent on both the global MIDI channel
and the Part 2 MIDI channel, playing 2 sounds at the same time.
• Press the [Shift]+[Internal] to activate Setup mode. The [Internal] button blinks while Setup is active.
• Press G#1 on the keyboard to select Part 2 ‘MIDI Ch.’
•
• Press [Enter] (C3) to accept the change and exit Setup.
Part 2 Transpose
As with octave, Part 2 buttons can be assigned to transpose notes played by up to 11 notes in either direction.
• Press [Shift]+[Internal] to activate Setup mode. The [Internal] button blinks while Setup is active.
• Press A1 on the keyboard to select Part 2 ‘Transpose’.
•
• Press [Enter] (C3) to accept the change and exit Setup.
Part 2 Layer
settings replace the note played.
• Press [Shift]+[Internal] to activate Setup mode. The [Internal] button blinks while Setup is active.
• Press A#1 on the keyboard to select Part 2 ‘Layer’. The status of Part 2 Layer is immediately changed and the unit exits Setup mode.
18 Nektar Impact LX Mini owner’s manual www.nektartech.com
Global MIDI Channel
The Impact LX Mini keyboard and any controls (including pads) assigned to MIDI Channel 0, send their messages on the global MIDI
channel from 1 to 16. To change the global MIDI channel do the following: By default, all controls are set up to send their messages
on the global channel. You may never need to change that but if you do, here is how:
• Press [Shift]+[Internal] to activate Setup mode. The [Internal] button blinks while Setup is active.
• Press C2 on the keyboard to select ‘Global MIDI Channel’.
• Enter the MIDI channel value between 1-16, using the black number keys labelled 0-9.
• Press [Enter] (C3) to accept the change and exit Setup.
Keyboard Velocity Curve
play for a while, then change to an option that might suite your playing style better.
Description Vel Curve No Description Fixed No
Soft - emphasis on lower values 1 Fixed velocity 127 5
Default - evenly balanced for most use 2 Fixed velocity 100 6
Hard1 - higher values than default 3 Fixed velocity 64 7
Hard2 - emphasis on higher values 4
In the selection steps below, use pads 1-7 to select a velocity option from the chart above by striking a pad. The currently selected velocity
curve is illuminated red and the 6 unselected options are illuminated yellow. Here is how you make a selection:
• Press [Shift]+[Internal] to activate Setup mode. The [Internal] button blinks while Setup is active.
• Press C#2 on the keyboard to select ‘Keyboard Velocity Curve’.
• Select the desired curve option from the chart above, then strike the corresponding pad.
Selection is instanct and Impact LX Mini will exit Setup mode.
Pad Curve
In the selection steps below, use pads 1-7 to select a velocity option from the chart above by striking a pad. The currently selected velocity
curve is illuminated red and the 6 unselected options are illuminated yellow. Here is how you make a selection:
• Press [Shift]+[Internal] to activate Setup mode. The [Internal] button blinks while Setup is active.
• Press D2 on the keyboard to select ‘Pad Velocity Curve’.
• Select the desired curve option from the chart above, then strike the corresponding pad.
Selection is instanct and Impact LX Mini will exit Setup mode.
Setup mode
Description Vel Curve No Description Fixed No
Dynamic - wide velocity range 1 Fixed velocity 127 5
Default - evenly balanced for most use 2 Fixed velocity 100 6
Hard1 - a slightly louder version of default 3 Fixed velocity 64 7
Hard2 - emphasis on higher values 4

www.nektartech.com Nektar Impact LX Mini owner’s manual 19
Setup mode
Panic
• Press [Shift]+[Internal] to activate Setup mode. The [Internal] button blinks while Setup is active.
• Press the D#2 key on the keyboard to select ‘Panic’. The reset will happen immediately and Impact LX Mini will exit Setup mode.
Memory Dump
The Memory Dump function will back up your current controller assignment settings including by sending out MIDI sysex data.
The data can be recorded in your DAW or other application capable of recording sysex data and replayed/sent back to your
Impact LX Mini keyboard when you want to reload your settings.
Sending out a sysex memory dump for backup:
• Make sure your MIDI software application is set up and capable of recording MIDI Sysex data
• Start recording
• Press [Shift]+[Internal] to activate Setup mode. The [Internal] button blinks while Setup is active.
• Press the E2 key on the keyboard to activate ‘Memory Dump’.
• Stop recording when you can see that data is no longer received in your software. The content of your Impact LX Mini memory
should now be recorded in your MIDI software.
Restoring a backup:
backup. Make sure the Impact LX Mini is the output destination of the MIDI track containing the backup data.
Low Power Mode
Impact LX Mini can be run at lower power to enable connectivity and powering from an iPad or to conserve battery power when running
There are a couple of ways the Impact LX Mini can enter and exit Low Power Mode:
•
• Release the buttons once the unit has powered up. Low Power Mode is now active while the unit is on.
• Make sure LX Mini is on.
• Press [Shift]+[Internal] to activate Setup mode. The [Internal] button blinks while Setup is active.
•
Set Tempo
• Press [Shift]+[Internal] to activate Setup mode. The [Internal] button blinks while Setup is active.
• Press G2 on the keyboard to select ‘Set Tempo’.
• Enter the desired tempo value from 30 to 240 bpm, using the black number keys labelled 0-9.
• Press [Enter] (C3) to accept the change and exit Setup.

20 Nektar Impact LX Mini owner’s manual www.nektartech.com
MMC Transport Control
The Nektar DAW Integration software automatically maps transport and navigation buttons to their respective functions in supported
DAWs. If your DAW is not supported directly, you may still be able to control your DAW’s transport controls using MIDI Machine Control.
For Pro Tools, you can use the dedicated setup below.
Here is how you set up the Impact LX Mini keyboard to send MIDI Machine Control messages:
• Press [Shift]+[Internal] to activate Setup mode. The [Internal] button blinks while Setup is active.
• Press A2 ‘USB Port Mode’ on the keyboard.
• Press G#1 to select the numerical value 3.
• Press [Enter] (C3) to accept the change and exit Setup.
• Make sure your DAW is set up to receive MMC from Impact LX Mini’s USB MIDI port 2.
Button Function
Click No
<< (Rewind) Yes
>> (Forward) Yes
Cycle / Loop No
Stop Yes
Play Yes
Record Yes
Pro Tools setup
• Press [Shift]+[Internal] to activate Setup mode. The [Internal] button blinks while Setup is active.
• Press A2 ‘USB Port Mode’ on the keyboard.
• Press A#1 to select the numerical value 4.
• Press [Enter] (C3) to accept the change and exit Setup.
In Pro Tools, go to Peripherals and select the ‘MIDI Controller’ tab. Next select the following settings:
Type: ‘M-Audio Keyboard’
Receive From: ’Impact LX Mini MIDI 2’ in OSX / MIDIIN2 (IMPACT LX Mini) in Windows.
Send To: ’Impact LX Mini MIDI 2’ in OSX / MIDIOUT2 (IMPACT LX Mini) in Windows.
• Click OK to exit.
Impact LX Mini is now set up to work with Pro Tools. When [Instrument] is selected, the 8 pots control volume for each of the mixer
channels in the current bank.
The chart below shows what the transport buttons do.
Transport Loop buttons [Shift] active/illuminated blue
[Click] : Not Assigned [Loop]+[Play] : Loop playback S1 : Mute selected track
[<<] : Rewind [Loop]+[Record] : Loop record S2 : Solo selected track
[>>] : Forward [Loop]+[Stop] : Undo <Track : Select previous track
[Loop] : Used with other buttons. See next
column
[Loop]+[<<] : Go to start Track> : Select next track
[Stop] : Stop playback [Loop]+[>>] : Go to end <Patch : Jump back 8 tracks
[Play] : Start playback Patch> : Jump ahead 8 tracks
[Record] : Arm for recording
MMC Transport & Pro Tools setup
Provided your DAW is set up to receive MMC, you can now control transport functions
from Impact LX Mini. The buttons are assigned according to the chart on the right.
MMC is supported by many DAWs and devices but is not needed for DAWs supported
by Nektar DAW Integration.
Table of contents
Other Nektar Recording Equipment manuals

Nektar
Nektar SE49 User manual

Nektar
Nektar SE49 User manual

Nektar
Nektar Impact LX49+ User manual

Nektar
Nektar Impact LX49+ Manual

Nektar
Nektar Aura User manual

Nektar
Nektar Reason T4 User manual

Nektar
Nektar Pacer User manual

Nektar
Nektar Impact iX49 User manual

Nektar
Nektar Panorama P1 User manual

Nektar
Nektar Aura Safety guide


