IEM Mobil-O-Graph NG User manual

Operating instructions
Ambulatory 24-hour blood pressure monitoring system
for the products:
Mobil-O-Graph® NG
Mobil-O-Graph® PWA
0044
Blood pressure monitor
Pulse Wave Analysis (PWA)
Analysis unit:
Hypertension Management Software
Client-Server Version 5.1
(HMS CS 5.1)
Dealer:
EN

Copyright© Mobil-O-Graph® Revision 5.1 10/2015 I.E.M. GmbH All rights reserved.
The contents may not be copied or published without written permission from I.E.M.
GmbH.
Manufacturer:
I.E.M. Industrielle Entwicklung Medizintechnik GmbH
Cockerillstrasse 69
52222 Stolberg
Germany
Tel.: + 49 (0)2402 - 9500 0
Fax: + 49 (0)2402 - 9500 11
e-mail: [email protected]
Homepage: www.iem.de

3
Mobil-O-Graph®, operating instructions, Rev. 5.1 10/2015, GmbH
Contents
1. Introduction ..........................................................................................................7
1.1 Foreword ....................................................................................................... 7
1.2 Operating Instructions ...................................................................................7
1.3 Clinical tests .................................................................................................. 7
1.4 CE mark ........................................................................................................7
1.5 Scope of delivery ...........................................................................................7
2. Operating instructions ........................................................................................9
2.1 Intended use.................................................................................................. 9
2.2 Incorrect use.................................................................................................. 9
2.3 Indication .......................................................................................................9
2.4 Side effects of 24-hour blood pressure monitoring .......................................9
2.5 Important instructions for the doctor ............................................................9
2.6 Important instructions for the patient ..........................................................10
3. Product description ........................................................................................... 11
3.1 Introduction .................................................................................................. 11
3.2 Unpacking ................................................................................................... 11
3.3 The monitor ................................................................................................. 11
3.3.1 Keys .............................................................................................................................11
3.3.2 Display ........................................................................................................................ 12
3.3.3 Acoustic signals .......................................................................................................... 12
3.3.4 Cuff connection........................................................................................................... 12
3.3.5 Data port ..................................................................................................................... 12
3.3.6 Infrared interface ........................................................................................................ 13
3.4 Preparing for monitoring ..............................................................................13
3.4.1 Switching on ............................................................................................................... 13
3.4.2 Clearing the memory .................................................................................................. 13
3.4.3 Setting the time/date .................................................................................................. 13
3.4.4 Transmitting patient data (ID) ..................................................................................... 13
3.4.5 Specifying the measurement protocol required.......................................................... 13
3.4.6 Putting on the monitor and starting measurement ..................................................... 14
3.5 Technical data .............................................................................................16
3.6 Symbols .......................................................................................................16
4. Hypertension Management Software Client-Server .......................................17
4.1 Using HMS CS ............................................................................................17
4.2 Installing the software .................................................................................18
4.2.1 System requirements ................................................................................................. 18
4.2.2 Installation for Windows® .......................................................................................... 19
4.2.3 Installation for Macintosh® OS X 10.7.5 and later ..................................................... 19
4.2.4 Installation for Linux ................................................................................................... 20
4.2.5 Hypertension Management Software update ............................................................. 20
4.2.6 Data back-up .............................................................................................................. 20
4.3 Starting and quitting HMS CS .....................................................................21
4.4 Structure of HMS CS user interface............................................................21
4.4.1 Menu bar .................................................................................................................... 22
4.4.2 Toolbar ........................................................................................................................ 23
4.4.3 Using the mouse ........................................................................................................ 23
4.5 First steps with a sample patient.................................................................23
4.5.1 Displaying sample patient .......................................................................................... 24
4.5.2 Displaying sample patient’s data ................................................................................ 24
4.5.3 Quitting HMS CS ........................................................................................................ 25
4.6 Editing patient data .....................................................................................25
4.6.1 Entering new patient................................................................................................... 25
4.6.2 Selecting existing patient............................................................................................ 26
4.6.3 Supplementing or modifying patient data ................................................................... 27
4.6.4 Changing patient ID number ...................................................................................... 27
4.6.5 Blood Pressure Limits ................................................................................................ 27
4.6.6 Deleting a patient ....................................................................................................... 28

4
Mobil-O-Graph®, operating instructions, Rev. 5.1 10/2015, GmbH
Contents
4.6.7 Enter office measurements BP ................................................................................... 28
4.6.8 Enter office measurements weight ............................................................................. 28
4.6.9 Audit trail .................................................................................................................... 29
4.7 Using the Mobil-O-Graph® blood pressure monitor ...................................29
4.7.1 Connection via cable .................................................................................................. 29
4.7.2 Connection via Bluetooth® ........................................................................................ 32
4.7.3 Connection via infrared (IR) ....................................................................................... 36
4.8 Preparing the monitor ..................................................................................39
4.8.1 Setting the measurement protocol ............................................................................. 40
4.8.2 Setting the monitor’s clock ......................................................................................... 41
4.8.3 Importing a patient ID ................................................................................................. 41
4.8.4 Testing the monitor ..................................................................................................... 41
4.8.5 Deleting old measurements........................................................................................ 41
4.8.6 Setting reminder times ............................................................................................... 41
4.8.7 Ending device preparation.......................................................................................... 42
4.8.8 Starting 24-hour monitoring with the Mobil-O-Graph® ............................................... 42
4.8.9 Starting measurement with the Stabil-O-Graph® ....................................................... 42
4.9 Reading out measurements from the monitor............................................. 43
4.9.1 Ending 24-hour monitoring with the Mobil-O-Graph® ................................................ 43
4.9.2 Connecting HMS CS to the Mobil-O-Graph® ............................................................. 43
4.9.3 Connecting HMS CS to the Stabil-O-Graph® ............................................................. 43
4.9.4 Importing measurements from monitor into HMS CS ................................................ 43
4.9.5 Exporting measurements ........................................................................................... 44
4.10 Using the Stabil-O-Graph® (optional) .........................................................45
4.11 Analysing measurements ............................................................................49
4.11.1 Table of measurements .............................................................................................. 50
4.11.2 Blood Pressure Profile (trend) .................................................................................... 50
4.11.3 Profile ......................................................................................................................... 51
4.11.4 Correlation .................................................................................................................. 52
4.11.5 Values above limit ...................................................................................................... 53
4.11.6 Frequency distributions .............................................................................................. 53
4.11.7 Report ......................................................................................................................... 54
4.11.8 Hourly mean values .................................................................................................... 55
4.11.9 Changes in blood pressure ........................................................................................ 55
4.11.10 Printing ....................................................................................................................... 56
4.11.11 Comparing several measurement series ................................................................... 57
4.11.12 24h-PWA .................................................................................................................... 57
4.11.13 Bar chart (PWA) ......................................................................................................... 58
4.11.14 Patient report (Day Average) ...................................................................................... 59
4.12 e-health .......................................................................................................60
4.12.1 Activate e-health service ............................................................................................ 60
4.12.2 Import Patients from e-health server ......................................................................... 61
4.12.3 Export Patients to e-health Server ............................................................................ 61
4.13 Practice Monitoring......................................................................................62
4.13.1 Prepare Mobil-O-Graph® for the practice monitoring ................................................. 62
4.13.2 Assign received test series ........................................................................................ 63
4.14 Pulse Wave Analysis (PWA) ....................................................................... 63
4.14.1 Installation of the PWA at the doctor’s practice ......................................................... 63
4.14.2 Carry out pulse wave analysis ................................................................................... 64
4.14.3 Triple Pulse Wave Analysis ........................................................................................ 64
4.14.4 Activating the 24h-PWA .............................................................................................. 64
4.14.5 Reading and Analysing the 24h-PWA ........................................................................ 65
4.14.6 Display of Pulse Wave Analysis ................................................................................. 65
4.14.7 AIx and PWV chronic ................................................................................................. 66
4.15 GDT-Interface ..............................................................................................66
4.15.1 Transfer Analysis Reports to Practice Software ......................................................... 67
4.16 Setting standard values for HMS CS ..........................................................67
4.16.1 Database .................................................................................................................... 67
4.16.2 Changing language .................................................................................................... 67
4.16.3 e-health service .......................................................................................................... 68
4.16.4 Interfaces .................................................................................................................... 68
4.16.5 Setting BP limits ......................................................................................................... 70
4.16.6 Analysis ...................................................................................................................... 71
4.16.7 Setting colours for curves and background in graphs ................................................ 71
4.16.8 Extras ......................................................................................................................... 72
4.16.9 GDT settings............................................................................................................... 72
4.16.10 Manufacturer information ........................................................................................... 73
5. Care and maintenance ......................................................................................75

Contents
5
Mobil-O-Graph®, operating instructions, Rev. 5.1 10/2015, GmbH
6. Troubleshooting.................................................................................................77
6.1 Principal sources of error ............................................................................77
6.2 Battery voltage curve ..................................................................................77
6.3 Transmission errors .....................................................................................77
6.4 Check list .....................................................................................................77
6.5 Error tables ..................................................................................................77
6.5.1 Troubleshooting, Mobil-O-Graph® ............................................................................. 77
6.5.2 Communication errors, Stabil-O-Graph® ................................................................... 80
6.5.3 Communication errors, Mobil-O-Graph® Bluetooth interface ................................... 81
7. Charging units ...................................................................................................83
7.1 M2X .............................................................................................................83
7.2 TL 4+4 Ultrafast Charger .............................................................................84
7.3 Operation with alkaline batteries .................................................................84
8. Guarantee and repair conditions .....................................................................85
9. Appendix ............................................................................................................87
9.1 EMC guidelines and manufacturer’s declaration ........................................87
9.2 Important instructions for the patient ...........................................................89
9.3 Accessories order form Mobil-O-Graph® .................................................... 90


7
Mobil-O-Graph®, operating instructions, Rev. 5.1 10/2015, GmbH
1. Introduction
1.1 Foreword
This Mobil-O-Graph® 24-hour Ambulatory Blood Pressure Monitor system (ABPM) provides you with a system
using the latest specialist technology, which incorporates all our experience of the past few years with the suc-
cessful Mobil-O-Graph
®
ABP moni tor. We ha ve als o in cor por ate d o ur cus tom ers ' wi she s i nto the Mo bil -O- Gra ph
®
.
The blood pressure monitor, also referred to below as ABP monitor or recorder, can be prepared for a new
patient in practice in just a few minutes. This gives you the advantage of using the ABP monitor optimally, and
the ability to complete a whole monitoring session each day. The Mobil-O-Graph® will thus quickly be integrat-
ed into the daily routine of the practice.
Clinical experience has shown that in addition to the ABPM, analysis of BP self-measurement is also sensible.
The client/server data management extension enables a virtual patient clinic to be established.
1.2 Operating Instructions
These operating instructions will show you quickly and simply how to use the ABP monitoring system and its
accessories. With a little practice you will see how easy it is to use the ambulatory blood pressure monitor.
For the analysis of the Mobil-O-Graph® the
Hypertension-Management-Software Client-Server
data management is used.
Where reference is made to specific characteristics, only those sections relating to your version are relevant!
Important: The operating instructions describe the ABP monitor and its accessories in the sequence in which
you will be setting up the equipment and then using it. After the general description you will find
details of installation, setting up, preparation for monitoring, fitting to the patient and evaluation. The
individual functions are explained later, at the point at which they are to be used. You will therefore
become familiar with use of the blood pressure monitor step by step.
The user should always have the operating instructions at hand.
1.3 Clinical tests
The Mobil-O-Graph® blood pressure monitor fulfils the requirements of the ESH (European Society of
Hypertension).
Blood pressure measurements determined with this device are equivalent to those obtained by a trained observer
using the cuff/stethoscope auscultatory method, within the limits prescribed by the American National Standard,
Manual, electronic or automated Sphygmomanometers.
1.4 CE mark
The Mobil-O-Graph® fulfils the requirements of the Medical Products Directive 93/42/EEC and bears
the CE mark.
The Mobil-O-Graph® fulfils the requirements of the R&TTE Directive 1999/5/EU and bears the CE
mark.
The declaration of conformity for this product can be downloaded from the I.E.M. website www.iem.de.
This device fulfils the requirements of the standards applicable in accordance with the Directives. In particular,
it fulfils the applicable requirements of the following standards:
1. EN 1060-1 Noninvasive blood pressure measuring equipment - Part 1: General requirements
2. EN 1060-3 Noninvasive blood pressure measuring equipment - Part 3: Supplementary requirements for
electromechanical blood pressure measuring systems
1.5 Scope of delivery
Basic set
1. Mobil-O-Graph® (NG or PWA)
2. S-, M- and L-Cuff
3. Mobil-O-Graph® Universal Case
4. Recharger including 4 NiMH batteries
5. Operating instructions
6. Measuring tape
7. Event protocol
Analysis unit HMS Client-Server:
1. HMS Client-Server on CD
2. Bluetooth-Dongle
alternatively
3. IR-MED serial or USB
alternatively
4. PC hybrid cable USB or serial


9
Mobil-O-Graph®, operating instructions, Rev. 5.1 10/2015, GmbH
2. Operating instructions
2.1 Intended use
The appropriate use is 24-hour blood pressure monitoring and pulse wave analysis (PWA). The Mobil-O-Graph®
should be used only under medical supervision.
2.2 Incorrect use
Because of the risk of strangulation from the tube and cuff, the ABPM System Mobil-O-Graph® may not be used
for patients who are legally incompetent nor for unattended children.
The Mobil-O-Graph® is not designed for the application in neonates and children under the age of 3.
The Mobil-O-Graph® must not be used for blood pressure monitoring during surgeries. It has not been designed
for alarm-giving monitoring in intensive care units.
2.3 Indication
The Mobil-O-Graph® ABPM system is intended for clarifying blood pressure and for use as a diagnostic aid.
The doctor can, at his or her own discretion, prescribe the use of this medical system for patients if they are
suffering from:
■hypertension,
■hypotension,
■borderline hypertrophy,
■impaired renal function, or
■require antihypertensive therapy.
2.4 Side effects of 24-hour blood pressure monitoring
24-hour blood pressure monitoring is now a familiar, acceptable and valuable method of measurement, used
daily in diagnostic investigation and treatment follow-up.
When considering the use of 24-hour blood pressure monitoring, it is important to check whether the patient is
suffering from coagulation disorders or is on anticoagulant treatment. As with occasional blood pressure meas-
urement, petechial bleeding can occur.
In patients on anticoagulant therapy or patients with coagulation disorders, petechial bleeding can occur on the
measurement arm in spite of correct cuff fit. The special risk to patients due to anticoagulant treatment or coag-
ulation disorders is present in all cases irrespective of the type of equipment used in measurement.
2.5 Important instructions for the doctor
■A measurement can be stopped at any time by pressing one of the monitor keys. This deflates the
cuff.
■Let your patients know that they should turn the device off and take off the cuff in the event of
any pain or allergic reactions. Attention: The printing ink contains epoxy resin. In hypersensitive
patients, the ink can cause allergic reactions in very rare cases.
■Explain to the patient how to place the cuff correctly.
■The equipment must not be used in the vicinity of an MRI scanner!
■The equipment must never be connected to a PC or other unit while still fitted to the patient.
■The use of components not supplied with the equipment can lead to incorrect measurements. Use
only accessories offered by IEM.
■The air tube between the Mobil-O-Graph® recorder and the cuff must never be knotted, compressed
or stretched.
■Observe the hygiene rules shown in the maintenance schedule.
■Attention: Due to the risk of strangulation with the tube and cuff, the ABPM system must only be
applied in children with special care and under the permanent supervision after specific prescription
by the doctor.
■Please note that for the application of the pulse wave analysis in children there are currently no clin-
ical studies available against reference methods.
■The pulse wave analysis provides additional indicators for possible risks, but is not admissible or
valid as a sufficient indicator for single diseases or therapy recommendations.
Warnings:
■The shoulder strap or cuff tube can become entangled around the patient’s neck and lead to stran-
gulation.

10
Mobil-O-Graph®, operating instructions, Rev. 5.1 10/2015, GmbH
2. Operating instructions
Countermeasures:
The doctor should draw the patient’s attention to the fact that the cuff must be worn on the upper
arm only and care must always be taken to ensure that neither the shoulder strap nor the air tube
can ever become wrapped around the neck. The air tube should therefore always be worn under the
outer clothing (even at night).
■If you suspect that water may have entered the unit during cleaning or use of the equipment, the
device may no longer be used on the patient.
Inform your service engineer without delay or send it for testing.
■The air tube may kink when inflated.
The doctor should explain to the patient that, particularly when sleeping, the equipment should be
positioned in such a way that the tube cannot be compressed. If the patient is not fully competent,
the equipment should be worn only under supervision.
■In some patients petechiae, haemorrhages or subcutaneous haematomas may occur.
All patients must be told when putting on the cuff that if they experience pain they should switch off
the equipment and inform the doctor.
■The doctor must be certain that, according to the health of the patient, the use of the device will not
damage blood circulation in the arm.
■The Mobil-O-Graph® is not suitable for use at the same time as high-frequency surgical equipment.
■The Mobil-O-Graph® fulfils the requirements of EMC standards; nevertheless, the Mobil-O-Graph®
should not be exposed to strong electromagnetic fields, as outside the limits they may cause mal-
function.
■The cuffs and the tube are made of electrically nonconductive material. They thus protect the device
from the effects of a defibrillator discharge.
■During a defibrillator discharge the device must not be allowed to touch the patient. The device may
be damaged by such a discharge and give inaccurate measurements.
■The device may not meet its performance specifications if stored or used outside the specified tem-
perature and humidity ranges (see section 3.5)
■In the majority of all cases the device is able to function according to specifications in the presence
of common arrhythmias such as atrial or ventricular premature beats. In the condition of atrial fibril-
lation, the device may not be able to function to its specifications.
■Caution: Substitution of a component different from that supplied might result in measurement error.
2.6 Important instructions for the patient
■The beep signals a measurement. Keep still during the measurement, until the process is complete.
Let your arm hang loosely or, when sitting, let your lower arm rest on the table or on a support.
Avoid moving your hand during the measurement.
■The Start key triggers an additional measurement. Press this key only if instructed to do so
by your doctor (e.g. after taking medication, if you have chest pains or shortness of breath etc.).
■The Event key records the time of an event and triggers a measurement. Press this key only
if something important or unusual is happening.
■The Day/Night key should be pressed immediately before going to sleep and upon waking.
■The ON/OFF key permits the device to be switched on and off if a measurement is not required
at the set time. To switch off, press the key for longer than 2 seconds.
■A measurement can be interrupted at any time by pressing any of the keys. This deflates the cuff.
Warnings:
■The cuff may only be worn on the upper arm and in every case you should ensure that neither the
shoulder strap nor the air tube can ever become wrapped around your neck. The air tube should
therefore always be worn under the outer clothing (even at night).
■Take care to ensure that the tube of the cuff cannot be kinked or compressed, particularly while
sleeping.
■If the measurement causes you pain, switch off the device, take off the cuff and inform your doctor.
■The blood pressure monitor must not come into contact with liquids. Do not wear the equipment in
the shower!
If, for example, water has entered the device, it may no longer be used. Switch off the device and
take out the batteries.
■Serious malfunctions are indicated by a continuous beep. If a continuous beep sounds, switch off
the device, take off the cuff and inform your doctor.
■The cuff connection (air connector) must always engage with an audible click. Otherwise there will
be a leaky connection between the Mobil-O-Graph® and the tube that will produce incorrect meas-
urements.
You can find a form to copy and give to the patient in the Appendix!
2.6
11
Mobil-O-Graph®, operating instructions, Rev. 5.1 10/2015, GmbH
3. Product description
3.1 Introduction
The Mobil-O-Graph® system consists of two principal components:
■the Mobil-O-Graph® NG or Mobil-O-Graph® PWA with different cuffs and further accessories.
■analysis software for the doctor to analyse the measurements.
Measurements from ABP monitor can be interpreted using the analysis unit HMS Client-Server. Using this soft-
ware, saved measurements can be downloaded to a PC, presented on the screen in various forms, as dia-
grams, lists and statistics, and printed out.
The Mobil-O-Graph® can then be prepared immediately for the next patient. With a little practice, this proce-
dure can be completed in just a few minutes. This allows the doctor to use the equipment on each working day,
around the clock.
The Mobil-O-Graph® monitoring system is designed to allow recording and display of a blood pressure profile
throughout the day and night. Additional parameters are detected, such as nocturnal values and blood pres-
sure variations. This allows the doctor to prescribe the optimum medication for the individual and to monitor the
therapeutic outcome.
3.2 Unpacking
All parts supplied are packed carefully for dispatch and checked for completeness and correct function. Should
the goods supplied be incomplete or damaged, please notify the supplier without delay.
3.3 The monitor
Components:
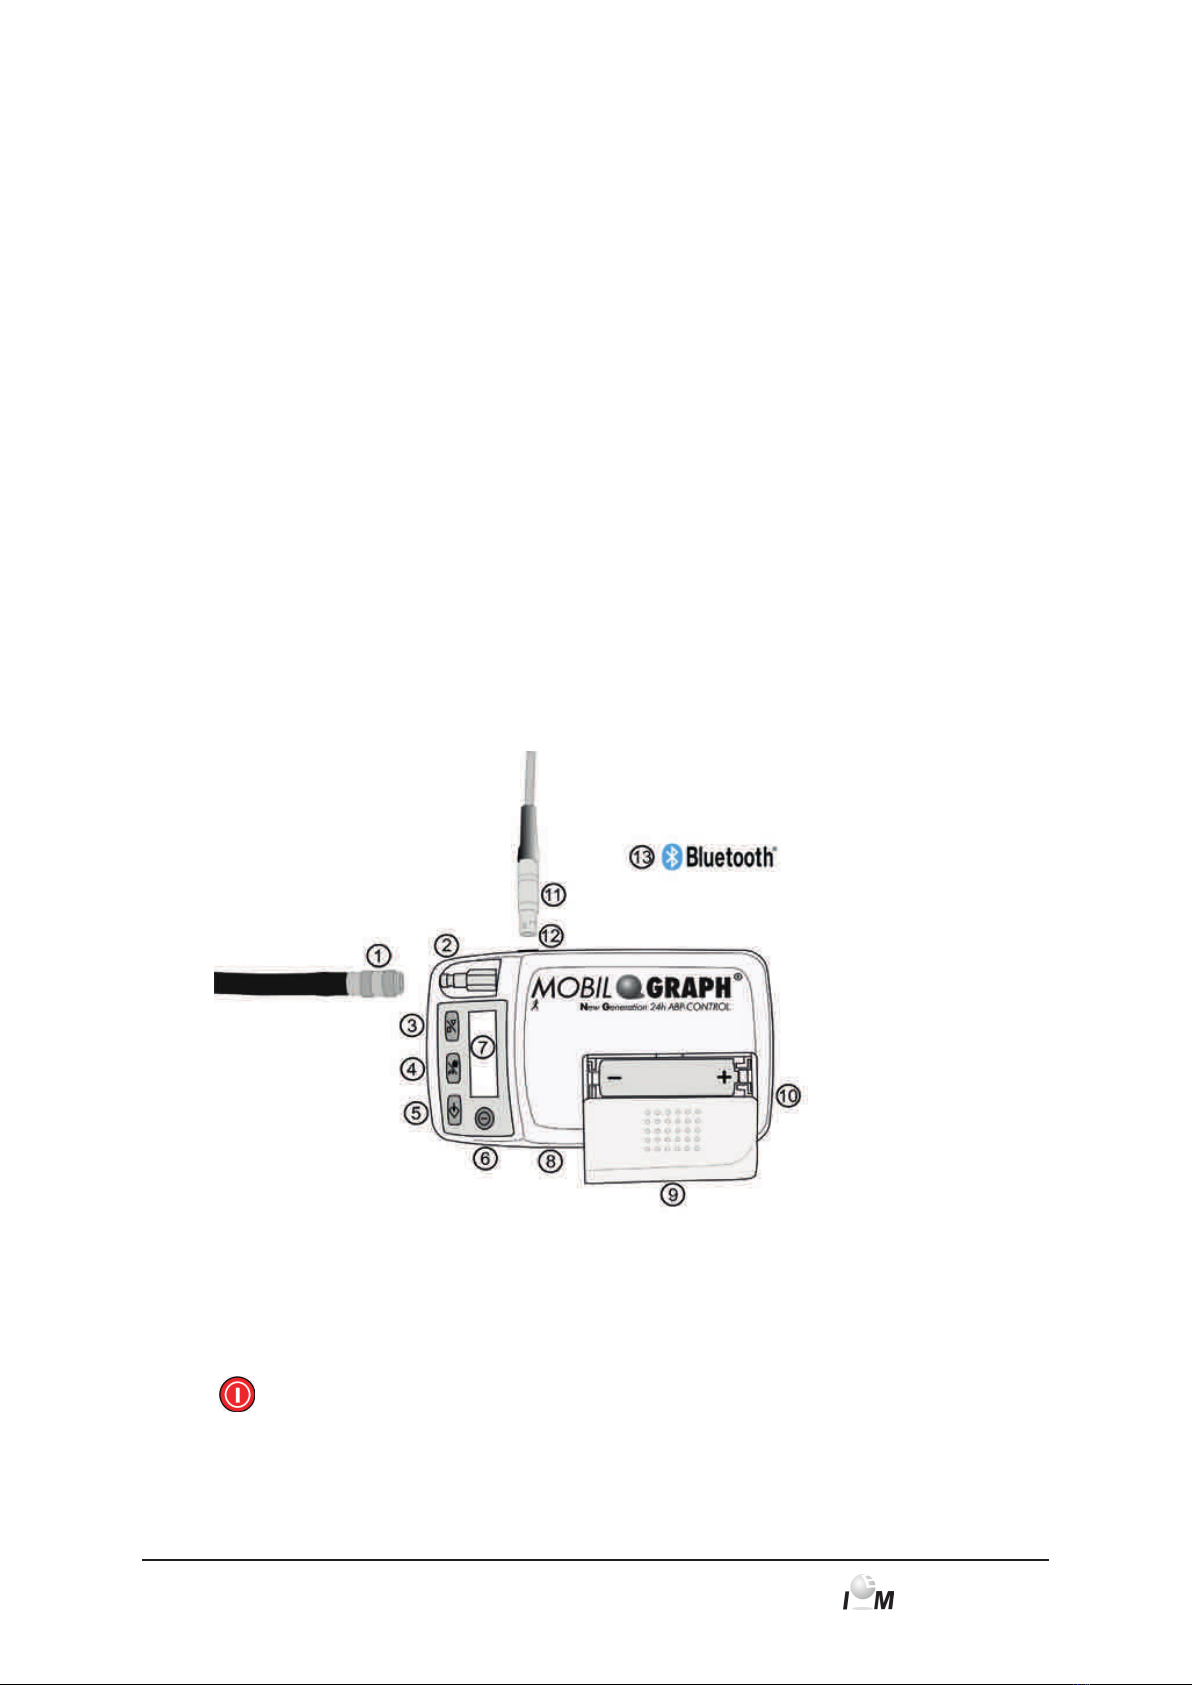
Figure 3.1 Monitor, top view
1: Cuff tube/air connector
2: Cuff connection
3: START key
4: DAY/NIGHT key
5: EVENT key
6: ON/OFF key
7: LCD display
8: Infrared interface
9: Battery compartment
cover
10: Battery compartment
11: PC interface cable
12: Data port
13: Bluetooth interface
(not visible)
3.3.1 Keys
All keys are located on the front of the recorder housing (see Figure 3.1 Monitor, top view).
ON/OFF This key switches the ABP recorder on and off. To prevent switching it on or off by mistake,
the key reacts only after 2 seconds.
As with all the other keys, blood pressure measurement can also be interrupted prematurely,
causing the pressure in the cuff to be released rapidly (see also the section Warnings).
Caution: Switch the unit on again to continue.

12
Mobil-O-Graph®, operating instructions, Rev. 5.1 10/2015, GmbH
3. Product description
DAY/NIGHT The DAY/NIGHT key allows waking and sleeping phases to be differentiated when record-
ing, which is important from the point of view of statistical evaluation and graphic presenta-
tion. For precise details of the effects on the printout, please see the relevant sections on
analysis.
Briefly: the patient is instructed to operate the “DAY/NIGHT” key on going to bed and again
when getting up in the morning. This adjusts the monitoring interval to suit the individu-
al patient and helps you in assessing the BP profile. As well as adjusting the interval, the
appropriate notes are shown on the printout. If this key is not operated, the change in inter-
val will take place according to the protocol selected.
EVENT This key allows the patient to record the time at which medication is taken or any events
happen that may cause blood pressure to rise or fall.
Pressing this key directly triggers a measurement. The patient should note the reason for
pressing the Event key in the events diary.
START This key starts the 24-hour measurement period and also allows a measurement outside the
pre-set measurement cycle.
Caution: The result of the first measurement should be checked by the doctor for plausibil-
ity, to ensure that the subsequent automatic measurements are correct, and that
the cuff fits properly. If the measurement is incorrect, the instructions in the sec-
tions Preparing for monitoring and Troubleshooting should be followed.
When the Start key is pressed, the number of measurements recorded so far is dis
-
played and manual measurement begins. This differs from automatic measurement
according to the monitoring protocol, in that the cuff is inflated in stages. This deter-
mines the cuff pressure required to allow the systolic blood pressure to be meas-
ured. This maximum inflation pressure is stored and is then approached immedi-
ately by direct inflation for the subsequent automatic measurements.
The patient can use the Start key to take manual measurements in addition to the
pre-set measurement cycle.
3.3.2 Display
The LCD display is located on the front of the recorder housing (see Figure 3.1 Monitor, top view). It displays
useful information for the doctor and patient on measurement data, monitor settings and measurement errors.
3.3.3 Acoustic signals
The acoustic signals used consist of single or multiple beeps.
The following signals are emitted:
1 beep Switching on or off, start and completion of a measurement (except for night
intervals), removal of interface cable, end of IR communication, set-up and end
of Bluetooth communication, and measuring error
3 beeps System error
Continuous beep Serious system error (e.g. cuff pressure is greater than 15 mmHg for more than
10 seconds outside of a measurement)
Combined beeps When deleting measurements manually, first one beep is emitted and 2 seconds
later 5 beeps.
3.3.4 Cuff connection
The cuff connection is fitted on the front of the recorder housing (see Figure 3.1 Monitor, top view). This metal
plug is used to connect the recorder with the cuff via the cuff tube and the metal cuff socket.
Important: Both the doctor and the patient should be aware that the metal plug (air connector) must
always engage with an audible click. Otherwise there will be a leaky connection between
the Mobil-O-Graph® and the tube that will produce incorrect measurements.
3.3.5 Data port
The data port is located on the left-hand side of the housing (see Figure 3.1 Monitor, top view). The connector
cable supplied goes into this socket. This is a plug-in connection, i.e. the red dot on the plug must be aligned
with the red dot on the socket. To disconnect, pull on the outer metal ring of the plug (see section: The analy-
sis unit).
3.3.2

3. Product description
13
Mobil-O-Graph®, operating instructions, Rev. 5.1 10/2015, GmbH
3.3.6 Infrared interface
The infrared interface provides an equal, wireless alternative to the data port. To use this interface you will need
the PC infrared interface IR-Med. The infrared interface can be obtained from your specialist dealer (see sec-
tion: The analysis unit).
3.4 Preparing for monitoring
■Connect the cuff tube with one of the cuffs supplied, by pushing it onto the plastic connector.
■Connect the cuff tube with the socket on the front of the recorder housing.
■First check that the batteries have been inserted correctly. You should always use fully charged batteries for
a new monitoring session. Alternatively, you can use alkaline batteries.
Take care to insert the batteries the right way round.
Important: Use only the I.E.M. NiMH rechargeable batteries supplied or alkaline batteries. Although zinc-carbon
batteries and NiCd rechargeables show adequate voltage in the battery test, the output is often
insufficient to carry out monitoring over a 24-hour period.
The rechargeable batteries should be discharged and recharged several times before they are first
used. Please follow the instructions for use enclosed with the charging unit.
To perform monitoring over a 48-hour period, you need 2 additional batteries to exchange after 24
hours.
3.4.1 Switching on
Always check the condition of your recorder first, before you give it to a patient. You can do this by observing
the initial displays shown on the recorder shortly after switching it on.
The following sequence of displays should appear:
Test Display Commentary
Battery status (Volts) 2.85 (for NiMH rechargeable batteries min. 2.75;
for alkaline batteries min. 3.10)
Display Segment Test 999:999 to
000:000
Along with the numbers, all the other LCD symbols are shown.
Check whether all segments are being shown correctly and
completely (the complete code is constantly being checked for
correctness in the background)
Current 24-hour time 21:45 (Example)
If a fault occurs during the internal test, the recorder shows E004 on the display and emits an acoustic signal.
For safety reasons, use of the recorder is blocked. Return the recorder to your specialist dealer or directly to
I.E.M. GmbH for repair without delay.
3.4.2 Clearing the memory
The memory must be cleared before each monitoring session, i.e. no blood pressure data from the previous
patient must be left in the memory. However, should values still be present, you can delete them with the delete
function of the analysis software.
You can delete the memory manually by pressing and holding down the start button for at least 5 seconds. While
holding down, all segments of the LCD are highlighted followed by a single beep. Subsequently the number of
the recordings is shown, followed by “clr”. If the event button is pressed within 5 seconds and held down for at
least 2 seconds, all recordings will be deleted.
3.4.3 Setting the time/date
The Mobil-O-Graph® has an internal buffer battery that allows the clock to continue running even after the bat-
teries have been removed. You should nevertheless check the time and date before each measurement series.
The time and date can be set with the analysis software. You can also set the time and date manually by hold-
ing the Start key and then pressing the Event key. Now you are in the “Set time” mode. Use the Start key to
change the number in question, and use the Event key to jump to the next.
3.4.4 Transmitting patient data (ID)
The Monitor must be prepared by transmitting the patient data (ID), so that measurements are allocated cor-
rectly when reading out (see 4.8.3, Importing a patient ID).
3.4.5 Specifying the measurement protocol required
You have the option to select from eleven (1-11) protocols.
Once you have completed one measurement, the protocol cannot be changed until deletion of all data has
been completed.
The protocols can be set using the analysis software.
3.3.6

14
Mobil-O-Graph®, operating instructions, Rev. 5.1 10/2015, GmbH
3. Product description
You can set the protocols manually by holding down the Day/Night and then pressing the Event key. Use the
Start/Stop key to change the protocol, and confirm with the Event key.
Protocol Day time Night time Measurements
per hour
Acoustic signal Measurements
shown on display
108:00
00:00
23:59
07:59
4
2
YES
NO
YES
208:00
23:00
22:59
07:59
4
1
YES
NO
YES
307:00
22:00
21:59
06:59
4
2
YES
NO
NO
408:00
00:00
23:59
07:59
4
2
YES
NO
NO
518:00
10:00
09:59
17:59
4
2
YES
NO
YES
607:00
00:00
23:59
06:59
4
2
YES
NO
YES
706:00
23:00
22:59
05:59
4
2
YES
NO
NO
807:00
09:00
00:00
08:59
23:59
06:59
6
4
2
YES
YES
NO
YES
909:00 08:59 30 NO YES
10 08:00 07:59 30 YES NO
11 08:00
00:00
23:59
07:59
4
2
YES
NO
YES
Table 3.0 Protocol list
Note: Protocols 1, 2 and 10 are provided as defaults, but they can be modified using the analysis soft-
ware (see 4.8, prepare measurement device). Protocol 5 is suitable for nighttime activity (night shift).
Protocol 9 is the Schellong-test.
Protocol 10 transmits the values automatically after each measurement to your doctor’s PC via
Bluetooth, or to a database via mobile communications such as a mobile phone or modem (precon-
figured by I.E.M.; see 4.8.1, Setting the measurement protocol). Only preconfigured mobile phones
or modems can send the data via GPRS as a block of data.
Protocol 11 is only available for the Mobil-O-Graph® with integrated 24-h-PWA and the HMS CS as
of version 4.0. Here, the intervals for blood pressure monitoring and 24-h-PWA can be configured
independently
3.4.6 Putting on the monitor and starting measurement
Figure 3.2 Putting on the cuff
Put the equipment pouch on the patient. By varying the length of
the strap you can use it either as a hip belt or a shoulder strap.
Alternatively, use a normal belt that matches the patient’s clothing.
Now fit the cuff on the patient; correct cuff fit is extremely important
for accurate measurement (see Figure 3.2).
The cuff can also be worn over the shirt or blouse. We recommend
that the cuff be fitted on the bare upper arm. In this case, bring the
tube out between the buttons of the shirt or blouse, around the back
of the neck to the ABP monitor on the right-hand side.
3.4.6

3. Product description
15
Mobil-O-Graph®, operating instructions, Rev. 5.1 10/2015, GmbH
Please note the following points:
IMPORTANT:
1. When putting the recorder on the patient, the recorder must not be connected to other external equip-
ment!
2. The cuff must fit so that the air tube cannot be kinked or compressed at any point. The tube connection
on the cuff should therefore be directed upwards. The air tube should allow free movement of the upper
arm and should run over the back of the neck to the other side of the body.
3. It is essential to ensure that the artery symbol lies over the brachial artery. When the cuff fits correctly, the
metal strip is on the outer side of the upper arm (elbow side).
4. The material loop must cover the skin under the metal strip.
5. The lower edge of the cuff should be about 2 cm above the bend of the patient’s elbow.
6. The cuff should fit relatively snugly on the upper arm. Correct fit can be checked by a simple test: there
should be room to slip one finger under the cuff.
7. The correct cuff size is also important if blood pressure is to be measured correctly. To obtain reproduc-
ible results, standardised monitoring conditions are required, i.e. the cuff must be the correct size for the
patient. Using the tape measure supplied, measure the circumference at the middle of the upper arm and
select the appropriate cuff:
Upper arm circumference Cuff
14 - 20 cm XS
20 - 24 cm S
24 - 32 cm M
32 - 38 cm L
38 - 55 cm XL
8. Connect the air tube from the cuff to the ABP recorder. Push the tube firmly over the connection until a
click is heard as it engages; to disconnect, simply pull back the outer metal ring on the plug.
9. The recorder is now correctly fitted and ready for use.
Once all these steps have been completed, the monitor can be started. First, a manual measurement must be
carried out by pressing the “START” key. This measurement is used to determine whether the recorder is work-
ing correctly.
If errors occur, check once more that the procedure followed in setting up and fitting the equipment was correct.
Should this not solve the problem, repeat the setting-up procedure.
Only after a successful manual measurement can the patient be allowed to leave with the equipment.
Interrupting measurements
During a measurement, ANY key can be used to interrupt the measurement. The display then shows “-StoP-”
and beeps 5 times. The process is also saved in the table of measurements under “Interruption”.
Important: Before beginning a 24-hour monitoring session, take the patient through Chapter 2: Operating
instructions.
3.4.6

16
Mobil-O-Graph®, operating instructions, Rev. 5.1 10/2015, GmbH
3. Product description
3.5 Technical data
Pressure measurement
range:
Systolic 60 to 290 mmHg
Diastolic 30 to195 mmHg
Accuracy: +/- 3 mmHg in the range indicated
Static pressure range: 0 to 300 mmHg
Pulse range: 30 to 240 beats per minute
Method: oscillometric
Measurement intervals: 0, 1, 2, 4, 5, 6, 12 or 30 measurements per hour
Monitoring protocols: 2 modifiable interval groups
Storage capacity: 300 measurements
Battery capacity: > 300 measurements
Operating temperatures: +10 °C to +40 °C
Operating humidity: 15% to 90%
Storage environment: -20 °C to 50 °C and 15% to 95% humidity
Dimensions: 128 x 75 x 30 mm
Weight: approx. 240 g including batteries
Power supply: 2 NiMH batteries, each 1.2 V and at least 1500 mAh (AA, Mignon)
2 alkaline 1.5 V batteries (AA, Mignon)
Interfaces: Serial (cable)
Infrared IEM-specific
Bluetooth (Class 1/100 m)
3.6 Symbols
Battery symbol
Meaning: The symbol shows the type of voltage.
Disposal of used electrical and electronic appliances
Meaning: This symbol on a product or its packaging indicates that the product
should not be treated as normal household waste, but must be returned to a recy-
cling point for electrical and electronic appliances. You can obtain further information
from your local authority, local waste disposal plants or specialist dealers.
Defibrillator rating
Meaning: BF applied part, defibrillator protected
Caution, consult accompanying documents
Meaning: caution, consult accompanying documents
Manufacturing date
Meaning: Date of manufacture
CE mark
Meaning: The device fulfils the basic requirements of the European Directives on
medical devices.
3.5

17
Mobil-O-Graph®, operating instructions, Rev. 5.1 10/2015, GmbH
4. Hypertension Management Software Client-Server
The monitor measures blood pressure and stores the measurement. On completion of measurements, the stored
measurements are transferred to your computer. You can then analyse the measurements according to your
requirements.
The patient file contains important data such as:
■Personal patient ID number (mandatory entry)
■Name (mandatory entry)
■Address, telephone number
■Personal data (age, sex etc.)
■Medication, medical history, emergency contacts
The HMS CS program offers you various options for analysis. You can choose to display the results on your
screen or print them out directly as:
■4.11.1, Table of measurements
■Statistical analysis with mean blood pressure values for the whole day, and for the daytime and nighttime periods
and the first hour after waking, plus hourly mean values, see 4.11.7, Report
■Extreme values (maximum and minimum values), see 4.11.7, Report
■Percentage incidence of values above a predetermined limit, see 4.11.7, Report
■Standard deviation (variability), see 4.11.8, Hourly mean values
■Calculation of day/night reduction, see 4.11.7, Report
■Graphs such as:
□Envelope curve of hourly mean values, see 4.11.2, BP profile
□Correlation, see 4.11.4, Correlation
□Pie chart of percentage of values above limit, see 4.11.5, Values above limit
□Bar chart of measurements, see 4.11.6 Frequency distributions
□Curve of changes in blood pressure, see 4.11.9, Changes in blood pressure
□Curve of measurements, see 4.11.9, Changes in blood pressure
□Histogram of blood pressure distribution, see 4.11.9, Changes in blood pressure
□Curve comparison for optimising treatment, see 4.11.9, Changes in blood pressure
In this way you can rapidly and simply visualise the course of and fluctuations in blood pressure over the day
and night. You can adjust medication to take the best possible account of these changes.
You can also enter measurements from the „Klock®” - the wrist blood pressure monitor - and the Stabil-O-Graph
- the upper arm blood pressure monitor - and manage the data using the HMS CS program (see 4.11.3, Self-
measurements). An infrared eye is required for data transfer.
The HMS CS also provides the opportunity to establish an E-Health Service (telemedicine), with a significantly
higher security for the patient, while saving work for the doctor.
You can set limits, or define alarms that will only inform you if the limits you have set are exceeded (e.g. by
Fax).
The offers include blood pressure monitoring by the Stabil-O-graph mobil and weight monitoring with the scale
mobil.
In addition to an online database, you can use these devices to synchronise and manage data online with the
HMS CS online.
For further information, please contact your specialist dealer or I.E.M. GmbH directly.
4.1 Using HMS CS
Basic knowledge and experience of the operating systems Windows®, Macintosh® or Linux® are required
for using HMS CS.
Use the HMS CS program to manage blood pressure monitoring data and evaluate them. You classify these
measurements by patient. You can store as many measurement series as you like for each patient. Each meas-
urement series consists of many single measurements.
HMS CS will run through the following steps:
■Before 24-hour monitoring: prepare measurement
1) Start HMS CS
2) Select patient or enter new patient
3) Connect monitor to HMS CS

18
Mobil-O-Graph®, operating instructions, Rev. 5.1 10/2015, GmbH
4. Hypertension Management Software Client-Server
4) Prepare monitor
5) Quit HMS CS.
■After 24-hour monitoring: Process data
1) Start HMS CS
2) Connect HMS CS to monitor
3) Read out measurements from the recorder
4) Analyse data
5) Quit HMS CS.
4.2 Installing the software
The software is able to communicate with the monitor via different interfaces. The following connections are
possible:
■Cable with serial interface (e.g. COM1,2...),
■Combi cable with USB interface,
■Infrared (IR) with serial interface,
■Infrared (IR) with USB interface,
■Bluetooth.
Important: If you are using the USB interface and/or Bluetooth, you must first install the corresponding driver.
You can find the details below.
Note: Please insert the USB adaptor (USB stick or cable with USB interface) only after installing the software
onto your computer, or when prompted to do so.
4.2.1 System requirements
1) Computer
■1 GHz
■1 GB RAM
■200 MB hard disk storage
■1024x768 pixels
■Two spare USB ports
2) Operating system
a) Windows® 7, Windows® 8, Windows® 8.1, Windows® 10, Windows Vista® (32-bit & 64-bit)
b) Macintosh® OS X 10.7.5 (64-bit)
c) Linux Ubuntu 14.04 (64-bit)
3) Software
Java Runtime Environment (JRE is supplied with the installation CD)
4) Bluetooth
■Bluetooth USB adapter
■Bluetooth 2.0 or higher
■USB Version 2.0 or higher
■BlueSoleil driver or software must not be installed!
■Tested USB adapters:
-DIGITUS USB-Adapter BT 4.0
-HAMA Nano v2.1
4.2

4. Hypertension Management Software Client-Server
19
Mobil-O-Graph®, operating instructions, Rev. 5.1 10/2015, GmbH
4.2.2 Installation for Windows®
Note: Please insert the USB adaptor (USB stick or cable with USB interface) only after installing the software
onto your computer, or when prompted to do so.
Important: If you are using the USB interface and/or Bluetooth, you must first install the corresponding driver.
Procedure:
1) Install application from CD-ROM
2) If necessary, install drivers from CD-ROM in the following order:
-first Bluetooth driver,
-then USB driver.
3) Insert USB adaptor and/or Bluetooth adaptor into the computer.
Installing the application from CD-ROM
►Insert the CD into the CD-ROM drive.
The installation program will normally start automatically. If it does not (autorun function has been switched off),
□open the CD-ROM drive in Windows Explorer and
□click the file CD_Start.exe, to start installation.
►Select your language.
►In the installation menu, click HMS-CS Setup.
The installation wizard will appear.
►Follow the instructions on the screen.
Installing the Bluetooth driver
Note: Please insert the Bluetooth adaptor only after installing the software onto your computer, or when prompt-
ed to do so.
For the Bluetooth-Adapter DIGITUS no driver software is needed.
►In the installation menu, click Bluetooth driver
►Follow the instructions on the screen.
Installing USB driver
Note: Please insert the USB adaptor (USB stick or cable with USB interface) only after installing the software
onto your computer.
►In the installation menu, click USB cable driver
►Follow the instructions on the screen.
Installation of the software is now complete.
4.2.3 Installation for Macintosh® OS X 10.7.5 and later
Procedure:
1) Install application from CD-ROM
2) Insert USB adaptor and/or Bluetooth adaptor into the computer.
Installing application from CD-ROM
►Insert the supplied CD into your CD-ROM drive.
The CD symbol HMS CS appears on the desktop.
►Double-click this CD symbol for HMS CS.
The CD-ROM opens.
►Open the directory Mac_10-7-5.
►Drag the file HMS.app into your Applications folder.
Installation of the software is now complete.
4.2.2

20
Mobil-O-Graph®, operating instructions, Rev. 5.1 10/2015, GmbH
4. Hypertension Management Software Client-Server
4.2.4 Installation for Linux
Procedure:
1) Install the application from the CD-ROM
2) Plug Bluetooth adapter and/or USB adapter into your computer.
Install the application from the CD-ROM
►Log in as System Administrator (root).
►Place the CD supplied into your CD-ROM drive.
►On the CD, open the Linux directory.
►Copy the HMS CS folder into your Home directory.
►Set the HMS CS file in the Home directory to executable.
►Set up a link to the HMS file on your desktop.
Software installation is now complete.
On the installation CD, the “Docs” directory contains various documents (first steps, brief instructions, user man-
ual). “index.htm” shows the available documents.
4.2.5 Hypertension Management Software update
Updating an already installed version of the Hypertension Management Software to the latest version is no dif-
ferent from installing the software from scratch. Settings which have already been selected are not changed dur-
ing an update. With regard GDT (German communication standard), HL7 and network settings, the user does
not need to do anything when carrying out an update. Before updating the Hypertension Management Software,
however, it is recommended that you back up the data, but this is not mandatory.
4.2.6 Data back-up
Back up data
To back up your data, proceed as follows:
1) Launch your Hypertension Management Software.
2) In the menu bar, click on Data -> Data back-up and Back up data.
3) The Back up data window appears.
4) Enter a filename and location to save the data you are backing up.
5) Click Save.
6) Your data is backed-up.
Restore data
To restore your data, proceed as follows:
1) Launch your Hypertension Management Software.
2) In the menu bar, click on Data -> Data back-up and Restore data.
3) The Back up data window appears.
4.2.4
Other manuals for Mobil-O-Graph NG
2
This manual suits for next models
1
Table of contents
Other IEM Blood Pressure Monitor manuals

IEM
IEM agedio B500 User manual

IEM
IEM Tel-O-Graph GSM User manual

IEM
IEM Mobil-O-Graph NG User manual

IEM
IEM Tel-O-Graph BT User manual

IEM
IEM agedio B500 User manual

IEM
IEM Mobil-O-Graph NG User manual

IEM
IEM Tel-O-Graph BT User manual

IEM
IEM Mobil-O-Graph PWA User manual

IEM
IEM Tel-O-Graph GSM User manual

IEM
IEM Tel-O-Graph BT plus User manual


