iGenix IG9301 User manual
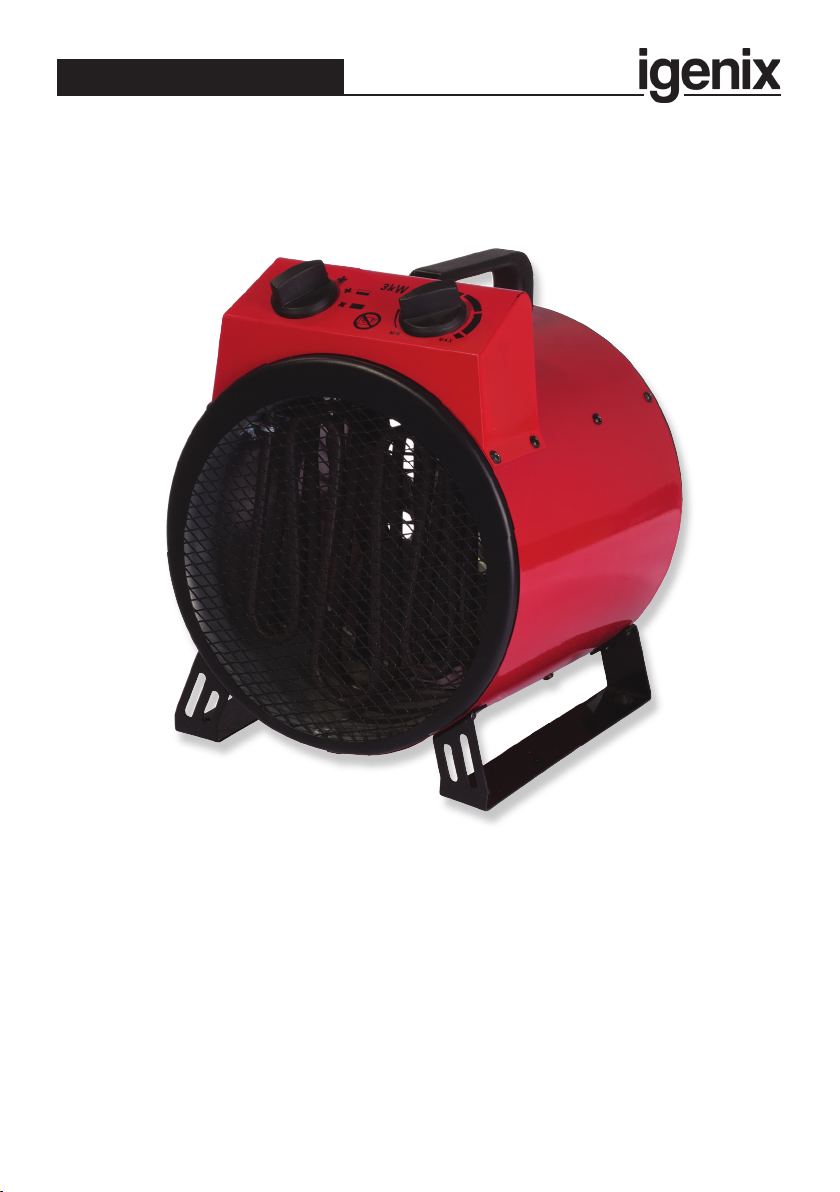
IG9301
3kW Commercial Drum Heater
Please read these instructions carefully before use and retain for future reference
Before switching on your appliance,
always check for any damage which may have been caused in transit
Batch code:
USER MANUAL

2
CONTENTS
Safefty instructions..................................................................3-5
Appliance Overview...................................................................5
Operation instructions ..............................................................6
Troubleshooting...........................................................................7
Mains plug replacement.............................................................7
Disposal Information..................................................................8
Igenix Warranty .................................................................. 10-11

3
SAFETY INSTRUCTIONS
Important: Read and follow all of the instructions even if you
feel you are familiar with the product, and nd a place to keep this
manual handy for future reference.
1. This appliance can be used by children aged from 8 years and
above if they have been given supervision or instruction
concerning the use of the appliance in a safe way and understand
the hazards involved.
2. Cleaning and user maintenance shall not be made by children
unless they are older than 8 years and supervised.
3. Keep the appliance and its cord out of reach of children aged
less than 8 years.
4. Children shall not play with the appliance.
5. Appliances can be used by persons with reduced physical,
sensory or mental capabilities or lack of experience and
knowledge if they have been given supervision or instruction
concerning use of the appliance in a safe way and understand the
hazards involved.
6. The heater is not designed for use as the main form of heating.
7. This product is for indoor use only.
8. Ensure that the electricity supply in your home is rated at
220-240 volts before operating the appliance.
9. Always place the heater on a level surface to avoid tipping over.
10. Do not use the heater if the power cord or plug is damaged.
Do not replace the power cord or any other parts yourself.
Always consult a qualied person in order to avoid hazard.
11. There are no user serviceable parts inside this heater.
12. Always turn off and unplug the appliance before attempting
to move.
13. Do not store the appliance while it is still hot.
14. Always turn off and unplug the appliance when not in use.
15. Do not use the heater in the immediate surroundings of a bath,
shower or swimming pool.

4
16. Do not reach for an appliance that has fallen into water. Switch
off at supply and unplug immediately
17. Never place the heater where it may fall into water, or stand on
a damp oor.
18. Do not cover or obstruct any of the heat outlet grilles or air
intake openings of the heater.
19. Do not insert any objects through the heat outlet of air intakes
grilles.
20. Attention: the front grille gets hot during use.
21. Do not place the heater on carpets with a deep pile.
22. Do not place the heater directly below a socket outlet.
23. Ensure that the heater is not positioned close to curtains or
furniture as this may create a re hazard - at least 50cm away.
24. Do not use the heater in areas where ammable liquids are
stored or ammable fumes may be present.
25. To protect against re, electric shock or injury do not immerse
the heater, power cord or plug in water or any other liquid.
26. Do not twist, kink or wrap the cord around the appliance, this
may cause the insulation to weaken and split.
27. Do not run the cord under carpeting, rugs or runners.Arrange
cord away from trafc so that it will not be tripped over. Keep
the cord a safe distance from the inlet and outlet grilles.
28. Do not operate with the cord coiled as a build up of heat could
be sufcient to become a hazard.
29. Do not remove plug from power socket by pulling the supply
cord.Always grip the plug.
30. Do not remove the plug socket until the appliance is
switched off.
31. Do not use the appliance to dry clothes.
32. Do not operate appliance with wet hands.
33. The most common cause of overheating is deposits of dust or
uff in the appliance. Ensure these deposits are removed
regularly by allowing the heater to cool down completely and
unplug it, then clean grilles with a vacuum cleaner.

5
SPECIFICATION
Supply Voltage: 220-240V~, 50Hz
Max Output: 3000W
WARNING: In order to avoid overheating, do not cover
the heater.
34. Use this appliance only as describe in the manual. Any other use
is not reccomended by the manufacturer and may case re,
electric shock or injury.
APPLIANCE OVERVIEW
Heat / Fan Selector Control Carry Handle and Foot
Adjustable Thermostat

6
OPERATING THE HEATER
Choose a suitable location for the heater ensuring you have taken account of the safety instructions
Note: It is normal that when the heater is turned on for the rst time or after not being used for a long
period of time that it may emit a slight smell and fumes.These will disappear when the heater has been
on a short while.
• Take out the heater from its box carefully. Please save the box to store the heater when not in use.
• Plug the unit into a power socket. Do not to use the same electrical socket as another high wattage
electrical appliance in order to avoid overloading the circuit.
• Use the heat / fan selector control to choose your mode.
1) The rst level is the fan function only
2) The second level is 2.0kW power
3) The third level is 3.0kW – full power.
• The thermostat can be adjusted between 5- 40ºC
• Turn the dial to increase or decrease the temperature.
Overheat Protection
This appliance is tted with a safeguard that will automatically shut the power off should any part of
the heater begin to overheat. The heater will automatically come back on when it has cooled down. The
heater will work again as normal once it has cooled down. Check for anything surrounding the heater
that may have caused it to overheat such as clothing or curtains covering the air inlet of outlet grill.
CLEANING & MAINTENANCE
Always unplug the heater from the wall and allow it to cool. Clean the outside by wiping with a damp
cloth (not wet). Do not use detergents or abrasives materials. Do not allow for any water to enter the
heater.You can use a vacuum cleaner to remove dust from the inlet and outlet grill.
Ensure that both the heater and plug are dry before being plugged in again.
Storing the Heater
When the heater is not used for long periods of time, it should be protected from dust and stored in a
clean dry place. The original packaging box can be saved and used to store the heater away.

7
Problem Possible Cause Solution
The heater 1. Not properly plugged into the 1. Plug in rmly.
does not work. mains wall socket. 2. Make sure appliance is switched on.
2. Not switched on 3. Check fuse or breaker.
3. No electricity in the mains wall socket.
The heater is 1. Inadequate air ow 1. Make sure there is circulating air in
getting too hot 2. Heat setting too high the room
3. Vents are blocked 2. Adjust heat settings accordingly
3. Make sure all vents are clear and free
from obstruction.
The heater is not 1.Thermostat not turned high enough 1.Adjust the thermostat to a high
heating up. 2.The selector control is on too low temperature
2.Turn the selector control to the higher
3.0kW setting
Fuse Replacement (Class I)
This appliance must be earthed. Remove the central screw on the plug and
open the shell. Take out the fuse and replace with a new fuse of the same Amp.
Install the shell again and tighten the screws.
MAINS PLUG FUSE REPLACEMENT
TROUBLESHOOTING GUIDE
Please refer to the trouble shooting guide when experiencing an issue with your heater. If you still cannot
determine the fault then please call our Customer Service number 01473 271272.

8
DISPOSAL INFORMATION
The European Directive 2012/19/EU on Waste Electrical and
Electronic Equipment (WEEE), requires that old household
electrical appliances must not be disposed of in normal unsorted
municipal waste.
Old appliances must be collected separately in order to optimise
the recovery and recycling of the materials they contain and reduce the impact
on human health and the environment.
The crossed out “wheeled bin” symbol on the product reminds you of your
obligation, that when you dispose of the appliance it must be separately collected.
Consumers should contact their local authority or retailer for information
concerning the correct disposal of their old appliance.

10
lgenix Warranty Terms & Conditions
This product is guaranteed for a period of 12 months as standard from the date of purchase
against mechanical and electrical defects.You can extend your warranty for a further 12 months by
registering your product.
Upon registration we will cover your product for a period of 24 months from the original purchase
date against any mechanical or electrical defects.
To qualify for the guarantee, the product must be used for domestic household use only and in
accordance with the instructions in the user manual.Any misuse of the product will result in the
warranty being void.
The guarantee does not cover accidental damage, misuse, neglect, tampering or incorrect
adjustment or installation.
The guarantee will be rendered invalid if the product is resold, has had its serial number removed
(or has an invalid serial number), or if an unauthorised person has carried out any repairs or
alterations.
The warranty does not cover accessories or consumable parts that require replacement under
normal use. This includes shelving, dials, lters, belts and trays etc.
In the unlikely event of a breakdown please refer to the Troubleshooting guide in your user manual
and check all plugs, fuses and the electricity supply.
If you still require assistance please contact our Customer Service department on
01473 271 272 or write to us at the following address:
Customer Service Department
38 Bluestem Road, Ransomes Europark
Ipswich, IP3 9RR
Please quote the Product Code which begins ‘IG’ or ‘DF’ and the Batch Coder beginning ‘5’ and give
details of the exact fault.We will then decide whether to repair or replace the item.
Before we arrange the repair or replacement you will be required to return a copy of your proof
of purchase. Please retain your original.
If an item is replaced within the agreed guarantee period, the guarantee for the replacement item
will be calculated from the purchase date of the original.
In the event that the product is inspected and no fault is found or the product is not within the
guarantee period you will be charged for the repair and any carriage costs.

11
Thank you for choosing lgenix
As a valued customer we would like to offer you a FREE 2 year warranty to cover your product
against any electrical or mechanical defects.
This means that in the unlikely event you develop a fault or problem with your product we will
happily repair or replace the item free of charge.
To qualify for the 2 year warranty you must register your product within 30 days of purchase.The
full Terms & Conditions of our warranty policy are shown on the opposite page.They are also
available on our website. www.igenix.co.uk
To register your product, please complete all sections of the form below and return to us at the
following address: lgenix, 38 Bluestem Road, Ransomes Europark, Ipswich, IP3 9RR.
Alternatively you can visit the lgenix website and complete the form online.
Customer Details:
Title: First Name Surname:
Address:
Post Code:
Email:
Telephone:
Product Information:
Product Code (Beginning IG or DF): Product Description:
Batch Number (Beginning 5): Serial Number (If applicable):
Date of Purchase:
Retailer Name:
Retailer Location:
Please tick here to conrm you have read and accept our Terms & Conditions
Please tick here if you DO NOT wish to receive marketing information from us
Customer Signature: Date:
Table of contents
Other iGenix Heater manuals

iGenix
iGenix IG2600 User manual

iGenix
iGenix IG9101 User manual

iGenix
iGenix IG9508 User manual

iGenix
iGenix IG9520WIFI User manual

iGenix
iGenix IG5200 User manual

iGenix
iGenix IG5005 User manual

iGenix
iGenix IG1670 User manual

iGenix
iGenix IG9042 User manual

iGenix
iGenix IG1601 User manual

iGenix
iGenix IG9021 User manual

iGenix
iGenix IG0500 User manual

iGenix
iGenix IG9041 User manual

iGenix
iGenix IG9521WIFI User manual

iGenix
iGenix IG9514 User manual

iGenix
iGenix IG5250 User manual

iGenix
iGenix IG5005 User manual

iGenix
iGenix IG9515WIFI User manual

iGenix
iGenix IG9010 User manual

iGenix
iGenix IG2611 User manual

iGenix
iGenix IG5300 User manual