manuals.online logo
Brands
  1. Home
  2. •
  3. Brands
  4. •
  5. iLive
  6. •
  7. Clock Radio
  8. •
  9. iLive ICQ988 User manual

iLive ICQ988 User manual

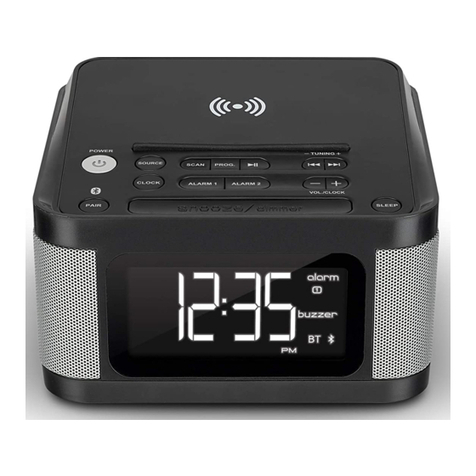
Skip / Tuning
In Bluetooth Mode, press to
skip audio tracks.
In Radio mode, press to tune
the radio. Press and hold to
search for the next available
station.
Overview
Wireless Clock Radio with Wireless Charging
User’s Guide for Model ICQ988 v2140-01
Sleep
Press repeatedly to set
the sleep timer.
Alarm 1/2 Indicator
Alarm Buzzer/
Radio Indicator
Source Indicator
AM/PM IndicatorSleep Timer Indicator
Volume Level
Important Safety Instructions
• Read these Instructions.
• Keep these Instructions.
• Heed all Warnings.
• Follow all instructions.
• Do not use this apparatus near water.
• Clean only with a dry cloth.
• Do not block any ventilation openings. Install in accordance with the manufacturer’s instructions.
• Do not install near any heat sources such as radiators, heat registers, stoves, or other apparatus (including ampliers) that
produce heat.
• Do not defeat the safety purpose of the polarized or grounding - type plug. A polarized plug has two blades with one
wider than the other. A grounding type plug has two blades and a third grounding prong. The wide blade or the third prong
are provided for your safety. When the provided plug does not t into your outlet, consult an electrician for replacement
of the obsolete outlet.
• Protect the power cord from being walked on or pinched particularly at plugs, convenience receptacles, and the point
where they exit from the apparatus.
• Only use attachments/accessories specied by the manufacturer.
• Unplug this apparatus during lightning storms or when unused for long periods of time.
• Refer all servicing to qualied service personnel. Servicing is required when the apparatus has been damaged in any
way, such as power-supply cord or plug is damaged, liquid has been spilled or objects have fallen into the apparatus, the
apparatus has been exposed to rain or moisture, does not operate normally, or has been dropped.
• WARNING: Shock hazard - Do Not Open.
FCC WARNINGS
Warning: Changes or modications to this unit not expressly approved by the party responsible for
compliance could void the user’s authority to operate the equipment.
NOTE: This equipment has been tested and found to comply with the limits for a Class B digital device,
pursuant to Part 15 of the FCC Rules. These limits are designed to provide reasonable protection against
harmful interference in a residential installation. This equipment generates, uses, and can radiate radio
frequency energy and, if not installed and used in accordance with the instructions, may cause harmful
interference to radio communications. However, there is no guarantee that interference will not occur in a
particular installation. If this equipment does cause harmful interference to radio or television reception,
which can be determined by turning the equipment off and on, the user is encouraged to try to correct the
interference by one or more of the following measures:
• Reorient or relocate the receiving antenna.
• Increase the separation between the equipment and receiver.
• Connect the equipment into an outlet on a circuit different from that to which the receiver is connected.
• Consult the dealer or an experienced radio/TV technician for help.
WARNING : This product can expose you to chemicals including lead, which is known
to the State of California to cause cancer and birth defects or other reproductive harm. For
more information go to www.P65Warnings.ca.gov. This product meets and complies
with all Federal regulations.
Alarm 1/2
Press & hold to begin
setting Alarm 1 or Alarm 2.
Power
Press to turn the unit ON or OFF.
Source
Press to switch between
Bluetooth, Aux In, and
Radio modes.
Clock
Press and hold to set the clock.
Pair
Press and hold to begin
pairing to a Bluetooth device.
Wireless Charging Pad
Backup Battery Indicator
Prog
Press with Tuning buttons to
search through presets.
Press and hold to store a
station manually.
Volume −/+
Press to adjust volume.
Press to adjust time when
setting the clock.
Play/Pause
Press to play or
pause audio tracks
(BLUETOOTH MODE).
Scan
Press and hold to scan radio
frequencies and automatically
assign radio presets.
Snooze/Dimmer
Press to delay the alarm for several minutes.
Press to dim the brightness of the display.
Wireless/Fast Charging
Note : Use only included AC/DC power
adapter. Unauthorized power adapters
may cause damage or the wireless
charger may malfunction.
Wireless/Fast charging is only compatible
with supported devices and the included
AC/DC power adapter.
On supported devices, if the “wireless
charging” or "fast/rapid charging" feature
is not active, you may need to enable it
from your device’s Settings, Power, or
Battery menu. Consult the user manual
for your specic device.
Charge mobile devices with the charging pad
or with the USB Charging Port on the rear of
the unit.
USB Charging Port
Output is 1A only.
To download this User’s Guide in English, Spanish, or French, or to get answers to frequently asked questions, visit the support section at:
www.iliveelectronics.com
Para descargar este Manual del Usuario en inglés, español y francés, o para obtener respuestas a preguntas frecuentes, visite la sección
de apoyo en: www.iliveelectronics.com
Pour télécharger ce guide de l’utilisateur en anglais, espagnol ou français, ou pour obtenir des réponses à des questions fréquemment
posées, consultez la rubrique d’assistance sur: www.iliveelectronics.com
For Warranty Information and the most up-to-date version of this User’s Guide, go to www.iliveelectronics.com
Customer Service: 1-888-999-4215 | Email Support: [email protected] | Email Parts: par[email protected]
Copyright © 2018 Digital Products International (DPI, Inc.) All other trademarks appearing herein are the property of their respective
owners. Specications are subject to change without notice.
International Support
Protect for Today
Sustain for Tomorrow
Made
Green
Saving Radio Presets
1. Press Scan to automatically scan and set radio presets.
2. To manually set a preset, tune to the desired frequency (see above steps).
3. Press and hold the Prog button. The display will begin ashing a preset. Ex: "P01".
4. Press the Tuning +/− buttons to select the preset to be saved. (P01 to P20).
5. Press the Prog button to save that preset.
6. To cycle through presets, press the Prog button, then the Tuning +/− buttons to select.
Power & Charging
Requires 2 AAA, 1.5V batteries (not included).
Plug the AC power cord into a standard power outlet.
Clock
Setting the Clock
1. With the unit OFF, press and hold the Clock button until the hour begins ashing.
2. Press the Volume +/− buttons to adjust the hour. Note the AM/PM indicators on the
display.
3. Press the Clock button to proceed.
4. Press the Volume +/− buttons to adjust the minute.
5. Press the Clock button to nish setting the time.
Alarm & Sleep Timer
Setting the Alarm
1. With the unit OFF, press and hold the Alarm 1 button until the Hour begins ashing.
2. Press the Volume +/− buttons to adjust the hour. Note the AM/PM indicators on the display.
3. Press the Alarm 1 button.
4. Press the Volume +/− buttons to adjust the minute.
5. Press the Alarm 1 button.
6. Press the Volume +/− buttons to set the alarm for Radio or Buzzer.
7. Press the Alarm 1 button.
8. Press the Volume +/− buttons to set the volume level for the alarm.
9. Press the Alarm 1 button to nish setting the alarm time. Once the set alarm time is
reached, the alarm will sound.
10. To set Alarm 2, follow the above steps using the Alarm 2 button.
Snooze and Alarm Reset
After the alarm sounds:
Press the Snooze button to delay the alarm for several minutes.
OR
Press the Power button to turn the alarm o until the set alarm
time is reached again.
Disabling the Alarm
Press the Alarm 1 or Alarm 2 buttons to turn the alarm ON or OFF. Note the indicator in the
display.
FM Radio
Tuning the FM Radio
1. Press the Power button to turn the unit on.
2. Press the Source button to switch to Radio mode, then press the Tuning +/− buttons
to select the desired frequency, or press and hold to quickly scan the frequencies.
Aux In
Requires a 3.5mm audio cable (not included).
1. With the unit powered ON, connect a 3.5mm audio cable to the Aux In on the rear of
the unit and the audio output on an audio device.
2. Press the Source button to select Aux-In Mode. Use the controls on the connected
device to play your audio through the unit.
Setting the Sleep Timer
1. Press the Sleep button to set the sleep timer (90, 80, 70, 60... min or OFF).
2. Once the set sleep time has expired the clock radio will automatically power o.
Bluetooth Wireless
Pairing to a Bluetooth Device and Playing Audio
After initial pairing, the unit will stay paired unless unpaired manually by the user
or erased due to a reset of the device. If your device should become unpaired or if
any pairing issues should occur, remove the unit from your Bluetooth settings and
follow these steps again.
1. Press the Source button to switch to Bluetooth mode. Press and hold the
Pair button, the BT symbol on the display will begin ashing and a voice
prompt will sound from the speaker. When pairing, remain within 3 feet of the
unit.
2. Using the controls on your Bluetooth device, select ICQ988 from your
Bluetooth settings to pair. When successfully paired, the BT symbol on
the display will turn solid and a voice prompt will sound. You can refer to the
user’s manual for your specic device for instructions on pairing and connecting
Bluetooth devices.
3. Audio played through the connected Bluetooth device should now be heard
through the speakers. Use the controls on the connected Bluetooth device to
select and begin playing audio. Play, pause or skip audio using the controls
on the device or the unit.

Other iLive Clock Radio manuals

iLive IC109 User manual

iLive

iLive IC109 User manual

iLive ICP310B User manual

iLive

iLive ICP310B User manual

iLive ICP211 User manual

iLive

iLive ICP211 User manual

iLive IC618B User manual

iLive

iLive IC618B User manual

iLive IKBC384S User manual

iLive

iLive IKBC384S User manual

iLive ICP232B User manual

iLive

iLive ICP232B User manual

iLive ICP360 User manual

iLive

iLive ICP360 User manual

iLive ISBQ270 User manual

iLive

iLive ISBQ270 User manual

iLive IC609 User manual

iLive

iLive IC609 User manual

iLive IC618B User manual

iLive

iLive IC618B User manual

iLive ICP102B User manual

iLive

iLive ICP102B User manual

iLive ICP601B User manual

iLive

iLive ICP601B User manual

iLive ICP310B User manual

iLive

iLive ICP310B User manual

iLive ICP200B User manual

iLive

iLive ICP200B User manual

iLive IC109 User manual

iLive

iLive IC109 User manual

iLive ic638B User manual

iLive

iLive ic638B User manual

iLive ICP122W User manual

iLive

iLive ICP122W User manual

iLive ICP360 User manual

iLive

iLive ICP360 User manual

iLive INTELLI SET IC600B User manual

iLive

iLive INTELLI SET IC600B User manual

iLive ICQ988B User manual

iLive

iLive ICQ988B User manual

iLive ICP360 User manual

iLive

iLive ICP360 User manual

Popular Clock Radio manuals by other brands

Hyundai H-1541 instruction manual

Hyundai

Hyundai H-1541 instruction manual

Sony ICF-C723 - Ic Memory Clock Radio operating instructions

Sony

Sony ICF-C723 - Ic Memory Clock Radio operating instructions

ARESA AR-3904 instruction manual

ARESA

ARESA AR-3904 instruction manual

Sony Dream Machine ICF-CD823 operating instructions

Sony

Sony Dream Machine ICF-CD823 operating instructions

iToma CKS507 quick guide

iToma

iToma CKS507 quick guide

Philips AJ7400 user manual

Philips

Philips AJ7400 user manual

Emerson CKS5060B owner's manual

Emerson

Emerson CKS5060B owner's manual

LEXIBOOK Spider-Man TimeProjector RP200SP instruction manual

LEXIBOOK

LEXIBOOK Spider-Man TimeProjector RP200SP instruction manual

Memorex MC7101 - CD Clock Radio user guide

Memorex

Memorex MC7101 - CD Clock Radio user guide

Coby CSMP162 - AM/FM Dual Alarm Clock/Radio instruction manual

Coby

Coby CSMP162 - AM/FM Dual Alarm Clock/Radio instruction manual

Philips AJ 3940/05 Instructions for use

Philips

Philips AJ 3940/05 Instructions for use

Slick CR312 owner's manual

Slick

Slick CR312 owner's manual

Philips AJ4200/79 user manual

Philips

Philips AJ4200/79 user manual

AudioSonic CL-1489 instruction manual

AudioSonic

AudioSonic CL-1489 instruction manual

Element EIPC 201 user guide

Element

Element EIPC 201 user guide

Teac SL-D910 owner's manual

Teac

Teac SL-D910 owner's manual

RCA RP3765 user guide

RCA

RCA RP3765 user guide

Auriol Z30237B Operation and safety notes

Auriol

Auriol Z30237B Operation and safety notes

manuals.online logo
manuals.online logoBrands
  • About & Mission
  • Contact us
  • Privacy Policy
  • Terms and Conditions

Copyright 2025 Manuals.Online. All Rights Reserved.