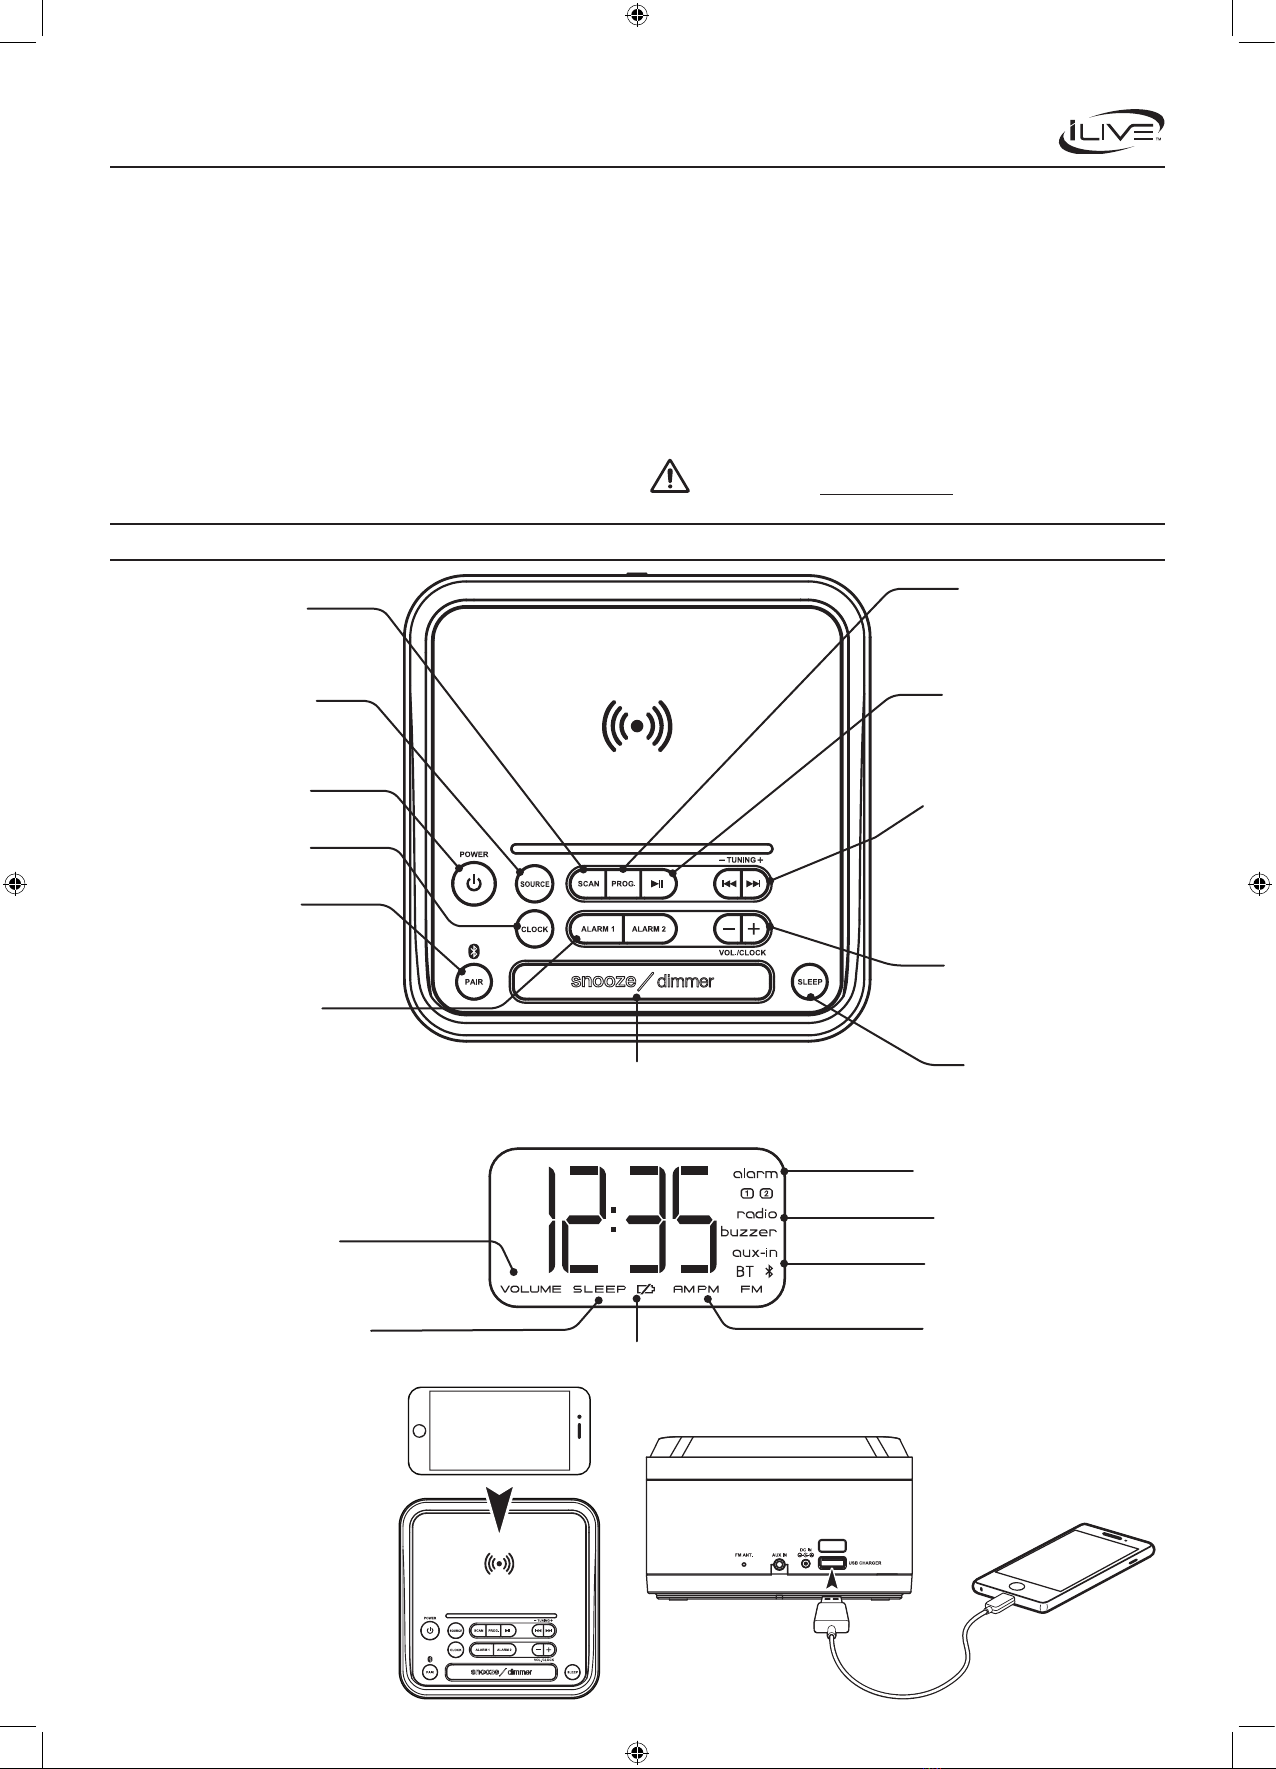
iLive ICQ988B User manual

Skip / Tuning
In Bluetooth Mode, press to
skip audio tracks.
In Radio mode, press to tune
the radio. Press and hold to
search for the next available
station.
Overview
User’s Guide for Model ICQ988B v2140-01
Sleep
Press repeatedly to set
the sleep timer.
Alarm 1/2 Indicator
Alarm Buzzer/
Radio Indicator
Source Indicator
AM/PM IndicatorSleep Timer Indicator
Volume Level
Important Safety Instructions
• ReadtheseInstructions.
• KeeptheseInstructions.
• HeedallWarnings.
• Followallinstructions.
• Donotusethisapparatusnearwater.
• Cleanonlywithadrycloth.
• Donotblockanyventilationopenings.Installinaccordancewiththemanufacturer’sinstructions.
• Donotinstallnearanyheatsourcessuchasradiators,heatregisters,stoves,orotherapparatus(includingampliers)that
produceheat.
• Donotdefeatthesafetypurposeofthepolarizedorgrounding-typeplug.Apolarizedplughastwobladeswithone
widerthantheother.Agroundingtypeplughastwobladesandathirdgroundingprong.Thewidebladeorthethirdprong
areprovidedforyoursafety.Whentheprovidedplugdoesnottintoyouroutlet,consultanelectricianforreplacement
oftheobsoleteoutlet.
• Protectthepowercordfrombeingwalkedonorpinchedparticularlyatplugs,conveniencereceptacles,andthepoint
wheretheyexitfromtheapparatus.
• Onlyuseattachments/accessoriesspeciedbythemanufacturer.
• Unplugthisapparatusduringlightningstormsorwhenunusedforlongperiodsoftime.
• Referallservicingtoqualiedservicepersonnel.Servicingisrequiredwhentheapparatushasbeendamagedinany
way,suchaspower-supplycordorplugisdamaged,liquidhasbeenspilledorobjectshavefallenintotheapparatus,the
apparatushasbeenexposedtorainormoisture,doesnotoperatenormally,orhasbeendropped.
• WARNING:Shockhazard-DoNotOpen.
FCC WARNINGS
Warning:Changesormodicationstothisunitnotexpresslyapprovedbythepartyresponsiblefor
compliancecouldvoidtheuser’sauthoritytooperatetheequipment.
NOTE:ThisequipmenthasbeentestedandfoundtocomplywiththelimitsforaClassBdigitaldevice,
pursuanttoPart15oftheFCCRules.Theselimitsaredesignedtoprovidereasonableprotectionagainst
harmfulinterferenceinaresidentialinstallation.Thisequipmentgenerates,uses,andcanradiateradio
frequencyenergyand,ifnotinstalledandusedinaccordancewiththeinstructions,maycauseharmful
interferencetoradiocommunications.However,thereisnoguaranteethatinterferencewillnotoccurina
particularinstallation.Ifthisequipmentdoescauseharmfulinterferencetoradioortelevisionreception,
whichcanbedeterminedbyturningtheequipmentoffandon,theuserisencouragedtotrytocorrectthe
interferencebyoneormoreofthefollowingmeasures:
• Reorientorrelocatethereceivingantenna.
• Increasetheseparationbetweentheequipmentandreceiver.
• Connecttheequipmentintoanoutletonacircuitdifferentfromthattowhichthereceiverisconnected.
• Consultthedealeroranexperiencedradio/TVtechnicianforhelp.
WARNING : Thisproductcanexposeyoutochemicalsincludinglead,whichisknown
totheStateofCaliforniatocausecancerandbirthdefectsorotherreproductiveharm.For
moreinformationgotowww.P65Warnings.ca.gov.This product meets and complies
with all Federal regulations.
Alarm 1/2
Press & hold to begin
setting Alarm 1 or Alarm 2.
Power
Press to turn the unit ON or OFF.
Source
Press to switch between
Bluetooth, Aux In, and
Radio modes.
Clock
Press and hold to set the clock.
Pair
Press and hold to begin
pairing to a Bluetooth device.
Wireless Charging Pad
Backup Battery Indicator
Prog
Press with Tuning buttons to
search through presets.
Press and hold to store a
station manually.
Volume −/+
Press to adjust volume.
Press to adjust time when
setting the clock.
Play/Pause
Press to play or
pause audio tracks
(BLUETOOTH MODE).
Scan
Press and hold to scan radio
frequencies and automatically
assign radio presets.
Snooze/Dimmer
Press to delay the alarm for several minutes.
Press to dim the brightness of the display.
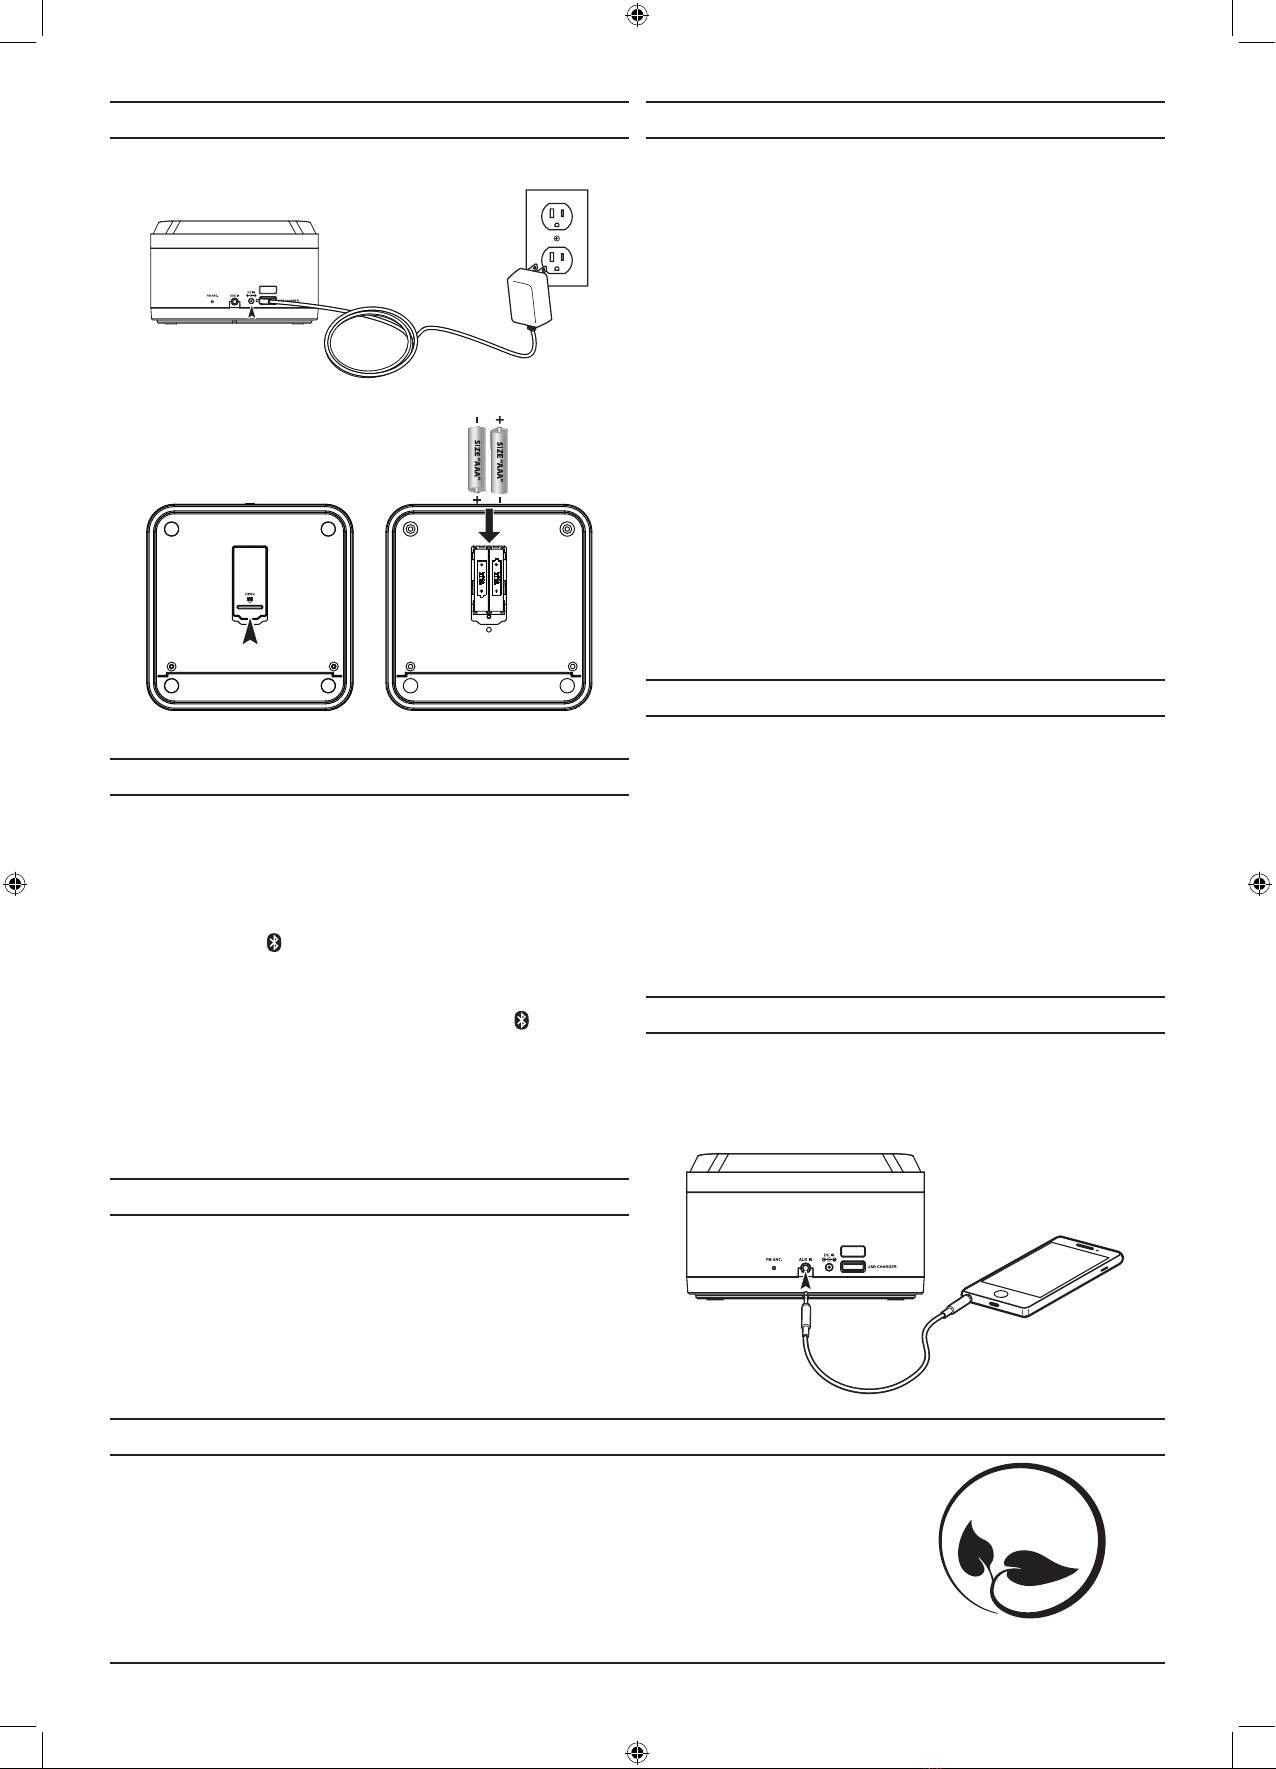
Wireless/Fast Charging
Note : Use only included AC/DC power
adapter. Unauthorized power adapters
may cause damage or the wireless
charger may malfunction.
Wireless/Fast charging is only compatible
with supported devices and the included
AC/DC power adapter.
On supported devices, if the “wireless
charging” or "fast/rapid charging" feature
is not active, you may need to enable it
from your device’s Settings, Power, or
Battery menu. Consult the user manual
for your specic device.
Charge mobile devices with the charging pad
or with the USB Charging Port on the rear of
the unit.
USB Charging Port
Output is 1A only.
ICQ988-2140-01-IB - 21Jun2018.indd 1 6/21/2018 1:48:21 PM
To maintain compliance with FCC’s RF Exposure guidelines, This equipment should be installed and
operated with minimum distance between 20cm the radiator your body: Use only the supplied antenna.
FCC ID:OKUCAB3C382
This device complies with part 15 of the FCC Rules. Operation is subject to the following two conditions:
(1) this device may not cause harmful interference, and (2) this device must accept any interference
received, including interference that may cause undesired operation.
WIRELESS CLOCK RADIO WITH WIRELESS CHARGING

To download this User’s Guide in English, Spanish, or French, or to get answers to frequently asked questions, visit the support section at:
www.iliveelectronics.com
Para descargar este Manual del Usuario en inglés, español y francés, o para obtener respuestas a preguntas frecuentes, visite la sección
de apoyo en: www.iliveelectronics.com
Pour télécharger ce guide de l’utilisateur en anglais, espagnol ou français, ou pour obtenir des réponses à des questions fréquemment
posées, consultez la rubrique d’assistance sur: www.iliveelectronics.com
For Warranty Information and the most up-to-date version of this User’s Guide, go to www.iliveelectronics.com
Customer Service: 1-888-999-4215 | Email Support: [email protected] | Email Parts: par[email protected]
Copyright © 2018 Digital Products International (DPI, Inc.) All other trademarks appearing herein are the property of their respective
owners. Specications are subject to change without notice.
International Support
Protect for Today
Sustain for Tomorrow
Made
Green
Saving Radio Presets
1. Press Scan to automatically scan and set radio presets.
2. To manually set a preset, tune to the desired frequency (see above steps).
3. Press and hold the Prog button. The display will begin ashing a preset. Ex: "P01".
4. Press the Tuning +/− buttons to select the preset to be saved. (P01 to P20).
5. Press the Prog button to save that preset.
6. To cycle through presets, press the Prog button, then the Tuning +/− buttons to select.
Power & Charging
Requires 2 AAA, 1.5V batteries (not included).
Plug the AC power cord into a standard power outlet.
Clock
Setting the Clock
1. With the unit OFF, press and hold the Clock button until the hour begins ashing.
2. Press the Volume +/− buttons to adjust the hour. Note the AM/PM indicators on the
display.
3. Press the Clock button to proceed.
4. Press the Volume +/− buttons to adjust the minute.
5. Press the Clock button to nish setting the time.
Alarm & Sleep Timer
Setting the Alarm
1. With the unit OFF, press and hold the Alarm 1 button until the Hour begins ashing.
2. Press the Volume +/− buttons to adjust the hour. Note the AM/PM indicators on the display.
3. Press the Alarm 1 button.
4. Press the Volume +/− buttons to adjust the minute.
5. Press the Alarm 1 button.
6. Press the Volume +/− buttons to set the alarm for Radio or Buzzer.
7. Press the Alarm 1 button.
8. Press the Volume +/− buttons to set the volume level for the alarm.
9. Press the Alarm 1 button to nish setting the alarm time. Once the set alarm time is
reached, the alarm will sound.
10. To set Alarm 2, follow the above steps using the Alarm 2 button.
Snooze and Alarm Reset
After the alarm sounds:
Press the Snooze button to delay the alarm for several minutes.
OR
Press the Power button to turn the alarm o until the set alarm
time is reached again.
Disabling the Alarm
Press the Alarm 1 or Alarm 2 buttons to turn the alarm ON or OFF. Note the indicator in the
display.
FM Radio
Tuning the FM Radio
1. Press the Power button to turn the unit on.
2. Press the Source button to switch to Radio mode, then press the Tuning +/− buttons
to select the desired frequency, or press and hold to quickly scan the frequencies.
Aux In
Requires a 3.5mm audio cable (not included).
1. With the unit powered ON, connect a 3.5mm audio cable to the Aux In on the rear of
the unit and the audio output on an audio device.
2. Press the Source button to select Aux-In Mode. Use the controls on the connected
device to play your audio through the unit.
Setting the Sleep Timer
1. Press the Sleep button to set the sleep timer (90, 80, 70, 60... min or OFF).
2. Once the set sleep time has expired the clock radio will automatically power o.
Bluetooth Wireless
Pairing to a Bluetooth Device and Playing Audio
After initial pairing, the unit will stay paired unless unpaired manually by the user
or erased due to a reset of the device. If your device should become unpaired or if
any pairing issues should occur, remove the unit from your Bluetooth settings and
follow these steps again.
1. Press the Source button to switch to Bluetooth mode. Press and hold the
Pair button, the BT symbol on the display will begin ashing and a voice
prompt will sound from the speaker. When pairing, remain within 3 feet of the
unit.
2. Using the controls on your Bluetooth device, select ICQ988 from your
Bluetooth settings to pair. When successfully paired, the BT symbol on
the display will turn solid and a voice prompt will sound. You can refer to the
user’s manual for your specic device for instructions on pairing and connecting
Bluetooth devices.
3. Audio played through the connected Bluetooth device should now be heard
through the speakers. Use the controls on the connected Bluetooth device to
select and begin playing audio. Play, pause or skip audio using the controls
on the device or the unit.
ICQ988-2140-01-IB - 21Jun2018.indd 2 6/21/2018 1:48:24 PM
Other iLive Clock Radio manuals

iLive
iLive ICP211 User manual

iLive
iLive ICP200B User manual

iLive
iLive IC618B User manual

iLive
iLive IC618B User manual

iLive
iLive ICP310B User manual

iLive
iLive ICP601B User manual

iLive
iLive IC109 User manual

iLive
iLive ic638B User manual

iLive
iLive ICP360 User manual

iLive
iLive INTELLI SET IC600B User manual