iLive IKC6106DT User manual

OR
R
O
1
POWER SOURCES / FUENTES DE ALIMENTACIÓN / SOURCES D’ALIMENTATION
INSTRUCTION MANUAL
M A N U A L D E I N S T R U C C I O N E S / M O D E D ' E M P L O I
LOCATION OF FEATURES / UBICACION DE LOS BOTONES / EMPLACEMENT DES BOUTONS
MODEL#
IKC6106DT
3
SETTING THE TIMER / PARA COLOCAR LA HORA DE LA ALARMA / POUR RÉGLER L' HEURE DU RÉVEIL
6
PROGRAMMING STATIONS INTO MEMORY
PROGRAMACIÓN DE ESTACIONES EN LA MEMORIA
MÉMORISER DES STATIONS
You can store up to 10 FM stations &10AM stations:
Puede programar hasta 10 estaciones FM & 10 estaciones AM:
Vous pouvez mémoriser jusqu' à 10 stations FM & 10 stations AM:
88.0
FM
MHz
LISTENING TO THE RADIO / ESCUCHA DE LA RADIO / ÉCOUTE DE LA RADIO
REPEAT TO STORE ADDITIONAL STATIONS
14
3
2
ATO SEECT RD
LIO
TUNING
SINTONIZAR
Commande de réglage du TUNING
TUNING
SINTONIZAR
Commande de réglage du TUNING
TUNING
SINTONIZAR
Commande de réglage du TUNING
1
FUNCTION
2 3 4
BAND
2
SETTING THE TIME / PARA COLOCAR LA HORA DEL RELOJ / POUR RÉGLER L' HEURE DE L' HORLOGE:
TM
iPod not included.
iPod is trademark of Apple Computer, Inc. registered in the U.S. and other countries.
I2:00 6:00 6:30
AM
AM AM
456
3
1
PRESS AND HOLD
PRESS AND HOLD
TO SELECT 24HR OR 12HR
There are different
brackets for your
iPod depending on
the size and the iPod
you have.
USING OTHER iPod MODELS
7
1345
2
VOLUME
VOLUME
iPod
LISTENING TO A PRESET STATION
ESCUCHE UNA ESTACIÓN PROGRAMADA
ÉCOUTE D' UNE STATION MÉMORISÉE
M-DN M-UP
OR
On the bottom of docking station. There is a
switch for iPod and iPod nano.
LISTENING TO YOUR iPod/ ESCUCHANDO SU iPod/ ÉCOUTER VOTRE iPod
+
LITHIUMBATTERY
CR2025
3V
+
LITHIUM BATTERY
CR2025
3V
Vous aurez besoin d' enlevez
l' enveloppe protectrice du
compartiment de la pile de la
télécommande avant d' u
tiliser la télécommande.
REMARQUE:NOTA:
Necesitará quitar la capa
p r o t e c t o r a d e l
compartimento de la pila
del control remoto antes
de usar el control remoto.
NOTE:
You may need to remove
a protective covering
from the remote's battery
compartment be fore
using the remote.
NOTE:
The button cell battery contains mercury, don't put in the
trash. Recycle or dispose as hazardous waste.
La pila célula tipo botón contiene mercurio, no la tire a la basura.
Recíclela ó deséchela como residuo peligroso.
La pile cellule type bouton contient du mercure, ne la jetez pas à la
poubelle. Veuillez la recyclé ou jeté comme déchet dangereux.
NOTE:
Battery is for time backup only. The
clock and alarm memory will be
retained during a power interruption.
During battery backup operation, the
display will not light up, but the correct
time will be maintained internally.
NOTA:
La pila es solo para conservar la
hora. El aparato conservará la hora
del reloj y de la alarma en la memoria
cuando haya un corte de energía
eléctrica. Cuando utilice la pila de
seguridad, el visualizador no se
iluminará pero el aparato conservará
.
la hora correcta internamente.
REMARQUE:
La pile est seulement pou r
garder l' heure. L' heure de l'
horloge et du réveil seront
gardées en mémoire lors d' une
coupure de courant. En mode
alimen tati on p ar p ile s de
secours, l' écran d' affichage
ne s' allumera pas mais l' heure
exacte sera gardée en mémoire.
120V AC/60 Hz
(NOT INCLUDED)
(NO INCLUIDAS)
(NON INCLUSES)
2 X "AAA"
ON
PRESS TO RETURN TO CURRENT TIME OR WAIT 3 SECONDS
AND IT WILL RETURN AUTOMATICALLY.
7
6
810
9
45
TIMER
3
12
I2:00
AM
ON
TIMER
I2:00
AM
ON
TIMER
I2:00
AM
OFF
TIMER
I2:00
AM
OFF
TIMER
I2:00
AM
TIMER TIMER
TIMER TIMER
TIMER TIMER
TO IMPROVE RECEPTION:
PARA MEJORAR LA RECEPTIÓN:
POUR AMÉLIORER LA RÉCEPTION:
FM:
AM:
iPods iPod Nano
MOUNTING BRACKET
SOPORTE DE INSTALACIÓN
SUPPORT D' INSTALLATION
VOLUME BUTTON
BOTÓN VOLUME
BOUTON VOLUME
TIMER BUTTON
BOTÓN TIMER
BOUTON TIMER
POWER BUTTON
BOTÓN POWER
BOUTON POWER
MEM/CLK SET BUTTON
BOTÓN MEM/CLK SET
BOUTON MEM /CLK SET
COOKING TIMER BUTTON
BOTÓN COOKING TIMER
BOUTON COOKING TIMER
MEM UP BUTTON
BOTÓN MEM UP
BOUTON MEM UP
FUNCTION BUTTON
BOTÓN FUNCTION
BOUTON FUNCTION
BAND BUTTON
BOTÓN BAND
BOUTON BAND
EQ BUTTON
BOTÓN EQ
BOUTON EQ
MEM DN BUTTON
BOTÓN MEM DN
BOUTON MEM DN
SLEEP BUTTON
BOTÓN SLEEP
BOUTON SLEEP
TUNE/SKIP/SEARCH DN SWITCH
SINTONIZAR/SALTAR/BOTÓN DE BUSCAR HACIA ABAJO
ACCORD/SAUTER/RECHERCHES DESCENDRE LE COMMUTATEUR
PLAY/PAUSE BUTTON
BOTÓN DE TOCAR/PAUSAR
BOUTON DE PLAY/PAUSE
DISPLAY BUTTON
BOTÓN EXHIBICIÓN
BOUTON AFFICHAGE
iPod BUTTON
BOTÓN DE iPod
BOUTON DE iPod
TUNE/SKIP/SEARCH UP SWITCH
SINTONIZAR/SALTAR/BOTÓN DE BUSCAR HACIA ARRIBA
ACCORD/SAUTER/RECHERCHES LÉVENT LE COMMUTATEUR
NOTE: MAKE SURE
THE UNIT IS IN
POWER OFF MODE.
EQ
POWER
FUNCTION
VOL
VOL
DISPLAY MUTE
FMST.
BAND
SLEEP TIMER MEM
CLKSET
MEMDN
MEMUP
TUNE/SKIP
SET
iPOD
EQ
POWER
FUNCTION
VOL
VOL
DISPLAY MUTE
FMST.
BAND
SLEEP TIMER MEM
CLKSET
MEMDN
MEMUP
TUNE/SKIP
SET
iPOD
EQ
POWER
FUNCTION
VOL
VOL
DISPLAY MUTE
FMST.
BAND
SLEEP TIMER MEM
CLKSET
MEMDN
MEMUP
TUNE/SKIP
SET
iPOD
EQ
POWER
FUNCTION
VOL
VOL
DISPLAY MUTE
FMST.
BAND
SLEEP TIMER MEM
CLKSET
MEMDN
MEMUP
TUNE/SKIP
SET
iPOD
Off
SLEEP
SLEEP TIMER / TEMPORIZADOR PARA DORMIR / MINUTERIE D' ARRÊT
SLEEP
12
90
5
SLEEP
After its on 10mins, press SLEEP again to power off
EQ
POWER
FUNCTION
VOL
VOL
DISPLAY MUTE
FMST.
BAND
SLEEP TIMER MEM
CLKSET
MEMDN
MEMUP
TUNE/SKIP
SET
iPOD
2
o
d
P
i
N
D
K
L
C
/
N
U
T
/
P
I
K
S
S
K
I
P
/
T
U
N
/
C
L
K
U
P
U
/
A
P
A
S
Y
L
E
P
D W
O N
UP
OR
o
d
P
i
N
D
K
L
C
/
N
U
T
/
P
I
K
S
S
K
I
P
/
T
U
N
/
C
L
K
U
P
U
/
A
P
A
S
Y
L
E
P
D W
O N
UP
OR
o
d
P
i
N
D
K
L
C
/
N
U
T
/
P
I
K
S
S
K
I
P
/
T
U
N
/
C
L
K
U
P
U
/
A
P
A
S
Y
L
E
P
DOWN
UP
OR
o
d
P
i
N
D
K
L
C
/
N
U
T
/
P
I
K
S
S
K
I
P
/
T
U
N
/
C
L
K
U
P
U
/
A
P
A
S
Y
L
E
P
DOWN
UP
OR
o
d
P
i
N
D
K
L
C
/
N
U
T
/
P
I
K
S
S
K
I
P
/
T
U
N
/
C
L
K
U
P
U
/
A
P
A
S
Y
L
E
P
DOWN
UP
OR
o
d
P
i
N
D
K
L
C
/
N
U
T
/
P
I
K
S
S
K
I
P
/
T
U
N
/
C
L
K
U
P
U
/
A
P
A
S
Y
L
E
P
DW
ON
UP
OR
o
d
P
i
N
D
K
L
C
/
N
U
T
/
P
I
K
S
S
K
I
P
/
T
U
N
/
C
L
K
U
P
U
/
A
P
A
S
Y
L
E
P
o
d
P
i
N
D
K
L
C
/
N
U
T
/
P
I
K
S
S
K
I
P
/
T
U
N
/
C
L
K
U
P
U
/
A
P
A
S
Y
L
E
P
o
d
P
i
N
D
K
L
C
/
N
U
T
/
P
I
K
S
S
K
I
P
/
T
U
N
/
C
L
K
U
P
S
Y
U
/
A
P
L
E
A
P
DOWN
UP
OR
o
d
P
i
N
D
K
L
C
/
N
U
T
/
P
I
K
S
S
K
I
P
/
T
U
N
/
C
L
K
U
P
S
Y
U
/
A
P
L
E
A
P
N
DOW
UP
OR
4COOKING TIMER / TEMPORIZADOR DE COCINAR / TEMPORISATEUR DU CUISINE
240
Press repeatedly until you have a desired time
from 240 to 10 min. Press Cooking Button to shut off
TIMER
123
COOKING TIMER COOKING TIMER
EQ
POWER
FUNCTION
VOL
VOL
DISPLAY MUTE
FMST.
BAND
SLEEP TIMER MEM
CLKSET
MEMDN
MEMUP
TUNE/SKIP
SET
iPOD
o
d
P
i
N
D
K
L
C
/
N
U
T
/
P
I
K
S
S
K
I
P
/
T
U
N
/
C
L
K
U
P
U
/
A
P
A
S
Y
L
E
P
DOWN
UP
OR
o
d
P
i
N
D
K
L
C
/
N
U
T
/
P
I
K
S
S
K
I
P
/
T
U
N
/
C
L
K
U
P
U
/
A
P
A
S
Y
L
E
P
DOWN
UP
OR
o
d
P
i
N
D
K
L
C
/
N
U
T
/
P
I
K
S
S
K
I
P
/
T
U
N
/
C
L
K
U
P
U
/
A
P
A
S
Y
L
E
P
D W
O N
UP
OR
NOTA : ASEG URES E
PRI MERO QU E LA
UNI DAD ESTA EN
MOD O APAGA DO.
REM ARQU E : AS SURE Z-
VOU S QUE L'A PPAREIL
SOI T HORS TEN SION. PRE SION E Y MANT ENGA
PRE SION E Y MANT ENGA
APP UYEZ ET M AINTE NEZ ENF ONCÉE
PRESS AND HOLD
PRES IONE Y M ANTEN GA
APPU YEZ ET MA INTEN EZ ENFO NCÉE
MEM/CLK SET MEM/CLK SET
PARA SELECCI ONAR 24 HR O 12HR
POU R SÉLEC TIONN ER LE FOR MAT 24HR OU 1 2HR
TUNER UP/DN
SIN TONIZ AR ARR IBA/ ABAJ O
Touch es TUNE R UP/DN
TUNER UP/DN
SIN TONIZ AR ARR IBA/ ABAJ O
Touch es TUNE R UP/DN
TUNER UP/DN
SIN TONIZ AR ARR IBA/ ABAJ O
Touch es TUNE R UP/DN
POWER
POWER
POWER
POWER
POWER ON
POWER ON
POWER OFF
ENCENDIDO
ENCENDIDO
COR TE DE ENE RGÍA
Touch e POWER O N
Touch e POWER O N
POWER ON
ENCENDIDO
Touche POWER ON
Touch e POWER O FF
TIMER ON
TEM PORI ZADO R ACTI VADO
MIN UTER IE ACTI VÉE
TIMER ON
TEM PORI ZADO R ACTI VADO
MIN UTER IE ACTI VÉE
TIMER ON TIMER OFF
TEM PORI ZADO R ACTI VADO
MIN UTER IE ACTI VÉE
TUNER UP/DN/REV/FWD
SIN TONI ZAR AR RIBA/ ABAJ O/
RETROCEDER/ AVANZAR
Touch es TUNE R UP/DN /REV/ FWD
TUNER UP/DN/REV/FWD
SIN TONI ZAR AR RIBA/ ABAJ O/
RETROCEDER/ AVANZAR
Touch es TUNE R UP/DN /REV/ FWD
TUNER UP/DN/REV/FWD
SIN TONI ZAR AR RIBA/ ABAJ O/
RETROCEDER/ AVANZAR
Touch es TUNE R UP/DN /REV/ FWD
TUNER UP/DN/REV/FWD
SIN TONI ZAR AR RIBA/ ABAJ O/
RETROCEDER/ AVANZAR
Touch es TUNE R UP/DN /REV/ FWD
TUNER UP/DN/REV/FWD
SIN TONI ZAR AR RIBA/ ABAJ O/
RETROCEDER/ AVANZAR
Touch es TUNE R UP/DN /REV/ FWD TEM PORIZ ADOR DE SACTI VA DO
MIN UTERI E DÉSAC TIVÉE
TIMER OFF
TEM PORIZ ADOR DE SACTI VA DO
MIN UTERI E DÉSAC TIVÉE
PRE SIONE PARA VOLVER A LA HORA ACTUA L O ESPERE
3 SEG UNDOS Y VO LVERÁ AUTOMÁTICAMENTE.
APP UYEZ SU R CETTE TO UCHE PO UR REVE NIR A L'AF FICHA GE DE
L'H ORLOG E OU ATTENDE Z 3 SECON DES, L' HORLO GE S'AF FICHE RA
AUTO MATIQUEMENT.
Pre sione r epeti damen te hast a que obt enga el
tie mpo des eado de sde 240 h asta 10 m in.
App uyez su r cette t ouche d e façon r épété e jusqu 'à ce que l a
dur ée dési rée com prise e ntre 24 0 min. et 1 0 min. so it affi chée à l' écran .
Press repeatedly until you have a desired
time from 1 to 9 min.
Pre sione r epeti damen te hast a que obt enga el
tie mpo des eado de sde 1 has ta 9 min
App uyez su r cette t ouche d e façon r épété e jusqu 'à ce que
la du rée dés irée co mpris e entre 1 e t 9 min soi t affic hée à l'é cran.
Pre sione e l botón “ Cooki ng” par a apaga r.
App uyez su r la touc he Cook ing pou r étein dre l'a ppare il.
Note: Using Sleep function when using Timer (alarm) in the same time frame as
the settings will not function as desired and will be made ineffective depending
on Sleep time settings.
FOR EXAMPLE: If user sets the Timer ON is 11:00AM & Timer OFF at 12:00PM.
1. Unit will automatically turn on at 11:00AM, if user sets the Sleep timer 30
minutes at that time, the unit will automatically shut off at 11:30AM instead
of 12:00PM.
2. Unit will automatically turn on at 11:00AM, if user sets the sleep timer 90
minutes at that time, the unit will automatically turn off at 12:00PM instead
of 12:30PM.
Not a: Al usar l a funci ón dorm ir y temp oriza dor (al arma) e n el mism o marco d e tiemp o,
alg una de la s funci ones no f uncio nará de m anera a decua da y no ser á efect uada
dep endie ndo de lo s ajust es de tie mpo de la f unció n dormi r.
POR E JEMPL O: Si el us uario a justa e l tempo rizad or de enc endid o par a las 11:00 AM
y el de a pagad o a las 12: 00PM.
1. La u nidad a utomá ticam ente se e ncend erá a las 11:00A M, si el us uario ajust a el
tem poriz ador de d ormir p ara 30 mi nutos a e sta hor a, la uni dad se ap agará
aut omáti camen te a las 11:30AM e n lugar d e a las 12: 00PM.
2. La u nidad a utomá ticam ente se e ncend erá a las 11:00A M, si el us uario ajust a el
tem poriz ador de d ormir p ara 90 mi nutes a e sta hor a, la uni dad se ap agará
aut omáti camen te a las 12 :00PM e n lugar d e a las 12: 30PM.
Rem arque : lorsq ue vous u tilis ez la fon ction Vei lle et qu e la fonc tion Mi nuter ie (ala rme) si multa némen t,
les p aramè tres se ront in effec tifs su ivant l a durée d e veill e entré e.
PAR EXE MPLE: L orsqu e l'uti lisat eur déf init la m ise en ma rche de l a minut erie à 11: 00AM & la
dés activ ation d e la minu terie à 1 2:00P M.
1. L' appar eil se me ttra au tomat iquem ent en ma rche à 11:0 0AM, si l 'util isate ur défi nit la mi nuter ie sur
30 mi nutes à c e moment , l'app areil s 'étei ndra al ors aut omati queme nt à 11:30 AM au lie u de 12:0 0PM.
2. L' appar eil se me ttra au tomat iquem ent en ma rche à 11:0 0AM, si l 'util isate ur défi nit la mi nuter ie sur
90 mi nutes à c e moment , l'app areil s 'étei ndra al ors aut omati queme nt à 12:0 0PM au li eu de 12: 30PM.
Des pués de e star en cendi do por 10 m ins, pr esion e SLEEP de nuevo para pagar.
Une f ois 10 mi nutes s élect ionné , appuy ez à nouv eau sur l a touch e SLEEP po ur étei ndre l' appar eil.
PARA S ELECC IONA R RAD IO
POU R SÉLEC TIONN ER RADI O
REP ITA PARA A LMA CEN AR E STACI ONE S ADI CIO NALE S.
RER ETEZ CE S ÉTAPES PO UR MÉMO RISER D 'AUTR ES STATION S.
TUNING
SINTONIZAR
Commande de réglage du TUNING
AUTO SEEK / BÚSQUEDA AUTOMÁTICA /
RECHERCHE AUTOMATIQUE
o
d
P
i
N
D
K
L
C
/
N
U
T
/
P
I
K
S
S
K
I
P
/
T
U
N
/
C
L
K
U
P
U
/
A
P
A
S
Y
L
E
P
O
DWN
UP
OR
PRESS AND HOLD
PRES IONE Y M ANTEN GA
APPU YEZ ET MA INTEN EZ ENFO NCÉE
Hay diferentes repisas
para su iPod dependiendo
del tamaño y modelo de
iPod que tenga.
Plusieurs réglages sont
disponibles pour insérer
différents types de iPod.
o
d
P
i
N
D
K
L
C
/
N
U
T
/
P
I
K
S
S
K
I
P
/
T
U
N
/
C
L
K
U
P
U
/
A
P
A
S
Y
L
E
P
DOWN
UP
OR
SKIP/SEARCH
Touche SKIP/SEARCH
SALTAR/BUSCAR
EQ
CLASSIC/JAZZ
ROCK/POP
PRESET EQ BUTTON
BOTÓN PRESET EQ
BOUTON PRESET EQ
TO CANCEL
PARA C ANCELAR
POU R ANNU LER
NOTE: You can connect iPod Video
and watch on your TV set.
Connect Video out from side of unit
to TV Video input.
NOTA: Puede conectar el video del iPod
y verlo en su televisor.
Conecte la salida de video en el costado
de la unidad a la entrada de video de su
televisor.
REMARQUE: Vous pouvez raccorder votre
iPod Vidéo et visionner vos vidéos sur un
téléviseur.
Raccordez la sortie vidéo du iPod à l'entrée
vidéo de votre téléviseur.
LA UTILIZACIÓN DE OTROS MODELOS de iPod
L'UTILISATION D'AUTRES MODÈLES d'iPod
Straight view to insert in the opening in front
of the clock radio section.
The iPod connector side at the bottom
opening and the socket becomes flush inside.
Con una vista frontal insértelo por la abertura
en el frente de la sección del reloj del radio el
conector del iPod a su costado en la apertura
inferior y la ranura facilita el deslizarlo hacia
adentro.
Placez-vous en face du panneau de commandes de la
radio lorsque vous insérez votre iPod. Le bas du dock
iPod s'ouvre et le connecteur peut être réglé.
En la base de la estación de soporte hay un
interruptor para seleccionar entre iPod e iPod
nano
Un commutateur iPod/iPod nano se situe sur la partie
inférieure de la station d'accueil.
o
d
P
i
N
D
K
L
C
/
N
U
T
/
P
I
K
S
S
K
I
P
/
T
U
N
/
C
L
K
U
P
U
/
A
P
A
S
Y
L
E
P
o
d
P
i
N
D
K
L
C
/
N
U
T
/
P
I
K
S
S
K
I
P
/
T
U
N
/
C
L
K
U
P
U
/
A
P
A
S
Y
L
E
P
PLAY/PAUSE
REPRODU CIR/PAUSA
Touch e PLAY/PAU SE
PLAY/PAUSE
REPRODU CIR/PAUSA
Touch e PLAY/PAU SE
PAUSE
PAUSA
PAUSE
TO CANCEL
PARACANCELAR
POU R ANNU LER
EQ
CLASSIC/JAZZ
ROCK/POP
PRESET EQ BUTTON
BOTÓN PRESET EQ
BOUTON PRESET EQ

Pr in te d in China / Imprimido en C hina / Imprim é en Chine
Vi si t us a t www.iLiv e. ne t
INSTRUCTION MANUAL
M A N U A L D E I N S T R U C C I O N E S / M O D E D ' E M P L O I
MODEL#
IKC6106DT
TM
C EMI LH CA
CARE AND MAINTENANCE / CUIDADO Y MANTENIMIENTO / SOINS ET ENTRETIEN
GENERAL / GENERAL / GÉNÉRALE
•Use a soft, clean cloth moistened with plain,
luke-warm water to clean the exterior of the unit.
Utilice un paño suave ligeramente humedecido en
agua tibia para limpiar el exterior de la unidad.
•Never use solvents such as benzene or other strong
chemical cleaners since these could damage the unit's finish.
• It is important that no liquid reaches the
inside of the unit.
Utilisez un chiffon doux et propre imbibé
d'eau tiède pour nettoyer l'extérieur de
l'appareil.
N'utilisez jamais des solvants comme le benzène ou
d'autres produits de nettoyage chimiques puissants car
ils peuvent endommager l'apprêt de l'appareil.
No use ningún solvente como benzole u otros limpiadores
químicos fuertes, ya que pueden dañar el acabado de la unidad.
TROUBLESHOOTING GUIDE / GUÍA DE RESOLUCIÓN DE PROBLEMAS / EN CAS DE PROBLÈMES
PROBLEM SOLUTION
POSSIBLE CAUSE
PROBLEMA SOLUCIÓN
CAUSA POSIBLE
PROBLÈME SOLUTION
CAUSE PROBABLE
GENERAL
RADIO
GENERAL
RADIO
No sound is heard.
No sound is heard.
Power is not on.
Wrong function selected.
VOLUME Control is set
to minimum.
Press POWER button .
Select appropriate function.
Adjust the VOLUME
Control.
Tune station properly.
Extend the FM antenna.
Reorient the unit.
Station has not been
tuned properly.
FM reception is weak.
AM Reception is weak.
Ajuste el botón VOLUME.
No hay sonido. El aparato está apagado
Ha seleccionado otra
función.
El botón VOLUME está en
mínimo
Coloque el interruptor
Auto/On/Off en la posición ON.
Seleccione la función apropiada.
No hay sonido. No ha sintonizado en
una estación
correctamente
Recepción FM débil.
Recepción AM débil. Reoriente la unidad.
Extienda la antena FM
Sintonice en una
estación correctamente.
GENERAL
RADIO
Il n’y a pas de son.
Il n’y a pas de son. L’appareil est éteint.
Vous avez selectionné une
autre function.
Le bouton VOLUME est sur MIN. Réglez le bouton VOLUME.
Sélectionnez la fonction
correspondante.
Réglez l' intérrupteur
Auto/On/Off sur la position
ON.
Vous n’avez pas réglé
sur une station
correctement.
Faible réception FM.
Faible réception AM.
Réglez sur une station
correctement.
Déployez antenne FM
Réorientez l' appareil.
READ THIS PAGE FIRST BEFORE OPERATING THE UNIT
AVISO: PARA EVITAR UNA DESCARGA ELÉCTRICA, INTRODUZCA LA
HOJA MÁS ANCHA DEL ENCHUFE EN LA RANURA CORRESPONDIENTE DE LA
PARA REDUCIR EL RIESGO DE SACUDIDAS ELÉCTRICAS, NO RETIRE LA TAPA (O LA
PARTE POSTERIOR) DEL APARATO. DENTRO DEL APARATO NO HAY PARTES QUE
PUEDAN SER REPARADAS POR EL USUARIO. LOS TRABAJOS DE REPARACIÓN
DEBEN SER EFECTUADOS POR PERSONAL DE SERVICIO CALIFICADO.
TOMA Y EMPUJE HASTA EL FONDO.
ADVERTENCIA: El usuario puede perder el derecho de utilizar este aparato si
efectua cambios o modificaciones que no han sido expresamente aprobados por
la autoridad responsable.
NOTA: Este equipo ha sido probado y ha demostrado cumplir con los límites
establecidos para los aparatos digitales de Clase B, de acuerdo con el Apartado
15 de las Normas de la FCC.
Estos límites han sido designados para proveer una protección
razonable contra las interferencias perjudiciales en una instalación residencial.
Este equipo genera, utiliza y puede irradiar energía radioeléctrica y, si no se instala
y utiliza de acuerdo con las instrucciones, puede causar interferencias
perjudiciales en las radiocomunicaciones. Sin embargo, no existe garantía de que
no se produzcan interferencias en una instalación en particular. Si este aparato
causa interferencias en la recepción de radio o de televisión, lo que puede
determinarse desconectando y conectando el aparato, se recomienda tratar de
corregir la interferencia de la siguiente manera:
El receptor se forma de laparte 15 en las reqlas FCC
cuando fabricado.
PARA REDUCIR EL RIESGO DE INCENDIOS O DE SACUDIDAS ELÉCTRICAS, NO
EXPONGA ESTE APARATO A LA LLUVIA O A LA HUMEDAD.
Este símbolo, localizado detrás o en la parte de abajo de la unidad, indica la
presencia de "tensiones peligrosas" sin aislar en el interior de la caja del
producto que pueden ser de suficiente magnitud como para constituir un
riesgo de sacudida eléctrica para las personas.
Este símbolo indica la presencia de instrucciones de operación y de
mantenimiento (reparación) en el material impreso que acompaña el aparato.
Vuelva a orientar la antena o cambie su lugar de instalación.
Aumente la separación entre el equipo y el receptor.
Conecte el equipo a una toma de corriente cuyo circuito no sea el mismo
que aquél al que ha conectado el receptor.
Consulte al concesionario o a un técnico de radio/televisión con experiencia.
Nota Especial
POUR PRÉVENIR TOUT RISQUE D'INCENDIE OU D'ÉLECTROCUTION, NE PAS
EXPOSER CET APPAREIL À LA PLUIE OU À L'HUMIDITÉ.
Ce symbole, situé dérrière ou dessous de l' appareil, est destiné à avertir
l'usager de la présence d'une "tension dangereuse" non isolée dans le
boîtier de l'appareil, dont l'intensité pourrait être suffisante pour constituer
un risque d' électrocution pour les personnes.
Ce symbole est destiné à avertir l'usager de la présence d'instructions
importantes pour le fonctionnement et l'entretien (réparation) de l'appareil,
dans la brochure qui accompagne celui-ci.
ATTENTION: POUR ÉVITER LES CHOCS ÉLECTRIQUES, INTRODUIRE
LA LAME LA PLUS LARGE DE LA FICHE DANS LA BORNE CORRESPONDANTE
DE LA PRISE ET POUSSER JUSQU'AU FOND.
POUR PRÉVENIR TOUT RISQUE D'ÉLECTROCUTION, NE RETIREZ PAS LE
COUVERCLE (OU LA PARTIE POSTÉRIEURE) DE L'APPAREIL. VOUS NE DEVEZ
PAS RÉPARER DES PIÈCES SE TROUVANT À L' INTÉRIEUR DE L'APPAREIL. LES
RÉPARATIONS DOIVENT ÊTRE EFFECTUÉES PAR DU PERSONNEL QUALIFIÉ.
AVERTISSEMENT: Tout changement ou modification appor té(e) à cet appareil
sans autorisation, peut entraîner l’interdiction d’utilisation de ce dernier.
REMARQUE: Cet appareil a été testé et il a été constaté qu'il respecte les limites
fixées pour les appareils numériques de la Catégorie B, par la Section 15 des Normes
FCC. Ces limites ont été fixées afin de fournir une protection raisonnable contre
les interférences nocives dans un logement résidentiel. Cet appareil produit, utilise et
peut émettre de l'énergie radioélectrique et, s'il n'est pas installé et utilisé suivant le
mode d'emploi, il peut produire des interférences nocives sur les
radiocommunications. Cependant, il peut y avoir des interférences nocives dans des
logements particuliers. Si l'appareil produit des interférences sur la réception radio
ou télévision (ce qu'on peut constater lorsqu'on débranche ou lorsqu'on raccorde
celui-ci), nous vous recommandons de corriger ce problème de la manière suivante:
Le récepteur est conforme á la partie 15 de réqles de FCC une fois
construit.
Réorientez l'antenne ou changez l'appareil de place.
Séparez davantage l'appareil du récepteur.
Branchez l'appareil à une prise de courant faisant partie d'un circuit différent
de celui auquel est branché le récepteur.
Consultez le vendeur ou un technicien de radio/télévision expérimenté.
AVERTISSEMENT ET PRÉCAUTIONS
Note Spéciale
WARNING: Changes or modifications to this unit not expressly approved by the
party responsible for compliance could void the user's authority to operate the
equipment.
NOTE: This equipment has been tested and found to comply with the limits for a
Class B digital device, pursuant to Part 15 of the FCC Rules. These limits are
designed to provide reasonable protection against harmful interference in a
residential installation. This equipment generates, uses, and can radiate radio
frequency energy and, if not installed and used in accordance with the instructions,
may cause harmfulinterference to radio communications. However, there is no
guarantee that interference will not occur in a particular installation. If this
equipment does cause harmful interference to radio or television reception, which
can be determined by turning the equipment off and on, the user is encouraged to
try to correct the interference by one or more of the following measures:
WARNINGS AND PRECAUTIONS
Special Note
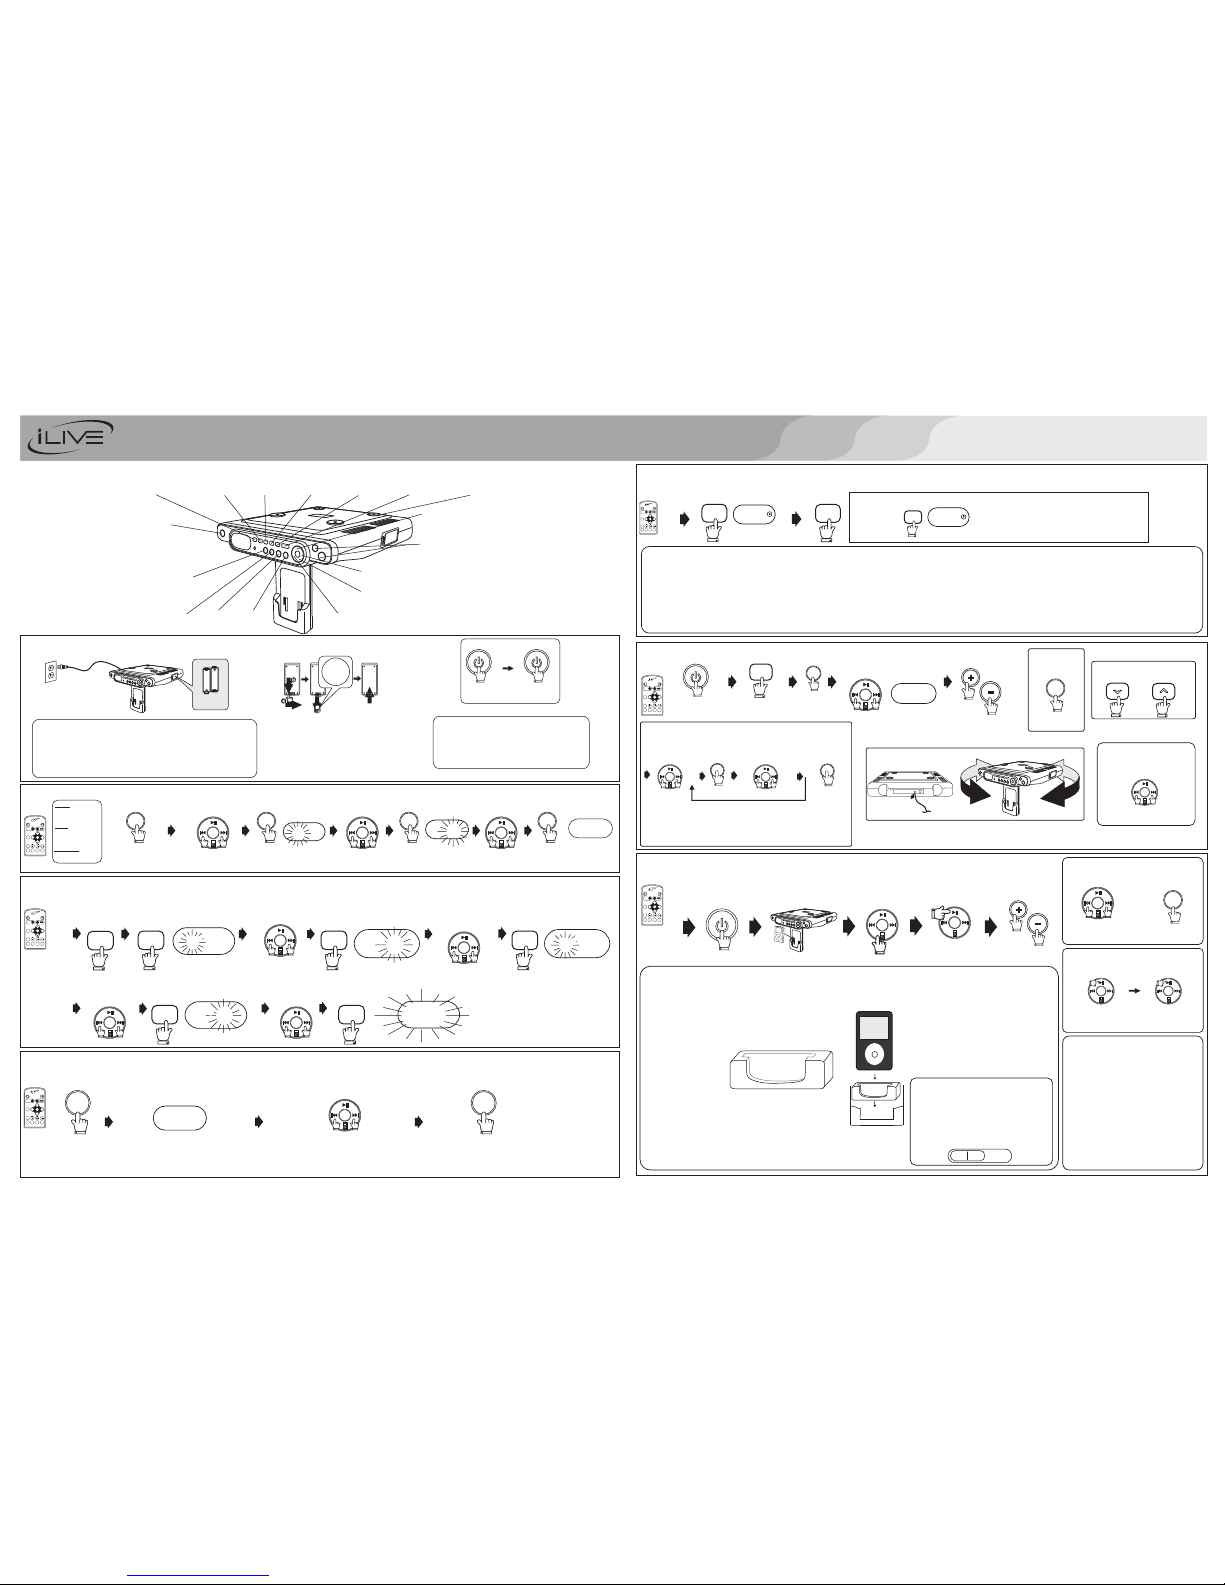
11USING THE RESET BUTTON
/USAR EL BOTÓN DE REAJUSTE
/ EMPLOYER LE BOUTON DE REMISE
Press the reset button
Presione el botón de reajuste
Appuyez le bouton de remise
RESET
Ne versez pas du liquide à l'intérieur de
l'appareil.
No permita que entre líquido dentro de
la unidad.
OR
9
10
6:30
AM
FUNCTION
AUX
35
POWER
124
VOLUME
LISTENING AND CHARGING YOUR iPod shuffle
/ESCUCHANDO Y CARGANDO SU iPod shuffle
/ECTOUTER AU REMPLISSAGE VITRE iPod shuffle
CHARGING YOUR IPOD
/ CARGANDO SU iPod
/ REMPLISSAGE DE VOTRE iPod
NOTE: Please make sure you are using the correct insert for your iPod and make sure it is properly
docked into the unit
When you dock your iPod it will go to a standby mode then turn off. While the iPod is docked, it
recharges until it is fully charged
NOTA: Asegúrese que está usando el enchufe adecuado para su iPod y que éste encaja de manera
apropiada en la unidad.
REMARQUE: Assurez-vou s d'utiliser l e bon adaptateur po ur votre iPod et que l'iPod soit corr ectement connec té à la station
d'accu eil.
Cuando su ajuste su iPod este pasara a modo standby y luego se apagará. Mientras el iPod está conectado,
se recargará hasta que la unidad este completamente cargada.
Lorsqu e vous connectez vo tre iPod à la stat ion d'accueil, ce lui-ci se positio nne en mode stan dby puis s'éteint . Lorsque l'iPod
est conn ecté, la batterie s e met en charge ju squ'à ce que celle- ci soit pleine.
Turn docking station around.
Gir e la esta ción de s oport e.
Tourn ez la sta tion d' accue il.
Place iPod shuffle in docking station
Col oque el i Pod en la e staci ón de sop orte.
Pla cez vot re iPod s huffl e sur la st ation d 'accu eil.
Side down the
bracket to hold the
iPod shuffle in.
Baj e la pala nca par a
aju star el i Pod.
Rég lez le do ck pour p ouvoi r
ins érer l' iPod sh uffle .
NOTE: Remember that you
have to use the iPod shuffle
controls in this mode.
The remote will not work for
these devices.
NOTA: Recuerde que debe usar
los controles fijos del iPod en
este modo. El mando a distancia
no funciona con este dispositivo.
REM ARQUE : Garde z en mémo ire que
sou s ce mode , vous de vez uti liser l es
com mande s de votr e iPod sh uffle . La
tél écomm ande ne f oncti onne pa s avec
ces p ériph ériqu es.
OR
POWER
6:30
AM
FUNCTION
LINE OUT JACK
AUXILIARY LINE-IN CORD (NOT INCLUDED)
LINE IN JACK
AUX
8
1 3 4
2
VOLUME
LISTENING TO OTHER PORTABLE AUDIO DEVICES
/ESCUCHANDO OTROS APARATOS DE AUDIO
/ ÉCOUTER VOTRE D'AUTRES DISOSITIFS AUDIO
VOL
VOL
CABLE DE ENTRADA AUXILIAR (NO INCLUIDAS)
AUXILIAIREA LIGNE-DANA LA CORDE (NON INCLUSES)
Enc hufe de l ínea de e ntrad a.
Conn ecteu r Line in .
Conn ecteu r Line ou t
Enc hufe de l ínea de s alida .
NOTE: Remember that you have to use the
portable devices controls in this mode.
The remote will not work for these devices.
NOTA: Recuerde que debe usar los controles
del dispositivo portátil en este modo. El mando
a distancia no funciona con este dispositivo.
REMARQUE: gardez en mémoire que sous ce mode,
vous devez utiliser les commandes de l'appareil
portable. La télécommande ne fonctionne pas avec
ces périphériques.
EQ
CLASSIC/JAZZ
ROCK/POP
PRESET EQ BUTTON
BOTÓN PRESET EQ
BOUTON PRESET EQ
EQ
CLASSIC/JAZZ
ROCK/POP
PRESET EQ BUTTON
BOTÓN PRESET EQ
BOUTON PRESET EQ
Other iLive Docking Station manuals

iLive
iLive Portable Docking System IBCD3816DT User manual

iLive
iLive IC618B User manual

iLive
iLive IHP310B User manual

iLive
iLive IBP291B User manual

iLive
iLive IHMD8816DT User manual

iLive
iLive IC2807 User manual

iLive
iLive IS3 IC2807BLK User manual

iLive
iLive ISD131B User manual

iLive
iLive ISP091 User manual

iLive
iLive IC600B User manual

iLive
iLive IC308B User manual

iLive
iLive ISP883B User manual

iLive
iLive Home Dock for iPhone/iPod with Intelli Set... User manual

iLive
iLive 182088 User manual

iLive
iLive IS208B User manual

iLive
iLive IJ328-IB User manual

iLive
iLive ISP801B User manual

iLive
iLive IS150B User manual

iLive
iLive IS108B User manual

iLive
iLive ISD582B User manual