Imagineering Clubs MORSE KEY & BUZZER Mk 2 User manual

.
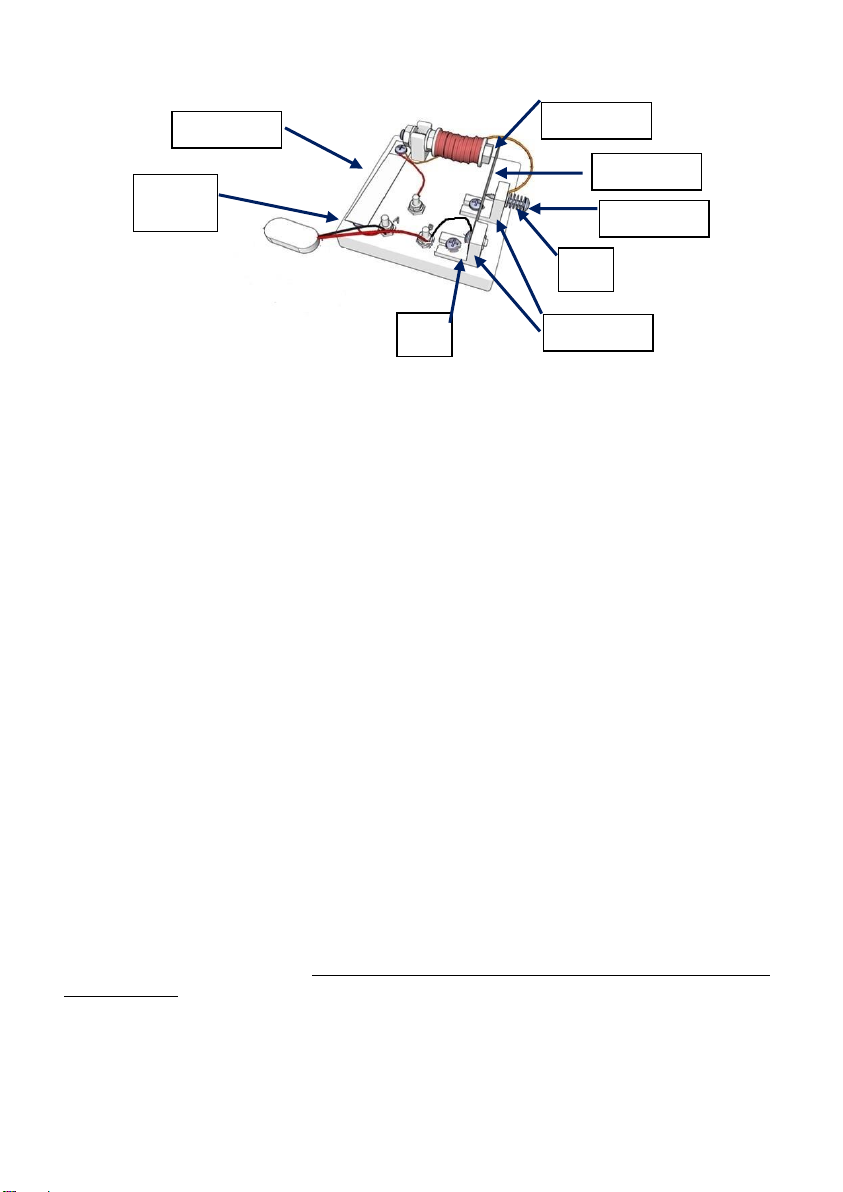
The Finished Model
The model should look like this when it is finished. The important parts are shown in the picture.
Topics Covered
Electromagnetism, Conductors and Insulators, Electrical circuits, Fundamentals of
telecommunication.
Tools required
One 7mm and two 13mm open ended spanners. Pozidrive screwdriver, pliers, wire stripper.
1 x PP3 battery is required.
The Imagineering Foundation is a Charitable Incorporated Organisation No: 1158003
www.imagineering.org.uk 15.06.17
MORSE KEY & BUZZER Mk 2
Instructions
This is an Education Kit –not a Toy.
It requires adult supervision during construction.
The Kit contains small parts and is NOT suitable for children under 8yrs of age.

1. Check you have the Parts
Lay out all the parts and check that you have
each part by putting a tick in the column
Item
Description
Number
Check
1
Key and armature
strips
2
2
M4x 10mm long
screws
5
3
M4x 15mm long
screws
3
4
M4 nuts
14
5
M4 washers
11
6
M5 washer
1
7
Plastic base
1
8
Self tapping screw
1
9
Spring
1
10
M8 washers
2
11
M8 set screw
1
12
Plastic spacer bushes
2
13
M8 thin nuts
2
14
Plastic brackets
2
15
Copper wire
1
16
Connecting wire
1
17
PP3 battery clip
1
7. Plastic
base
12. Plastic
spacers
14. Plastic
brackets
11. M8 Set
screw
18.
Battery
box
13. M8
Thin nuts
Plastic
base
10. M8
washers
17. Battery
clip
16.
Connecting
wire
15. Copper
wire
1. Key &
Armature
4. M4
nuts
6. M5
washer
9. Spring
8. Self
tapping
screw
2 & 3. M4
screws
5. M4
washers
2. Winding and fitting the Coil
a) Assemble the 2 spacer bushes on the
M8 set screw as shown with a single nut.
Tighten up the nut using two 13mm
spanners.
Spacer
Bush

3. Terminal Screws and the Key Screw
a) Cut the connecting wire (16) into 2 pieces
about 6cm long, and one 10cm long. Strip
about 2cm of insulation from both ends of
each piece and form the wire into small
hooks go under the screw washers.
b) Take 3 M4 x 15mm long screws, (3) put
washers on them and push them up through the holes marked A, B and C on the top of the
base (7) (to be the terminal screws). Run nuts on each and tighten screws underneath to pull
the nuts down into the hexagon sockets.
Put another washer and nut loosely on the screw terminal A.
c) Take an M4 x 10mm long screw (2) (to be the Key Screw) with a washer and insert it down
through the corner hole in the base. Run a nut loosely on underneath.
4. Fit the Key, Armature and Contact Screw
a) Connect the terminal A to the Key screw with a 6cm wire,
trapping the bare end hooks of the wire under the washers.
Tighten the Key screw and nut, and the nut on A to secure
the wire.
b) Fit the Key strip (1) to the base using a screw and washer
through its end hole and the corner hole in the base with a
nut underneath. Connect one end of the 10cm wire under
this screw/washer together with one end of the coil wire.
Tighten the screw.
2. b) Leaving about 8 cm of the copper wire
free so that it can be connected to the
terminals, wind all the wire onto the spacers
as neatly as possible. When complete wrap
tape round wire to stop it unwinding.
2. c) Remove the insulation varnish from
about 1 cm at each end of the wire with a
scraper or sand paper. (The armature strip
makes a good scraper).
2. d)Fit the coil assembly (armature) to the
base with a washer each side of the bracket,
tightened with the second nut.
Key Strip
Coil
Assembly
(Armature)
Key Screw
Terminal Screws
c) Put another washer and nut on terminal C, connect the other end of the 10cm wire to it and
tighten it down. Bend the key strip up slightly so that it is just clear of the Key screw.
d) Take the Armature strip (1), push a screw with a washer through the end hole, and then
through the hole in one of the plastic Brackets at [S]. Run a nut into the hexagon socket on
the back. Trap one end of the other 6cm piece of connecting wire under the washer. Tighten
the screw.
e) Fit the spring (9)and then the 5mm washer (6) to the pointed self tapping Contact screw (8).
Screw this into the other bracket at [P] as shown in the diagram.
f) Assemble both brackets to the base with screws, and washers and nuts underneath.
g) Put another washer and nut on terminal B. Hook under the washer the other end of the 6cm
wire from the armature strip. Tighten the nut by hand.
5. Final Connections & Adjustments
a) Connect the other end of the coil wire to the contact screw by slipping it between the bracket
and the washer under the spring. Connect the two Battery clip (17) wires to terminals A and B
b) Position the armature strip about 1mm from the end of the coil assembly (armature) bolt head
by adjusting the position of the bracket. Screw the contact screw in towards the armature strip
until it just touches it. (It may be necessary to adjust the bracket first)
c) Connect a PP3 battery to the battery clip (17).
d) Press the key down to make contact with the key screw. Adjust the contact breaker screw to
get the best buzz. A drop of oil reduces oxidising at the spark point.
6. Sending a message
Write a short message and translate it into Morse Code. Send the message by operating the
key with short or long presses. Do not hold the key down for a long time –the battery will
quickly go flat.
7. Sending a message to another unit
Connect terminal A of the first unit to terminal B of the second unit and vice versa with the
other A and B terminals. Connect the two terminals C together with the battery between. The
key on one will sound on the buzzer of the other and vice versa. (You will need extra wire for
this). The Teacher/Tutor notes give more detail on how to achieve this.
Brackets
P
Key
Screw
Armature
1mm gap
Contact
S
Key Strip
Table of contents
Popular Educational Equipment manuals by other brands

ACROME
ACROME myCONTROL STEWART PRO user manual

Tensegri-Teach
Tensegri-Teach 6-Dowel bowl with cacao pod Assembly instructions

Copernicus
Copernicus Tech Tub2 Assembly guide

Rompa
Rompa 20019 manual

IngMar Medical
IngMar Medical Laerdal ASL 5000 Quick setup guide

Regina
Regina FH-100E VER.2 instruction manual

Nasco Healthcare
Nasco Healthcare Simulaids LifeForm LF00698U instruction manual

Pakronics
Pakronics PAKR-A0471 quick start guide

Kyoto Kagaku
Kyoto Kagaku MW57 instruction manual

DIVERSIFIED WOODCRAFTS
DIVERSIFIED WOODCRAFTS AUGMENTED REALITY Series manual

laerdal
laerdal Nursing Anne VitalSim Directions for use

SeaPerch
SeaPerch ROV Construction manual


