manuals.online logo
Brands
  1. Home
  2. •
  3. Brands
  4. •
  5. Tensegri-Teach
  6. •
  7. Educational Equipment
  8. •
  9. Tensegri-Teach 6-Dowel bowl with cacao pod User manual

Tensegri-Teach 6-Dowel bowl with cacao pod User manual

Other Tensegri-Teach Educational Equipment manuals

Tensegri-Teach X-Strut User manual

Tensegri-Teach

Tensegri-Teach X-Strut User manual

Tensegri-Teach Octahedron User manual

Tensegri-Teach

Tensegri-Teach Octahedron User manual

Tensegri-Teach Pelvis User manual

Tensegri-Teach

Tensegri-Teach Pelvis User manual

Popular Educational Equipment manuals by other brands

DISCOVER talking pen user guide

DISCOVER

DISCOVER talking pen user guide

pitsco Smart Buddies 45895 quick start guide

pitsco

pitsco Smart Buddies 45895 quick start guide

RS 3.5 quick start guide

RS

RS 3.5 quick start guide

Quanser QNET 2.0 quick start guide

Quanser

Quanser QNET 2.0 quick start guide

CAE Healthcare METIman user guide

CAE Healthcare

CAE Healthcare METIman user guide

Turning Technologies Pulse quick start guide

Turning Technologies

Turning Technologies Pulse quick start guide

TruCorp AirSim user manual

TruCorp

TruCorp AirSim user manual

LION R.A.C.E. STATION user manual

LION

LION R.A.C.E. STATION user manual

jp.ik LEAPW505 user guide

jp.ik

jp.ik LEAPW505 user guide

laerdal ASL 5000 Lung Solution for SimMan Quick setup guide

laerdal

laerdal ASL 5000 Lung Solution for SimMan Quick setup guide

Rompa GYMTOP 20143 manual

Rompa

Rompa GYMTOP 20143 manual

ScienTECH 2261 Product tutorial

ScienTECH

ScienTECH 2261 Product tutorial

Quanser 6 DOF Hexapod Laboratory guide

Quanser

Quanser 6 DOF Hexapod Laboratory guide

Surefire Flying Model Rocket Kit How to use

Surefire

Surefire Flying Model Rocket Kit How to use

ACROME myCONTROL STEWART PRO user manual

ACROME

ACROME myCONTROL STEWART PRO user manual

SmartMan Baby Manikin manual

SmartMan

SmartMan Baby Manikin manual

Nasco Life/form LF03840U instruction manual

Nasco

Nasco Life/form LF03840U instruction manual

Pitsco Education BUILDERSPACES SPACEPORT Assembly instructions

Pitsco Education

Pitsco Education BUILDERSPACES SPACEPORT Assembly instructions

manuals.online logo
manuals.online logoBrands
  • About & Mission
  • Contact us
  • Privacy Policy
  • Terms and Conditions

Copyright 2025 Manuals.Online. All Rights Reserved.

A
B
C
F
A
B
C
D
E
F
A
B
C
D
E
F
A
B
C
D
E
F
A
B
C
D
E
F
2. Place one band on each stick. The bands
should be flat on the stick and the ends should
not be twisted. Make sure the bands are
equally tight on both sides of the stick by pulling
the bands apart. They should pull equally far.
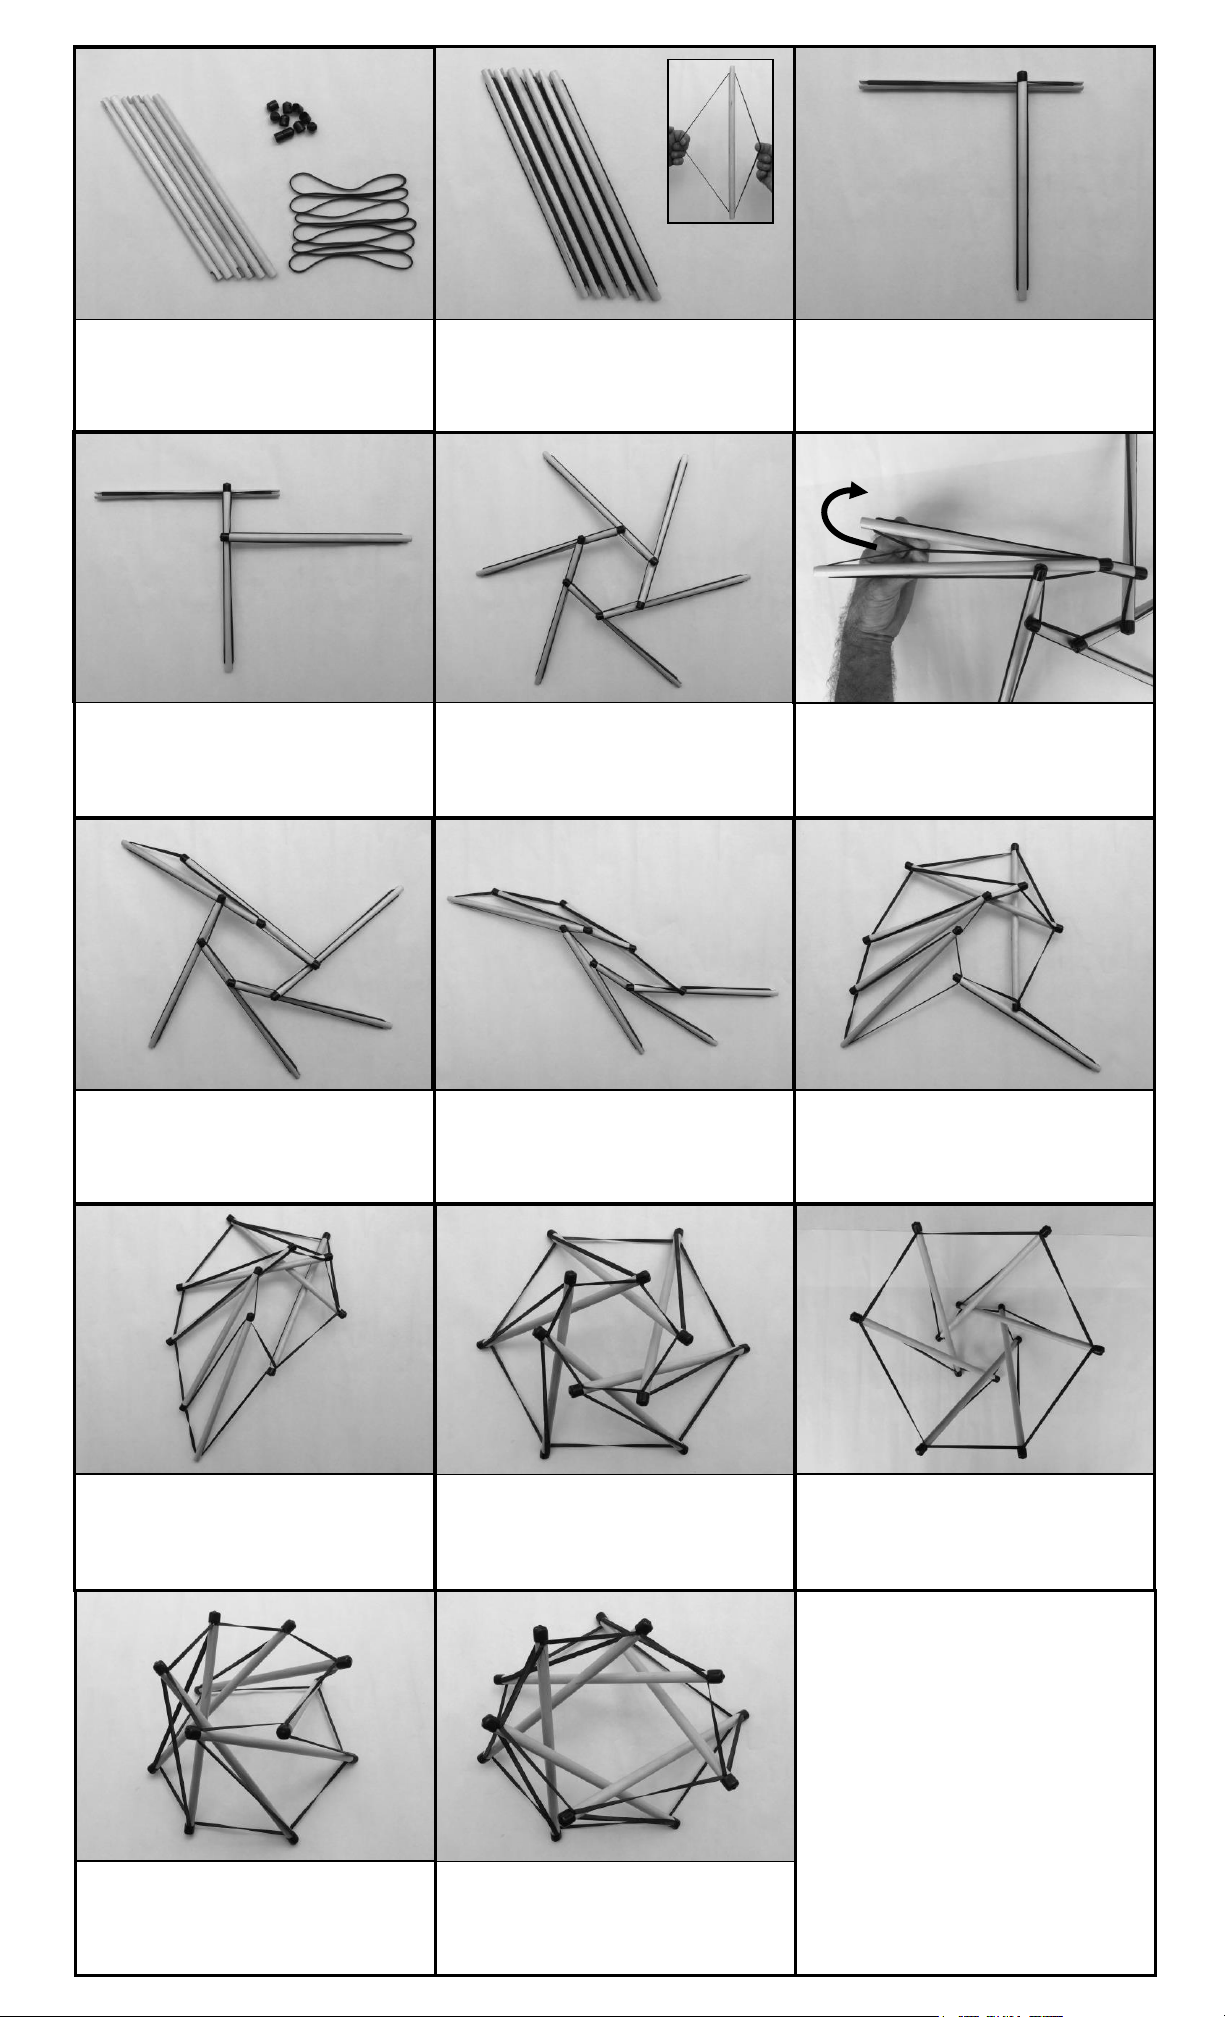
1. To assemble a 6-dowel Bowl model you will
need following items: 6 sticks, 6 bands, 12
caps.
3. Place two sticks in the shape above. Place
the band of stick A into the slot of stick B and
firmly twist a cap onto the end to lock the band
into the slot. Make sure the tip of stick B is on
top of stick A.
4. Place sticks C on top of stick B to create the
shape above. Place band of stick B into the
slot of stick C and firmly twist a cap onto the
end.
5. Continue adding sticks D, E, and F in the
same manner, ensuring the caps are twisted on
firmly. Finally, place the band of stick F into the
slot of stick A. Make sure the tips are attached
equally far apart and rest on top.
6. Place the unused band of B against the used
band of A, pinch them together 1-2 inches from
the stick end and pull both over the stick end
and into the slot. This increases the tightness of
both evenly. Firmly twist a cap on to the end.
8. Again, place the unused band of C against
the used band of B, pinch them together about
1-2 inches from the stick end and pull both over
the stick end and into the slot. Firmly twist a
cap on to the end.
9. Repeat this process with the band of stick D
into the unused slot of stick C, and then with
the band of stick E into the unused slot of stick
D. Firmly twist a cap onto the end of both sticks.
10. Repeat this process again with the band of
stick F into the unused slot of stick E. Notice
that there is only one more band to attach but
the model is still mostly 2-dimensional.
A
B
A
B
C
A
B
C
D
E
F
11. Finally, place the unused band of F against
the used band of A, pinch them together and
pull both over the stick end and into the slot.
Firmly twist a cap on to the end. Your model is
now a full Tensegrity.
12. Above is another view of the 6-dowel Bowl
with a smaller original hexagon in step 5.
Notice how making the last connection unified
the whole structure into an expansive tensional
network.
7. The farther from the sticks end you pinch the
two bands and pull, the more slack you add to
the outer ring of the model and thus the bigger
that end becomes. It is informative to assemble
the model with different tightness.
13. You can balance or modify the shape of
the tensegrity by pulling the bands through the
stick slot. Above is another example of the 6-
dowel Bowl.
14. A view from above.
6-Dowel bowl with cacao pod
EliThompson.com [email protected] 617-776-9494
More Tensegri-Teach Models
Download assembly instructions online at Tensegri-Teach.com
X-Strut
Pelvis
12-Dowel
Tower
3-Dowel
6-Dowel
Bowl