Imit FIRE/503 WATER-N User manual

MI07A592-Rev1011-GB 1/4
FIRE/503 WATER-N
ELECTRONIC CONTROLLER FOR
FIREPLACES
INTRODUCTION
We thank you for your trust and congratulate you for choosing
one of our products. This device is a BUILT-IN ELECTRONIC
CONTROLLER FOR FIREPLACES that manages four devices
through microprocessor logic: two circulators, one diverter
valve and one auxiliary output.
COMPLIANCE WITH STANDARDS:
•EN 60730-1 as subsequently amended
•EN 60730-2-7
•EN 60730-2-9
COMPLIANCE WITH DIRECTIVES:
•B.T. 73/23/EEC
•E.M.C. 89/336/EEC
as subsequently amended CE 93/68/EEC
TECHNICAL CHARACTERISTICS
POWER SUPPLY = 230Va.c./50Hz (+10%-15%)
TEMPERATURE PROBE = NTC 1%
MAXIMUM PROBE TEMPERATURE = 150°C
OPERATING TEMPERATURE = 0÷50°C
STORAGE TEMPERATURE = 0÷60°C
OPERATING HUMIDITY = 10%÷90% with no condensate
ADJUSTMENT = with relays (I max. = 3A)
ABSORBED POWER = 1VA
LCD DISPLAY
TEMPERATURE DISPLAY = 5÷85°C (1°C resolution)
DEGREE OF PROTECTION = IP20 (installed product)
INSTALLATION CONDITIONS = normal environment
ASSEMBLY = in standard 3–module flush-mounted box DIN503
NON-VOLATILE DATA STORAGE ON FLASH TECHNOLOGY
KEYPAD = in rubber with 8 keys
BUZZER internal for alarm signalling
CONTROLS LEGEND
+ / - keys Increases or decreases the selected value
SET key Enables the SET Point function
E key Enables the Enter function
A key Enables the Automatic function
T button Press T to store the new parameters
OFF key Press OFF to turn off the controller
DIMENSION
INSTALLATION AND CONNECTIONS
SAFETY INSTRUCTIONS
•Before you connect the controller to the mains, make
sure that voltage is CUT OUT and that it corresponds
to a value of 230Va.c. (Fig. 3).
•The fireplace must be connected to the mains, with a line
differential main switch, in compliance with regulations
in force.
Make sure that the electrical characteristics of the motor to be
controlled are compatible with those of the product (Imax=3A).
The manufacturer is not liable for improper use of the device.
POSITIONING
•Do not install in places where temperature can exceed
40°C (Fig.4)
•Make sure the box is expressly intended to contain the
product only, and that it is NOT used as a shunt (Fig.5)
INSTALLATION
A) Connect the wires to the terminal boards as shown in the
electrical diagram (see paragraph “electrical wirings” and
“application diagram” below)
B) Fit the controller inside the 3-module box previously
mounted within the wall, and secure everything using the
screws supplied with the product
Fig. 3
Fig. 4
Fig. 6
Fig. 1
Fig. 5
Fig. 2

MI07A592-Rev1011-GB 2/4
C) Assemble the desired PLAQUE by pressing it in. In case
you choose to fit a PLAQUE from the “LIVING
INTERNATIONAL”, “PLAYBUS” or “PLAYBUS
YOUNG” series, you need to break off and throw away the
two tabs on the sides of the front panel (Fig.7).
In case you decide to fit a PLAQUE from the “IDEA” or
“IDEA RONDO” series, leave the two tabs on the front panel
(Fig. 8)
N.B.: The package includes 2 plastic strips needed to cover up the
holes that would otherwise be visible on the front panel of the
controller in case you decide to use GEWISS or VIMAR plaques.
ELECTRICAL WIRING AND
APPLICATION DIAGRAM
Carry out the connections as illustrated in the diagrams in Fig.9
CAUTION:
It is recommended to install the product in strict compliance
with the safety standards and legal provisions in force.
N.B.: The probe is a very fragile device; be as careful as
possible during the assembly phase in order to avoid breaking
the terminals or even the probe.
Description of controller functions
The controller has to work on:
•C1 Circulator : The circulator is activated in the following
cases:
oalways if the DHW (Domestic Hot Water) request
flow switch is closed;
oin all other cases, only when the Circulator Set Point
temperature set by the user between 20°C and 85°C
is exceeded
•EV Diverter valve: The diverter valve is activated in the
following case:
oWhen the Diverter valve Set Point temperature set
by the user between 20°C and 85°C is exceeded :
EV output - Heating
•If the DHW flow switch is closed, the diverter valve
switches to the fireplace EV output DHW.
•AUX output that can be configured in three different ways:
ofunction 0 : boiler configuration
•the boiler is deactivated when the set
point is reached
ofunction 1 : thermostat configuration
•the output is activated when the set point
is reached
ofunction 2 : grill configuration
•the output is activated and deactivated
from the keypad to control a roasting pit
through keys + and -
•C2 Circulator : The Circulator is activated in the following
cases:
oOnly when the Circulator Set Point temperature set
by the user between 20°C and 85°C is exceeded
oSafety function: when the probe temperature
exceeds the value set in parameter P16 (default
90°C – see parameter table), the following
conditions have to occur :
•Alarm A01 appears on the display
•Circulator C1 is working
•The buzzer is sounding (press E to silence it)
The controller switches back to the AUTO mode when the
temperature falls below the value set in parameter P16
Fig. 7
Fig. 9
CONNECTIONS
TERMINAL 1 = Circulator C2 phase output
TERMINAL 2 = Phase
TERMINAL 3 = Neutral
TERMINALS 4-5 = Probe
TERMINALS 4-6 = Flow switch
TERMINAL 7 = Common EV solenoid valve
Common C1 circulator
TERMINALS 8-9 = AUX output
TERMINAL 10 = EV output – DHW
TERMINAL 11 = EV output – Heating
TERMINAL 12 = C1 circulator output
230Va.c
}
Fig. 8

MI07A592-Rev1011-GB 3/4
oFrost-protection function: when the probe
temperature falls below the value set in parameter
P17 ( default 5°C – see parameter table), the
following conditions have to occur :
•Display of alarm status A04
•Circulator C1 working
•Buzzer sounding (press E to silence it)
The controller switches back to the previous mode when the
temperature rises above the value set in parameter P17.
oAnti-block function: In case circulator C1 is
inactive for more than one week, the following
conditions have to occur :
•“BLP” displayed
•C1 circulator starts working for 30 seconds
The controller switches back to the previous mode when the 30-
second period expires (this function can be turned off by using
parameter P18).
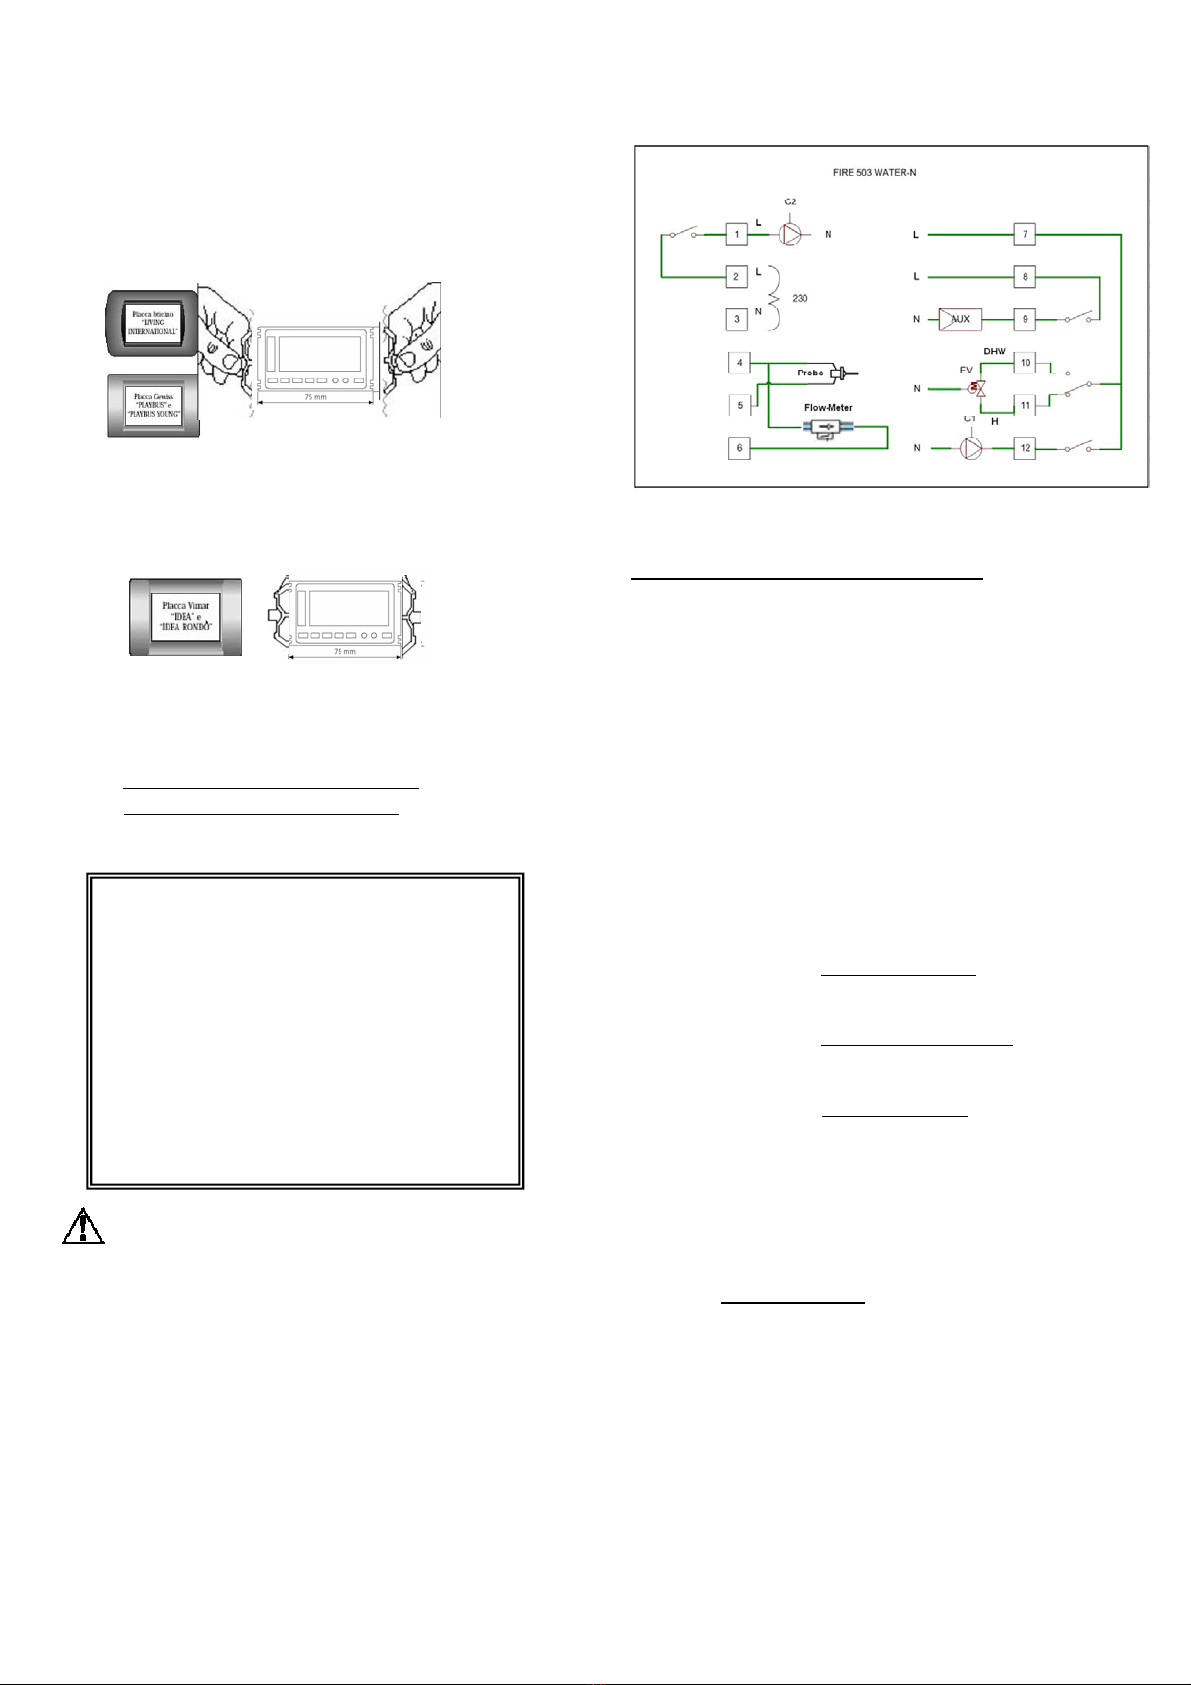
CONTROLLER OPERATION
AUTOMATIC MODE - “AUTO” MODE
Press key A to enter the AUTO
(automatic mode). In this mode, the
display shows the word “AUTO”,
the water temperature detected by
the probe, the circulator C1 set
point, or the letters “FL” in case the
flow switch contact is closed (two digits at the bottom right).
•Symbol “1” and , when the C1 circulator is
working
•The symbol , represents the EV solenoid
valve working
•Display of the word “AUX” represents the active
auxiliary output (in case of configuration 2 (grill
function), keys + and – are used to activate and
deactivate
•Symbol “2” and , when the C2 circulator is
working
Proceed as follow to exit the AUTO mode:
•Press the OFF key to switch to the OFF mode
•Press the SET key to switch to the SET mode
•Press the Tkey to switch to the TEST mode
•Press the OFF key for more than 5 seconds to switch
to the CONF mode (configuration parameters for
installing personnel only).
TURNING OFF THE CONTROLLER – OFF mode
The OFF mode is entered when you
first turn on the device, or by pressing
the OFF key. In this mode, the display
shows “ OFF ” and the water
temperature detected by the probe. The
device is deactivated.
Proceed as follows to exit the OFF mode:
•Press the A key to switch to the AUTO mode
•Press the SET key to switch to the SET mode
•Press the T key to switch to the TEST mode
•Press the OFF key for more than 5 seconds to switch
to the CONF mode (configuration parameters for
installing personnel only).
“SET” MODE (Set Point)
Enter the SET mode by pressing the
SET key. In this mode, the display
shows “P00” (parameter 00) and the
Set Point value for Circulator C1
(two digits at the bottom right).
Use keys – and + to change the C1 Set Point value
(as per Table 1 and the corresponding symbol appears ).
Afterwards, press E to confirm and to move on to the following
parameters. Repeat the procedure described above for all the
other parameters.
Proceed as follows to exit the SET mode:
•Press key E to put the controller back into the previous
mode.
Table 1
PARAMETER CODE MIN. PRE-SET MAX
C1 Set point P00 20°C 40°C 85°C
EV Set point P01 20°C 45°C 85°C
*AUX Set point P02 20°C 50°C 85°C
C2 Set point P03 20°C 50°C 85°C
*AUX Set point = only when the output is configured in
function 0 (boiler configuration) or function 1 (thermostat
configuration)
**AUX enabling = only when the output is configured in
function 2 (grill)

MI07A592-Rev1011-GB 4/4
“TEST” MODE
Enter the TEST mode by pressing the T
key. In this mode, the display shows:
•The word “OFF” (at the bottom
right)
•Symbol “1” and (output C1)
Use keys + and –to activate or deactivate output C1
•Press + to activate output C1
•Press – to deactivate output C1
•Press key E to switch to the following output
All outputs can be activated, consecutively, with the TEST
mode, and they are:
- Solenoid valve EV with the symbol
- auxiliary output with the word “AUX”
- Circulator C2 with symbol “2” and
Exit the TEST mode after having selected the last output and
pressing key E, which sets the controller in the previous mode.
The outputs are deactivated .
“CONF” MODE (Configuration mode)
-for installing personnel only-
Enter the CONF mode by pressing the
OFF key for more than 5 seconds.
In this mode, the display shows “P10”
(parameter 10) and the parameter set
value (two digits at the bottom right).
Using keys – and +, you can change the value of the selected
parameter; afterwards, press key E to switch to the following
parameter P11.
The parameters that can be changed are listed in table 2
Proceed as follows to exit the CONF mode:
•After the last displayed parameter P18, press T to store
the new parameters
•After the last displayed parameter P18, press RESET if
you do not want to store the new parameters
Parameters
The parameters shown in the table below can be modified by the
installer or by the fireplace manufacturer according to the
procedure described in CONF (Configuration Mode).
Table 2
Storing the Parameters
Parameter P00÷P18 are stored after 60 seconds have expired
from their modification.
In case of a power failure, the parameters are kept in memory
and the controller restarts according to the previous condition.
When the controller is turned on, the parameters are checked
and if any of them are out of range for any reason, the control
system reloads the pre-set parameters
FUNCTIONAL TEST
Enter the TEST (TEST mode) by pressing key T, and follow
the instructions provided in paragraph “TEST” MODE
TROUBLESHOOTING
PROBLEM POSSIBLE CAUSE SOLUTION
The controller
does not turn on
1.Wrong connections 1.Check connection of
the power supply wires
(230VAC) with
terminals no.2 and no.3
of the controller
Alarm A02 Probe in short-circuit
(T>130°C)
- Turn off the controller
- Connect a new probe
- Turn on the controller
Alarm A03 Probe not present or break
(T<0°C)
- Turn off the controller
- Connect a new probe
- Turn on the controller
N.B.: In case of persistent irregularities, do not tamper with any
part of the product for any reason and contact the technical
assistance service.
PARAMETERS CODE MIN PRE-SET MAX
C1 circulator differential P10 2°C 4°C 8°C
EV Solenoid valve differential P11 2°C 4°C 8°C
AUX output differential P12 2°C 4°C 8°C
C2 circulator differential P13 2°C 4°C 8°C
Configuration of
AUX output
0 = Boiler function
1 = Thermostat function
2 = Grill function
P14 0 0 2
Operating mode
Mode 0 : without flow switch
Mode 1 : with flow switch (for
domestic hot water )
P15 0 0 1
Safety function
activating temperature
P16 60°C 90°C 95°C
Frost-protection function
activating temperature
P17 2°C 5°C 9°C
Anti-block function
Enabling
P18 0
(off)
1 1
(on)
Popular Controllers manuals by other brands

Emerson
Emerson AVENTICS 651 Series Installation and maintenance instructions

IPAS
IPAS Power Block Series Operating and mounting instructions

Solar
Solar EPHC-ST Series instruction manual

Supreme Heating
Supreme Heating Aqua-Gen 2 instructions

Sentinel
Sentinel CO2-EXP instruction manual

National Instruments
National Instruments Motion Control 7334 user manual