In The Ditch X Series User manual
TM FOR MORE INFORMATION: www.intheditch.com | (208) 587-7960 | [email protected]
FAILURE TO FOLLOW THE SAFETY GUIDELINES LISTED MAY RESULT IN VOIDING ANY APPLICABLE WARRANTY, SERIOUS BODILY INJURY, OR DEATH.
!
IT IS VERY IMPORTANT THAT YOU PROPERLY FILL OUT YOUR PRODUCT REGISTRATION FORM AT REGISTRATION.INTHEDITCH.COM TO REGISTER YOUR EQUIPMENT.
BY SUBMITTING THE INFORMATION WITHIN 15 DAYS OF YOUR PURCHASE, YOUR WARRANTY WILL BE VALIDATED, ENSURING THAT YOUR EQUIPMENT WILL BE
PROTECTED SUBJECT TO THE TERMS AND CONDITIONS SET OUT HEREIN. IN THE EVENT WE NEED TO CONTACT YOU CONCERNING YOUR REGISTERED EQUIPMENT,
PRODUCT UPDATES, SERVICE BULLETINS, OR PRODUCT RECALLS, THE INFORMATION YOU HAVE PROVIDED ON THE PRODUCT REGISTRATION FORM WILL ENSURE
YOUR IMMEDIATE NOTIFICATION. DO YOUR PART AND LET US HELP YOU BY FILLING OUT YOUR PRODUCT REGISTRATION FORM.
!
IT IS THE OPERATOR’S RESPONSIBILITY TO INSPECT DOLLIES BEFORE EACH USE. INSPECTION SHOULD BE A PART OF THE OPERATOR’S DAILY
CIRCLE CHECK OF THE VEHICLE.
!
SERIES
TM
DOLLIES
DOLLY OPERATION
PAGE 1 OF 6
LOADING
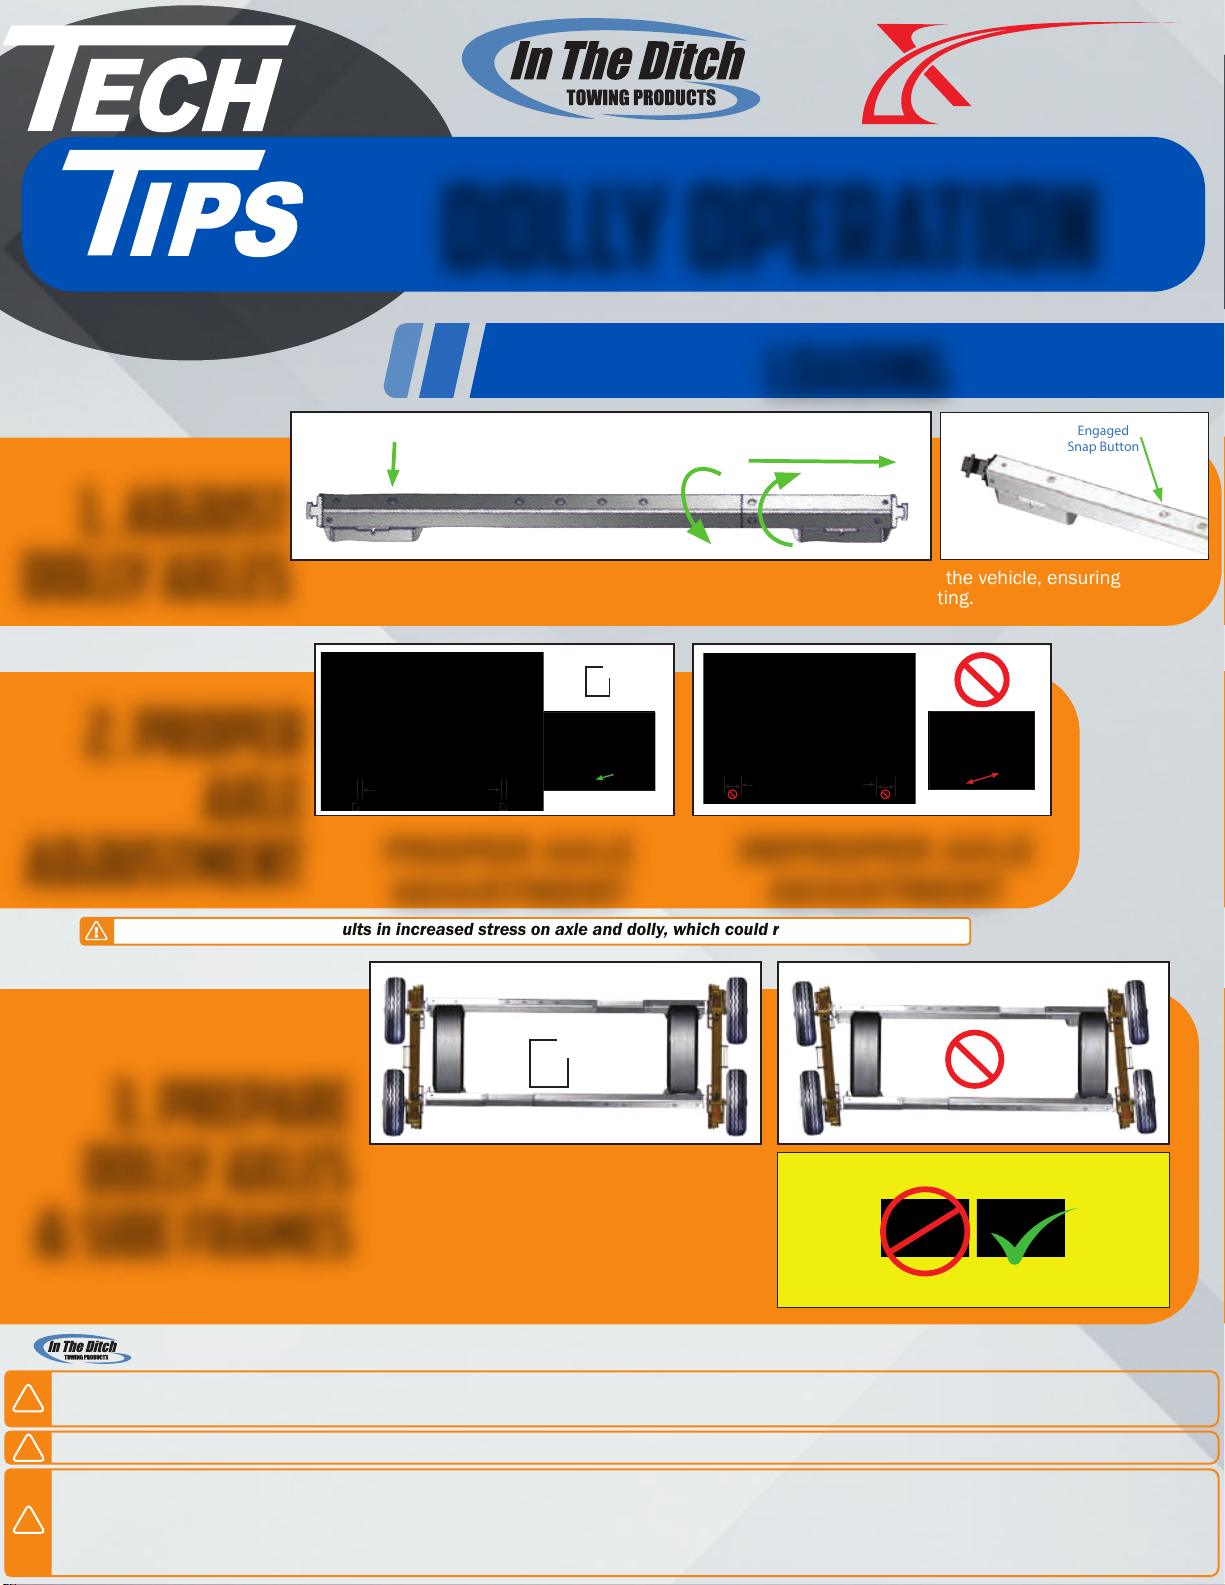
1. ADJUST
DOLLY AXLES
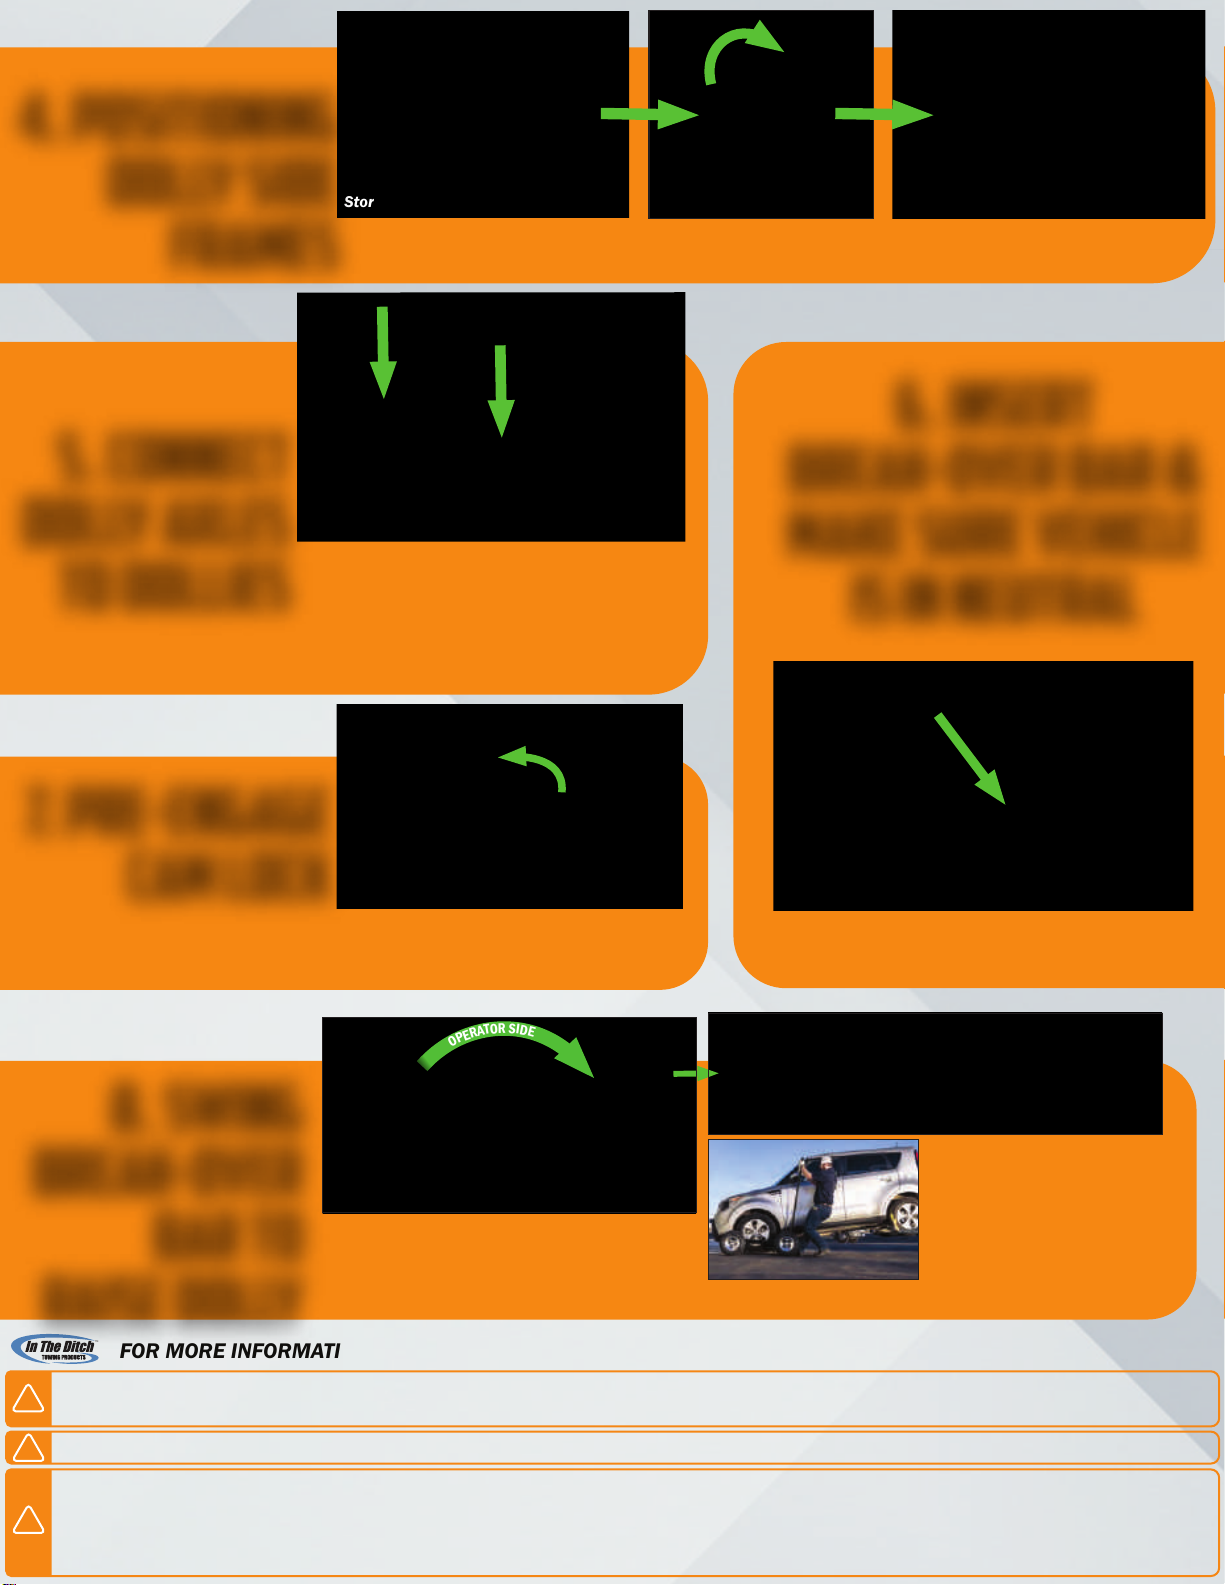
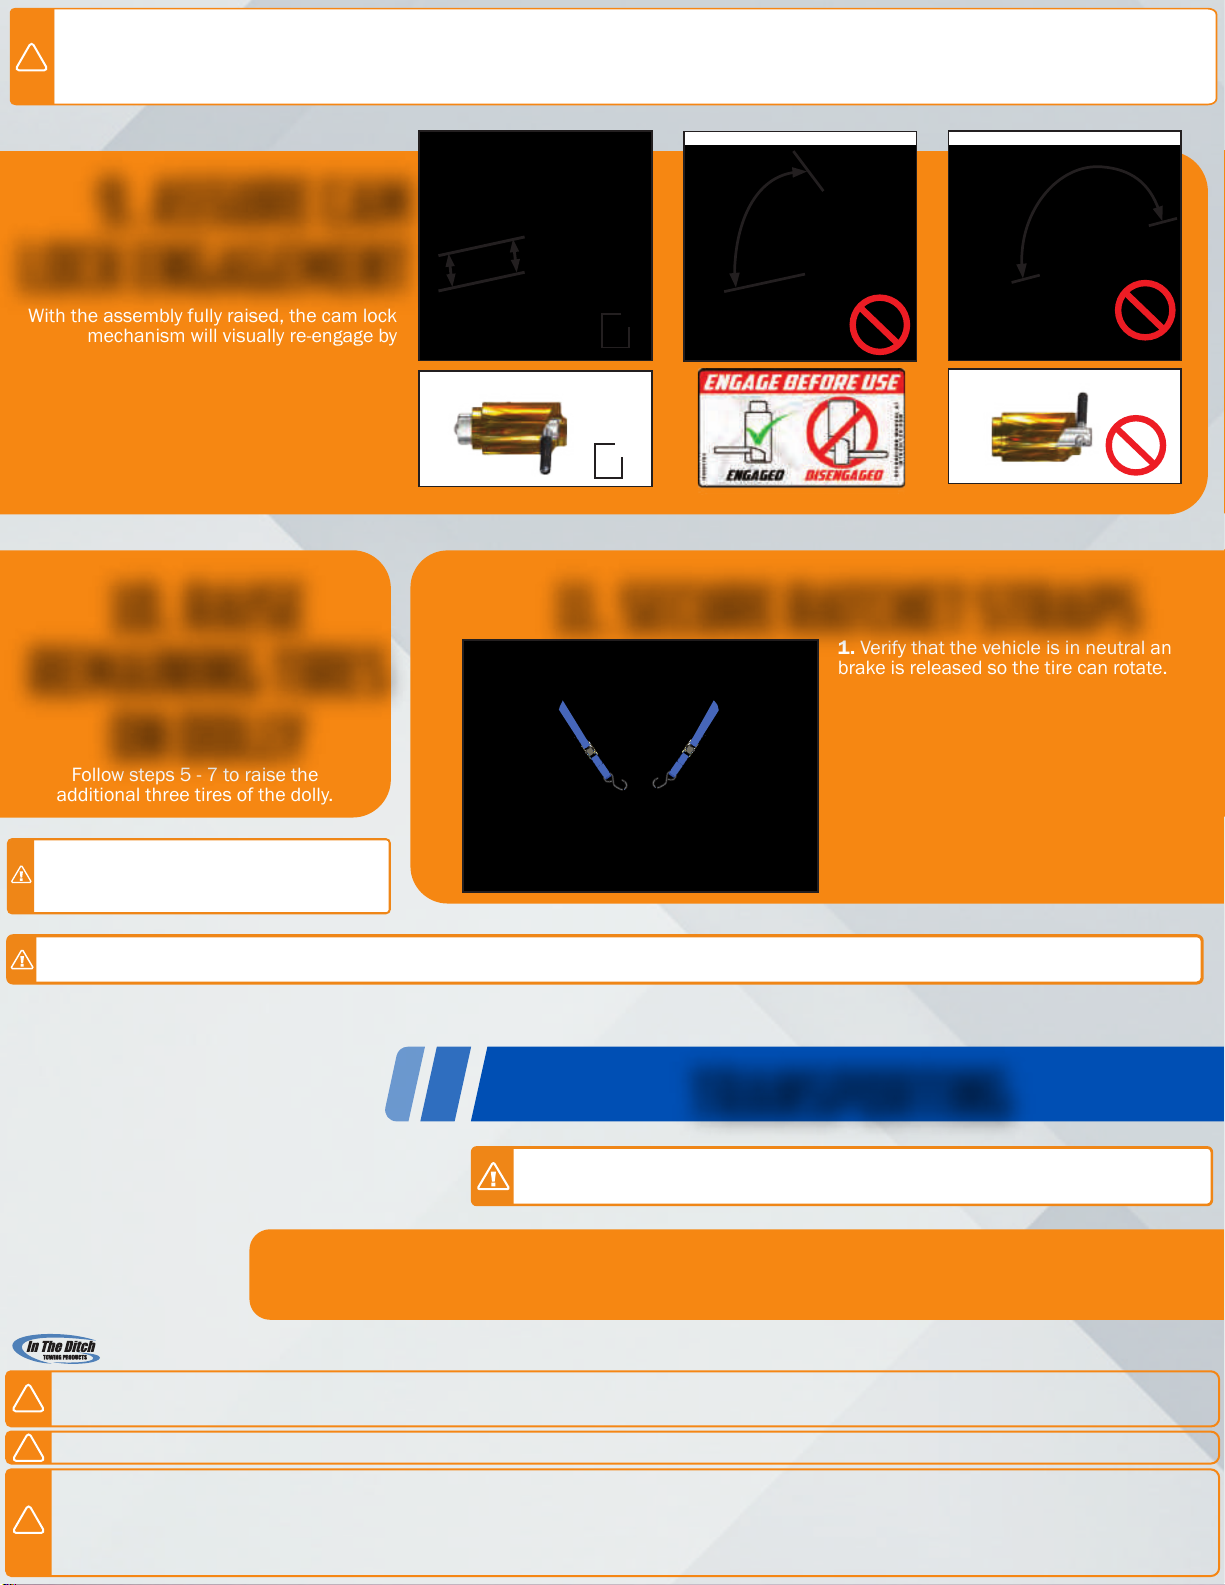
3. PREPARE
DOLLY AXLES
& SIDE FRAMES
Extend axles to the minimum length required to span the width of the vehicle, ensuring
the snap button re-engages at the extended setting.
Depress Extend
PROPER AXLE
ADJUSTMENT
IMPROPER AXLE
ADJUSTMENT
Place the dolly axles and side frames on the
groundin the configuration shown belowwith
dollies centered and parallel to vehicle tires.
More than 4” More than 4” BAD
✓ ✓
4” or less 4” or less
✓
GOOD
2. PROPER
AXLE
ADJUSTMENT
Overextending your axle results in increased stress on axle and dolly, which could result in personal injury!
Top View
✓
Top View
WARNING:
SNAP BUTTON MUST BE FULLY ENGAGED BEFORE USE OR TRANSPORT
FAILURE TO ENGAGE SNAP BUTTON MAY RESULT IN PERSONAL INJURY
ITD0791
Engaged
Snap Button
FAILURE TO FOLLOW THE SAFETY GUIDELINES LISTED MAY RESULT IN VOIDING ANY APPLICABLE WARRANTY, SERIOUS BODILY INJURY, OR DEATH.
!
IT IS VERY IMPORTANT THAT YOU PROPERLY FILL OUT YOUR PRODUCT REGISTRATION FORM AT REGISTRATION.INTHEDITCH.COM TO REGISTER YOUR EQUIPMENT.
BY SUBMITTING THE INFORMATION WITHIN 15 DAYS OF YOUR PURCHASE, YOUR WARRANTY WILL BE VALIDATED, ENSURING THAT YOUR EQUIPMENT WILL BE
PROTECTED SUBJECT TO THE TERMS AND CONDITIONS SET OUT HEREIN. IN THE EVENT WE NEED TO CONTACT YOU CONCERNING YOUR REGISTERED EQUIPMENT,
PRODUCT UPDATES, SERVICE BULLETINS, OR PRODUCT RECALLS, THE INFORMATION YOU HAVE PROVIDED ON THE PRODUCT REGISTRATION FORM WILL ENSURE
YOUR IMMEDIATE NOTIFICATION. DO YOUR PART AND LET US HELP YOU BY FILLING OUT YOUR PRODUCT REGISTRATION FORM.
!
IT IS THE OPERATOR’S RESPONSIBILITY TO INSPECT DOLLIES BEFORE EACH USE. INSPECTION SHOULD BE A PART OF THE OPERATOR’S DAILY
CIRCLE CHECK OF THE VEHICLE.
!
PAGE 2 OF 6
5. CONNECT
DOLLY AXLES
TO DOLLIES
7. PRE-ENGAGE
CAM LOCK
6. INSERT
BREAK-OVER BAR &
MAKE SURE VEHICLE
IS IN NEUTRAL
8. SWING
BREAK-OVER
BAR TO
RAISE DOLLY
Place the engagement tabs into axle cradles
of both dollies.
NOTE: Assure both dollies use identical cradle
positions, such that dolly axles are parallel to
each other and perpendicular to side frames.
Make sure to shift the vehicle you are about to
dolly into neutral, theninsert the break-over bar
into the dolly’s receiver tube.
NOTE: If you have pre-engaged the cam
lock, you should hear an audible “click”
when the cam lock locks into the spindle,
keeping the wheel in place.
A.Rotate cam locks to release tires from storage position.
B. Allow wheel pivot arms to rotate until the tires hit the ground.
C. Position the dolly side frames while the cam locks stay in detents.
Rotate the cam lock back towards the engaged position to ready it.
Once the hole on the spindle reaches the right spot, the cam lock
will automatically engage.
Axles in Cradles
Break-over Bar
inside receiver tube.
Ready to Engage.
O
P
E
R
A
T
O
R
S
I
D
E
Use both hands while lifting or lowering with
break-over bar at all times!
Storage Position
Cam-Locks in detents
with tires on ground
Disengage
Cam-lock
4. POSITIONING
DOLLY SIDE
FRAMES
ITD0791
TM FOR MORE INFORMATION: www.intheditch.com | (208) 587-7960 | [email protected]
FAILURE TO FOLLOW THE SAFETY GUIDELINES LISTED MAY RESULT IN VOIDING ANY APPLICABLE WARRANTY, SERIOUS BODILY INJURY, OR DEATH.
!
IT IS VERY IMPORTANT THAT YOU PROPERLY FILL OUT YOUR PRODUCT REGISTRATION FORM AT REGISTRATION.INTHEDITCH.COM TO REGISTER YOUR EQUIPMENT.
BY SUBMITTING THE INFORMATION WITHIN 15 DAYS OF YOUR PURCHASE, YOUR WARRANTY WILL BE VALIDATED, ENSURING THAT YOUR EQUIPMENT WILL BE
PROTECTED SUBJECT TO THE TERMS AND CONDITIONS SET OUT HEREIN. IN THE EVENT WE NEED TO CONTACT YOU CONCERNING YOUR REGISTERED EQUIPMENT,
PRODUCT UPDATES, SERVICE BULLETINS, OR PRODUCT RECALLS, THE INFORMATION YOU HAVE PROVIDED ON THE PRODUCT REGISTRATION FORM WILL ENSURE
YOUR IMMEDIATE NOTIFICATION. DO YOUR PART AND LET US HELP YOU BY FILLING OUT YOUR PRODUCT REGISTRATION FORM.
!
IT IS THE OPERATOR’S RESPONSIBILITY TO INSPECT DOLLIES BEFORE EACH USE. INSPECTION SHOULD BE A PART OF THE OPERATOR’S DAILY
CIRCLE CHECK OF THE VEHICLE.
!
TRANSPORTING
PAGE 3 OF 6
!
ALWAYS KEEP BOTH HANDS ON THE BREAK-OVER BAR WHILE RAISING THE DOLLY!
EXTRA CAUTION SHOULD BE USED IF LOADING OR UNLOADING ON UNEVEN PAVEMENT, LOOSE GRAVEL, SNOW, WATER, OR ICE!
THE SAME OPERATOR MUST LOAD AND UNLOAD THE DOLL. CHANGES IN OPERATORS WILL RESULT IN UNFAMILIAR LOADS. WHICH MAY RESULT
IN SERIOUS INJURY!
With the assembly fully raised, the cam lock
mechanism will visually re-engage by
snapping into the closed position.
NOTE: An engaged cam lock can be
distinguished by the roll pin lying flat against
the body in a position parallel to the dolly
tube. If not visually engaged, lower the dolly
into the starting position before inspecting
the cam lock.
Follow steps 5 - 7 to raise the
additional three tires of the dolly.
• ITD dollies are designed for on-road use onlyand are not approved for freeway driving.
• Potholes should be approached at a low rate of speed.
• ITD recommends while towing with dollies to place the casualty in neutral to allow tires to move with the dolly.
1. Verify that the vehicle is in neutral and the
brake is released so the tire can rotate. Pass
the ratchet straps behind the vehicle tire,
attaching the hooked ends to the mounts on
the dolly handle. Ratchet the straps to secure
the dolly to the towed vehicle.
2. Verify that the ratchet strap has two full
wraps on the ratchet drum before you tighten
them down.
NOTE:The towed vehicle must be in neutral
and theemergency brake released.
✓
Engaged
✓
Engaged
Disengaged Disengaged
Disengaged
It is the driver/operator’s responsibility to ensure that nothing can come loose from any part of the truck or transport vehicle or the vehicle
being towed. It is the operator’s responsibility to make sure that all items are in good working order and are properly secured!
Follow all local and state laws concerning
proper towing. We recommend you consult
www.wreckmaster.com or your state
association for additional training.
WHILE TOWING A VEHICLE ON DOLLIES, DO NOT EXCEED
50MPH!
ITD0791
9. ASSURE CAM
LOCK ENGAGEMENT
10. RAISE
REMAINING TIRES
ON DOLLY
11. SECURE RATCHET STRAPS
TM FOR MORE INFORMATION: www.intheditch.com | (208) 587-7960 | [email protected]
FAILURE TO FOLLOW THE SAFETY GUIDELINES LISTED MAY RESULT IN VOIDING ANY APPLICABLE WARRANTY, SERIOUS BODILY INJURY, OR DEATH.
!
IT IS VERY IMPORTANT THAT YOU PROPERLY FILL OUT YOUR PRODUCT REGISTRATION FORM AT REGISTRATION.INTHEDITCH.COM TO REGISTER YOUR EQUIPMENT.
BY SUBMITTING THE INFORMATION WITHIN 15 DAYS OF YOUR PURCHASE, YOUR WARRANTY WILL BE VALIDATED, ENSURING THAT YOUR EQUIPMENT WILL BE
PROTECTED SUBJECT TO THE TERMS AND CONDITIONS SET OUT HEREIN. IN THE EVENT WE NEED TO CONTACT YOU CONCERNING YOUR REGISTERED EQUIPMENT,
PRODUCT UPDATES, SERVICE BULLETINS, OR PRODUCT RECALLS, THE INFORMATION YOU HAVE PROVIDED ON THE PRODUCT REGISTRATION FORM WILL ENSURE
YOUR IMMEDIATE NOTIFICATION. DO YOUR PART AND LET US HELP YOU BY FILLING OUT YOUR PRODUCT REGISTRATION FORM.
!
IT IS THE OPERATOR’S RESPONSIBILITY TO INSPECT DOLLIES BEFORE EACH USE. INSPECTION SHOULD BE A PART OF THE OPERATOR’S DAILY
CIRCLE CHECK OF THE VEHICLE.
!
UNLOADING
PAGE 4 OF 6
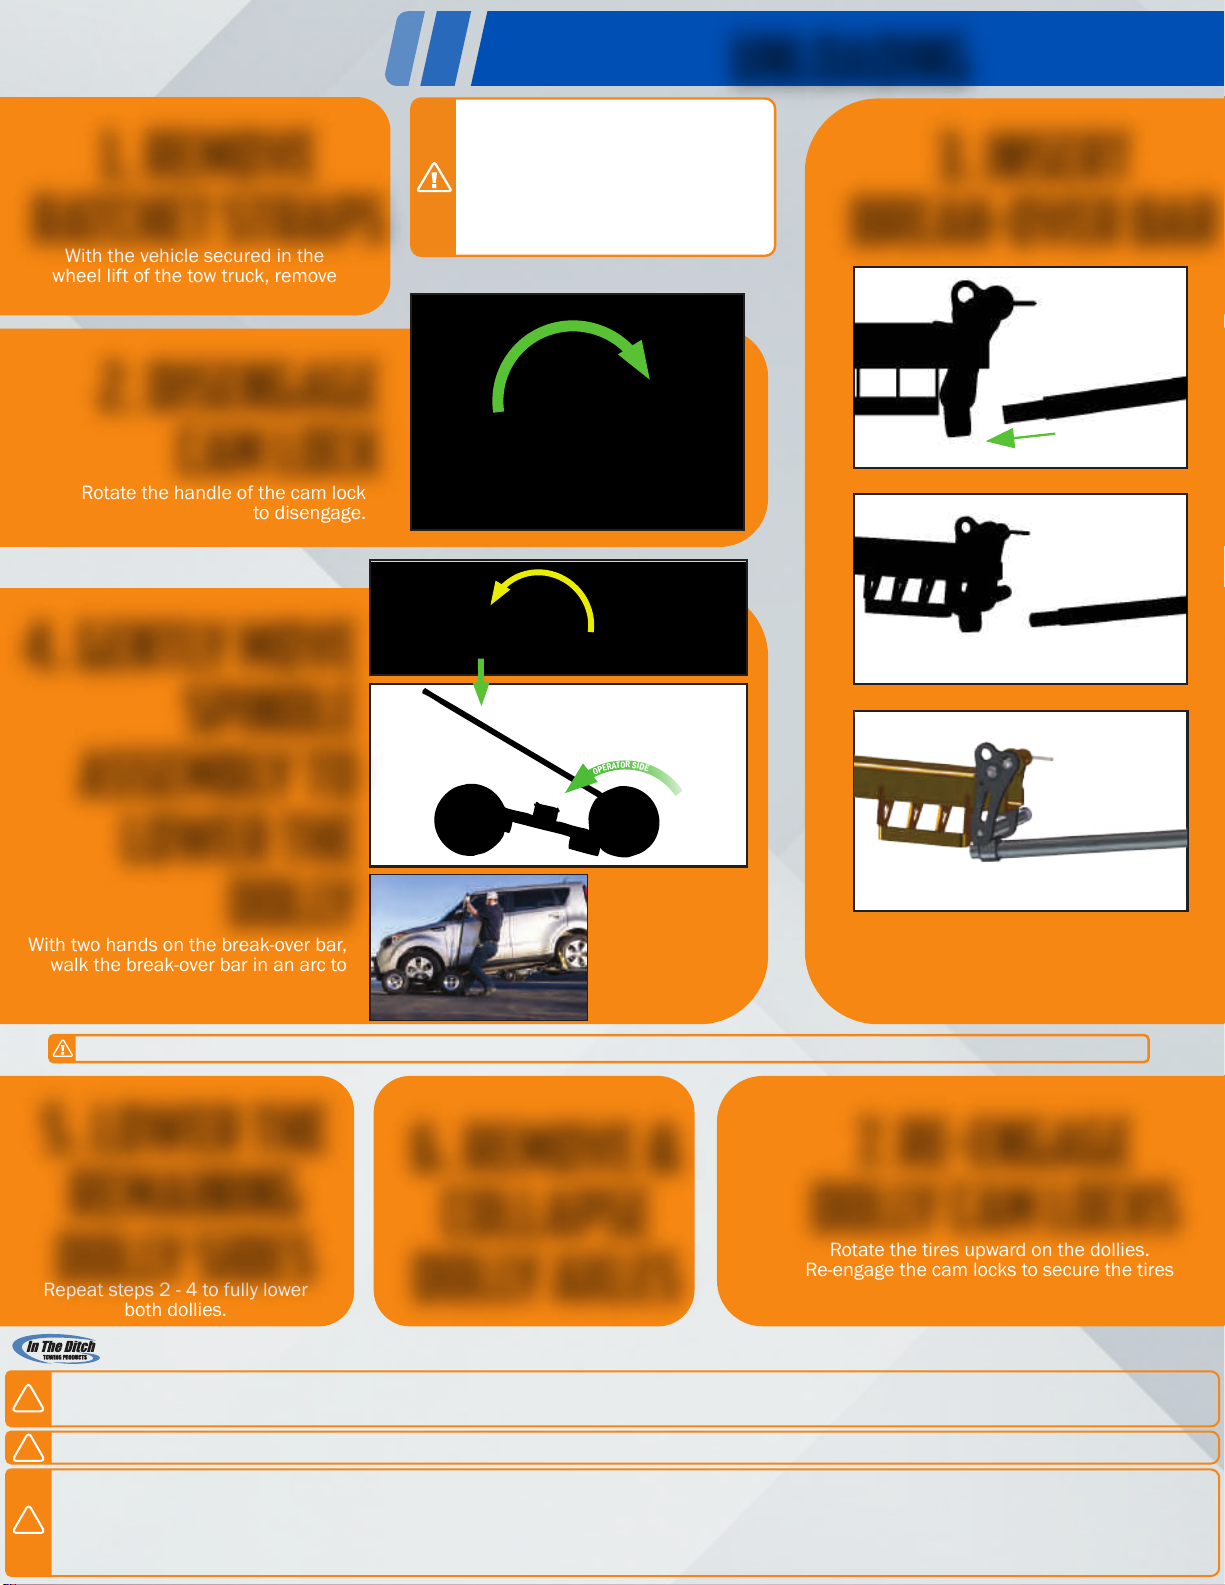
With the vehicle secured in the
wheel lift of the tow truck, remove
ratchet straps on dolly.
Rotate the handle of the cam lock
to disengage.
With two hands on the break-over bar,
walk the break-over bar in an arc to
gently lower one end of the dolly side
frame.
Keeping both hands on the
break-over bar, insert into the
receiver tube on the dolly. Stay on
operator side while lowering.
THE SAME OPERATOR MUST
LOAD & UNLOAD THE DOLLY.
CHANGES IN OPERATORS WILL
RESULT IN UNFAMILIAR LOADS,
WHICH MAY RESULT IN
SERIOUS INJURY.
O
P
E
R
A
T
O
R
S
I
D
E
Use extreme caution and stay on the operator’s side on the break-over bar! Always keep both hands on the break-over bar while lowering the dolly!
Repeat steps 2 - 4 to fully lower
both dollies.
Rotate the tires upward on the dollies.
Re-engage the cam locks to secure the tires
and ease transportation of the dollies.
ITD0791
1. REMOVE
RATCHET STRAPS
5. LOWER THE
REMAINING
DOLLY SIDES
2. disengage
cam lock
4. GENTLY MOVE
SPINDLE
ASSEMBLY TO
LOWER THE
DOLLY
3. INSERT
BREAK-OVER BAR
6. REMOVE &
COLLAPSE
DOLLY AXLES
7. RE-ENGAGE
DOLLY CAM LOCKS

TM FOR MORE INFORMATION: www.intheditch.com | (208) 587-7960 | [email protected]
FAILURE TO FOLLOW THE SAFETY GUIDELINES LISTED MAY RESULT IN VOIDING ANY APPLICABLE WARRANTY, SERIOUS BODILY INJURY, OR DEATH.
!
IT IS VERY IMPORTANT THAT YOU PROPERLY FILL OUT YOUR PRODUCT REGISTRATION FORM AT REGISTRATION.INTHEDITCH.COM TO REGISTER YOUR EQUIPMENT.
BY SUBMITTING THE INFORMATION WITHIN 15 DAYS OF YOUR PURCHASE, YOUR WARRANTY WILL BE VALIDATED, ENSURING THAT YOUR EQUIPMENT WILL BE
PROTECTED SUBJECT TO THE TERMS AND CONDITIONS SET OUT HEREIN. IN THE EVENT WE NEED TO CONTACT YOU CONCERNING YOUR REGISTERED EQUIPMENT,
PRODUCT UPDATES, SERVICE BULLETINS, OR PRODUCT RECALLS, THE INFORMATION YOU HAVE PROVIDED ON THE PRODUCT REGISTRATION FORM WILL ENSURE
YOUR IMMEDIATE NOTIFICATION. DO YOUR PART AND LET US HELP YOU BY FILLING OUT YOUR PRODUCT REGISTRATION FORM.
!
IT IS THE OPERATOR’S RESPONSIBILITY TO INSPECT DOLLIES BEFORE EACH USE. INSPECTION SHOULD BE A PART OF THE OPERATOR’S DAILY
CIRCLE CHECK OF THE VEHICLE.
!
TIPS & TRICKS
PAGE 5 OF 6
STEPS 1 - 4
LOAD DOLLY
TIRE YOU HAVE
ACCESS TO
THE CRUNCH ZONE
A simple little tip when you find yourself in the crunch zone.
The crunch zone is anytime you are up against an obstacle such that you cannot fully raise the dolly using the break-over bar.
The following are the steps to get out of the “Crunch Zone” using ITD dollies:
WALL
Lock in
UP position
Lock in
DOWN position
1. Fully load the dolly tire that has full
access for the break-over bar.
2. Insert the break-over bar into the
BACK SIDE of the receiver tube.
3. Re-engage the cam lock and pull
the bar towards the frame to lock it
into the stowed position. This will raise
the vehicle’s tire up just enough such
that you can pull away from the wall.
4. Repeat steps 1 -3 on other side of
dolly.
STEP 5
move vehicle away
from obstacle
5. Once away from the obstacle,
re-install the break-over bar in the
stowed wheel receiver.
STEP 6
LOAD VEHICLE
COMPLETELY
6. Apply a small amount of
pressure forward to allow
disengage of cam lock.
WALL
WALL
Lock in
DOWN position
ITD0791

TM FOR MORE INFORMATION: www.intheditch.com | (208) 587-7960 | [email protected]
FAILURE TO FOLLOW THE SAFETY GUIDELINES LISTED MAY RESULT IN VOIDING ANY APPLICABLE WARRANTY, SERIOUS BODILY INJURY, OR DEATH.
!
IT IS VERY IMPORTANT THAT YOU PROPERLY FILL OUT YOUR PRODUCT REGISTRATION FORM AT REGISTRATION.INTHEDITCH.COM TO REGISTER YOUR EQUIPMENT.
BY SUBMITTING THE INFORMATION WITHIN 15 DAYS OF YOUR PURCHASE, YOUR WARRANTY WILL BE VALIDATED, ENSURING THAT YOUR EQUIPMENT WILL BE
PROTECTED SUBJECT TO THE TERMS AND CONDITIONS SET OUT HEREIN. IN THE EVENT WE NEED TO CONTACT YOU CONCERNING YOUR REGISTERED EQUIPMENT,
PRODUCT UPDATES, SERVICE BULLETINS, OR PRODUCT RECALLS, THE INFORMATION YOU HAVE PROVIDED ON THE PRODUCT REGISTRATION FORM WILL ENSURE
YOUR IMMEDIATE NOTIFICATION. DO YOUR PART AND LET US HELP YOU BY FILLING OUT YOUR PRODUCT REGISTRATION FORM.
!
IT IS THE OPERATOR’S RESPONSIBILITY TO INSPECT DOLLIES BEFORE EACH USE. INSPECTION SHOULD BE A PART OF THE OPERATOR’S DAILY
CIRCLE CHECK OF THE VEHICLE.
!
PAGE 6 OF 6
Always inspect for any evidence of physical damage such as bending, cracking, and any defects.
If there is any damage, DO NOT USE and replace with an ITD axle and/or break-over bar. !!
WALKING THE DOLLY
With the ability to lock the dolly wheels in the stowed position, the ITD dollies have the unique feature of “walking” using the break-over
bar. The advantage of walking the dolly is to reduce weight and back strain.
STEP 7
SECURE WITH
TIE DOWNS
7. Load dolly as normal and
attach tie downs.
TO “WALK THE DOLLY”:
1. Set the dollies on the ground
2. Insert the break-over bar
3. Walk them back to the towed vehicle.
Please note that the
X-Series™ Dollies are
NOT prime movers.
They are designed to
transport the disabled
vehicle to the nearest
safe haven for
placement on a
vehicle carrier.
Before operating,
perform a thorough
visual inspection of
the unit and
accessories.
Before operating
X-Serie™ Dollies, refer
to the capacity labels
on the main tube near
the dolly handle.
Do not use the
X-Series™ Dollies for
the movement or
transportation of
humans or livestock
animals.
WALL
SAFETY & PRECAUTIONS
ITD0791
Table of contents
Other In The Ditch Farm Equipment manuals


