infaco A3MV2-48V User manual

A3MV2-48V
other languages
tying machine
Original user guide - EN


3
Precautions before use 4
Protection of the environment 4
Box contents 4
General product view 5
Specifications 5
User guide 6
USE 11
RECHARGING THE BATTERY 13
Servicing and maintenance 18
OPERATING PROBLEMS 20
SAFETY INSTRUCTIONS 25
GUARANTEE CONDITIONS 26
Servicing 27
Tying method 27
Technical information 31
Declaration of conformity (CE) 34
Contents EN

4
Precautions before use
WARNING. Read all the safety warnings and all the instructions. Failing to
heed warnings and follow instructions may lead to an electric shock, a fire and/or
serious injury.
Keep all warnings and instructions for future reference. The term “tools” in the war-
nings refers to your battery powered electric tool (with power cord), or your tool operating
on a battery (without power cord).
Protection of the environment
Observe all country-specific waste disposal rules and regulations.
>Power tools must not be disposed of with household refuse.
>The device, accessories and packaging must be taken to a recycling centre.
>Ask the approved INFACO dealer for up-to-date information on the eco-
compatible elimination of waste.
Box contents
Tying machine A3MV2-12v
Grease spray
Tying head unlocking key
Tool cary bag
Pincers
User guide

5
General product view
Tying head
Adjustment wheel of the
number of turns
Switch
Reel of wire
Lever
48V supply cable
A3MV2 - 48 V
Rated power supply 48V
Weight of the machine alone 650 g
Battery autonomy 12 500 attachments
Charging time 1h30
Opening diameter 30 mm
Available wire diameter 0,40 - 0,46 - 0,50 - 0,55 mm
These specifications are given as an indication only. Under no circumstances may they be considered as
contractually binding. They are subject to modification without prior notice in the interests of product
development.
Patented equipment
Specifications

6
First use
The first time you use the equipment, we strongly recommend you to ask the advice of your
dealer, who is qualified to give you all the advice you need for correct use and good output.
It is imperative to carefully read the tool and accessory user manuals before handling or
powering up the tool.
It will take a day’s use to acquire a sound knowledge of how to operate the machine.
Battery: Before using the equipment for the first time and/or following wintering, fully
charge the battery (see charging procedure on page 13).
The F3015 Lithium battery MUST be recharged using the INFACO Lithium charger
(Ref.:841C1/841C2). It is prohibited to use a different charger as this may lead to a
serious electrical accident.
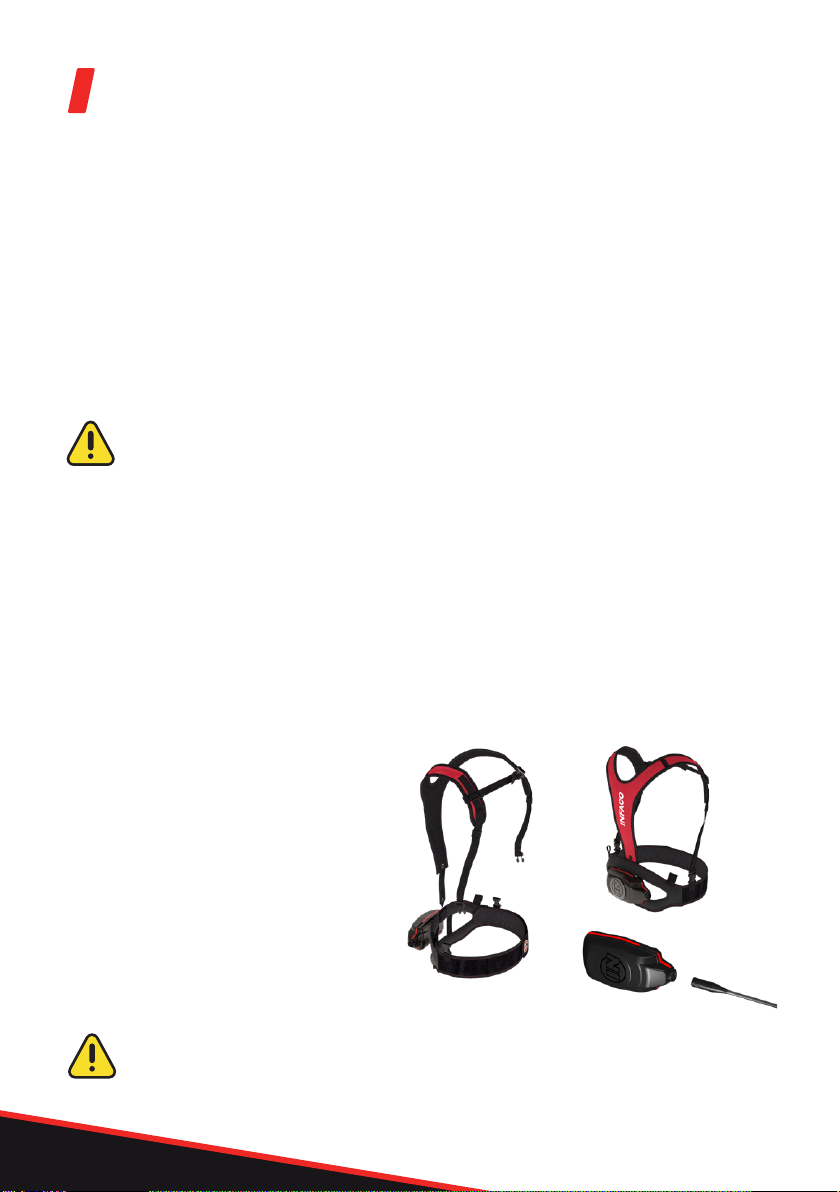
Carrying the Equipment
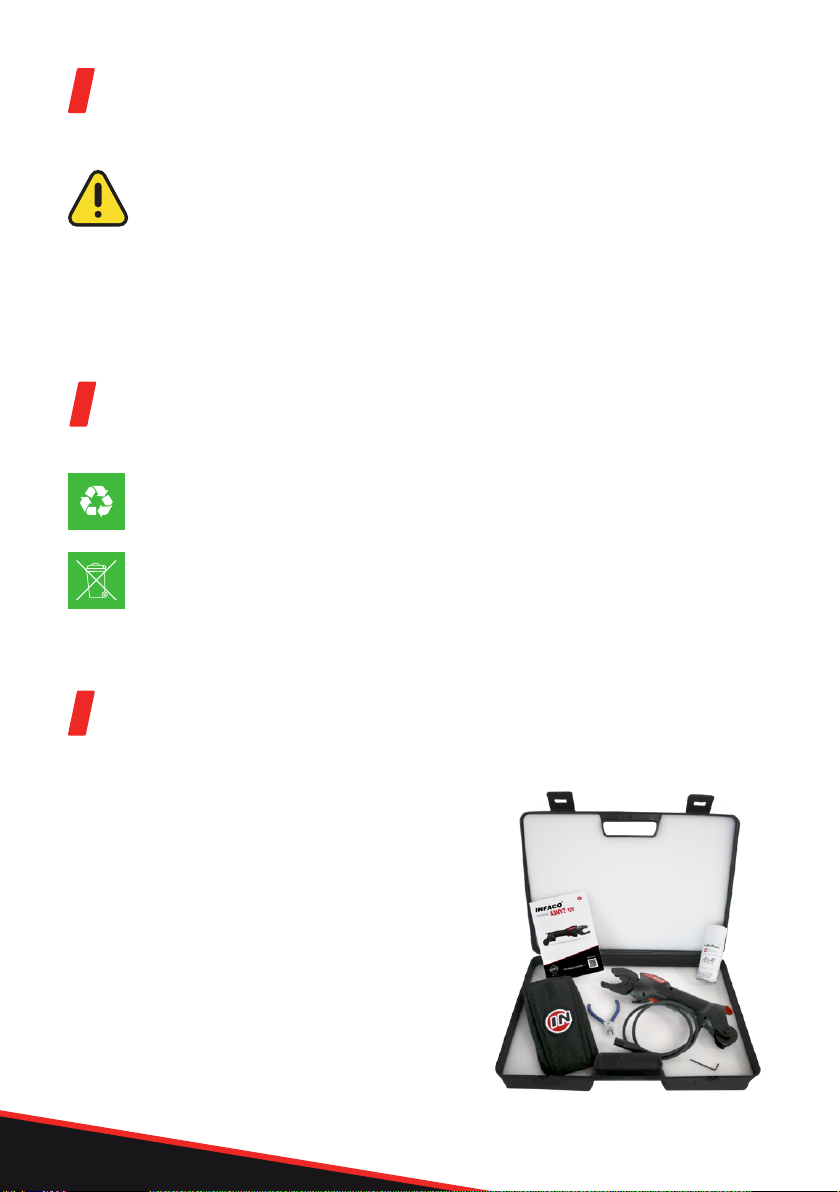
1. Remove the battery, the battery-holder belt, the suspenders, the holster and the power
cord from the case.
2. Fit the battery onto the battery-holder belt. To do this, slip straps through the battery
tabs. Place the holster on the left or right strap on the battery-holder belt.
3. Slip the power cord through the left or right eye-hole provided in the battery-holder
belt.
4. Fix the battery-holder belt to your
waist, the battery must be located
in the lumbar region.
When using suspenders, fix them to the
battery-holder belt and adjust them to
your size by pulling on the straps.
User guide
In wet weather, it is imperative to carry the battery under waterproof clothing to
keep the battery unit protected from the rain.

7
Switching on
The tying head should be in the working position before switching on.
The machine is switched on.
• Short pressure on the switch will control only the wire cutting function.
• Sustained pressure will launch the complete tying cycle (See chapter “Making a tie” P. 11).
Connect the battery to the machine supply cable.

8
Loading the reel
The wire needs to be prepared to make it easier to feed through the machine.
1Cut the end to obtain a wire with
no bends in it. 2
Smoothe the wire for at least 40 cm.
3Clip the lever upwards. 4Clip the reel on to the machine
between cheeks.

9
5Insert the wire into hole.
If you come up against an obstacle during
insertion, move the wire gently backwards
and forwards and/or press once or twice the
control switch to pivot the tying head and to
keep the wire moving through the machine.
6Keep on feeding the wire through until it emerges from the tying head.
If the wire still doesn’t come out: we recommend that you disconnect the tying head (see
chapter “Operating problems” P17), check that the wire isn’t stuck and try to insert it with
the head removed.
7Unclip the brake system lever.
At the start of each reel, check that the wire
is properly rolled and doesn’t stick between
cheeks.
8Switch the machine on and press
briefly on the control switch to cut
the excess wire.
You can now start tying operations.

10
Removing the reel
• Reel with remaining wire
• Empty reel
Clip lever upwards to allow the wire free
movement through the passage.
Pull the reel to unclip it from the machine.
Pull directly on the reel to unclip it from
the machine.
Carry out a visual check on wire exit to ensure that there is no wire remaining in the machine.
After the last tying operation it is possible that some wire may remain stuck in the tying head:
• If it does not prevent you from loading another reel,
carry on working. It will come out during tying, usually
without a problem.
• If it does prevent you from feeding a new wire through,
disconnect the head and remove the remaining wire
by hand (see chapter “Operating problems” P 17).

11
USE
Making a tie
2Firmly place the branch + the
trellising wire inside the tying
head.
Go right up to the abutment to ensure
that the arm closes fully and attaches the
wire correctly.
1Hold the end of the branch and the
trellising wire firmly in your free
hand and bring the A3MV2 closer.
Position the tying head just before
the last node on the branch.
3Move the machine back firmly to
release the tying head: the wire
then wraps round the branch. Press
control switch to complete the tie.
The knot is made more or less tight
depending on how far you pull back the
machine (see next chapter).
4The tie holds the branch on the
trellising wire.

12
Tightening the knot
Adjusting the number of turns
To vary the number of turns, move the wheel to the right or left
Adjustments vary from 3 to 6 turns. The number of twists increases the holding power of the
tie. The standard knot adjustment is 4 twists.
Ask your retailer to help you choose the best compromise to suit your region, the type of wire
you are using and the tying method.
Position 1 = tight knot.
Pull the machine back approximately 1 to
2 cm, then press the control switch.
Position 2 = loose knot.
Pull the machine back approximately 3 to
4 cm, then press the control switch.
twist 3 turns twist 6 turns

13
RECHARGING THE BATTERY
Using the charger
To charge your battery, plug in the charger in a well ventilated area which is free from
inflammable products and other sources of combustible materials. The area must be at a
temperature between 10°C and 25°C and be sheltered from damp conditions.
1. Connect one end of the power cord to the
charger.
2. Connect the other end of the power cord
to the mains outlet.
3. When powered on, the charger initialises:
Green LED + Red LED light for 2 seconds.
4. When the LEDs turn off, the charger is ready
for use.
The battery has sufficient autonomy to complete between 12 500 ties.
If you are thinking of doing more than 8000 ties a day, we advise you to either recharge
the battery for at least an hour during your lunch break to achieve extra autonomy of
approximately 10 000 ties.
N.B. a few minutes before your battery is completely discharged, the A3MV2 may lose speed
or no longer cut the wire.
Charger Battery A3MV2 - 48 V

14
Charging the battery
It is strictly forbidden to charge the batteries when the temperature in the room is below
0°C or higher than 40°C.
When charging, the battery must not be covered and not be close to a heat source.
1. Place the battery on channel 1
of the charger.
3. Battery charge completion:
The time needed to fully charge an
831B battery is about one and a half
hours.
2. Once the battery is in place,
the charger detects it and begins
charging:
C.1
Channel 1: Green LED flashes quickly throughout the charge.
C.1
Channel 1: Green LED on (not flashing).

15
Charging a second battery
A second battery can be placed on the charger:
1. Place the battery on channel 2 of
the charger.
C.1
C.2 2. If the battery on channel 1 is char-
ging, the battery on channel 2 swit-
ches to a waiting charge status:
Channel 1: Green LED flashes quickly throughout the charge.
Channel 2: Green LED flashes slowly throughout the wait.
C.1
C.2 3. Once the battery on channel 1 is
fully charged, the battery on channel
2 begins charging:
Channel 1: Green LED on and not flashing (battery charged).
Channel 2: Green LED flashes quickly throughout the charge.
C.1
C.1 4. The two batteries are charged:
Channel 1: Green LED on (stops flashing).
Channel 2: Green LED on (stops flashing).

16
Storing the battery / Putting the battery to Sleep Mode or
Winter Mode
To keep your batteries in good condition (at the end of every pruning season or when
not used for more than 1 month) the following process must be applied (this process
can take up to 10 hours per battery):
1. Place the battery (or batteries) on the charge:
NOTE: If there are two batteries on the charger,
the sleep mode will be carried out on both
batteries, one after the other.
V. 1
2. Press the SLEEP button to begin the process.
The LED switches to red (not flashing) and the
charging LED flashes green.
NOTE: If there are two batteries on the charger,
the sleep mode will be carried out on both
batteries, one after the other.
3. SLEEP MODE complete:
The charger’s LED stays red (not flashing).
Channel1’s LED (and channel 2’s if there are 2
batteries) stays green (not flashing).
The battery must be removed from the charger and stored in the case.
Wintering mode is disabled when the mains plug is disconnected from the chargers.

17
Forgetting to put your Batteries in Sleep Mode
If the sleep process has not been followed correctly there may be a loss of autonomy
in future uses of the battery. To remedy this situation, leave the battery on charge
for between 12 and 72 hours (for extreme cases of incorrect storage that cause an
imbalance).
Full autonomy can also be recovered over several daily charges that can be spread over the
first week of work. To do this, make sure the battery remains on the charger every night
during the first week of work.
Reminder: Putting the battery to sleep mode eliminates any risk of battery imbalance (see
page 16).
Battery storage instructions
Store the battery and the charger in a well ventilated area, free from inflammable products
or heat sources, and keep out of reach of children.
Do not store empty batteries. If the battery is very flat it will no longer charge and will be
considered to be out of service.
Do not store the battery without carrying out the Sleep / Winter mode process.
Do not store batteries that are out of service, return them to your approved INFACO dealer.
Do not store batteries when they are connected to the charger or to a tool.
Do not store the charger connected to the mains power supply.
All failures to follow the storage and safety instructions will result in the
manufacturer’s guarantee being voided.
There is a fire hazard if the product suffers damage (impacts, being dropped,
exposure to high temperatures, etc.).
According to the 2002/96/EC standard, do not dispose of the battery with
household waste, do not burn it or dispose of it in water. Do not open the battery.
Return the battery to an approved INFACO dealer.
Used or defective batteries must be recycled according to the 91/157/EEC
directive.

18
Servicing and maintenance
Daily maintenance
Lubricate at least twice a day :
- in the morning before you start work
- at midday
Lubricate at the points shown below:
The following tasks should be carried out with the machine disconnected.
• Lubricate to restrict wear
Spray the end of the head on the blade
side.
Spray inside the head.
Spray the end of the head on the wire-
pinching side.
Spray beneath
the metal ring.

19
Spray the point of contact between the
reel and the cheeks
Spray directly on to the wire on the reel,
once or twice per reel, to help the wire
to slide more easily as it moves round the
reel.
We strongly recommend doing this when
the wire becomes unpleasantly difficult to
pull on during the typing operation
• Lubricate to make your work easier
Annual maintenance
During the off-season, recharge your battery at least once every two months and
store your machine in a dry place at a temperature of between 10° C and 25° C maximum.
We strongly recommend that you carry out our suggested servicing routine every year. This
will allow you to start off the following season comfortably and in complete safety.

20
1
2
3
OPERATING PROBLEMS
The loop no longer forms during the tying operation
2. The wire may be bent at exit 3: (no need to
disconnect the machine)
Simply go through the cycle empty or run the knife
only and resume the tying action.
These tasks should be carried out with the machine disconnected.
1. A piece of wire may be stuck in the wire pincher 1:
To release it, press pin 2in the circular orifice with your fingernail or using the supplied
pliers.
Table of contents
Other infaco Power Tools manuals

infaco
infaco A3M V2.0 Installation and operation manual

infaco
infaco Powercoup PW2 EC1700 User manual

infaco
infaco Powercoup PW2 User manual

infaco
infaco Electrocoup F3015 User manual

infaco
infaco A3MV2-12V User manual

infaco
infaco E5000 12V User manual

infaco
infaco Electrocoup F3015 User manual

infaco
infaco Powercoup PW2 User manual

infaco
infaco EC1700 User manual