Innohome SGK510 Stove Guard User manual

STOVE GUARD SGK510
REFERENCE MANUAL
For installers and end-users

2
Thank you for choosing
Innohome SGK510 Stove Guard.
Before using this product, please read
‘safety instructions’ rst.
The manual and the user guide are an integral
part of the product and contain important
information about use and handling. Ensure
that the manual is left for the end-user for
future reference.
Package contents:
• Intelligent Heat Sensor SGS510
• Control Unit SGC510-2 or SGC500-3
• IR eye (lens extension)
• Control Unit installation set
• Installation instructions
• Guide for User – low installations
• Guide for User – high installations
• Reference manual
• Connection guide
• Cupboard sticker

3
1. Safety instructions 4
2. Choosing optional features 5
2.1. Optional features description 5
2.2. Recommended mode based on user group 6
2.3. Stove Guard modes and features summary 7
3. Activating optional features 8
3.1. Carbon monoxide/smoke alarm detection 8
3.2. Activating modes 9
4. Frequently Asked Questions 12
5. Settings 19
5.1. Manual setting of the Heat Sensor sensitivity level 19
5.2. Pairing of devices 20
5.3. Return to factory settings 21
5.4. Silent alarm 22
5.5. Checking the Control Unit mode 23
6. Low battery alarm 24
7. Disposal 24
8. EU Declaration of conformity 25
9. Warranty 26
10. Technical specications 27
Contents

4
The Stove Guard does not cover all possible hazardous situations
but signicantly increases the safety of a cooker. Never leave the
cooker unattended on purpose.
Indoor use only.
Not suitable for use in professional kitchens.
Do not leave the cooker unattended after resetting the pre-alarm
signal.
Ensure a minimum distance of 15cm between you and an intelligent
heat sensor in full alarm, due to risk of damage to hearing.
Do not leave small children unsupervised with the product, its parts
or packaging, due to risk of swallowing small parts.
Do not disassemble.
Do not immerse the Intelligent Heat Sensor in water.
The Stove Guard alarm is not triggered if the hob’s temperature is
too low for a hazardous situation to be identied, or if the cooker
automatically limits a temperature increase.
Stove Guard should never be used to switch o cooker electricity for
cooker servicing/repair procedures.
Batteries
Do not short-circuit or charge batteries, due to risk of explosion.
Do not attempt to open or burn batteries due to risk of explosion.
1. Safety Instructions

5
Cooker type Available features Activation
All cookers Carbon monoxide / smoke alarm
detection (requires additional alarm).
Alarms detected using sound detection.
Compatible with virtually all carbon monoxide /
smoke alarms.
Silent alarm
The Intelligent Heat Sensor does not signal
an audible alarm but ashes the red LED upon
alarm.
Activate sound
detection and test
connection, see
page 8.
See page 22.
Cookers with
mechanical knobs
that have a clock
- also mechanical
cookers that do not
have a clock when the
user often cooks food
by leaving a pot on
low heat for long long
periods of time.
Intelligent Timer detects if the cooker
has been abandoned, by real-time cooker
operation analysis. The cooker is turned o in 1 – 3
hours, depending on the power setting and the
type of cooker. The cooker is not turned o when
used on a low power setting.
Sensor dirt and grease detection
Identies when the Intelligent Heat Sensor’s
operation is compromised by being covered by
dirt or fat.
Activate mode 2, see
page 10.
Cookers with
mechanical knobs
that do not have a
clock
+Intelligent Timer+, detects if the cooker
has been abandoned. Includes low-power
setting detection. Works as the Intelligent Timer
described in the row above. Also detects hotplates
on a low power setting, which can cause burns
but are unable to produce a re.
+Sensor dirt and grease detection+
increased frequency of diagnostic checks
Recommended for high-risk user groups.
Safety Lock switches o the power to the
cooker when it’s not in use.
The cooker needs to be manually activated before
use (by pressing the Heat Sensor cover once), and
is ‘locked’ approx. 20 minutes after last use.
No Safety Lock ->
activate mode 3A,
see page 10.
With Safety Lock ->
activate mode 3B,
see page 11.
2.1. Optional features description
The Stove Guard can be adjusted to suit the needs of dierent user groups.
Additionally, more basic cookers without a thermostat or a timer can be upgraded to
correspond to cookers with those features (modes 2, 3A and 3B).
2. Choosing optional features

6
Cooker
Users
Touch
controls
Mechanical
knobs no clock
Mechanical
knobs with clock
11
2*
1
2*
1 3B 1
2*
1 3B 1
2*
1 3A 2
Special
user groups
1
1
3A*
3B**
1
2*
2.2. Recommended mode based on user group
* Recommended for cookers where the heat adjusts in clear steps (ie. no stepless heat adjusting = the
cooker has no thermostat); when the cooker has several users; or when cooking frequently involves using a
lot of oil/butter.
** When preventing unnecessary cooker use is required (cooker needs to be activated by pressing Heat
Sensor cover).

7
Cooker
mode
Features
Touch controls
or default
features for all
cooker types
Mechanical
knobs with
clock/no clock
Mechanical
knobs
no clock
Mechanical
knobs
no clock
Activation
1 2 3A 3B
Heat hazard
detection
(EN 50615
cat. B device) 3-
Fault diagnosis,
EN 50615 3-
CO / smoke alarm
sound detection
Optional, additional CO / smoke alarm required See
page 8
Silent alarm
Optional See
page 22
Sensor dirt and
grease detection 33
Increased frequency
Set mode,
see pages
10-11
Intelligent Timer
(> 1kW) 3 3 3 Set mode,
see pages
10-11
Intelligent Timer+
(also low power
settings)
+3 3 Set mode,
see pages
10-11
Safety Lock
3Set mode,
see pages
10-11
2.3. Summary of features, modes and cooker compatibility

8
3.1. Carbon monoxide/smoke alarm detection
The carbon monoxide/smoke detector needs to be placed within
5 metres distance of the Control Unit. Innohome Stove Guard is
compatible with virtually all carbon monoxide alarms, however
ensure correct alarm recognition by testing the system rst.
If you later wish to deactivate the feature, carry out the same procedure again.
1. Detach the Intelligent Heat Sensor. (Wait until the Sensor emits four beeps and the
cooker is turned o.)
2. Press and release the Heat Sensor cover so that the green LED illuminates.
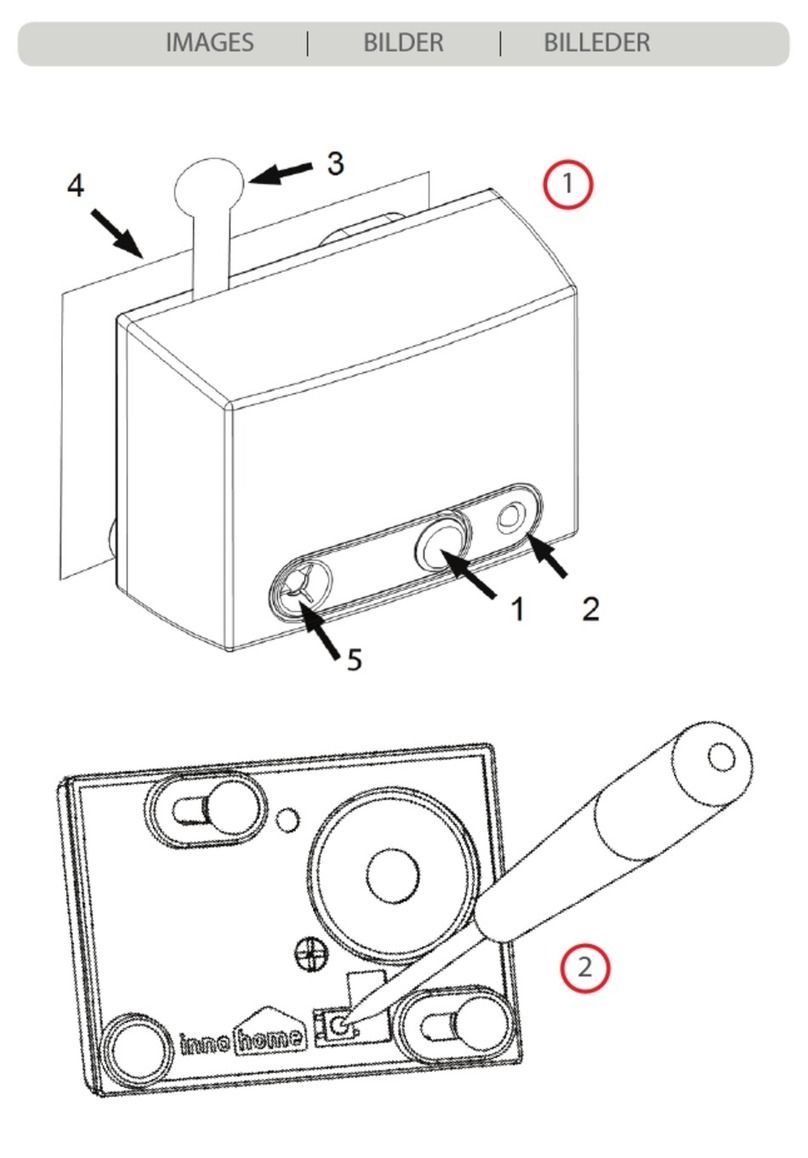
3. Put the battery disconnection piece into the space on the underside of the Heat
Sensor (see image 1 on page 21). Hold the Heat Sensor in your hand and press the
disconnection piece and the cover towards each other, hold for about 5 seconds.
Release the hold (the Sensor emits a beep). Then again press the disconnection
piece and the cover towards each other, hold for about 5 seconds. Release the hold
(the Sensor emits a beep) and remove the battery disconnection piece.
If you have lost the disconnection piece, you can alternatively use a screwdriver,
see image 2 page 21.
4. Press the Heat Sensor cover once. The Sensor will now emit beeps conrming its
new setting: one beep signies that the Audible Alarm Detection is activated, two
beeps signies that the feature is deactivated.
5. Return the Heat Sensor on to the mounting plate and press its cover once.
Inform the user about an activated feature by ticking the box in
the guide for user (low installations: page 3, high installations for
cookers with touch controls: page 2).
3. Activating optional features

9
6. Now test the feature:
Turn the smallest hotplate to medium heat.
• Smoke alarm: Do a test alarm with the smoke detector.
• Carbon monoxide alarm: Do a test alarm with the CO detector. If the Stove Guard
does not respond, refer to the CO detector’s manual as to how to trigger an
actual alarm for testing. (Due to varying test alarm signals in CO alarms, the Stove
Guard does not always react to the CO test alarm although will identify the actual
alarm.)
7. Check that the Control Unit receives the signal: the cooker is turned o and the
Control Unit starts to emit a buzzing sound every 5 seconds. To reset the alarm, turn
the hotplate back to ‘0’ (not required in cookers with touch controls), then press the
Heat Sensor cover once.
If the Stove Guard does not react to the external alarm signal, adjust the signal
recognition frequency as advised in ‘FAQ’, question 6.1.
Save the disconnection piece for possible later use.
3.2. Activating modes
To switch between the modes 2 / 3A / 3B, carry out the setup
procedure for the desired mode. To return back to mode 1, return
the Stove Guard to its factory settings. (chapter 5.3).
1

10
Setting mode 2
1. Press the Control Unit setup button (1, see image on previous page) and hold
it down. After 10 seconds the Control Unit emits a buzzing sound, and after a
moment another buzzing sound. Release the setup button.
2. Wait for approximately 30 seconds, until you will hear two buzzing sounds.
If the Control Unit emits one or three buzzing sounds, the mode was not set properly, and
the procedure should be carried out again, starting from point 1.
3. Then go to the end of this chapter, ‘Finishing o’.
NOTE The ‘nishing o’ procedure is required for Stove Guard’s correct operation.
Setting mode 3a
1. Press the Control Unit setup button (1, see image on previous page) and hold
it down. After 10 seconds the Control Unit emits a buzzing sound, and after a
moment another buzzing sound. Release the setup button.
2. Wait for 10 seconds, turn on the largest hotplate for 5 seconds, then turn it o. The
Control Unit will emit three buzzing sounds after a short moment.
If the Control Unit emits one or two buzzing sounds, the mode was not set properly, and
the procedure should be carried out again, starting from point 1.
3. Then go to the end of this chapter, ‘Finishing o’.
NOTE The ‘nishing o’ procedure is required for Stove Guard’s correct operation.

11
Setting mode 3b
1. Press the Control Unit setup button (1, see image on page 9) and hold it down.
After 10 seconds the Control Unit emits a buzzing sound, and after a moment
another buzzing sound. Release the setup button.
2. Wait for 10 seconds, then turn on the largest hotplate. Wait until you have heard
three buzzing sounds from the Control Unit, then turn the hotplate o.
If the Control Unit emits one or two buzzing sounds, the mode was not set properly, and
the procedure should be carried out again, starting from point 1.
3. Then go to the end of this chapter, ‘Finishing o’.
NOTE The ‘nishing o’ procedure is required for Stove Guard’s correct operation.
Finishing o
1. Using the isolator switch, turn the cooker electricity o for approx. 15 seconds. Turn
the electricity back on and wait for 20 seconds for the Control Unit to conrm its
current setting with two sets of buzzing sounds.
2. Straight after the signals do a test alarm: turn a hotplate on, then press the
Intelligent Heat Sensor cover until the Sensor emits a beep. The Control Unit turns
the cooker o and the Sensor emits a test alarm. Turn the hotplate o and return
the cooker power by pressing Sensor cover once.
The test alarm is an essential part of the setup procedure. Not doing a test alarm will
aect the functionality of the Stove Guard.
The installation is now complete. For the next 15 minutes, do not turn
the cooker on as the Control Unit identies and adjusts to its installation
environment (the Control Unit will emit a buzzing sound as the cooker is ready
for use).
Inform the user about an activated feature by ticking the box in the
guide for user (low installations: page 3).

12
1. General questions and at the beginning of use p. 12
2. Alarm triggers during normal cooking p. 13
3. Alarm did not trigger in a hazardous situation p. 14
4. The cooker does not turn on p. 15
5. Control Unit error signals p. 16
6. Optional features operation (Safety Lock, sound detection, Intelligent Timer) p. 17
7. Stove Guard turning the cooker o when not necessary / unexpected operation
of the Stove Guard p. 18
1. General questions and at the beginning of use
1.1. Why are there two dierent guides for the user?
• The Stove Guard operates dierently when the Heat Sensor is installed higher
than 90 cm (35.5’’ ) above the cooker top.
1.2. What is a ‘low installation’ and a ‘high installation’?
• In a ‘low installation’, the Heat Sensor is installed lower than 90 cm (35.5’’ ) above
the cooker top. In a ‘high installation’ the Heat Sensor is installed higher than 90
cm above the cooker top.
1.3. What to do when changing the cooker to a new one/moving house?
• Return the Stove Guard to its factory settings (see chapter 5.3). This can be done
both when the Control Unit is still attached to the old cooker or after having
been connected to the new cooker. When returned to factory settings, install
as for rst installation. The installation instructions sheet can be found from
www.innohome.com.
1.4. What to do when replacing the Intelligent Heat Sensor or the Control Unit
with a new one?
• See chapter 5.2 in this manual for device pairing instructions.
1.5. I accidentally reset the pre-alarm signal even though the alarm was triggered
by a hazardous situation. Has the Intelligent Heat Sensor now become too
insensitive? (low installations only)
• Resetting the pre-alarm signal changes the Intelligent Heat Sensor’s sensitivity
but only to such a small extent, that resetting it a couple of times does not cause
insensitivity.
4. Frequently Asked Questions

13
1.6. How to test the Stove Guard function, as recommended for ceiling
installations, with induction cookers?
• An adapter plate that enables the use of all cooking vessels on an induction
cooker (available from several retailers) is required. Place the adapter plate on a
hotplate and carry out the test as instructed in the installation instructions sheet.
However, this test is not absolutely necessary, since any potential problems
would eventually be picked up by the automatic fault diagnosis.
1.7. What does ‘not fullling all EN standard requirements’ mean? (Certain
installation positions only, see * and ** under the tables in the installation
instructions sheet)
According to the EN standard, the heat sensor should see to the bottom surface
of a pot. In these installation positions, the Intelligent Heat Sensor cannot see
the bottom surface of certain pots with higher edges. With these pots, the Stove
Guard will identify a risk situation slightly later but is still safe to use.
2. Alarm triggers during normal cooking
2.1. The Stove Guard alarm triggers during normal cooking
• For low installations (lower than 35.5’’(90 cm) above the cooker top), the alarm
sensitivity has a learning component. Pressing the Sensor cover during pre-alarm
signal adjusts Sensor sensitivity (see Guide for User, low installations). However,
if this has been done a couple of times and the alarm still triggers in a similar
cooking situation, see below.
• The Heat Sensor may interpret placing a hot oven tray on the cooker or removing
a pot from a hot hotplate as a hazardous situation and signal a short alarm.
• A stove-top coee maker or a pot that is much smaller than the hotplate can
continuously trigger the Stove Guard alarm. The alarm can also trigger more
easily if a pot is used without a lid.
• It is recommended to use a pot/pan that ts the hotplate, and to use a lid when
possible. To use a stove-top coee maker, see question 2.2.
• For low installations (learning sensitivity), if the Stove Guard alarm still triggers
in situations not mentioned above, adjust the Intelligent Heat Sensor sensitivity
manually to be less sensitive, see chapter 5.1 in this manual.

14
2.2. The Stove Guard alarm triggers when I make coee with a stove-top
coee maker.
• Stove-top coee makers are often much smaller than the hotplate, hence the
Stove Guard cannot distinguish it from a risk situation. This is usually a problem
with the smaller coee makers, and with ones that take a longer time to make
the coee.
• To carry on using a stove-top coee maker, we recommend using a larger model
covering more of the hotplate (perhaps only making a half of the amount each
time), and/or getting a dierent model.
• If you however wish to use the existing coee maker, the Stove Guard alarm can
be reset when it triggers during making coee (low installations only). This does
not cause changes in the Heat Sensor sensitivity (coee maker triggers the non-
learning maximum temperature alarm).
3. Alarm did not trigger in a hazardous situation
3.1. The Stove Guard alarm did not trigger in a hazardous situation
• It is possible that the temperature in the situation was not yet high enough to
be identied as a risk situation. The Heat Sensor needs to take dierent cooking
scenarios into account, including frying at high temperatures, and not trigger too
easily. Hence, the alarm is triggered only when a certain temperature (or rate of
increase) is reached, still long before the ignition of a re. However, it is important
to double check the Stove Guard operation with the following procedures (see
the next points).
• Check that the Intelligent Heat Sensor is installed to a correct position by double
checking the instructions mentioned in the installation instructions sheet (also
available online at www.innohome.com).
• If the Sensor is installed correctly, turn on a hotplate and do a test alarm by
pressing the Sensor cover until the Sensor emits a beep. Check that the Control
Unit turns the cooker o. If the test alarm does not succeed, contact the product
retailer.
• For low installations (lower than 90 cm (35.5’’) above the cooker top), it is possible
to change the Sensor’s sensitivity so that it reacts earlier (increase by one or two
levels, see chapter 5.1 in this manual).

15
4. The cooker does not turn on
4.1. I cannot turn the cooker on and the Control Unit is emitting a buzzing sound
every 5 seconds / I cannot reset the Heat Sensor alarm.
• The cooker has been locked due to a temporary error in the Stove Guard or
several concurrent maximum temperature alarms. Unlock the cooker by turning
o the power to the cooker for 15 seconds using the isolator switch.
4.2. I cannot turn the cooker on, and no signal sounds from the Stove Guard
• The Sensor has been removed from its mounting plate or it is not placed on it
correctly. The LED on the side of the Heat Sensor should face towards the user
(see image below). Check that the Sensor ts tightly on the mounting plate with
no gaps.
• If the Sensor is placed on the mounting plate correctly, the Control Unit
overheating protection has turned the Control Unit and the cooker o. This has
likely happened due to incorrect installation location that becomes apparent
when the cooker is used on a high power setting. The cooker can be turned
back on by turning the electricity o for a moment using the isolator switch. If
the overheating protection turns the cooker o again, change the Control Unit
installation location to a cooler one or to one that has better ventilation.

16
5. Control Unit error signals
5.1. The fault diagnosis alarm (Control Unit: a short and a long buzzing sound,
alternating at 5 second intervals) did not reset by pressing the Heat Sensor
cover once.
• The fault diagnosis alarm can be triggered by the Heat Sensor not being on its
mounting plate, or it being placed the wrong way round. In modes 2, 3A and 3B
(optional features activated), the fault diagnosis alarm will also trigger if collected
dirt or fat on the Heat Sensor covers its sensors. The fault diagnosis alarm can also
tell about a problem in the radio connection or in the functioning of some part
of the system.
• Reset the alarm by turning the electricity o for 15 seconds using the isolator
switch.
• Ensure that the Heat Sensor ts tightly on its mounting plate with no gaps, and
that it is placed the right way round (see question 4.2, rst point). Clean the
Heat Sensor by wiping it with a cloth dampened with a mixture of household
detergent and water. Only use a cloth that does not leave bres.
• If the fault diagnosis turns the cooker o again, contact the product retailer.
A cooker that is constantly turned o by the fault diagnosis, can only be used for
5 minutes at a time, by switching the electricity o for 15 seconds in the above
mentioned way (EN standard requirement).
5.2. The Control Unit emits a buzzing sound every hour or half hour
• The Stove Guard is detecting an error in cooker identication (modes 2, 3a
and 3b). Repeat the setup procedure and check the Control Unit mode in the
following manner;
1. Turn the electricity o for 15 seconds using the isolator switch.
2. The Control Unit conrms its mode with buzzing sounds as the electricity is
reconnected. Compare the signals to the table in chapter 5.6. If the Control Unit’s
setting was not correct carry out the mode setup again, go to chapter 3.2.
3. Within one minute of the last signal, press the Intelligent Heat Sensor cover until
you hear a beep. The Sensor will emit an alarm and the Control Unit turns the
cooker o. Reset the alarm by pressing the Sensor cover once.
4. For the next 15 minutes, do not turn the cooker on as the Control Unit identies
and adjusts to its installation environment.

17
6. Optional features operation (Safety Lock, sound detection,
Intelligent Timer)
6.1. The Control Unit did not identify the alarm signal of the carbon monoxide/
smoke alarm
• Note that when CO alarms are tested, their sounds are not always the same as
their main alarm sound, and thus may not be detected by the Stove Guard. Refer
to the manufacturer’s manual as to how to trigger an actual alarm for testing.
• Clean the alarm with the soft brush attachment of a vacuum cleaner.
• Change the batteries in the alarm if necessary.
• Check that the alarm is not located too far from the Control Unit. The alarms
should be located at a maximum distance of 5 metres.
• Adjust the signal recognition frequency by turning the trimmer on the Control
Unit using a screwdriver (frequency adjustment, see the image below): turn the
trimmer rst approximately 0.5mm to the right, then do a test alarm with the CO/
smoke alarm. If the Control Unit does not react to the alarm signal, then turn the
trimmer 0.5mm to the left counting from the original position and repeat the test
alarm. If the Control Unit does not identify the signal, then move the trimmer this
time 1 mm to the right. Keep repeating test alarms and moving the trimmer with
an ever expanding movement, moving from right to left until the Control Unit
identies the signal.
6.2. The Control Unit responds to other sounds e.g. a telephone ringing
or noise from a television
• Change the telephone’s ring tone or turn down the volume on the television.
If the signal that causes the false alarm cannot be disabled, adjust the signal
recognition frequency by turning the trimmer on the Control Unit using a
screwdriver (frequency adjustment, see image above): turn the trimmer rst
approximately 0.5mm to the right, then see if the sound still triggers a false alarm.
If a false alarm is still triggered, then turn the trimmer 0.5mm to the left counting
from the original position and try again. If the false alarm is still triggered, move
the trimmer this time 1 mm to the right. Keep repeating and moving the trimmer
with an ever expanding movement, moving from right to left until no false
alarms are triggered. When the correct position is found, then make sure that the
Stove Guard still responds to the carbon monoxide/smoke detector alarm signal
by re-testing sound detection as advised in chapter 3.1 (point 6).
• Alternatively, sound detection can be disabled, see chapter 3.1.
Frequency adjustment

18
6.3. The Safety Lock did not activate within 20 minutes
• Check the Control Unit mode as advised in chapter 5.6. If the Safety Lock was not
activated, set the Control Unit mode again, go to chapter 3.2.
6.4. The Intelligent Timer did not cut o the electricity supply in 3 hours
• Check that the Intelligent Timer is activated (mode 2, 3a or 3b) by checking the
Control Unit mode (see chapter 5.5)
• The standard Intelligent Timer, activated in mode 2, does not cut the electricity
o if the hotplate is on a low power setting. The Intelligent Timer+, available
for cookers with mechanical knobs only (modes 3a and 3b), also reacts when a
hotplate is left on at low power setting.
7. Stove Guard turning the cooker o when not necessary / odd
operation of the Stove Guard
7.1. The cooker lights shut down for a couple of seconds / the Control Unit makes
noises when I am using the cooker
• When the Control Unit is set in mode 3a or 3b, it performs a check every 15
minutes to see if the cooker is still being used. This is a normal function of the
Stove Guard.
7.2. The Stove Guard turned the cooker o when I was using the oven.
• On some cases when a convection oven is used on high heat setting (modes
2 or 3a/3b), the Stove Guard fails to identify that the oven is being used, hence
turning the cooker o. The cooker shutdown can be prevented by pressing the
Intelligent Heat Sensor cover once when starting to use the oven (just before
or after), or when the Stove Guard starts signalling (a short and a long buzzing
sound, alternating at 5 second intervals) before the cooker shutdown.
• Alternatively, the Stove Guard can be set to mode 1. To change to mode 1, return
the Stove Guard to its factory settings, see chapter 5.3.
7.3. The Stove Guard turns the cooker o and the Control Unit starts to signal
even though the cooker is not in use / The Stove Guard turns the cooker o
every 15 minutes when using the cooker
• There has been disruption in the process of the Control Unit adjusting to the
cooker (only in modes 2, 3a and 3b). Initiate the process again by carrying out the
‘nishing o’ procedure, described at the end of chapter 3.2.
7.4. The Control Unit is not acting as described in the user manual or you are not
certain whether its settings are correct
• Return the Stove Guard to its factory settings, see chapter 5.3.

19
5.1. Manual setting of the Heat Sensor sensitivity level
The sensitivity level can be manually set to levels between 1 and 10.
(Afterwards it can automatically adjust the sensitivity and move up
to level 16)
Levels 3 – 10 are reserved for low installations (lower than 90 cm above
the cooker top)
Levels 1 and 2 are reserved for high installations (higher than 90 cm
above the cooker top)
NOTE The maximum level to manually set the Heat Sensor is 10.
First check the current sensitivity level as instructed below.
1. Check the current sensitivity level
• Press the Intelligent Heat Sensor cover for about ve seconds, until you hear a beep.
Release and immediately press again, hold until you hear a further beep.
• After a pause, the Intelligent Heat Sensor conrms its sensitivity level with beeps
(e.g. 2 beeps = level 2).
2. Set the new sensitivity level
To increase sensitivity, change the level a step downwards (eg. from 5 to 4)
To decrease sensitivity, change the level a step upwards (eg. from 5 to 6)
1. Detach the Intelligent Heat Sensor. (Wait until the Sensor emits four beeps and the
cooker is turned o.)
2. Put the battery disconnection piece into the space on the underside of the Heat
Sensor (see image 1 on page 21). Hold the Sensor in your hand and press the
disconnection piece and the cover towards each other, hold for about 5 seconds. If
you have lost the disconnection piece, you can alternatively use a screwdriver, see image
2 on page 21.
3. Release the hold (the Sensor emits a beep) and remove the battery disconnection
piece. Within 20 seconds, rst press the cover once with a short press, then press
and hold the cover down for about 5 seconds, until you hear a beep. Release and
immediately press and hold again, until you hear a further beep, then release
the hold.
5. Settings

20
4. Within 20 seconds, start pressing the cover as many times as is the sensitivity level
you want to adjust the Sensor to, with short presses. Wait for the green LED to go o
between the presses.
5. The Intelligent Heat Sensor now conrms its sensitivity level with beeps, given in
two lots – see table below. (Afterwards the Sensor emits 3 + 7 beeps.) If the level is
not correct carry out the procedure again, starting from point 1.
6. Return the Heat Sensor to its place and press its cover once
Save the battery disconnection piece for possible later use.
Beeps Sensitivity level
2 + 2 (+ 3 + 7) 2
3 + 3 (+ 3 + 7) 3
4 + 4 (+ 3 + 7) 4
... ...
10 + 10 (+ 3 + 7) 10
5.2. Pairing of devices
(The Heat Sensor should be placed on its mounting plate.)
1. Turn o cooker electricity for 15 seconds using the isolator switch.
2. Turn the electricity on for 5 seconds, then turn o again for 15 seconds.
3. Turn the electricity back on and wait for 20 seconds so that the Control Unit emits
a buzzing sound and after a moment another sound/sounds, then press the Sensor
cover until the Sensor emits a beep. The Control Unit turns the cooker o and the
Sensor emits a test alarm. Return the power to the cooker by pressing the Sensor
cover once.
Other manuals for SGK510 Stove Guard
1
Table of contents
Other Innohome Security System manuals
Innohome
Innohome Stove Alarm SA100 User manual

Innohome
Innohome Stove Alarm SA101 User manual

Innohome
Innohome SGS1030 User manual

Innohome
Innohome Smart Socket SSC100 User manual

Innohome
Innohome Stove Guard 300 User manual

Innohome
Innohome Stove Alarm SA101 User manual
Innohome
Innohome SA102RF User manual
Popular Security System manuals by other brands

Kidde
Kidde KN-COB-B user guide

Mopar
Mopar Jeep Commander (XK) installation instructions

GSD
GSD Wi-Corporate Controller Installation & user manual

Camlite Video Systems
Camlite Video Systems 1000 Operating instructions and warranty

Technology Programs
Technology Programs 911 Alert Owner's instructions

DEXAPLAN
DEXAPLAN BA 611 - 8-2007 manual