Inrico PD660 User manual
www.inricosolutions.com
Please read this instruction book carefully before using and keep this with care.
1%
USER GUIDE
Professional In High Quality Two Way Radios
INRICO TECHNOLOGIES CO., LTD.
www.inricosolutions.com
Innovation Rich Communications
A1703, Shenzhen National Engineering Laboratory Building, Shenzhen. P.R.C
Digital Radio
Contents
01
02
03
03
03
03
03
04
06
07
07
07
08
09
10
11
12
12
12
12
13
13
13
13
13
13
14
14
16
Please read the following content carefully. It is very
important for radio users to gain general knowledge and
risks.
Ɣ
Do not use the device or charging the battery in any
hazardous areas such as gas, dust, steam, etc.
Ɣ
Please turn offthe device while refueling or parking at
the gas station.
Ɣ
Do not disassemble your radio.
Ɣ
Avoidprolongedtime inthe sun or placing it near
heating appliance.
Ɣ
Avoid excessive exposure to the extreme dusty, damp
and splashing place, or leave it on unstable surface.
Ɣ
Changes or modifications made to this device, not
expressly approved by Inrico, could void the user's
authority to operate this equipment.
Ɣ
Reparation by professional technicians, do not
disassemble by yourself.
This manual is for reference only and does not constitute
any form of commitment. Detailedinformationisin
accordwiththefinalproduct.
Notes Before Using
Unpacking and Device Checking..................................
Operating Safety Instruction.........................................
BatterySafetyInstruction.............................................
Fully Charge Battery Before Initial Use........................
Properly Store Batteries..............................................
Features of Lithium Battery.........................................
Clean and Maintenance..............................................
Radio Structure Drawing..............................................
Function Sheet.............................................................
Accessories Installation...............................................
Assemble the Battery.................................................
Remove the Battery....................................................
Assemble the Antenna...............................................
Assemble the Belt Clip................................................
Assemble headphones/speakers................................
Charge via Desktop Charger.......................................
Overview......................................................................
Basic Functions............................................................
Power on/Power off...................................................
Adjust volume...........................................................
Choose Channel........................................................
Voice Broadcast........................................................
PPT Transmit.............................................................
User-defined Side Button..........................................
Digital/Analog Communication..................................
Encryption Function..................................................
Simple Troubleshooting...............................................
TechnicalParameters..................................................
Technical Specifications..............................................

Operating Safety Instruction
Unpacking and Device Checking
Please unpack and take out the device and all
accessories carefully, and make sure all items listed
below have been received before throwing away the box.
If any items are lost or damaged in transit, please contact
with our distributors.
Please read the following notice carefully. It is very
important for device users to gain general knowledge and
risks.
Ɣ
Do not charge the battery for an extended period of
time
Please stop charging if the battery is found not full
charged within the specified time. The battery may
overheat and burst with smoke or on fire.
Ɣ
Do not put batteries in microwave ovens and high
pressure containers
The battery may overheat and burst with smoke or on fire.
Ɣ
Please keep cracked and leaking batteries away from
fire
If the battery leaks or emits a pungent odor, move it away
from flammable areas immediately. The electrolyte
leaking from the battery is prone to fire, which may cause
the battery to smoke or burst into flames.
Ɣ
Do not use abnormal battery
Please remove the battery from charger or device and
stop use if the battery smell, discolor, or behaves
abnormally for any reason.
Ɣ
Please use a dedicated charger
The charger is specially designed for this type of
equipment, which is more scientific, reasonable, safe and
reliable.
Walkie-talkie
Lithium Battery
Power Adaptor
Desktop Charger
Antenna
Belt Clip
Hand Strip
User Manual
1
1
1
1
1
1
1
1
Items Number
Accessories

%DWWHU\b6DIHW\b,QVWUXFWLRQ
Fully Charge Battery Before Initial Use
a. Do preserve battery life by switching offa device and
removing the batteries when it's not being used, and is
not expected to be used for extended periods of time.
b. Do practice proper battery storage by keeping batteries
in a cool, dry place at normal room temperature.
Properly Store Batteries
Ɣ
Remove the battery from the device.
Ɣ
Charge and discharge the battery to 40%-65% if it will
not be used for 10 days or more. This can greatly extend
the battery life.
Ɣ
The battery should drop below 65% when it is idle for
more than 10 days to prevent it from swelling.
Ɣ
Store the battery in cool and dry environment that’s less
than 25đ.
Features of Lithium Battery
Ɣ
Battery capacity will reduce after multiple charging
cycles.
Ɣ
The battery capacity drops gradually even without being
used.
Ɣ
Longer charging time is required in shady place.
Ɣ
Charging and storing Lithium battery in warm condition
will short its lifespan. Please do not leave them inside the
vehicle or near the heater.
Ɣ
If the battery working time has reduced significantly,
please replace the battery immediately in avoidance of
fluid leakage.
Clean and Maintenance
Ɣ
Before cleaning and maintaining the device: please stop
running, turn offthe device, and disconnect all
connections with other equipment.
Ɣ
When you do not use the radio, please cover the
accessories connector.
Ɣ
When cleaning the dust, please use soft brush and
neutral detergent (no strong corrosive chemicals) to wipe
it.
Ɣ
Please keep the equipment and accessories dry.
Ɣ
Please do not use the microwave oven or hair dryer or
other heating devices for dry them.
Radio Structure Drawing
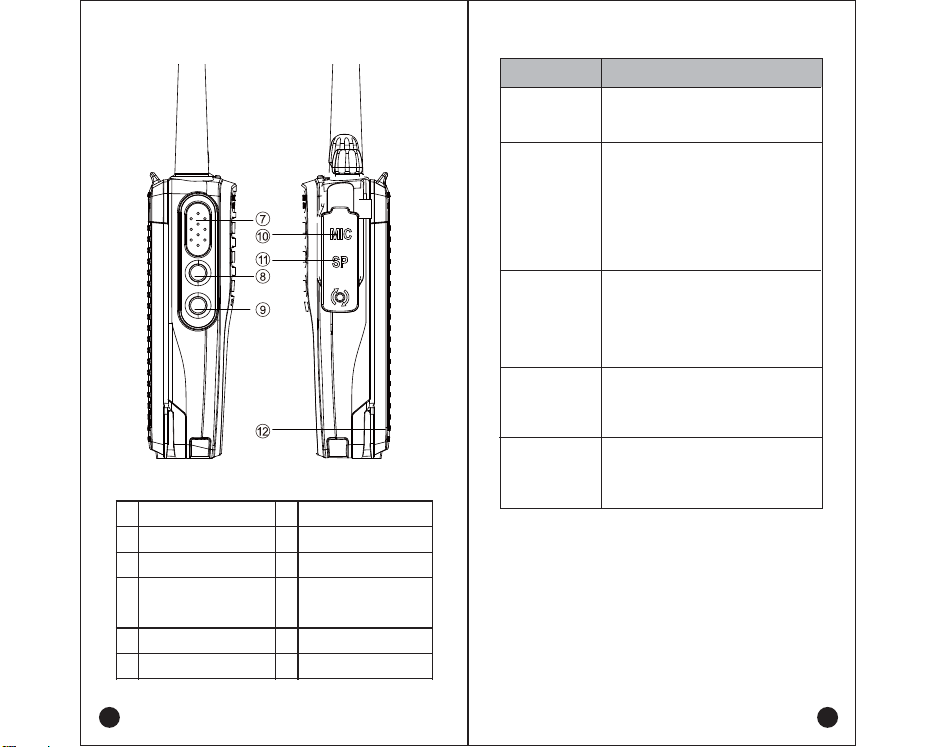
Function Sheet
1
2
3
5
6
7
8
9
11
12
Antenna
Status Indicator
Loud Speaker
Frequency Switch
Power Switch/Volume
PTT
Side Button1
Side Button2
Program Interface
Li-ion Battery Pack
Microphone/
Loud Speaker Interface
10
Microphone
4
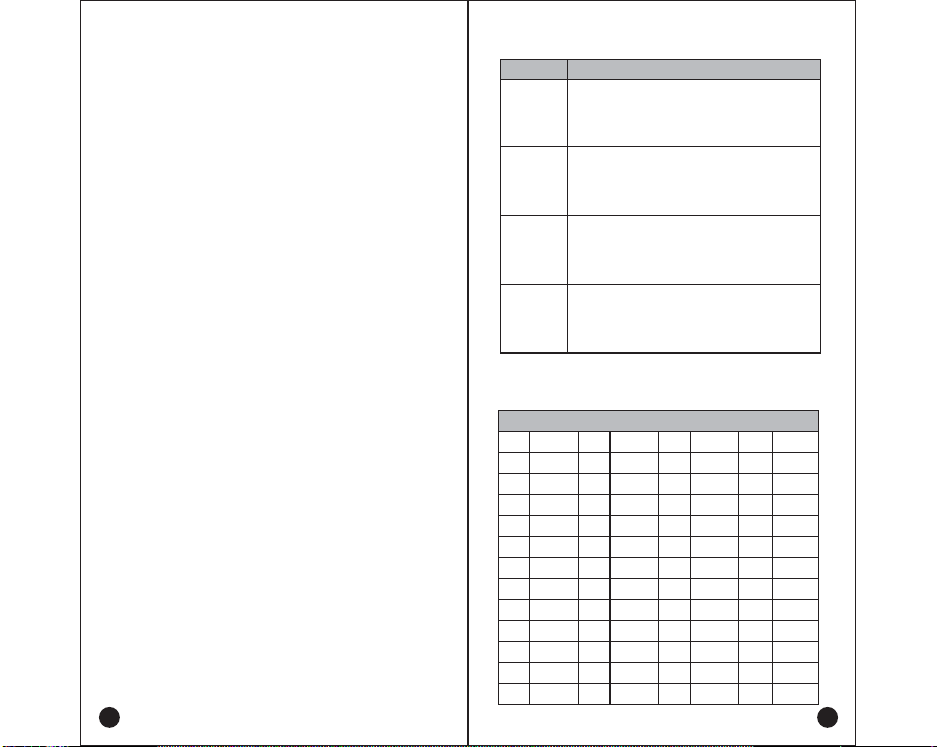
Button Name Function
PTT Button
Side Button2
Side Button1
Frequency
Switch
Power Switch/
Volume
Rotate the knob to select channels 1
to 32.
Turn it clockwise to turn on the
power of the walkie-talkie, and turn it
counterclockwise until a click sounds
to turn offthe power of the
walkie-talkie;
Rotate to adjust the volume of the
sound.
Short press and long press function
of side key can be customized
through program software.
Short press and long press function
of side key can be customized
through program software.
Press the PTT button, the red
indicator light will light up, then
speak into the microphone;
Release the PTT button to receive,
the LED indicator will be green.
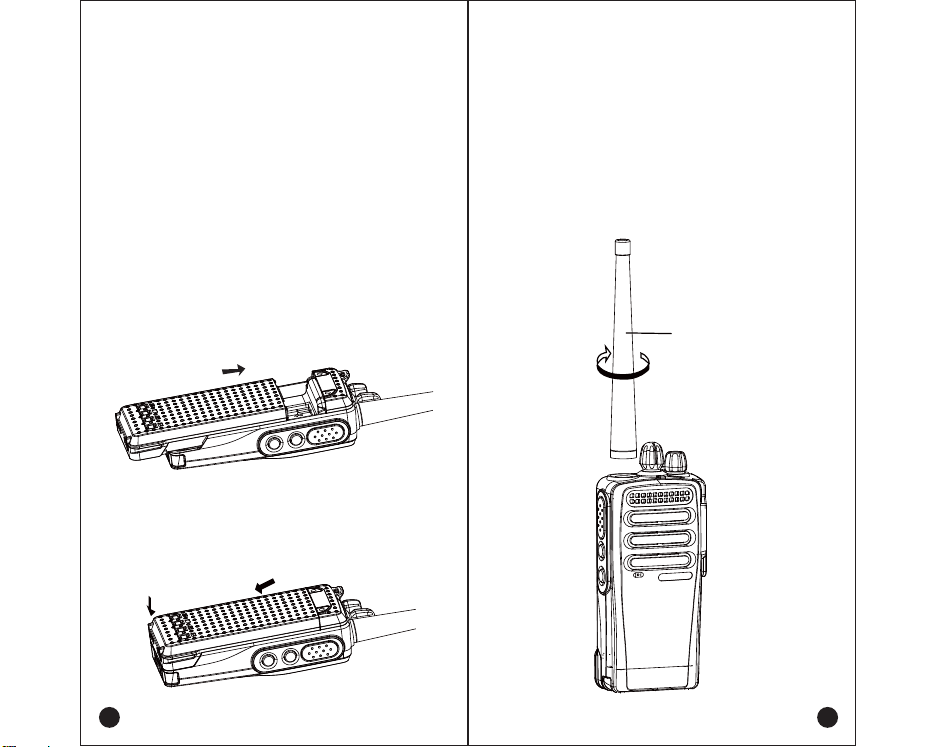
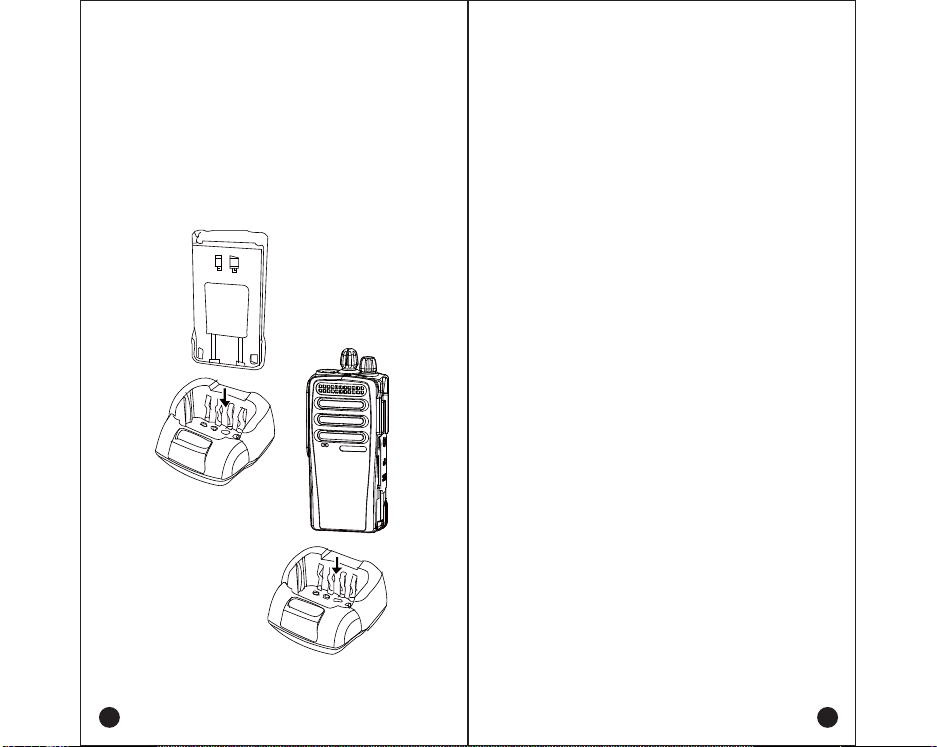
1.Assemble the Battery
The average usage time of the Li-ion battery pack is 8
hours. Average usage time is calculated base on 5%
transmit time, 5% receive time and 90% standby time.
Attention
Ɣ
Do not short-circuit battery terminals or dispose of
batteries in fire.
Ɣ
Do not disassemble the cover of the battery pack
without authorization.
Align the four grooves of the battery pack with the
corresponding guides on the back of the radio.
Push the battery pack along the back of the radio until the
release latch on the base of the radio locks.
2.Remove the Battery
Pull down on the release latch and push the battery pack
offthe radio.
Accessories Installation
3.Assemble the Antenna
Holding the antenna base, screw the antenna clockwise
into the connector on the top of the radio until it is firmly
screwed.
Attention
Ɣ
Do not use the antenna as a handle, keychain or
speaker/microphone hanger. Otherwise the antenna will
be damage and the performance will be degraded.
Antenna
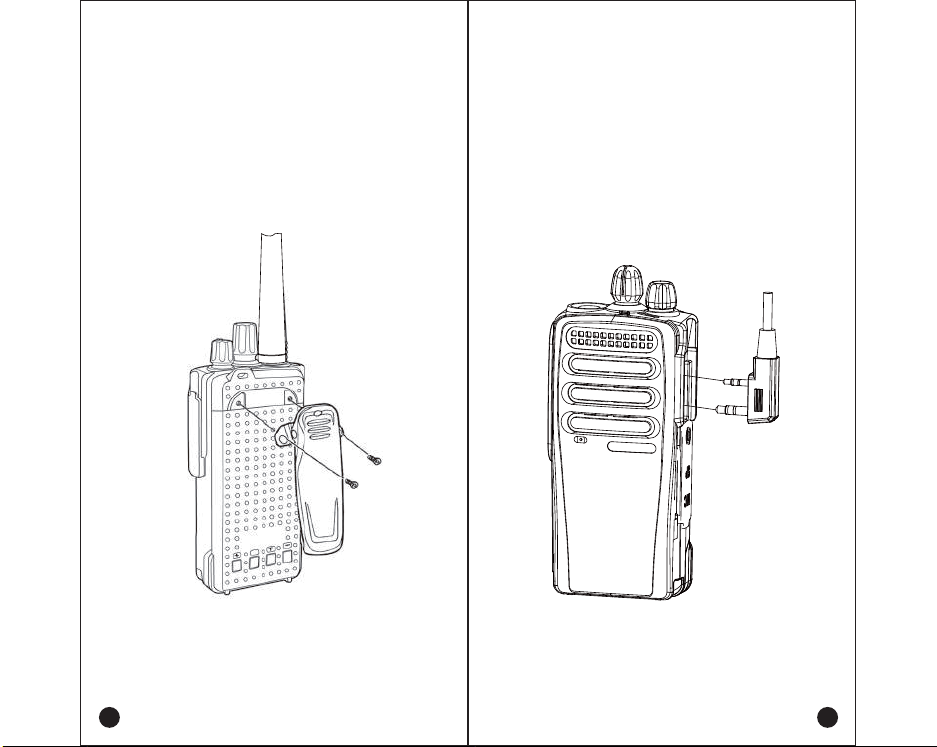
4.Assemble the Belt Clip
If necessary, use the two included 3x8mm screws to
fasten the back clip.
Attention
Ɣ
If the back clip is not assembled, its site will become
hot during continuous communication or when placed in
a hot environment.
5.Assemble headphones/speakers
Insert the speaker/microphone into the speaker/micro-
phone jack cover.
Attention
Ɣ
The walkie-talkie is not fully waterproof when using the
speaker/microphone.
Main Feature
32 Storage Channels
Dual Mode Communication Mode:DMR/Analog
Computer Program Function
Transmit High and Low Power Selection
Transmit Timeout Prompt
Chinese and English Voice Prompts
Analog Communication: CTCSS(QTV (DQT) Functional
Analog Communication : WIDNAR
Digital Communication: Encryption Function
Digital Communication: Single Call/Group Call
Overview
Ɣ
Power on
Rotate the power switch/volume knob clockwise to power
on the radio, and simultaneously hear the "Beep", the unit
will broadcast the current corresponding channel by voice.
Ɣ
Power off
Rotate the power switch/volume knob counterclockwise
until a click sounds, it will turn offand the indicator light
will be off.
Ɣ
Adjust volume
Turn the volume control knob clockwise to increase the
volume; turn it counterclockwise to decrease the volume.
Basic Function
6.Charge via Desktop Charger
The desktop charger must be placed on a plane away
from inflammable materials when charging. Align the
intercom with the charging port, and put it down into the
desktop charger port according to the instructions. The
battery does not need to be removed from the intercom
when charging.
Fail to turn on
Situation
Ɣ
Incorrectly assemble of battery:remove and reassemble
Ɣ
Run out of battery: charge or replace battery
Ɣ
Poor connection because of dirty or damage battery
Ɣ
Battery contact: Clean contact point or replace the battery
Shorten the
standby time
Hot environment:battery lifespan is shorten because of high
temperature, replace the battery
Local operator:power consumption increases in areas with
weak signal. Please temporarily turn offthe intercom
Receiver light
is on, but
speaker is
silent
The light
is red, but
there's no
sound
Make sure the volume knob is set to maximum
Speaker damage: replace speaker
The power module is damaged: replace the power module
The microphone is damaged:replace the microphone
Possible Reason and Solution
7HFKQLFDOb3DUDPHWHUV
Ɣ
Choose Channel
You can turn the knob to select the channel you want. A
total of 16 channels are available for programming.
Ɣ
Voice Broadcast
1.This machine has a voice broadcast function, which is
convenient for you to quickly know the current channel of
the walkie-talkie you are using when operating at night or
in the dark. This function can be realized by computer
programming software
2.Program Software【Setting】->Choose Language
English/Chinese
Ɣ
PTT Transmit
1.Hold the PTT button and speak in a normal tone. (Red
light on when launching)
2.Release the PTT button and wait for reception when you
finish speaking.
Ɣ
User-defined Side Button
1.Set the function of long press and short press in program
software(Keys Setting)
Ɣ
Digital/Analog Communication
1.DMR and Analog modes are both optional. Set the
corresponding communication mode through program
software.
Ɣ
Encryption Function
1.This function is only valid in digital channels
2.Only in the same method and serial of encryption then
the receive radio and the transmit radio can communicate
successfully.
6LPSOH7URXEOHVKRRWLQJ
1
2
3
4
5
6
7
8
9
10
11
12
13
67.0
69.3
71.9
74.4
77.0
79.7
82.5
85.4
88.5
91.5
94.8
97.4
100.0
14
15
16
17
18
19
20
21
22
23
24
25
26
103.5
107.2
110.9
114.8
118.8
123.0
127.3
131.8
136.5
141.3
146.2
151.4
156.7
27
28
29
30
31
32
33
34
35
36
37
38
159.8
162.2
165.5
167.9
171.3
173.8
177.3
179.9
183.5
186.2
189.9
192.8
39
40
41
42
43
44
45
46
47
48
49
50
196.6
199.5
203.5
206.5
210.7
218.1
225.7
229.1
233.6
241.8
250.3
254.1
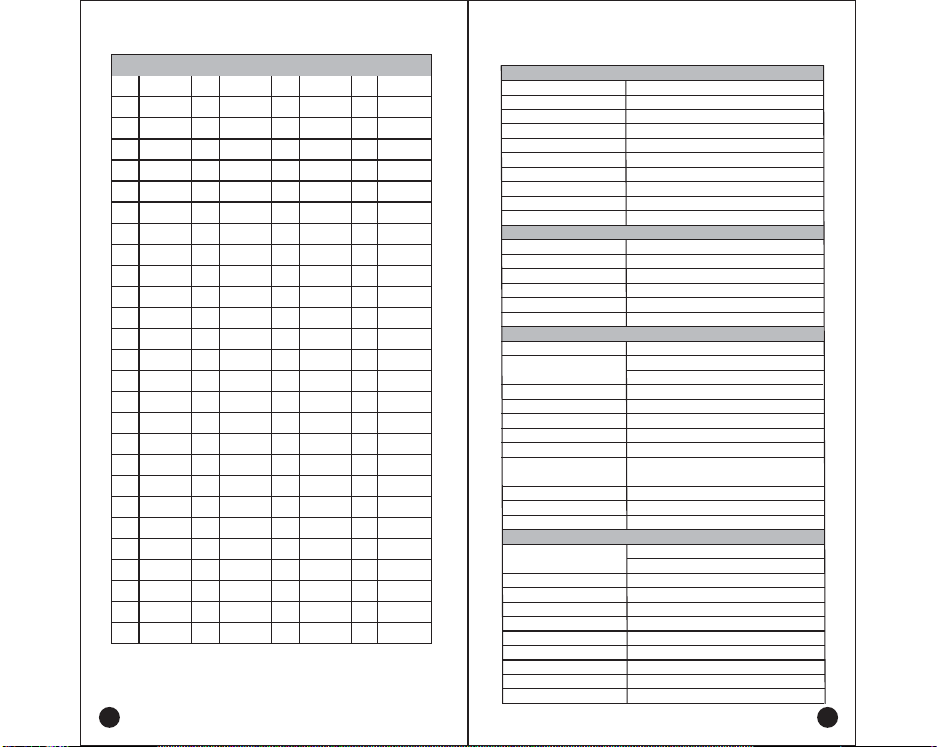
Analog(CTCSS)
125x60x37mm (Without Antenna & Belt clip)
-20°C ~ 55°C
-25°C ~ 70°C
7HFKQLFDO6SHFLFDWLRQV
Digital(D.C.S) Basic Parameter
Physical
1
2
3
4
5
6
7
8
9
10
11
12
13
14
15
16
17
18
19
20
21
22
23
24
25
26
27
D023N
D025N
D026N
D031N
D032N
D036N
D043N
D047N
D051N
D053N
D054N
D065N
D071N
D072N
D073N
D074N
D114N
D115N
D116N
D122N
D125N
D131N
D132N
D134N
D143N
D145N
D152N
28
29
30
31
32
33
34
35
36
37
38
39
40
41
42
43
44
45
46
47
48
49
50
51
52
53
D155N
D156N
D162N
D165N
D172N
D174N
D205N
D212N
D223N
D225N
D226N
D243N
D244N
D245N
D246N
D251N
D252N
D255N
D261N
D263N
D265N
D266N
D271N
D274N
D306N
D311N
54
55
56
57
58
59
60
61
62
63
64
65
66
67
68
69
70
71
72
73
74
75
76
77
78
79
D315N
D325N
D331N
D332N
D343N
D346N
D351N
D356N
D364N
D365N
D371N
D411N
D412N
D413N
D423N
D431N
D432N
D445N
D446N
D452N
D454N
D455N
D462N
D464N
D465N
D466N
80
81
82
83
84
85
86
87
88
89
90
91
92
93
94
95
96
97
98
99
100
101
102
103
104
105
D503N
D506N
D516N
D523N
D526N
D532N
D546N
D565N
D606N
D612N
D624N
D627N
D631N
D632N
D645N
D654N
D662N
D664N
D703N
D712N
D723N
D731N
D732N
D734N
D743N
D754N
≈230g
UHF 400-480MHz
Frequency
Channel Capacity
Voltage
Channel Spacing
16*2 Channels
DC7.4V±15%
12.5K
Battery Capacity 1500mAh
IP55
Ingress Protection
Dimension (H*W*D)
Weight
Working Temperature
Storage Temperature
Radiating Portion
Output power 4W/1W
Modulation(Analog) 11KΦ[email protected]
Modulation(Digital) 12.5KHz data:7K60'%EBUB
12.5KHz Voice and data:7K60'&WPJDFEBUB
Frequency Stability ±1.5PPM
Audio Distortion ≤3%
Audio Response +1~-3dB
Conducted / Radiated
Emission ≤36dBm@<1GHz,≤-30dBm@>1GHz
Adjacent Channel Power 60dB
Digital Vocoder Type AMBE+2™
Digital Protocol ETSI TS 102 361-1,-2,-3
Receiving Part
Sensitivity Analog(12dB SINAD):0.20μV/-121dBm
Digital (BER 3%):0.25μv/-119dBm
Intermodulation 60dB
Adjacent Channel Selectivity 60dB
Channel Inhibition -8dB
Spurious Response Rejection 60dB
Blocking 85dB
Rated Audio 1W
Audio Response +1~-3dB
Audio Distortion ≤3%
Antenna Impedance
CMIIT ID 2019FP13099
50Ω
2.2KΩ
16Ω/1W
Speaker
Kenwood 2pin connector
Earphone Jack
Microphone Impedance

&tĂƌŶŝŶŐ
ŶLJŚĂŶŐĞƐŽƌŵŽĚŝĨŝĐĂƚŝŽŶƐŶŽƚĞdžƉƌĞƐƐůLJĂƉƉƌŽǀĞĚďLJƚŚĞƉĂƌƚLJƌĞƐƉŽŶƐŝďůĞĨŽƌĐŽŵƉůŝĂŶĐĞ
ĐŽƵůĚǀŽŝĚƚŚĞƵƐĞƌΖƐĂƵƚŚŽƌŝƚLJƚŽŽƉĞƌĂƚĞƚŚĞĞƋƵŝƉŵĞŶƚ
dŚŝƐĚĞǀŝĐĞĐŽŵƉůŝĞƐǁŝƚŚƉĂƌƚϭϱŽĨƚŚĞ&ZƵůĞƐKƉĞƌĂƚŝŽŶŝƐƐƵďũĞĐƚƚŽƚŚĞĨŽůůŽǁŝŶŐƚǁŽ
ĐŽŶĚŝƚŝŽŶƐ;ϭͿdŚŝƐĚĞǀŝĐĞŵĂLJŶŽƚĐĂƵƐĞŚĂƌŵĨƵůŝŶƚĞƌĨĞƌĞŶĐĞĂŶĚ;ϮͿƚŚŝƐĚĞǀŝĐĞŵƵƐƚĂĐĐĞƉƚ
ĂŶLJŝŶƚĞƌĨĞƌĞŶĐĞƌĞĐĞŝǀĞĚŝŶĐůƵĚŝŶŐŝŶƚĞƌĨĞƌĞŶĐĞƚŚĂƚŵĂLJĐĂƵƐĞƵŶĚĞƐŝƌĞĚŽƉĞƌĂƚŝŽŶ
EŽƚĞdŚŝƐĞƋƵŝƉŵĞŶƚŚĂƐďĞĞŶƚĞƐƚĞĚĂŶĚĨŽƵŶĚƚŽĐŽŵƉůLJǁŝƚŚƚŚĞůŝŵŝƚƐĨŽƌĂůĂƐƐĚŝŐŝƚĂů
ĚĞǀŝĐĞƉƵƌƐƵĂŶƚƚŽƉĂƌƚϭϱŽĨƚŚĞ&ZƵůĞƐdŚĞƐĞůŝŵŝƚƐĂƌĞĚĞƐŝŐŶĞĚƚŽƉƌŽǀŝĚĞƌĞĂƐŽŶĂďůĞ
ƉƌŽƚĞĐƚŝŽŶĂŐĂŝŶƐƚŚĂƌŵĨƵůŝŶƚĞƌĨĞƌĞŶĐĞŝŶĂƌĞƐŝĚĞŶƚŝĂůŝŶƐƚĂůůĂƚŝŽŶdŚŝƐĞƋƵŝƉŵĞŶƚŐĞŶĞƌĂƚĞƐ
ƵƐĞƐĂŶĚĐĂŶƌĂĚŝĂƚĞƌĂĚŝŽĨƌĞƋƵĞŶĐLJĞŶĞƌŐLJĂŶĚŝĨŶŽƚŝŶƐƚĂůůĞĚĂŶĚƵƐĞĚŝŶĂĐĐŽƌĚĂŶĐĞǁŝƚŚ
ƚŚĞŝŶƐƚƌƵĐƚŝŽŶƐŵĂLJĐĂƵƐĞŚĂƌŵĨƵůŝŶƚĞƌĨĞƌĞŶĐĞƚŽƌĂĚŝŽĐŽŵŵƵŶŝĐĂƚŝŽŶƐ,ŽǁĞǀĞƌƚŚĞƌĞŝƐŶŽ
ŐƵĂƌĂŶƚĞĞƚŚĂƚŝŶƚĞƌĨĞƌĞŶĐĞǁŝůůŶŽƚŽĐĐƵƌŝŶĂƉĂƌƚŝĐƵůĂƌŝŶƐƚĂůůĂƚŝŽŶ/ĨƚŚŝƐĞƋƵŝƉŵĞŶƚĚŽĞƐ
ĐĂƵƐĞŚĂƌŵĨƵůŝŶƚĞƌĨĞƌĞŶĐĞƚŽƌĂĚŝŽŽƌƚĞůĞǀŝƐŝŽŶƌĞĐĞƉƚŝŽŶǁŚŝĐŚĐĂŶďĞĚĞƚĞƌŵŝŶĞĚďLJƚƵƌŶŝŶŐ
ƚŚĞĞƋƵŝƉŵĞŶƚŽĨĨĂŶĚŽŶƚŚĞƵƐĞƌŝƐĞŶĐŽƵƌĂŐĞĚƚŽƚƌLJƚŽĐŽƌƌĞĐƚƚŚĞŝŶƚĞƌĨĞƌĞŶĐĞďLJŽŶĞŽƌ
ŵŽƌĞŽĨƚŚĞĨŽůůŽǁŝŶŐŵĞĂƐƵƌĞƐ
üZĞŽƌŝĞŶƚŽƌƌĞůŽĐĂƚĞƚŚĞƌĞĐĞŝǀŝŶŐĂŶƚĞŶŶĂ
ü/ŶĐƌĞĂƐĞƚŚĞƐĞƉĂƌĂƚŝŽŶďĞƚǁĞĞŶƚŚĞĞƋƵŝƉŵĞŶƚĂŶĚƌĞĐĞŝǀĞƌ
üŽŶŶĞĐƚƚŚĞĞƋƵŝƉŵĞŶƚŝŶƚŽĂŶŽƵƚůĞƚŽŶĂĐŝƌĐƵŝƚĚŝĨĨĞƌĞŶƚĨƌŽŵƚŚĂƚƚŽǁŚŝĐŚƚŚĞƌĞĐĞŝǀĞƌ
ŝƐĐŽŶŶĞĐƚĞĚ
üŽŶƐƵůƚƚŚĞĚĞĂůĞƌŽƌĂŶĞdžƉĞƌŝĞŶĐĞĚƌĂĚŝŽdsƚĞĐŚŶŝĐŝĂŶĨŽƌŚĞůƉ
Z&džƉŽƐƵƌĞŽŵƉůŝĂŶĐĞĂŶĚŽŶƚƌŽů'ƵŝĚĞůŝŶĞƐĂŶĚKƉĞƌĂƚŝŶŐ/ŶƐƚƌƵĐƚŝŽŶƐ
dŽĐŽŶƚƌŽůLJŽƵƌĞdžƉŽƐƵƌĞĂŶĚĞŶƐƵƌĞĐŽŵƉůŝĂŶĐĞǁŝƚŚƚŚĞŽĐĐƵƉĂƚŝŽŶĂůĐŽŶƚƌŽůůĞĚĞŶǀŝƌŽŶŵĞŶƚ
ĞdžƉŽƐƵƌĞůŝŵŝƚƐĂůǁĂLJƐĂĚŚĞƌĞƚŽƚŚĞĨŽůůŽǁŝŶŐƉƌŽĐĞĚƵƌĞƐ
'ƵŝĚĞůŝŶĞƐ
ŽŶŽƚƌĞŵŽǀĞƚŚĞZ&džƉŽƐƵƌĞ>ĂďĞůĨƌŽŵƚŚĞĚĞǀŝĐĞ
hƐĞƌĂǁĂƌĞŶĞƐƐŝŶƐƚƌƵĐƚŝŽŶƐƐŚŽƵůĚĂĐĐŽŵƉĂŶLJĚĞǀŝĐĞǁŚĞŶƚƌĂŶƐĨĞƌƌĞĚƚŽŽƚŚĞƌƵƐĞƌƐ
ŽŶŽƚƵƐĞƚŚŝƐĚĞǀŝĐĞŝĨƚŚĞŽƉĞƌĂƚŝŽŶĂůƌĞƋƵŝƌĞŵĞŶƚƐĚĞƐĐƌŝďĞĚŚĞƌĞŝŶĂƌĞŶŽƚŵĞƚ
KƉĞƌĂƚŝŶŐ/ŶƐƚƌƵĐƚŝŽŶƐ
dƌĂŶƐŵŝƚŶŽŵŽƌĞƚŚĂŶƚŚĞƌĂƚĞĚĚƵƚLJĨĂĐƚŽƌŽĨϱϬйŽĨƚŚĞƚŝŵĞdŽƚƌĂŶƐŵŝƚ;ƚĂůŬͿƉƵƐŚ
ƚŚĞWƵƐŚͲdŽͲdĂůŬ;WddͿďƵƚƚŽŶdŽƌĞĐĞŝǀĞĐĂůůƐƌĞůĞĂƐĞƚŚĞWddďƵƚƚŽŶdƌĂŶƐŵŝƚƚŝŶŐϱϬй
ŽĨƚŚĞƚŝŵĞŽƌůĞƐƐŝƐŝŵƉŽƌƚĂŶƚďĞĐĂƵƐĞƚŚŝƐƌĂĚŝŽŐĞŶĞƌĂƚĞƐŵĞĂƐƵƌĂďůĞZ&ĞŶĞƌŐLJĞdžƉŽƐƵƌĞ
ŽŶůLJǁŚĞŶƚƌĂŶƐŵŝƚƚŝŶŐ;ŝŶƚĞƌŵƐŽĨŵĞĂƐƵƌŝŶŐĨŽƌƐƚĂŶĚĂƌĚƐĐŽŵƉůŝĂŶĐĞͿ
,ŽůĚƚŚĞƌĂĚŝŽŝŶĂǀĞƌƚŝĐĂůƉŽƐŝƚŝŽŶŝŶĨƌŽŶƚŽĨĨĂĐĞǁŝƚŚƚŚĞŵŝĐƌŽƉŚŽŶĞ;ĂŶĚƚŚĞŽƚŚĞƌƉĂƌƚƐ
ŽĨƚŚĞƌĂĚŝŽŝŶĐůƵĚŝŶŐƚŚĞĂŶƚĞŶŶĂͿĂƚůĞĂƐƚŽŶĞŝŶĐŚ;ϮϱĐŵͿĂǁĂLJĨƌŽŵƚŚĞŶŽƐĞ<ĞĞƉŝŶŐƚŚĞ
ƌĂĚŝŽĂƚƚŚĞƉƌŽƉĞƌĚŝƐƚĂŶĐĞŝƐŝŵƉŽƌƚĂŶƚďĞĐĂƵƐĞZ&ĞdžƉŽƐƵƌĞƐĚĞĐƌĞĂƐĞǁŝƚŚĚŝƐƚĂŶĐĞĨƌŽŵƚŚĞ
ĂŶƚĞŶŶĂŶƚĞŶŶĂƐŚŽƵůĚďĞŬĞƉƚĂǁĂLJĨƌŽŵĞLJĞƐ
tŚĞŶǁŽƌŶŽŶƚŚĞďŽĚLJĂůǁĂLJƐƉůĂĐĞƚŚĞƌĂĚŝŽŝŶĂƉƉƌŽǀĞĚĐůŝƉŚŽůĚĞƌŚŽůƐƚĞƌĐĂƐĞŽƌďŽĚLJ
ŚĂƌŶĞƐƐĨŽƌƚŚŝƐƉƌŽĚƵĐƚhƐĞŽĨŶŽŶͲĂƉƉƌŽǀĞĚĂĐĐĞƐƐŽƌŝĞƐŵĂLJƌĞƐƵůƚŝŶĞdžƉŽƐƵƌĞůĞǀĞůƐǁŚŝĐŚ
ĞdžĐĞĞĚƚŚĞŽĐĐƵƉĂƚŝŽŶĂůĐŽŶƚƌŽůůĞĚĞŶǀŝƌŽŶŵĞŶƚZ&ĞdžƉŽƐƵƌĞůŝŵŝƚƐ
hƐĞŽŶůLJŵĂŶƵĨĂĐƚƵƌĞƌƐŶĂŵĞĂƉƉƌŽǀĞĚƐƵƉƉůŝĞĚŽƌƌĞƉůĂĐĞŵĞŶƚĂŶƚĞŶŶĂƐďĂƚƚĞƌŝĞƐĂŶĚ

ĂĐĐĞƐƐŽƌŝĞƐhƐĞŽĨŶŽŶͲŵĂŶƵĨĂĐƚƵƌĞƌͲŶĂŵĞĂƉƉƌŽǀĞĚĂŶƚĞŶŶĂƐďĂƚƚĞƌŝĞƐĂŶĚĂĐĐĞƐƐŽƌŝĞƐŵĂLJ
ĞdžĐĞĞĚƚŚĞ&ĂŶĚ/Z&ĞdžƉŽƐƵƌĞŐƵŝĚĞůŝŶĞƐ
&ŽƌĂůŝƐƚĂƉƉƌŽǀĞĚĂĐĐĞƐƐŽƌŝĞƐƉůĞĂƐĞĐŽŶƐƵůƚLJŽƵƌůŽĐĂůĚĞĂůĞƌĨŽƌŝŶĨŽƌŵĂƚŝŽŶ
Table of contents
Other Inrico Radio manuals

Inrico
Inrico IRC590 User manual

Inrico
Inrico S100 User manual

Inrico
Inrico S300 User manual

Inrico
Inrico T310 User manual

Inrico
Inrico S100 User manual

Inrico
Inrico TM-7 Plus User manual

Inrico
Inrico TM-9 User manual

Inrico
Inrico T710A User manual

Inrico
Inrico TM-7Plus User manual

Inrico
Inrico S300 User manual

Popular Radio manuals by other brands

Motorola solutions
Motorola solutions APX 8500 E5 CONTROL HEAD Quick reference card

Matsui
Matsui MDABB13E instruction manual

Hyundai
Hyundai RA 202 instruction manual

HanRongDa
HanRongDa K-603 instruction manual

PRESIDENT
PRESIDENT GRANT II PREMIUM Service manual

Pure Digital
Pure Digital EVOKE 1XT owner's manual


