Inseego Skyus 500V User manual
inseego.com
User Guide
Skyus 500
Inseego
9605 Scranton Road Suite 300
San Diego, CA 92121
(858) 812-3400

User Guide
Skyus 500 (Ninkasi)
Rev 1 Page 2of 78
inseego.com
Table of Contents
1. Product Overview ...........................................................................................................................3
2. UI Reference....................................................................................................................................6
3. Using, Testing, Troubleshooting ................................................................................................... 48
4. Regulatory Information................................................................................................................. 78
User Guide
Skyus 500 (Ninkasi)
Rev 1 Page 3of 78
inseego.com
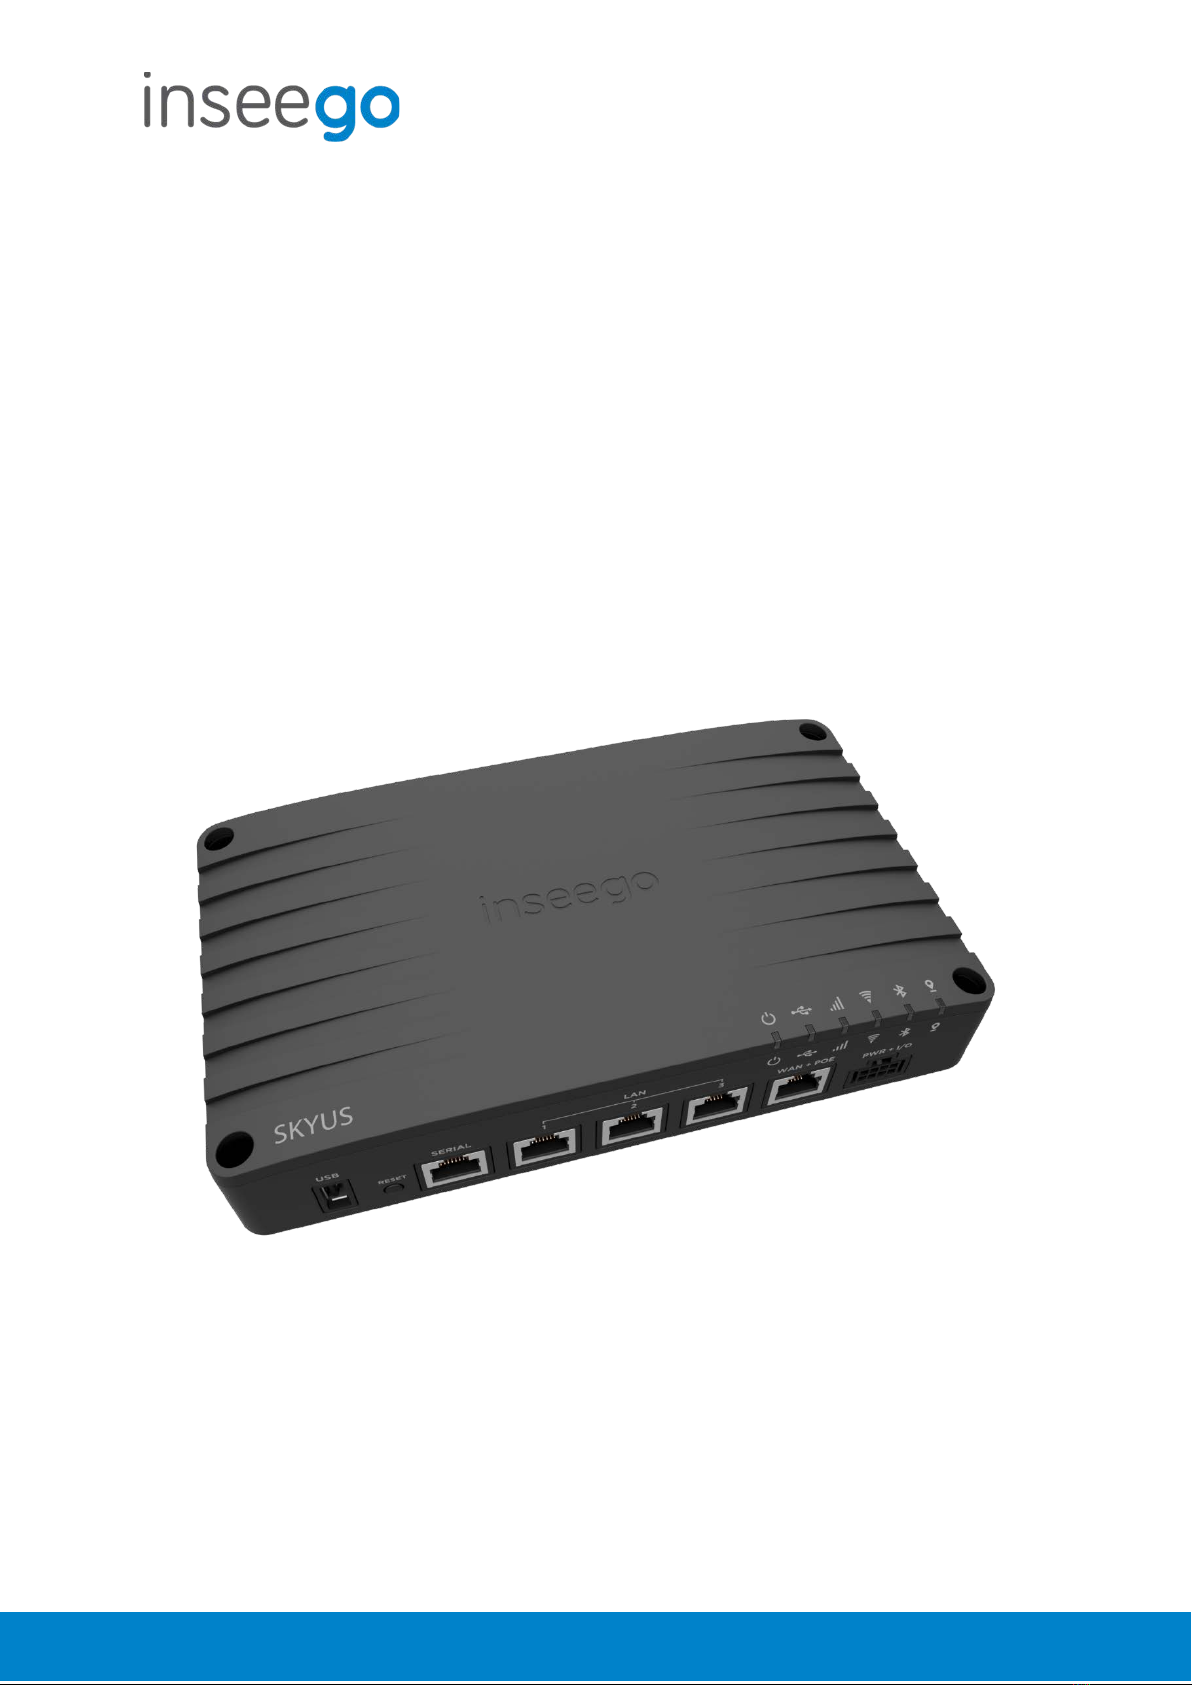
1. Product Overview
Marketing Name: Skyus 500V
Model Name: SKR5MD8800
Base SKU: SK500V
Front View
Back View

User Guide
Skyus 500 (Ninkasi)
Rev 1 Page 4of 78
inseego.com
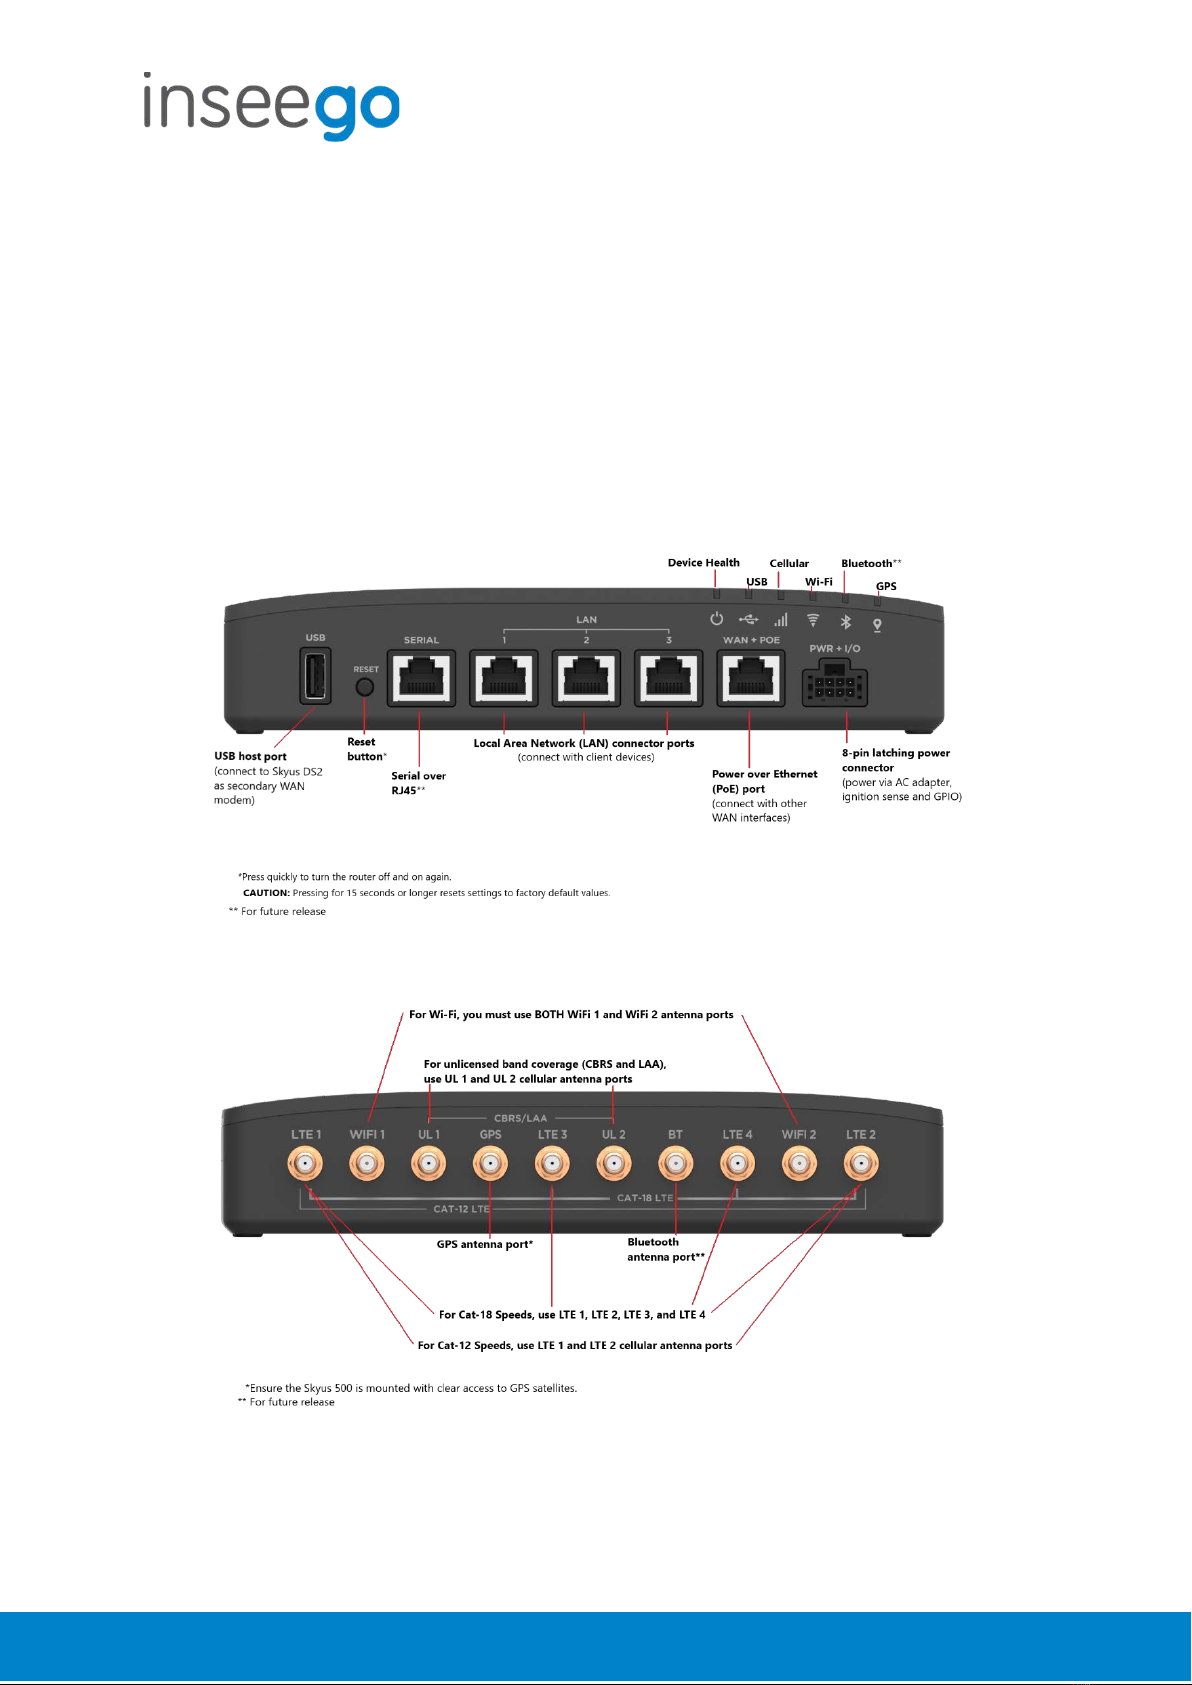
Right Side View

User Guide
Skyus 500 (Ninkasi)
Rev 1 Page 5of 78
inseego.com
Indicator LEDs
The Skyus 500 has six indicator LEDs. These indicators change colors and either blink or glow
solid to communicate current states for the device.
LED LED Color Operation Meaning
Device Health
Green
Solid
Good
Orange
Solid
Temperature Approaching Limits
Magenta
Solid
Thermal Protection Mode
Blue
Slow blink
Firmware Update Available
USB
Green
Solid
Connected External Device
Blue
Solid
Fast Blink
External Cellular Device Active (Routing Mode from External
Device or Failover is Active)
Traffic passing from external modem
Cellular
White
Solid
Slow Blink
No SIM
Inactive SIM
Red
Solid
Cellular Error
Blue
Solid
Fast Blink
Excellent Signal
Excellent Signal with Traffic
Green
Solid
Fast Blink
Great Signal
Great Signal with Traffic
Yellow
Solid
Fast Blink
Good Signal
Good Signal with Traffic
Orange
Solid
Fast Blink
OK Signal
OK Signal with Traffic
Magenta
Solid
Fast Blink
Poor Signal
Poor Signal with Traffic
Wi-Fi
Off
Off
Off
Red
Solid
Wi-Fi Error
White
Solid
On with no Connected Devices
Green
Solid
Fast Blink
On with Connected Devices
Wi-Fi Traffic
Blue
Solid
Fast Blink
Wi-Fi as WAN Mode Active
Traffic passing over Wi-Fi as WAN
Bluetooth*
GPS
Off
Off
Off
Red
Solid
GPS Error
White
Slow Blink
Searching/Acquiring
Yellow
Solid
GPS Active
*For future release

User Guide
Skyus 500 (Ninkasi)
Rev 1 Page 6of 78
inseego.com
2. UI Reference
Navigating the Web UI
Home Page
The Skyus 500 Home page is the local gateway to configuring and managing your router. It
displays current router status, lists currently connected devices, and offers links to other pages
with option settings and help.
Click >in the bottom-right corner of a panel to access subscreens with further information and
options.
Side Menu
Each subscreen in the Skyus 500 Web Interface includes a menu on the left, which you can use to
return to the Home page or jump to other screens. The current screen is indicated by a red bar.
The side menu includes items that are not visible from the Home page, including Access Control,
GPS, GPIO, VPN, and Remote Management. Access a subscreen from the Home page to
choose these additional options from the Side Menu.
Help
Select the question mark (?) in the upper right hand corner of a page to view Help on that topic.
Initial Configuration
There are some initial steps you may want to take before connecting more devices to your Skyus
500.
1. Set up Primary network name, security, and password on the Wi-Fi > Wi-Fi Primary
Network tab. You can also set up a Guest network on the Wi-Fi > Wi-Fi Guest Network tab.
2. Change the Admin password for the Web UI. Click the down arrow next to Sign Out in the
top-right corner of any Web Interface page and select Change Password. Select Help >
Admin Password for more information.
3. To set an Access Point Name (APN) for your network to communicate with the Skyus 500, go
to Settings > Advanced > Network tab.
Connecting Devices
You can connect up to 128 client devices to your Skyus 500 via Wi-Fi. NOTE: This many client
devices may affect throughput and stability.
Connecting via Wi-Fi
To wirelessly connect a Wi-Fi-capable device to your Skyus 500 for the first time:

User Guide
Skyus 500 (Ninkasi)
Rev 1 Page 7of 78
inseego.com
1. On the device you want to connect to the Internet, open the Wi-Fi application or controls
and in the displayed list of available networks, find the network name for your Skyus 500.
2. Click Connect or otherwise select the network name.
3. When prompted, enter the password. NOTE: The Wi-Fi name and password are displayed
in the Wi-Fi panel of the Home screen.
Connecting via Ethernet
To connect a wired device to your Skyus 500, plug the end of an Ethernet cable into one of the
three LAN ports.

User Guide
Skyus 500 (Ninkasi)
Rev 1 Page 8of 78
inseego.com
Support
A User Guide for your Skyus 500 is available online. To download the complete User Guide, go to
www.inseego.com/support-documentation.
For additional information and technical support, email Technical Support at
technicalsupportus@inseego.com or call Customer Support (Toll Free) at 1-877-698-6481.

User Guide
Skyus 500 (Ninkasi)
Rev 1 Page 9of 78
inseego.com
Admin Password
The Admin password is what you use to sign into the Skyus 500 Web Interface. Initially, it is the
same as the default password for your router’s Primary network and is printed on the bottom of
the router.
NOTE: You can set up separate Wi-Fi passwords both Primary and Guest networks in Wi-Fi, but
these are different from the Admin password, which is for this Web Interface.
Important: It is critical that you change the Admin password from the default to keep the
device and your network secure.
To change the Admin password, click the down arrow next to Sign Out in the top-right corner of
any Web Interface page and select Change Password. Enter your current Admin password, then
enter a new password and confirm it.
You must also select a security question from the drop-down list and type an answer to question
in the Answer field. NOTE: Answers are case-sensitive. Click Save Changes.
The next time you sign in to the Skyus 500 Web Interface, use the new Admin password. If you
cannot remember the password, click I forgot the Admin password. After you correctly answer
the security question you set up, the current password is displayed.

User Guide
Skyus 500 (Ninkasi)
Rev 1 Page 10 of 78
inseego.com
Wi-Fi - Settings
You can use the default values as they appear on this tab, or can adjust them for your
environment.
Wi-Fi
Use the Allow Wi-Fi devices to connect to this Router ON/OFF slider to turn Wi-Fi on or off.
This selection affects Primary and Guest networks.
When Wi-Fi is turned off, the only way to connect to the router (and to the Admin website) is
with Ethernet cable.
Band Selection
Each network can be accessed over two bands: 2.4 GHz and 5 GHz:
•The 2.4 GHz band is supported by all devices with Wi-Fi and should be used by devices
that are a few years old or older. This band passes through walls better, so it may have a
longer range.
•The 5 GHz band is best for newer devices. It offers better throughput and reduced
interference, but does not pass through walls as well as the 2.4 GHz band.
NOTE: The Guest Network must be assigned at least one band before it can be turned on.
2.4 GHz Band Selection
This section displays the 802.11 Mode in use when the 2.4 GHz band is active and allows you to
select a Channel.
NOTE: Leave the Channel set to Automatic unless you need to choose a particular channel for
your environment.
5 GHz Band Selection
This section displays the 802.11 Mode in use when the 5 GHz band is active and allows you to
select a Bandwidth and Channel.
NOTE: Leave the Bandwidth at the default setting unless you experience interference with other
Wi-Fi devices. If you experience interference, try lowering the Bandwidth setting to reduce the
interference.
NOTE: Leave the Channel set to Automatic unless you need to choose a particular channel for
your environment.
Select Save Changes to store new settings.

User Guide
Skyus 500 (Ninkasi)
Rev 1 Page 11 of 78
inseego.com
Wi-Fi – Primary Network
Use these settings to connect initially to the Primary Wi-Fi network or change Primary network
information. Connected devices must use the Wi-Fi settings shown on this screen.
NOTE: If you change these settings, existing connected devices may lose their connection.
Settings
Primary network name (SSID): Enter a Primary network name (SSID) to set up or change the
Primary network name. The name can be up to 28 characters long.
Security: Select an option for Wi-Fi security:
•WPA2 Personal is the most secure method of Wi-Fi Protected Access and should be
used if possible.
•WPA/WPA2 Personal can be used if some of your older devices do not support WPA2.
•WPA/WPA2 Enterprise is designed for organizations and includes enterprise-grade
authentication. NOTE: This method provides administrative control over access to your
Wi-Fi network, so that administrators assign, modify and revoke login credentials for
users. A Remote Authentication Dial-In User Service (RADIUS) server is required and must
be configured for this option.
•None allows others to monitor your Wi-Fi traffic and use your data plan to access the
Internet. NOTE: Avoid using this option.
Password: Enter a Wi-Fi password, or you can use the Generate new password button.
Important: It is critical that you change the password from the default and use a different
password from your Admin password to keep the device and your network secure.
Generate new password: This button inserts a strong random password in the Password field.
You can click the eye icon to view the password.
Options
Broadcast primary network name (SSID): Check this box to allow Wi-Fi devices in the area to
see the Wi-Fi Primary network name (SSID) on their list of available networks. If not selected, the
network name will need to be manually entered for devices to connect to the network.
Select Save Changes to store new settings.
User Guide
Skyus 500 (Ninkasi)
Rev 1 Page 12 of 78
inseego.com
Wi-Fi – Guest Network
The Wi-Fi Guest network allows you to segregate traffic to a separate network rather than share
access to your Wi-Fi Primary network. Use settings on this tab to set up or change Wi-Fi Guest
network information. Connected devices must use the Wi-Fi settings shown on this screen to
connect to the Guest Wi-Fi network.
NOTE: To turn the Wi-Fi Guest network on, you must select at least one band for Guest Network
under Band Selection on the Wi-Fi Settings tab and then select Save Changes.
Settings
Guest network name (SSID): Enter a Guest network name (SSID) to set up or change the Guest
network name. The name can be up to 28 characters long.
Security: Select an option for Wi-Fi security:
•WPA2 Personal is the most secure method of Wi-Fi Protected Access and should be
used if possible.
•WPA/WPA2 Personal can be used if some of your older devices do not support WPA2.
•WPA/WPA2 Enterprise is designed for organizations and includes enterprise-grade
authentication. NOTE: This method provides administrative control over access to your
Wi-Fi network, so that administrators assign, modify and revoke login credentials for
users. A Remote Authentication Dial-In User Service (RADIUS) server is required and must
be configured for this option.
•None allows others to monitor your Wi-Fi traffic and use your data plan to access the
Internet. NOTE: Avoid using this option.
Password: Enter a Wi-Fi password, or you can use the Generate new password button.
Important: It is critical that you change the password from the default and use a different
password from your Admin or Primary network password to keep the device and your network
secure.
Generate new password: This button inserts a strong random password in the Password field.
You can click the eye icon to view the password.
Options
Broadcast guest network name (SSID): Check this box to allow Wi-Fi devices in the area to see
the Wi-Fi Guest network name (SSID) on their list of available networks. If not selected, the
network name will need to be manually entered for devices to connect to the network.
Select Save Changes to store new settings.
User Guide
Skyus 500 (Ninkasi)
Rev 1 Page 13 of 78
inseego.com
Wi-Fi – Wi-Fi as WAN
Use settings on this tab to set options for using an external Wi-Fi network to access the Internet.
NOTE: To enable Wi-Fi as WAN, you must go to the Wi-Fi Settings tab and in Band Selection,
select a band for Wi-Fi as WAN. Then select Save Changes.
Important: Only one station/network from either the 2.4GHz or 5GHz band can be enabled at
a time. If you deselect a band from the Primary or Guest network, some existing connected
devices may lose their connection.
Once you have enabled Wi-Fi as WAN on the Wi-Fi Settings tab, return to the Wi-Fi as WAN tab.
The band you enabled is displayed.
Access Points
By default, one access point is listed initially.
Add Access Point: Use this button to add a hidden network. The Add new access point dialog
displays. Enter an SSID, choose a security level from the Security drop-down, and enter a
password if prompted. Select Save Changes.
Once connected, the new access point appears in the Access Points list.
Scan: Use this button to see a list of available access points and add an access point. The Scan
Results dialog displays, listing available access points. Click Add to add an access point. The Add
new access point dialog displays. Choose a security level from the Security drop-down and
enter a password if prompted. Select Save Changes.
Once connected, the new access point appears in the Access Points list.
When there is at least one Access Point in the Access Points list, you can set the following:
•Enabled: Enable or disable an access point.
•Priority: Use the Up and Down buttons to set the priority for each access point.
If an access point is enabled and available, and has highest priority among the enabled
access points (is first in the list), the Skyus 500 connects to that access point and displays its
details in the Connected Access Point area below, including:
oSSID: The SSID (network name) of the connected access point.
oMAC Address:The MAC Address (unique network identifier).
oFreq: The frequency used by the connected access point.
oSecurity: The security level.
oWPA State: The Wi-Fi Protected Access state.
•Edit: Change the SSID, security setting, or password for an access point. NOTE: The SSID and
password must match the access point. Only change these fields to match changes in the
actual access point information.

User Guide
Skyus 500 (Ninkasi)
Rev 1 Page 14 of 78
inseego.com
•Delete: Delete an access point from the list.

User Guide
Skyus 500 (Ninkasi)
Rev 1 Page 15 of 78
inseego.com
Connected Devices
This page provides details about each device connected to the Skyus 500 and allows you to edit
how device names appear in the Web UI. You can also block or unblock a device from Internet
access.
NOTE: You can also see list of all devices currently connected to the router and the network they
are using in the Connected Devices panel on the Web UI Home page.
Connected
This table lists all devices connected to the Skyus 500:
Connection: An icon indicates the connection type (Wi-Fi or Ethernet) for each device.
(You can hover over the icon to read the type of connection.)
Device: This is usually the hostname set on the connected device. In rare cases, the
hostname may be unavailable.
You can change the name of a device as it appears in the Skyus 500 Web UI by clicking in
the Device field and editing the name. NOTE: This only changes the how the device
name appears in the Skyus 500 Web UI.
Network:Indicates whether the device is connected to the Primary or Guest network.
Block: Select this box to disconnect a device and prevent it from reconnecting. Select
Save Changes. The device is removed from the Connected list and appears in the
Blocked list below.
NOTE: This option is available for each device connected through Wi-Fi, but is not
available for your own device or devices connected via Ethernet.
To view details on a device, click the plus icon (+) on the right to expand the device row. The
following information appears:
•IP Address: The IP address of the connected device.
•MAC Address: The MAC Address (unique network identifier for this connected device).
•Link Local:The Link-Local IPv6 address if the connected device supports IPv6.
Click the minus icon (-) to collapse a row.
Blocked
This section lists all devices blocked from connecting to the Skyus 500.
NOTE: Since blocked devices are not currently connected, they do not have an IP address.
Instead, they are identified by their name and MAC address.
To unblock a blocked device, click the Unblock button and select Save Changes. The device is
removed from the Blocked list and appears in the Connected list above.

User Guide
Skyus 500 (Ninkasi)
Rev 1 Page 16 of 78
inseego.com

User Guide
Skyus 500 (Ninkasi)
Rev 1 Page 17 of 78
inseego.com
Access Control - Devices
Access controls in the Skyus 500 Web UI allow you to control Internet access to specific devices.
You can set up multiple schedules for Internet access on the Schedules tab and apply them to
individual connected devices on the Devices tab.
NOTE: You must first create schedules on the Schedules tab for device and schedule information
to display on the Devices tab.
This tab lists all currently connected devices and any applied schedules. (Unspecified indicates
that no schedule is applied to a device, and Internet access is unrestricted.)
To apply a schedule to a device, select a schedule from the drop-down list. Select Save Changes.

User Guide
Skyus 500 (Ninkasi)
Rev 1 Page 18 of 78
inseego.com
Access Control - Schedules
Access controls in the Skyus 500 Web UI allow you to control Internet access to specific devices.
You can set up multiple schedules for Internet access on the Schedules tab and apply them to
individual connected devices on the Devices tab.
Use this tab to manage schedules for when devices can access the Internet through the Skyus
500.
Create New Schedule: Select this button to create a new schedule. The Create New Schedule
dialog box appears. Enter a name and description for the schedule.
In the Access section:
•Determine if you want Allow access during the specified days/times or if you want to
Block access during the specified days/times.
•Set a range of time for allowing or blocking Internet access:
oSelect the days of the week you want the range to apply to.
oEnter start and end times for the range.
Select Save Schedule to close the dialog box and return to the Schedules page. The new
schedule is now listed.
Use the View, Edit, and Delete buttons to view, edit, or delete (unapplied schedules only) listed
schedules.
Use the Devices tab to apply schedules to devices.

User Guide
Skyus 500 (Ninkasi)
Rev 1 Page 19 of 78
inseego.com
Settings - Preferences
This tab allows you to change how dates, time, and numbers are displayed in the Skyus 500 Web
UI. NOTE: These preferences affect packets sent to remote servers. For example, if you select a 24
hour time format, the Web UI, and any packets reporting time somewhere else, will display time
in 24 hour format.
Date: Select the date format to be used throughout the Web UI and remote servers
(mm/dd/yyyy or dd/mm/yyyy).
Time: Select the time format to be used throughout the Web UI and remote servers (12 or 24
hour).
Number Format: Choose the format for decimal numbers displayed in the Web UI and remote
servers (using a period or comma as the decimal point).
Select your display choices from the drop-down menus and click Save Changes to update
settings.

User Guide
Skyus 500 (Ninkasi)
Rev 1 Page 20 of 78
inseego.com
Settings – Software Update
Software updates are delivered to the Skyus 500 automatically over the mobile network. This tab
displays your current software version, last system update information, and allows you to check
for new software updates.
NOTE: You can also view the date and time of the last system update in the Settings panel on the
Web UI Home page.
Current Software
Software Version: The version of the software currently installed on your Skyus 500.
Check for New System Update
Checked for update: The date and time the Skyus 500 last checked to see if an update was
available.
Update status: This is area is usually blank. If you check for an update, the result of that check, or
the download progress of an update displays.
Check for update: Click this button to manually check for available software updates.
•If a new software update is available, click Download now to install it.
•If a new system update is available, you are given an option to install it now or later.
•If a configuration update is available, it is installed automatically.
Last System Update
This section displays details about the last software update.
System Update History
This section displays details of the last updates that have been downloaded and installed to this
device. If this section is blank, no updates have been installed.
This manual suits for next models
1
Table of contents
Other Inseego Gateway manuals

Inseego
Inseego SKYUS 160 Series User manual

Inseego
Inseego SKYUS 300 User manual

Inseego
Inseego Skyus 100 Series User manual

Inseego
Inseego Wavemaker PRO User manual

Inseego
Inseego SKYUS 160 Series User manual

Inseego
Inseego FW2000 Series User manual

Inseego
Inseego SKYUS 160 Series User manual

Inseego
Inseego SKYUS 160 Series User manual

Inseego
Inseego SKYUS 100B Series User manual


