Insight Vision IRIS User manual

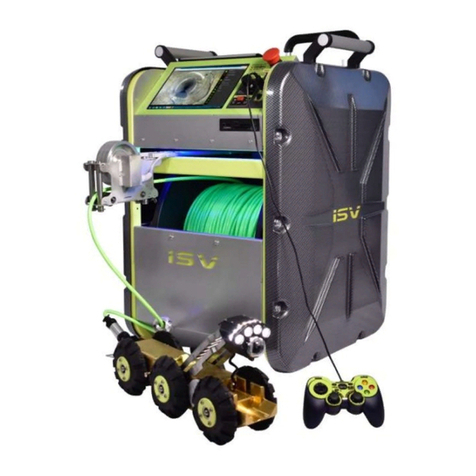
IRIS MAINLINE CRAWLER
Integrated Remote Inspection System
FOLLOW, LIKE AND WATCH

0
General Safety Guidelines
WARNING: Read all safety warnings and guidelines.
Failure to follow the warnings and instructions may result in electrical shock, fire, and/or serious injury.
Work Area Safety Guide
Keep your work area clean and dry as possible.
Do not operate equipment in explosive or flammable environment.
Keep children away when operating the system.
Electrical Safety Guide
Do not expose equipment to rain or wet environment.
Keep hands dry and all electrical connections dry.
Ensure all power cord, connectors and wires are in working condition.
Personal Safety Guide
Be alert and aware of your environment.
Be prepared and follow instructions.
Use protective gears when using the equipment.
Use Equipment with Care
Do not force the equipment.
Do not allow inexperience operator to use the equipment.
Maintain equipment and use only accessories that are recommended by the manufacturer.
If you need to contact customer service.
For immediate assistance, contact Insight Vision.
Phone: 800-488-8177
Fax: 262-268-9952
Email Technical Service: service@insightvisioncameras.com
Email Sales & Support: sales@insightvisioncameras.com
Web Inquiry: www.insightvisioncameras.com
Please complete the following information for future reference:
Serial Number: _____________________________________
Date of Purchase: __________________________________
Place of Purchase: __________________________________
The serial number is on the back of the unit. Retain this manual with your sales receipt as a permanent
record of your purchase, in the event of theft, fire or warranty service.

1
TABLE OF CONTENTS
Warranty.............................................................................................2
System Overview ..............................................................................3
System Package................................................................................6
System Power-Up..............................................................................7
Motorized Reel Control.....................................................................8
Crawler Pendant Control..................................................................9
Control System App........................................................................10
System Recording...........................................................................11
On Screen Display App ..................................................................14
Technical Specifications ................................................................16

2
Warranty
Insight Vision warrants to the original purchaser that should any of its products prove to be defective in material
or workmanship in normal use, within one (1) year from the date of delivery, Insight Vision will, at its exclusive
option, repair, replace or exchange the product or any of its parts.
THIS WARRANTY IS SUBJECT TO THE FOLLOWING LIMITATIONS:
1. The warranty does not apply to any product which has been subject to accident, negligence, alteration,
abuse, misuse, overload, repair by anyone other than Insight Vision or its authorized representatives, or not
maintained in accordance with the manufacturer's suggested maintenance requirements.
2. The warranty applies only to components manufactured by Insight Vision. The appropriate manufacturer's
warranty, if any, shall apply to components not manufactured by the company.
3. The warranty does not apply to flex-link connectors, rod, LED light rings, cable, rollers, O-rings, and skids,
or other parts, which are considered consumable. The replacement of these items is part of normal product
maintenance.
4. The warranty shall not apply if the products are used or operated in any manner not consistent with their
intended purpose.
5. The warranty is limited to repair or replacement of defective products and parts during the warranty period,
and shall be the exclusive remedy. Insight Vision shall in no event have any other obligation or liability of
any nature arising from the breakdown, malfunction, defect or other failure of the product, including, without
limitation, any liability for service, maintenance, repairs, personal injury, property damage, loss of profits, loss
of use or other consequential damages.
6. Any action for any claimed breach of this warranty shall be brought within one (1) year from the date of
delivery of the product.
7. The purchaser must return the defective product, part or component to the Insight Vision factory in Saukville,
WI 53080 at the purchaser's expense, properly and adequately packaged, with insurance and transportation
pre-paid. Insight Vision will either repair or replace the defective product, part or component, at its option,
and will return it to the purchaser at the customer's expense. In no event shall Insight Vision be liable for
delay in repair or replacement and return under this warranty. Insight Vision will endeavor to effect
appropriate repairs in the shortest time practical, with respect to the customer having beneficial use of their
equipment.
8. Insight Vision neither assumes nor authorizes any person to assume any other liability or make any other
warranty in connection with the products.
9. THIS WARRANTY IS EXPRESSLY GIVEN IN LIEU OF ALL OTHER WARRANTIES EXPRESSED OR
IMPLIED. INSIGHT VISION EXPRESSLY DISCLAIMS ANY OTHER WARRANTY, INCLUDING, WITHOUT
LIMITATION, ANY WARRANTY OF MERCHANTABILITY OR FITNESS FOR A PARTICULAR PURPOSE.

3
System Overview
Thank you for purchasing the Insight Vision Portable Mainline Crawler system. Reading the
documentation will help you make the most of your equipment.
Descriptions:
The IRIS mainline crawler is an “All-In-One”, inspection system designed to inspect and record mainlines,
pipelines and underground infrastructure videos. Designed for ease-of-use and portability operable by two
technicians, saving countless time and resources. The user-friendly system control interface has been
reengineered with one Windows™compatible app for recording and entering text to help speed up inspection
time. Technicians can easily record vital inspection data and key in client information under one screen. A
built-in microphone and speaker on the motorized reel drum allows the technician to record voiceover videos
and then play the video back on the 10.4” LCD touchscreen monitor. The motorized reel drum has multiple
output device ports for additional accessories. System can record to internal solid state drive (500GB) or
external USB memory stick. The crawler is designed to inspect sewer pipes from 6” to 12” (Up to 18” with
additional wheelset). A built-in sonde is optional which can transmit a frequency that is locatable with a 512 Hz
locator. The IRIS portable mainline crawler also comes with a free downloadable mobile streaming app for
Apple™and Android™mobile devices which allows users to view, record, and snapshot.
NOTICE:
All Insight Vision command modules are not water-resistant. Insight Vision assumes no liability for any
water damage, caused directly or indirectly, by improper usage of the system. Damage to the system
components, the internal mother board, and injury to you may result if water is applied to the command
module. Water damage will not be covered under warranty, and may be cause for voiding of the
warranty.
NOTICE: FAILURE TO FOLLOW THIS PROCEDURE INVALIDATES ANY WARRANTY CLAIM AGAINST
PORTABLE MAINLINE CRAWLER FOR THE FUNCTIONALITY OF THE RECORDING DEVICE AND
WARRANTY COVERAGE WILL NOT BE GRANTED.

4
System Maintenance Requirements:
The following maintenance procedures are recommended for all IRIS mainline crawler system. Standard
warranty policy dictates that components and accessories subject to wear and tear are not covered under the
One (1) year warranty. Therefore we are strongly recommending that all systems be maintained according to
the following procedures. Please be advised that IRIS mainline crawler will not allow warranty coverage for
these items if these procedures are not followed.
Crawler:
It is important to improve the longevity of your crawler by doing these basic checkups. It is recommended
before and after every inspection to do the following maintenance to prevent water damage.
1. After every use wipe down the crawler with a damp towel to remove excess debris and moisture.
2. Check for loose bolts, screws or nuts on the crawler.
3. Once a month, apple connectors on the crawler with dialectic grease.
4. Check the body to head cable on the crawler for any damages, cracks, pinched, and kinks.
5. Do not lift the crawler by the strain relief or cable.
Notice: Do not remove the screws from the clip on top of the crawler body. This can void the
warranty.
Motorized Reel Drum:
It is important to improve the longevity of your motorized reel by doing these basic checkups. It is
recommended before and after every inspection to do the following maintenance.
1. Do a visual inspection for any kinks, damages, cracks, and loose screws on the motorized reel.
2. Plug in the full system with crawler and perform these steps:
a. Check for video, footage counter, and text-writer
b. Drive the crawler forward and back
c. Auto-feed the reel forward and back
d. Perform basic recording, snapshots and text writing
e. Test the e-stop button
3. Once a month, apply the connector on the cable with dielectric grease.
4. Cleaning the cable as it is recoiling back to the drum.
5. Check for loose bots, screws, or nuts on the motorized reel.
Notice: Do not power up the motorized reel by itself. The crawler and pendant control will
need to be connected to the motorized reel prior to powering up the system.

5
System Features:
The Integrated Remote Inspection System is a compact & portable unit that incorporates a
motorized/self-propelled robotic crawler, motorized drum for rewind of the cable, pan and tilt camera
head, 10” touch-screen, multiple recording options and operates on Windows™compatible apps.
Standard inspection range is from 6” inch diameter to 12” inch diameter (Up to 18” with an additional
wheel set).
PAN & TILT CRAWLER:
Fully automatic and integrated tractor power supply
Tractor free-wheels when in rewind mode
Do not “drive” the tractor back while trying to rewind
Bright LED lateral lighting
MINI COAX CABLE:
The drum reel holds 600 ft. of cable
Finished OD .35”
WHEEL SETS:
Provided wheel set options to get into 6” up to 12” diameter pipes
OPERATING SYSTEM:
Operates on Windows 7 Operating System
500GB of Solid State Drive (SSD)
Wi-Fi Adapter
9.7” TOUCH-SCREEN:
Resistive Touch screen works with gloves
Use stylus to improve functionality. (Using sharp or hard object may scratch the screen)
ON SCREEN DISTANCE-COUNTER:
Footage counter in meters or feet
Direct mounting level wind
RETRACTABLE HANDLE:
Telescopic handle and large wheels for easy portability
ON SCREEN TEXT-WRITER:
Digital onscreen keyboard
External keyboard capable
RECORDING OPTIONS:
Records to removable USB, Internal Hard drive (500 GB), SD Card
MOTORIZED REEL DRUM:
Auto-feed/ rewind reel drum
Level wind with attached counter
Adjustable speed for auto-assist cable
Additional external device ports(HDMI, USB, and SD)

6
System Package:
What’s Included:
PORTABLE USER MANUAL
MOTORIZED REEL (w/ extendable rear handle)
PAN & TILT CRAWLER
120V POWER CABLE
CRAWLER CONTROLLER
SMALL & MIDI WHEEL SET (installed)
LCD REMOTE (touch screen monitor)
3/32 ALLEN WRENCH (strain relief tightening)
MOTORIZED REEL SUNSHADE
MOTORIZED REEL RAIN COVER
LCD SCREEN COVER
600 FT. CABLE
CRAWLER HARD CASE
Optional Accessories:
PNEUMATIC WHEELS
LOWERING HOOKS
8 GB FLASH DRIVE
512HZ SONDE
Replacement Parts:
SUNSHADE
RAIN COVER
HAND CONTROLLER
PNEUMATIC WHEELS
CAMERA NOSE CONE
SIDE PANEL
REMOTE CONTROL FOR LCD
MOTORIZED REEL WHEELS
15 FOOT POWER CORD
FUSE (SPARE)
3/32 ALLEN WRENCH
STRAIN RELIEF KIT
Notice:
We ship the Portable mainline crawler system in a shipping crate, it is strongly
suggested to keep this crate in your possession in case your unit needs to be
returned for any kind of service.

7
System Power-Up:
Follow these steps before powering up the system.
1. Plug in your power cable in the back of the system with
external power outlet.
2. Plug in the crawler controller into the specified USB port.
3. Connect the crawler to the mainline cable receptacle.
4. Tighten your strain relief clamp using the provided 3-32
Allen wrench.
5. Set your camera height to desired pipe diameter.
6. Switch power toggle on back of the system to the on
position.
7. Press the power button on the face of the system.

8
Motorized Reel Control:
Read these steps before powering up the system.
Front Control Panel:
1. ON/OFF Power Button –Turn on the system
2. Video Monitor IR Sensor –Change brightness on the LCD Monitor
3. USB Ports –To connect to external devices
4. Crawler Pendant Control Port –To connect to the crawler pendant control
5. Emergency Stop Button –Shut off the power to the crawler and motorized reel drum
6. Reel Speed Control Knob
Notice:
To bring the crawler back with the reel using the pendant control momentarily press (2 sec) the
crawler in reverse to dis-engage the crawler. When using reel speed control auto assist out you
will need to be aware of the speed of the reel in conjunction with running the crawler out, this is
not synchronized action. If you stop moving the crawler forward, you also need to stop the auto
pay out on the reel speed control.
7. Reel Direction Toggle Auto-Pay and Rewind Toggle Switch –Control speed and forward/back on the
motorized reel
8. 10” LCD Touch Screen –Resistive screen for touch activation

9
Crawler Pendant Controls:
1. Tractor Speed Control
2. Camera Light Control
3. Pan Control
4. Tilt Control
5. Drive Control
The process to drive the crawler back you will also need to use the motorized reel front
control panel. Please follow the direction to properly drive your crawler forward and back.
1. When you are ready to drive the crawler forward. Press the feed toggle on motorized reel
front control panel “OUT”. This will push your cable out to help assist the crawler. You
can control the speed of the auto-assist by turning the knob clockwise. Use as required.
Notice: Pay attention as you assist the crawler, you don’t want to do too much
where the cable can get tangle or kink. The idea of the auto-assist is to relieve
tension on the crawler as it pulls the cable.
2. When you are ready to drive the crawler back. On the pendant control momentarily press
(2 sec) the crawler in reverse to dis-engage the crawler. This will unlock the wheels.
Press the feed toggle on the motorized reel front control panel “IN”. This will rewind the
cable in. You can control the speed of the auto-rewind by turning the knob counter-
clockwise.
Notice: Pay attention as you rewind the crawler, you want to make sure the crawler
is in free-wheel mode. This will help speed up your inspection time.
1
2
3
4
1
5
1

10
Control System Apps:
Read these steps before starting your inspections.
System Control Apps:
1. CAMERA APP:
Launches your crawler camera video and take snapshots.
2. PORTABLE PLAYER:
Plays back your inspection videos.
3. ON SCREEN DISPLAY (OSD):
On screen text writer and data entry for your video inspections.
This app will automatically launch with the camera app.
4. RECORD MP4 APP:
Use this app to do your recording in MP4 format.
This app will automatically launch with the camera app.
5. VIDEOS & SNAPSHOTS FOLDERS:
Access all your recordings and photos.
Factory defaults Videos and Snapshots folders on the desktop.
Drag and drop to your intended external storage device (USB or SD).
6. DIGITAL KEYBOARD:
Access your digital keypad for text-writing.
7. NETWORK METER:
Shows your network speed and IP Address.

11
System Recording:
Follow these steps before starting your inspections.
1. Open up the CAMERA app by
double-clicking the icon.
2. Three (3) apps will launch
simultaneously. The CAMERA,
Record MP4, and the OSD
App.
Notice:
Some Apps maybe hidden
behind other apps when
launched, simply click and
drag to rearrange
accordingly.
3. When MP4 Record app is first
run, opened, and/or loaded.
You must open the settings
dialog by clicking on Settings.
4. The settings are all at the
proper defaults. Notice: Only
advanced users will need to
change them based on
application needs. To
produce smaller files the size
can be reduced to 320x240
pixel by using the pull down
selection in the size window.
5.
Generally the default is set for
most reasonable quality vs
size.

12
1. The location and name of the
video clips can be changed by
typing in to the File name
field or by selecting the drop-
down box at the right side of
the line.
2. Once finished with your
proper settings, you must
click, “Apply”.
3. Once applied you are set for
the duration and ready to
record your inspection.
4. Once you click on “Record”,
you will see the red box.
5. While recording the meter
will show you the amount of
disk space is being used.
6. When you wish to stop, press
the Red Box. There is no
“Pause” function. Files can be
spliced later in any number of
video editors such as the ones
that comes with Windows.
System Recording:
Follow these steps before starting your inspections.

13
Reference Only Setup Diagram:
Follow these steps before starting your inspections.

14
On Screen Display App:
Follow these steps before starting your inspections.
A. On Screen Display (OSD) APP
Complete these fields prior to starting your recordings, scroll through to capture in your video
User ID Tab
This is where you can key in all of the proper information
you want to show on the front of the screen. This will
be your on screen data to be captured in your inspections
videos.
Job ID
This is an additional tab to use and capture data in
your inspection videos.

15
On Screen Display App:
Follow these steps before starting your inspections.
A
B
C
A
B
C
Run 1/2:
A. Text ON/OFF
a. To allow text to be captured in your video
B. Distance Zero
a. Reset your on screen distance counter
C. Up/Down
a. Move distance counter up and down on your
screen
Setup:
A. Display Units:
a. Show the distance in meters or feet
B. Count Preset:
a. Set Zero Offset
C. Count direction:
a. Forward or Backward
Exit:
A. Closes the OSD text writer
B. Saved the previous text.

16
Specifications:
Transporter:
Six-wheeled crawler with all-wheel drive
Three available wheel sets for various pipe size ranges
Pipe diameter 6” to 12” (Up to 18” with additional wheel set)
Tractor operates via pendant speed and direction controls
High grip polymer tires for demanding conditions and terrain
Leak/pressure test valve/port
Hardened helical final drive gears
Easy/rapid wheel change with single retaining nut per wheel
Weight of transporter is 35 lbs.
Transporter dimensions is 19”L x 3.5”H x 5”W
9 Bright LED lateral lights
4 Front LED lights
Motorized Cable Drum:
Variable speed motorized Reel rewind and payout
Automatic freewheel drum clutch
Standard 600’ of cable per system
Footage counter
On-screen distance display in feet or meters
Level wind system
Reel weight is 150 lbs.
Reel dimensions is 29”H x 20”W x 21”D
Reel is splash resistant with cover
Reel power 110 volts 240V optional
Control Panel:
Screen is 9.7” color High Resolution LCD touchscreen
Digital On-screen Text Enable with External HDMI Port
Wireless “N” speed connectivity
Interface includes Wireless Remote Access Wi-Fi
Operates on Windows 7 x 64 bit Professional
External recordings to USB and SD
Camera Specs:
360 degree camera tilt rotation by 180 degree pan
Fixed focus at 4” through 24”
Camera head height adjustable for various size pipes
Impact resistant and replaceable polycarbonate dome
Video system is NTSC or PAL Mode
Resolution is 640 x480 pixels
Hi-intensity LED’s provides pipe illumination
Camera sensitivity is 1 Lux

17
Contact Us
INSIGHT VISION
600 DEKORA WOODS BLVD.
SAUKVILLE, WI 53080
PHONE: 800-488-8177
FAX: 262-268-9952
WWW.INSIGHTVISIONCAMERAS.COM
Service and Support Specialist:
Service Manager: Linda Moe
Email: linda@insightvisioncameras.com
Sales Manager: Bob Masse
Email: bob@insightvisioncameras.com
Director of MFG: Wayne Hartlich
Email: wayne@alliancetechnology.com
Table of contents
Other Insight Vision Analytical Instrument manuals
Insight Vision
Insight Vision Xpress User manual
Insight Vision
Insight Vision Digital Xpress D2 User manual
Insight Vision
Insight Vision Digital Xpress D2 User manual
Insight Vision
Insight Vision DVDXPRESS User manual
Insight Vision
Insight Vision IV2 User manual
Insight Vision
Insight Vision Vutek User manual
Insight Vision
Insight Vision IRIS Mainline Crawler User manual

