#2441TH, 2732-422, 2732-522 Rev. 11/7/2012 10:06 AM / See Owner’s Manual for Warranty Information.
Protected under U.S. and foreign patents (see www.insteon.com)
© Copyright 2012 INSTEON, 16542 Millikan Ave., Irvine, CA 92606, 866-243-8022
Set Heat and Cool Temperatures
Heating
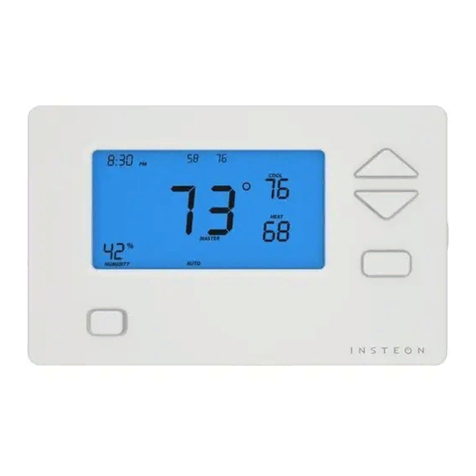
1) Press Mode button once to enter Heat mode.
2) Tap the Up arrow several times until heat setpoint is 2° above ambient.
INSTEON Thermostat will call for heat and “Heat” will change to “Heating” and flash briefly.
3) Confirm proper function by letting your furnace to operate long enough to begin blowing warm air.
4) Tap the Up/Down arrows until you reach a desirable heat setpoint.
Cooling
1) Wait until at least six minutes have passed since furnace was heating.
2) Tap mode button a second time to enter Cool mode.
3) Tap the down arrow several times until cool setpoint is 2° below ambient.
INSTEON Thermostat will call for cooling and “Cool” will change to “Cooling” and flash briefly.
4) Confirm proper function by letting A/C operate long enough to begin blowing cool air.
5) Tap the Up/Down arrows until you reach a desirable cool setpoint.
Auto Mode
1) Tap Mode button until Auto appears.
Heat and cool setpoints are as set in previous steps.
2) Tap Up once to increase both heat and cool setpoints by 1°.
3) Tap Down once to decrease both heat and cool setpoints by 1°.
4) As desired, tap Mode button a third time to cycle to Time of Day mode (see Owner’s Manual for instructions) and a fifth time
to cycle back to Off mode.
Make INSTEON Thermostat an INSTEON Controller
INSTEON Thermostat can control other INSTEON devices or trigger software events when there is a change. The following
INSTEON Thermostat changes can be set up as a controller:
Group 1 - Cooling mode change (scene control)
Group 2 - Heating mode change (scene control)
Group 3 - Humidification, high humidity setpoint (scene control)
Group 4 - Dehumidification, low humidity setpoint (scene control)
1) Press and hold INSTEON Thermostat set button until it beeps.
LED will start blinking green.
2) Tap Up and Down button to add to a Scene to Group 1 through 4 (default setting = Cooling mode, Group 1).
3) Adjust scene responder to the state you want when scene is activated from INSTEON Thermostat (e.g. 50%, 25% or even
off).
4) Press and hold responder Set button until unit double-beeps and/or LED flashes.
INSTEON Thermostat will double-beep and its LED will stop blinking.
5) Test by tapping INSTEON Thermostat mode button to chosen scene (i.e. Heat or Cool mode).
Each time mode selected in step 2 becomes active, responder will turn on (or off).
Make INSTEON Thermostat an INSTEON Responder
1) Set INSTEON Thermostat to desired state (mode, setpoint, fan state and energy button state).
2) Press and hold controller set button until it beeps (or LED flashes).
Controller LED will start blinking.
3) Press and hold INSTEON Thermostat set button until it beeps.
INSTEON Thermostat will double-beep.
If you want INSTEON Thermostat to also respond to an off command (e.g. control from a toggle button).
1) Set INSTEON Thermostat to desired state.
2) Press and hold controller Set button until it beeps (or LED flashes).
Controller LED will start blinking.
3) Press and hold INSTEON Thermostat Set button and Down Arrow until it beeps.
INSTEON Thermostat will double-beep.
Owner’s Manual and Tech Support
For the Owner’s Manual and the most current Quick Start Guide, visit http://www.insteon.com/support
Call: INSTEON Support Line at 866-243-8022
FCC and IC Warnings
This device complies with FCC Rules and Industry Canada license-exempt RSS standard(s). Operation is subject to the following two conditions: (1) this device may not cause harmful
interference, and (2) this device must accept any interference, including interference that may cause undesired operation of the device.
Le present appareil est conforme aux CNR d'Industrie Canada applicables aux appareils radio exempts de licence. L'exploitation est autorise aux deux conditions suivantes: (1) l'appareil ne doit
pas produire de brouillage, et (2) l'utilisateur de l'appareil doit accepter tout brouillage radiolectrique subi, mme si le brouillage est susceptible d'en compromettre le fonctionnement.
CAUTION - To reduce the risk of overheating and possible damage to other equipment do not install to control a receptacle, a motor-operated appliance, a fluorescent lighting fixture, or a
transformer-supplied appliance.
Gradateurs commandant une lampe a filament de tungstene – afin de reduire le risqué de surchauffe et la possibilite d’endommagement a d’autres materiels, ne pas installer pour commader une
prise, un appareil a moteur, une lampe fluorescente ou un appareil alimente par un transformateur.

