Insulet Omnipod GO User manual

PT-000863-AW Rev. 009 5/23
Omnipod GO™User Guide
User Guide
Pod shown without the necessary adhesive.
Omnipod GO™
Insulet Corporation
100 Nagog Park
Acton, MA 01720
1-800-591-3455 |1-978-600-7850
omnipod.com
2797

i
Omnipod GO™ Insulin Delivery Device User Guide
Contacts and Important Information
Customer Care
1-800-591-3455 — 24 hours/7 days
1-978-600-7850 when calling from outside the United States of America
Customer Care Fax:877-467-8538
Website: omnipod.com
Address: Insulet Corporation
100 Nagog Park, Acton MA 01720
Emergency Services: Dial 911 (USA only; not available in
all communities)
Omnipod GO™ Insulin Delivery Device
Start Date _____________
Healthcare Provider
Name
Address
Phone
Email
Health Insurance Pharmacy
Name Name
Address Address
Phone Phone
Policy Number Email

ii
© 2023 Insulet Corporation. Insulet, Omnipod, the Omnipod logo,
Omnipod GO, and the Omnipod GO logo are trademarks or registered
trademarks of Insulet Corporation. All rights reserved. All other
trademarks are the property of their respective owners. The use of
third party trademarks does not constitute an endorsement or imply a
relationship or other aliation.
Patent information at www.insulet.com/patents.
PT-000863-AW REV 009 05/23

iii
Read the entire user guide before operating the Omnipod GO Pod.
Contents
Contacts and Important Information......................... i
Contents ................................................ iii
Chapter 1: Introduction ....................................1
1.1. Welcome to Your Omnipod GO™ Pod ...................2
1.2. Learning Resources ..................................2
1.3. About This User Guide ................................3
1.4. Terminology.........................................4
1.5. Indications for Use ...................................6
1.6. Compatible Insulins ..................................6
1.7. General Warnings and Safety Information ...............6
1.8. General Precautions ..................................9
1.9. Healthcare Provider Dosing Considerations.............13
1.10. Understanding Your Pod's Daily Insulin Rate and Your
Syringe's 3-day Fill Line ...................................14
Chapter 2: Applying or Removing a Pod .....................19
2.1. About the Pod ......................................20
2.2. About the Fill Syringe and Fill Needle...................23
2.3. Before You Fill and Apply Your Pod ....................24
2.4. Using the Right Pod and Fill Syringe....................25
2.5. Select the Pod Site (Infusion Site) ......................26
2.6. Understand Pod Positioning ..........................27
2.7. Prepare the Pod Site.................................28
2.8. Fill the Syringe to the "Fill Here" Line ...................28
2.9. Fill the Pod .........................................30
2.10. Take Actions to Apply the Pod Properly While the
Amber Light is Flashing .............................32
2.11. Remove (Snap O) the Pod's Hard Plastic Tab..........33
2.12. Remove (Peel O) the Paper from the Adhesive Tape ...34
2.13. Inspect the Pod ....................................34
2.14. Apply the Pod .....................................35
2.15. Remove a Pod .....................................39
2.16. More Information about Pod Use ....................40
Chapter 3: Understanding Pod Lights and Sounds and Alarms..43
3.1. Introduction to How the Pod Communicates ............44
3.2. During Pod Setup ...................................46
3.3. During Pod Use .....................................48
3.4. When the Pod has Stopped: Alarms....................48
3.5. Silencing Alarms ....................................48

iv
Contents
Chapter 4: Taking Care of Your Pod and Your Diabetes ........51
4.1. Pod and Insulin Storage ..............................52
4.2. Pods and the Environment ...........................52
4.3. Cleaning Your Pod...................................53
4.4. Pod Site Checks .....................................54
4.5. Being Aware of Your Glucose .........................55
4.6. Traveling and Vacations ..............................55
4.7. Avoiding Low and High Glucose .......................58
4.8. Handling Special Situations ...........................62
Chapter 5: Troubleshooting ................................63
5.1. Pod Issues .........................................64
5.2. Pod Complaints .....................................65
Appendix ................................................67
Index ...................................................89

1
Chapter 1: Introduction
Contents
1.1 Welcome to Your Omnipod GO™ Pod .....................2
1.2 Learning Resources ....................................2
1.3 About This User Guide ..................................3
1.4 Terminology...........................................4
1.5 Indications for Use .....................................6
Indications for use ......................................6
Contraindications .......................................6
1.6 Compatible Insulins ....................................6
1.7 General Warnings and Safety Information ................6
1.8 General Precautions....................................9
Important User Information .............................11
Emergency Kit .........................................12
1.9 Healthcare Provider Dosing Considerations ..............13
1.10 Understanding Your Pod's Daily Insulin Rate and Your
Syringe's 3-day Fill Line ...............................14

2
1 Introduction
1.1. Welcome to Your Omnipod GO™ Pod
The Omnipod GO Pod helps manage your diabetes by providing
continuous subcutaneous insulin delivery. It may be worn for up to
3 days (72 hours) and can be lled with U-100 rapid-acting insulin.
Each Pod is marked with the daily insulin rate it's made to deliver.
Additional features include:
• No Tubing: There is no tubing with the Omnipod GO Pod. You can
swim wearing the Pod. The Pod is waterproof for depths up to
25 feet (7.6 meters) for up to 60 minutes (IP28).
• Lights and Sounds: Colored LED lights and beeps help you
understand how your Pod is working, and alert you if you need to
change your Pod.
1.2. Learning Resources
Start learning to use the Omnipod GO Pod by reading this entire
User Guide. Also make sure to watch the complete set of step by step
instructional videos at
https://www.omnipod.com/go/start
Use the following resources to learn how to use the Omnipod GO Pod.
• This User Guide
• Quick Start Guide
• Instructional videos at:
https://www.omnipod.com/go/start
If you feel unsure about how to use the Omnipod GO Pod after using
these resources, call Customer Care.

3
Introduction 1
1.3. About This User Guide
Note: This User Guide is intended for use only with the
Omnipod GO Insulin Delivery Device.Each device is marked
with Omnipod GO™and the daily insulin rate. Make sure the
marking on your Pod matches your prescribed amount, for
example, 20 U/day. If you do not know which Pod you are
using, call Customer Care.
This User Guide is provided to help you understand the features and
functions of the Omnipod GO Pod. It provides step by step instructions
on how to properly use the Pod, as well as important warnings and
cautions to ensure your safety during use.
Healthcare and treatment are complex subjects requiring the
services of qualied healthcare providers. This User Guide is
informational only and not intended as medical or healthcare advice
or recommendations to be used for diagnosis, treatment, or for any
other individual needs. This User Guide is not a substitute for medical
or healthcare advice, recommendations, and/or services from a
qualied healthcare provider. This User Guide may not be relied upon
in any way in connection with your personal healthcare, related
decisions, and treatment. All such decisions and treatment should
be discussed with a qualied healthcare provider who is familiar with
your individual needs.

4
1 Introduction
1.4. Terminology
Term Description
Blockage (occlusion) An interruption in insulin delivery. A
blockage may result from blocked tubing,
Pod malfunction, or from using old or
inactive insulin.
Blood glucose The amount of glucose, or sugar, in the blood.
Blood
glucose meter
A device used to check blood glucose.
Cannula A small, thin tube the Pod inserts under the
skin and uses to deliver insulin.
Diabetes,
diabetes mellitus
A condition characterized by high blood
glucose resulting from the body’s inability
to use blood glucose for energy. In type 2
diabetes, either the pancreas does not make
enough insulin or the body is unable to use
insulin eectively.
Glucose A simple sugar used by the body for energy.
Without insulin, many cells in the body cannot
use glucose for energy.
Hemoglobin A1c
(HbA1c)
Blood test used to diagnose diabetes and
to gauge how well your diabetes therapy is
working for you. A1C reects your average
glucose for the past 2 to 3 months.
Hyperglycemia High glucose. Higher-than-optimal glucose in
the blood; generally above 250 mg/dL.
Hyperosmolar
hyperglycemic
state (HHS)
A serious condition marked by extremely high
blood glucose and severe dehydration. This
condition can lead to confusion, seizure, coma,
and even death. HHS is generally preceded
by an illness or infection and can take days or
weeks to develop.
Hypoglycemia Low glucose. Lower-than-optimal glucose in
the blood; generally below 70 mg/dL.
Hypoglycemia
unawareness
A condition in which a person does not feel
or recognize the symptoms of low glucose in
the blood.

5
Introduction 1
Insulin A hormone that helps the body use
glucose for energy. The beta cells of a
pancreas make insulin when the pancreas
is functioning typically.
Ketoacidosis
(Diabetic
ketoacidosis,
or DKA)
Diabetic ketoacidosis (DKA) is a serious
condition in which extremely high blood
glucose and a severe lack of insulin cause
the body to break down fat for energy. The
breakdown of fat releases ketones into the
blood and urine. DKA can take hours or days
to develop, with symptoms that include
stomach pain, nausea, vomiting, fruity
breath odor, and rapid breathing.
Pod site
(infusion site)
The place on the body where a Pod's cannula
is inserted to deliver insulin.
Syringe (ll syringe) Small device used to ll the Pod with insulin.
Titration When your healthcare provider starts your
insulin at one infusion rate and periodically
raises the dosage until it provides the result
you need.
Units (U) How insulin is measured.
Vial Small glass bottle.

6
1 Introduction
1.5. Indications for Use
Caution: Federal (US) law restricts this device to sale by or on
the order of a physician.
Indications for use
The Omnipod GO Insulin Delivery Device is intended for the
subcutaneous infusion of insulin at a preset basal rate in one 24-hour
time period for 3 days (72 hours) in adults with type 2 diabetes.
Contraindications
Insulin pump therapy is NOT recommended for people who:
• are unable to monitor glucose as recommended by their
healthcare provider.
• are unable to maintain contact with their healthcare provider.
• are unable to use the Omnipod GO Pod according to instructions.
• do NOT have adequate hearing and/or vision to allow recognition
of Pod lights and sounds that signify alerts and alarms.
The Pod must be removed before Magnetic Resonance Imaging (MRI),
Computed Tomography (CT) scan, and diathermy treatment. Exposure
to MRI, CT, or diathermy treatment can damage the Pod.
1.6. Compatible Insulins
The Omnipod GO Pod is compatible with the following U-100 insulins:
NovoLog®, Fiasp®, Humalog®, Admelog®, and Lyumjev®.
1.7. General Warnings and Safety Information
Warning: Read all the instructions provided in this User Guide
before using the Omnipod GO Pod. Monitor your glucose with
the guidance of your healthcare provider. Undetected high
glucose or low glucose can result without proper monitoring.

7
Introduction 1
Warning: DO NOT attempt to use the Omnipod GO Insulin
Delivery Device before you have read this User Guide and
watched the complete set of instructional videos. Inadequate
understanding of how to use the Omnipod GO Pod can lead
to high glucose or low glucose.
Warning: DO NOT rely upon this User Guide in any way
in connection with your personal healthcare, related
decisions, and treatment. This User Guide is informational
only and not intended as medical or healthcare advice or
recommendations to be used for diagnosis, treatment,
or for any other individual needs. This User Guide is
not a substitute for medical or healthcare advice,
recommendations, and/or services from a qualied
healthcare provider. All such decisions and treatment should
be discussed with a qualied healthcare provider who is
familiar with your individual needs.
Warning: DO NOT use the Omnipod GO Insulin Delivery
Device if you are unable or unwilling to use it as instructed by
this User Guide and prescribed by your healthcare provider.
Failure to use this Pod as intended could result in over-
delivery or under-delivery of insulin which can lead to low
glucose or high glucose.
Warning: USE ONLY rapid-acting U-100 NovoLog (insulin
aspart), Fiasp (insulin aspart), Humalog (insulin lispro),
Admelog (insulin lispro), or Lyumjev (insulin lispro-aabc) in the
Omnipod GO Pod as they have been tested and found to be
safe for use with the Omnipod GO Pod. If you have questions
about using other insulins, contact your healthcare provider.
Warning: AVOID using the Omnipod GO Pod if you do not
have adequate hearing and/or vision to let you recognize
Pod lights and sounds that signify alerts and alarms. ALWAYS
check your Pod and Pod light more frequently when in loud
environments for prolonged periods of time. Failure to
respond to the alerts and alarms from your Omnipod GO Pod
could result in under-delivery of insulin, which can lead to
high glucose.

8
1 Introduction
Warning: AVOID administering insulin, such as by injection
or inhalation, while wearing an active Pod as this could result
in low glucose. The Omnipod GO Pod cannot recognize insulin
administered outside the Pod. Consult your healthcare
provider about how long to wait after manually administering
insulin before you begin using the Omnipod GO Pod.
Warning: Check your glucose at least once a day, or as
advised by your healthcare provider. The Omnipod GO Pod
does not check your glucose.
Warning: ALWAYS follow your healthcare provider's
guidance on appropriate glucose monitoring to detect high
glucose and low glucose.
Warning: Glucose below 70 mg/dL may indicate low glucose.
Glucose readings above 250 mg/dL may indicate high glucose.
Follow your healthcare provider's suggestions for treatment.
Warning: ALWAYS promptly treat glucose below 70 mg/dL
(low glucose) according to your healthcare provider's
recommendations. Symptoms of low glucose include
weakness, sweating, nervousness, headache, or confusion.
If left untreated, low glucose could lead to seizure, loss of
consciousness, and death.
Warning: DO NOT wait to treat low glucose or symptoms of
low glucose. Even if you cannot check your glucose, waiting to
treat symptoms could lead to severe low glucose, which can
quickly lead to shock, coma, or death.
Warning: NEVER drive yourself to the emergency room if you
need emergency medical care. Ask a friend or family member
to take you to the emergency room or call an ambulance.
9
Introduction 1
Warning: DO NOT use the Omnipod GO Pod in oxygen rich
environments (greater than 25% oxygen), which include
home or surgical areas that use supplementary oxygen
and hyperbaric chambers. Hyperbaric, or high pressure,
chambers are sometimes used to promote healing of diabetic
ulcers, or to treat carbon monoxide poisoning, certain bone
and tissue infections, and decompression sickness. Exposure
to oxygen rich environments could result in combustion of
the Pod, which can cause severe burns to the body.
Warning: AVOID using the Omnipod GO Pod at low
atmospheric pressure (below 700 hPa). You could encounter
such low atmospheric pressures at high elevations, such as
when mountain climbing or living at elevations above 10,000
feet (3,000 meters). Change in atmospheric pressure can
also occur during take-o with air travel. Unintended insulin
delivery can occur if there is expansion of tiny air bubbles
that may exist inside the Pod. This can result in low glucose.
It is important to check your glucose when ying to avoid
prolonged low glucose.
Warning: DO NOT dispose of the Pod as unsorted household
waste. ALWAYS dispose of the Pod according to local waste
disposal guidelines. The Pod is considered biohazardous after
use and can potentially transmit infectious diseases.
1.8. General Precautions
If you observe that your Pod is not working as it should, please contact
Customer Care.
Caution: DO NOT use a Pod if you suspect damage after
an unexpected event such as dropping or hitting on a hard
surface. Using a damaged Pod may put your health at risk
as the Pod may not be working properly. If you are unsure if
your Pod is damaged, stop using it and call Customer Care
for support.
10
1 Introduction
Caution: Federal (US) law restricts this device to sale by or on
the order of a physician.
Caution: ALWAYS begin using a new Pod in a timely manner.
Waiting too long between Pod changes could result in under-
delivery of insulin which can lead to high glucose.
Caution: ALWAYS respond to a red or blinking red Pod light
as soon as possible. A red or blinking red Pod light indicates
that insulin delivery has stopped and you need to change
your Pod to continue receiving insulin. Failure to respond to a
red or blinking red Pod light could result in the under-delivery
of insulin which can lead to high glucose.
Caution: Be prepared to check your glucose following
amusement park rides and during ying or other situations
with sudden changes or extremes of air pressure, altitude,
or gravity. Though the Omnipod GO Pod is safe to use at
atmospheric pressures typically found in airplane cabins
during ight, the atmospheric pressure in an airplane cabin
could change during ight, which may aect the Pod's insulin
delivery. Rapid changes in altitude and gravity, such as those
typically found on amusement park rides or ight take-o and
landing, could aect insulin delivery leading to possible low
glucose or injury. If needed, follow your healthcare provider's
treatment instructions.
Caution: DO NOT use the Omnipod GO Pod in high
atmospheric pressure environments (above 1060 hPa), which
can be found in a hyperbaric chamber. Hyperbaric, or high
pressure, chambers are sometimes used to promote healing
of diabetic ulcers, or to treat carbon monoxide poisoning,
certain bone and tissue infections, and decompression
sickness. Exposure to high atmospheric pressure
environments can damage your Pod which could lead to
under-delivery of insulin which can lead to high glucose.

11
Introduction 1
Potential Risks
• Wearing a Pod might cause infection. Be aware of signs of
infection including: bleeding, pain, and skin irritation including
redness. See your healthcare provider if irritation occurs.
• Kinks in the cannula, or dislodging of the cannula can aect
insulin delivery. Unexpected high glucose could be a sign of a
blockage (occlusion) or other interruption in insulin delivery.
• Air bubbles in the Pod or cannula can aect insulin delivery.
If there is a large amount of air in the Pod, it could deliver an
inaccurate dose of insulin which can lead to low glucose or
high glucose.
• Infusion site complications like scar tissue and infection can make
insulin delivery less eective. Unexplained high glucose is a sign
of ineective insulin delivery.
• Hardware defects, software glitches, and Pod failures could
cause an interruption in insulin delivery. A Pod failure can lead
to high glucose, diabetic ketoacidosis (DKA) or hyperosmolar
hyperglycemic state (HHS). Check your Pod light frequently,
especially when in loud environments, to ensure you are aware
of your Pod's insulin delivery status.
Important User Information
Pay special attention to Warnings and Precautions in this User Guide.
The words "Warning" and "Caution" are displayed in red, bolded text.
A red warning icon is shown before each warning. A yellow caution
icon is shown before each caution statement.
You, an adult with diabetes, are the intended user of the Omnipod GO Pod.
It is very important that you review all instructions in this User Guide
before using the Omnipod GO Pod.
If you still have questions after reading this User Guide, contact
Customer Care 24 hours a day, 7 days a week.

12
1 Introduction
Emergency Kit
Warning: ALWAYS keep the emergency kit supplies
recommended by your healthcare provider on hand to
quickly respond to any diabetes emergency or in case your
Pod stops working. Always carry supplies to perform a Pod
change should you need to replace your Pod at any time.
Warning: NEVER drive yourself to the emergency room if you
need emergency medical care. Ask a friend or family member
to take you to the emergency room or call an ambulance.
Some items you may need include:
• Glucose tablets or another fast-acting source of carbs
• Blood glucose test strips
• Blood glucose meter
• Lancing device and lancets
• Alcohol prep swabs
• A bottle (vial) of rapid-acting U-100 insulin
(see "1.6. Compatible Insulins" on page 6for insulins cleared for
use in the Omnipod GO Pod)
• Several new, sealed Omnipod GO Pods
• A signed letter from your healthcare provider explaining that you
need to carry insulin supplies and the Omnipod GO Pod
• Phone numbers for your healthcare provider and/or physician in
case of an emergency
Tip: Before discontinuing use of the Omnipod GO Pod, ask
your healthcare provider what supplies you need to keep
on hand.
Tip: Ask your healthcare provider to help you develop plans
for handling emergency situations, including what to do if you
cannot reach your healthcare provider.

13
Introduction 1
1.9. Healthcare Provider Dosing Considerations
Your healthcare provider determines and prescribes the amount of
insulin you need per day based on their experience and based on
professional guidelines for insulin therapy.
Depending on your needs, or the actual amount of insulin you have
been taking currently, the Pod may be prescribed for any of these
options: 10 units per day, 15 units per day, 20 units per day, 25 units
per day, 30 units per day, 35 units per day or 40 units per day.
If you're already using insulin, your healthcare provider may consider
reducing your prescribed daily insulin rate when you start using the
Omnipod GO Pod.
Your healthcare provider may change your prescription to a dierent
option for your Pod as your insulin needs change.
Caution: DO NOT use long-acting insulin in the Pod. If you
have used long-acting insulin in the past, note that the Pod is
designed to use rapid-acting, a dierent, faster insulin that
requires a separate prescription. Using incorrect insulin could
result in high glucose or low glucose.
14
1 Introduction
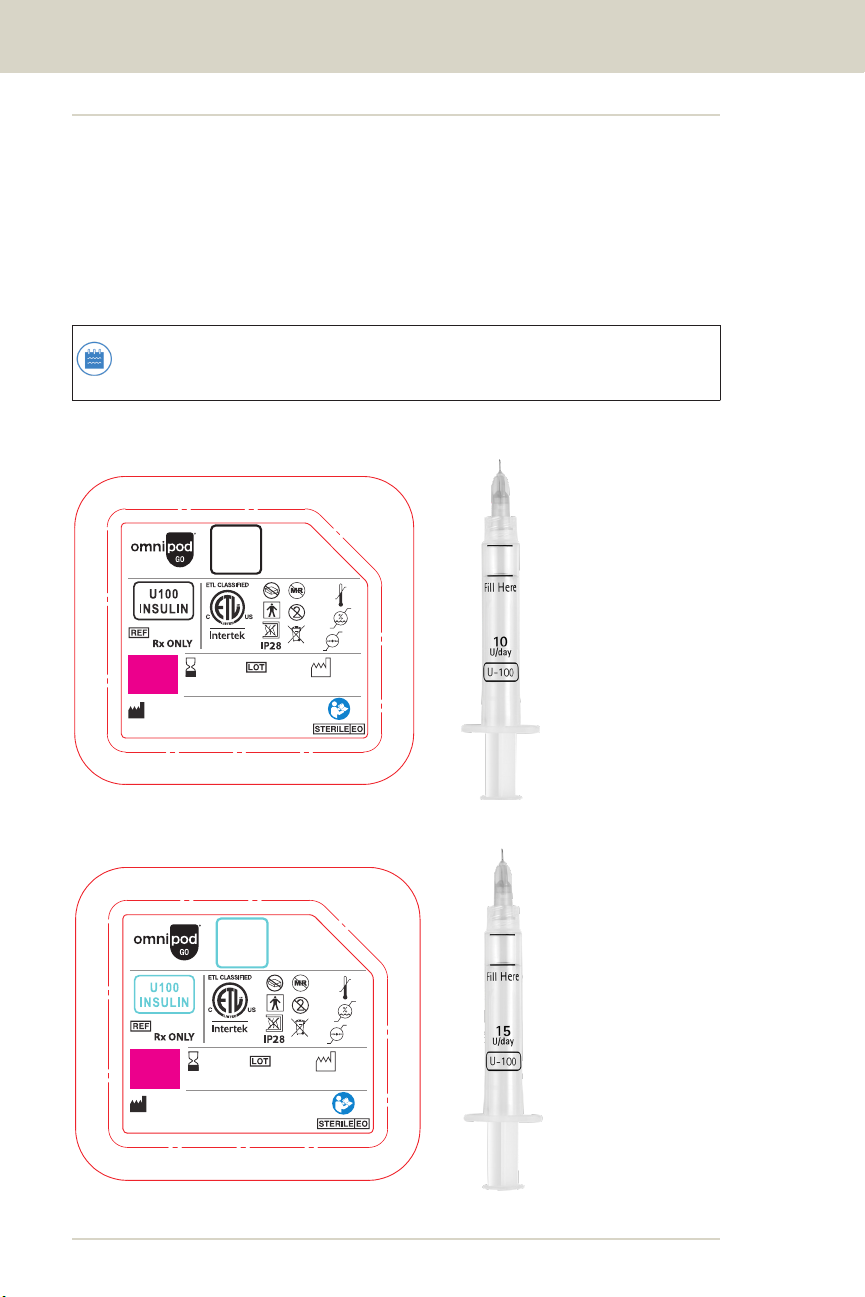
1.10. Understanding Your Pod's Daily Insulin Rate
and Your Syringe's 3-day Fill Line
The following images show the dierent Pod options and the syringe
that comes with each Pod. You'll see that for each prescribed Pod, the
syringe that comes with it is marked with a "Fill Here" line and a daily
insulin rate, for example, 25 U/day. Use only the syringe that came
with your Pod to ensure you get the prescribed daily insulin for 3 days.
Note: The location of the "Fill Here" line marked on the
syringe is specic to each daily insulin rate.
Omnipod GO-10
Insulet Corporation | 100 Nagog Park
Acton, MA 01720 USA
1.800.591.3455 | 1.978.600.7850 | omnipod.com
Assembled in China | PT-000771-10-AW Rev. 004 2/23
POD-INS-I1-1025
10
units
per day
85%
20% 1060 hPa
700 hPa
(41oF)
5oC
(104oF)
40oC
5023778
MEE
yyyy-mm-dd yyyy-mm-dd
T1234567
File name: Artwork, Tray Lid, Pod, 10U, Inspire
Part Number: PT-000771-10-AW
Part Revision: 004
File date: 02/17/2023
Note: Die lines and hidden layers do not print.
Color Key:
Die line, UDI or Variable Data -
Non-printable information
CMYK
Omnipod GO-15
Assembled in China | PT-000771-15-AW Rev. 004 2/23
Insulet Corporation | 100 Nagog Park
Acton, MA 01720 USA
1.800.591.3455 | 1.978.600.7850 | omnipod.com
POD-INS-I1-1525
15
units
per day
85%
20% 1060 hPa
700 hPa
(41oF)
5oC
(104oF)
40oC
5023778
MEE
yyyy-mm-dd yyyy-mm-dd
T1234567
File name: Artwork, Tray Lid, Pod, 15U, Inspire
Part Number: PT-000771-15-AW
Part Revision: 004
File date: 02/17/2023
Note: Die lines and hidden layers do not print.
Color Key:
Die line, UDI or Variable Data -
Non-printable information
CMYK

15
Introduction 1
Omnipod GO-20
Assembled in China | PT-000771-20-AW Rev. 004 02/23
Insulet Corporation | 100 Nagog Park
Acton, MA 01720 USA
1.800.591.3455 | 1.978.600.7850 | omnipod.com
POD-INS-I1-2025
20
units
per day
85%
20% 1060 hPa
700 hPa
(41oF)
5oC
(104oF)
40oC
5023778
MEE
yyyy-mm-dd yyyy-mm-dd
T1234567
File name: Artwork, Tray Lid, Pod, 20U, Inspire
Part Number: PT-000771-20-AW
Part Revision: 004
File date: 02/17/2023
Note: Die lines and hidden layers do not print.
Color Key:
Die line, UDI or Variable Data -
Non-printable information
CMYK
Omnipod GO-25
Assembled in China | PT-000771-25-AW Rev. 004 2/23
Insulet Corporation | 100 Nagog Park
Acton, MA 01720 USA
1.800.591.3455 | 1.978.600.7850 | omnipod.com
POD-INS-I1-2525
25
units
per day
85%
20% 1060 hPa
700 hPa
(41oF)
5oC
(104oF)
40oC
5023778
MEE
yyyy-mm-dd yyyy-mm-dd
T1234567
File name: Artwork, Tray Lid, Pod, 25U, Inspire
Part Number: PT-000771-25-AW
Part Revision: 004
File date: 02/17/2023
Note: Die lines and hidden layers do not print.
Color Key:
Die line, UDI or Variable Data -
Non-printable information
CMYK
Table of contents
Other Insulet Medical Equipment manuals


Popular Medical Equipment manuals by other brands


Bailey
Bailey 9600 Series product manual

SELVAS Healthcare
SELVAS Healthcare ACCUNIQ BP210 user manual

AREQUIPMENT
AREQUIPMENT M860 user manual

ResMed
ResMed AirSense 10 AutoSet for Her Plus Clinical Guide

Orliman
Orliman BOXIA AB13 INSTRUCTIONS FOR USE AND PRESERVATION

Atmos
Atmos S 201 Thorax operating instructions


