Intec ColorCut SC5000 Series User manual
ColorCut SC5000 Series
ColorCut Pro - Production Studio 2021
User Guide
Revision: 0.1


Contents
1. INTRODUCTION ...................................................................................... 6
Compatibility ........................................................................................................ 6
Compatible Vector Programs: ................................................................................... 6
Workstation Hardware requirements: .................................................................. 7
2. INTRODUCTION, COLORCUT PRO - Production Studio..................... 8
Mac users and ColorCut Pro..................................................................................... 9
3. Setting Up Live Video for ColorCut Pro............................................... 10
3.1. Using Wi-Fi to connect to your ColorCut’s Live Video Feed....................... 10
3.2 Windows applications for creating a Wi- HotSpot. .................................... 11
3.2.1 Conguring WindowsOS Wi-Fi HotSpot ........................................................ 11
3.2.2 Daily Operation - Enabling WindowsOS Wi-Fi HotSpot................................. 15
3.2.3 Conguring Windows Wi-Fi Direct Access Point (Method 2)......................... 16
4. Graphics File Design - Creating your Artwork.................................... 18
4.1 Layers for printing ............................................................................................. 19
4.2 Layers for cutting............................................................................................... 19
5. DRAWING CUT LINES, PERFORATED LINES OR CREASE LINES.... 20
5.1 Line Colors recognised by ColorCut Pro...................................................... 20
6. COLORCUT REGISTRATION PAGEMARKs......................................... 22
6.1 Positioning of Registration PageMARKs ..................................................... 23
6.2 Considerations for rear PageMARK placement. .......................................... 23
6.2.1 Conguring PageMARKs for maximum cut accuracy.................................... 24
6.2.2 Conguring PageMARKs for maximum efciency.......................................... 25
6.3 Automatically Adding Registration PageMARKs.......................................... 26
6.3.1 Conguring Automatic PageMARKs ............................................................. 27
6.3.2 Additional Conguration for Mac users ......................................................... 28
6.4 Using ‘ColorCut Pro Add PageMARKs’ ....................................................... 29
6.4.1 Selecting the Layer to Add PageMARKs ....................................................... 29
6.4.2 Automatically Adding PageMARKs ............................................................... 30
6.5 Job Numbers, BarCodes and the Job Library ............................................. 31
7. THE JOB LIBRARY, JOB NUMBERS & QR CODES ............................ 32
7.1 Automatically Adding PageMARKs and QR codes ...................................... 33
8. HOW TO CUT YOUR FILES USING COLORCUT PRO........................ 36
Two different ways to Launch ColorCut Pro Production Studio.............................. 36
8.1 Launching ColorCut Pro - Production Studio (Direct Mode) ...................... 37
8.1.1 Selecting the Cutline Layer............................................................................. 37
8.1.2 Select the layer for the cutting ....................................................................... 37
8.2 Launching ColorCut Pro (Direct Mode) ....................................................... 38
Conguring ColorCut Pro to match your cutter....................................................... 39
8.2.1 Customising the ColorCut Pro skin to your SC5000 cutter .......................... 39
8.2.2 Device Type .................................................................................................... 40
8.2.3 Output device................................................................................................. 40
8.2.4 Overview of the ColorCut Pro Main Screen (Direct Mode)............................. 41
8.3 Launching ColorCut Pro (Job Server Mode) ............................................... 42
8.3.1 Customising the ColorCut Pro skin to your SC5000 cutter .......................... 43
8.3.2 Device Type .................................................................................................... 44
8.3.3 Output device................................................................................................. 44
8.3.4 Overview of the ColorCut Pro Screen Layout (Job Server Mode).................. 45
9. SETTINGS: CONFIGURING THE COLORCUT PRO PLUG-IN ............ 46
9.1 Knife Offset................................................................................................... 47

9.1.1 Choosing the correct Blade for the job .......................................................... 48
9.2 Scan Targets................................................................................................. 49
9.3 Output Device............................................................................................... 50
9.4 Device Type .................................................................................................. 50
9.5 Sensor Offset & the Auto Find feature.......................................................... 51
9.5.1 Auto Find - Setting the Sensor Offset to the Blade........................................ 51
9.5.2 Automatically Setting the Sensor Offset ....................................................... 52
9.6 Units of Measurement .................................................................................. 55
9.7 Vision3 CCD Camera Live Video feed connection ....................................... 56
9.7.1 Setting IP address for Vision3 CCD Camera Live Video Echo....................... 56
9.7.2 Setting the HOTSPOT SSID ........................................................................... 57
9.8 Choosing where to set Speed and Force..................................................... 57
9.10 Activation/ Deactivating your ColorCut Pro License .................................. 58
9.10.1 Deactivating ColorCut Pro............................................................................ 58
9.11 Regional Language Options ....................................................................... 59
10. COLORCUT PRO - MAIN INTERFACE OVERVIEW ........................... 60
10.1 About (Version information) for ColorCut Pro............................................. 60
10.2 The Job Preview Window........................................................................... 60
10.3 The Live Preview Window .......................................................................... 61
10.4 The Brightness / Illumination Control ......................................................... 62
10.5 The Scan History Window .......................................................................... 63
10.6 The Settings Button.................................................................................... 64
10.7 The Productivity Button.............................................................................. 64
10.8 The Cut Settings Window........................................................................... 65
10.9 Selecting Order of the Cut/Creasing to be performed. .............................. 66
10.10 The Material Type/Actions Window.......................................................... 66
10.11 Assigning a Material Type/Action to a Color (or clearing one).................. 67
10.12 The Editing Material Type Window ........................................................... 67
10.12.1 Selecting the Tool (Cutting/Creasing/Ignore).............................................. 68
10.12.2 Selecting the Double Pass Feature ............................................................ 68
10.12.3 Selecting the Line Style of the Cut or Creasing Tool.................................. 68
10.12.4 Creating TAGs to hold elements in Using “Line Style”............................... 69
10.12.5 Selecting the Speed of the Cut or Creasing Tool ....................................... 72
10.12.6 Selecting the Force of the Cut/Crease ....................................................... 72
10.13 OverCut .................................................................................................... 73
10.14 Media Positioning (AutoFeed / Manual Feed) .......................................... 74
10.15 START / SCAN QR CODE......................................................................... 75
10.16 SWITCH MODES...................................................................................... 75
11. PRODUCTIVITY OPTIONS .................................................................. 76
11.1 Sort Method................................................................................................ 77
11.2 Scan for QR Code on every sheet.............................................................. 78
11.3 After scanning QR Code ask before cutting............................................... 79
11.4 Media Positioning....................................................................................... 80
11.5 Automatic Production Options ................................................................... 81
11.5.1 COPIES Mode ............................................................................................. 81
11.5.2 SINGLE Mode............................................................................................... 81
11.5.3 CONTINUOUS Mode.................................................................................... 81
11.5.4 Copies Entry................................................................................................. 81
11.5.6 Error handling ............................................................................................... 81
11.6 Media Options ............................................................................................ 82
11.6.1 Media Size.................................................................................................... 82
11.7 Recap - Position of PageMarks on your Media.......................................... 83

Intec Printing Solutions - ColorCut Pro User Guide for Intec ColorCut SC5000..................................................................................................Page No: 5
11.8 Media Positioning....................................................................................... 83
11.9 SC5000 - Cutting without Targets (Origin ne tuning) ................................ 84
11.13 Production Log......................................................................................... 85
11.11 ADVANCED Productivity options ............................................................. 86

Intec Printing Solutions - ColorCut Pro User Guide for Intec ColorCut SC5000..................................................................................................Page No: 6
1. INTRODUCTION
To cut your projects with the Intec ColorCut SC5000 cutter, you need to be able to
design your artwork and then apply lines that you designate for cutting, creasing,
scoring or perforating. Projects and artwork can be created using either Adobe
Illustrator on Mac or PC, or CorelDraw on PC.
ColorCut Pro is a plug-in that provides you the ability to send projects that you
have designed in Adobe Illustrator® or CorelDRAW® directly to your Intec ColorCut
Flatbed cutter with no need to convert them to a different format.
After you install ColorCut Pro™ (including ColorCut Pro - Production Studio) you
will be provided with a new option within your Adobe Illustrator® or CorelDRAW®
software program enabling you to send vector lines from your software to your
ColorCut SC5000 cutter. During the installation, ColorCut Pro will also add an option
that enables you to automatically add Page Registration Marks for print & cut jobs,
(these work with the ColorCut SC5000’s Vision3 CCD sensor). In addition ColorCut
Pro will add an option for you to assign Job numbers or QR Codes to your cut jobs,
enabling you to build a library of cut job les which can be used with a stand alone
version of ColorCut Pro known as ColorCut Pro - Production Studio (or Job Server).
Files can be cut directly from your graphics application using the ColorCut Pro plug-
in, or using the ColorCut Pro - Production Studio version of software, which can
be launched separately either on the same or a different computer. ColorCut Pro
- Production Studio is a simple interface that enables other individuals within your
company the ability to cut your jobs at any time without requiring Adobe Illustrator or
Corel Draw, and without having to re-open the original le.
The ColorCut Pro plug-in does not currently work with any other vector imaging
programs aside from those listed in the Compatibility section below.
Files may be cut directly from PC Graphics applications using ColorCut Pro’s plug-in
or using the by using ColorCut Pro - Production Studio (PC only). Mac users can
design their jobs, add cutting registration marks, assign Job numbers, add QR Codes
and add jobs to the ColorCut Pro Job library using the ColorCut Pro Mac Client. The
Mac workstation is not used to cut the les, Mac jobs are sent to the ColorCut Pro job
library on a remote PC for cutting with the ColorCut Pro - Production studio software.
Compatibility
The plug-in requires Adobe Illustrator® (Mac or PC) or CorelDRAW® (PC only) to be
installed on the computer in question. The ColorCut Pro™ software does not include
the Adobe Illustrator® or CorelDRAW® software.
Compatible Vector Programs:
PC - Adobe Illustrator®* CS1–CS6, CC, CC2014, CC2015, CC2017, CC2018 , CC2019, CC2020, CC2021
CorelDRAW®** X4 - X8, 2017 - 2020
MAC - Adobe Illustrator®* CC2015, CC2017, CC2018 , CC2019, CC2020, CC2021
* Does not support illegal copies of Illustrator
** Full version only. Does not support “Home and Student”, “Essentials” edition or illegal copies of CorelDRAW

Intec Printing Solutions - ColorCut Pro User Guide for Intec ColorCut SC5000..................................................................................................Page No: 7
Multicore Intel processor with 64-bit support
Windows 10 x64 bit
4 GB of RAM (8 GB recommended (As supplied with ColorCut Pro Server Station)
Minimum display resolution : 1024x900
Recommended Display Resolution: 1280x960 or higher.
(Screens with resolutions such as: 1152x900, 1024x900, 1280x960, 1440x900, 1440x960,
1440x1024, 1440x1080, 1600x900, 1600x1080, 1600x1280, 1920x1080 or higher)
2x available USB Ports
(Note KB & Mouse often use a port each so factor this in)
FB750, FB1150, FB8000, SC5000 and LC600 users:
PC directly connected to ColorCut must have Wi-Fi capability for Direct connection to Vision3
Camera Sensor. (for PC users with no wi- currently a USB Wi-Fi dongle included)
Compatible OS Versions:
PC Windows v7,8 or 10 – 64bit with
Mac OS version 10.15 (Mountain Lion), Mac OS 10.13 (High Sierra), MacOS
version 10.12 (Sierra), or Mac OS X version 10.11 (El Capitan)
Compatible Cutting Units:
Intec ColorCut® Flatbed (SC5000)
Workstation Hardware requirements:

Intec Printing Solutions - ColorCut Pro User Guide for Intec ColorCut SC5000..................................................................................................... Page No: 8
2. INTRODUCTION, COLORCUT PRO - Production Studio
ColorCut Pro - Production Studio (The main application), is PC Only. This is
the application that communicates with your Intec cutter and will ultimately cut your
designs. This can be launched in two ways:
ColorCut Pro (Direct Plug-in): ColorCut Pro can be accessed and launched from
inside Illustrator or CorelDraw - just under your PRINT command. When starting
ColorCut Pro directly from Illustrator or Corel Draw, it works just like the PRINT
command. When the ColorCut Pro option is selected in your graphics application
from the [FILE] menu, the vector lines on the currently selected layer are directly
exported into the ColorCut Pro cutting window. Once exported to ColorCut Pro,
simply choose the action for each colored line e.g. Cut, Crease, Ignore, Perforate,
Score and click start. Cutting will commence immediately. This is a very simple way
to cut directly from your le.
Where access to the original artwork les is not practical, or where a different user
wishes to cut the job, then we recommend designers create their jobs with a job
number and/or QRcode to enable jobs to be cut using ColorCut Pro - Production
Studio software (detailed below), either on the same computer or a different computer.
ColorCut Pro - Production Studio (Job Server), Launched from the START MENU
on your computer. Like the ColorCut Pro (Direct Plug-in) above, this is also the
main application - identical to the application that launches from inside Illustrator or
CorelDraw. However, at launch ColorCut Pro (Job Server) will open with no cutting
le or job selected instead cut les are retrieved from the ColorCut Job library by
entering the job number OR scanning the QRcode on the printed sheets and then
cut the le. The advantage of using ColorCut Pro - Production Studion version in
job server mode is that there is no need for Illustrator or CorelDraw. The Job Server
version of ColorCut Pro is stand alone, thus will cut les or jobs created and saved
to the ColorCut Pro job library using the ColorCut Pro ADD PageMarks & QRcode
feature (detailed below). Both in Direct or Job Server mode, users can choose speed,
force and other cutting related controls and can set productivity options such as
number of copies to cut.
Within Illustrator (Mac or PC) or CorelDraw (PC only) you will nd 2 additional functions:
ColorCut Pro ADD PageMARKs; this is a utility that automatically adds cutting
registration marks to your artwork. (Known as PageMARKs). Illustrator or Corel Draw
les with PageMARKs can be cut directly from Illustrator or Corel Draw by using the
ColorCut Pro application.
ColorCut Pro ADD PageMARKs & QRcode; this is a utility that enables users to
assign a Job number AND a QRcode to their artwork so that is may be cut at a later
date. The QRcode is automatically generated and the job number and placed on your
artwork. Once a QRcode has been assigned to your artwork, the cutting le is sent
(in the background) to the ColorCut job library for use later with the main ColorCut
Pro (Job Server) application. With Job numbers and QRcodes, les can be printed (or
sent to RIP’s (like a Fiery) and printed at a later date). The sheets can be cut using the
ColorCut Pro (Job Server) version which can be done on a separate PC and does not
require the original le to be opened. The design to be cut is retrieved automatically
as the user enters the job number OR the cutter reads the QRcode. This is ideal for
larger companies looking to separate design and nishing(Cutting) of jobs.

Intec Printing Solutions - ColorCut Pro User Guide for Intec ColorCut SC5000..................................................................................................Page No: 9
Mac users and ColorCut Pro
Mac users can design and generate jobs on Mac workstations using ColorCut Pro’s
Job library feature.
Note the main ColorCut Pro (Production Studio) cutting application is PC
only, so Mac users can design their artwork on the Mac and use a PC to
connect to the cutter for the cutting of the jobs.
Mac users can design and cut les using 2 different approaches:
1. You can use the Mac ColorCut Pro feature ‘ColorCut Pro ADD PageMARKs’; this
utility will add the registration marks necessary to cut your le. You should then save
your design as an illustrator le that can be opened on the PC which is connected
to the cutter. (If you save the les in Illustrator format, you must have Illustrator also
installed on the PC to open Illustrator les). You can then use ColorCut Pro in direct
mode and then cut directly from the PC version of Illustrator.
or (the recommended solution is ):
2. Connect a PC to your Intec cutter and install ColorCut Pro - Production Studio, on
the PC (on the same network as the MAC), congure the ColorCut Pro Job Library
feature to act as a cut job library server for your Mac.
Use your Mac to create your artwork and then use the Mac ColorCut Pro feature
‘ColorCut Pro ADD PageMARKs & QRcode’. (On MAC, this feature is found in
the Illustrator main menu, just under the PRINT command). This feature enables
Mac users to design on their Mac and then when the ‘Add PageMARKs & QRcode’
feature is selected from the Illustrator menu, ColorCut Pro will assign a Job number
AND a QRcode to the artwork, the cut le is automatically sent (in the background),
to the ColorCut Pro Job library server on your PC so that is may be cut at a later
date. This enables Mac designers to design efciently on their MAC and allows Print
Production operators to cut the Mac designed jobs from the remote PC connected
to the Intec cutter using the Job Server and Job Library feature.

Intec Printing Solutions - ColorCut Pro User Guide for Intec ColorCut SC5000................................................................................................Page No: 10
ColorCut Pro uses the Vision3 registration system on your SC5000 to identify your
cutting registration marks (PageMarks) and to read the QR code for retrieving job
numbers.
Please Note: ColorCut Pro does NOT require a live video feed to do this,
your cutter will work perfectly ne with no video connection as all this is
all handled in the cutter. However, the Vision3 registration system uses
a CCD camera which incorporates a camera image echo function.
This function will broadcast over Wi-Fi the video feed that the Vision3
sensor can see. You can connect to the live video relay using the ColorCut
Pro application and display the video feed which is useful when placing
sheets manually or to see while cutting and help identify issues. We
recommend you do enable this feature. Please follow the guide below
on how to connect to the live video feed before launching ColorCut Pro.
3.1. Using Wi-Fi to connect to your ColorCut’s Live Video Feed
The Vision3 registration system tted in an Intec SC5000 cutter, has a camera image
echo function which enables the live video feed from the camera to be ‘echo’d’ or
transmitted through a direct Wi- connection so that you can also see what your
SC5000 cutter can see. To connect to the Video feed you will need to ‘make’ a Wi-Fi
Direct connection from the computer that is running the ColorCut Pro application
and is connected to the cutter.
3. Setting Up Live Video for ColorCut Pro
B
The SC5000 cutter will connect to a 2.4GHz Wi-Fi Direct connection or Wi- HotSpot
dened as follows:
SSID: H3
Password: 12345678
If your computer is not a laptop then you
may not have Wi-Fi capabilities on your PC,
therefore your Intec SC5000 is supplied with
a USB Wi-Fi Dongle B. to enable you to do
this.
If you are connected on a PC with a Wi-Fi
connection (such as a laptop you can ignore
this step).
1. Insert the Wi-Fi Dongle supplied with the
SC5000.
2. When the dongle is recognised, please install the drivers (supplied in the Wi-Fi
dongle box).

Intec Printing Solutions - ColorCut Pro User Guide for Intec ColorCut SC5000................................................................................................Page No: 11
3.2 Windows applications for creating a Wi-fi HotSpot.
Once you have Wi-Fi installed on your computer there are 2 methods to connect to
your Intec SC5000 cutter.
1. Use the built in Windows HOTSPOT function. This is easy to use and uses
Windows 10’s own HOTSPOT feature.
Note: Windows HotSpot is a WindowsOS feature that enables a Mobile
HotSpot - Direct Wi-Fi connection. However, it as initially intended for
sharing an internet connection, so please bear in mind that if you do not
have an internet connection on your computer, the Windows HOTSPOT
feature can not be enabled. (This is true, even though you are connecting
directly to the Intec SC5000 cutter and not using the feature to connect to
the internet). If you do not have an internet connection then we recommend
creating a DIRECT connection (Below) which is how newer devices like
some TV remote controls (Roku 3 )work, to do this use a utility like Wi-Fi
Direct Access point (below).
2. Use the Wi-Fi Direct Access Point. This is a paid for utility from the
Windows Store for Windows 10 users.
Wi-Fi Direct makes a direct connection to the Intec Wi- video feed from the Camera,
eliminating any routers or network management issues. It does this using the Wi-Fi
Direct standard, which enables devices to easily connect with each other without
requiring a wireless access point. Wi-Fi Direct allows two devices to establish a
direct Wi-Fi connection without requiring a wireless router or internet connection.
3.2.1 Configuring WindowsOS Wi-Fi HotSpot
1.Check the task bar on your
computer and ensure you have
an internet connection. If NO Wi-Fi
connection shows, or the “Not connected
to the Internet” icon shows Cthen click
on the icon and connect to your Wi-Fi
router and enter any ID or passwords
required.
2.Check the task bar on your
computer and ensure you have a
the Wi-Fi connection showing D. (This is
essential to start the Wi-Fi HotSpot)
C
D
Intec Printing Solutions - ColorCut Pro User Guide for Intec ColorCut SC5000................................................................................................... Page No: 12
Configuring WindowsOS Wi-Fi HotSpot (Cont.).
3.
Left click on the Wi-Fi icon Din the task bar
to display the ‘Wi-Fi, Network & Internet
setting’ menu, then Right mouse click over the
Mobile Hotspot Ebutton in the lower right.
The sub menu item ‘Go to Settings’ will be displayed.
Click this.
4.
The ‘Windows Mobile hotspot’ conguration menu will be displayed. This menu
is only required when initially setting up the HotSpot. Each time you activate
the HotSpot after this, the settings for the SSID, and Password will be remembered.
Your Intec SC5000
is set to make a
direct connection
to a 2.4GHz
WLAN with an
SSID of “H3”, and
broadcasts the
Live video feed to
that connection.
You need to set up
your HotSpot to
match this SSID
name. Click Edit
Fto congure
your Hotspot to
2.4GHz, and set
your SSID and
the password for
connection.
If you can’t activate the HotSpot and
you see the message show to the
right, then you skipped step 2. You
must ensure you have an internet
connection to use Windows HotSpot,
even though the cutter does not need
one.
F
D
E

Intec Printing Solutions - ColorCut Pro User Guide for Intec ColorCut SC5000................................................................................................Page No: 13
Configuring WindowsOS Wi-Fi HotSpot (Cont.).
5.
Under, Network Name, enter the SSID name ‘H3’ as shown G. Within the eld,
Network password, enter the password ‘12345678’H(The Intec SC5000 cutter
will automatically connect to the SSID “H3”, with a password of ‘12345678’. So
these entries must be set to match exactly.
6.
The Intec SC5000 Vision3 sensor’s image Echo feature broadcasts only using
the 2.4GHz, so it is essential that you set the ‘Network Band’ Ito 2.4GHz, if
you set it to 5GHz or “Any Available” the cutter will not connect to your HotSpot
and you will not be able to see the Camera.
7.
Click save to save nish and save your setting. These will be remembered
and in future you only need to enable or disable the connection. When you
click SAVE you will be returned to the ‘Windows Mobile hotspot’ conguration
dialogue box.
H
G
I

Intec Printing Solutions - ColorCut Pro User Guide for Intec ColorCut SC5000................................................................................................... Page No: 14
Configuring WindowsOS Wi-Fi HotSpot (Cont.).
8. In the ‘Windows Mobile hotspot’ conguration dialogue box, turn ON the
‘Share my hotspot connection with other devices’ J.
At the bottom of this dialogue box you can see the devices that connect to
your computer K. It will take between 30 secs to 2 mins for the Intec SC5000
to see the connection and connect to your Hotspot.
9. After a short period (30 secs to 2mins)
you should see a new device appear
under the ‘connected device’ list. L
Either:
FriendlyElec
Intec SC5000
The IP address will be shown in the
connected devices list so you know it
has connected..
The setup is complete. In future you only
need to enable and disable your HotSpot,
to connect to the cutter. (See step 10 to
understand how to do this).
J
K
L
Intec Printing Solutions - ColorCut Pro User Guide for Intec ColorCut SC5000................................................................................................Page No: 15
You can now skip to the section on Graphic Design and Using ColorCut Pro.
However, if you do not have an Internet connection then follow the steps on how to
set up a direct connection to the Cutter without requiring an internet connection or
router. (Wi-Fi Direct Access Point following.)
3.2.2 Daily Operation - Enabling WindowsOS Wi-Fi HotSpot.
10.
During daily operation you can now enable the connection to your Intec
cutter by simply clicking on the Wi-Fi icon in the Windows task bar M
(Bottom right of your screen).
Next click on the Mobile
HotSpot button Nthat
appears in the lower right
corner of the ‘Network and
Internet settings’ Dialogue
box/menu that appears.
The Mobile HotSpot button will
change color when it is activated,
and indicate the SSID name
(H3) and how many devices are
connected. O
After enabling the mobile
Hotspot, ensure you power ON
the Intec SC5000 cutter, and
allow 30 secs - 2mins for it to
connect to your HotSpot. Your
Mobile HotSpot will show when
the device is connected. P
M
N
O
P
Intec Printing Solutions - ColorCut Pro User Guide for Intec ColorCut SC5000................................................................................................... Page No: 16
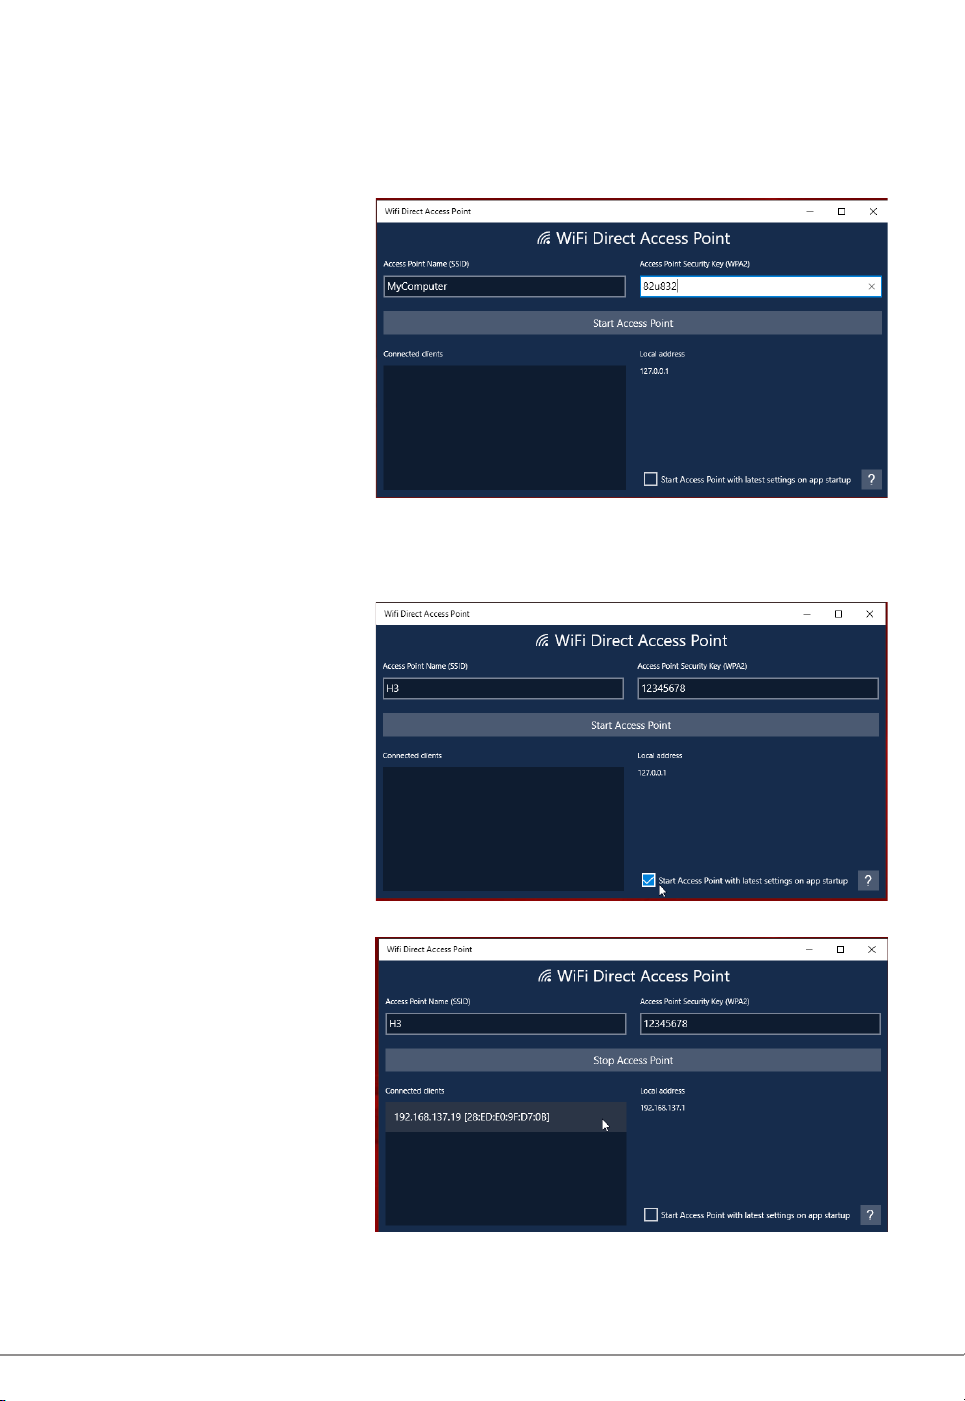
3.2.3 Configuring Windows Wi-Fi Direct Access Point (Method 2)
‘Wi-Fi Direct Access Point’ is an app available from the MicroSoft Store. It is
available for Win 10 users and enables you to set up a Direct Wi-Fi connection to the
Intec cutter without the need for an internet connection or a separate router. It is
ideal for users without connection to a router OR users in secure environments where
connection to the Internet is not permitted for IT reasons and as such the normal
WindowsOS Wi-Fi HotSpot will not work.
‘Wi-Fi Direct Access Point’ (other alternative apps may be available), is a paid for
application available from the MicroSoft Store.
1.To download it, open the
Microsoft Store program from
your Windows Start Menu, and
click on the SEARCH box B,
enter the search term ‘Direct
Access’ and the app will
appear in the search.
2. Click on the application and
click [ GET ] to download it.
(Note: This is a paid app and
not part of the Intec ColorCut
solution, please check it is
compatible with your Wi-Fi
equipment (The USB Dongles
supplied have been tested so
if you are using these it should
be ne).
3. After installing the Wi-Fi Direct Access
Point, locate the app from your Windows
START Menu and click to launch it.
B
Intec Printing Solutions - ColorCut Pro User Guide for Intec ColorCut SC5000................................................................................................Page No: 17
Configuring Windows Wi-Fi Direct Access Point (Cont.)
4. The rst time you launch Wi-Fi Direct Access Point, you will need to set the
Access Point Name (SSID) and the Security Key/Password to match the SSID
and Password that your Intec ColorCut Cutter will try to connect to.
Click on the Access
Point Name SSID Cand
set it to ‘H3’ .
Click on the Access
Point Security Key and
set the password to
‘12345678’ D
5. Having entered the Access Point Name and the Password ensure that is starts
each time with the same settings by clicking the check box next to “Start
Access Point with latest settings on app startup” E .
Click on the button
‘START ACCESS
POINT’ to congure
the PC to accept Direct
Wi-Fi connections.
6. After clicking ‘START
ACCESS POINT’, the
Intec cutter will take
approx 30 secs to 2mins
to see the Wi-Fi access
point and connect.
When the Intec cutter
connects, you will
see the device and IP
address appear in the
left column, F
You can now follow the the section on Graphic Design and Using ColorCut Pro. For
how to set up your artwork and how to congure the ColorCut Pro app for initial use
and daily operation.
C D
E
F
Intec Printing Solutions - ColorCut Pro User Guide for Intec ColorCut SC5000................................................................................................Page No: 18
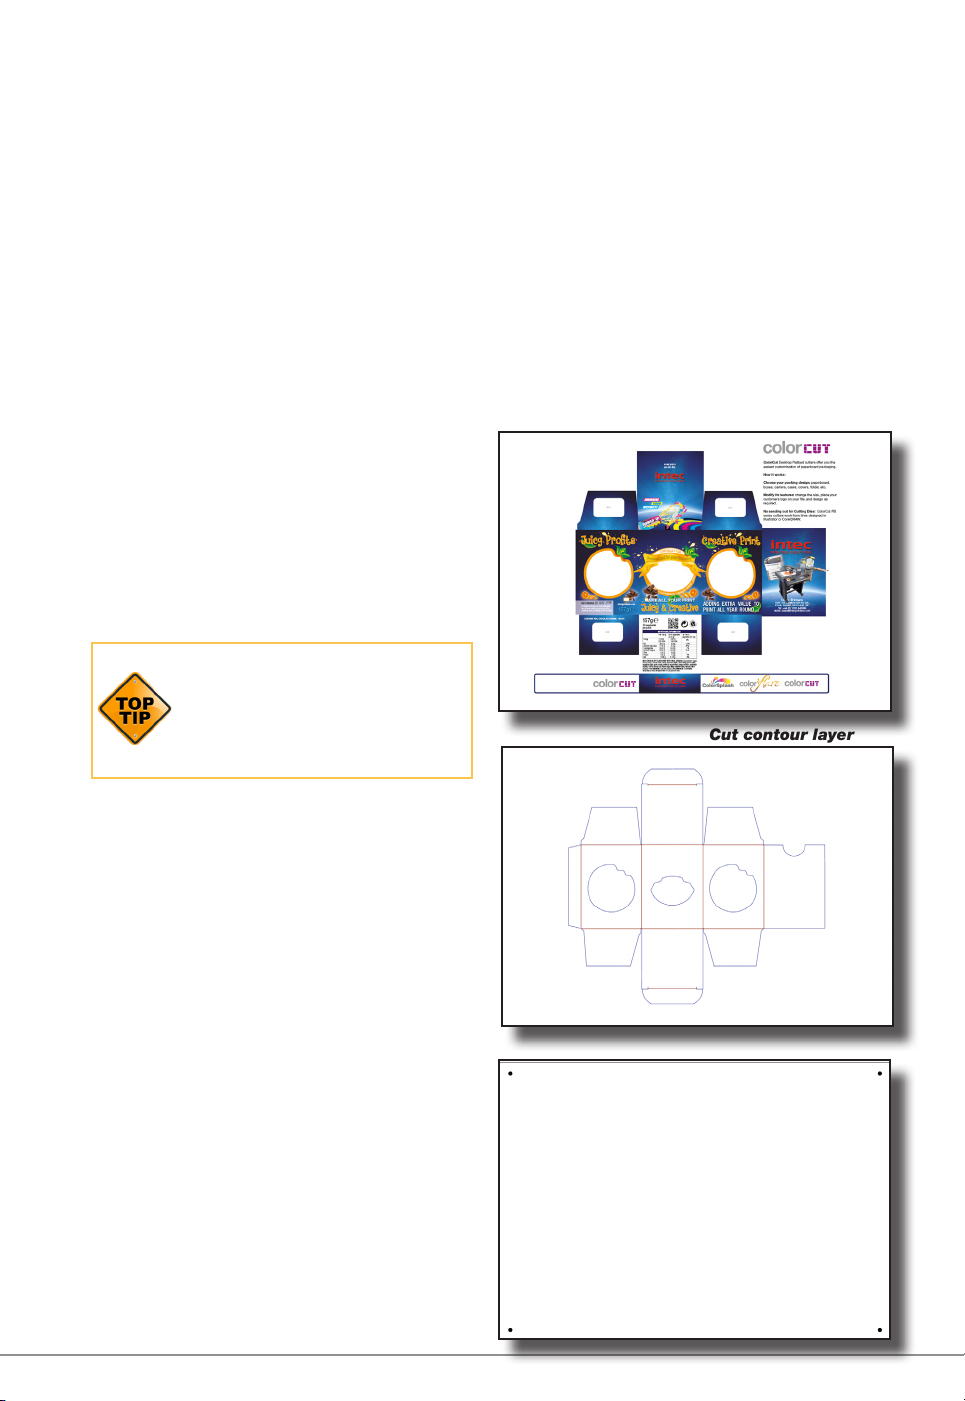
4. GRAPHICS FILE DESIGN - CREATING YOUR ARTWORK
The ColorCut Pro Plug-in works directly from Adobe Illustrator or CorelDRAW. It
requires the lines for cutting, perforating and creasing to be organised on a single
layer. Therefore when designing with graphics you should organize the graphic
design in different layers:
- One (or more layers) for the main graphics (The design you will print).
- One layer for the cutting contour (the lines to be cut -which you don’t want to print).
- An additional layer will be created by ColorCut used for Page
Registration Target (PageMARKs) which are automatically placed on
this different (additional) layer.
Designing using layers makes life easier
because when printing, you don’t want
to print the cutting lines or folding lines
on your artwork. Equally, when sending
cutting lines to the cutter, you don’t want
to confuse the cutter with lines that may
be in your printed design. The layers
feature enables you to turn the visibility of
layers, on or off as required.
The most common mistake
people make is to print all the
layers including the contour layer
(the cut lines) that make the
prints unusable in most cases.
Similar commands are available in Adobe
Illustrator and CorelDRAW to enable and
disable the layers.
In the pictures shown on this page there
is an external frame to indicate the border
of the sheet making it easier for you to
see the page.
Note: This is for illustration purposes
only.
Also please note: When you open
some PDF format les directly in Adobe
Illustrator or CorelDRAW, very often you
may also nd an external frame on the
graphics. You may need to delete the
external frame if it exists or ColorCut Pro
may cut this in addition for you.
Graphics/Artwork layer
Cut contour layer
Automatic ColorCut Pro Marks Layer

Intec Printing Solutions - ColorCut Pro User Guide for Intec ColorCut SC5000................................................................................................... Page No: 19
4.1 Layers for printing
In this example, the main graphics layer is visible and active. The ColorCut auto-
generated 3rd layer with Alignment PageMARKs is also visible. (Detailed later).
The cut contour layer is disabled. This drawing is ready for printing.
4.2 Layers for cutting
In this example, the main graphics layer is disabled. The ColorCut auto-generated
3rd layer with Alignment PageMARKs is still visible. (Detailed later).
The cut contour layer is active. This drawing is ready for cutting.
If you used guidelines then it is not necessary to hide or remove them before saving.

Intec Printing Solutions - ColorCut Pro User Guide for Intec ColorCut SC5000................................................................................................Page No: 20
The Intec ColorCut has 2 tools.
A Blade Tool, which can be used
to:
A double ended Creasing
Tool which can be used for:
Contour-Cut shapes Wide Crease lines
Score lines Narrow Crease lines
Perforate lines
When creating your projects you may wish to perform 2 or more actions with your
cutter. For example cutting a box and creasing the folds.
The easiest way to do this in your artwork is to use a different coloured line in your
design for the Crease lSine to the Cutting line. ColorCut Pro can recognise up to
8 pre-dened colored lines (detailed below) making it easier for you to design and
assign actions for each line.
If you created a job with 4 colored lines (For example; RED, YELLOW, BLUE, GREEN)
in the ColorCut software you could set the actions as follows :
RED to Cut using the Blade with full pressure
YELLOW to Score, using the Blade with half pressure
BLUE to Crease using the Creasing Tool, with full pressure.
and GREEN to Perforate, using a dashed line and the Blade with full pressure.
NOTE: The actions you select a Line Color to perform can be reassigned at any time,
and the order in which they are performed can be adjusted easily. (See following pages).
5. DRAWING CUT LINES, PERFORATED LINES OR CREASE LINES
ColorCut Pro uses 8 standard colors, which when used on the cutting layer are
recognised by ColorCut Pro. Even if your cut lines are not drawn in these specic
colors, the ColorCut Pro software will inteligently Color match up to 256 variations
of these each of these colors and assign your colored line to the closest match with
one of the below colors.
ColorCut Pro will recognise the named colors in either RGB or C,M,Y,K.
Black Red Green Yellow
RGB No: (0,0,0) (255,0,0) (0,255,0) (255,255,0)
CMYK No: [75,68,67,90] [2,98,95,0] [76,0,100,0] [4,2,98,0]
Blue Magenta Cyan Violet
RGB No: (0,0,255) (255,0,255) (0,255,255) (115,0,204)
CMYK No: [91,80,1,0] [0,100,0,0] [100,0,0,0] [70,87,0,0]
If you have designed your cut lines using a Pantone or other color spaces you must
use the Illustrator or CorelDRAW color commands to convert to (or remap) the color
to one of the above RGB or CMYK line colors.
5.1 Line Colors recognised by ColorCut Pro
Other manuals for ColorCut SC5000 Series
1
Table of contents
Other Intec Cutter manuals


Popular Cutter manuals by other brands


 Parts Breakdown")


IECHO
IECHO BK4 Series manual

Lincoln Electric
Lincoln Electric Torchmate 4400 Site prep guide

Cricut Expression
Cricut Expression 24" Personal Electronic Cutter user manual

Krug & Priester
Krug & Priester IDEAL 4305 operating instructions

Makita
Makita 4191DZ parts manual

Makita
Makita EK6100 Operator's and safety manual