Interphone F4MC User manual

www.interphone.cellularline.com
USER MANUAL

ITALIANO - 3 ITALIANO - 4ENGLISH - 3 ENGLISH - 4
1 – Introducon
1.1 Hello!
Thank you for choosing our product. InterphoneF4MC is a Bluetooth® helmet headset for
wireless entertainment and communicaon system among mulple bikers.
InterphoneF4MC can be installed on most helmets by aachment / detachment quick bracket.
The ergonomic shape of the unit is user-friendly also with motorbike gloves.
InterphoneF4MC is waterproof tested, up to IP67 protecon degree (using the sealant
provided).
1.2 Main features
1. 1.Intercom: InterphoneF4MC allows Bluetooth Intercom communicaon between
two riders up to 0,8 km (in the best environmental condion). It also allows Intercom
Communicaon between four riders, bike to bike.
2. Phone: InterphoneF4MC has a Mulpoint Bluetooth® connecon for dual mobile
phone or other Bluetooth devices (mobile phone/GPS navigaon).
3. FM Radio: InterphoneF4MC includes a built-in FM-RDS (88-108MHz)receiver with a
8 preset memories.
4. Music: InterphoneF4MC is able to play music from a Bluetooth® device, supporng
A2DP and AVRCP proles (smartphones, MP3 player etc.).
5. AUX: InterphoneF4MC is provided with AUX line-in connector with a 2,5 mm stereo
jack for non-Bluetooth® devices.
6. Vocal guide: InterphoneF4MC is equipped with a Text To Speech vocal guidance
system, that helps the user to operate each product feature and menu.
Index:
1. Introducon 4
2. Geng started 6
3. Sengs 9
4. Intercom 11
5. Phone / GPS 16
6. FM Radio 19
7. Music Streaming 20
8. AUX input 22

1
37
5
6
8
2
4
www.interphone.cellularline.com
GUIDA RAPIDA IT
GUIDA RAPIDA IT
SI CONSIGLIA DIVERIFICARE LA PRESENZA
DI AGGIORNAMENTI SOFTWARE SUL SITO
WWW.INTERPHONE.CELLULARLINE.COM
A
B
C
D
E
H
I
J
F
G
ITALIANO - 5 ITALIANO - 6ENGLISH - 5 ENGLISH - 6
2 – Geng Started
Pic.2
(1) MFB buon
(2) UP buon
(3) DOWN buon
(4) Volume + buon
(5) Volume - buon
(6) Blue led
(7) Red/Green/Orange led
(8) Connector
2.1 Main Commands (Pic.2)
Power on Press MFB buon(1), led(6) ashes.
Power o Press and hold MFB buon(1) unl you hear “Interphone powering
down” message. Led(7) ashes red for few seconds.
Volume Press buons (4) to increase or (5) to decrease.
Mute Press buon (5) for about 2 seconds.
Menu
Press buons (2) or (3) to scroll the menu items. Press MFB buon
(1) to select an item. Once selected a menu item, you come back to
“INTERCOM” menu (Standby)with a short press of MFB buon.
A. Bluetooth® unit
B. Microphone for full face helmet
C. Microphone for Jet/ip up helmet
D. Le speaker
E. Right speaker
F. Velcro set for speaker/mic + spare POP
wind protecon
G. Fixing plates + screwdriver
H. USB charging cable
I. USB data cable
J. Quick guide
Please refer to quick guide for installing F4MC on your helmet, provided in the box (can
be also downloaded from Interphone website), otherwise you can also check video
TUTORIAL on website www.interphone.cellularline.com.
1.3 Box contents
Pic.1

ITALIANO - 7 ITALIANO - 8ENGLISH - 7 ENGLISH - 8
If you select a wrong language, follow the steps below:
1. Turn o the F4MC. (Press the MFB for 5s, or unl the led lights RED).
2. Turn on the F4MC (Press the MFB for 2s).
3. Short press UP buon (2).
4. Short press MFB buon (1).
5. Short press UP buon (2).
6. Press MFB when you hear your language.
2.6 Audio priories
F4MC determinates the audio source priority in the following way:
1. Mobile phone
2. Intercom
3. A2DP audio (Smartphone/Player MP3)
4. FM Radio
5. AUX line-in
F4MC automacally manage priority when audio sources play simultaneously, using the
sequence above.
Example:
● Incoming mobile call interrupt ongoing A2DP music.
● Incoming Intercom call does not interrupt an ongoing mobile phone call; the rider,
who started the intercom call, will hear a “connection failed” message.
2.2 Status led (Pic.2)
Standby BLUE led (6) ashes every 3 seconds.
Intercom acve BLUE led (6) is solid .
Interphone connected with
mobile/GPS BLUE led (6) ashes twice every 3 seconds.
Pairing mode BLUE (6) and RED (7) led ash alternately.
Charging ORANGE led (7) is solid. When charging is
completed led (7) becomes solid GREEN.
Baery low Led (7) is solid RED.
2.3 First Switch on (only twin pack)
Press MFB (1) buon to turn on both units. The units are already factory-
paired, wait for your language and press MFB (1) buon to conrm.
Later two units will be in “INTERCOM” Standby status (Chapter 4).
2.4 First Switch on (only single pack)
Press MFB (1) buon to turn on unit, wait for your language and press MFB (1) buon
to conrm.
Unit will be in “INTERCOM” Standby status (Chapter 4).
The unit will enter in “PAIRING MODE”, choose one of these:
- Short press of MFB (1) buon – pairing with mobile phone or GPS navigator.
- Short press of Up (2) buon – intercom pairing with INTERPHONE device.
- Short press of DOWN (3) buon – intercom pairing with other brand device(NON
INTERPHONE) ANYCOM mode.
- Long press of MFB (1) unl the beep – to cancel “PAIRING MODE”. Unit will enter in
“INTERCOM” Standby status(Chapter 4) and Blue led (6) will ash every 3 seconds.
2.5 Language selecon (aer rst switch on):
F4MC in Standby mode (Blue led(6) ashing), press UP buon(2) and then MFB
buon(1) to enter in “SETUP” menu. Press again UP buon(2), “LANGUAGE
SELECTION” start, wait for your language and then press MFB buon (1)to conrm it.

ITALIANO - 9 ITALIANO - 10ENGLISH - 9 ENGLISH - 10
3.1 System sengs
Once in “SETUP” menu, scroll items by UP (2) and DOWN (3) buon unl you nd the
one you want.
Press MFB (1) buon unl the beep to change seng or enable a funcon.
● RDS: allows the F4MC receiver to re-tune to a dierent frequency, providing the
same staon when the rst signal becomes too weak. It is possible enable/disable
the funcon.
● Call ID: when you receive a phone call, F4MC pronounce the name of the caller. It is
possible enable/disable the funcon.
● AUTOMATIC VOLUME:(FULLFACE HELMET/JET HELMET/OFF): F4MC can adjust
volume automacally according as helmet you are using. The user can completely
disable the funcon and adjust the volume manually. AUTOMATIC VOLUME
CONTROL OFF allows to gain maximum.
● VOICE ANSWER: user can answer to a phone call just speaking a voice command. It
is possible enable/disable the funcon.
● ERASE PAIRINGS: this funcon allows to cancel all devices paired before from
F4MC memory. At the rst restart F4MC will enter in pairing mode automacally as
explained in Chapter 2.4.
● VOCAL HELPS: F4MC has two dierent levels for vocal helps: FULL for unskilled user
and LIMITED for skilled user. It is possible to choose one of these two opons.
● ANYCOM SEARCH: acve search for other brand’s Bluetooth® headsets.
● INTERCOM SEARCH: acve search for INTERPHONE branded devices.
● PAIRING MODE: acve search for Bluetooth® devices such as mobile phone, GPS
navigator, MP3 player etc.
● LANGUAGE SELECTION: acve the selecon of languages. Wait when you hear
your language and then press MFB (1) buon to conrm it.
3 – Sengs
You can easily customize your F4MC . From Standby mode (Blue led (6) ashing), press
UP buon (2) and aer MFB buon (1) to acve “SETUP” menu, entering in the main
funcons Pic.3.
INTERCOM/STAND BY
PHONE
FM RADIO
MUSIC STREAMING
AUXILIARY INPUT
SET UP
RDS on/o
CALL ID on/o
FULLFACE HELMET/JET HELMET/AUTOMATIC VOLUME CONTROL o
VOICE ANSWER on/o
ERASE PAIRINGS
full/limited VOCAL HELP
ANYCOM SEARCH
INTERCOM DEVICE SEARCH
PAIRING MODE
LANGUAGE SELECTION
(2)
MFB
(3)
Pic.3

ITALIANO - 11 ITALIANO - 12ENGLISH - 11 ENGLISH - 12
4.1.2 Pairing with an INTERPHONE unit (not MC).
With your unit in Standby mode (led BLUE (6) ashing):
1. press once the UP(2) buon and then press once the MFB (1) buon to acvate
the “SETUP” menu.
2. Press three mes the UP(2) buon to select “INTERCOM DEVICE SEARCH” feature,
press the MFB (1) unl the beep to start the search.
3. On the second Interphone unit (previous series not “MC”), with unit o, push and
keep pressed the MFB buon unl the alternate ashing red/blue of unit led.
4. Aer few seconds the units will be paired, intercom connecon will be
automacally started (led BLUE (6) on). To stop the intercom communicaon press
once MFB (1) buon on one of the two units.
4.1.3 Pairing with units not Interphone (other brands) - ANYCOM.
With your unit in Standby mode (led BLUE (6) ashing):
1. press once the UP(2) buon and then press once the MFB (1) buon to acvate
the “SETUP” menu.
2. Press four mes the UP(2) buon to select “ANYCOM SEARCH” feature, press the
MFB (1) unl the beep to start the search.
3. On the second unit NOT Interphone start the “phone search/phone pairing mode”,
see user manual of NOT Interphone unit for more details.
4. Aer few seconds the units will be paired, intercom connecon will be
automacally started (led BLUE (6) on). To stop the intercom communicaon press
once MFB (1) buon on your F4MC unit.
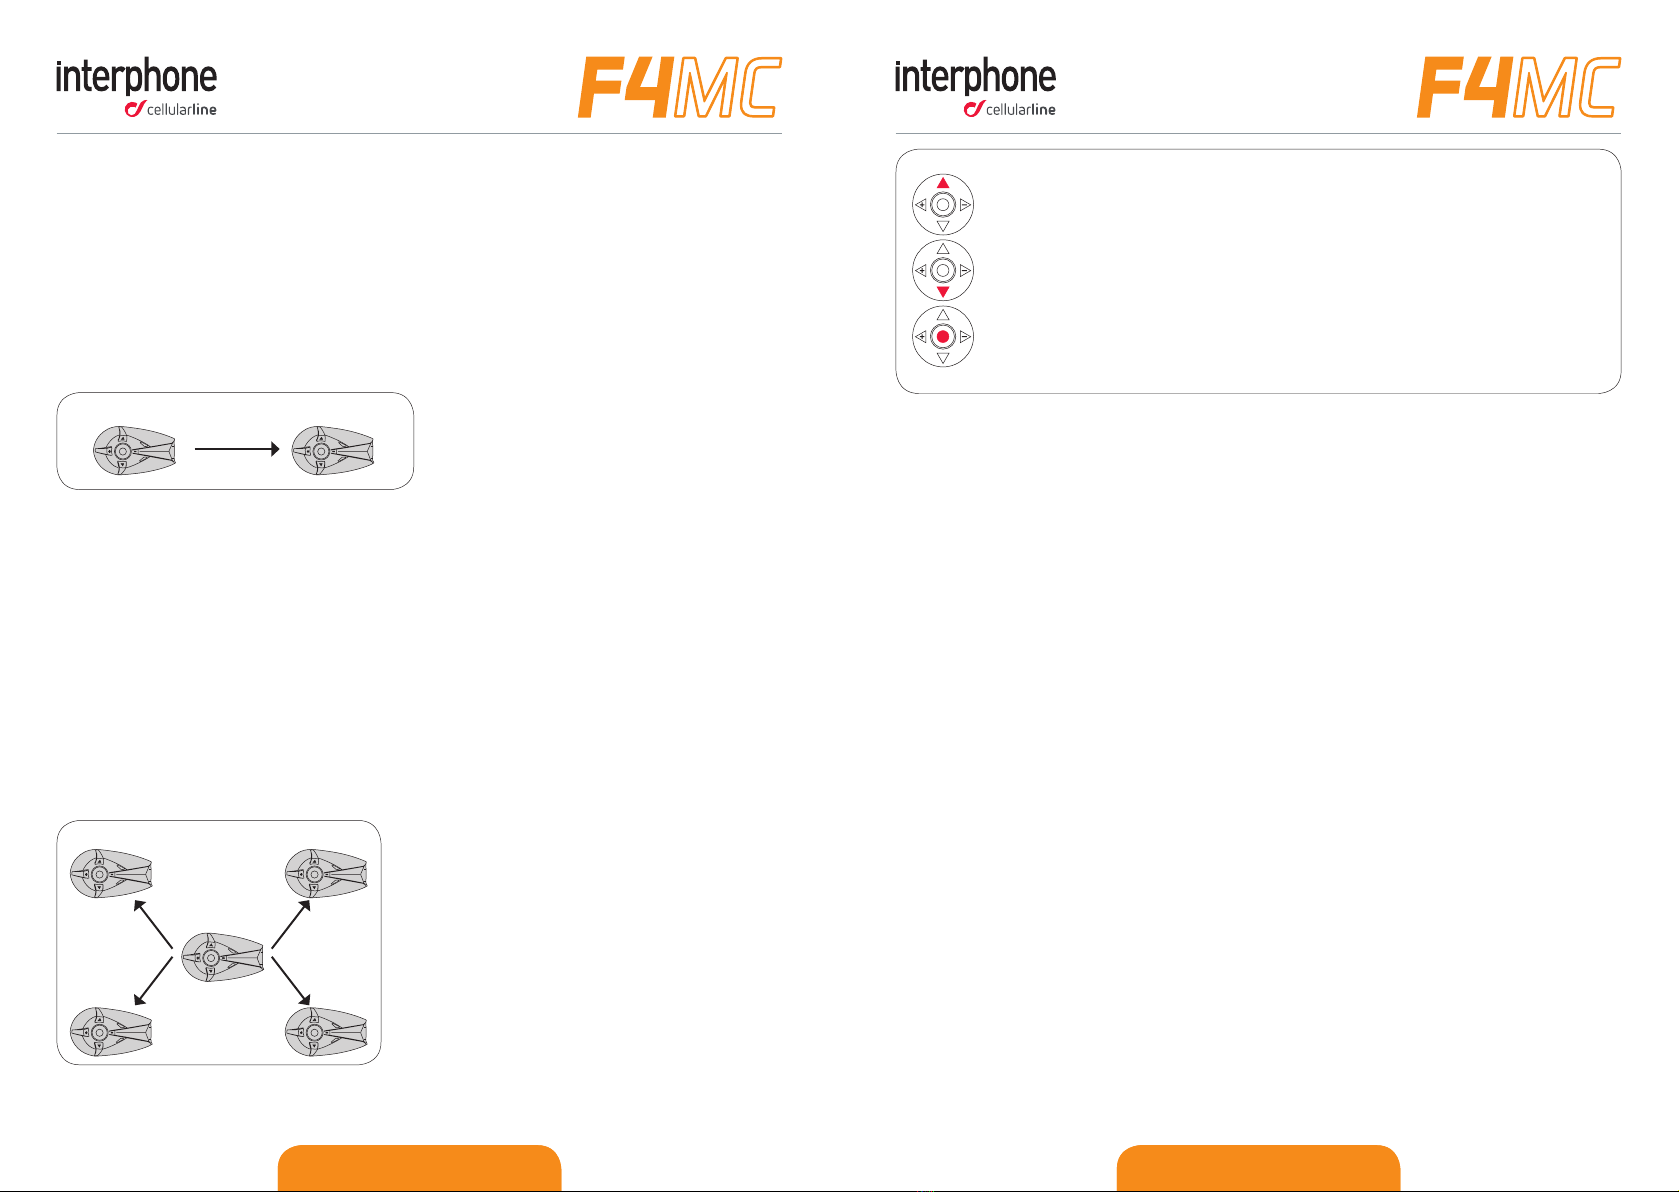
4.1.4 Pairing up to four other units (TOGGLING)
Follow chapters before (4.11/4.1.2/4.1.3) to pair your F4MC with other four units.
Every me one unit is paired with your F4MC, the last paired unit switchs in the next
Intercom channel as shown in the following chart:
Single unit
pairing
Twin units
pairing
Three units
pairing
Four units
pairing
Further units
pairing
Intercom A 1° paired unit 2° paired unit 3° paired unit 4° paired unit Further
paired unit
Intercom B - 1° paired unit 2° paired unit 3° paired unit 4° paired unit
Intercom C - - 1° paired unit 2° paired unit 3° paired unit
Intercom D - - - 1° paired unit 2° paired unit
Pairing erased 1° paired unit
4 – Intercom
F4MC allows intercom communicaon between bike to bike (INTERCOM) and also up to 4
other riders (INTERCOM TOGGLING) one to one.
4.1 Pairing
Before starng the communicaon between headsets, is necessary to pair together the
units. This process has to be done only one me. F4MC will automacally recognize devices
previously paired.
F4MC is compable with all range of INTERPHONE device (also previous series) and by
ANYCOM funcon is also compable with other brands of helmet Bluetooth headsets.
Each F4MC can be paired to maximum four other units.
4.1.1 Pairing with an INTERPHONE MC unit
With both units in Standby mode (led BLUE (6) ashing):
1. On your F4MC unit press once the UP(2) buon and then press once the MFB (1)
buon to acvate the “SETUP” menu.
2. Press three mes the UP(2) buon to select “INTERCOM DEVICE SEARCH” feature,
press the MFB (1) unl the beep to start the search.
3. On the other unit (F4MC or F4MC or F3MC) press UP(2) buon and then press once
MFB (1) buon to acvate the “SETUP” menu.
4. Press UP(2) buon two mes, the second MC unit will go in “PAIRING MODE”.
5. Aer few seconds the units will be paired, intercom connecon will be automacally
started (led BLUE (6) on). To stop the intercom communicaon press once MFB (1)
buon on one of the two units.

ITALIANO - 13 ITALIANO - 14ENGLISH - 13 ENGLISH - 14
Press UP (2): unl the beep to connect A (unit nr. 4)
unl the second beeb to connect C (unit nr. 3)
Press DOWN (3): unl the beep to connect B (unit nr. 2)
unl the second beeb to connect D (unit nr. 1)
Press MFB buon (1) to connect the last intercom paired
Pic.6
4.4 Intercom auto-reconnecon
● When your F4MC unit is over the communicaon range, connecon hangs. F4MC
will try to recover the connecon for 30 minutes. Within this me interval, if F4MC
unit will come again into communicaon range, connecon will be automacally
resumed.
● During reconnecon aempts, a double-beep will be generated, as a reminder that
unit is aempng to reconnect.
● Aer 30 minutes, if reconnecon fails, F4MC will go in Standby mode, stopping
reconnecon aempt.
● If you need to stop reconnecon aempt, press MFB (1) buon on your F4MC unit.
4.5 Intercom ps
Once acvated the intercom channel, communicaon remains acve unl it is manually
stopped by the rider. It is suggested to suspend the intercom conversaon, if not necessary,
to opmize baery life.
The best behavior of Intercom TOGGLING is guarantee only using Interphone branded
intercom units.
“INTERCOM” audio quality is strongly inuenced by:
● proper installaon of speakers and microphone inside the helmet. Always check
very carefully that speakers are placed exactly on your ears, and microphone is
placed as close as possible to your mouth. Any error on these posions will cause
an important decrease of performances.
● environment (electromagnec interference, natural obstacles, etc.).
● aerodynamic protecon of your motorcycle.
●type of helmet used.
4.2 Intercom communicaon between two units (from “INTERCOM” menu)
To start an intercom communicaon between your F4MC (unit nr1 Pic. 4) and another
one (unit nr2 Pic. 4) follow these steps:
1. Pair units 1 and 2 (chapters 4.1.1/4.1.2/4.1.3), this is necessary only once.
2. With your F4MC unit in Standby mode (led BLUE (6) ashing), press once the MFB
(1) buon, connecon will be started. The vocal guidance will prompt a message for
intercom acvaon, BLUE (6) led of F4MC units will lights up. To stop the intercom
communicaon press once MFB (1) buon on your F4MC, both units will go in
Standby mode.
1 2
Pic.4
4.3 Intercom communicaon between three units (from “INTERCOM” menu)
To start an intercom communicaon between your F4MC (F4M unit Pic. 5) and one of
other four units (units 1,2,3,4 Pic. 5) follow these steps:
1. Pair units as described in Chapters 4.1.4
2. Follow the chart shown in Pic.6 to start intercom communicaon.
3. When connecon has been started the vocal guidance will prompt a message for
intercom acvaon, BLUE (6) led of F4MC units will lights up.
4. To stop the intercom communicaon press MFB (1) buon on your F4MC (Pic.5). All
units will go in Standby mode.
1
F4MC
2
3 4
Pic.5

ITALIANO - 15 ITALIANO - 16ENGLISH - 15 ENGLISH - 16
5.2 Incoming phone calls
As indicated in chapter 2.6, phone calls have the highest priority and will override each
of other F4MC feature. During an incoming phone call these are the possible commands:
Answer to a phone call
Push MFB (1) or pronounce loudly any
word (in case that voice answer feature is
enabled Chapter 3.1).
End a phone call Push once the MFB (1) buon.
Reject a phone call
Push DOWN (3) buon to reject.
Otherwise wait for 15 seconds, the call
will be automacally rejected.
Ringtone mung Push UP (2) buon to mute the ringtone.
5.3 Phone
All features related to phone can be acvated entering into “PHONE” menu of F4MC.
With F4MC in Standby mode (led BLUE (6) ashing), push DOWN (3) buon one me and
then press the MFB (1) buon to acvate the “PHONE” menu.
Redialling last number Press UP(2) buon to redial last number.
Voice dial
Press DOWN(3) buon to acvate the
voice dial feature of the phone. Follow
phone’s prompts to complete the task.
5 – Phone/GPS
F4MC can be used together with Bluetooth® devices, as mobile phones, GPS devices, MP3
players.
To each F4MC unit is possible to connect, in the same me, max two Bluetooth® devices.
5.1 Pairing
Before using the F4MC unit with these devices, is necessary to run the pairing procedure.
This is necessary only once, aer F4MC will automacally recognize and connect devices
already paired.
Pairing procedure
1. Start Bluetooth® service on mobile phone / GPS / MP3 player (check the device’s
user guide for more details).
2. With F4MC in Standby mode (led BLUE (6) ashing), press UP (2) buon and then
press MFB (1) buon to acvate “SETUP” menu. Press UP (2) buon twice, F4MC
will enter in “PAIRING MODE” .
3. Start searching for new Bluetooth® devices on mobile phone / GPS / MP3 player.
4. Aer few moments the device in searching mode will list “Interphone F4MC”. Select
it.
5. If prompted for a PIN number, type “0000” (four mes the zero number).
6. F4MC vocal guide will conrm the successful pairing with the message “PAIRING
SUCCESSFUL, CONNECTED TO PHONE”. F4MC will go in Standby mode, the led BLUE
(6) will ash twice, every three seconds.
7. If the Bluetooth® device ask authorizaon to phonebook access, conrm.
If you want to pair a second device, repeat the pairing procedure from step 1).

ITALIANO - 17 ITALIANO - 18ENGLISH - 17 ENGLISH - 18
6 – FM radio
F4MC includes an integrated FM RDS radio receiver with memory to store eight radio staons.
To start the FM radio listening, with F4MC in Standby mode (led BLUE (6) ashing), push
DOWN (3) buon for two mes and aer press the MFB (1) buon to acvate the “FM
RADIO” menu.
Frequency scan
Press UP (2) buon to start frequency scan
up (from 88 MHz to 108 MHz).
Press DOWN (3) buon to start frequency
scan down (from 108 MHz to 88 MHz).
Memory scan
Press UP (2) buon unl the beep to select
the next FM staon memorized.
Press DOWN (3) buon unl the beep to
select the previous FM staon memorized.
Store FM staon
Press MFB (1) buon unl the beep, to
save the FM staon you are listening.
Press UP (2) or DOWN (3) buon to select
the memory nr (from nr.1 to nr.8).
Press once MFB (1) buon to conrm the
memory nr (from nr.1 to nr.8).
“RDS” allows these features:
● allows the F4MC receiver to re-tune to a dierent frequency, providing the same
staon when the rst signal becomes too weak.
● when F4MC re-tunes to a dierent frequency, the vocal help (TTS) will speak the
name and the frequency of the FM staon.
5.4 Phone ps
If two dierent phones are connected at the same me to a single F4MC unit, the features
“Redialling last number” e“Voice dial” can be used only with the FIRST connected phone.
The second connected phone can only receive calls, or managed by hand commands
directly on the phone.
Depending on the phone model it could be necessary to have an acve internet connecon
to use the “Voice dial” feature.
The “Voice dial” feature could not be supported by your phone. Check the phone user
manual for more details.
From “SETUP” menu is possible to change two sengs for the phone usage (Caller ID ON/
OFF e Voice answer ON/OFF), see chapter 3.1 for more details.
From “PHONE” menu, it is possible to go in Standby mode (led BLUE (6) ashing-menu
“INTERCOM”), pressing once the MFB (1) buon.
5.5 GPS
Aer compleng the pairing between F4MC and GPS device (see chapter 5.1) is possible
to listen to vocal instrucons from the GPS for the roung. The GPS will stop any intercom
communicaon each me that will send a vocal instrucon.
Check that the GPS device is compable with Bluetooth® headsets, “HFP”
Bluetooth® prole has to be supported by GPS. Check GPS user guide
for more details. F4MC uses the “HFP” Bluetooth® prole to manage the
connecon with GPS devices.
Navigaon apps, installed on smartphone devices, use the A2DP Bluetooth® prole to send
roung indicaons to headset. This prole doesn’t let to automacally stop the intercom
communicaon when needed.
Car GPS navigator usually don’t support the HFP Bluetooth® prole. For this reason these
devices can’t send vocal roung instrucons to Bluetooth® headset. Check GPS user guide
for more details.

ITALIANO - 19 ITALIANO - 20ENGLISH - 19 ENGLISH - 20
7.2 Song sharing
F4MC is equipped with the “SONG SHARING” feature, to share the music streaming among
two Interphone MC units.
Start/Stop sharing
Press UP (2) buon unl the beep to start/stop
the song sharing with Interphone “A” (unit nr.3
chapter 4.3 - Pic.5)
Press DOWN (3) buon unl the beep to start/
stop the song sharing with Interphone “B” (unit
nr.2 chapter 4.3 - Pic.5)
During the sharing is possible to start an intercom session, as indicated in the following
table.
On MC unit that is
sharing the music
Press the MFB (1) buon to acvate the
INTERCOM menu.
Press again the MFB (1) buon to start an
intercom call.
On MC unit that is
receiving the music
Press the MFB (1) buon to start an intercom
call.
7.3 Important informaons for “MUSIC STREAMING” feature
● Only Bluetooth® devices supporng A2DP prole can stream stereo music to F4MC.
● Only Bluetooth® devices supporng AVRCP can be managed by F4MC.
● The song sharing feature couldn’t be used to share other audio sources , like GPS,
Phone calls or intercom calls.
● The song sharing feature is opmized to work with Interphone devices of MC range.
Using this feature, with other device, could bring a decrease of listening quality on
the headset unit, that will receive the music shared.
● The listening audio quality is strictly connected to the quality of music source
(bitrate and codec type of audio le, quality of Bluetooth® player, etc.).
When the signal strength is not enough weak to acvate the re-tune to
an alternave frequency, the listening quality could be decreased due to
the low quality of signal. FM staons listening is strongly inuenced by the
environment (EMC noise, poor signal coverage, etc).
During the FM radio listening, it is possible to go in Standby mode (led BLUE (6) ashing-
menu “INTERCOM”), pressing the MFB (1) buon.
7 – Music streaming
With F4MC is possible to listen to music from an A2DP Bluetooth® device (smartphone,
MP3 player, etc..). To play music from these devices is necessary to pair the F4MC unit
with the music source device (Chapter 5.1).
7.1 Music play
With F4MC in Standby mode (led BLUE (6) ashing), push DOWN buon for three mes
and then press the MFB (1) buon to acvate the “MUSIC STREAMING” menu.
Play/Pause Push the MFB (1) buon unl the beep
to play/pause the music.
Track select Press UP (2) or DOWN (3) buon to
select the previous or the next track.
During the music listening, it is possible to go in Standby mode (led BLUE (6) ashing-
menu “INTERCOM”), pressing the MFB (1) buon. To resume the music listening it will be
necessary to go again into “MUSIC” menu, as described at beginning of this chapter.

ITALIANO - 22ENGLISH - 22ITALIANO - 21ENGLISH - 21
8 – Auxiliary input
F4MC can be connected to a non-Bluetooth® player, thanks to auxiliary input jack.
8.1 Music listening
With F4MC in Standby mode (led BLUE (6) ashing), push UP (2) buon for two mes and
aer press the MFB (1) buon to acvate the “AUXILIARY INPUT” menu.
Connect the jack cable provided to F4MC and to music player.
Start the music player.
During the music listening is possible to go in Standby mode (led BLUE (6) ashing, menu
“INTERCOM” ), pressing the MFB (1) buon.
Appendix 1
Menu chart.
F4MC VOICE MENU DIAGRAM
press unl you hear the beep
to conrm
use the arrows to scroll through the menu and use the central buon to select
INTERCOM
PHONE
FM RADIO
MUSIC STREAMING
AUXILIARY INPUT
SET UP
press unl the beep to play/pause
press to select track
press up buon unl the beep to share
press MFB buon to connect the last intercom paired
press unl the beep to connect A
press unl the second beeb to connect C
press unl the beep to connect B
press unl the second beeb to connect D
press to search
to select memorised staons press unl a beep is heard
press to memorise staons
press to re-dial
press to voice dial
RDS on/o
CALL ID on/o
FULLFACE HELMET/JET HELMET/AUTOMATIC VOLUME CONTROL o
VOICE ANSWER on/o
ERASE PAIRINGS
full/limited VOCAL HELP
ANYCOM SEARCH
INTERCOM DEVICE SEARCH
PAIRING MODE
LANGUAGE SELECTION
EQUIPMENT DISPOSAL INSTRUCTIONS FOR DOMESTIC USERS
(Applicable within the European Union and those countries with separate collection
systems)
The marking shown on the product or its literature indicates that at the end of its life
the product should not be disposed together with other household waste. To prevent
possible harm to the environment or human health from uncontrolled waste disposal,
please separate this from other types of wastes and recycle it responsibly to promote
the sustainable reuse of material resources.
Domestic users are invited to contact the sales point where the product was pur-
chased or the local oce with information regarding recycling of this type of product.
Business users should contact their supplier and check the terms and conditions of
the purchase contract. This product should not be mixed with other commercial waste
for disposal purposes.
This product has an embedded, non-replaceable battery, do not attempt to open the
product or remove the battery as this may cause injury and damage the product. When
disposing of the product, please contact your local waste disposal service in order to
remove the battery. The battery contained within the device and been designed to be
used throughout the life cycle of the product.
This product is CE marked in accordance with the provisions of the R&TTE Directive
(1999/5/EC) and the RoHS Directive (2011/65/EU). With this CE mark Cellular Italy
S.p.A. declares that this product complies with the essential requirements and other
relevant provisions of the 1999/5/EC and 2011/65/EU Directives. The user is forbid-
den to make changes or modications of any kind to this device. Changes or modica-
tions not expressly approved by Cellular Italy S.p.A. will void the user's authorisation
to operate the device. Bluetooth® is a trademark owned by Bluetooth SIG, Inc.
For more information please visit the website: www.interphone.cellularline.com
Technical Specicaons
Bluetooth® compliance: Bluetooth® V.3.0 - Class II
Supported Bluetooth® proles: HFP A2DP AVRCP
Dimensions mm: 60x80x30
Weight: 44g
Range: Up to 10 metres
Talk me: 12h
Stand-by me: 700h
Charging me: 3h
Baery type: Rechargeable Li-ion
Table of contents
Other Interphone Headset manuals

Interphone
Interphone F5XT User manual

Interphone
Interphone F5XT User manual

Interphone
Interphone OFFROAD User manual

Interphone
Interphone F3MC User manual

Interphone
Interphone AVANT User manual

Interphone
Interphone U-COM 2 User manual

Interphone
Interphone F3MC User manual

Interphone
Interphone F5XT User manual

Interphone
Interphone F3S User manual

Interphone
Interphone BTF3XT User manual